The Secret World Crafting Comprehensive Guide
The Secret World Crafting Comprehensive Guide by Raithwood
Contents
Introduction
1. Crafting Menu
2. Disassembling Items
3. Stacking Materials
4. Upgrading Metal/Items
5. Item Types/Tiers
6. Item Placement/Patterns
7. Reassembling Items
8. Item Kits
9. Runes
10. Adding a Suffix/Prefix effect
In Closing
Special Thanks
Introduction
Hi everyone and thank you so much for coming to check out my guide. I have received an amazing response from players just like you all over the world asking for more information on crafting, and while I had the answers (Most of the time), I strongly felt that I really had to provide a more in depth guide for you all. I’d like to state that this guide is not intended to be the be all and end all of Crafting in The Secret World. We are currently in Beta and there are an immense amount of issues that still need to be addressed. I have heard many reports from players stating that their crafting mats were eaten or simply vanished or the crafting simply didn’t work ect. My point being, I will try and provide you with the skills to become a proficient crafter. I cannot promise it will work perfectly every single time but what I can promise is that you will all have the basic skills to understand this really simplistic and beautiful crafting system should you take the time to read the guide. So I hope you all enjoy this. The guide is not just my work, but a compilation of some twenty other people’s experiences as well. I hope you find it’s what you’re looking for.
1. Crafting Menu
Now for something so vital to the game, I have received a load of tells in game from people asking how to use the crafting menu, how to open it up and how to manage it. Let me be the first to say, there are no tutorials directing you to the crafting window so don’t feel bad. It’s a good question to ask. To be perfectly honest, I only figured it out by going into key binding settings. So let me break it down for you guys.
This is the Crafting Window…

To access the crafting Menu, press “Y” on your keypad. It will open up a box that shows you where you can place your items. It also helps at this point to open your inventory by pressing “I” in order to see which items you’re going to be placing in the crafting box. As you can see, there is the Assembly box, the Tool box and the Item box. Please also note that the Assembly box is a 5×4 box. This will be important later when we cover patterns.
2. Disassembling Items
In order to disassemble an item the first thing to do is to open your crafting menu and your inventory. Move the item you wish to disassemble from your inventory to your Assembly Box. It should look like this.

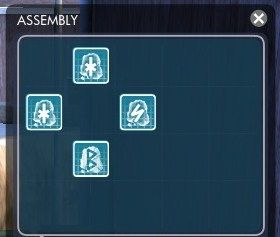
You will note that the button that usually says “Assemble” will have changed to “Disassemble”. Click this button. At this point your item will have been broken down into raw metals. It is also important to note at this point that when your item has been disassembled, it will be sitting in your Assembly Box in a specific shape, like so…

This shape is quite important to your future crafting so please take note. In this weapons case, it’s a broken down Assault Rifle.
3. Stacking Materials
Now that you have disassembled your item, it’s time to get ready to upgrade the gained materials. In order to do this you will need to break the pattern your disassembled weapon is in and stack the materials on top of each other. NOTE: There should be no other items in your Assembly box at this time. All you need in there are your materials. The stack should look something like this…

Please note that while I have stacked only 4 of the item required, you actually need five of the item in order to move on to the next step.
4. Upgrading Materials/Items
Now note that when you move the metal into your inventory it stacks. Stack it all up and move it back into the crafting window. The button at the bottom of the box will have changed to assemble. Click this and you will note that in your stack, (FIVE pieces) of the metal will have vanished and in your inventory an upgraded form of metal will have appeared. Each time you deconstruct you can get more materials in order to make stronger metal or other items for talismans and such.
5. Item Tiers/Types
From my very limited time playing TSW open Beta in Kingsmouth I have been able to determine that these are correct in most cases. The item tiers are as follows.
– Base
– Imperfect
– Perfect (This Tier doesn’t have a Prefix name)
– Sacred
– Pure
It’s also important to note that there are many different types of materials used in crafting. A breakdown I received from one of my many little helpers is as follows…
Metal: used to add weapon power and structure to items
Water: used to add health and structure to items
Dust: used to add healing and structure to items
Fire: used to add attack rating and structure to items
Wheel Rune: used to add hit to items
Lu Rune: used to add crit to items
Trinity Rune: used to add penetration to items
Denkyem Rune: used to add crit damage to items
Wedjat Rune: used to add defense to items
Yggdrasil Rune: used to add evade to items
Earth Rune: used to add block to items
Koru Rune: used to add physical protection to items
Pentagram Rune: used to add magical protection to items
6. Item Placement/Patterns
Please note that while I compiled single pictures of each and every crafting pattern it seems that we have a genius amongst us and that genius has a name. Yalexy! It must be the problem with living down under but I figured… HEY! Why not instead of attaching 12 or so single pictures of me running around figuring out the patterns…. why don’t I channel my inner convict and blatently steal from Yalexy’s thread. So there we have it….I did. I am saying right now that I in no way own this picture, it belongs to Yalexy and I would have asked his permission but for some odd reason I cant message him. Anyways. Here you have it. This is a picture of all the item placements for crafting. Thank you Yalexy for making my life a little easier.

7. Reassembling Items
Okay so now we have followed the basic steps of crafting thus far. The next step is to decide what you want to craft. Using your base materials (Or upgraded ones), form the specific pattern you want and then click assemble. Note that you will need to use a Weapons Kit in order to have it work effectively/at all.
8. Item Kits
Item Kits can be purchased from vendors in the game or found on monsters. You use these in crafting by placing them in the Tool Box, section of the Assembly Box like so…

It is also important to note that there are different tiers of Kits. Stronger kits will be needed to make more powerful upgrades.
9. Runes
While I have given a brief description of runes above it should be noted that runes are used a tad differently. Firstly Runes run by the same item quality as above, moving from base to through to pure. It should also be noted though that Runes are the main quality affecting your Prefix and Suffix traits on a weapon or item. See below for descriptions.
10. Adding a Suffix/Prefix effect and the Symbol for Anima Effects
In order to add a prefix or suffix effect you need to upgrade your Runes to your desired level and then place them in a specific pattern like so…
This is for Prefix and Suffix…
And this is the pattern for an Anima…Meaning pots and the like!!

Please note that I am just using items from my characters inventory in order to show you the way in which its done. Those are not the correct items to use.
Once you have completed this part, you will be granted an item that is known as a Suffix/Prefix rune or Glyph. At this point its a simple matter of placing your upgraded weapon/item in the Assembly Box with the Suffix/Prefix Rune/Glyph and hitting assemble. After which you should be now the proud owner of a very deadly weapon/item.
Edit: It should be noted that the above is an earlier draft. I believe that the Suffix and Prefix symbols are the same, although I’m not 100%. The way a Glyph is attached is either in front of or behind the weapon in the assembly box. I could also be very wrong on this point, however I will test it out next weekend.
In Closing
In closing I would like to state that once again, this guide is in no way definitive. I have not really had that much time to explore the game in between work and the game itself crashing on me every 10 or so minutes. I would like to state however, that I could not have put this guide together without a lot of help from other people. I will try and update this guide when the game goes live but I can’t really do much as I am only an Open Beta Tester, not a Closed Beta Tester. I will continue to update the guide as much as I can though.
Special Thanks
First and foremost I would like to thank Funcom, for putting together an amazing game. Mostly though I want to thank Senior Producer Ragnar Tørnquist, Lead Designer Martin Bruusgaard and Lead Content Designer Joel Bylos. You guys are amazing!
Secondly I want to thank Sappho and the other forum mods. Its great to know we players have the support to really explore this game.
Finally I want to thank the people who without, there would be no guide. Those people are ThunXa, Admittance, Yalexy and of course every single one of you forum junkies!! ;-p
Thanks again, I’m sorry if the guide doesn’t help you. I really tried to make it as user friendly as I could. I will do an official one after launch.
Thanks again
Raithwood

This is pure awesome. Great write up and well laid out, easy to follow as well, I don't feel so special any more.
I don't get the point of crafting except maybe for gadgets, anima? All of the end results are far worse that what you can get as drops or purchase with tokens, seems pointless.
I made a video about crafting but this blows it out the water and taught me a few things thanks!