Shaiya New Player’s Basic Guide
Shaiya New Player’s Basic Guide by kikix12
Table of Contents:
Chapter 1, Introducion:
Chapter 2, Basic Mechanics:
- Mode of Play Starting Character Death and Reviving Battle Basics Leveling and Levels
Chapter 3, Characters Properties:
- Mode of Play (Short Reminder) Races/Classess Stat Points Description Suggested (classic) NM build Suggested Lapis and Weapon Stats (from most to least important, classic build) Common HM builds Elements
Chapter 4, Goals of the Game/Quests:
- Boss Killing Character Tuning Quests
Chapter 5, Characters Roles/Basic Strategies:
- Basic Roles Basic Strategies/Tips General Strategies
Chapter 6, Items/Gear:
- Armor/Weapon Groups Gear Types Mounts Lapis Disposable Items Warehouse
Chapter 7, Item Mall:
- In-Game Item Mall Main Site Item Mall
Chapter 8, PvP and Bless:
- Rules Objectives Bless
Chapter 9, Capital City and Economy:
- Exceptional Warriors Manager Opening a Shop Black Market Arena
Chapter 10, In-game Item Mall Items
—————————————————————-
Chapter 1, Introduction:
Hi. My name is Krystian. I’m a Shaiya player since end of february, although I had many shorter and longer breaks in the meantime.
I became active on forum month after I became playing, although I did read threads before that. Just didn’t post. For a long time, I was very active (as my post count proves), and until around 2500 posts, the majority of my posts, by far, were in suggestion forums, gameplay forum or announcements, if my memory serves me right. Around that time I began posting more in general forum.
I have maybe a couple of spam posts, and not a single spam thread. In discussions I try to not post without giving arguments. I had double-posted once, and couldn’t fix it by deleting the second post because a different poster made a post right after me (dang him…, anyway this doesn’t include forums parts in which editing and deleting posts isn’t possible). That means that I have pretty good ratio, keh.
Anyway, I’m a poor player, especially in PvP (the irony…). That said, I have somewhat good knowledge about the game due to my activity on the various parts of Shaiya forum, as well as curiosity in game. This resulted in first version of this guide named “Basic Guide” being made five months after I began playing Shaiya. Obviously it had (and still have) quite a lot of errors, some of which hopefully are fixed in this one.
I hope that if anyone reading it will find an error or will have idea what I could add further to it, you will inform me of that fact. I’m very open to critique (both good and bad), but only as long as there are arguments going along with it.
I hope you will find this guide useful.
Now, without further wasting words, this ends Chapter 1.
Chapter 2, Basic Mechanics:
Those of you who began the game already, and played it for at least few hours, won’t have use for majority of this.
First, a little explanation. A mechanic (as far as this guide is concerned) is anything that is shared between all classes or by whole attack type. There are four attack types. Physical melee, physical range, magical and debuffs (which often are given along with damage). Everything that is part of a specific class (like gear available to it) is that classes mechanic, and is explained on the guide for the proper class on it’s own section of gameplay help forum.
So, now, let’s begin.
1) Mode of Play:
When a character is made, the creation window asks to choose a difficulty mode. As this is a MMORPG game (Massive Multiplayer Online Role Playing Game), changing the monsters strength depending on the character is out of the question. Instead, the mode changes the characters strength. Unlike in most games, higher difficulties give stronger characters compared to lower ones (and compared to monsters), but they level slower or even risk deletion.
In Shaiya there are four modes of play, each with it’s own characteristics.
Easy Mode (EM):
Stat points/lvl: 5
Skill points/lvl: 3
The weakest characters. They have no access to the best skills or items, and can’t join (or create) a guild. Easy mode characters get experience twice as fast as normal mode, but can level only to 30lvl after which, they are pretty useless. This is tutorial mode, to show someone as much of the game as possible in short time. Anyway, it’s advised to not use EM to play, ever. Leveling it have no purpose, as they are too weak and can’t unlock anything.
Easy mode thanks to the fast exp can be used as a scrap character simply to check the stats effects, builds or get low level quest items.
Normal Mode (NM):
Stat points/lvl: 5
Skill points/lvl: 3
One of two modes available from beginning. It have access to special skills tab, which hold the most powerful skills. It’s leveling rates are normal, and it can use more items than easy mode. Maximum level is 60. After obtaining 40 level, account is flagged as one with unlocked hard mode (on the server you did reach it only). It’s advised for everyone to always start with NM character.
Hard Mode (HM):
Stat points/lvl: 7
Skill points/lvl: 4
Locked mode. It’s unlocked after leveling NM character to lvl40. Maximum level is 60. HM characters have additional skills, additional quests, and can use some of the gear that is not accessible to NM. They need up to 4 times as much exp to next level as NM characters. This mode is hard, only due to very slow levels. If you can play only rarely, you may think they are simply too hard to level, so this mode is not really casual player friendly. I advise though at least giving it a shot for some time. After obtaining 40 level, UM is unlocked for the account.
Ultimate Mode (UM):
Stat points/lvl: 9
Skill points/lvl: 5
Locked mode. It’s unlocked after leveling HM character to lvl40. Maximum level is 60. UM characters have even more skills (with a lvl60 skill of huge power), I suppose additional quests, and can use every piece of gear in game. They need up to 4 times as much exp to next level as NM characters, but as they are almost double as strong (and have far easier start), it doesn’t take so much time, and is actually easier to level than HM. This mode have one catch though. After death, you have 3min counter for resurrection, like on every other mode, but on this one, you must either use AP (Aeria Points) item or be resurrected by a priest with lvl2 resurrection (which is obtained at 31 level), or it will be deleted. Death during duels or Goddess Battle does not risk deletion. There is no reward obtained after getting any level of UM. It’s the highest mode.
Note: When you unlock one of the modes on a server, you don’t need the character you used for that. That matters when you want to use that characters slot again or simply want to change faction, which forces you to delete all your characters. In such situation, you still keep the unlocked mode.
Note 2: Each server must have modes unlocked separately. That means that unlocking Hard Mode on Lailah doesn’t allow you to make Hard Mode characters on Teos or Etain, unless you unlock it on those servers as well.
2) Starting Character:
One of the first mechanics a player gets into contact with, is rarely noticed. It’s a weapon dependability. Though it is possible to unequip weapon, no action is possible but movement unless one is used. This is true also for buffs, even though they are not attacks. Character should start with a weapon, and if it did not, delete it and make a new one.
Important part of the game are the three bars visible on a small box. They are HP (Health Points, red bar), MP (Mana Points, blue bar) and SP (Stamina Points, yellow bar). Every player have all three. Some NPC’s (Non-Player Character) have HP. Those NPC’s are called mobs. There is no NPC that have MP or SP.
When a character levels, it gets bonus HP/MP/SP points to their total amount. Every armor also gives HP and at least one of MP and SP.
Health Points: When a characters HP goes down to 0, it dies. If that character is NPC, it vanishes, to return after specific time passes (which is called mob spawn). Mobs spawn always in the same place, and the time after they respawn depends on the mob and place.
If the character that dies is a PC (Player Character), it’s body falls on ground and from it a ghost emerges, until the character is resurrected (see next point).
Only characters with Health Points can be attacked.
Mana Points: Mana points are used to power specific skills. Every spell, every buff and great majority of debuffs uses MP. Some other powerful attacks also consume mana. If MP drops to 0, nothing special happens.
Stamina Points: Stamina points are used to power specific skills. Every non-spell, every buff and every debuff uses SP. If stamina drops to 0, nothing special happens.
Restoring HP/MP/SP: Standing or moving character that doesn’t use skills or attack heals 4 of each after each 3 seconds. This isn’t much, but there are ways to heal these faster. The most important of them is a bless (more information on it in next chapter). The more bless a faction have, the larger amounts of HP, MP and SP is healed naturally. Second most important is rest (sitting). A resting character heals larger amount of each after each 3 seconds. Every class have a passive skill called body relax that increases HP/MP/SP healed while resting, and Mage/Pagan have a party buff that increases MP healing rate while resting. All these methods are cumulative with each other.
Unless the bless is high, natural healing is possible only after few seconds of not issuing any non-move command (whether or not the action will succeed or be actually used), but a high bless allows to regenerate MP and SP even during battle (when actions are used). This also takes place each 3 seconds. There is no natural regeneration of HP during battle though. One thing to know though is, that the character being attacked doesn’t affect it’s natural healing. Only whether or not that character attacks does.
Third way of healing restoring these are potions. Under the definition of “potion” hidden is every item that helps to restore either or all of them, or that removes debuffs. These heal various amounts, depending on the particular item. Each have recharge time. Until recharge on item expires, it can’t be used again. Some similar items share recharge with each other (as example can be taken all potions that heal only one of these). Debuff removing potions don’t have recharge.
Last way of healing, is through skills. Priests/Oracles can heal HP of any character which depends on the type of the skill they use, as well as it’s level and the healers wisdom stat. Multiple characters also have other restoring skills, but neither can be used often, with only one of them being able to heal someone other than the user.
3) Death and Reviving:
Character dies when it’s HP reaches 0. Every player and most NPC’s found outside towns have HP bar, and therefore may be killed. Dead mobs respawn (“revive”) automatically after set amount of time depending on the mob in question. No player involvement is needed.
Dead players can be revived with options depending on the mode of that character.
EM, NM and HM: When they are dead they get option of reviving at town with full HP/MP/SP. If nothing is done for 3 minutes after death, this is the default option. If they are in a party, they have option of reviving at the party leaders position. Reviving in town is instant, but reviving at party leader takes 30sec before it takes place. In both cases, the character may lose experience. If the bless is below 25%, the experience lost is 5%. If the bless is at 25-50%, experience lost is 2,5%. With bless at 50% and above, no experience is lost.
There are three more ways these characters could be revived.
1) Priests skill, Resurrection. It’s a skill available at 11lvl, which resurrects the target at the priests position with no experience lost, and with full HP/MP/SP.
2) Target resurrection rune. It’s an item that allows to resurrect anyone at the position of user. It’s a one-time use item.
3) Normal Resurrection Rune. When a character in one of these modes have a normal resurrection rune in inventory, normal options are changed for those given by rune. Those are resurrection in town with 50% of HP/MP/SP, or resurrection on the spot the character died. Neither takes any experience, but both consume the rune. I don’t know whether leader resurrection is available though. Obviously, if rune won’t be used within the 3 minutes, the character will be resurrected in town with all HP/MP/SP, possibly losing experience, but without consuming the rune.
UM: UM characters don’t have innate resurrection options. If they are not resurrected by some means within the 3 minute limit, they are permanently deleted. There is no way for UM to lose any amount of experience. That said, these are the reviving options UM’s possess:
1) Priests skill, Resurrection, but only lvl2 and lvl3. This means that UM’s can be resurrected only by lvl31+ priests.
2) Resurrection rune. Unlike EM/NM/HM, UM’s don’t get the option of resurrecting on spot. They can be resurrected in town with 50% of HP, MP and SP though, which consumes the rune. This is the default resurrection method after 3 minute timer runs out (if rune is available), which saves characters of players that get disconnected or are away from keyboard when dead. (There is an option that Small Resurrection Rune in Premium Package gives option of resurrection on spot, but I cannot guarantee it being true.)
3) Continuous Resurrection Rune. If a UM character uses continuous resurrection rune, as long as that rune works, they can revive in town with 50% of HP/MP/SP any amount of times. (This rune must be activated BEFORE death.)
4) Target resurrection rune. It works like for every other character.
Deleted Character: Deleted characters (whether UM’s without runes not resurrected in time, or simply characters deleted when they were seen as no longer needed) may not be lost. GM’s on occasions offer character revival promotion. In such case, if the account on which the character originally was made have at least one slot open, and the proper information is sent, the character is brought back to life with all items it had at the time of death (and all buffs that didn’t yet run out).
4) Battle Basics:
Battle is the main focus of this game. There are few mechanics that affect it though.
Offensive: Attacks (overall), Physical Melee, Physical Ranged, Magic, Critical Hits, Fixed Damage, Debuffs.
Defensive: Defense, Resistance, Physical Evasion, Magical Evasion, Critical Evasion
Other: Party, Aggro and Mobs Attacks, Loot.
Offensive Mechanics:
Attacks: Attacking is basically any action that have the potential to hinder or harm at least one enemy.
Normal attack (physical, basic attack with held weapon) is used by targeting any opponent (with left mouse button or ~), then clicking on it again, with left mouse button. Alternatively, “Attack” action can be used through the use of hotkeys.
Skill attacks are used by targeting the enemy and then either left-clicking on a skill in the skill-tab, left clicking on the hotkey bar or using the hotkey to which it corresponds.
All attacks have specific range. If the target is outside the range, the character will automatically try to get into the border of range before using the attack.
Normal attack is used continuously until canceled (which is done by moving) or the target is dead. As this is server-based, attack occurs even if the player heavily lags. Skills will be used only once. If the skill is used after the character began attacking normally, it will continue to use basic attacks after the skill is used.
Physical Melee: Physical melee damage is dealt by great majority of weapons. Exceptions to this are bow (archer/hunter), crossbow (archer) and javelin (hunter). As physical damage, it’s accuracy is dexterity-based, and it is affected by Darkness debuff. All Physical Melee attacks are instantaneous (no casting time).
Physical Melee damage is based on Physical Attack Rating (ATK on character tab), which in this case is derived in this manner: Str*1.3 + Dex*0.2 + Weapon Attack. (Also note that there are skills which increase it, but these are hidden values not seen on the character screen.)
Physical Ranged: Physical ranged damage is dealt only by bow (archer/hunter), crossbow (archer) and javelin (hunter). As physical damage, it’s accuracy is dexterity-based, and it is affected by Darkness debuff. Also, it is given a penalty. In melee, the damage dealt by ranged weapons is halved. Most Physical Ranged attacks are instantaneous (no casting time). Exception to this is Nuke Shot.
Physical Melee damage is based on Physical Attack Rating (ATK on character tab), which in this case is derived in this manner: Str*1 + Dex*0.2 + Luc*0.3 + Weapon Attack. (Also note that there are skills which increase it, but these are hidden values not seen on the character screen.)
Magic: All magic attacks are exactly the same (there’s no melee or ranged), mechanic-wise. Only mages/pagans and priests/oracles can use magic. As magical damage, it’s accuracy is wisdom-based, and it’s affected by Silence debuff. Many spells have casting times. When a caster uses a spell, a specific amount of time must pass before the spell is finished and have effect. In this time, any movement or successful attack on the caster will cancel it (if you did move, you can’t start casting another spell until the canceled spells cast time is finished, even granted that the cast time bar is no longer active). After spell is casted, weapons speed still limits the time before next attack.
Magical damage is based on Magical Attack Rating (Magic on character tab), which is derived in this manner: Int*1.3 + Wis*0.2 + Weapon Attack. (Also note that there are skills which increase weapon attack, that also increase magical damage. Also, each spell adds it’s own bonus to attack rating.)
Critical Damage: Critical damage is a special, two-part bonus that can take place for any non-fixed damage dealing attack. Note that all the information here is to the best knowledge of community, but it still may not be proper.
When attack hits (through normal means) it have a chance of „critting” (higher luck stat increases the chance). Then a hit did crit, there are two things happening. First, the attack rating of the attack is multiplied by 1.5. This part of the critical hit is affected by the proper defensive stat. After that, to the damage dealt, added is a random value derived from this formula: Luck*(random # between 0 and 1.5). This part of damage is fixed. The whole formula is as follows:
Attack Rating*Elemental Factor – Defensive Stat (depending on attack type) + Luck*(random # between 0 and 1.5)
Fixed Damage: Fixed damage skills are explained separately, because they have their own rules.
Fixed damage is not reduced or increased by anything (including defense and resistance). It’s always the same. That means that after the skill takes full effect, it always takes the same amount of HP (either in specific number, or %). For some attacks, damage is instant, while for others, it’s dealt over time.
Fixed damage can’t crit. If attack deals normal damage + fixed damage, the normal damage part may crit, but the fixed damage will not be affected.
Many of the fixed damage skills are in form of debuffs, as their power would be unbalancing against bosses. Debuffs that fit this category are…Poison, Venom (Venom is not typed), Burn (Burn is not typed), Dying and Death. Other than HP damage, they may also deal MP/SP damage, which are taken by Disease and Sickness debuffs.
Debuffs: Debuff is a type of attacks that can be separated in two ways, each into two categories. First way is: Instant debuffs or debuffs over time. Second way is, typed or not typed debuffs.
Debuff is a general term for effects that hinder character over course of some time, in any way (with exceptions that have full effect instantly). Bosses are always immune to at least some debuffs. Greater bosses are immune to all debuffs. Wyverns are immune to all debuffs, while many other mobs have usually one or two immunities.
Debuffs either have fixed chance of hitting (varying from debuff to debuff, example are majority of defenders/guardians debuffs), are brought on along with attack, but only if that attack doesn’t miss (majority of ranger/assassin debuffs), or have a chance of being brought on from an attack, and only if that attack didn’t miss (Debuff Lapis).
First Categorization
Instant Debuffs: Those are fixed damage dealing debuffs. Majority, if not all of them, are either Death or Dying debuffs. Instant debuffs can’t be dispelled by any level of dispel or any type of pots.
Debuffs Over Time: Everything that have it’s effect for a specific amount of time fits into this category. All of them can be dispelled, though many only by level 3 Dispel.
Second Categorization
Typed Debuffs: Those are debuffs that are given a type from a list. Lvl1 and 2 Dispel, as well as pots (with exception of Venom Cure), can remove some of those. Examples include Unconsciousness, Poison, Sickness, Slow, Dying or Death. All typed debuffs have the name of the debuff type they belong to in their description (“Condition” line).
Un-typed Debuffs: Those are debuffs that (assuming they are not instant) can only be dispelled by lvl3 Dispel. There is one exception (possibly a bug, maybe was fixed) called Venom. Many (if not all) poisonous attacks of mobs, are actually venom debuffs, and they can be cured by Venom Cure pot and Dispel lvl3, but not by anything else (even if it would cure poison). Most of the un-typed debuffs are uniquely used by special mobs (like Dark Sigil), are fighter/warrior debuffs or are fire’s DoT damage (Damage over Time), which I’d call Burn. Un-typed debuffs have no type name in their description.
Defensive Mechanics:
Defense: Defense is a stat derived from rec (1 rec = 1 defense) and armors. Some lapis also add bonus to defense. Each point of defense lowers physical damage by 1.
Resistance: Resistance is a stat derived from wis (1 wis = 2 resistance) and armors. Some lapis also add large bonuses to resistance. Each point of resistance lowers magical damage by 2.
Physical Evasion: Physical evasion is % chance of attack negating all effects of physical attack, including both damage and debuffs that would be brought in by the attack. The chance of evading an attack depends on dexterity of both the defending and the attacking character and on the skills that give bonus evasion (defending character) or bonus hit rate (attacking character. It seems that the latter take priority over dexterity effect, aka. no matter your how much dexterity the opponent have, that dexterity can’t negate bonus evasion. Physical evasion helps at least partially in evading critical hits (attack that can’t hit, can’t crit).
There is NO formula to count evasion rate, which was proved through testing to work correctly.
Magical Evasion: It have the same effect as physical evasion, but towards spells. Instead of dex, wis is used, and there are no skills that would give bonus magical evasion or magical hit rate.
Critical Evasion: If attack hits, it may become critical. Critical evasion have the same effect as the two above, but miss means the attack is normal, while hit means the attack is critical. Currently the only effect additional to damage crits have, is lowering the endurance the weapon with which crit was dealt, and the armors of the person which was critically hit. It’s affected by luc of the attacker and defender.
Other Mechanics:
Party: I’ll update it at some point when I’ll be able to take screenshots, most likely at end of may.
Aggro: Aggro is term used to describe aggression of mobs. Basically, if a mob does anything other than move, it’s aggroed.
Most mobs aggro on proximity, aka. they start attacking themselves when a player gets close to them. Various mobs, have different ranges of vision in which they aggro. Some mobs (mostly the lowest levels mobs meant for beginning players) don’t aggro on proximity.
Any action taken against a mob builds up aggro, as long as it hits. Misses don’t affect aggro. Actions not affecting mobs directly, like using buffs, does not generate aggro. There is some kind of aggro system for heals, but it’s not as clear on how it works (there are two major versions for that).
Strength of aggro depends on characters defense rating. Each action towards mobs seems to build up some aggro rating, which is stronger the higher the defense character have. Various attacks have various aggro bonuses. Mobs attack the player that generated the highest aggro.
Mobs lose all aggro, and return to their original spot if the person who have the highest aggro goes outside specific range from their starting point. This makes it impossible to aggro or attack the mob until it reaches that spot, at which point it becomes fully healed.
Mobs Attacks: All mobs use either physical melee attack (most common) or physical ranged attack (uncommon). Some mobs have one or two skills that may deal magical damage and/or debuff character. Special mobs and bosses may have more skills.
Mobs have no MP or SP ratings. That means that their skills are not limited in resources, so skills that deplete MP or SP have no effect on use of them. All mob skills have recharge, even if they emulate class skill without one.
Mobs skills seem to have far greater accuracy than their normal attacks. Whether this is a feature or a bug, I don’t know, but it’s the only explanation on how a mob which always misses with normal attacks (mob 40 levels lower, on a 200dex ranger), almost always hits with physical damage skills (like the various Wood Spirits using Slasher).
Loot: Currently there are two loot systems, depending on whether the player is in party or solo.
When solo player kills a mob, that mob may drop loot in either gold or items. The loot stays on ground for limited time, and only the player that killed the mob can pick it up. After some time have passed, any player can pick up the loot. Moment later, the loot is permanently lost. Those rules also apply to items dropped by the player on ground.
When player in a party kills a mob, the loot does not drop on ground. Instead, items are given one-by-one to the party members, in the order from the oldest member (person on the top of party member tabs) to the newest member (the person on the bottom of the party tabs) after which it cycles. Gold instead is shared equally among party members.
EP4 brings master looter system, that can be changed by party leader. When it is turned on, all items (with exception of low quality or quest items) are given to party leader instead, as long as he/she have space in the backpack. Not sure, but I think it also brings random system as well.
5) Leveling and Levels:
There are two means of gaining experience in theory. Quests, and kills. That said, quests always include killing and quite often for experienced players bring experience at slower pace, as well as they never give enough experience to level. That gets worse with each level you gain. Killing cannot be avoided, either mob NPC’s or players.
Important during the leveling is relative mob level. It is clearly visible by colors of their name, depending on their level.
White: Six or more levels lower. The mob gets extreme penalty to rates of attack and evasion. It gives no experience at all.
Light Blue: Four or five levels lower. The mob gets large penalty to rates of attack and evasion. The experience is minimal.
Dark Blue: Two or three levels lower. The mob gets penalty to rates of attack and evasion. The experience is noticeably lowered.
Green: Of players level or one level lower/higher. Experience is and strength is normal or very close to it.
Yellow: Two or three levels higher. The mob gets very slight bonus to most stats, and gives slightly more experience.
Orange: Four or five levels higher. The mob gets large bonus to most stats, and gives slightly more experience than yellow. It’s not advised to grind on orange mobs.
Red: Six or seven levels higher. The mobs get very large bonus to most stats, and gives large experience. It’s not advised to grind on red mobs.
Purple: Eight or nine levels higher. The mobs get very large bonus to most stats, and gives very large experience, but it’s strength make it worthless for grinding.
Gray: Ten or more levels higher. The mobs get immense bonus to most stats, and gives no experience. Unless the mob is a boss, there is no reason whatsoever to get close to it.
Leveling:
Mobs: Each mob have hidden stats, including level. Each mob gives experience depending primarily on it’s level and secondarily on it’s “class”. Unique mobs (like bosses) are stronger, and give slightly better experience. Each mob have a base amount they always give, regardless of player or his party.
Players get normal experience (without bonuses or penalties) only if their level is equal to the mobs level, and they are not in party.
Party does change experience gained. Experience gained from mob is shared equally between all players, after which all bonuses/penalties are applied (experience stones, level difference from mob etc.) and a slight bonus for partying. That means that you’ll get slightly more than half of what you would normally, when you duo, for example.
Quests: Each quest, when completed, gives gold and experience (with exception of six per faction, which are called Favor quests and are repeatable). If the quest does not have time limit, it’s fixed. No matter how many mobs will be killed/items gotten, the experience gained will not increase. If the quest does have a time limit, the reward in experience and gold will increase, and chances are that additional reward will be given, that would normally not have place.
Levels:
When a player levels, there are few things that happen.
- Experience bar drops to 0%. That means, level can’t be lost by dying.
- That players HP/MP/SP are fully restored.
- Mobs relative level changes. Their strength is reduced (only towards player! Their stats are unchanged!), and experience they give is lessened. Those decreases are greater at specific level differences, which is symbolized by color coding (look above).
- One stat point is added to the characters stats, depending on the class (Str for fighter/warrior, Rec for defender/guardian, Wis for priest/oracle, Int for mage/pagan, Dex for ranger/assassin or Luc for archer/hunter).
- Max HP/MP/SP increase, depending on the class and mode (higher mode gain more HP/MP/SP, and it’s not linear).
- That player gains stat points to freely distribute depending on it’s mode (5/5/7/9 respectively for EM, NM, HM and UM).
- That player gains skill points to freely distribute depending on it’s mode (3/3/4/5 respectively for EM, NM, HM and UM).
All these, with the exception of points #6 and #7, are done automatically.
To add stat points, open the status window. On the left part of it, there’s a tab titled “Stat Point Setting” which opens a small, additional part of the status tab.
If you have usable points, “+” allows you to add them to corresponding stats. If you added too much, you can use “-” to undo adding of that stat, and return it to the pool of usable points (you can only remove those stats, that weren’t final). When you’re done, OK finalizes the stat adding (WARNING! You can’t later change those stats if you click OK. Be sure that you didn’t make mistake.). Cancel returns all the points to the pool of unused stat points.
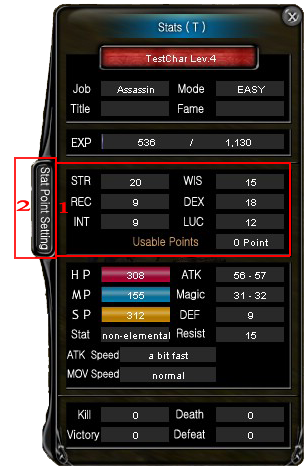
1) Current stat points, along with number of points that can be distributed.
2) Button to open stat distribution tab.
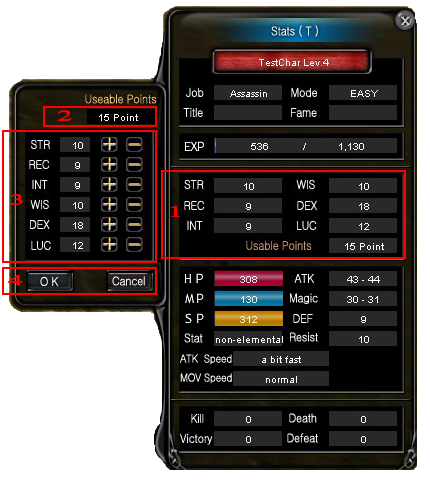
1) Current stat points, along with number of points that can be distributed. They are changed only after OK was pushed.
2) Number of usable points that is updated through allocating points in the tab.
3) Stats to which points can be added, as well as “+” and “-” buttons to allocate stats. Hovering mouse over abbreviation of stat will give short description of what it does.
4) OK and Cancel buttons, to finalize the selection, or returning all points to unused pool.
To add skill points, open the skill tab. On the left part of it, there are four tabs named “Passive”, “Basic”, “Combat” and “Special” respectively. Clicking on one of those will show the corresponding tabs skills. “Special” can’t be opened on Easy Mode.
On the right of the skill there is arrow up. If it’s yellow, the skill can be leveled. Clicking on it will automatically add the level, and it can’t be undone. Player can’t use the skill at level lower than the maximum he/she bought.
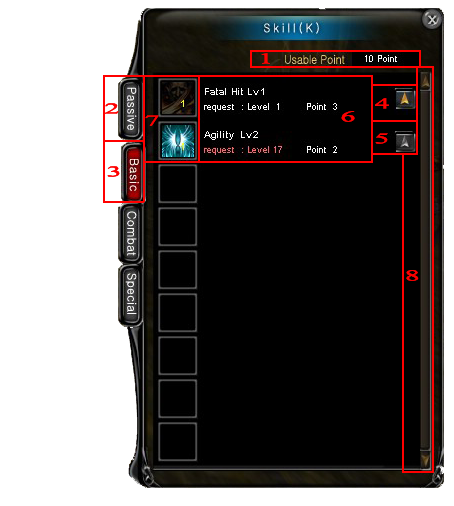
1) Number of skill points that can be used.
2) Unselected skill tab category.
3) Selected skill tab category.
4) Active skill level up button (using it will level the skill by spending points on it).
5) Inactive skill level up button (requirements aren’t met, there’s not enough skill points to spend on it or maximum level already obtained).
6) Name of the next level of the skill (name of lvl1 if the skill is not bought yet, or name of last level if the skill is maxed), along with level requirements before it can be bought (written in red if character is too low, or with white if character meets them) and skill point cost. Hovering over this part shows that levels skill description.
7) Icon of the skill. If it’s grayed out, the skill is not yet bought at all. Hovering over it (if it’s active) will show the currently possessed levels skill description. The icon can be dragged and dropped onto the hot-key bars.
8) Scroll bar, if there are more skills in the category than the skill tab can show.
IMPORTANT: If level requirements of skills lvl1 aren’t met, it’s not shown in the skill tab until the level they are unlocked.
Chapter 3, Characters Properties:
In this chapter, I will talk about the characters, and what is relevant towards them.
NOTICE: Mode of play, HP/MP/SP bars and levels are originally described in “Chapter 1, Basic Mechanics” above. They may be mentioned in here as well, where applicable.
1) Mode of Play:
Chapter 1, Basic Mechanics wrote: |
When a character is made, the creation window asks to choose a difficulty mode. As this is a MMORPG game (Massive Multiplayer Online Role Playing Game), changing the monsters strength depending on the character is out of the question. Instead, the mode changes the characters strength. Unlike in most games, higher difficulties give stronger characters compared to lower ones (and compared to monsters), but they level slower or even risk deletion. |
In Shaiya there are four modes of play, each with it’s own characteristics.
The four modes differ in few ways, from Easy Mode being the lowest, while Ultimate mode is the highest, as far as this guide is concerned.
The higher modes have more stat points and skill points than the lower ones. Exception is Easy Mode which have the same values as Normal Mode.
The higher the mode, the more skills, quests and mode-specific items are available.
Easy and Normal modes can wear items up to Dread. Hard Mode can wear items up to Legend. Ultimate mode can use all items in game.
The higher the mode, the more experience is needed to level. After EP4 releases soon, this is the case for all modes. Currently, Hard Mode have the same experience table as Ultimate Mode.
The higher the mode, the more bonus stat points are available from high PvP rank. Currently, until EP4, only UM mode can obtain status points from every rank.
All but Ultimate Mode risk losing experience (and if killed by player in PvP/GvG items) if killed. Ultimate Mode is permanently deleted if not resurrected in time. They still risk losing items in PvP and GvG situations.
2) Races/Classess:
EP4 brings racial skills, shared by all classess under the race. Other than those, race itself have no mechanical effect.
Alliance of Light, Races:
Human- Humans are the typical “knights”. They have both, the highest melee damager and the tank of the light side. To spice it up a bit, they were given healer, quite making humans the “templars” of Shaiya. Generally human classess are party classess. All of them have their role in parties. Fighters deal AoE (Area of Effect) damage, defenders take all the beating from others (usually mages and priests) to them (and withstands it usually) while priests buff and heal the tank, so he can deal even more beating.
Elfs- Elfs are fast dying, but also fast killing classess. They are terror on the battlefield. From the mage, wiping out whole hoards (if first tanked, that is) at once, through fast-hitting rangers to far-shooting archers. Except for mage though, elves are loners in PvE (Player VS Environement), but all are fearsome enemies on the PvP (Player VS Player) battlegrounds (called borderlands).
Union of Fury, Races:
Deatheaters- Those are the narrow, near-mindless brutes. All their classess are pretty straigthforward, and all are physically exceptional. They have no magic class, nor are they agile enough to have assassins. They have both melee and range offense (warrior and hunter respectively) and the tank of fury (guardian). Unlike humans, deatheaters have one of the highly soloing class, and unlike humans, they are vail-dependable for healer.
Vail- The casters of fury, with addition of assassins as the only physical class. They have the lowest defense, but are essential for long-surviving parties thanks to their healer and the best AoE damage dealers. All those classess are harder to use due to low defense and mechanical problems (spell interruption or skill chains).
Classess:
UoF – AoL
Warrior (Nordein) = Fighter (Human)
Guardian (Nordein) = Defender (Human)
Oracle (Vail) = Priest (Human)
Assassin (Vail) = Ranger (Elf)
Pagan (Vail) = Mage (Elf)
Hunter (Nordein) = Archer (Elf)
Every class have one bonus stat point, which each level is added to that classess base stat. Those are as follows:
Fighter/Warrior —> Str
Defender/Guardian —> Rec
Priest/Oracle —> Wis
Ranger/Assassin —> Dex
Mage/Pagan —> Int
Archer/Hunter —> Luc
Various Classess also have different HP/MP/SP growth. Classess are listed from the one with highest base growth, to the one with lowest base growth, to the best of my knowledge. Higher modes have higher growths as well.
HP Growth: Defender/Guardian > Fighter/Warrior > Ranger/Assassin > Archer/Hunter > Priest/Oracle > Mage/Pagan
MP Growth: Priest/Oracle > Mage/Pagan > Ranger/Assassin and Archer/Hunter > Defender/Guardian and Fighter/Warrior
SP Growth: Ranger/Assassin > Archer/Hunter > Defender/Guardian and Fighter/Warrior > Priest/Oracle and Mage/Pagan
Further, not wanting to write both factions classess, I will use their basic “job”. That’s attacker (fighter/warrior), tank (defender/guardian), healer (priest/oracle), nuker (mage/pagan), killer (ranger/assassin) and ranged attacker (archer/hunter).
The basic characteristics are as follows:
Attacker: Strong on the offense, medium on defense. Very narrow minded (all non-buffs are damage skills, usually weapon specific). Easy to play with appropriate build, and can make good duo with priest. HM and UM fighters have good while NM fighters have small AoE potential.
Tank: Very bad on offence, the best on defense. Very party centered character. Have almost only debuffs, some with added damage potential. Is supposed to take groups of mobs on himself to allow other characters freely and safely AoE them to death.
Healer: Either very bad or very good on offense. Bad on defense (good magical resistance). The only character who can heal. Mostly very party oriented. Have the best buffs in the game. Have the second best AoE potential (unless built for being the healer).
Nuker: Have the highest damage in the game, but as those are spells, they need some planning and time to cast. Very low on defense. Narrow (all non-buff skills are damaging or damaging with debuff). Highest AoE potential in game.
Killer: Have the fastest attack in game, but the lowest base damage of all the physically oriented classess. Good evasion, great accurancy and universal, with debuffs. Solo character that have very hard time finding parties. Hard to play due to chain limitation on skills. Absolutely no AoE potential.
Ranged Attacker: High damage and quite low defense. Only character with non-spell long-range attacks. Have debuffs and damage skills. Is soloing class, and have hard time finding parties. Is, along with ranger, very hard to play, at least at the beginnings. Not advised for NM.
Each of those classess is build around a specific theme. Granted that, they have usually very limited builds that can draw their full potential. As modes go up, more builds become useful. Below are advised builds for NM and advised status bonuses from weapons and lapis (on which I will talk later).
3) Stat Points Description:
Those are based on the community best knowledge.
STR – Strength
– increases base physical melee damage, 1str = 1.3 attack
– increases base physical ranged damage, 1str = 1 attack
REC – Reaction or Recovery
– increases physical defense, 1rec = 1 defense
– increases Hit Points, 1rec = 5HP
INT – Intelligence
– increases magic damage, 1int = 1.3 magic attack
WIS – Wisdom
– increases magical attack accuracy
– increases magic damage, 5wis = 1 magic attack
– increases magic defense, 1wis = 1 resistance
– increases Mana Points, 1wis = 5MP
– increases HP healed by wis-dependant healing spells, 1wis= +2HP healed
DEX – Dexterity
– increases physical attack accuracy
– increases physical attack evasion chance
– increases Stamina Points, 1dex = 5SP
– increases base physical damage, 5dex = 1 attack
LUC – Luck
– increases critical hit chance, 5luc = 1%
– increases critical hit max attack, 1luc = 1.5 max damage on critical
– increases critical hit evasion
– increases base shooting damage, 3luc = 1 attack
4) Suggested (classic) NM build:
The tested and proven builds that allow the character to level effectivel in their basic roles. Builds with “!” at the end, are the most suggested.
Attacker: 3str and 2dex! or 2str, 1rec and 2dex.
Tank: Originally it was full rec. Since EP5 updated skills, Tank needs dexterity to hit with most of his skills, so 3rec and 2dex would give him high chance to hit, while 4rec and 1dex would give him slightly higher defense but lower chance to hit.
Healer: 5wis! or 3wis and 2 int
Killer: 3str and 2dex!
Nuker: 5int! or 4int and 1wis or 3int and 2wis
Ranged Attacker: 3str and 2dex! or 4luc and 1dex or 3luc and 2dex (luck builds are common, but have a VERY long time to be of worth.)
5) Suggested Lapis and Weapon Stats (from most to least important, classic build):
These lapis are the most important lapis from PvE perspective, regardless of mode, as long as the common builds are used.
Attacker: Craft (str), Shrewd (dex) and Safe (rec) lapis. Bonus str, dex and rec.
Tank: Safe (rec) lapis. Bonus rec.
Healer: Mental (MP), Wisdom (wis), Mystic (int) lapis. Bonus wis and int.
Killer: Shrewd (dex) and Craft (str) lapis. Bonus dex, str and luc.
Nuker: Mystic (int), Mental (MP) and Wise (wis) lapis. Bonus int and wis.
Ranged Attacker: Fortune (luc) and Shrewd (dex) lapis. Bonus luc, dex and str. (Exchange Fortune for Craft and luc for str if you use the str/dex build.)
It’s not advised to stray from those too far on NM.
6) Common HM builds:
Some builds that I think are common and working on HM. Builds with “!” at the end, are the most suggested.
Not that there is no archer build with “!”. That is because, there simply is no all-purpose static build for that class in HM. Many archers use str/dex build, then restat to high luck builds at higher levels. If you want more information on this class, it is highly suggested to visit this guide for the build information.
Attacker: 5str and 2dex! or 4str, 1rec and 2dex or 3str, 2rec and 2dex.
Tank: 7rec!
Healer: 7wis! or 5wis and 2 rec
Killer: 5str and 2dex! or 4str and 3dex or 2str, 2dex and 3luc or 3str, 2dex and 2luc
Nuker: 7int! or 5int and 2wis or 4int and 3rec
Ranged Attacker: 5str and 2dex or 7luc or 6luc and 1dex or 5luc and 2dex
7) Elements:
There are four elements in this game. Fire, water, earth and wind. Each element have one weakness and one strong point. Every mob that is of any of those elements is target of that element. It seems that all mobs attacks (unless magic) are non-elemental though. Players are non-elemental targets, and their attacks are non-elemental. There are lapis to change that state (chapter X).
A pretty recent post did change the general opinion on those. Data from it is posted here.
Fire attacks deal 40% more damage to wind targets, 20% more to non-elemental targets and normal damage to fire and earth targets. It deals 50% less damage on water targets.
Fire is dealt 50% less damage by wind attacks, 20% less damage from non-elemental attacks and normal damage from fire and earth attacks. It is dealt 40% more damage by water attacks.
Water attacks deal 40% more damage to fire targets, 20% more to non-elemental targets and normal damage to water and wind targets. It deals 50% less damage on earth targets.
Water is dealt 50% less damage by fire attacks, 20% less damage from non-elemental attacks and normal damage from water and wind attacks. It is dealt 40% more damage by earth attacks.
Earth attacks deal 40% more damage to water targets and 20% more to non-elemental targets and normal damage to earth and fire targets. It deals 50% less damage on wind targets.
Earth is dealt 50% less damage by water attacks, 20% less damage from non-elemental attacks and normal damage from earth and fire attacks. It is dealt 40% more damage by wind attacks.
Wind attacks deal 40% more damage to earth targets and 20% more to non-elemental targets and normal damage to wind and water targets. It deals 50% less damage on fire targets.
Wind is dealt 50% less damage by earth attacks, 20% less damage from non-elemental attacks and normal damage from wind and water attacks. It is dealt 40% more damage by fire attacks.
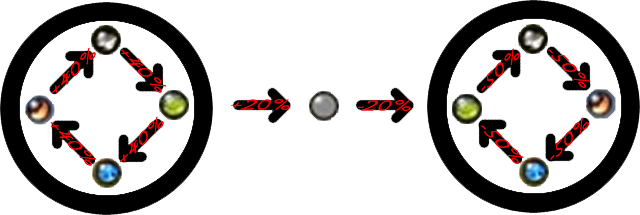
Non-elemental attacks deal 20% less damage to elemental targets and normal damage to non-elemental targets.
Non-elemental is dealt 20% more damage by elemental attacks and normal damage from non-elemental attacks.
Or, in (crappy) image form (the pairs that are not shown, deals 100%, or normal, damage).
Chapter 4, Goals of the Game/Quests:
Credit for helping to rewrite this chapter goes to Anadyne.
There are two general goals in this game. Being one of the best (aka. getting to lvl60 UM) and quests. As being “the best” is pretty straightforward, in it’s place, I’ll write about what to look for in the end-game.
1) Boss Killing:
There are many end-game bossess. Many of them need large, coordinated groups and possibly hours before they fall.
Alliance of Light:
Five Elemental Cave bossess – One of each of the four elements, along with one non-elemental. Their important loot consists of drop limited by time weapons. They are not worth much, nor do they need large groups of people.
Cloron Troll – 12h spawn boss at the end of cloron lvl3, right in front of portal to Cloron’s cave. Drops legend items of 51-53lvl, as well as drop limited by time weapons.
Cloron the Dragon – 3day spawn boss, obviously in his cave. Drops unique and goddess weapons around 50lvl. After his death, around the cave, chests are spawned which after being destroyed may drop miscelaneous items not gotten anywhere else, as well as high level legend items or lvl6 debuff lapises. Worthwile to kill, but needs coordinated, larger groups.
Freezing Mirage – Spawned only after maintance (weekly spawn) in elf form, which changes into dragon after being killed. It’s on the middle of the large lake on the west of map 2. It drops 45-46lvl goddess armors and various high lvl legend armors. After it’s killed, around the lake, chests appear that when killed may drop various legend gears or lvl6 stat lapis. Needs large and well coordinated groups, as well as a long time to be killed. After dragon form Freezing Mirage is killed, it opens way to Crypticone Throne dungeon, to which portal is next to the lake.
Union of Fury:
Mago and her sons – Ruber Chaos mobs, that are Elemental Cave bossess equivalents.
Fantasma Troll – Cloron Troll’s equivalent, at end of Fantasma Lair lvl3.
Fantasma the Dragon – Cloron’s equivalent, in it’s cave reached by portal at end of lvl3 of Fantasma Lair.
Haruhion – Freezing Mirage’s equivalent, on the empty field at south-west part of map 2. It’s death opens Crypticone Thrones portal near it.
Both:
Kimuraku – 12h spawn boss of D2 dungeon in D-Water. Heavily camped, gives the most sought after item in the whole game. Two elemental lapis. One of them is for armor, and one is for weapon. Does not need large groups, but it’s value makes it heavily camped by both factions, and most likely never lives longer than few minutes at best.
Deinos the Dream – Spawned during maintance. Weakest boss of Crypticone Throne. Drops lvl56 weapon.
Nantarios – Spawned during maintance. Second boss of Crypticone throne. Drops lvl56 weapon and two lvl50 goddess armor pieces.
Belisabeth Eathory – Spawned during maintance. Third boss of Crypticone throne. Drops lvl56 weapon and two lvl51 goddess armor pieces.
Parridalis – Spawned during maintance. Fourth boss of Crypticone throne. Drops lvl56 weapon and two lvl52 goddess armor pieces.
Alcarian the Flame – Spawned during maintance. Fifth boss of Crypticone throne. Drops lvl56 weapon and two lvl53 goddess armor pieces.
Kirhiross – Spawned during maintance. Sixth boss of Crypticone throne. Drops lvl56 weapon and two lvl50-53 goddess armor pieces.
Cryptic One/Immortal – Spawned during maintance. Final boss of Crypticone throne, with two forms. Cryptic One (demon form) drops nothing, while Cryptic Immortal (dragon form) drops lvl59 items.
2) Character Tuning:
When a player reaches his dream level (whatever it may be), he may get stronger by PvP and tuning his gear.
This game is heavily stat based. Level have quite low effect to gear compared to other games. A player being many levels lower can easily kill higher leveled player. That is due to slotted gears and lapis.
When a person reaches the top level for his mode, the only ways of getting stronger is through getting higher and more slotted gear, along with better lapising…or getting PvP rank.
I cannot give advice in PvP, but you can see some of the information about PvP kill/death ratios and ranks here.
That said, I can say where are dropped most important gears:
NM:
Lvl50-53 Dread Set may be dropped by the special mobs in Cloron’s Lair/Fantasma’s Lair, right before dragons cave (they have long recharge times and are very strong).
Stigma Cave/Aurizen Ruins mobs have a small chance of dropping dread, high level items, among them the 50-53 set.
Lvl55-58 Dread Set may be dropped in Stable Arde and Deep Desert.
Chestpieces can be dropped by Troll bossess in Stable Arde, boots can be dropped by Troll mobs in Stable Arde, bottom armor can be dropped by Scorpion bossess in Deep Desert 1 and gloves may be dropped by Scorpion mobs in Deep Desert 1.
~lvl50 dread weapons are dropped the most by the special mobs in Cloron’s Lair/Fantasma’s Lair and Cloron’s Lair/Fantasma’s Lair mini-bossess (Asmodeus Incarnation, at least for AoL).
Lvl56? weapons are dropped by all bossess in Crypticone Throne, but Cryptic One and it’s dragon form.
Lvl59? weapons are dropped by Cryptic Immortal (dragon form of Cryptic One).
HM:
Lvl50-53 Legend Set is dropped by two bossess. Gloves are dropped by Ankykul/Astaroth which is a boss of Maitreyan/Aidion Neckria (they are 4h spawn quest bossess…therefore killing them without questers in party is agains’t rules!). All the other pieces are dropped by Cloron Troll/Fantasma Troll.
Also, dragon boxes can give legend, high level armors.
Lvl55-58 Legend Set may be dropped in Stable Arde and Deep Desert, on the same mobs as dread set.
Chestpieces can be dropped by Troll bossess in Stable Arde, boots can be dropped by Troll mobs in Stable Arde, bottom armor can be dropped by Scorpion bossess in Deep Desert 1 and gloves may be dropped by Scorpion mobs in Deep Desert 1.
~lvl50 legend weapons are dropped by Ankykul/Astaroth.
Lvl56 weapons are dropped by all bossess in Crypticone Throne, but Cryptic One and it’s dragon form.
Lvl59 weapons are dropped by Cryptic Immortal (dragon form of Cryptic One).
UM:
Lvl 45-46 Goddess Set is dropped by Freezing Mirage/Haruhion.
Lvl50-53 Goddess Set is dropped by bossess in Crypticone Throne (dungeon open only after Freezing Mirage/Haruhion was killed). Each of them is dropped by a different boss.
Gloves are dropped by Nantarios, Boots are droppeb by Belizabeth Eathory, Bottom is dropped by Parridalis and Chestpiece is dropped by Alcarian the Flame. Kirhiross drops any 50-53 goddess item piece.
~50lvl weapons are dropped by Cloron the Dragon/Fantasma the Dragon and Freezing Mirage/Haruhion.
Lvl56 weapons are dropped by all bossess in Crypticone Throne, but Cryptic One and it’s dragon form.
Lvl59 weapons are dropped by Cryptic Immortal (dragon form of Cryptic One).
All:
Lvl5 Lapis – Dropped by mobs in Stigma Cave (AoL) or Aurizen Ruins (Aurizen Combat Commanders, UoF), as well as mobs around relics in D-Water. (Only the mobs, not the guards. Also doesn’t include Heres and Entis mobs.)
“Lvl5” Helmet Lapis – Only from various AP promotions. There are no in-game drops.
Lvl6 Stat Lapis – Dropped by Freezing Mirage (AoL) or Haruhion (UoF).
Dual Lapis (Wit 3, Int 3, All Str) – They are dropped by majority of mobs in Stable Arde (the “Jungle”), but not Trolls.
Dual Lapis (All Rec, All Dex, All Luc) – They are dropped by majority of mobs in Deep Desert 1.
Accessory Lapis – They are dropped by majority of mobs in Deep Desert 2.
Dual Lapis (Str, Rec, Dex, Int, Wis and Luc, all 1) – Proper Blacksmith Packages.
Elemental Lapis – Drops normally only from Kimuraku, 12h spawn boss of D2.
Sonic and Flash Lapis – Only from various AP promotions. There are no in-game drops.
3) Quests:
1) There are not many quests in this game. There are a lot of them, till around 18 level, after that being only a couple, averaging 2/level. When you have no quests, the only thing you can do is…GRIND, aka. repeatedly kill mobs in a spot for exp.
2) AoL and UoF gain quests at various rates. It seems that UoF get’s 2 levels at each level, while AoL have “dead” levels where there are no quests, while on other levels, they have 3 or 4 quests to do.
3) If at any map you have no quests for two levels straigth, then you should change map.
4) This game is translated very badly, and some quests are incorrectly named/logged etc. I play only on AoL, so would like someone to help with UoF quests that does bring a lot of trouble.
Typos:
Starving Bears quest is supposed to be Starving Boars. Wherever there is a Bear word, exchange it with a Boar. Otherwise, this quest is fine.
For Suspicious Plan quest you have to kill Orc Spirit. It’s a unique mob, so is lil stronger than a typical mob of it’s level, but can be easily soloed (he is blue at the time of quest). He is south from Maitreyan Dungeon, on the top edge of forest. If you still have trouble finding him, stand near to the first Nepenthes going from Mait and look around. He is close. If you STILL have trouble, then near to that Nepenthes push “~” a couple of times until it targets the Orc, and then simply use skill or Auto-Attack to be brougth to him.
For the quest saying about getting a rarely dropped Glowing Feather from Harpy Magician, you must kill Harpy Illusionists instead.
Locations:
Lupers is on the west side of the bridge that is near the tower at which you got the quest. DON’T EVER say “Lupers” in trade chat. Honestly, there are so many people that ask about him, that it’s tragic.
Dolama and Delano are east of Keolloseu. One is on the island, while the other is on the beach near some rocks.
Kaznil can be soloed at 18, and sometimes even at 17 level. He is straigth south from Keolloseu, right in front of the mountain. He looks like a big Ogre Chief.
Cloron Goblins are west of Cloron, in between two rivers. Isprit is east of Cloron on the other hand.
Dread Quests (Light):
If you are HM and want to get dread gloves, you need to finish all quests given by Creath Question. DO NOT cancel them. To do so, you may also finish one quest given by a lady under a tree, near the crossroad south of Fedion.
There are four dread quests (respectively, 25, 26, 27 and 28lvl).
First one, for gloves, is obtained by getting item named Poemas Mandolin from Juliah Dillun. You must finished Creath’s Question quests to activate the quest.
Second items quest, for boots, is obtained from Sealakel Fighters, and is named Monkey Skull.
For pants, third quest, you must get Empty Trunk from Orc Robbers.
Fourth quest is initiated from item called Lens Bow, dropped by Priest Dempnun.
Repeatable Favor Quest:
These quests give a mini-nos (item that boosts two stats for 10min). All these are for the map 2 repeatable quests, though there are higher level quests at map 3 and map 1 (for items from Desert/Jungle). They never give any experience or gold.
Thin Meats are dropped by animals, like Wolves or Bears. The reward is mini-nos boosting str and rec by 3.
Witchs Essence is obtained from Harpies and Leopardless. Reward in mini-nos boosting int and wis by 3.
Broken Cores are from caster mobs, like the Sealakel Shamans/Priests. Whether you want it or not, you will have lot’s of them after trying to get Spirit Cores the old, hard (farming) way. The reward is mini-nos boosting dex and luc by 3.
Things to Keep:
Spirit Cores are dropped the most by caster mobs, like Sealakel Shamans/Priests or Willesue Monkey Trainers. Generally though, people get them either from Sealakels on Maelstorm Coast or from Goblins south of it.
30 of them are needed for lvl29 helmet quest, and another 30 for lvl43 epic quest.
Mare Cores are dropped often by Golems in Elaste Valley and by Goblins east of portal at map 3. They are used at lvl36 for helmet quest (again 30 of them).
Adamas stones can be obtained from Sealakels at map 3 (where I advise leveling since they become yellow). Magic Leather can be obtained from a couple of mobs, but are dropped the most from Karis Wolves. Just remember that D-Water is PvP map, so all items you don’t want to lose put into warehouse, and don’t go there with lot’s of exp to lose. Rillain can be bought from Liquid Medicine Merchant in Keolloseu for around 250 000 gold in total. Gold Abels are obtained from mobs around starting towns.
All these items are used for lvl43 epic quest (40 Adamas Stones total, 20 Magic Leathers, 99 Rillain’s and 90 Gold Abels).
Fury seem to need 10 gold powders in place of 20 Adamas Stones, but I don’t know where to get these.
Mind you that locations are from lights perspective. Most likely there are equivalents on fury, though.
Chapter 5, Characters Roles/Basic Strategies:
One thing will always be true for all discussions about roles and strategies. They are personal opinions. All that I’ll write about in here is from my point of view. Some may agree, some may not, thus it’s important for you to take your time in NM to build your own opinions and strategies, fitting you. Those are just guideliness to start with, or…food for though, if you so will.
This chapter uses the basic roles classess fit. That said, these instead of meaning a specific class, show a specific role that more than one class can fill, with correct build. For all these roles, take their names representative as the best example.
Keep in mind that of these, only “Tank”, “Nuker” and “Healer” are used. “Attacker”, “Killer” and “Ranged Attackers” are not needed in parties, so no one looks for them. There was no reason for making them then, thus it’s possible you’ll only see them here. That said, I seen them as important enough to mention them.
1) Basic Roles:
Attacker: Aggressive role that attacks in melee multiple targets as often as possible. This role can’t be filled except by fighters/warriors and defenders/guardians, which are the only classess with melee AoE attacks.
Tank: He is to gather couple of mobs using whatever means he deems necessary, They aren’t counted on for damage, so it’s better for them to NOT attack, just focus on keeping aggro. This job is very well filled also by fighters/warriors and mages/pagans which keep aggro while at the same time deal worthwile damage. A priest/oracle can also fill this role, with some success but they lack spammable AoE attack.
Healer: This role can be filled only by priest/oracle. They are not to attack at all, but keep everyone healed and clean of debuffs.
Killer: Another aggressive role that though, unlike attacker, focuses on as quickly killing single target, with skills that enhance damage if possible. That said, they must possess some way to defend themselves. All classess may fill this role, but archers/hunters and casters have near to none skills to help in it, therefore they are not worthwile killers.
Nuker: Magical version of attackers, spamming AoE attacks. Can be filled by mage/pagan and priest/oracle only.
Ranged Attacker: Killer’s ranged version. Attacks mobs one by one, until kills them. The major difference is that they usually have lesser need for defence or evasion, prefering to not getting into opponents range at all. Mages/pagans and priests/oracles can fulfill this role. That said, they have limited single-target attacks.
2) Basic Strategies/Tips:
Solo:
First strategy is for the specialised class (the one best fit, by the developers opinion). Further I’ll mention others as well.
Fighter and Warrior:
As Killer: Rising Crush > Deadly Strike (If dual/spear, if 2-hander skip) > Double Damage > normal attacks, repeat.
This saves resources. In no way this is the fastest killing “chain”, but allows to kill more mobs without rest, which I found more effective, myself. Most use though:
Rising Crush > Deadly Strike (If dual/spear, if 2-hander skip) > Windspin > Double Damage > normal attacks, repeat.
Don’t ever use Enhanced Windspin or Wild Wild Dance agains’t only one mob.
If that mob hit’s hard though, I found effective using Ground Shock as the first move in a battle. Watch out though. It seems to never hit the mob if while running to it, you use it “on the run” before going through target, as if he was out of range. That said, either stop before using it, attack normally (or with Rising Crash) or go right through him first and then use it. Prolly just effect of lag, not all may see.
As Attacker: This should look around (after gathering mobs)…
Ground Shock > Wild Wild Dance > Wind Spin > Enhanced Wind Spin > , attack till the first skill recharges, repeat.
I obviously don’t suggest this for NM’s.
Also, if you lack only a bit to kill all the mobs after whole chain, you may try using Ground Shock after Wild Wild Dance. It will give you a bit of damage more, but you’ll sustain more as well.
Defender and Guardian:
As Killer: Panic > Curse Raid > Heavy Swat > Attack. Possibly use other debuffs, if they won’t hit other mobs as well (or if you’re willing to change the role ya fit mid-fight).
As Attacker: This class is not very effective for attacker builds in NM. First, it have too little stat points to successfully attack many and survive. Second, it’ll end with little skills.
In HM, there are few ways to keep it.
Before getting the proper AoE skills, you can use Heavy Swat on multiple targets one by the other, using Ground Boom, then choosing one and debuffing it (using Panic) and keep attacking it until it’s dead, Heavy Swat ends on others, or Ground Boom is no longer on recharge.
After you get all the AoE skills, the chain would best look something like this:
Panic on all mobs you want to take (in long range to reduce damage to you, will increase all damage to them) > Ground Boom (increases survival rate + cheap AoE damage) > Darkness Blow (to remove all physical attacks + AoE damage) > Arachne Range or Silence Blow (Depending on enemies) > Any other AoE that are not on recharge. Rinse and repeat until mobs die, or you will lack SP/MP. There is no way of saving either with battle-tanks in AoE attacks.
If you have bless, and lack pots, SP and MP, it’s better to not do anything and wait for them to refill, instead of using normal attacks.
Priest and Oracle:
As Ranged Attacker: From maximum possible range use Ice Ball to slow the opponent down, then start spamming Magic Spot. When opponent get’s closer, if you have Ice Ball lvl1 just run around casting Magic Spot, or healing yourself. If you have at least lvl2, shortly before it get’s to you, use it again, move quite some range, use it again, spam Magic Spot, rinse and repeat.
Now, why the difference? Slow effect of lvl1 is too short for you to run distance large enough to explain the casting time. 3 seconds is just the casting of the both (right before move, and right after it), so you technically end at the same range to your opponent whether or not you cast it.
With lvl2 you have bonus 2sec, which allow you to gain some distance. Lvl3 gives you 4 such seconds.
Alternatively, if the opponent is weak, you can just cast Ice Ball first and then spam Magic Spot not worrying about opponent closing in.
As Killer: Don’t, Really. As killer just attack with normal hits and heal when necessery or use Health Assistant , possibly hypnotising opponent to heal and recharge Instant Heal. Evolution also increases physical damage and hit rate.
As Nuker: Impossible until lvl21 when you first get spammable AoE. There’s not much choice either. It’s casting time is too large to successfully solo with a nuker. Fastest spammable AoE spell priest/oracle have (Elemental Shock) is at lvl28 and still is hard to use.
Ranger and Assassin
Ranger/Assassin can successfully fill only a role of a killer.
These two classess are chain-dependant. As they use many debuffs, strategy changes from mob to mob. Levels of Fatal Hit and Stun Crush also change the strategy. Let’s assume now that you have lvl2 Fatal Hit and lvl1 Stun Crash.
If mob have no immunities, but is strong physically:
Fatal Hit —> Halt Kick —> Stun Crash —> Tetanus —> Normal Attack or Aggravation —> Halt Kick —> Stun Crash —> Fatal Hit, repeat.
If mob is immune to Stun Crash and is strong, don’t fight him. Stun Crash is very important for survival in such battles, as it’s hard to survive long with low defense, even with quite high evasion. Such mobs are too risky to be worth it.
Weak mob with no immunities:
Fatal Hit —> Halt Kick —> Stun Crash —> Tetanus —> Aggravation —> Normal attacks all the way.
Depending on your strength, honestly, you may skip the whole Halt Kick/Stun Crash, and just use Tetanus. It saves SP, and on HM I use up SP before my HP falls, just using this one skill on yellows.
After falling low on HP/SP, for resting, you don’t have (unlike other classess) look for a safe spot, as you have one everywhere. Before sitting, cast Stealth that will last long enough for you to fully heal and get into a good position to continue grinding (dropping stealth while sitting will make you instantly stand).
Never use Venom Strike or Gruesome Attack on normal field mobs, unless you fight with them for a long time. They have so low HP, that normal attacks are faster dealing with them, while both skills use quite a bit of SP.
Mage and Pagan:
As Ranged Attacker:
At low level (below 20) – If mobs are far from each other, from max rangeuse one of the spammable AoE earth spells to stop their moving (giving you technically a free hit) > Sustain Doom (lvl19) > One or two Magic Missiles (Or Storm’s if nothing other will be hit) > Ensnare Roots (stopping them on the way) > Magic Missile (or Storm again…) until they get close to you > Sonic Bolt (when they already are attacking you). I do not advice using Fireball, personally.
The largest mistake I see from newer players at low levels, is casting Sonic Bolt at long range as opening move. Some of you may ask “But why. It’s got good damage.” Yes, it does. “But it’s instant. I don’t lose anything!” It doesn’t have cast time, that’s right. “So why!” Because it have recharge. At this levels, not even NM will be killing a green or yellow mob 30 seconds, so you have only one cast of it in battle. It’s almost sure on the other hand that the mob will reach you. Isn’t it better to cast non-instant spells when they won’t stop you from casting it, and finishing the mob with attack that they won’t stop through interruption? For me, it personally saved lot’s of HP when something got bad.
At 20+ – If mobs are far from each other, from max range use one of the spammable AoE earth spells to stop their moving (giving you technically a free hit) > Sonic Bolt > Sustain Doom > Hellfire (if you’re high enough) > Ensnare Roots (stopping them on the way) > Magic Missile until they get close to you (or you may try to get in Hellfire, Storm/Meteor Rain or Lightning instead of one of them). Recast Sustain Doom if needed.
Now, why is it at the beginning?! Magic Missile is instant cast since 20, so that part doesn’t matter. Sonic Bolt is dealing more damage, and it’s better to deal as much damage as possible, maybe killing them before they get to you.
Also, generally Storm or Lightning are the only AoE spells that are worthwile, unless agains’t fire mobs, which best skip alltogether.
If you are low on defense, start every battle at max range using earth spell to pause mob giving you a bit of time. After that, use spells with opposite element. When mob is close to you, you can either use Magic Missile, or the instantly casted wind spells. Never use them before mob is in melee to you, as it’s a waste of them.
If you are high on defense, players usually drag a bunch of mobs, uses Fire Bush and while kiting, casts spells with low casting times.
If mobs are close to you, and they attack all at once, you can cast every spell with cast time not longer than 1sec without interruption. You can do this by starting to push the spell at the moment the mobs attack you. To make all mobs attack at once, after gathering them, move a bit so that they have to go after you. That should work.
As Nuker:
Pretty advanced style of play, I’d say, to self-tank with a mage. You must kite the mobs. Fire Thorns will aid as small, but free damage. Other than that, all you should do is use AoE wind magic, while outside the range of mobs, far enough for Storm to end being casted. Don’t use fire, as it’s far more risky (although used well, Fire Bush helps a lot). Don’t use earth. It’s simply (or nearly) impossible (all AoE earth spells take too much time, so you have to go so far that some mobs may simply run).
Don’t stay in place hoping that spell will go through. Many spellcasters die because of this.
Archer and Hunter:
Ranged Attacker: Always try to start the battle at max range (unless you’re sure shorter one will bring no issues whatsoever, which is a case at high levels).
Piercing Shot > Rapid Shot > Attack (Either normal to save MP/SP or a skill to speed up the killing) > Slow (If you have it ready) > Attack till end. Normal mobs won’t survive until any of the skills will be ready again, unless at low levels when missing is not uncommon.
As Killer: You’re archer/hunter for a reason. If something forces you into using sword…don’t fight that. You have only Sleepers Ban in melee, so if you really want to, just attack…
Party:
I will not talk about any role that is ineffective in party, thus I’ll wholly skip the “killer” and “ranged attacker” one for all but ranger/assassin which have no access to any other. Archer/hunter have few AoE skills, thus they’ll get a mix.
Remember though. Those are the BASIC guidelines. There’s no such guide that’ll be better than experience and cooperation within the party.
Fighter and Warrior:
Fighter/warrior in party usually take role of attacker, along with the chain written above. This class is really straight-forward, so the only thing that may matter is whether you need to intercept a mob running loose, or not.
If you are main (or only) damage dealer and there is a tank, leave the mob that runs wild to the tank. If you are more of a support in the damage department, or are self-tank (like in duos with healer) your priority should depend on the skills of the tank. If he’s doing his job well, he’ll regain the aggro, most likely before the mob get’s to casters. If he’s not as skillful, or didn’t notice one running stray, you need to take care of the mobs that go after the weaker casters.
Defender and Guardian:
There are fine guides on the advanced tanking techniques for tanks. You can find them here and here.
As Tank: Gather all the mobs you need, and wait in a spot for a moment (you may use Curse Raid) for mobs to gather. When they do, move a step or two back if they aren’t all tightly together. After they are as close to each other as possible, run in between them and Taunt. Remember that the spot you Taunt at should always be the same. After that use Curse Raid two times (it will fail for some surely the first time) and cast other debuffs as needed (like Darkness Blow and Silence Blow). This is the most basic, and is not so much a strategy as simply spamming AoE. There is a thing called kiting though, which is very important for strong mobs. Kiting means staying on the move after Taunt, which forces mobs to walk here and there behind you, wasting time they would attack in. If mobs don’t have AoE attacks, and the room is free, you can do large circles, stopping only rarely for using debuffs to keep the aggro. In this case, mages may be in the middle of the circle to always have mobs in range. If mobs have AoE, KEEP THEM AWAY from other party members. Running in line back and forth is less effective than in circles, but allows mages to be at the max range all the time, making it safe for them, while still giving a bit of kiting advantages. Stop Blow is used to stop the mobs while tank goes out of their range safely for the time.
As Attacker: It’s most likely impossible for a Battle-Tank to outdamage either fighter/warrior or any offensively built caster during normal grinding. That said, your role would be to support the main tank (if there is one) or just act like while soloing (if you’re self-tank as well).
Unlike fighter/warrior, you have both the skills and defense to draw mobs that run stray onto yourself (and probably even if the main tank dies, to keep all the mobs until they are finished). If a mob runs, use stop blow if you have it, to give time to the main tank for recovering aggro.
If the bunch is mixed (some caster mobs), and you have a tank, your duo can really make mobs worthless. When the tank uses Darkness Blow, you may use Silence Blow, blocking all the mobs from attacking in one go, and keeping them so when you change the order. At lvl55 with both Silence Blow and Darkness Blow at lvl3, this really shines.
Priest and Oracle:
As Healer: The most basic strategy is to always keep tank in as high healt as you can. To do so, you should cast healing (or healing prayer at higher levels) whenever the tank get’s some more serious damage. When he is close to dying even with normal heals (which may be the case when mobs deal more damage than you heal) use instant healing. Whenever you see a debuff that deals continuous damage, if your tank can stand for a bit agains’t the mobs without healing, dispell it at the first opportunity. One of them is practically like a bunch of yellows or orange mobs to a defender in itself.
When you see that mob comes after you, don’t panic unless he actually starts hitting you. It’s tanks job to take it off from you. If he doesn’t see it, other party members should take note of that, and at worst, even mage should take the mob from you. You MUST heal as much as possible, as long as your tank does get any more serious damage. If he doesn’t, why are you even there?
If you can’t cast the heal because the mobs hit’s you, move a bit and cast Heal, basically kiting the mob. Don’t EVER use Healing Prayer while under attack. Don’t EVER use Recovery on yourself. Even if you have a choice of Recovery and potion, use potion. If you have a choice of Recovery or dying…flee. There’s no way you could cast a spell but you couldn’t flee. On the other note, if you flee and the mob leaves you alone, you may return and probably will have to use Recovery on the tank.
Don’t spam healing like mad, unless you don’t have anything better to do. When mobs are yellow to tank, usually you can afford to waste mana in that way, but agains’t orange/red mobs (depending on your heals and tanks defense, aka. on modes and builds), you must get the most of every point you have. Also, use dagger, not staff. That means faster heals through less casting time in-between spells.
When tank gathers mobs, if bless is high, try to not use heals at all.
Never start of with Instant Heal or Recovery (HM and UM skill for great heal). It may be tempting, esp. with the second one, but if you do use them at wrong time (the first heal of battle for example), you won’t have them for emergency. If you need to use them at the start of battle, then you shouldn’t even try to take so many of those mobs in the first place unless your nukers/attackers are taking the mobs in first few seconds. The best time to use Recovery is when tank is at around 50-70%. If he dies fast, then it’s higher end of that. If he dies not much faster than you heal, then keep it until around half. I use Instant Heal when tank is at around 20-25% whatever the mobs, when Recovery is recharging.
If for some reason your attack will be slowed, dispel it whatever the cost. Your attack being slowed, means that you heal slower as well, which would be like making the mobs stronger. Even with strong mobs, you will be better off with wasting the time for Dispel than healing while slowed. If you will need to use Instant Heal or Recovery if you have it right AFTER the dispell.
As Tank: Unfortunately, I actually never even saw a tanking priest in the process. My best guess is simply using Stamina Leakage/Magic Missile/Magic Spot to gather the mobs while generating some aggro and Hail Storm’ing them when they get close. That’s the only instant-cast AoE aggro-generating skill priests/oracles have.
As Nuker: First of, make sure that the party chooses the right mobs for the job. Never even try to fight earth mobs if there is any single other element mob out there. Mages love earth, but Battle-Priests right the opposite.
Second, you have pretty much no AoE potential till you get Blizzard at lvl21. Remember that over the course it will be your main means of dealing damage that you can use safely at all mobs.
Third, Elemental Storm will deal lesser damage than Blizzard on all but earth mobs, until you give it element, when it’s larger base will outdamage the latter. That said, it’s cast time is shorter, so with battle taking long enough, it may outdamage water spells on non-fire mobs eventually.
Fourth, Frozen Ice deals the largest AoE damage of all the spells a priest have. It’s not without serious flaws though. You have to be close to the tank to use it, which means you’ll be within any AoE skills mobs have. This greatly limits it’s usefulness. Also, it’s long cast time means that the stronger the mobs, the less worthwile it becomes. Not only it’ll eat your MP faster but the quickly casted Elemental Storm and Blizzard Storm will outdamage it eventually (the sooner the more damage you have from stats in comparison to spells base). Two Elemental Storms with added element will deal far more damage far quicker than Frozen Ice will be able to ever hope, because at slightly slower rate (additional weapon recharge) you’ll deal damage equal to 2X (base magic attack + Elemental Shock base) compared to 1X (base magic attack + Frozen Ice base). There’s a gain to it though. It stops mobs from moving, which with cooperation from the battle-priest and defender may help the latter in surviving.
Regardless of the spell you’ll spam to deal damage, always cast Hail Storm as first spell. It’s lack of casting time will always boost the damage per second you deal.
Mage and Pagan:
As Nuker: Depends on the mobs you fight. If you are fighting earth mobs, use only wind. If you are fighting wind mobs use only fire (+ wind instant-casts). If you are fighting water mobs…you must check what will be more effective. Long cast time of earth spells but with bonus damage and stunning/pausing, or fast cast of Storm. It may vary at different levels, with different builds. Regardless of the mob you kill, if you have the MP to do so, always start the battle with your instant-cast AoE wind spells. Unless on fire mobs, it’s a very fast, and very large damage to start with. On fire mobs, those are more of a MP waste though. For fire mobs, use Meteor Storm.
As nuker, NEVER use Aura of Thorns! Absolutely NEVER!
As Tank: Here, ALWAYS use Aura of Thorns. Why the difference?! Aura of Thorns generates enormous aggro. Not only that, but it’s cheap, free and always active. Also one that damages the mobs. What drawback is there?! None, really. It works on every single mob in game, unlike taunt, you don’t have to stop to use skill on the non-aggressive mobs, no one will start casting spells before you cast “Taunt”, and even the damage is fixed. You don’t need to cast it in battle either. What that have to do?! It doesn’t stop bless from healing you.
Fire Bush is a very good skill for tanking mages as well. Why?! It’s another source of good damage. It also deals fixed damage which is important for no-int (or low-int) spellcaster. Obviously, it won’t deal anything serious, but it will keep generating even more aggro. Use it after getting the “attention” of all the mobs you want to tank, but before they get to you.
When the mobs get close to you, use Lightning and Turbulence. More damage, and more aggro?! Why not?! Unlike nuker, don’t worry about mobs element. Ideally the mob should be earth for these (or at least shouldn’t be fire), but they are more for generating aggro than damage, which is a nice bonus though.
When they are on recharge, what to do?! Nothing. All that will most likely keep the aggro for far more than needed, and if you have bless, standing still will heal your HP and MP.
So…exactly why Defenders/Guardians are better tanks?! They are neither better, nor worse. They are different.
Mages/pagans can survive far less than Defender/Guardian ever could. Less HP, no bonus rec, no shield, lesser armors defense, only one defensive skill. On the other hand, not even dedicated defender/guardian will take aggro off a dedicated mage/pagan tank, esp. aggro from a debuff-immune mobs like bossess.
Ranger and Assassin:
There are only two ways ranger/assassin can be useful currently. First is guarding the casters, which is especially important for mobs that love running lose. Unlike fighter/warrior your job is less of killing them off, more of giving time to the tank.
Fatal Hit > Halt Kick > Stun Crash > Single Hit > Fantom Assault
This chain will give you maximum stun time, and prevent caster mobs from using the spells later on.
Second is lessening a bit the damage done to tank by silencing and stunning the mobs. You may use ~ to choose a new target instead of mouse, which will simplify this. You can also use backspace to cycle between two mobs.
For melee parties, the strategy doesn’t change. Two rangers may cooperate, for one to use stun chain, and for the other to use attack chain, but that’s the extent of change worth the note.
For party with archer/hunter, it’s possible for it to attack a far off mob dealing some damage to it, and when it’s near dead, the ranger/assassin finishes the mob off, while archer/hunter starts attacking next one. This will allow melee character to stay in place without having to run after the mob losing time and attacks. This works for all melee/ranged attack combinations.
Archer and Hunter:
Technically, the only real worth noted is in party with melee characters, or other ranged attackers. Note the above ranger/assassin strategy for parties with melee. Other than that, fight exactly as you would solo.
In other parties though, you take the role of some extra damage. Remember that as you aren’t going to spam AoE skills, your priority will ALWAYS be to kill the mobs that go wild on casters. To be as much helpful as you can, you need all four AoE skills this class have. There are few issues here though. First, half of them is for bows, while other half is for crossbows/javelins. Each weapon have one skill with 20sec recharge and one with 600sec recharge. That’s not a lot of AoE, and to really use them, you need to lapis at least two weapons of different types. As far as this is viable, probably no party will really care about it.
Also, it seems that crits generate more aggro (which is only a probability). This means that party may not want you to attack the mobs other than your AoE attacks, or mobs running loose.
3) General Strategies:
In party, try to grind on yellow or orange field mobs, or on yellow dungeon mobs. Green mobs give too low exp compared to yellows, while red mobs (or oranges in dungeons) have so much damage bonus, and take so much less damage that it’s usually not worth the effort.
Solo, if you’re NM, never attack orange field mobs or yellow dungeon mobs. If you’re HM, try to grind only on yellows, with rare oranges (non-elemental oranges takes rougly the same damage as elemental yellow mobs).
Never grind on blue field mobs, whatever your mode. Probably you shouldn’t attack blue dungeon ones either. They have serious penalty to exp given, while they are NOT so much weaker.
Remember that even though ranger can kill much stronger mobs with less risk than other classess (although only if both Tetanus and Stun Crash works on them, and Gruesome Attack and Venom Strike helps too), that’s not worth the time spend to do so. Never try grinding on red mobs.
Try not to grind on mobs with continuous damage attacks, like orcs with Double Strike or Spiders with Venom, whatever class you are. Those skills always take at least 15% of your max HP, going up to even 40% from the skeletons generals in Ankykuls room for example. All mobs have their unique skills. For example, all highly armoured orcs have Pain Excruciator. Learn those skills and avoid those that have something that is too dangerous. With levels, the skills may be stronger (like whether two or three attacks from Pain Excruciator), and some mobs from map 1 get a new skill at higher levels. This doesn’t include bossess, which may differ from their normal counterparts.
Never grind on bossess. They give only slightly more exp, but are far stronger.
Watch out for bless. Unless it is full (flashing and going down) don’t try mobs that you can’t kill usually. Bless can go away right after you start fighting, and if that mob with no bless is too dangerous, you will risk dying. It’s better to wipe out safer mobs faster and with less rest.
Watch out for opponents element. If you have a choice of fighting elemental mob and non-elemental one, choose the non-elemental one. They always are dealt more damage. This is not true only if you can use element which is stronger than mobs.
Chapter 6, Items/Gear:
1) Armor/Weapon Groups:
There are three major armor groups for each side, each usable by two classess.
Armor:
Heavy Armor: Usable by tanks and attackers. This armor have the highest defense and life bonus, but low resistance bonus and no mana bonus.
Medium Armor: Usable by killer and ranged attacker. This armor have both defense and resistance that is the average of those of both other types. For example if heavy armor of one level have 16defense and 4 resistance, and robes have 4 defense and 16 resistance, medium armor have around 10 defense and resistance. This have also mediocre bonus to HP, MP and SP.
Robes: Usable by nuker and healer. This armor is the opposite of heavy armor, in that it’s defense is low and resistance is high. It have low HP, high MP and no SP boost.
AoL and UoF have all their own armor.
Weapons:
Each weapon except for dagger and staff have exactly one class with mastery in it. I will say which class have it by saying that weapon is such and such classess weapon.
1-handers- Tanks weapon. Normal attack speed, mediocre damage. Often bonuses are to str and dex. Can be used by tanks, ranged attackers and attackers. Those weapons are swords on light side, axes on fury side.
2-handers- Attackers weapon. A bit slow attack speed, high damage. Usually have high dex bonus, and low str or luc bonus. Can be used only by attackers. Those weapons are swords on light side, axes on fury side.
Duals- Attackers weapon. Normal speed, mediocre damage. Usually have str and rec or dex bonus. Can be used only by attackers. Those weapons are dual swords on light side, dual axes on fury side.
Longshaft- Attackers weapon. Very slow attack speed, very high damage. Often bonuses are to str and luc. Can be used only by attackers. Those weapons are spears on light side, sickles on fury side.
One Handed Heavy- Tanks weapon. Normal attack speed, high damage. Usually have dex and str bonuses. Can be used only by tanks. Those weapons are hammers on light side, but I don’t know what on fury side.
Two Handed Heavy- Tanks weapon. Slow attack speed, highest damage (along with thrown weapons). Usually have rec and wis bonuses. Can be used only by tanks. Those weapons are various looking, large things on both sides.
Bows- Ranged attackers weapon. Normal attack speed, mediocre damage. Usually have luc, dex and str bonuses. Can be used only by ranged attackers. Those weapons are always bows.
Thrown- Ranged attackers weapon. Slow attack speed, highest damage damage (along with two handed heavy, have lower average damage),. Usually have luc bonuses. Can be used only by ranged attackers. Those weapons are crossbows on light side, and javelins on fury side.
Daggers- No mastery. Fast attack speed, low damage. Usually have str, luc and dex bonuses. Can be used by all casters and killers. Both sides uses the same daggers.
Staffs- No mastery. Fast attack speed, mediocre damage. Usually have int and wis bonuses. Can be used by all casters. Both sides have their unique staffs.
Rogue- Killers weapon. A bit fast attack speed. Low damage. There are two rogue weapons. Claws and reverse swords. Claws usually have rec and str bonuses, while reverse swords usually have dex and luc bonuses. Both sides uses the same rogue weapons.
2) Gear Types:
Normal- Those are found from field mobs or in shops. They have no slots for lapis and no bonus stats. They can be used by all characters of appropriate class and level.
Noble- Those are found in low level dungeon. They have +1 bonus if armor, +6 if weapon and one slot for lapis. They can be used by all characters of appropriate class and level.
Worship- Those are found in low level dungeon. They have +2 bonus if armor, +12 if weapon and two slots for lapis. They can be used by all characters of appropriate class and level.
Heroic- Those are found in medium to high level dungeons and from low level dungeons bossess. They have +3 bonus if armor, +18 if weapon and three slots for lapis. They can be used by all characters of appropriate class and level.
Dread- Those are found from high level bossess and highest level dungeons. They have +5 bonus if armor, +24 if weapon and four slots for lapis. They can be used by all characters of appropriate class and level.
Legend- Those are found from highest level boss and in new PvP maps. They have +6 bonus if armor, +30 if weapon and five slots for lapis. They can be only used by HM and UM mode characters of appropriate class and level. They glow.
Goddess- They are dropped only by the strongest bossess with around 60 level. They have +7 bonus if armor, +36 if weapon and six slots for lapis. They can be used only by UM mode characters of appropriate class and level. They glow.
Drop Limited- They are dropped at various situations, mostly from boss and from map 4 mobs. They have various status bonus, number of slots and class requirements. They glow.
Epic/Quest- They are given by quests. There is 25 level epic for each class, 35 level non-epic dual for fighter and 35 level one handed heavy for defender and level 45 elemental epic weapon. They have no slots but large stat bonuses and some have faster attack speed. Level 45 epic have no stat bonus (except the healers one), but are elemental weapons (fire for fury and water for light). All lvl 45 epic except for rogue ones (that’s a cheat…) have faster attack speed. They glow.
3) Mounts:
Mounts are separate for each mode. They are gear that upon click casts a spell after which your character is mounted. If you are mounted, you can’t use any skill and you can’t attack. If you are hit by any attack, you are instantly dismounted. Missess does not dismount you, but skills that does no miss (even if they can fail) does always. You can’t use mounts in dungeons, black market and arena. Normal mounts (those bought in apulune) can’t be dropped or traded by any means, but can be sold to NPC and stored in warehouse to trade between characters on the same account.
NM mounts: They can be used by all modes. They can be used from 40 level, have very fast movement speed and have no additional spot for passenger. Normal version costs 11mil in apulune. There is one rare version.
HM mounts: They can be used by HM and UM. They can be used from 50 level, have extremally fast movement speed and have additional spot for passenger. Normal version costs 75mil in apulune. There are two rare versions.
UM mounts: They can be used only by UM. They can be used from 58 level. They are extremally fast and have additional spot for passenger. There are no normal versions. There is one uber version.
Christmas Reindeer: Usable by all modes from lvl28, have very fast movement speed and no spot for passenger, as far as I know. Limited in quantity, as was dropped only by a mob that is no longer in-game (was only for limited time).
4) Lapis and Linking:
For thread wholly made about lapis, including list of the lapis available, look here.
Lapis are gems that can be added to items with slots. They grant their bonuses to those items. Lapises have item requirements. Not every lapis can be added to every type of gear. They can be linked into those items at blacksmith. You do not need linking hammers to link lapis to gear.
Linking is the action to add lapises to a gear with slots. It can be done at any blacksmith, and needs one item with at least one free slot and at one lapis that can be linked into that particular gear (lapis limits what type of gear it can be linked into, as well as there can’t be two exact same lapis in the same piece of gear).
The link may fail, in which case lapis is lost. Few lapis also destroy gear on failure (like sonic and flash lapises).
There are few types of lapis.
Stat Lapis- Those are common lapis with levels from lvl1+. Lvl1-5 don’t break gear on failure, while lvl6+ always breaks gear on failure.
Dual Lapis- Those are new but already quite common lapis. They have are named like the common ones, and always give +9 to stat appropriate to the name, and have one of four secondary bonuses. They have linking chance of lvl4 lapis, don’t break items.
Accessory Lapis- Those give +7 to one stat, and +6 to second one. They always break item upon failure and have very poor chance of linking.
Elemental Lapis- They are either for weapons or for armors. They add element to that item and have good chance of linking with no chance of breaking item. They are very rare (there’s only one boss that drops them, always one for armor and one for weapon, respawning each 12h) and costly.
AP Lapis: Have two stats, +6 (I think) to each, never break items and have 50% chance of linking. They are bought with AP.
Special lvl6 lapis- They have special skills (like a chance of inducing sleep on attack). They can be obtained from a high level and mode non-repeatable quest or Cloron/Fantasma Dragon.
Special Lapis- There are various lapis that are obtained (at least currently) only through events. They have various effects, linking rates and break chances. They vary from sonic (granting higher speed, 1% chance to link and always break upon failure), through perfect (+X to all stats, depending on level, +7 for lvl3, don’t break gear and I heard have 50% link chance) to flash (boosts attack speed by one, but that’s all I know).
5) Disposable Items:
There are various types of disposable items. Some are made for crafting, some are one-time use healing items.
Potions:
They come as Mini-potions, Potions, Grain Potions and special potions. They heal 33%, 50% and 75% respectively. Those % are counted without adding any bonuses (from gear and buffs).
There are few types of potions-
Health- They heal HP instantly by the amount depending on their size.
Mana- They heal MP instantly by the amount depending on their size.
Stamina- They heal SP instantly by the amount depending on their size.
Super- They heal HP/SP/MP instantly by the amount depending on their size.
Those potions (or their description) is bugged. They heal fixed amount.
Super heals all three by one amount, which seems to be higher than any amount healed by the same size potions of other types.
Status Healing- There are two types. Common which heal one debuff (max stack of five) and strong that heals a couple of debuffs at once (max stack of three). Venom potion cures more poisons than the one that removes multiple debuffs with poison as well.
Arkain- Special potion which heals fully all HP/SP/MP. It have no level restriction and can’t be bought, but is given from quest and some events that was recently.
Special Potions- They are obtained either from events or from takng altars and heal by a fixed amount.
Scrolls:
Each scroll heals one, specific debuff. All (I know of) can be bougth.
Craft Items:
All of them except for a few that are used for quests have no use currently, as there is no crafting implemented in this game yet. They are sold to NPC’.
Quest Items:
There is a thread for the items used for quests, so only a link here (click anywhere on this text).
6) Warehouse:
Every account have one warehouse shared by all characters on that account. Each warehouse have three “free” tabs, and three locked tabs that can be temporarily unlocked by AP items. Each tab have 40 slots for items, for a total of 120 free slots and 120 locked slots.
You can’t put gold in warehouse, or anywhere else for that matter.
Taking items out of warehouse costs money. It’s supposed to be 5% of that items value, but that amount is bugged. It always take minimal amounts, which is more closer to 0.5%. Funny is that it works fine for lapis.
Chapter 7, Item Mall:
Item mall is the thing that keeps this game (and quite a lot of other free games) going. You buy things in it by using Aeria Points (AP for short), which must first be bougth for real life money, or won in few events/contests that are held.
1) In-Game Item Mall:
In game there are a couple of icons on the bottom right side of the screen, just above bless bar. The first of those icons (from left) looking like a bunch of coins opens a window showing this:
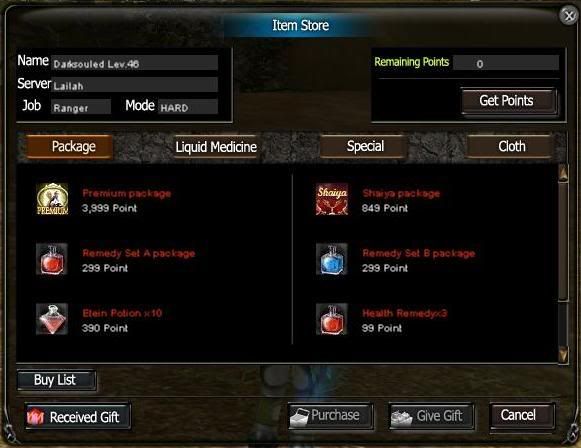
I did never buy AP, so I don’t know how to use it, more than simply what I assume is needed. Simply click on what you want to buy to highlight it and push the purchase button (probably double-clicking works as well). As this involves real life money, I assume you have to agree to the transaction in a popup window that will appear.
After the purchase, the item will be put into your inventory.
I categorized items from mall into two groups.
Nostrums (aka. NOS):
Nostrums are in-game drugs (along with their addiction element for few, watch out for your wallet). They always affect a stat of character.
Nostrums work as a long-working buffs. They have 1, 2 or 3h duration. Most vanish at the time of death, but there are some that stays even after it until their duration ends. I don’t really use nostrums, but here are couple of effects they give (it’s by no means even close to a complete list, just four examples):
KO Nos: By far the most powerful of nostrums. It gives for 2h (or until first death) 95% chance of critical. It seems that doesn’t help too much with hit rate though, as I saw defender on this nos that did hit once each four hits, and fighter that did miss on one hit each five or six.
Remedies: There is remedy for each of HP, SP and MP. They have various levels, but at the mall, there are currently sold only of lvl1. Lvl1 remedies gives 500 to the max amount of stat they are made for (at least for HP, as I am not sure whether SP and MP remedies give the same amount).
Sprint Nos: Working for 1h nos that upps the movement speed by one (to fast).
Weapon Mastery Nos: Working for 1h nos that upps the attack speed by one (Very Slow –> Slow –> A Bit Slow –> Normal –> A Bit Fast –> Fast –> Very Fast –> Extremally Fast).
“Tools”:
Various items that do not affect players stats in any way. They may give random items (various Boxes), fixed amounts and types of items (Packages), speed up exp gain (Experience Stones), affect linking/extracting rate (Linking/Extraction Hammers) and do other, mostly one-time effect. Here are a couple a bit closer:
Small Expierience Stone: The greatest HM modes characters friend, that grants a 50% bonus everytime you get exp for killing a monster for 7 days. It does not affect exp gained from quests. It also doesn’t stack with any exp stone, even one with longer/shorter duration.
Linking Hammer: Optional item for linking lapis that grants a % bonus to linking chance. It’s a percentage of the chance you have, not added % to rate (aka. if your normal chance to link is 24%, a +100% linking hammer will make that 48%, not 124%). In no case you can have more than 50% chance to link.
Extraction Hammer: The opposite of the above. It helps extract one lapis from the items. There are two of those. Big and small. Small have fixed 50% chance of extracting, while large have 80%.
Small Resurrection/Continuous Resurrection Runes: Runes used by UM mode characters (although the first one can be used by all modes as far as I know). Small Resurrection Rune is activated after death, and resurrects in town with 50% of max HP/SP/MP with no exp loss. Continuous Resurrection Rune is buff-like item that works for 3h. In those three hours, whenever you die, you are resurrected in town as per the first rune. This can be used only by UM’s.
Help the UM’s in this game and resell the runes. Both are used at various situations, so both are sold.
2) Main Site Item Mall:
This is a different item mall, and can be found here.
How to use it?! By clicking on the item, you are shown the items description. The quantity under the the items name means how much of that item is left for the week (currently, all quantity-limited items are restocked weekly). If there is no quantity value, it can be bought without limit.
How to buy something?! Just mark the box under the item named “Select” and when you select all the items you want choose “Add to cart”. You will be taken to your shopping cart with the name and price of all items you did choose. To the right there is bin icon to delete them from your cart if you made a mistake. As far as I know, to but multiple items at once you have to repeat the procedure for selecting them again. To finalize the transaction (after making sure you have enough AP left, the total is shown on the bottom of your shopping cart list) click “purchase”. To cancel the transaction, choose discard. This will remove all the items on your list.
The items you bought will be sent to your bank. You may need to relog before getting them.
Chapter 8, PvP and Bless:
I’m not actively visiting PvP maps, so I would appreciate help from the more experienced players to fix the possible errors and add information I missed.
PvP (Player VS Player) is the general name of both, fight between two players/factions, and is used for maps on which it have place.
Fights between factions (UoF VS AoL) take place on maps specifically made for those, called borderlands. There is a total of six such maps.
Proelium Frontier: Borderland for levels 1 to 15. At level 16 you have no further right (nor a way) to get into this map. If you level to 16, if you won’t leave this map at the first opportunity to do so, you are breaking the rules. Portal to this is in Keolloseu near the Gate Keeper and Blacksmith. Only lapis of first level drop in this map, and there is one relic here.
Cantabilian: Borderland for levels 20-30. You can’t use portal to this map before obtaining 20 level, nor after getting 31 level. Portal is in the middle of Arktuis Vill on map 2. Mobs here drop lapis of second level, there is one relic here, and one dungeon for each side.
D-Water Borderlands: Borderland for all levels (1-60) but that shouldn’t be visited before lvl40. Portal is at the bottom right part of map 3, but much more efficient is using gatekeeper from Presnya Manor or Apulune (Gatekeepers send to Karis Castle). Lapis of second, third and fourth level drop here (mostly three). There are two dungeons on this map, both can be visited by both factions, with each faction having their own entrace (which still can be used by all, as far as I know). There are five relics on this map.
Stable Arde: One of the new PvP maps unlocked by possessing right combination of relics in D-Water, always including the center one called Medius. This map is a jungle with dinosaurs. It’s advised to not go there as a NM, as it’s very hard, for great exp. It’s map for 54+ lvl’s. Portal to it is in Karis/Raigo castle.
Desert 1 and Desert 2: Two new maps, similar to Stable Arde. To get to Desert 2, you must go through Desert 1. It’s generally the same as Stable Arde when comparing their advised level/mode, as far as I know. Portal to it is in Karis/Raigo castle.
1) Rules:
Currently, the rules in place state that person that spawn from dungeon portal or at spawn point in castle can’t be attacked until gives sign of fully loading (using buff, talking, moving), no one can be attacked while using NPC, and players can’t hinder someone who tries to leave the map.
All general rules (ToS) does still hold true, so exploits can’t be used, for example. There is no kill stealing from other player on player kills, and there is no kill stealing from other faction.
If you seek more information, please read this thread.
2) Objectives:
The first, major objective (which, surprisingly, a lot of people forget about) is to have fun. The secondary ones are: attacking and killing players from opposite faction and taking down relics to boost bless of your own faction (which I will explain in a bit).
Player VS Player Battle: In this battle you still have penalty for attacking players of higher level, like agains’t mobs. Players are susceptible to any and all attacks of all classess. There is (currently) no immunity for players. As I’m not much of a PvP’er, this is the basic and the best explanation I can give.
Taking Relics: Relics are guarded by mobs (if neutral) or by owners guards. At the time of destruction of a relic, all it’s current guardians die. Relics respawn each 10min, it seems (at the time they are destroyed, obviously they can’t be taken by other side).
The Proelium and Cantabilian mobs/guards are very weak, and the relics can be easily destroyed by a single player. As far as D-Water goes, both the mobs and guards are very strong, and high level is advised, although a good party of lower leveled players can take it with proper gear and tactics. That said, the relics themselves are hard to damage because of high defense and resistance stats.
With each relic owned by a faction, that factions bless rises. When the bar is full, a goddess blessing takes place and all relics are destroyed, to reappear as neutral 10min later (which means no side have any bless until a relic is taken).
D-Water relics have elemental Poles that defend them. Fire pole, uses damage-dealing AoE attack. Earth pole and wind pole use debuff-inducing AoE attacks. Water pole heals all the poles and relic.
3) Bless:
Bless is a state affected by the amount of relics controled by the faction, and is shown by a bar on the bottom right side of the screen.
Bless gives various bonuses, depending on how much the faction possessess of it. At the time the bar is fully filled up, goddess blessing takes place. All effects given by it are shown on the picture:
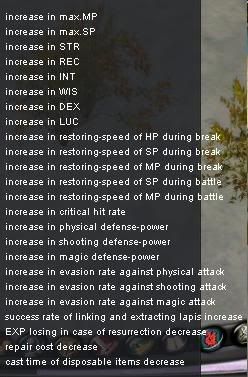
The blessing have some specyfic characteristics. When one faction have full blessing, the other have none, and for 10min cannot obtain any. After 10min of the blessing, all relics are reseted as neutral (with exception of two faction relics in D-Water which are of their own side).
There is one bless for whole faction.
PS: If you want to have a longer talk with a member of other faction, DON’T DO IT IN PvP MAP! GO TO ARENA!
Chapter 9, Capital City and Economy:
There is one capital city for each faction. For AoL it’s Apulune, while for UoF it’s Iris. You can get there from almost any gatekeeper in the game. In addition to that, in Keolloseu and Gliter (AoL and UoF towns respectively) there is free portal to it for characters up to 20lvl. Don’t know for UoF, but there is one free portal for all levels on map 2 in Arktuis Vill’s docks.
The capital city have one major characteristic. It’s the only place you can set up your indyvidual shop (which I will tell about a bit later in this chapter) and buy from other persons shops. On the streets of capital there are various NPC merchants as well. They sell pretty much every piece of gear that can be bought in the game (there are few exceptions, like the accessories from new PvP maps).
There are quests in it as well, but the only one worth noting is the lvl50 quest helmet that as a reward gives helmet for 51lvl character. The other quest is a multi-part repeatable quest that involves getting a total of 3125 Earth Alchemy Powders which can be exchanged for 1000 etin coin.
1) Exceptional Warriors Manager:
This is an NPC that can be found it capitals. After getting 16 level, here, you can exchange your PvP kills for bonus stat points. You can also get (pathetic amount of) gold depending on how many times you were killed by the other faction.
2) Opening a Shop:
To open your own shop, push “B” on your keyboard (or open sub-skills menu using the icon on bottom right) and choose Indyvidual Shop action. A shop window will open along will inventory.
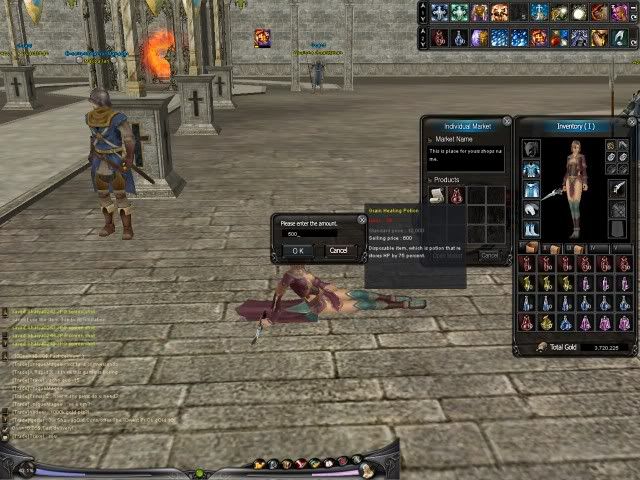
When you drop an item from inventory into the shops window, the price inputting window will open. You must input price of single item, even if you input a stack. The price shown on the window will multiply the price of single item by the amount of items in stack (like on the screen, with the price of that potion being 200, there are three in that stack, so it shows 600).
After inputting all the items you want and adding the name of shop, choose the option “Open Shop”. To close it, either stand up or use the button “Cancel”.
Shop can be opened only in capital city and black market.
3) Black Market:
Black market can be reached from a gatekeeper that is in merchant part of the capital. Both factions can meet in black market and sell items to the other side.
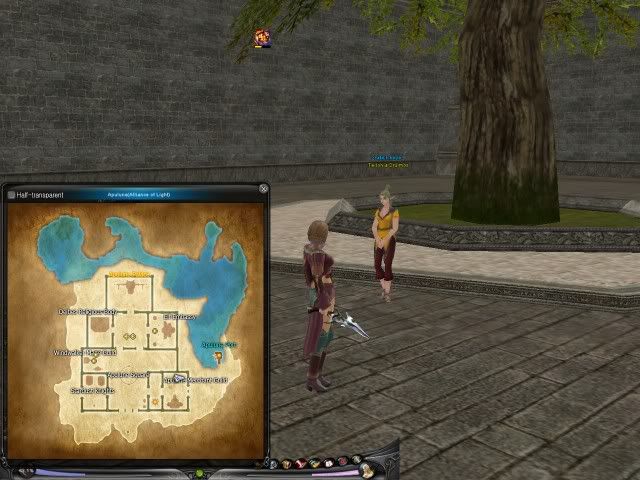
UoF
Selling in black market involves 5% fee.
4) Arena:
The same gatekeeper that sends you to black market takes you also to arena. It’s the only place where AoL and UoF can meet safely. All battles there must be initialized by “Duel” option. This does not bring kill/death points, but does win/lose from duels. If you want to talk with your friend from other faction, go to arena. In black market you make it harder to buy/sell, and in PvP no one have a reason to not attack you because you chose to make a picnic.
Chapter 10: In-game Item Mall Items:
Package:
Premium package
In-Game Description: This package include Double Warehouse, Etein Potion, Stamina Remedy, Health Remedy, Mana Remedy, Large Increase EXP, Large Prevent of EXP Drop, Large Prevent of Item Drop, Small Resurrection Rune, Linking Hammer Lv1, Party Member Summon Rune, Movement Rune, Rapis item.
Cost: 3999 AP
Shaiya package
In-Game Description: This package include Etein Potion, Small Increase EXP, Small Prevent of EXP Drop, Small Increase Drop Gold.
Cost: 849AP
Remedy Set A package
In-Game Description: This package is for over 16lv users who is attacker with close and long range.
This one include Strength Remedy, Reaction Remedy, Dexter Remedy, Lucky Remedy.
Cost: 249AP
Remedy Set B package
In-Game Description: This package is for over 16lv users who are likely to use magic in game.
This one include Intelligence Remedy Lv2, Wisdom Remedy Lv2, Reaction Remedy Lv2, Lucky Remedy Lv2.
Cost: 249AP
Etein Potion X10
In-Game Description: Restores HP, SP, MP by 75% each.
Description: These potions use the same recharge timer as Great Potions and Arkain Potions. It heals the % amount of each, as noted.
Cost: 299AP
Health RemedyX3
In-Game Description: Increases HP by 500 for 3 hours. Effect vanishes after first death. Restricted to character currently in use.
Description: After use, the characters maximum health rise by 500 for 3 hours. Only the character that used it have it’s effect. It is not persistent, so like buffs, death ends it prematurely. When maximum health drops in the game, the current HP does not change unless it’s higher than the new max amount. The effect, as far as I know, does run in game time (logging off stops it).
Cost: 99AP
Stamina RemedyX3
In-Game Description: Increases SP by 600 for 3 hours. Effect vanishes after first death. Restricted to character currently in use.
Description: After use, the characters maximum stamina rise by 600 for 3 hours. Only the character that used it have it’s effect. It is not persistent, so like buffs, death ends it prematurely. When maximum health drops in the game, the current HP does not change unless it’s higher than the new max amount. The effect, as far as I know, does run in game time (logging off stops it).
Cost: 99AP
Mana RemedyX3
In-Game Description: Increases MP by 700 for 3 hours. Effect vanishes after first death. Restricted to character currently in use.
Description: After use, the characters maximum mana rise by 700 for 3 hours. Only the character that used it have it’s effect. It is not persistent, so like buffs, death ends it prematurely. When maximum health drops in the game, the current HP does not change unless it’s higher than the new max amount. The effect, as far as I know, does run in game time (logging off stops it).
Cost: 99AP
Clean Hit Nostrum
In-Game Description: Increases physical, shooting attack-power by 65 for 3 hours. Effect vanished after first death.
Description: After use, the characters minimum and maximum physical attack rating rises by 65 for 3 hours. Only the character that used it have it’s effect. It is not persistent, so like buffs, death ends it prematurely. The effect does run in game time (logging off stops it).
Cost: 149AP
Defense Nostrum
In-Game Description: Increases physical, shooting defense-power by 50 for 3 hours. Effect vanishes after first death.
Description: After use, the characters defense and resistance rating increases by 50 for 3 hours. Only the character that used it have it’s effect. It is not persistent, so like buffs, death ends it prematurely. The effect does run in game time (logging off stops it).
Cost: 149AP
Wizardship Nostrum
In-Game Description: Increases magic attack-power by 65 for 3 hours. Effect vanishes after first death.
Description: After use, the characters minimum and maximum magic attack rating rises by 65 for 3 hours. Only the character that used it have it’s effect. It is not persistent, so like buffs, death ends it prematurely. The effect does run in game time (logging off stops it).
Cost: 149AP
Sprint Nostrum
In-Game Description: Increases moving-speed slightly for 1 hour. Effect vanishes after first death.
Description: After use, the characters speed on foot rises by one level to fast for 1 hour. Only the character that used it have it’s effect. It is not persistent, so like buffs, death ends it prematurely. The effect does run in game time (logging off stops it). It is cumulative with Sonic lapis and Sprint, but speed on foot can never be more than very fast. That said, if speed is lowered by a debuff, extra level of speed does kick in.
Cost: 99AP
Weapon Mastery Nostrum
In-Game Description: Increases attack-speed for 1hour. Effect vanishes after first death.
Description: After use, the characters attack speed rises by one for 1 hour (Very Slow > Slow > A Bit Slow > Normal > A Bit Fast > Fast > Very Fast > Extremely Fast). Only the character that used it have it’s effect. It is not persistent, so like buffs, death ends it prematurely. The effect, does run in game time (logging off stops it). You can’t ever attack faster than Extremally Fast, that said this NOS stacks with all other attack speed buffs.
Cost: 149AP
Knockout Nostrum
In-Game Description: Increases physical, shooting, magic critical hit rate for 2 hours. Effect vanishes after first death.
Description: After use, the characters critical hit rate with all attacks that does not have fixed damage becomes 95% for 2 hours. Only the character that used it have it’s effect. It is not persistent, so like buffs, death ends it prematurely. The effect does run in game time (logging off stops it). Criticals do not assure the hit is successful, and luck is still used to calculate damage. Minimum bonus damage on critical (with no added luck) is 50%.
Cost: 299AP
Sharp Shooter Nostrum
In-Game Description: Increases shooting success rate for 4 hours. Effect vanishes after first death, and its accuracy rate won’t be higher than 95%.
Description: After use, the chance of hitting with a physical ranged attack is 95% for 4 hours (there is no 100% in this game). Only the character that used it have it’s effect. It is not persistent, so like buffs, death ends it prematurely. The effect does run in game time (logging off stops it).
Cost: 199AP
Black Art Nostrum (Bugged Item)
In-Game Description: Increases magic success rate for 4 hours. Effect vanishes after first death, and its accuracy won’t be higher than 95%.
Description: This item does not work. It’s price is to prevent anyone from buying it.
Cost: 999999AP (Not for sale…)
Concentration Nostrum
In-Game Description: Increases physical success rate for 4 hours. Effect vanishes after first death, and its accuracy rate won’t be higher than 95%.
Description: After use, the chance of hitting with a physical melee attack is 95% for 4 hours (there is no 100% in this game). Only the character that used it have it’s effect. It is not persistent, so like buffs, death ends it prematurely. The effect does run in game time (logging off stops it).
Cost: 199AP
Strength RemedyLv1
In-Game Description: Increases STR by 20 for 2 hours. Effect vannishes after first death.
Description: After use, the strength stat of the user rises by 20 for 2 hours. Only the character that used it have it’s effect. It is not persistent, so like buffs, death ends it prematurely. The effect does run in game time (logging off stops it).
Cost: 149AP
Reaction RemedyLv1
In-Game Description: Increases REC by 15 for 2 hours. Effect vanishes after first death.
Description: After use, the reaction stat of the user rises by 15 for 2 hours. Only the character that used it have it’s effect. It is not persistent, so like buffs, death ends it prematurely. The effect does run in game time (logging off stops it).
Cost: 149AP
Dexterity RemedyLv1
In-Game Description: Increases DEX by 15 for 2 hours. Effect vanishes after first death.
Description: After use, the dexterity stat of the user rises by 15 for 2 hours. Only the character that used it have it’s effect. It is not persistent, so like buffs, death ends it prematurely. The effect does run in game time (logging off stops it).
Cost: 149AP
Lucky RemedyLv1
In-Game Description: Increases LUC by 15 for 2 hours. Effect vanishes after first death.
Description: After use, the luck stat of the user rises by 15 for 2 hours. Only the character that used it have it’s effect. It is not persistent, so like buffs, death ends it prematurely. The effect does run in game time (logging off stops it).
Cost: 149AP
Intelligence Remedy Lv1
In-Game Description: Increases INT by 20 for 2 hours. Effect vanishes after first death.
Description: After use, the inteligence stat of the user rises by 20 for 2 hours. Only the character that used it have it’s effect. It is not persistent, so like buffs, death ends it prematurely. The effect does run in game time (logging off stops it).
Cost: 149AP
Wisdom RemedyLv1
In-Game Description: Increases WIS by 20 for 2 hours. Effect vanishes after first death.
Description: After use, the wisdom stat of the user rises by 20 for 2 hours. Only the character that used it have it’s effect. It is not persistent, so like buffs, death ends it prematurely. The effect does run in game time (logging off stops it).
Cost: 149AP
Clean Hit Nostrum XT
In-Game Description: Increases physical, shooting attack-power by 50 for 1 hour. Effect remains after character dies.
Description: This actually gives Clean Hit Lvl1 nostrum. After use, all types of attack ratings (magical and physical, both melee and ranged) rise by 50 for 1 hour. Only the character that used it have it’s effect. It is persistent, so unlike buffs, death does not end it prematurely. The effect does run in game time (logging off stops it). It stacks with Clean Hit Nostrum and Wizardship Nostrum.
Cost: 249AP
Defense Nostrum XT
In-Game Description: Increases physical, shooting, magic defense-power by 50 for 1 hour. Effect remains after character dies.
Description: This actually gives Defense Nostrum Lvl1. After use, both defense and resistance ratings rise by 50 for 1 hour. Only the character that used it have it’s effect. It is persistent, so unlike buffs, death does not end it prematurely. The effect runs in real life time, as far as I know (logging off does not stop it).
Cost: 249AP
Huckeberry’s Power Lv1
In-Game Description: Increases STR, REC by 3 each for 10 minutes. Its effect will vanish when dead. Restricted to characters currently in use.
Description: After use, the strength and reaction stats of the user rise by 3 each for 10 minutes. Only the character that used it have it’s effect. It is not persistent, so like buffs, death ends it prematurely. The effect does run in game time (logging off stops it). It can’t be traded or dropped, but can be put into warehouse.
Cost: 49AP
Eihcim’s Competence Lv1
In-Game Description: Increases DEX, LUC by 3 each for 10 minutes. Its effect will vanish when dead. Only restricted to characters currently in use. Description: After use, the dexterity and luck stats of the user rise by 3 each for 10 minutes. Only the character that used it have it’s effect. It is not persistent, so like buffs, death ends it prematurely. The effect does run in game time (logging off stops it). It can’t be traded or dropped, but can be put into warehouse.
Cost: 49AP
Ventsol’s AbilityLv1
In-Game Description: Increases INT, WIS by 3 each for 10 minutes. Its effect will vanish when dead. Restricted to character currently in use. Description: After use, the intelligence and wisdom stats of the user rise by 3 each for 10 minutes. Only the character that used it have it’s effect. It is not persistent, so like buffs, death ends it prematurely. The effect does run in game time (logging off stops it). It can’t be traded or dropped, but can be put into warehouse.
Cost: 49AP
Liquid Medicine
Blue Dragon Charm
In-Game Description: After activating the Blue Dragon Charm causes EXP to decrease by only 1 percent after dying, increases EXP gain by 20 percent, and gives 2 possible Recorded Points.
Description: After use, death will never decrease the EXP for more than 1%, character will get 20% more EXP for killing monsters (but not from quests) and player will be able to choose 2 Recorded Points. After recording a point, player can use Teleportation Stone to instantly teleport to one of those. This is persistent, so does not vanish after death. It does run in real time (so logging of does not affect the countdown), and does work for 10 days. Any one Charm can be used with one Experience Stone.
Cost: 799AP
White Tiger Charm
In-Game Description: After activating the Blue Dragon Charm causes EXP to decrease by only 1 percent after dying, increases EXP gain by 20 percent, and gives 4 possible Recorded Points and increases the chance of gold Drops from mobs by 20 percent.
Description: After use, death will never decrease the EXP for more than 1%, character will get 20% more EXP for killing monsters (but not from quests), chance of mob dropping gold pile will be 20% more (or…the gold dropped will be increased by 20%…not sure, sorry…) and player will be able to choose 4 Recorded Points. After recording a point, player can use Teleportation Stone to instantly teleport to one of those. This is persistent, so does not vanish after death. It does run in real time (so logging of does not affect the countdown), and does work for 30 days. Any one Charm can be used with one Experience Stone.
Cost: 1799AP
Red Phoenix Charm
In-Game Description: After activating the Phoenix Charm prevents EXP loss from dying, increases EXP gain by 20 percent, increases gold dropped from mobs by 50%, gives 4 possible Recorded Points and doubles the warehouse size.
Description: After use, death will never take any amount of experience, character will get 20% more EXP for killing monsters (but not from quests), the gold dropped will be increased by 50%, this character will be able to put items into 4th, 5th and 6th warehouse tab and player will be able to choose 4 Recorded Points. After recording a point, player can use Teleportation Stone to instantly teleport to one of those. This is persistent, so does not vanish after death. It does run in real time (so logging of does not affect the countdown), and does work for 30 days. Any one Charm can be used with one Experience Stone.
Cost: 2799AP
Teleportation Stone X5
In-Game Description: Activates Recorded Point window in which you can save map points or move to saved map points. Cannot use to move to dungeons or level restricted area.
Description: Opens the point selection screen on which you can either record the position the character stands in, or teleport to previously Recorded Point. You can’t teleport to a place to which you can’t get at the current time, or to dungeon.
Cost: 99AP
Uber Mystery Box
In-Game Description: Some of the most used items in Shaiya pulled at random. Also your chance to get a rare mount.
Description: Right-clicking it gives a random item from a specific list. Very often that item being a single Etein Potion. Very rarely gives a Blue Dragon mount. If you want a rare mount for a different race, send in a ticket with the information, and a GM will change it to a proper one.
Cost: 599AP
Small Increase EXP
In-Game Description: Obtains 1.5 times EXP for 7 days, and effect remains even after death. Max. EXP cannot exceed 200 percent. Restricted to character currently in use.
Description: During the 7 day duration all experience gained from killing monsters will be higher by 50%. There is no limit on how much experience can be gained through it. The clause means that multiple experience-boosting items can’t ever give more than double the original experience for each kill. Only the character that used this item get this benefit. The effect is persistent and death does not end it prematurely. It counts in real life time, so logging of doesn’t stop it. Any one Experience Stone can be used with any one Charm.
Cost: 499AP
Resurrection Rune
In-Game Description: Resurrect in the nearest town or dead point with 50 percent of HP, SP, MP. For Ultimate Mode characters, they will resurrect in the town automatically. Restricted to characters in possession.
Description: After a character with resurrection rune in inventory dies, he have option to be resurrected in nearest spawn point (usually town) with 50% of HP, SP and MP. HM and NM characters have option to be resurrected on the spot they died or in spawn point. The character doesn’t lose any experience and the item is consumed. If character does not resurrect within the 3min time, the item is not consumed for HM or NM, and is used automatically for UM. If UM dies and is disconnected, the item is used automatically.
Cost: 249AP
Party Member Summon Rune X5
In-Game Description: Summons a party member to the user’s point. Does not work in some borderlands.
Description: After a character uses this (it does have short cast time) all other members of the same party have an option to instantly teleport to the spot in which the item was used. The window stays for 30 seconds, and it may be used during that time, canceled (for the one person only) or ignored with the option lost after the time ends.
Cost: 49AP
Movement Rune X5
In-Game Description: Makes the user move to a party member’s point. Does not work in some borderlands.
Description: After use the user instantly teleports to a chosen member of party (use party tab).
Cost: 49AP
Linking Hammer
In-Game Description: Links lapis with items at 2X current chance of success. Max. possibility doesn’t exceed 50% in any circumstance.
Description: Doubles the % chance of linking the lapis. If the chance to link it is 26 or higher, after use of the hamer the chance will be 50%. Single use item, not required to link lapis.
Cost: 299AP
Small Eternal Endurance
In-Game Description: Items’ Endurance will not decrease for 7 days. Effect remains even after dying. Restricted to character currently in use.
Description: After use, for 7 days, no item in possiession will lose endurance, which prevents lessening it’s effectiveness through use. Works only for the character who used it. The item is persistent and counts in real life time.
Cost: 249AP
Prevent of Item Drop
In-Game Description: Prevents items in Inventory from dropping for 1 day even after character dies. Effect will not be removed after character dies. Restricted to characters currently in use.
Description: For 1 day, character does not drop any item when killed by a member of other faction. Only the character that used it gains it’s benefit. The item is persistent and counts in real life time.
Cost: 99AP
Small Prevent of Item Drop
In-Game Description: Prevents items in Inventory from dropping for 7 days. Effect remains even after dying. Restricted to characters currently in use.
Description: For 7 days, character does not drop any item when killed by a member of other faction. Only the character that used it gains it’s benefit. The item is persistent and counts in real life time.
Cost: 199AP
Warehouse Call Rune
In-Game Description: Allows user to access the Warehouse for five minutes without having to speak with the Warehouse Caretaker. One use per Rune.
Description: Allows to open warehouse regardless of the place it’s used in, but only once and for no more than 5 minutes.
Cost: 199AP
Prevent of EXP Drop
In-Game Description: Prevents EXP from dropping for 24 hours even when dead. Effect remains even after character dies.
Description: For 1 day, character does not lose any experience when it dies. Only the character that used it gains it’s benefit. The item is persistent and counts in real life time.
Cost: 99AP
Small Prevent of EXP Drop
In-Game Description: Prevents EXP loss from dying for 7 days. Effect remains even after dying.
Description: For 7 days, character does not lose any experience when it dies. Only the character that used it gains it’s benefit. The item is persistent and counts in real life time.
Cost: 598AP
Repair Hammer
In-Game Description: Instantly repairs endurance of all equipped item.
Description: All equipped items endurance is brought to max without any additional costs and without having to visit a blacksmith. One time use.
Cost: 24AP
Double Warehouse
In-Game Description: Doubles the warehouse size for 30 days. After 30 days, items can still be seen but not removed from the warehouse until used again. Restricted to characters currently in use.
Description: Character that used this may put items into the 4th, 5th and 6th Warehouse tabs for 30 day. Any character can take them out though, it seems.The item is persistent and counts in real life time.
Cost: 399AP
Small Increase Drop Gold
In-Game Description: Increases Gold dropped from mobs by 100 percent for 7 days. Restricted to characters currently in use.
Description: For 7 days, doubles all the gold character get’s from monsters. Only affects character that used it. It’s persistent and counts in real life time.
Cost: 299AP
Mini Sun EXP Stone
In-Game Description: Obtains 1.5 times EXP for 1 hour, and effect remains even after character dies. Max. EXP cannot exceed 200 percent. Restricted to characters currently in use.
Description: During the 1 hour duration all experience gained from killing monsters will be higher by 50%. There is no limit on how much experience can be gained through it. The clause means that multiple experience-boosting items can’t ever give more than double the original experience for each kill. Only the character that used this item get this benefit. The effect is persistent and death does not end it prematurely. It counts in real life time, so logging of doesn’t stop it. Any one Experience Stone can be used with any one Charm.
Cost: 99AP
Small Sun EXP Stone
In-Game Description: Obtains 1.5 times EXP for 12 hours, and effect will remain even after character dies. Max. EXP cannot exceed 200 percent. Restricted to characters currently in use.
Description: During the 12 hour duration all experience gained from killing monsters will be higher by 50%. There is no limit on how much experience can be gained through it. The clause means that multiple experience-boosting items can’t ever give more than double the original experience for each kill. Only the character that used this item get this benefit. The effect is persistent and death does not end it prematurely. It counts in real life time, so logging of doesn’t stop it. Any one Experience Stone can be used with any one Charm.
Cost: 199AP
Mysterious Charm
In-Game Description: Gives 1 Linking Hammer that randomly increases the possibility of successful linking by 10~200%. Double click to activate.
Description: Gives one random linking hammer from lvl1 to 5, as far as I know. For description of their effect, see here.
Cost: 99AP
Continuous Resurrection Rune
In-Game Description: Resurrects character in the nearest town with 50 percent of HP, SP, MP for 3 hours after use. Can only be used with Ultimate Mode characters.
Description: Grants the effect of Resurrection Rune for 3 hours, regardless of the number of deaths. This item must be activated BEFORE first death. Only UM characters can use it. This is persistent and works in games time (it does not count down while logged off).
Cost: 349AP
Capital Movement Stone
In-Game Description: Moves to Capital city.
Description: Have few second casting time after which it instantly teleports to capital city (Apulune for AoL or Iris for UoF). Can also be bought from Apulune/Iris Accessory Merchant.
Cost: 299AP
Bootleggery Movement Rune X10
In-Game Description: Moves to the Bootleggery area.
Description: Have few second casting time after which it instantly teleports to black market. Can also be bought from Apulune/Iris Accessory Merchant.
Cost: 299AP
Arena Movement Stone X10
In-Game Description: Moves character to Arena area.
Description: Have few second casting time after which it instantly teleports to arena. Can also be bought from Apulune/Iris Accessory Merchant.
Cost: 299AP
Special:
Small Extraction Hammer
In-Game Description: Use this hammer to extract Lapis with a fair success rate.
Description: Extracts a single lapis from the item with fixed, 50% chance. If the lapis normally breaks items on failed link, it WILL break item on failed extraction, and Lucky Charms does NOT prevent it. Single use item.
Cost: 349AP
Large Extraction Hammer
In-Game Description: Use this hammer to extract Lapis with an excellent success rate.
Description: Extracts a single lapis from the item with fixed, 80% chance. If the lapis normally breaks items on failed link, it WILL break item on failed extraction, and Lucky Charms does NOT prevent it. Single use item.
Cost: 499AP
Lucky Charm
In-Game Description: Keeping this item in your inventory will protect your items from breaking when attempting to combine them with Lapis.
Description: If lapis you try to link does break gear on failed link and this charm is in inventory, you have option of using it. Regardless of success or failure, this charm is consumed and the item is not broken (it’s a single use item). This does not prevent lapis from breaking, and it doesn’t prevent breaking of item in any other way (currently, by extraction).
Cost: 999AP
Mysterious Lapis Pocket
In-Game Description: After activating randomly gives a Lapis (Lv1~Lv5).
Description: Gives a random lapis from lvl1 to lvl5. Also, have a VERY small chance of giving elemental lapis.
Cost: 199AP
Big Firecracker
In-Game Description: Shoots off big firecracker when double clicked.
Cost: 24AP
Love Firecracker
In-Game Description: Shoots off firecracker of love when double clicked.
Cost: 24AP
Jumbo Firecracker
In-Game Description: Shoots off jumbo Firecracker when double clicked.
Cost: 24AP
SK Butterfly Firecracker
In-Game Description: Shoots off SK Butterfly Firecracker when double clicked.
Cost: 24AP
Cloth:
For capes descriptions, look here.
Termit long mantle
Cost: 2999AP
Skay Long mantle
Cost: 3399AP
Zubelyou Long Cape
Cost: 2999AP
Bestong Long Cape
Cost: 3399AP
Phukey Long Cape
Cost: 2999AP
Hermit Long Cape
Cost: 3399AP
Cape of Revenge
Cost: 2999AP
Cape of Vengeance
Cost: 3399AP
Cape of the Feral
Cost: 2999AP
Cape of the Savage
Cost: 3399AP
Cape of Virtue
Cost: 2999AP
Cape of Sancitude
Cost: 3399AP
Normal Item Pocket
In-Game Description: Gives a random item for characters in Normal Mode. Double click to activate.
Description: Item was made unavailable due to complains.
Cost: 999999AP (Not for sale…)
Hard Item Pocket
In-Game Description: Gives a random item for characters in Hard Mode. Double click to activate.
Description: Item was made unavailable due to complains.
Cost: 999999AP (Not for sale…)
Ultimate Item Pocket
In-Game Description: Gives a random item for characters in Ultimate Mode. Double click to activate.
Description: Item was made unavailable due to complains.
Cost: 999999AP (Not for sale…)
Skill Initialization Stone
In-Game Description: Resets distributed skill points and places them back into the Usable Point pool. In order to initialize it, you must empty the 3rd, 4th and 5th Inventory tab. Restricted to characters currently in use.
Description: Resets all skill points, so player can redistribute them. You can use this item only if you have no items in backpacks tabs 3-5, as they will no longer be accessible. Single use item.
Cost: 799AP
Stats Initializing Stone
In-Game Description: Resets Characters Stats. For status received from the Excellent Warriors Manager, you must go back to the manager and get it again. Restricted to characters currently in use.
Description: Resets all stat points, so player can redistribute them. You don’t get to redistribute the automatic point per level from class. If you have rank, you must go to Exceptional Warrior Manager again, to regain stat points gained through him. Single use item.
Cost: 799AP
Appearance Change Scroll
In-Game Description: Allows you to change your character’s appearance.
Description: Allows to change existing characters appearance, giving few extra options not available at character creation.
Cost: 299AP
Sex Change Scroll
In-Game Description: Allows you to change your character’s s.e.x and appearance.
Description: Allows to change existing characters gender, as well as it’s appearance, giving few extra options not available at character creation.
Cost: 599AP
Name Change Stone
In-Game Description: Allows player to change their character’s name. Game will be exited and player will be taken to the character screen where the new character name will need to be entered.
Description: Allows to change existing characters name. All players who have the character on buddy list will have the updated name automatically.
Cost: 999AP
Mini Mystery Box
In-Game Description: This is Open Beta event for Shaiya Game!!! Nobody knows which items will be appeared.
Description: Gives random item from a specific list. To my knowledge, nothing of worth.
Cost: 24AP
Jumbo Mystery Box
In-Game Description: This is Open Beta event for Shaiya Game!!! Nobody knows which items will be appeared.
Description: Gives random item from a specific list. To my knowledge, nothing of worth.
Cost: 249AP

Recent Comments