Pokemon Sword and Shield Breeding Guide (Natures, IVs & EVs)
by Tsumiiya
Hi All, Miiya here! Hope you’re all well. I wanted to document how to properly breed in pokemon sword and shield as it’s a topic that’s spoken about at length and quite intimidating to get into. Hopefully this guide helps with any queries you may have – any questions feel free to contact me on discord at any time (Miiyabee#1074). With that out of the way, please see the below guide on how to create a competitive pokemon!
Basics
What are natures and IVs/EVs? What do they do? Allow me to help explain!
Natures: Every Pokemon is born or caught with a nature. A nature will increase the stat growth for one stat, and lower the growth in another. What this means is that your Pokemon will have a higher Sp. Atk stat if it has a nature that benefits Sp.Atk, however, this will also lower a stat as well depending on the chosen nature. These are also personality types for a Pokemon to give them some character! There are ways to influence Nature, but we will get to that shortly.
IVs (Individual Values): When a Pokemon is caught or bred it is given IV values – these reflect stat growth for a specific stat. Most Pokémon caught in the wild have lower IV values than one that is either a raid pokemon, or a bred pokemon. Each value will range from 0-31, in most cases you can only have 5 stats with an individual value of 31. An exception to this rule is if one of the parents has 6 IVs – fret not, however, 5 is the most you will need!
EVs (Effort Values): Effort values are used to increase a stat. While IVs increase the growth rate, EVs actively add to that stat. You are given a total of 510 effort values to distribute as you please. There are multiple ways to gain EVs as we’ll explain below, however all you’ll need to know for now is that a single stat can have an EV of 252, so in theory you can split this so two stats have 252 and fill the final few points in a stat of your choosing.
That’s a lot to take in already, so we’re going to cover the basics now. Our goal here is to create a viable Pokemon, for all the examples used in this guide we’re going to take our good old friend Scorbunny and applying what we learn to create a competitive fire bunny.
Breeding Basics
Pokemon breeding is simple at first but for competitive there are a lot of intricacies that show their face when you start looking into it deeper. I’ve been doing breeding since the Ruby/Sapphire/Emerald stage and I feel like I have a good understanding of the process and want to get this across to others. Let’s go over the basics first;
- Pokemon of different genders can breed with one another to create a Pokemon egg. This egg will hatch into one of the parent Pokemon (if differing parents, results will vary)
- Nearly all Pokemon can breed with a Ditto (exceptions are baby Pokemon, mythicals and legendaries
- On the topic of Ditto, while I won’t be covering it in this guide, a foreign ditto (differing language) increases the chance of breeding a shiny pokemon.
- Genderless pokemon (such as Klingklang) can only breed with Dittos, not with each other. Sorry Klingklang!
Ditto
Let’s now cover where to get started. In sword and shield, Dittos are found in the grass in the wild area – more specifically the Lake of Outrage. They have a 10% chance to spawn in the overworld grass and a 2% encounter chance through grass encounters – unfortunately, you’ll need to have obtained 7 gym badges before gaining access to this area. These dittos will largely have bad IVs but are a good place to get started if you simply want to breed evolved Pokemon for their earlier stages (that’s for you pokedex completionists out there).
If you’re looking for a good IV ditto, there are 2 options;
- An overworld ditto may have a ‘yellow aura’. This means it has better potential than Pokemon around it. To explain simply, it will have some ‘Best IVs’. Usually glowing Pokemon have 2 Best IVs (31 in that stat), they can have more but for the large part it’s between 2 and 4.
- A raid ditto of 4* and up has a high chance of having a guaranteed 4 best IVs. If you are part of the sword and shield discord, many players share their raids and allow discord members to join in – going as far as to reset ditto runs so everyone can get one, highly recommend joining this community! (Discord link here: https://discord.gg/JjXjcGy)
Starting Out
Now that we know where to find out ditto, let’s quickly touch upon the other things you’ll need to start breeding competitive pokemon;
- IV Checker/Judge Feature: Found in the post-game’s Battle Tower after winning 6 matches in the tower, this quality of life fix helps us check our pokemon’s stats on the go. The game refers to this feature as the ‘Judge’ feature and will allow any pokemon’s IVs to be viewed in the boxes. Simply press + when hovering over a Pokemon in a box and it will display a list of stats with a 1-2 word rating next to it. We are looking for ‘Best’. Best means that Pokemon has 31 IVs in that stat.
- Destiny Knot: Found in Hammerlocke’s central pokemon centre (and costing 10BP), this item is used to transfer IVs from parent pokemon to offspring. When held by a Pokemon in the day care, five of the parent’s combined twelve IVs will be passed down to the child. We’ll cover this in depth slightly later, but for now know this is an essential item to competitive breeding.
- Everstone: Found on Route 5 or through a pokemon giving you a gift once returning from a PokeJob (found in Rotom PC), when held by a Pokemon in the daycare it will guarantee its nature to be passed down to the offspring.
Nature Breeding
Nature breeding would, ideally, come first. Regardless of IVs, to start with, we are looking for a specific nature to save us 50 BP down the line (cost of 1 nature mint, more on that later). By giving a Pokemon an everstone when breeding, we can pass that Pokemon’s nature down to any and all offspring. In most cases we’re going to be unlucky to start with, and by that I mean our chances of having the correct nature pokemon immediately are 1/25 which further increases to 2/50 if we’re counting the secondary parent/ditto. This means we’re going to have to hatch a bunch of Pokemon to ‘fish’ for the correct nature. We’re not too worried about the IVs at this stage, however, while we are ‘fishing’ for the correct nature you can attach a destiny knot to the ditto to at least get some IVs passed down to speed up the next stage.
List of Natures:
| Nature | Increased Stat | Decreased Stat |
| Hardy | ||
| Lonely | Attack | Defence |
| Brave | Attack | Speed |
| Adamant | Attack | Sp. Attack |
| Naughty | Attack | Sp. Defence |
| Bold | Defence | Attack |
| Docile | ||
| Relaxed | Defence | Speed |
| Impish | Defence | Sp. Attack |
| Lax | Defence | Sp. Defence |
| Timid | Speed | Attack |
| Hasty | Speed | Defence |
| Serious | ||
| Jolly | Speed | Sp. Attack |
| Naïve | Speed | Sp. Defence |
| Modest | Sp. Attack | Attack |
| Mild | Sp. Attack | Defence |
| Quiet | Sp. Attack | Speed |
| Bashful | ||
| Rash | Sp. Attack | Sp. Defence |
| Calm | Sp. Defence | Attack |
| Gentle | Sp. Defence | Defence |
| Sassy | Sp. Defence | Speed |
| Careful | Sp. Defence | Sp. Attack |
| Quirky |
Example for Nature Breeding: We’re looking to create a competitive Cinderace, so let’s focus our attention onto Scorbunny. Scorbunny’s best abilities are its attack and speed, boasting a 71 and 69 respectively in its base stats (note: for base stats, I advise looking on serebii or bulbapedia for these! Great resources). As we won’t need special attack, we are free to abuse this by making our nature lower special attack. Due to this, Scorbunny’s best natures would be either Adamant for a harder-hitting Cinderace or Jolly for a quicker Cinderace to get those first hits in.
IV Breeding
Now that we’ve got our correct nature, let’s work on getting those IVs up. At this point you should have the following;
- A Pokemon with the nature you wish to breed
- Either a high IV Ditto or a High IV opposing gender off-spring from ‘fishing’ for the nature (either will be fine)
Our set up will change slightly now; give the correct nature pokemon the everstone, and the other Pokemon (be it ditto or an opposed gender) the destiny knot. What we’re aiming to do now is to ensure that all eggs will be the right nature (in our example, we’ll be aiming for Jolly) and have 3+IVs. From here on out examples are quite hard to give without actually going through the process. The offspring will vary from good IV to bad IV and this will be trial and error. What you’re looking for is either;
- A Pokemon with more IVs that the ‘nature parent’ (a term we’ll be using for the Pokemon we are passing down the nature from)
OR - A Pokemon with better IVs than the ‘destiny knot parent’.
This stage has a lot of swapping taking place. Largely the ditto will be used in the early stages of IV Breeding. Let’s use an example to get this across below.
Our male Scorbunny, holding an everstone, (for complexity’s sake) has no ‘Best’ IVs – Instead, they are ranging from decent to pretty good. Our Ditto, holding destiny knot, has Best IVs in HP, Attack, Sp. Attack and Speed. By pairing these together, all offspring will have the Jolly nature and IVs passed down from both parents.
In this example, out of our first hatched set of Scorbunny’s, our best egg hatch is a Jolly Male Scorbunny with 2 Best IVs in HP and Speed. Great! What we would do in this example is swap out the ‘nature parent’ with our new Scorbunny. Move the everstone from the original Scorbunny onto this one and continue the breeding process. Now with both parents having ‘Best’ in HP & Speed, we have a higher chance of these being passed down onto the egg hatches.
Continue this process for the next set of hatches and continue to swap in and out the parent Pokemon as the IVs increase. Your best chance at a 5 IV Pokemon is when you reach 4 IVs on both parents. In this example our Scorbunny hatches have led us to an offspring with HP, Attack, Sp. Defence and Speed and our ditto has HP, Attack, Sp. Attack and Speed. By breeding these we have a large chance of obtaining a 5 IV Scorbunny – congratulations, you did it! However, notice a problem? We have 31 IVs in Sp. Attack when we won’t actually be using it. That’s a problem because now our defence is lower. Let’s fix that!
Perfecting IVs
Through the breeding process you may get into a similar situation as we did above, one of the IVs you have is useless for your pokemon! To fix this we can do multiple things;
- Continue breeding until you find an offspring with the perfect missing IV and breed it with the 5 IV parent.
- Find yourself a new Ditto with a ‘Best’ IV in that stat as well as 2-3+ others.
- Use a bottle cap in the post-game to increase the missing stat to 31, also giving you a 6 IV Pokemon (more on this later)
- When held during breeding, Power Items will allow the egg to inherit a relating stat. This is guaranteed!
- Power Weight – HP
- Power Bracelet – Attack
- Power Belt – Defence
- Power Lens – Special Attack
- Power Band – Special Defence
- Power Anklet – Speed
The above Power Items can be found in Hammerlocke at the same shop as the Destiny Knot (central pokemon centre) costing 10BP.
All options are viable here, and you’ll be repeating the same process as described above – swapping a parent out for a new Pokemon, swapping over the item to the new parent, and breeding again from there.
Hidden Ability Breeding
Usually, you’re only going to have access to 2 abilities for your Pokemon, however, some (if not most) have what’s called a ‘Hidden Ability’ – we’ll refer to this as HA moving forward. In Sword & Shield, Hidden Ability Pokemon can be obtained through either aura pokemon (mentioned above in relation to Ditto) or through raids, as these yield a higher chance of obtaining a Hidden Ability Pokemon. NOTE: Ability Capsules found in the battle tower will not grant you access to a Pokemon’s hidden ability.
With that out the way, let’s talk about how to pass these special abilities down to your eggs! To breed a HA Pokemon you’re first going to need to get your hands on one – once you do here’s how it works;
- Hidden Ability breeding with a ditto does not care about the gender of your Pokemon – in cases like these the Hidden Ability has a 60% chance of being inherited by an egg. This means there is a 40% chance of inheriting the other abilities the Pokemon can learn. It can be RNG at times, but the 60% is actually quite good and you’ll often find yourself thinking it was higher!
- Hidden Ability breeding without a ditto DOES care about the gender of the Pokemon. If you’re not using a ditto then you’ll need to have a Female Pokemon with the hidden ability, otherwise your eggs won’t inherit the ability. The percentages are the same as the ditto method – 60% for the HA to be inherited and 40% for the other abilities.
PSA – Please make sure to check your abilities before swapping out the ditto or the HA Pokemon. As the judge function is on a separate tab to the ability it can be very easy to assume the egg has the HA and continue breeding when in some cases, it may not have the HA and you may be wasting your time! Just be careful out there, breeders!
EV Training
Congratulations trainer, you’ve done it! We have gotten ourselves a perfect IV pokemon. Be proud of yourself, it’s a lot of work to get this done! Even though Sword and Shield made it easier, it’s still an accomplishment for sure! But our journey is not over yet – we’ve got a few more steps to go. This step is the last of the basic steps, then we’ll touch on egg moves.
EV training was made slightly more accessible in this game but also quite a lot more expensive in either time or in game money. In Sword and Shield we have multiple ways to increase an effort value which I’ll go over below;
- Vitamins – Found in Wyndon (town pokemon centre), you can purchase Vitamins for your pokemon. These cost $10,000 a pop and increase an effort value by 10. You will need 26 total if you ONLY want to use vitamins, costing you a whopping $260,000. Expensive right? There are ways to money farm through either; championship tournaments using money-enhancing items or alternatively completing raids in the wild area and selling the rewards. In regards to actually increasing the effort value, this is the quickest method, however getting the money can be lengthy in itself.
- Good old battling Pokemon – All Pokemon in the game have an Effort Valued tied to defeating them. Let’s take Rookidee for example, this Pokemon has an effort value of +1 Speed EV upon defeating it. Other Pokemon that are evolved yield higher EVs, totalling between 1 and 3. There are items that increase EV yield but we won’t be touching upon those here. Simply put; repeatedly defeating the same pokemon continuously will help build EVs in the specific stat. Give serebii a check, each individual Pokemon entry page on the site will show you how many EVs a pokemon will give when defeated.
- Let’s quickly touch on increasing EV yield.
- Pokerus is not just a microscopic life form! It’s an EV booster! Pokerus increases the EV yield of a pokemon.
- It’s confirmed that Pokerus DOES effect Pokejobs, doubling the amount of EVs gained
- Power Items increase the EV yield by 8 for specific stats when held in battle;
- Power Weight – HP
- Power Bracelet – Attack
- Power Belt – Defence
- Power Lens – Special Attack
- Power Band – Special Defence
- Power Anklet – Speed
The above Power Items can be found in Hammerlocke at the same shop as the Destiny Knot (central pokemon centre) costing 10BP.
- Pokerus is not just a microscopic life form! It’s an EV booster! Pokerus increases the EV yield of a pokemon.
- Let’s quickly touch on increasing EV yield.
With all of the above stated, let’s now quickly touch upon the best way to EV train through battling. As with other types of EV training, Pokerus and Power Items stack when defeating Pokemon. There is a certain formula that can be used to display how this works – so I’ll list that first then explain in more depth.
EV Battling: (Base EV Yield + 8) x 2
As explained above, holding a Power Item allows us to gain a +8 to whatever EV we are training on. Combined with this, Pokerus doubles the overall EVs gained. Let’s use Nicket as an example. Nicket gives us +1 Special Defense EV everytime we defeat one, when the above formula is applied it actually gives us 18 per defeat. This means we can level our Special Defense in 14 encounters – insane, right?!
Here’s, in my opinion, the easiest Pokemon to level EVs on (plus their locations)
HP: Skowvet (+1 HP EV) Locations
Attack: Stufful (+1 Attack EV), Locations OR Chewtle (+1 Attack EV) Locations
Defense: Wooloo (+1 Defense EV) Locations
Special Attack: Vanillite (+1 Sp. Atk EV) Locations OR Gastly (+1 Sp. Atk EV) Locations
Special Defense: Nicket (+1 Sp. Def EV) Locations OR Gossifleur (+1 Sp. Def EV) Locations
Speed: Rookidee (+1 Speed EV) Locations
- PokeJobs – Pokejobs are a new addition to Sword and Shield and, in my opinion, are one of the best ways to gain EVs in the game. Pokejobs allow us to do multiple things but mainly fulfill 2 roles; gaining exp and gaining EVs. We’re going to avoid touching the exp topic today and instead focus on gaining EVs as we can gain 252 EVs in 12 hours while not even playing the game. Do I have your attention? Great, let’s explain how they work.
Pokejobs are accessed through Rotom PCs in Pokemon Centers and allow you to send away a number of Pokemon to complete a task, these tasks give rewards – some better than others. As you progress through the game and earn my gym badges you will unlock more jobs – the jobs we’re interested in are what I will refer to as ‘Stat Seminars’. Star Seminars are jobs where you can send a Pokemon off to train so they can gain EVs – this is perfect if you are heading to bed, going to school or going to work. You can have your Pokemon gain EVs and you don’t even need to be in the game!
Like defeating Pokemon for EVs, two things affect our EV gain; Pokerus and Power Items (more detail on these above if you missed it!). These two things will allow you to fully stat a pokemon in 12 hours instead of 3 days. When you prepare for a job, you’ll notice there are time scales – here’s an explanation of how long each time takes and the EV yield returned for your time;
| Time sent for | Real life hours | EV increased by |
| A little while | 1 Hour | 4 pts |
| Very short | 2 Hours | 8 pts |
| Short | 3 Hours | 12 pts |
| Long | 4 Hours | 16 pts |
| Very Long | 8 Hours | 32 pts |
| Half Day | 12 Hours | 48 pts |
| Whole Day | 24 Hours | 96 pts |
Great – so as you can see you are rewarded for your time with EV yields. As it stands, it would take 3 ‘Whole Day’ sessions to hit 252 EVs. That’s almost a whole week for a fully trained Pokemon! Luckily for us, we have a way to speed this up so each session yields us six times the EVs.
First things first, grab yourself those Power Items (10BP each) from Hammerlock’s Pokemon Center and try to get your hands on Pokerus. This is essential to the process. I’ll go into the maths in a moment, but in the case of a 12 hour session we can cap out a single stat. You’ll want the Pokemon you want to train to be infected with Pokerus and be holding the stat-relevant item. Pop them into the seminar and then return 12 hours later. When you return you’ll find them sitting on a nice +252EV gain. Now – let’s talk about how this works. It’s still unconfirmed, but here’s how it seems to work. First, the equation;
Pokejob EVs: (Base EV Gain x 3) x 2
To explain that further, our Base EV Gain (in this case 48) is multiplied by 3 (the Power Item’s effect on breeding) and the total of that sum is multiplied by 2 due to Pokerus. Here’s the equation in action;
12 Hour session – (48EV x 3) x 2 = 288EVs (capped down to 252)
8 Hour session – (32EV x 3) x 2 = 192EVs
Below are some pictures documenting this. This is a great way to AFK some Pokemon’s EVs, especially as you can do multiple Pokemon at once (10 per session). If you did wish to do 10 of each Pokemon at once that would cost 100BP for 10 of the stat-related Power Item, and 600BP for 10 of each stat-related Power Item.

- Feathers – Feathers can be found between Route 5 and Hulbury; and Motostoke and Motostoke Outskirts, these respawn each day and grant 1 EV for the respective feather;
| Wing | EV Affect |
| Health Wing | HP |
| Muscle Wing | Attack |
| Swift Wing | Speed |
| Clever Wing | Sp. Defence |
| Genius Wing | Sp. Attack |
| Resist Wing | Defence |
- Removing EVs – In the unfortunate case you end up with EVs in a stat you don’t want, there are certain berries (obtained by shaking berry trees) that can actually increase friendship and removes EVs in a certain stat. These are hard to farm and a lengthy process, but at least we have the method!
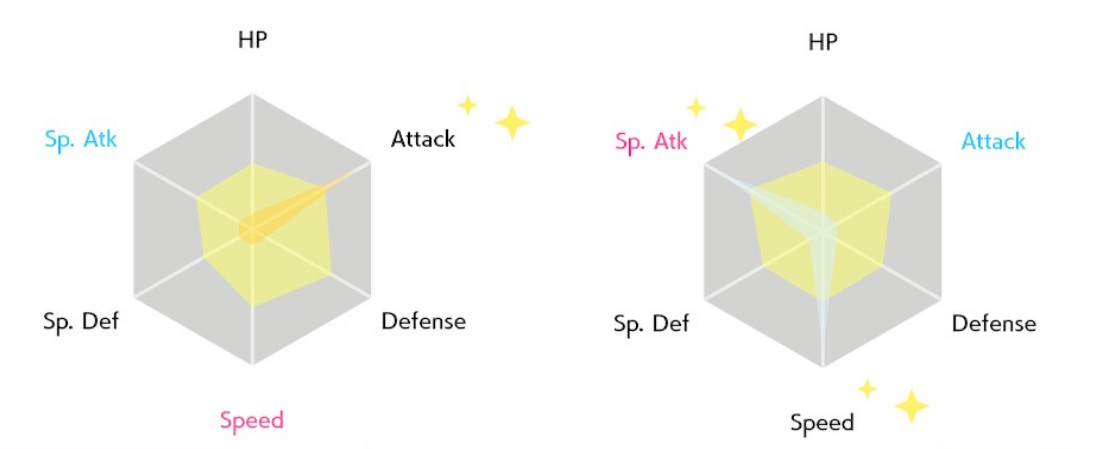
- Checking EV Progress – Finally, if we head over to a Pokemon’s summary page and go to the second tab we can see the stat spread. If we press X on this screen we’ll see the EV chart which shows the spread of EVs on that specific Pokemon. Unfortunately, we can’t see the actual number of EVs but we can at least see the spread. When a Pokemon has gained EVs in a stat it will be shown as a deeper yellow. When a Pokemon is fully EV trained (510 total EVs) the chart will display as a white colour (see below!). When a single stat is 252 EVs it will have stars!
Have you done it?! Well done trainer! You have now got your first competitive Pokemon, how does it feel?! Tired yet? With the Pokemon fully trained, increase its level to 50, or higher if it evolves past 50 (through exp candies or rare candies – fun note, using these does not increase EVs at all, so feel free to increase the Pokemon’s level at any time through candies!) and get ready for competitive. Why 50? Competitive battling takes place at level 50 to keep things fair for all, a nice obtainable level. Getting the pokemon to 50 you can see what it’ll look like in competitive so you can get a good idea of what it’s capable of!
A few quick things to touch upon;
Egg Moves
Egg moves are a bit of a complicated creature in Sword and Shield. Unlike previous generations we can now allow parent Pokemon to inherit egg moves, whereas before we would have to breed an entirely new pokemon. While that does still come into play, I’d like to quickly explain how to do this.
The process starts largely the same. I’m going to use the example of Jungmo-o and Dreepy, two pokemon that share an egg group and, in this case, an egg move – Dragon Tail. Jungmo-o learns this at level 8, so our first case of business is levelling the Pokemon we want the egg move from, in this case Jungmo-o, to the correct level. In the case of Jungmo-o and Dreepy, the eggs can actually be either of those parent Pokemon, but we can manipulate this by making the Jungmo-o male and the Dreepy female.
The two will now start to breed and in a few steps you’ll be greeted with an egg – it’s worth noting that all eggs that hatch when paired with the Dragon Tail Jungmo-o and Dreepy will be Dragon Tail Dreepy’s. What we’re looking to do here is obtain a Dragon Tail Dreepy that is a different gender to the Parent Dreepy we are looking to give Dragon Tail to. Once you have obtained one we’re almost done! Our next step is to quickly visit a Pokemon centre (this step can be done at any time before this point) and delete a move from Dreepy so it has an empty move slot.
Now we are ready to move Dragon Tail onto the parent. We’ll make sure we have the Dragon Tail Dreepy and the Inheriting Dreepy to hand and put them into a daycare together. The two will now yield eggs (once again, all eggs will hatch into Dragon Tail Dreepys) but the big difference here is that while they are breeding, the movie is transferring across to the Inheriting Dreepy (our original!). It takes roughly 1 or 2 eggs for the move to be inherited, so feel free to decline or accept the eggs and then take your original Dreepy out of the day care. Check its moves and what do we have here?! Dragon tail!
Below is a TL;DR for the process;
- Find the egg move you wish to move onto your pokemon
- Level the Pokemon you’re going to be transferring the move from so that it can learn said move
- Breed the inheriting Pokemon with the Pokemon who’s transfering the move (opposite gender) NOTE: some species will breed both Pokemon in eggs, so if the gender combination is giving you the wrong pokemon, swap the genders
- Hatch the eggs that the parents will give to acquire Pokemon with the egg move
- Delete a move on the destination pokemon so it has space for a move (ignore this if Pokemon already has a free move space)
- Swap out the original transfer Pokemon with a hatched Pokemon with the egg move who is a different gender to our destination parent
- Have the two breed 1-2 eggs, then take the destination Pokemon out of the daycare and it will have inherited the egg move
Pokeball Transfer
When breeding, to make a Pokemon more valuable, you can pass down the pokeball type from the parents. There are multiple ways to do this so I’ll list them below – I will use varying examples below;
- (different species) Ultra Ball Toxapex Male + Love Ball Quagsire Female breeding = Female pokeball always passed down
- (same species) Ultra Ball Toxapex Male + Love Ball Toxapex Female = 50% Chance for either
- (using ditto) Non-Ditto ball ALWAYS passed down. This includes genderless, Ditto’s ball holds no influence
Mints and Hyper Training
As a quick note – I’d like to touch on mints (introduced in sword and shield) as well as ‘bottle cap’ hyper-training as these effect natures and IVs respectively. Both of these things are found in the Battle Tower in Wyndon.
- Mints will adjust the nature stat growths of a specific Pokemon, by giving a Pokemon a mint the nature’s stats will change but the nature will remain the same. For example, a hasty Pokemon could be given a calm mint, now level stats as if it was a Calm pokemon but the summary will still say hasty.
- Hyper Training works similarly in the sense that once a Pokemon hits level 100, a bottle cap can be used to make a singular IV stat capped. A golden bottle cap has the same effect but for all stats.
With both of these things I would just like to note that these changes cannot be passed down through breeding. Breeding a mint/hyper trained Pokemon will result in their original nature/stats being passed down if an everstone/destiny knot is used. So while this is a good method for a singular pokemon, please be aware that you will not be able to pass down these changes.
Quality of Life Adjustments (Flame Body/ Oval Charm)
Within breeding there are certain ways to make your life easier when it comes to hatching eggs and obtaining eggs. These are in the form of Pokemon and a specific item, the Oval Charm, respectively. Let’s quickly touch on this as it will make everything go a lot faster for you!
- Flame Body Ability Pokemon have the unique effect of speeding up the hatching process. Multiple Pokemon can be found in Sword and Shield that have these abilities and I’ll list them below. The way these abilities work is that the Flame Body ability Pokemon must be in your party (even if it is fainted) and it will cut the amount of steps needed to hatch an egg in half. When you start mass-breeding for IVs, this really does help speed up the process.
Pokemon with these abilities are as follows;- Litwik/Lampent/Chandelure – Litwik can be found at Bridge Field, Motostoke & Motostoke Riverbank. Litwik has 2 obtainable abilities, the other is Flash Fire – so this may require multiple catches.
- Carol/Coalossal – Rolycoly can be found early in the game on route 3 and also in the Galar Mine. While Rolycoly does not have the option of obtaining Flame Body it does have Heatproof which will change to Flame Body when it evolves at Level 18.
- Sizzlipede/Centiskorch – The Sizzlipede line also has access to Flame Body, however, it is only through its Hidden Ability. This means you will have to catch a Hidden Ability Sizzlipede/Centiskorch in a raid battle and have a chance to obtain this.
With the above stated, your best choices are of course the Litwik line and Rolycoly line of Pokemon. While Centiskorch is a great Pokemon, the fact it only has Flame Body through its Hidden Ability makes it a redundant choice when you have 2 easily obtainable alternatives.
- The Oval Charm is an item that allows for eggs to spawn faster in the day care. Just like with Flame Body, this is a great item to have access to as someone Pokemon take quite a while to produce an egg, especially if it’s interspecies breeding. In Sword and Shield you can obtain this by heading to Circhester once you complete the game. Head inside the hotel on the left-hand side of the plaza and head up to the second floor, first door on the left. There’s a police NPC inside who will ask to battle you (it’s a double battle!). His Pokemon are level 65 and he has a 6 Pokemon team so make sure you are prepared. Once you beat him, he’ll give the Oval charm.
The Oval Charm is a key item, so no need to worry about equipping it. Once obtained you’ll have so many eggs you won’t know what to do with them!
Hey! You got to the end of the breeding manifesto – that’s a feat in itself. I hope this has helped you with any questions or queries you may have had, or if you’re brand new I hope it was informative enough to get you started! If you liked the guide why not throw me a follow on twitter? You can find me @Miiyaboo or alternatively come chat on discord; Miiyabee#1074.
Also some other cool news – the guide is going to be translated into Spanish! Once the translation is done I’ll put up a link so we can show the translation some love!
Also a big thank you to Izzy from the Swsh discord who helped with testing things and being an overall great person! Big thanks Izzy!!

Recent Comments