Skyforge Knight Class Guide
Skyforge Knight Class Guide by Yokai
Everyone knows that tank classes (Paladin, Knight) do low damage, are only needed for group 5/10-person content, and that you can clear solo/squad instances much faster with any DPS class, right? Honestly, that is certainly true for Paladins, but I’m here to explain why it’s not true for Knights, if you build them right. I main both Knight and Berserker, play them both very well, and I can vouch that my Knight can, for example, clear through the first boss in Tau Experimental station almost exactly as fast as Chaz does with his Berserker in the video shown on page 2 of his Berserker guide. And I can often manage to kill all four splits from that boss simultaneously and get all 4 boxes. With a Knight. Admittedly, the Zerker can more reliably nail all four boxes than the Knight can, but the point is that my clear speed is nearly the same, and I can often nail 4 boxes. On top of having excellent solo clear speed and survivability, I can still also hold all aggro for DPS teammates just fine, and withstand the onslaught as “tank” just fine. Yes, the Knight can do it all.
So, does the fact I can clear content nearly as fast as well built and well played Berserker get your attention? It should. The NA/EU Knight is currently very strong. Which makes me understand first hand why Knight (and Paladin) have already been reworked in Russia (according to Wyck, not “nerfed” per se, but in the Knight’s case made less OP than it is today in NA/EU). If you want to enjoy a crazy powerful tank class that simply melts through huge groups and bosses alike, read on!
Note that because the Knight will sooner or later be patched to the Russian version, I’m not spending too much time on visual “polish” for this guide with tons of screenshots and detailed breakdowns of every single ability and supporting talent. Instead, I’m going to summarize the pros and cons, the target build you’re shooting for, how to get there efficiently, gearing choices, and typical rotation priority.
PROS AND CONS OF THE KNIGHT
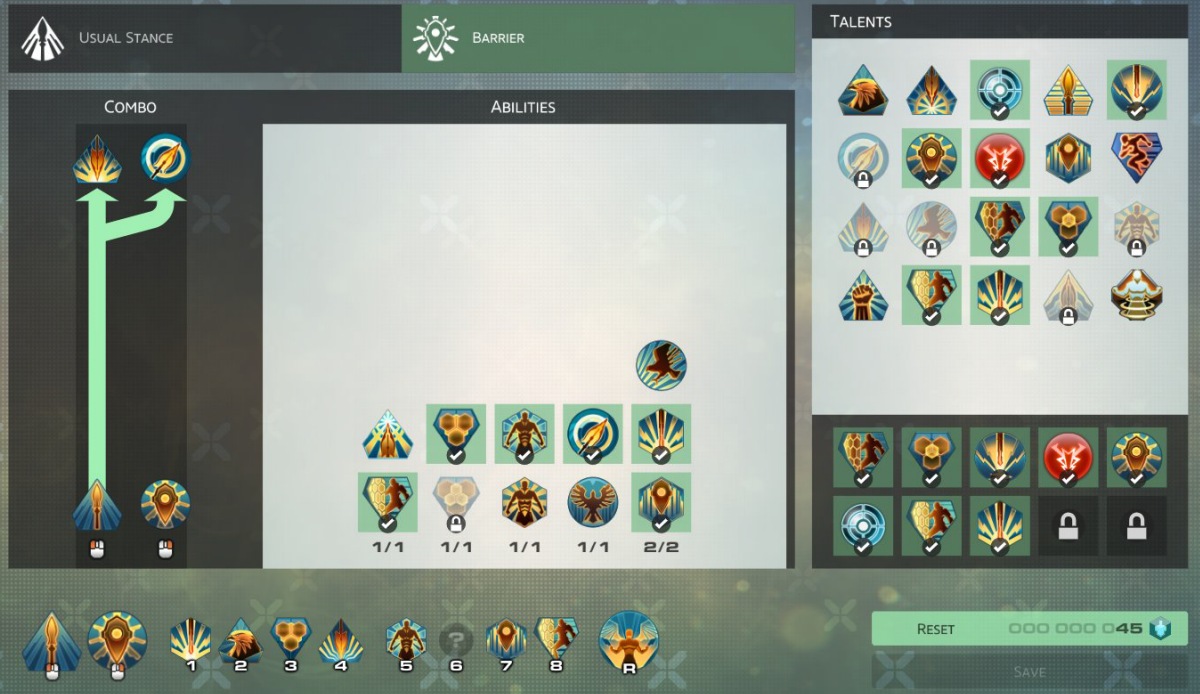
The Knight’s build choices seems to give you the option to make a more DPS-oriented Knight revolving around talent buffs to Resolute Strike and Falcon Attack in the “Usual Stance”, versus building a “tanky” Knight revolving around the Barrier ability. The design intent seems to be encouraging you to “stance dance” between Barrier and Usual Stance depending on the situation. The reality in the current NA/EU Knight, however, is that when built correctly, you never, ever leave Barrier stance, because you are a reflected damage monster in Barrier mode.
Pros:
- You will never fear death. Solo or group. (Unless your group is extremely dysfunctional.)
- Even if you do manage to die, you have a “battle self rez” that will instantly bring you back with 50% health, which is huge. Oh, and it’s on a relatively short 8-minute cooldown.
- You can never accidentally trigger your ultimate (R), because it’s the aforementioned self-rez and cannot be triggered unless you are dead.
- You have surprisingly strong sustained DPS due to your massive ongoing reflect damage of 25% of everything that is being thrown at you.
- You have surprisingly strong burst DPS every 15 seconds due to your Resolute Rebuff “bubble shield”, which you can hold for as long as 3 seconds, absorbing 100% of all damage, and then bursting (sooner than 3 seconds if desired) to reflect back ALL of the absorbed damage (but limited to a max equal to 25% of your maximum health). When used tactically against huge Boss attacks, I regularly strip nearly an entire health bar off of many boss types with this one burst alone. When used at the right moment during heavy swarm attacks by non-trash mobs, you can really burst all of them down by half their life. (For example, the 6 Mantid types around the egg fountain just before final swarm queen and boss in Thetin Rift, or the 4-5 Mantid types in the final approach to the last boss in Lanber Catacombs.)
- You have heavy CC ability for all large swarm encounters, being able to practically perma-stun entire huge groups with both Battering Ram and Earthquake. You will also add a significant amount of AOE damage with every hit of both these abilities.
- You will breeze through Nedder Test Area and fear no boss or arena in there. You will face-tank the Wind Ray and burst him down in no time flat. No kiting or dodging needed! I don’t think I even bother to pick up health balls in that fight. This Knight build is perfect for quick farming of any 4 platforms, then doing the jumping puzzle last so you can switch to a newly unlocked class before jumping back to center. (So you can quickly get some decent green gear for your new class.)
Cons:
- It’s painful to play during early development. You are underwhelming at first, and very slow to kill things until you are pretty far into the class sparks portion of the tree. You will be saying “What the heck is Yokai talking about? This is terrible!”. Therefore, you might need to develop your Knight only when running with understanding friends/guildmates, or else by playing another fully-developed main for neutral gold-colored Sparks of Evolution and passively investing in the Knight tree until you finally unlock a few key talents/abilities.
- Once you develop far enough and see for yourself what I’m talking about, you will dread the eventual Russian reworking of the class, and will pray that they drag their heels on this.
TARGET BUILD
First, let’s look at the current best all-around target build for the Knight. You could make some slightly different ability and talent choices “to make it more tanky”, but honestly, there’s no point in doing so. Trust me, you are plenty “tanky” enough with this build, yet you also do a surprisingly large amount of both sustained and burstdamage. I frequently pair with a Necro teammate, and the amount of sustained DPS pressure I put out is very similar to hers. And my burst is available every 15 seconds, and I’ve stripped entire health bars (or nearly so) off of bosses with my burst. At “recommended” difficulty levels.
Another thing to note is that it is incredibly tough to choose “the best 8” talents for a Knight, because there are so many great-looking talents. I have spent more than 400 Sparks of Transformation trying out every likely combination of abilities and talents, and I’m convinced this is the best possibly all-around build possible.
First Let’s look at my talent choices in detail:
Why Rampage of Strength and Triumph? Impulse damage isn’t that important to a Knight (especially when you see the emphasis on Str/Valor/Luck/Crit in the gearing section below)? You need these two talents not because of Impulse damage, but instead because Rampage of Strength restores 10 points of willpower (your blue energy for the class) every time you trigger an Impulse charge, which can happen every time you cleave with Battering Ram (your RMB skill) or every time you PBAOE with Stray Attack II. Triumph also ensures that you get a massive amount of instant Impulse charges (full Impulse bars) every time you tank a big mob swarm. It’s not uncommon to see that blue symbol with a 2 next to it in your buff area during a big swarm attack. Because of this constant, instant refilling of your Impulse bar, it’s also not uncommon to do two or three Battering Rams in a row and see the cleaved enemies stunned all two or three times due to theCollision talent. To summarize, the synergy between Ramage of Strength, Triumph, and Collision is too huge to give up for any other more enticing talent. These three talents make dealing with the alpha strikes of huge swarms much easier. Also, Rampage of Strength is vital to maintaining your willpower during long single-target fights. You’re not generating impulse as quickly during such fights, but every time that impulse bar fills up, a quick Battering Ram will generate a huge tick of willpower.
Why Rockwall? This is your aggro-generation talent. Same as for Paladin. It’s simply a must-have.
Why Knightly Daring? This reduces the cooldown of your most powerful mitigation and burst damage skill (Resolute Rebuff) from 20 seconds to 15 seconds. This is a massive boon for boss fights! And every hard swarm encounter (with multiple non-trash mobs) is made much easier with one or two tactical uses of Resolute Rebuff during the fight.
Why Heavy Tread and Mother Earth? These make your Earthquake ability (PBAOE damage) much harder hitting, and is a vital part of the chain-stun ability of the Knight. By alternating your RMB Battering Ram with Earthquake each time the stunned mobs get up, you can effectively chain stun for a loooonnnnnggggg time during swarm encounters. Mother Earth also really helps with boss fights where they summon adds.
Why Inspiration? This talent (along with Rampage of Strength) is vital to maintaining willpower during long single target fights. You never want to sit there with a full bar of willpower sitting unused. So Falcon Attack is your primary willpower dump during long single-target fights. This talent ensures that you are regenning willpower at a faster rate for 6 seconds after using the dump. Add in one RMB Battering Ram right afterward, and the big tick of willpower returned from Rampage of Strength will bring you right back to full willpower again. So an important tactic during every long single-target fight is (start with a full impulse bar): Falcon Attack > LMB for 6 seconds > Battering Ram > repeat (because your Impulse bar will be full again by your next Battering Ram in this cycle).
Once you understand the above talent choices, my ability choices will become more understandable:
Why Barrier II? This is strong to the point of being broken OP, and is probably the reason the Knight class has already been reworked in Russia. Enjoy it while you can, because it’s UBER. 50% ongoing damage mitigation off the top, with 25% reflect of all incoming damage. Insanely good.
Why Resolute Rebuff? It takes pressure off the Lightbringers to keep you shielded, which indirectly contributes to team DPS and team survivability, and it enables you to provide your own pretty darn massive burst damage every 15 seconds. Once you learn the telegraphs for really bad boss attacks, you’ll be SAD when some other team member (or necro pet) is targeted by the boss. You literally want to stand in the fire with this skill, because you’ll take ZERO damage and will throw ALL of it back in the boss’s face. (Well, capped at 25% of your total max health.)
Why Tantrum? Isn’t Resolute Defense more tanky with a shorter cooldown? This is the ONE ability that I’ll say you should think about respeccing for really HARD group content. For most of your soloing and squad partying, however, stick with Tantrum. The 1:30 cooldown of Tantrum versus the 1:20 cooldown of Resolute Defense is negligible when you compare the benefit of 15 full seconds of 40% increased damage fromTantrum. However, if you’re in a big group, your job is to tank and not worry about DPS, so pay the sparks to swap into Resolute Defense instead, because being able to add 15% extra damage mitigation on top of your baseline 50% mitigation is indeed useful for some really hard segments of long boss fights.
Why Stray Attack II? Because the 5-second snare of Falcon Fury is pretty useless compared to a little extra PBAOE when you have no Impulse charges to trigger the stun from Battering Ram. You won’t use Stray Attack much, but you _will_ see the benefit of this ability if you really A-B test it against Falcon Fury.
Why Earthquake/Stunning Blow instead of x/Falconry? Because Cutting Grass is worthless for this build, and Falconry does not in any way boost Falcon Attack itself. Earthquake is a mandatory part of your perma-stun technique. Stunning Blow is worthless for damage, but useful as a second gap closer if you don’t have enough dash charges to rush over with Battering Ram.
How to get to the target build efficiently
As I mention in the cons section, the Knight can be painful to level at first. Your primary goal is to acquire Earthquake, Heavy Tread, and Barrier II as quickly as possible. With each of these skills that you acquire, things will get easier and you will get stronger. If you’re passively leveling Knight through gold sparks from another main class, feel free to wait until you unlock Barrier II in the sequence below before jumping in and actually playing the Knight.
I recommend you unlock nodes after the first branch in the Knight atlas in the following path order. The talents/abilities in parentheses are ones you won’t really use, but they’re on the shortest path to each thing youwill use. Triumph > Rockwall > Earthquake > Inspiration > (Resolute Strike) > Heavy Tread > (Unshakable) > Barrier II > Whiplash > Knightly Daring > Mother Earth. Then finally, go back to the fork point and pick up (Salt in the Wound) > Stray Attack II.
Gearing choices
Believe it or not, you actually want DPS rings and stats: Str/Valor/Luck and +Crit. Depending on your total Accuracy from Temples, you might get slightly more bang for the buck from either Valor/Luck rings or Strength/Luck rings. You probably want roughly 10% or more crit from rings alone, although since we don’t have talents that bring other synergy to crits, you should use a good damage calculator to determine whether bringing in some Accuracy or Temper instead of Crit would give you more overall DPS. I recommend using the damage calculator that Chaz links in his Berserker Guide. I’m not going to go into how, exactly, to evaluate any given four rings. Experiment with that calculator or look in other guides for that.
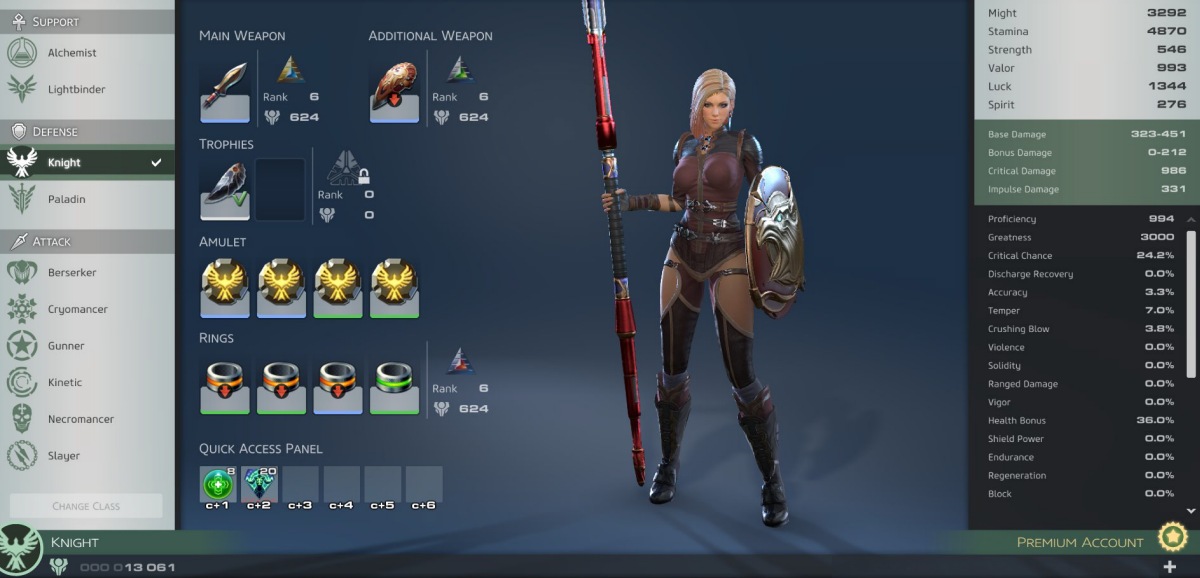
From my stats screenshot at the very bottom of this guide, you can see that at the time of writing this guide I was getting the most bang for the buck out of Valor/Strength rings with +Crit on every ring.
That said, the OTHER really important stats for a Knight are your Stamina and Health Bonus! Why? Because your reflected damage from both Barrier II and from Resolute Rebuff are hard-capped at 25% of your total maximum health. So for a Knight you should definitely rank your Order temples aggressively for the massive Stamina bonuses they provide, and especially for the massive Health Bonus they provide!
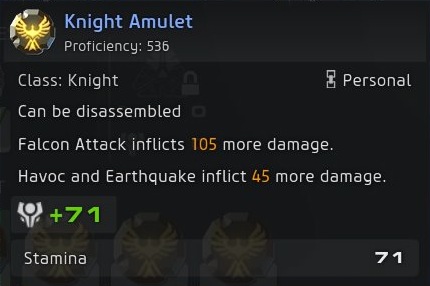
For your Amulets, bonuses to Earthquake/Havoc damage trumps everything else. Load up with 4 such amulets. If you find a hybrid amulet with both Earthquake/Havoc and Falcon Attack, it’s useful to slot in 1 or 2 of those to help with your sustained DPS during long single-target fights.
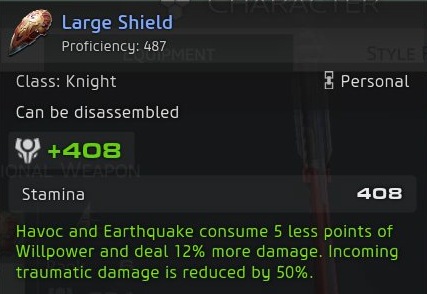
For your shield, the only one worth equipping is a blue (or green) with Earthquake/Havoc bonuses, even if it’s very low prestige.
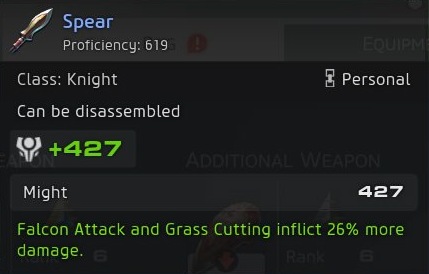
For your spear, the only one worth equipping is one with bonus to Falcon Attack, since you will be using this skill often during long single-target fights as your primary willpower dump.
Typical rotation priority
Note the use of the word “priority” here: Skyforge is a prioritization-based game, not a straight optimal rotation game. So you have a basic set of prioritization patterns to use, but you might interrupt them as events occur with other more high priority responses.
Basic alpha swarm rotation priority:
Against trash mobs, just dash in with Battering Ram or Stunning Blow > Earthquake > Battering Ram >repeat(Earthquake > Battering Ram) until low on willpower, and if you really need to keep AOE stun-locking, pop Tantrum for more willpower. As execute (E) targets appear, feel free to help execute them. If a pesky support mob isn’t dying fast enough, feel free to focus on them with LMB (Lunge) and Falcon Attack once you’ve gathered enough aggro from the mob.
Against non-trash mobs, similar rotation as above, but pop Tantrum after you’ve burned off 50 points of willpower (or you’re wasting the willpower component of Tantrum). Either before or after your Tantrum, look for an opportunity early in the fight, after the mobs have all gotten up and are beating on you, to pop a full 3-second duration of Resolute Rebuff for a huge AOE burst. Between the two bursts from Tantrum and Resolute Rebuff, you’ll burn down even the scariest non-trash packs very quickly.
Basic single-target rotation priority:
Keep an eye on your Impulse bar and your cooldown on Resolute Rebuff at ALL times. Strive to keep your willpower bar NEAR full at all times (but dump willpower into Falcon Attack when it is full; don’t sit around wasting unused willpower). Your basic rotation should start when you have full impulse:
Falcon Attack > LMB (Lunge) for 6 seconds > Battering Ram/Stray Attack II > by this point you should be back at full willpower > (repeat entire sequence). Deciding whether to use Battering Ram or Stray Attack II depends on whether you’re able to keep all boss adds in front of you or not (SAII is a PBAOE). The main point here is to use Falcon Attack only when you need to dump full willpower, and then regenerate willpower as fast as possible with 6 seconds of LMB followed by either BR or SAII. See the talents section above if you don’t understand the way this works to rapidly regenerate full willpower after a willpower dump (Falcon Attack).
While performing the basic rotation, watch for opportunities to use either Earthquake + Battering Ram to burn down (and stun lock) summoned adds. This is why you want to keep near a full bar of willpower at all times (quickly regenning after a Falcon Attack dump), and why you want to keep Tantrum unused. Some boss fights have tough adds that you must burn down fast, and Tantrum can help you do that by making Earthquake and Battering Ram hit 40% harder (as well as being a great willpower regen in and of itself).
Also watch for opportunities to use Resolute Rebuff during the boss’s heaviest attacks. Just time it so that the bubble will absorb as much damage as possible, then pop it after the heavy attack is over. BOOM!
I hope you’ve enjoyed this guide and will find it useful. Here’s a parting shot of my current stats at the time I wrote this. Note the huge Health Bonus and Stam numbers, and the high crit chance. From here, I’ll be working to get more Crushing Blow and Accuracy through my Order chapels.

Recent Comments