Grand Chase Rama Guide
Grand Chase Rama Guide by TheKN
“One Day You Too Will Be Able To Stand Where I Am”. – Jin
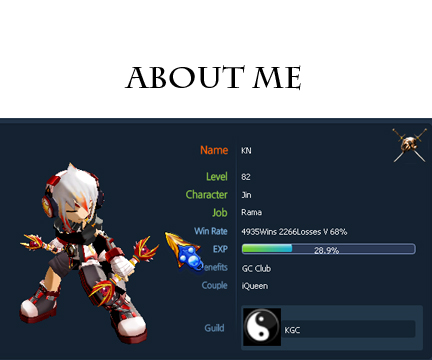
What’s up guys, I’m KN
Thank you for picking this guide. I’ve been playing Rama since it came out and have mastered what was necessary to become the Rama I am today. Most people think that I am the best Rama, but of course where there is love, there is hate, but I respect all opinions even if you don’t think I’m the best Rama. This guide wouldn’t have been made without the support of my friends, and my homie TofuTasty. So again, I thank you to everyone who picked this guide.
Intro to Rama
Rama is a very fast class with great utilities to add to mobility, it is also one of the stronger classes in-game. Despite being nerfed in the Eternal patch, Rama can still be one of the best classes if used correctly. Everything you need to know on how to use Rama correctly is in this guide. In addition, this entire guide does not require 3rd bar for an entire game in PVP. Before Eternal patch it is one of the most overpowered 3rd bar skill in the game, so I decided to avoid being cheap and play like a real Rama.
Expectations
After reading this guide I mostly expect 2 things. You’ll either be better than me or not learn at all. I don’t expect people to be like me, therefore after learning this guide you’ll only be at 99% as good as me. That 1% left depends on you, that 1% depends if you’ll be better than me, that 1% is what you need to do that makes Rama more viable to you. 100% would mean that you’re perfectly like me, perfectly imitating everything I do, however you are not me, therefore we have different understandings, tackling situations, etc. But again, it could also mean that you can be better than me at 100%. At 99% you would have gotten this guide down, do everything right, but one day when you get the chance to PvP me and lose, you will know why you can’t be like me and why you’re at 99%. So if you’re at 99% don’t lose hope, you’re getting there, all you have to do is readjust to get that 1% and maybe “one day you too will be able to stand where I am”.
Why everyone thinks Rama is easy, and all the same
In all honesty, I see why people say Rama is easy. Everyone says Rama only does run and spam 3rd bar. Every Rama that does that strategy has no experience with it. I have to be honest, I started with that strategy too. Every new Rama resorts to that strategy because it’s the easiest way to learn Rama, that’s people say learning Rama is easy. And every person who sees that play style of Rama thinks Rama is simple because it’s just rolling and spamming 3rd bar as what they’re witnessing. People just want to take the easiest route to play Rama without the need of using more complex strategies. That’s why Hawa was considered a pro, he stepped that strategy up to the next level and pretty much influenced a lot of Rama players with that strategy(no disrespect to Hawa). After Hawa there is Laggur who made it better to play Rama, then xFriessssss and more. Now there is me, KN, who made the new, complex, and different strategy that is much better than spamming 3rd bar and running. 3rd bar is not needed and is not recommended for this guide. All you need for your max MP is 2nd bar skill, that’s why I assure you this guide is better than just 3rd bar spamming. 3rd bar is not needed for this because it’s a waste of MP, think about it you’d be saving better MP delaying, countering, etc. if you limit yourself to 2nd bar. If you keep spamming 3rd bar you won’t have enough to do major combos with your MP bars and it’ll make this guide’s strategy harder to pull off. If people think differently when playing Rama, then it wouldn’t be every Rama the same and every Rama is easy to learn. That is why I made this guide to prove to you Rama is much more complex then what everyone thinks it is.
This guide covers strategies, combos, and basic knowledge pioneered by KN himself.
Requirements:
- Grand Chase
- Jin
- Rama Class
- Basic Knowledge of Rama
- A K120 Logitech Keyboard or something that can step
Table of Contents
- What You Need to Know
- Game Sense
- Combos
- Conclusion
What You Need to Know

Basic Combo: Z Z Z Z
Grab: Dash Z in front of opponent
Roll: Dash Z ↓
Dodge/Evade: Z ↓
Dash Attack: Z while Dashing
Chi Wave: Z ↑
Stance: X X
Chi Charge: Hold X
1st Bar: Hold Z to charge MP or Press A
2nd Bar: Hold Z to charge MP or Press S
3rd Bar: Hold Z to charge MP or Press D

This Video will show you how to step
https://www.youtube.com/watch?v=RDmG9nYbPA0
Stepping is very important, without stepping you won’t be fast enough to take advantages and will be at disadvantage against players who can step. Rama’s step in my opinion is the most stable of all steps, not too fast like Edel, and not too sluggish like PK. Why does the speed of stepping matter? If you’re going too fast you won’t be able to control and will overshoot your attack. A step too sluggish is self – explanatory, but stepping is useful no matter what character you’re using. Some steps like Asin, Zero, and Dio have a step that leans them forward a bit which makes it a harder to grab. These steps are basically one at a time(wait for 1 step to finish then next) while other characters can do it constantly without waiting for 1 step to finish. When you’re stepping with Rama you will feel very stable and ease. Stepping also gives a higher chance of you grabbing an opponent especially with Rama’s ease step. It’s all about plotting your grabs or dash attack with your step. Rama’s Dash attack is the best because it stays in one spot. At this point, you must learn slide flash and demon step because there is a very crucial move you will have to do in a later section about strategy.
Slide Flash Rolling and Rocket Roll
Very important for mobility. You must learn these moves. It is simply Slide flash/Rocket Step connected to a roll, Shouldn’t be hard after you’ve learned slide flash/rocket step. (Basically make sure you press z down at the end of your slide flash/rocket step).
Stepping on platforms and Claw stepping on platforms

You can either shadow step or better on platforms or claw step. Claw step is simply rocket step, down, and quickly tap z once when you’re about to hit the ground to do a jump attack, repeat. Claw step is better on platforms and makes it harder for enemies to chase you.

↓ Z ↓ Z ↓ Z, Keep repeating

Ottoing is very important, it is a huge advantage to wiping out your opponent’s entire health. In Elven Forest Rama can otto in 3 places, the top right corner, the slope of the 2nd middle platform on the left side of the map, and the gap between 2 platforms on the left side of the map. Maps with a slope that is pointing downwards can be otto’d too, except the slope in Elven Forest. In Trial Forest the middle platform supported by a sloped tree branch is a great spot. The best spot to otto in Elven Forest is the top right spot. In the strategy section I will tell you when to camp at these spots and when not to. Coordinating your hands is very crucial to ottoing so get it down quickly. You will need to otto for at least 5 – 10 seconds or more.

Trick: Jump Attack locking

Where: Between a platform and the ground/platform you are on
Dash/turn left or right, ↑, immediately turn left; or right the direction opposite of what you first turned right when you jump up, Z while still in mid air, ↓, Z, repeat

In addition to otto, this trick makes your jump attack locking faster, or you can do the old fashion up z down z, but your opponent will most likely break free. Your safe zones are basically the spots on “where” and including your otto spots that I mentioned in the otto section. The green circle zone is most likely where you will be if all other safe zones are taken. Use these spots wisely when there are too many or overpowering enemies. Do not just charge in recklessly without a strategy or camp in the safe zones with too many or overpowering enemies. If all safe zones are taken then stay in a place with less enemies and avoid a little fighting until you are ready to fight. I will guide you about when you fight in strategy.
Game Sense

This is the most important section of all. Read and learn carefully
SUPER IMPORTANT: GRAB WHEN EVER YOU HAVE THE CHANCE!
Alright guys, you’re main strategy is to BAIT AND RUN. All good players know how to bait and I suggest you know too, except for ranged classes they usually run more but still bait a little. There are different ways to bait depending on different characters/classes you face; I will cover this. This Bait and Run strategy works very well when you’re fighting 1v1 or a survival with 3 or 4 people, but be warned the more people the harder it is to stay in one spot to bait. Also strategies that gives the element of surprise also works well with this bait strategy such as a roll to a falling sky, etc.
When You’re Baiting
The move you mainly want to use is chi ball ( up z in burning) to stun your enemy. Lure your enemy in, once you’ve stunned your enemy proceed to combo which I will cover later. You can use other moves to bait such as slide flash into dash attack which is also great for stunning the enemy. Claw stepping is a good way of luring an enemy to you. If the opponent is aware of your strategy switch your strategy up quick by using different techniques such as otto, claw stepping, slide flash roll around, etc., then come back to this strategy.
Where to bait

The best spot is here in Elven Forest. I always use this spot; those of you who have fought me… now you know. Corners are also great spots to bait. Any spot where it limits enemy movement behind you is great for those of you that do not fight in Elven Forest. You also need to watch your back and in front if not in a safe spot.
Unsuccessful Baits.
(Bail in my meaning is either roll or slide flash out of danger). If you failed to stun the enemy or miss your combo. You can either bail or get a recovery by hitting them more and proceed to combo again. If you’re getting hit too much, bail out. In Elven Fores the best place to bail are the safe spots I mentioned. In the spot above in the picture you can bail to the spot behind where you can jump attack lock. In addition to this jump attack lock enemies cannot get to you unless they can roll or evade through it. If so, bail again. If an enemy appears behind you at that safe spot, bail immediately, and use chi ball at the green circle spot that was mentioned in the other picture. When the enemy comes to you roll to the other side back to your bail spot and repeat.
When you’re attacking
Falling Sky ( X X ^), Rapid Fire (X X < or > opposite of where you’re facing, Z), and Dash Attack/Slide Flash into Dash attack are your best friends when attacking(also grabbing A LOT helps). After you’ve bait and stunned the enemy you can use all these moves here for you to stack combos more and more. In addition, You can also use your 1st MP skill, 2nd MP skill, and 3rd MP skill, but again, I will cover this in the Combo section. When you’ve knocked down an enemy you can take a 50/50 chance to get a free hit. Depending which way they get up and run to, do a rocket step and Rapid Fire. Use Chi ball to finish out enemies, or you can be fancy like me and combo them to death, stone fist them, etc. BUT be warned if you miss, it’ll look bad for you.
When you’re running

When you’re opponent is chasing you can do a lot of things. This is where the demon step that I told you to learn comes useful and why it is important. Do a demon step until you face your enemy, and dash attack, this will stun your enemy and you can combo them. You must learn this, if you’re being chased and not know this move going to get wrecked. You can take chances by using Trigram (X X < or > the direction you’re facing) if they attack you, but it is only A CHANCE, not guaranteed if they attack or grab you. Claw stepping is also a good way of running on platforms. You can utilize your mobility by slide flashing or slide flash rolling around dodging opponents.
When you’re Chasing down opponents
Runners are easy to get with Rama, you have insane mobility with slide flash roll, slide flash, etc. you can launch a combo if you can get an element of surprise on them with falling sky or rapid fire. For example, in Elven Forest the top right platform is a good place to hit someone with a falling sky that they won’t expect; as they’re falling down you can combo into maybe a non burning 2nd bar.
When you’re cornered or prepared to be wrecked by the opponent
TRIGRAM AND EVADE IS YOUR BEST FRIEND IN THIS.Trigram is the best if you’re locked and have no other options. But use this wisely, do not use this recklessly or you will be slaughtered. Using trigram is a risk but always saved your life if done right; trigram is a must use at different situation and used cautiously. Evade (Z down) is best for someone delaying you or getting stunned and locked by an attack or skill and you can easily get out of skill or the attack, however, you’re not always guaranteed to get out of the opponent’s skill. You can also counter or delay with MP, but its all up to you. If you’re grabbed or in a grab duel, Rama has one of the fastest grabs, when you finish your grab animation and your opponent is still grabbing wait for them to finish the grab animation and use jump attack to stun them and proceed to grab.
When you’re In a Full Survival Match
Your safe zones are your best friends in this. If they’re taken use claw stepping on platforms or any method of the running tactic. Attack one person at a time or you can charge in with an MP and take out multiple opponents, if it gets too risky or too rough, just bail out to safe zones or slide flash roll around places. In addition, most of the bait strategy can be used, such as using chi ball to stun multiple or just one enemy that is near you. You mainly want to focus whoever is near you. You can try to knock opponents out of those safe zones, but when you do keep check of you’re HP, if it’s much lower than the opponent you must bail out.
When you’re Against Specific Classes
- Lass – Strikers: The best way to defeat a striker THAT INFI SLASHES is to let them chase, you can trigram the hell out of them. Again the demon step to trigram works well against these guys. If they know your strategy again use safe spots, slide roll around, and do unexpected things like the demon step to trigram. Everything I told you in strategy is necessary also.
- Sieghart – Prime Knight(PK): After the eternal patch, it is much harder to kill a PK than ever because of they’re invincible slide transitioning to their JF. You mainly want to again use the bait strategy if it gets rough on your end, bail out and use the unsuccessful bait strategy.
- Lass – Dark Assassins(DA): These guys are the hardest to beat when you’re on Rama. USE CLAW STEPPING ON PLATFORMS A LOT. Lure these guys in as hard as you can, and use the unsuccessful bait also. If they’re in one position hummering then you can use chi ball to get them, if lucky and combo. Use your safe zones wisely, otto safe zones are usually harder and can lead you into being locked by them.
In addition, you can ask me on the post on which classes you want to take down. I only covered 3 because they’re more common in PVPs.
Combos

Rama, in my opinion, has the most combos out of any other character. With X X stand and MP skill that all hits an opponent into the air. Literally, Rama’s combos are basic combos stacked upon more basic combos and combined into advanced combos. This is where it gets good, all that work to stunning will pay off here.
(Must know how to Air Grab)
This is where you wreck your opponents hard after you’ve stunned them. USE NON BURNING 2nd BAR A LOT they will not be able to counter(unless they know the secret). If they counter then go back to those strategies I covered. Here are some basic combos and some advanced combos. Usually you want to transition these after a dash attack stun.
- Falling Sky to Air Grab(Basic Combo)
- Falling sky to Double air grab without a ledge(Harder Combo)
- 1st MP bar to Air Grab(Basic Combo)
- 1st MP bar to Double Air Grab without a ledge(Harder Combo)
- Non Burning 2nd bar to grab (Medium Combo)
- Non Burning 2nd bar to another Non Burning 2nd bar(Medium Combo)(Time that delay wisely)
- My favorite, Rapid fire to Non Burning 2nd bar(Medium Combo)(Time that delay wisely)
- Falling sky to Non Burning 2nd bar(Medium Combo)(Time that delay wisely)
- 1st MP bar to falling sky to air grab or double air grab without ledge(Basic Combo)
- Rapid Fire to air grab (Medium Combo)(Clutch Grab)
- Falling Sky Juggling (Not a Combo, Just a Trick)(Honorable Mention)
These basic combos will help you explore new combos and be creative with more. Remember to save MP and use non burning 2nd bar a lot. Here are some advanced combos.
- Z Z Z Z combo to 1st MP bar to non burning 2nd bar to falling sky to double air grab without a ledge.
- Z Z Z Z combo to 1st MP bar to non burning 2nd bar to falling sky to air grab to another falling sky to another air grab.
- Quad Grab in Forgotten City with platforms
- Falling sky to Burning 3rd bar to Rapid Fire to one of the clutch grabs I’ve ever done. (I did use 3rd bar, but I wanted to combo my opponent)
- Rapid Fire to non burning 2nd bar to falling sky to triple grab.
Conclusion
If you Guys have any questions, concern, elaborating, clarifications please post on this thread or contact me. And again, thank you for picking my guide.
- Skype: LookisNub
- Find me on the Grand Chase of NA or The Real Grand Chase of NA facebook group
- Or contact me in game IGN: KN
Credits goes out to:
TofuTasty for the major support
HotStuven for the gifs
And supporters

Recent Comments