CrimeCraft Level 50 Clothing Set Builds
CrimeCraft Level 50 Clothing Set Builds by Avarice
Self explanatory here. :P This does not include anything other than Peerless, Top, Best, and Stunning level 50 clothing sets.
Goes Great with: Weapon Base Stat Comparison Charts
Peerless – Light Focus, Hit and Run build
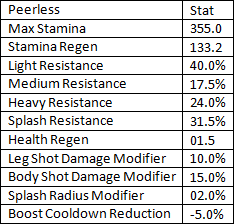
Face Slot Item: Glasses (+2 Regen)
Weapons:
- Light Weapon: R-Sys Leopard
- Medium Weapon: Hargan Bulldog
- Heavy Weapon: R-Sys Sabretooth
Skills:
- Enhanced Endurance 2
- Stealth Tactics
- Shock Grenade 3
Boosts:
- Betadyne Amplifex (A-29 is best bang for your buck)
- Medkit (Instant health or regen)
AUGs:
- Misuki FG-SHG (or any other with SHG)
Strategy and Explanation:
This build is very light, sort of kamikaze/ninja/assassin style. You want to be doing as much damage as possible in as little a time as possible, and get away as quickly as possible. A good combination of agility and deadliness. A fully upgraded Leopard can do about 26 damage a shot with 40 blue ammo and with Amplifex A-29, you’re doing 33.54 base damage.
Since you’re very weak to everything but light resistances, it’s more of a CQC build designed for smaller maps with places to hide behind in case you’re taking heavy fire. Olympia Mill and Lumberyard is a good example. Spray your enemy with your Leopard, surprise them around a corner with a few shots from the Bulldog, or flush a pesky opponent out of hiding using the Sabretooth.
The Enhanced Endurance 2 will allow you to sprint for longer to get away without you taking a hit on resistances (like EE3). Stealth Tactics will allow you to sneak up on your prey without them even knowing you’re there, unless they have Heartbeat detector, and even then you’ll be sprinting most of the time and their readings will be innaccurate. Shock grenades will allow you to stun a player, not much more explanation needed there. :P Good for every situation.
The Stealth Tactics is important though, you won’t believe how many people rely on their hearing you moving about. I’ve caught so many players off guard using it that it’s something of a must-have for me.
Top – Medium Focus, Long Range Build
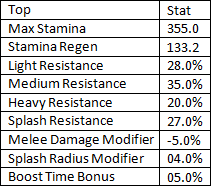
Face Slot Item: Glasses for Regen, or Mask/Googles for 5% Headshot Damage Modifier
Weapons:
- Raskolnikov SMG/Wolf&Maus; SG10
- Raskolnikov ARS/Wolf&Maus; SG1/SG2
- Raskolnikov SVR/Wolf&Maus; SG50/Exeter Marquis
Skills:
- HVI Rounds 3
- Proximity Mines 3
- Charge Compression
Boosts:
- 2 Medkits (one regen, one instant) OR
- Heavy Resistance Drug (such as Chimera) or Health Increasing Drug (Zymek Stim-Ex/Chemtech Supermax) /w medkit
AUGs:
- Misuki HR-PM (-5 second cooldown on HVI, Proxy mines stay after death)
Strategy and Explanation:
All of the Wolf&Maus; weapons are good for mid-long range combat, and the SG1 (AR) is highly accurate and deadly. The Raskolnikov weapons have a lower rate of fire, but also fare well in mid-long range combat, and the Raskolnikov SVR has a higher rate of fire and doesn’t compromise much in the way of damage. A fully modded 50b SVR does about 118 damage, 133 with 50 Blue SR ammo. The Exeter Marquis and Wolf&Maus; SG50 both have the damage capacity to kill in 1 hit med-range if you do not have the maximum range upgrades.
This build is more designed for camping, which is why you have Proximity Mines and Charge Compression. Proximity Mines will allow you to booby trap the area you are camping while Charge Compression allows you to lay down a second mine to cover your butt. You should never be camping in an area that has more than two paths of access. That’s just silly and will get a barrel pressed to the back of your skull faster than you can say “shiddailostmygawldwatch”.
I’d use SR every time HVI is available to conserve ammo to ensure 1hks, and switch to AR afterwards and start whittling people down for my teammates or clean up what they’ve missed. If someone makes it past a proximity mine, quickly glance at your minimap to see which is down so that you can hurry up and finish the job with your SMG before they can heal, then plant another mine. Make sure not to plant your mines too close to yourself or directly above/below you, -5 points.
The Health Increasing drug will assist you in case anyone tries to jumpknife you, you’ll survive it, heavy resistance drugs will help you guard against enemy snipers and LMG users. The Googles/Masks with headshot damage modifier will help you in situations where you are camping with just your head or very little of your body showing while behind cover.
Also remember not to camp the same spot too long or your enemies will catch on to you and find a way to take you out while staying out of your line of sight. This build is best used in Isopach Oil, Old Sunrise City Hall, Sunrise Harbor, Delosville, and Mackenzies Sports Complex.
Best – Heavy Focus, SuperTank
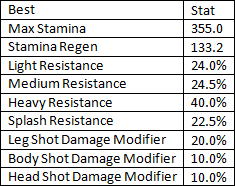
Face Slot Item: Goggles/Mask w/ 5% Headshot Damage Modifier
Weapons:
- Oslo Odin SMG
- Valley Forge SG
- Raskolnikov PRS
Skills:
- Blast Helmet 3
- Liquid Armor 3
- Direct Inject
Boosts:
- Indura Liquidstone 26-O/30-Q
- Chemtech Sureboost/Zymek Lifeline
AUGs:
- TripleS DIS-BA
Strategy and Explanation:
This is the highest damage resistant build possible. With the Blast Helmet and Liquid Armor skills as well as the Goggles/Mask that gives 5% Head Shot Damage Modifier you have a total of 25% Body Shot Damage Modifier and 35% Headshot Damage Modifier.
The Liquidstone will buff up your resistances past 50% across the board with level 40 (except Splash which will be 48.5%), which is exceptional. Pop a medkit any time you get worried. With the DIS-BA Ability AUG, you don’t take the run speed penalty from Blast Helmet and Liquid Armor, and you also get 1 extra use out of your drugs. =)
The weapons for this one can be anything really, but I prefer these weapons with this profile. The Rask just feels like it’s a tank-user weapon. xD Good for any situation, really.
Stunning – Splash Focus, Explosives Expert

Face Slot Item: Regen Glasses
Weapons:
- R-Sys Leopard
- Black Sea Iapetus
- Hargan Mastiff/Jericho Ragnarok
Skills:
- IED Training 3
- Demolitions Training 3/Fire Control
- LMG Turret 3/Molotov Cocktail/Cluster Rocket
Boosts:
- Chemtech Forceward 50 (very cheap and easy to make lvl 50 drug)
- Betadyne Rejuva HPS
AUGs:
- Misuki IR-MC/any aug with MC (if using fire half of build)
- Any AUG with CR if using Cluster Rocket
Strategy and Explanation:
You have an extremely high resistance to Splash, so you don’t have to worry about blowing yourself to bits, however you do have to watch out for anything else that comes your way. Pop in a Cluster Rocket when you spawn and fire away. Best when shot at groups of enemies, and fire on the ground, at their feet.
With the CR Ability AUG, they’ll be stunned for the big bang and almost a guaranteed kill. There are rare occasions that it’s possible to get away from the explosion and for some reason some people don’t get stunned at all. Also, if you hit your teammates with this they will be stunned, too, so watch out for them.
NEVER fire your RL while a teammate is in front of you. It’s fine if it’s an enemy, because at least it wouldn’t be a waste of ammo.
I like to hit an opponent with a rocket and then either drop a turret or hit them with a molly to take them out if they don’t die on the first hit. Works very nicely. =) If you don’t have any of those skills in favor of Cluster Rocket, whip out your SMG and clean up.
In larger maps, if an opponent is too far out Black Sea Iapetus makes a nice killing tool, with virtually no recoil and the same range as an SG1.
Another multi-purpose build. =)
And that’s it! If you have any questions, feel free to ask. ^^

Recent Comments