Destiny Vault of Glass Detailed Walkthrough
Destiny Vault of Glass Detailed Walkthrough by F8L Fool
This walkthrough will assist any and everyone succeed in the Vault of Glass raid. The walkthroughs are divided up by boss and event, in the order that you will encounter them in the raid.
The main purpose of the guide is to lay the groundwork for mastering the raid and eventually unlock Raider, Epic Raider and the pinnacle of them all: Flawless Raider. As my group becomes more familiar with the bosses and the game as a whole, the strategies will become more fine tuned. So be sure to check back often as there will be a large amount of reiteration in the coming weeks.
Now, on to the guide!
_______________________________________________
Before You Begin
Before you start your raid I suggest each member of your fireteam prepares for what’s to come. If you are really confident you are prepared and feel like glossing over this information, just skip over the spoiler below and get right to business.
Boss #1: Open the Vault of Glass
Objective(s): Summon a Conflux using Sync Plates while keeping Praetorian’s out of them
Enemies: Goblin, Harpy, Praetorian
Guardian Grouping: 2-2-2
Overview
The first encounter in the Vault of Glass is a rather simple fight with only a single phase and one real mechanic. You must simultaneously activate and maintain three Sync Plates at three different locations in the entrance hall, in order to build a Conflux. The Conflux opens the entrance to the Vault of Glass after it has been channeled long enough. While the Conflux is being constructed, a steady stream of Vex will attempt to disrupt the process.
The Encounter
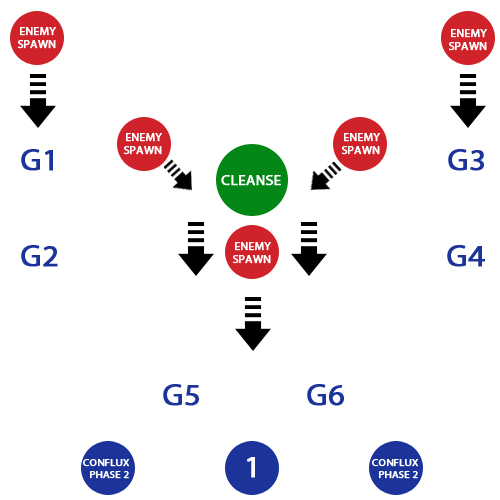
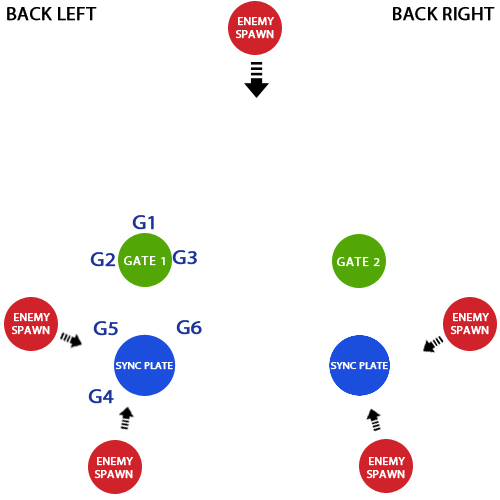
In order to handle the Vex you should break up into pairs to defend each Sync Plate. The locations of the plates, enemy spawn points and their pathing, as well as where the Guardians should be standing can be seen in the image below.

Positioning and map layout for the Vault of Glass entrance event
Each Guardian should focus on the enemy spawn nearest to them. Roughly every other spawn wave a Praetorian will appear. When this happens the most important thing to do is call out where it is (i.e. Back Right Praetorian, Front Left Praetorian, etc.) and focus fire it down. Nothing else matters as much because the Praetorian is the only one that can disrupt the Sync Plates, so they need to die long before they reach them. They are also the most dangerous so they shouldn’t be up long.
The most important role on the map is the G3 slot. Enemies will frequently peel off and loop towards the middle Sync Plate. When this happens pepper them down as best you can and tell the mid they are on their way. You also should be looking towards the right sync plate to put in some damage if they are being overwhelmed, especially if you have a quality scout rifle or assault rifle with bonus ranged effectiveness.
That is literally all there is to the fight. It is just rinse and repeat, clear waves and keep them off the plates long enough for the conflux to spawn.
Boss #2: Templar
Objective(s): Defend the confluxes; destroy the Oracles; defeat the Templar within 8 minutes
Enemies: Fanaticm Goblin, Harpy, Minotaur
Level: 26
Guardian Grouping: P1&2 2-2-2, P3 2-1-3
Overview
This is the first full on boss rather than mini-boss event in the dungeon. It consists of three phases, two of which have sub-phases within them. For the majority of the fight the boss is hidden behind a shield, completely immobile and rarely performing any task.
What makes the fight difficult is the sheer number of things happening at a time along with many foreign mechanics. There is the constant looming threat of the Templar’s Mark of Negation which instantly kills the player that is debuffed, along with a large variant of adds and the first true cleanse mechanics within Destiny.
The key is to designate roles to every person along with quadrants they are responsible for. Beyond that a huge amount of responsibility rests with the Relic carrier. Because if the relic carrier dies it must be picked up within seconds or the entire group dies. As long as each person does their assignment this fight is simple. A marathon, sure, but still simple.
Phase 1: Defend the Conflux
The start of the fight is fairly straight forward in that you must defend a single Conflux from the invading horde of Vex. If they reach the confluxes 4 times you will lose the fight. They will spawn in three primary locations: back left, back right, and middle. The only catch is a new type of enemy called a Fanatic that drops green pools of slime on the ground upon death.
The pools place a debuff on whoever steps in it called a “Mark of Negation”. You can tell if you have it by a red a red icon above the bottom left HUD that will say “Mark of Negation” next to it.
If you happen to step into a pool for whatever reason, you must quickly get to the very center of the room and get cleansed. A bright white light circle is located there—amid three separate enemy spawn points—that will instantly remove the debuff when you walk into it. The reason you must cleanse ASAP is that the Templar will periodically cast a skill called “Ritual of Negation”, which instantly kills any player that is marked. Avoid getting within melee range of the Fanatics and kill them as fast as you can when you see them.
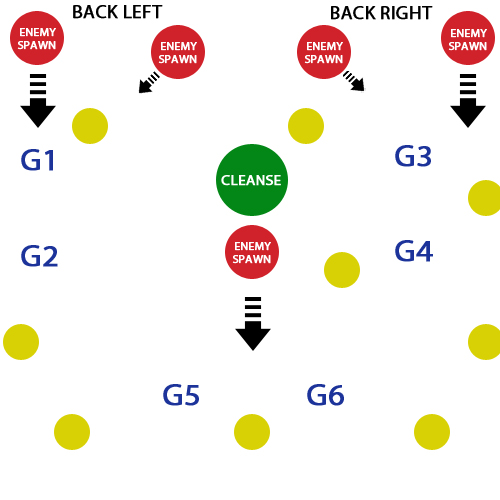
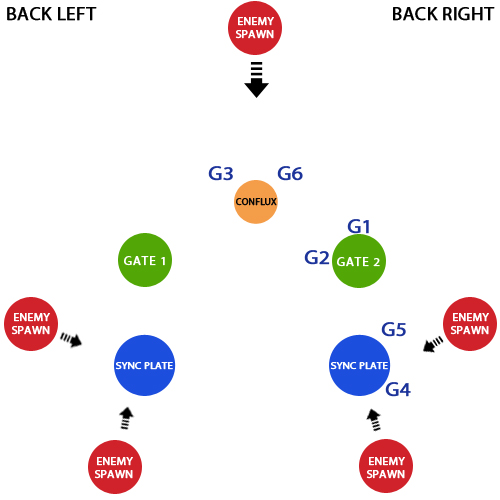
In order to combat the Fanatic pools and keep all enemies from reaching the Confluxes, I suggest doing the positioning in the following image.
Templar Phase 1 positioning and map scheme
The left and right sides of the map can be handled quite easily by two people without incident. However, every so often a huge zerg of Fanatics will overrun the middle and Axis Harpies will begin to spawn at the back left/right. You will know when this is about to occur by the message “The Templar summons its legions” at the bottom left of your screen, a constant beeping noise, and the tunnels will cease to spawn. When the zerg begins G2 and G4 should peel off and clean them up before they can get far up the stairs. G1 and G3 can handle the harpies quite easily with a Rocket Launcher or Heavy Machinegun.
After a few minutes the middle Conflux will split into two; one on the front and right left. Minotaurs will also begin to spawn on the back right and left tunnels with a void shield, so make sure to have a Void weapon equipped—preferably a Fusion Rifle.
A third and final split will happen that is the same as the previous phases. Just hold out
Phase 2: Destroy the Oracles
In this phase the Fanatics will stop spawning. Additional Goblins will spawn now around the perimeter of the map on concrete perches. They will indefinitely snipe players and have an extremely short respawn timer. Just continuously move and only focus one down if you are low health and forced into cover near one.
The biggest change from P1 is an enemy called an Oracle will appear at one of 8 preset locations repeatedly, for short bursts at a time. They are large, yellow, glowing cubes that grow in size the longer they are up. You will know that one has appeared when a series of chimes or bells rings out, indicating that you must find and dispatch it immediately.
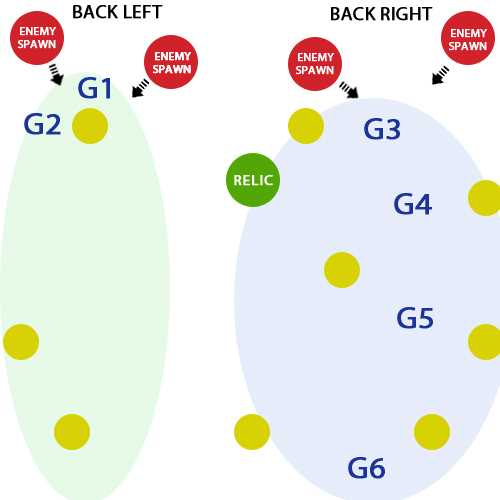
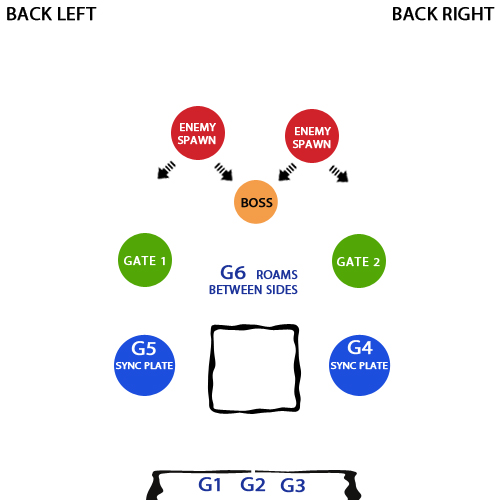
The Oracle locations as well as the adjustments in Guardian positioning can be seen in the next image:
Templar Phase 2: positioning and Oracle locations (yellow dots)
If you happen to let an Oracle finish its song it will place a mark on everyone in the raid. The only way to remove it is by going into the cleanse. Obviously having the entire raid cease what they are doing is dangerous, so the Oracles must die at all times.
Simply continue killing goblins Oracles until the phase ends.
Phase 3: Defeat the Templar
The final phase is the one that requires the most amount of caution and coordination out of the three. The cleanse circle is now disabled but the risk of Mark of Negation remains, thanks to Oracles also being present in this phase and the Relic. If the relic holder dies at any point in this phase the relic will fall on the ground. If it is not picked up within 3-5 seconds the Templar will kill the entire group. Luckily the only enemy that appears are slow moving Harpy’s that only attack if left alone for a long time.
To begin the encounter you must first pick up the Relic. The Relic is a glowing sphere that has now been placed on the inactive Cleanse circle. It is the most important object in the fight and whomever holds it has the most responsibility, by far. Because of that it requires its own mini-tutorial and explanation below. Especially because it will be seen again later on in the raid.
Relic Controls:
+
Jump+
Now that you know what the Relic does you can decide who uses it before picking it up. If you are with someone that is below level 26 they should never carry the Relic, due to the fact they have a higher chance of dying.
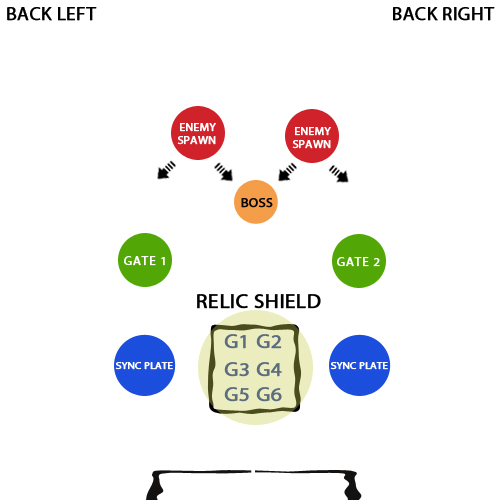
Here is the new positioning scheme for the third and final phase, as well as the Oracles each side is responsible for killing:
Templar Phase 3: positioning and Oracle responsibilities
Once the Relic carrier picks it up the Templar will spawn at the dead center of the map, between the middle and front stairs. He will constantly bombard players just like the boss in the Strike “The Nexus” does. However, he will be encompassed in a giant shield that makes him immune to all attacks. This shield must be taken down and you will use the Relic super to do so.
The super takes some time to charge but you can shorten it dramatically by killing Harpy’s. Keep the relic carrier on the back left side with a single person and roam when the wave is cleared, always returning when possible. This serves two purposes: 1.) guard their partner by killing Harpy’s full time, which allows the non-relic player to scan the entirety of the left side for Oracles, and 2.) keeps them out of the line of fire from the boss.
This tandem will take care of 100% of the left side Oracles that spawn and should never need assistance, thanks to the enormous burst damage of the relic.
The right side should be taken care of by the remaining four players. They must keep the side clear of Harpy’s and every Oracle in order to have clean transitions to the non-shield phases.
If at any time an Oracle should get the Mark of Negation cast off everyone should immediately collapse on to the relic carrier. You will be able to see where the Relic is at all times because he will have a grey and white star on him. After grouping up the carrier then uses  to remove the mark and the players return to their original positions.

Templar Phase 3: the relic prior to being picked up; note the white/grey star icon
Once the super is nearly charged the relic carrier should tell the group he is going to bring down the shield. Everyone should then drop what they are doing, unless it is killing an oracle, and beeline towards the boss. When the shield falls unload on it and try to aim for the white light on the front of it to do bonus precision damage.
Here is a video of a kill from my perspective as the Relic Carrier.
Note: I show how to block the teleport in order to be thorough and showcase all of the mechanics. I personally prefer to not block it unless it is absolutely safe. You can read more about that below.
Two mechanics will take place once the shield is brought down that I will now cover. The first is Detain and the second is Teleport.
Detain
As soon as the shield falls the Templar will cast an ability called “Detain” on anyone within its line of sight. It is a red pixelated bubble that surrounds the player, slows them, and blocks all outgoing damage. Detain lasts 12 seconds and will remain until it takes enough damage to be broken or the duration ends. Luckily it can also be broken by outside sources, so if someone is in a bad location at the time of the detain for whatever reason, the party can focus fire it down and break it very quickly.
What makes Detain especially dangerous is that if you physically walk out or exit it for whatever reason before breaking it, you will continuously take damage until you either die or the Detain is destroyed. The person that should be most wary of the mechanic is the Relic Carrier. They can break their own Detain barrier by using  or
or  +, but it can be extremely finicky. If you are too close to the edge of the Detain when you use it can thrust you out of it and position you on the outside, leading to a death most of the time. So when you use make sure you are centered or just inside of the ‘s max range.
Lastly, the one thing about Detain that everyone needs to be conscious of is falling out of it while jumping. If you are falling from a ledge or jumping at all when the Templar Shield comes down and you get detained, the Detain barrier will appear where you previously were. Meaning you will instantly exit its perimeter and start to die. To avoid this resist the urge to jump or run off of a ledge when you hear that the shield is being broken. This goes double for the Relic Carrier since there is a high chance your raid will wipe if you die.
Templar Teleport
A few moments after the shield is brought down the Templar will attempt to teleport to a new location. When he does so he will reapply the immune shield and you must use the Relic super again to disable it. You CAN stop the teleport from happening if you proceed to his intended destination, which is indicated by a red circle and a white light vertical line. However, when you stop it he will spawn a Minotaur that is rather problematic.
Templar Teleport Destination
It is also very dangerous most of the time to actually stop the teleport from happening. You will be out of position when doing so, susceptible to fire from all angles, and he may teleport before you reach the circle—often leading to a quick death from being too close. If you stagger the Minotaur by never consecutively blocking his teleport it isn’t too bad, but still dangerous if Harpies aren’t taken care of well.
Because of this I suggest just avoiding the teleport and killing him. At most you’ll shave off 1-2 minutes from the kill, which isn’t a big deal. If you let your Relic Carrier farm kills non-stop he will be at ~75% super before the teleport and re-shielding even begins.
This means there’s no more than a 4-5s delay between him teleporting and the shield coming back down again. Add it up and you prolong the fight by MAYBE 45 seconds, or a minute at most. That’s a lot better than wiping outright because a Minotaur teleported in and nearly 1-shots the relic carrier, who then dies to Harpies/Minotaur/Templar as they flee.
Super, Shoot, Repeat
This fight is simply rinse and repeat during the third phase. What makes it difficult is always having maximum up time on the boss when he shield is down. If you do not have everyone up constantly and to the boss when the shield falls, you run the risk of the fight going too long.
Once the fight reaches 7 minutes he will let out a red warning that he is about to Enrage. A minute later he will enrage and start spawning Minotaurs and Goblins. Don’t panic: all hope isn’t lost. You can still kill the boss if it is low health so long as you quickly dispatch the Minotaurs and group up. Although I suggest simply wiping the group if within the first minute or so you have a few deaths, rather than risking an enrage.
Continue to bring down the shield, do damage during it, and kill oracles until the boss is dead.
Boss #3: The Gorgon’s Labyrinth
Objective(s): Sneak by the Gorgon’s unseen
Enemies: Gorgons
Level: N/A
Guardian Grouping: 6
Overview
After killing the templar you will traverse the side of the wall and then reach a huge hole. Back up and sprint towards the edge and jump as far into the hole as you can get, away from the left wall. Don’t use double jump until you are very near the ground or else you will die.
Once you land you’ll be in a dark cave along with a few fluorescent Gorgon’s. They are very slow and path around in a preset pattern. They will not notice you if you crouch and walk behind them, stand on an elevated surface, or hide just outside of their rather short range. The closer you get to their visibility range the faster a beeping noise will become.
There are two hidden chests here on opposite sides of the room. The first is on the left and the second is on the right. Get them both prior to moving on to the next section because if you don’t it will be lost forever. See the video below for how to get both chests and reach the exit.
Chest 1
Once you drop down head directly to the left. You’ll see a steep hill that you can climb up, as well as some stepping stone to the left of that. Rather high up is a triangular hole in the wall that you can reach by ascending the stones or the hill. Once you reach it head to the left down the tunnel until you reach the chest.
Chest 2
The second chest is just beyond the first Gorgon on the right. To reach it take the rightmost path and evade the Gorgon. He will walk around a giant boulder, going left to right. Follow him and once he’s on the rightmost side of the boulder have your entire party sprint straight past it until you reach a tiny alcove with purple fire in it. Wait there for just a moment until the second Gorgon does another lap around the boulder. Then follow the leftmost wall until you reach the chest.
After you get the chest you should just suicide so you can start back at the beginning.
Labyrinth Exit
From the respawn point walk straight in and to the left of the giant center rock. You’ll see a Gorgon just ahead which you need to let pass to the right. After it is out of range run straight until you see a narrow crack in the wall. Enter it and hug/follow the right wall all the way until you are finally forced to take a hard left. Proceed through the hallway until you exit and reach the jumping puzzle.
Boss #4: Atheon
Objective(s): Defeat the gatekeeper; collect the relics from the timegates to build the Conflux; defeat Atheon
Enemies: Gatekeeper, Goblin, Harpy, Praetorian, Oracle
Level: 27 (P1/2), 28 (P3)
Guardian Grouping: P1 2-2-2; P2 3-3 / 3-2-1 / 6; P3 3-3
Overview
This fight combines the aspects of all of the previous encounters and adds even more. You will be getting a Relic, defending separate Sync plates, cleansing debuffs, and much, much more. One of the many difficult parts of this fight is the overwhelming number of directions enemies come from in combination with the sniping power of the Goblins. Combined with the need to split up a great deal and you end up with a ton of personal responsibility.
The key to the entire fight is how you handle the Timegates (activated via Sync Plate) and the Relics. If you manage that well everything else comes down to not dying to a myriad of things.
The Encounter
Phase 1: Kill the Gatekeeper
The first phase is as cookie cutter as they come. Head up to the platform where a ton of dormant Vex are waiting and pick them off. Once the white Vex are cleared out you can start taking aim at the Gatekeeper. With some focus fire it will go down within one or two teleports around the map. Nothing to fear here.
Phase 2: Collect the relics and defend the Conflux
Phase 2 is where all hell starts to break loose. In order to progress to the next phase you must open up a Timegate on either side, go in and kill the Gatekeeper, and take the Relic that it drops back to the present time. This must be done on both sides before the newly spawned Conflux is destroyed by Vex in the middle of the map.
The instant you transition to this phase G1, 2, and 3 need to get in the left gate. It is the harder of the two because of the Praetorians so you want to get it out of the way first. While the Relic trio are in the Timegate the remaining people outside must fend off the Praetorians so they don’t sabatoge the Sync Plate, just like in the very first event of the raid. If they close it while players are inside they will become “Lost in Time” and the entire raid will die. It must stay open until they exit.
This is my setup for keeping the initial Sync Plate safe while the Timegate group gets the relic:
Atheon Phase 2: G1-3 get in the gate that G4-6 opens and protects for the full duration
After killing the Gatekeeper and picking up the relic the three players need to exit as fast as possible from the same side of the gate, so they will be standing just outside the gate together. When they exit they must stand still so the relic carrier can hold and cleanse off the Mark of the Void debuff that is gained when the relic becomes active in the Timegate. The instant the debuff comes off the relic carrier and one of the people from the original Timegate group needs to go to the right one, activate it, and go in.
Two of the remaining people outside will fend off the newly spawning Minotaurs that are coming down the center of the map to destroy the Conflux. The other two will keep the right Sync Plate clear just like they did with the previous one.
This will be the new Guardian distribution after the first Relic is secured:
Atheon Phase 2: G3 and G6 protect the Conflux from Minotaurs
After the relic carrier and his partner enters the second gate the carrier needs to launch a Super into the middle of the enemy, making sure to hit the boss. The partner should use rockets and grenades to finish off the rest, and then steadily push the gatekeeper up the hill. Once the screen begins to get dark the Relic Carrier needs to and cleanse both himself and his partner, then continue the assault on the gatekeeper.
If for some reason the Timegate group is struggling inside, you can try to use three people like the first gate, but you run the risk of losing the Conflux to minotaurs.
Upon acquiring the second relic make your way outside as safely as possible in order to not drop either relic. If either relic carrier drops their relics at this point it will be an instant wipe, so be cautious. Once outside the entire raid should group up on the Conflux and dispatch any remaining enemies until the event concludes.
Phase 3: Defeat Atheon
There is an eight minute enrage timer, but using this strategy it will be nearly impossible to take that long. If you are running into the 8 minute timer with this method either people are dying or are too low level to kill the boss.
The third and final phase of the fight is the main boss. He has an enormous amount of health, hits very hard, and spawns self-destructing Harpies. He also forcibly transfers the three farthest players—no it is not random like many seem to believe— into the timegate to pick up the relic.
The difference is that this time the exit won’t be open until the people on the outside open it for you. You will also be able to immediately pick up the Relic and the Mark of the Void debuff will again be present. Unfortunately there are also Oracles spawning that must be dealt with immediately or they kill everyone in the timegate and wipe the raid. Because of the Oracles you can’t simply flee the timegate in a hurry and circumvent dealing with frequent Mark of the Void cleansing.
After exiting the timegate you are given a buff called “Time’s Vengeance” which multiplies outgoing damage on Atheon by roughly 5x. You can resume attacking Atheon for thirty seconds until the buff expires, then he will teleport three more people into the timegate. Each time he does this he forces any open Sync Plates and their gate closed and destroys the previous relic, meaning that the relic holder can be teleported as well.
Here is a video of our entire fight using my method. It is of my perspective (Relic Carrier):
Here is another video from the perspective of the Titan inside the timegate, SneakyBean:
Group Setup
Your entire raid will be divided up into two separate groups of three: timegate players and Present players. The timegate players are the three guardians that will always be entering the timegate during the transition. To accomplish this they must stand the farthest away from the boss, because he will always teleport the three farthest players. This happens 25 seconds into the fight as well as 25 seconds after you exit the timegate.
To prepare for this one player should be standing on top of/in the center of each stone column directly in the center of the Sync Plates. They will constantly be charging up both sides during the Timegate phase, so no matter where you are teleported, you will be able to get out quickly. It also helps to funnel the Harpies away from the gate itself so the timegate group can exit safely. They are simultaneously killing Harpies and cross firing to the other Sync Plate to assist. The third player roams and helps whoever needs it.
The group distribution will look just like this when you first engage the boss:
Guaridians 1-3 are waiting on the ledge in the back for teleport; 5/4 on Sync Plates with 6 roaming and helping both
When the timegate players are teleported inside they must immediately focus down the adds in the center of the room, as fast as possible. You should always save your supers to accomplish this and make the process as painless as possible.
Timegate Rooms
Jungle – In the Jungle room everything except the minotaur should die before your partners touch the Oracles. Try and line of sight the minotaur in the process if he doesn’t instantly die from the onslaught. The Relic player should use their Super ( +  ) on it as well as doing leaping ground slams ( + ) to help stagger and/or finish it off. Just don’t get killed in the process no matter what, or neglect cleansing. After the oracles are gone exit the room regardless of if the minotaur is alive.
Desert – In the Desert room everything should die in mere seconds. The Relic user can jump in and use ground slam to clean up all of the mobs with ease, if any are left up by his teammates that is. Clear the relics while constantly cleansing and make your way out. The best case scenario is to get this room first because you will not have a super to deal with the Jungle quite yet.
***Transition to Present with the Relic***
This is the missing piece of the puzzle for the entire fight. The following method is, in my opinion, the true way this boss is meant to be done.
After downing all Oracles in each room you need to walk out of the gate with all three players in tow. Do not sprint out because it can glitch and keep you in the room. Walk, don’t run. The moment you exit you will start holding to get everyone cleansed then jump on to the square isolated platform that is located between the two Timegates/Sync Plates. The rest of your group will also drop what they are doing and jump there as well.
The relic holder will then hold indefinitely until Time’s Vengeance expires after 25 seconds. During the 25 seconds of the buff you will be able to have the shield up and negate all incoming damage, while allowing all outgoing damage to continue. Make sure that your whole part is to the right of the rock on the left or you will take splash damage when Atheon’s attacks hit it.
When done correctly this is how your raid should appear during “Time’s Vengeance”:
All 6 Guardians are now stacked on the middle platform, while the Relic Carrier shields them with for the duration of Time’s Vengeance
While the shield is up four out of the 5 remaining players need to be damaging Atheon. The 5th player will be cleaning up the Harpies that are lined up at the edge and shooting at you, so that the Sync Plate players can safely return to their spots.
Once the Time’s Vengeance buff on the bottom left reads 0:02, the three Timegate players will turn around and jump to the platform behind them. The three Present players will jump back to their spots. If you have a highly leveled Defender Titan they should throw down their Ward at 0:02 to help make the leap backwards safer.
Shortly after the debuff expires Atheon will teleport the farthest three players into the opposite Timegate they were previously in. So if you started in the Jungle you will now be in the Desert, then the Jungle, and so on.
From here on out it is rinse and repeat. So long as no one dies, the oracles are cleared quickly, and the group collapses to the center before he stops summoning Harpies the boss will die with time to spare. It is all about flawlessly executing the Timegate while the Present group plays as safe as possible. The boss should die somewhere between 5 and 6 minutes when done properly, easily avoiding the enrage timer.

Recent Comments