World of Tanks Tips to Prevent Lag
World of Tanks Tips to Prevent Lag by blacksheepwarrock
Step 1 :
This might sound silly but if you got too many friends on your buddy list, You will lagg.
It’s best to keep it around 50 friends max.Depend on the game are you playing on but it works for most of them
Step 2 :
A tool called ” Game Booster ” closes down all windows aplications you dont need for gaming.
and in that way, Reduces a bit of lagg, look for it on google.
Step 3 :
Turn off your ” Anti-Virus ” This helps alot.
But dont forget, When you stop playing, Turn it back on!!
Step 4 :
If you are running Windows XP on a slower computer you may want to turn off all the excess visual effects. These effects can look appealing, but there is no doubt that the more visual effects the Operating System has to handle, the slower the system will be. You can disable the visual effects to increase the speed of Windows XP.
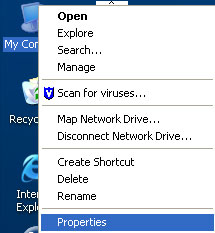
First we need to get to the Visual Effects settings. Right click on My Computer and select Properties.
Click on the Advanced Tab. Then under the Performance section click the settings button.

The Performance Options window should open with the Visual Effects tab open.

As you can see this computer is set for best appearance. The easiest option is to simply choose the option to Adjust for best performance. This will turn off all of the visual enhancements.

Now press ” Apply ” and its done!
Step 5 :
Defragment your disk drives once a month for faster data access.
Click Start > All Programs > Accessories > System Tools > Disk Defragmenter ~ to launch the utility.
Step 6 :
right-click on the desktop, select ‘Properties’, under theme select ‘Windows Classic’. Disable the wallpaper and set a color of your choice. Disable your screen saver too.
Step 7 :Disable compression and indexing
Right-click on your (C: drive and select properties. At the bottom of the dialog that pops up you will see two check boxes called ‘Compress drive to save disk space’ and ‘Allow Indexing Service to index this disk for fast file searching’. Uncheck both check boxes and click ‘Apply’.
Step 8 :
Disable Services
Go to Start > Run, type in ’services.msc’. To turn off a service, double-click on it and select Disabled under Startup type.For normal use, disable the following services:
Alerter
Background Intelligent Transfer Service
ClipBook
Computer Browser
Error Reporting Service
Help and Support
Indexing Service
IPSEC Services
Messenger
NetMeeting Remote Desktop Sharing
Network DDE
Network DDE DSDM
Performance Logs and Alerts
Portable Media Serial Number
QOS RSVP
Remote Desktop Help Session Manager
Remote Registry
Secondary Logon
Server
Smart Card
Smart Card Helper
SSDP Discovery Service
System restore Service
TCP/IP NetBIOS Helper
Uninterruptible Power Supply
Universal Plug and Play Device Host
WebClient
Windows time
Wireless Zero Configuration
WMI Performance Adapter
Step 9 :
Virus Scan your pc every week or so.
——————————————————————————————————-
For Windows XP
Download the following program: TCP optimizer (GOOGLE IT PLEASE)
Its a really light program, and it changes the settings on your registry so that you can get the most out of your connection.
But in order to do that you must know at what speed you connect to the internet.
If you see speed 100mbps you are probably looking at the speed your pc has to your modem ,
not the modem to the internet so look further, heck ask your mom and dad if u have to.
Now, you have the progam downloaded and everything, the first thing you need to do is find out how much your MTU is.
Click here www.speedguide.net:8080/ And you will see it on top saying for example MTU = 1492 or MTU = 1500
The MTU means Maximum Transmited Unit. The number is in Kilobits.
So when your pc talks with a server or another pc on the internet it sends out thousands of those units.
Now what happens is this, windows have as default 1500 as the MTU, if your provider uses a smaller number, it will have to convert every single packet from 1500 to say 1492.
To do that it requires some time, very little time, but it adds up since there are thousands of those packets sent and received thus your ping gets higher.
So what you need to absolutely make sure at first is that your pc sends out the packets at the right size, to save the server from needing change them!
All good until now? i hope you understand what i just said, if you did not , please get someone who does to fiddle with your internet settings, i don’t want you guys to mess up and blame me.
Okay great! Now lets start tweaking
Do what i write in the same exact order.

First off we open the TCPoptimizer program.
We go to the bottom of it and click on custom settings (1)
On the network adapter settings we check modify all network adapters(2)
We put the MTU the site gave us on the MTU box (3)
Then we drag the slider on top to the network speed we have (changes the receive window automaticaly) (4)
Put Time To Live (TTL) 64. (5)
Max duplicate ACKS 2 (6)
Make sure window scaling is checked and timestamps are not (7)
And that does it!
Click on apply , And click okay. Then restart your pc and you are good to go!
If you have messed around with your modem settings before i strongly recommend you to find the MTU setting for the modem as well and change it to the one the website shows u.
If u cant do it it is okay, don’t mess with your modem settings too much because every modem is different so i cant post a guide on how to do it to yours.
Now for Vista or Windows 7 users:
The newer versions of windows have a self tuning TCP connection program !
So you dont have to fiddle with any of those stuff like you did on windows xp!!!
BUT… yea theres always the BUT
They do not tweak the MTU.
They do anything else just not the MTU.
So now what you need to do is go to our trusty site www.speedguide.net:8080/
Now if your MTU=1500 then my man you are good to go!
Whatever is causing your lag is definately not from your connection settings.
If it is another number then you will need to modify it.

To modify it you have to open an elevated command prompt.
To do that write cmd on the search (1)
then right click on the cmd prompt (2)
select “run as administrator”.(3)
Once you got that right
enter the following in the command prompt netsh interface ipv4 show subinterface (4)
You can copy paste it from here just make sure you right click and select paste on the command prompt because ctrl+v does not work.
After you do that it will show you the results. You will see that MTU is 1500 as default. In my picture its 1492 because i have already tweaked mine.
To change the MTU from 1500 to whatever the website tells you the real MTU that gets there is put the following in and replace “MTU” with your mtu’s number and “Local Area Connection” with whatever your pc calls yours.
So put
netsh interface ipv4 set subinterface “Local Area Connection” mtu=MTU store=persistent (5)
For example for my pc it was
netsh interface ipv4 set subinterface “Local Area Connection” mtu=1492 store=persistent
if you do it right you will be rewarded with an ok
Once you do that you can also try to fiddle with your modems MTU and change it with the one the site gives you, if u cant dont bother at all.
Reboot and ure done
Good luck everyone!

Is there any chance of this stuffing up your internet? if so, how would you fix it?