Overwatch Choke Point Strategy Guide
by Willster328
Who Am I
OW player basically since release. Highest I’ve been is 3300 across all 3 Roles (been Diamond for about 13 seasons now). I climbed from Bronze to Diamond in my career. I do have Alt Accounts for which I reserve for characters I’m not at a Diamond level with mechanically or skillwise that range from Silver to Plat, and I play with friends that are lower than me, so quite often team SR will be in the Gold/Plat range, which is applicable to much of the target audience I have here.
Bottom line, this is my experience in Silver to Diamond, cannot confirm anything higher than that.
What is this Guide
It’s a theoretical approach to what teams are currently doing incorrectly and not thinking about when they play Chokes, and there is a Map by Map breakdown of some of the notorious chokes at which the community is guilty of this. People play on “autopilot”, walking in directions out of habit, rather than really thinking of strategy and effectiveness.
What is the TLDR
The average attack team takes an auto-pilot approach to most choke points by just pressing W, without much regard for the angles they’re receiving damage, the route they take, and most importantly how they’re utilizing natural cover
Let’s Get Started
Introduction
Most teams will statistically exit out of the front door directly ahead of them on attack, and typically just walk forward in the path that opens the quickest to them. Where people start to get overwhelmed is that most of these auto-pilot approaches expose yourselves to mass amounts of incoming damage. And it’s one of the reasons why people clamor for shields or more healing, because playing with two off-tanks, or with dive tanks, makes taking these routes near impossible given the math behind damage/healing thresholds.
In the following examples, I’ve drawn out the Entrances and Choke points to certain maps with graphics drawn over them to display what I’m talking about. The key for all these maps is as follows:
| Color | What it is |
|---|---|
| Red | The average auto-pilot route teams take |
| Red Tickmarks | Where you’re exposed to enemy spam damage |
| Green | The proposed “safe” route |
| Green Tickmarks | Where you’re exposed to enemy spam damage |
| Pink | Where your spawn doors are |
| Orange | Where the average Defensive Comp sets up |
| Yellow | The average length and spam damage sightlines |
| Purple Dots | The Health Packs |
The things you really need to focus on the maps are the Red and Green route, and the tickmarks along those lines. The tickmarks are where your team is essentially “exposed” with no natural cover given the yellow sightlines of spam damage
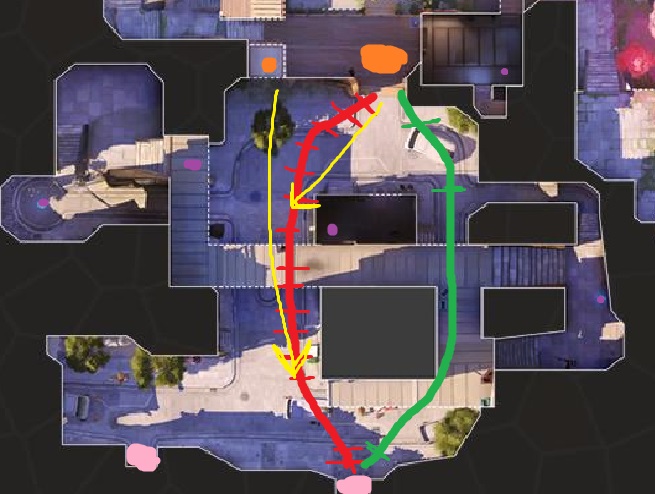
Hollywood

As you can see, the average route attacking teams take is in red. And if the Defending team pushes up a few feet at the choke, they can basically see you the whole way you walk from your spawn door. It’s over extending if they stay there too long, but teams with range (Hanzo, Junkrat, Pharah, etc) will often push up a bit because they have such a clear sighline at your spawn door.
If you look at that Green route, not only does it have you starting at a completely different spawn door, which eliminates the chance of starting spam dmg (Junk traps, Symm turrets, Rein firestrikes, Ashe dynamite, etc) which is a common theme across these maps, but it literally takes you indoors along the side of the map almost completely removing you from the enemy’s line of sight.
At which point you essentially still end up at the choke, but you’ve taken a route that limits the spam damage which not only keeps you alive through it, but also works wonders for shield uptime for characters like Rein/Sigma, and or Orisa who needs to constantly wait for the Shield Cooldown.
Not only that but you pass two Healthpacks along the way, and you still have the option to choose which choke door you want to go through.
It also eliminates you from some of the particularly lethal damage that comes from a defender holding the high ground, where you essentially get into sniping matches with them if you’re standing in the middle of the open space, versus if you use the natural cover to change the angle of the teamfight.
Eichenwalde

Almost all the same theory will hold true for all these maps as we go through them. The average Eichenwalde team will leave the main door (exposing themselves to lots of pre-fire), and will just walk straight ahead up the long hallway to which there’s tons of spam damage. It makes it almost impossible to actually get close without taking significant damage first.
But if you look at the Green line, it uses a completely different spawn exit, and takes you around the map where once again, you are almost completely out of line of sight of the enemy, to which you can very easily get to the choke and decide which door you want to go through once you’re there. Same thing with Health Packs, there’s two there along the way if you need them.
Hanamura
Same theory, different map. The average comp will take that red line and just come face first with spam damage almost the whole way since so many characters can either abuse the window, or straight up stand on top of the beam (Hanzo, Widow, etc). You also take a long way to the choke by trying to cross over.
Whereas the Green line, you’re almost entirely covered by buildings up until you get to the van at the choke, at which you can easily make your Dives or Brawl out there. Once again, two health packs along the way there for you with easy access to get to that high ground stairwell if you want it.
And most of you have done this unknowingly without realizing it. Think of the Symmetra TP strategy that gets used so often. How do teams typically do it. They go right side all the way up, and put the TP down really quickly. Now think, why do the Symm TP comps always do this? Because they know, they want to be sneaky so the team can’t see what they’re doing, and they need to limit the spam damage so the TP can stay alive and you all make it through.
This strategy isn’t just limited to Symmetra, this is how you should be playing frequently because this is what we mean by playing natural cover.
Volksaya
Most people just exit the front door and walk all the way to the left which leaves them a massively long walk to get to the choke, not to mention exposing yourself to easy Orisa/Hog/Pharah boops off the side of the map.
Whereas the Green line not only is covered by a ton of the building for natural cover, but one of the green lines uses the alternate spawn exit completely eliminating the risk of the pre-fire. The window here at Volskaya isn’t as lethal as the one on Hanamura because it’s smaller and more confined to take splash damage, so if you’re taking the green route you’re once again limiting how much time you’re exposed to spam damage before you get to the choke.
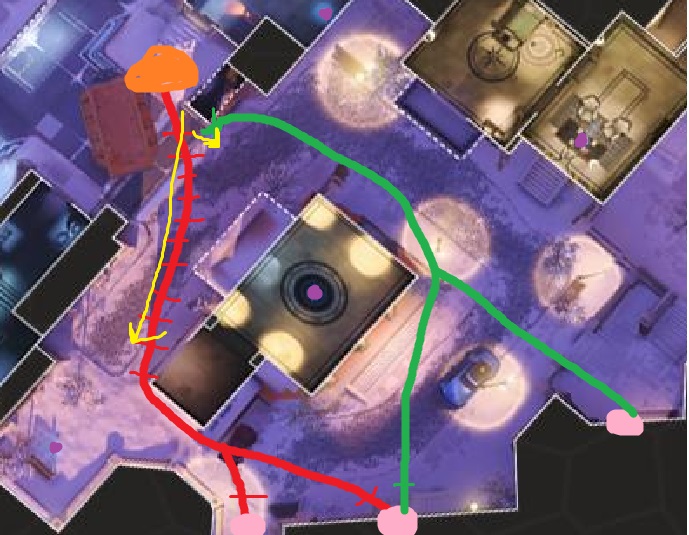
Anubis (Attempting to go Left)
This one actually makes me irrationally angry

Most teams will make their first attempt by going the left passage of the choke, but for reasons I never understand they for some reason want to go straight ahead, and cross allllllll the way across the choke point to get to the door. Meanwhile, that spawn door is really open to spam fire from enemies that sit across the top of the choke on that little bridge area (Pharah, Junk, Hanzo, Genji, etc) can all pretty safely get up there and get a clear LOS on the spawn doors.
Whereas look at the Green line, once again using an alternate spawn entrance avoiding all that spam and pre-fire, and taking a direct line to the left side of the choke where they can quickly turn the corner.
Sure, if you’re going right side, you can walk straight ahead and go right, but the vast amount of teams don’t start this way and only use it as a second or last resort.
King’s Row

The majority of teams will just walk out the front door (Again, open to spam damage) and walk along the left side of the bus which has no natural cover, leaving them open to teams hitting from multiple angles on defense.
Instead look at the green lines, both use the alternate exits, and have natural cover the entire way to the choke, and both play by mega healthpacks. The one that’s on the right is a smidge more exposed, if you’re trying to go up the stairs and out the window, but that’s a super easy way to get through it all.
In Conclusion
Hopefully what I’m presenting here you see some commonalities in as it pertains to the route you take and how much you limit your exposure to incoming enemy fire. Not only do things like this work for higher Shield Uptime for your Tanks, but also makes you less reliant on them to stay alive.
Similarly for Dive, these are great routes to take since Dive comps really have no damage mitigation as they approach where they want to be. So this is applicable to all comp types.
As it stands for some that are thinking, “oh man that’s the long route”, it’s really not. Not only are you talking about an extra 3 or 4 seconds in total time, but if you’re with someone slow like Rein who needs to walk with the Shield up in the red areas, by going these alternate routes he can walk with his shield down which is faster overall. In addition, your team is likely getting picked off a lot in the spam damage areas, which means more and more staggers and wait times to respawn and group up, rather than just taking a few extra seconds to determine the best way to approach.
This isn’t to say you always need to go this way, but it’s something that I don’t think people have actively seen or executed together. And so this post is for people that are good at verbal communication in trying to show the team a more effective way to go.
Way too often, you get these big heated arguments that you need more shields, or you need more healing, when the fact of the matter is just smarter positioning prior to the engagement, which helps not only manage the damage your team takes, but also your cooldown economy as well. You won’t be popping as many cooldowns just to get to the teamfight.

Recent Comments