Escape From Tarkov Complete In-depth Guide
by dumnem
Greetings, this is dumnem, also known as Theorchero, but you can call me Theo. I’m an experienced Tarkov player and I’m writing this guide to try and assist new Tarkov players learn the game, because it has one hell of a learning curve. We’ll be going over a lot of different aspects of this guide, and it is going to be huge. Feel free to digest this in parts.
This is Primarily directed towards Tarkov Novices, but should be useful for even Tarkov Veterans. It hopefully includes everything you need to know to be able to go into a Raid equipped for success and to successfully extract with gear.
Table of Contents
- Tarkov Overview – What is Escape from Tarkov?
- Tarkov Resources – Useful links
- Tarkov’s Maps
- Tarkov’s Health System
- Tarkov’s Hideout System
- Tarkov’s Quest System and Progression
- Tarkov’s Hotkeys to Know
- Getting Started
- Player Scavs
- New Player’s loadouts – LL1 Traders
- What to Loot – How to get the most money per slot
- Stash Management – How to combat Gear Fear
- Tarkov Economy – How do I make money?
- What now?
Tarkov Overview – What is Escape from Tarkov?
Escape from Tarkov is a tactical, realistic, FPS with MMO elements developed by Battlestate Games. It is currently in closed Beta. The game features several maps in which your primary character, your PMC, goes into Raids in order to find and salvage loot and useful equipment to survive and thrive in Tarkov. Death is very punishing in Tarkov. If you die you lose everything you had on you when you die (with the exception of what’s inside your Container and your melee weapon) including any equipment you brought with you or what you found inside the Raid.
Enemies can be players (PMCs) or Scavengers (‘Scavs’) that are either controlled by AI or by players. Unlike many shooters, AI enemies in Tarkov are deadly – they can and will kill you on sight. They have recently been upgraded to act more intelligently, shoot more accurately, and react to situations on the map, such as investigating noise of gunfire or searching. It features beautiful and immersive environments, intricate and in-depth weapon modification system, a complex health system, dynamic and specific loot placement, and multiple options for engagement. Do you want to play slow and stealthy, to avoid fights, or set up a deadly ambush on an unwary foe? Or do you prefer raw combat, where only your quick wit, placements of shots, and tenaciousness determines who gets out alive? It’s your Tarkov. You make the rules.
Tarkov Resources – Useful links
I take no credit or responsibility for any of the content in these links. To the best of my knowledge, these are updated consistently and are accurate, but user beware.
Quick-Reference Ammo Chart
An updated ammo chart can be found on the wiki.
Tarkov Wiki
Absolutely fantastic resource. You can visit them here.
It is a massive collection of everything that we players have been able to find.
They contain trades, user-created maps, lists of ammo, parts, weapons, loot, etc. If it’s in the game, it’s on the Wiki, somewhere.
I highly recommend opening the wiki page for the Map that you plan on raiding in.
Map Keys and You
Huge collection of all the keys in the game. These are also on the wiki, but this page has them all on one page, and tries to inform the user if the key is worth keeping or using.
This section is open to revision. Mention me in a thread (or in the comments below) about a resource and I’ll see about adding it here.
Tarkov’s Weapon Compatibility Guide
Pretty self explanatory. Also includes a Key guide and a Mod guide.
HUGE Reference Bible by Veritas
Courtesy of Veritas, It’s located here. (Open in new tab.) Contains: Detailed information about: Ammunition, Health, Firearms, Body Armor, Helmets, Rigs & Backpacks, Labs & Quest keys. Outdated! Needs to be updated for .12
Offline Raids – Player Practice
Offline raids is a feature added for testing and learning purposes for both new and veteran players alike. It is an incredibly useful tool.
In an offline raid, your progress is not saved. This means you don’t keep anything you find, keep any experience ‘earned’ if you successfully extract, or lose any gear when/if you die. To access OFFLINE Raids, head into a Raid normally until you see this screen. Then Check the box indicating that you want to do an OFFLINE raid and you’re good to go! You even have a choice on whether or not to add AI. You can also control how many AI enemies spawn, fewer than normal or a great deal more! You can even make Scavs fight each other. (Framerates beware.)
You can control how many scavs spawn (if any) as well as a number of other paramaters. New players should use offline raids as a tool to practice shooting, controls, movement, etc.
Tarkov’s Maps
Tarkov features several maps – ranging from wide, beautiful vistas to ruined factory districts, to an abandoned laboratory where illegal experiments were being conducted. It is important to learn the maps you intend to play. In order to keep your gear, you must ‘extract’ at one of your designated exfiltration points. Not all extracts will be active every game, and some are conditional.
To see what extracts are available to you, double tap ‘O’ to show raid time and your exfils. If it has a ???? it might not be open.
Factory
Gate 3 Extract
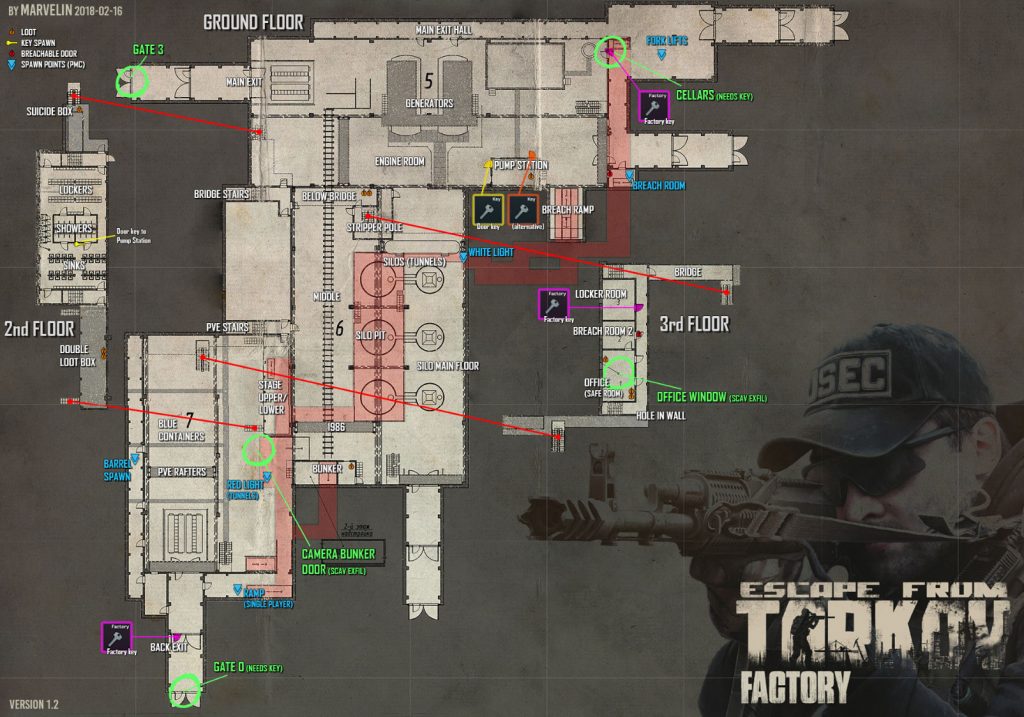
A small, fast-paced map that was primarily created for PvP. Scavs spawn in all the time. Very close quarters, shotguns and SMGs tend to dominate here. PMCs can only access one Exit (Gate 3) without the Factory Exit Key. Good place to go if you need PMC kills as action is pretty much guaranteed. It is recommended NOT to bring in a lot of gear to Factory until you are experienced.
Factory Map in PvP is best played in Duos – due to the layout of the map, a Maximum of 6 PMCs may be present in the game. Due to the split spawn points, you effectively have ‘sides’ that have up to 3 spawn locations that are close together. This is why it is recommended to secure/scout enemy spawn locations. If you go in with a Duo, you at max have 2 players on your side for an even 2v2, and if played smartly you can eliminate them and know your ‘side’ is secure from aggression for the time being.
Upon loading in, scavs usually take a couple minutes to spawn, though this depends on the server in question and isn’t super reliable. For new players, the best loadout in Factory is going to be a MP-153 Loadout – using just an MBSS (or similar bag) and ammo in your pocket to fight other players and Scavs. Scavs will often spawn with AKs and other ‘vendorable’ weapons, so is a good source of income.
Factory is also one of the best maps to Scav into, as Scavs can typically avoid the Exit camping strategy employed by a lot of weaker or newer players in order to secure gear, because they typically have extra exfiltrations whereas PMCs without the Factory Exit Key are stuck using Gate 3.
If you go in with a modicum of gear, it is recommended to keep at least a flashbang (Zarya) in your container. This will allow you to quickly slot it into an empty chest rig or pocket so you can throw it into the exit door, this will flash enemies and is cheap to do – the one time you survive because you flashed the 3 exit campers using shotguns will make this strategy extremely valuable.
Customs
Extract map
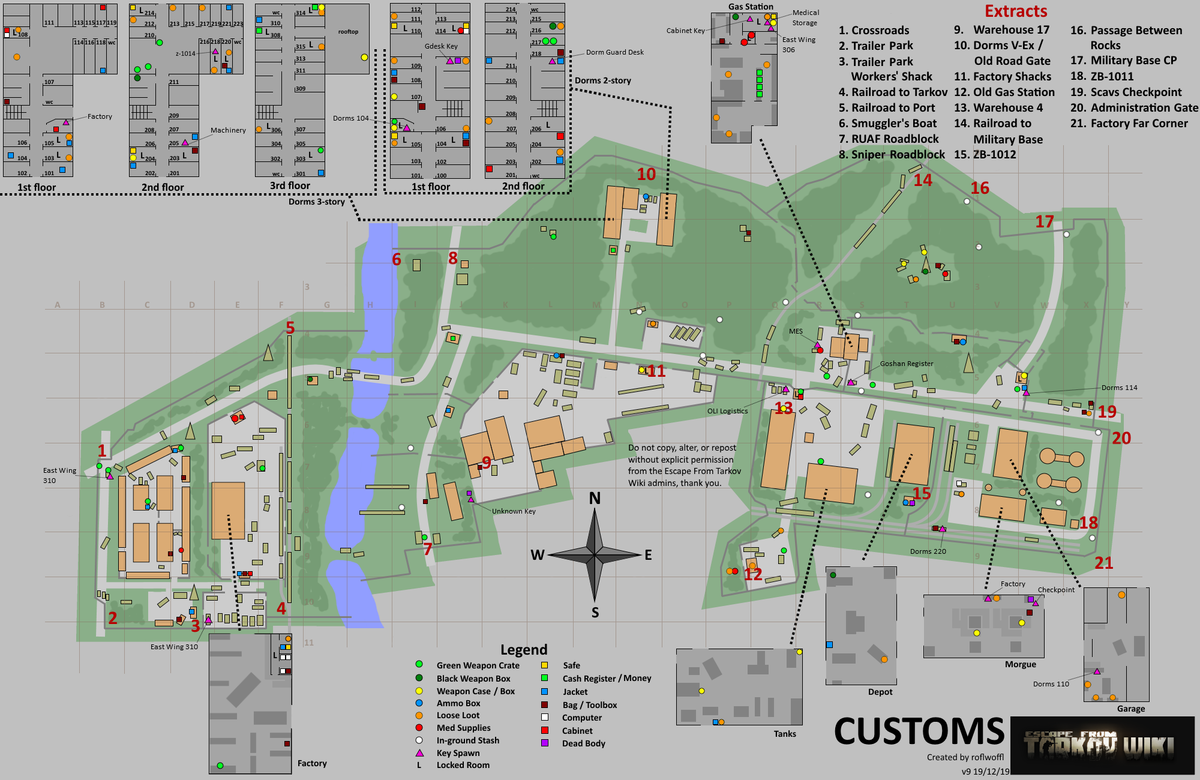
A fairly large map that was recently expanded and is expected to receive an overhaul within a patch or two, due to the choke point design of the map. Essentially, players spawn either on ‘warehouse’ or ‘boiler (stacks)’ side. If you see a large red warehouse (‘big red’) near you (Customs Warehouse), then you spawned on the warehouse side. If you don’t, you likely spawned near Boiler side. Players can also spawn in several places in the woods North of boilers.
This map has the most quests in the game. Geared players often come to customs to challenge other squads over Dorm loot and to fight a Scav boss. New players are usually trying to do one of several early quests, such as ‘Debut’ which tasks them with killing 5 scavs on Customs and acquiring 2 MR-133 shotguns (pump shotties) from their corpses. Construction is also a popular hotspot as it has a lot of scav spawns as well as the location for the Bronze Pocketwatch, which is Prapor’s second quest.
Customs itself does not offer very much loot on average. There are several spots which can contain decent, but the vast majority is located in a couple different locations.
Dorms is the best loot location for Customs. It has two sets, 2 story and 3 story dorms. They each have their own sections of good loot, but the best is considered to be 3 story dorms, due to the presence of the Marked Room. The marked room requires a marked key to open, and has a good chance to spawn rare loot, such as keytools, documents cases, weapons cases, and high-end weapons. Due to the nature of the high value of this room, it’s almost always contested and it’s one of the best rooms in the game to farm, albeit with difficulty to successfully extract with the loot found. Note, though the key required has a maximum amount of uses, it is a fairly cheap key, and worth buying if you like to run customs and go to Dorms.
Dorms also has a ton of early quests (Operation Aquarius, for one) with some keys being valuable to use, but most dorms keys aren’t worth that much on the market. There’s too many to list here, but make sure to check the Map Keys and You at the top of the guide to determine what the value of a particular key is.
Checkpoint (Military Checkpoint) is also a decent loot spot, though not nearly as good as Dorms. If you have the key, it has a grenade box and 2 ammo boxes which can spawn good ammo. The jacket in the blue car also can spawn good medical keys as well as medical items. It is very close to the gas station, so I’ll include that here as well.
The Gas Station is one of the possible spawn locations for the scav boss. It has loose food items, a weapon box in the side room, with two keyed rooms leading to a safe and a med bag and box. Also contains a couple registers and food spawns on the floor. The emercom key can spawn on the seat in the ambulance out front.
North of the gas station is the Antenna, which contains 3 weapon boxes, a tool box, and a med bag. Possible location for scav boss spawn, albeit rarely, and also spawns regular scavs, like checkpoint and gas station.
Beyond that, there’s scattered loot around the map in different places, but usually not enough to warrant going out of your way for. There’s also scav caches, mostly around the middle road outside construction and around the boiler area.
The scav boss for customs is ‘Reshala.’ He has 5 guards that have above-average gear and can be tough to deal with solo. The guards tend to be more aggressive than normal scavs, so they can be a lot to handle but are vulnerable to fragmentation grenades or flashbangs due to their close proximity to one another. Reshala himself has a good chance to have one or more bitcoin in his pockets, as well as his unique Golden TT, which is required for a Jaegar quest and used in conjunction with other Golden TT’s to purchase a Tactec, good plate carrier. Reshala may spawn either Dorms (either bldg), New Gas Station, or rarely the tower north of the gas station. Scav bosses are dangerous enemies with escorts that have above-average loot (sometimes great loot) and are hostile to everyone, Including player scavs. Scav guards will approach a player scav and basically tell them to leave the area, and if they walk closer towards the scav boss they turn hostile.
The ‘official’ spawn rate for Reshala is 35%.
Woods
Woods Map with Exfil

A very large map that is mostly just a large forest, with the occasional bunker, and the Lumber Mill in the center. The Lumber Mill is the primary point of interest, as it contains a couple quest locations and is the primary location to farm Scavs, as Scavs killed on woods are a good source of end-game keys that are hard to find.
Since the map is so large and open, sniper rifles with scopes usually reign king here. You will see a lot of players with Mosin rifles as they are a cheap way to train the Sniper skill (for a quest later on) and are capable of killing geared players and scavs alike.
Overall, not usually very populated. An early quest from Prapor sends you here to kill a number of Scavs. A good map to learn the game, as although the loot is not fantastic, you can get experience with how the game runs and operates while fighting AI and possibly getting lucky with a key find off a scav.
As of .12, Woods now houses a Scav boss that acts as a Sniper scav. He is incredibly dangerous and usually carries a tricked-out SVDS. The 7.62×54 caliber is not to be underestimated. That caliber can and will wreck your shit through what most players are capable of wearing, especially early on in a wipe. He may also carry an AK-105, so he’s going to be dangerous at both short and long ranges.
He has two guards, and he typically patrols the area around the Sawmill, and carries a key to a cache nearby full of goodies. His key is part of a quest for Jaegar.
Woods also has two bunkers, one of them being an extract and requiring a key. Both bunkers have some moderate loot in them, thus worth visiting, though not necessarily worth going out of your way for them. Several quests occur around the sawmill area, which contains a good couple keys that can spawn.
Shoreline
Shoreline Map, with Loot, Exfil, etc
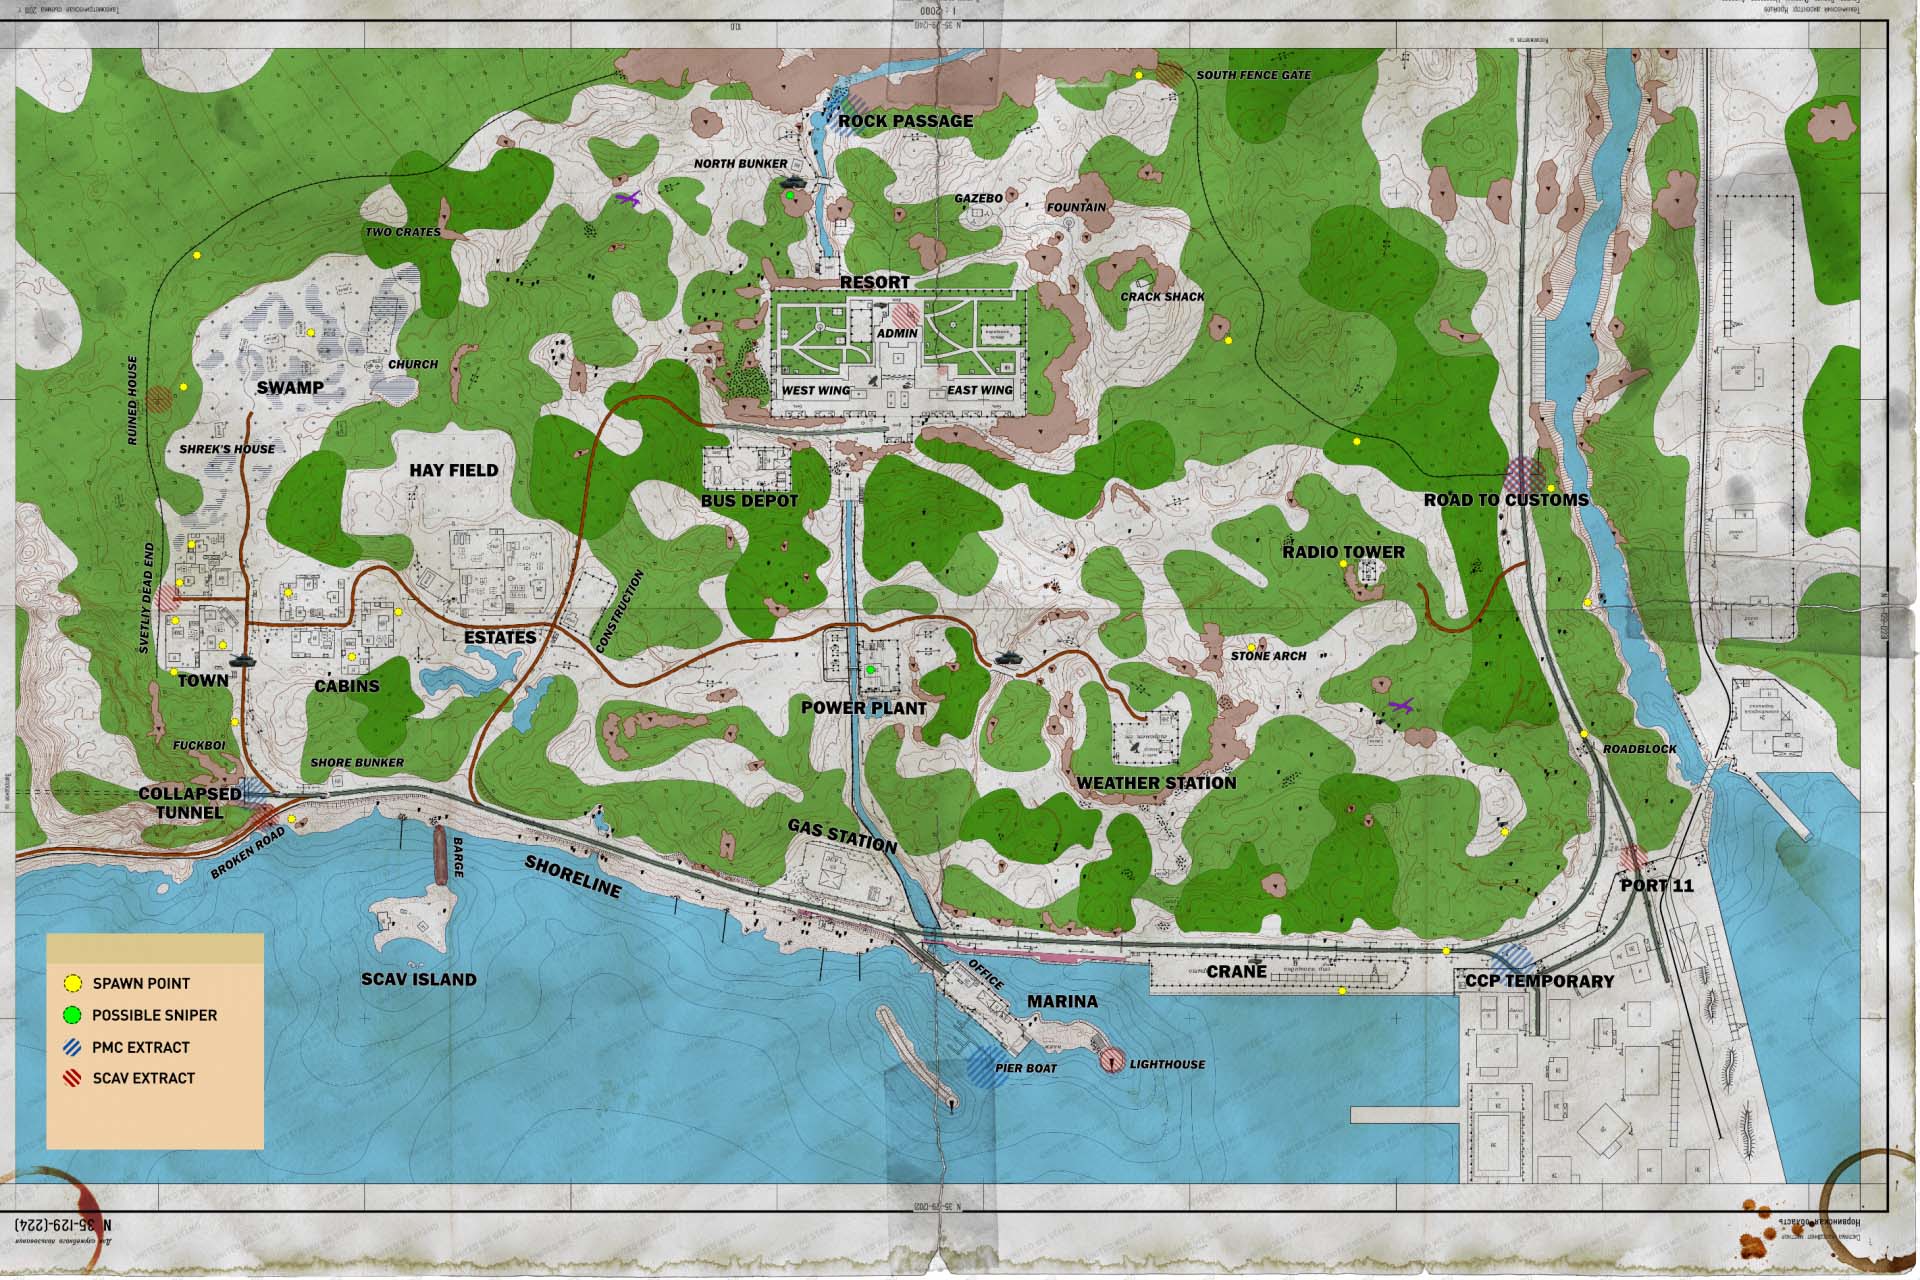
A very large map, notorious for its FPS hit. Generally speaking, one of the better maps for loot. The primary point of interest is the Resort, but scavs spawn there, and is primarily occupied by hatchlings (players only with hatchet, ie melee weapon) and geared players. Resort has great loot, but requires keys to access most of it.
A great map to learn though from new players as the outskirts still contains plenty of loot and combat opportunities with AI scavs. You can hit Villa, Scav Island, Weather station, Docks, etc and come out with a backpack full of valuable gear fairly easily. The Village (Not to be confused with villa) contains a lot of toolboxes which can contain lots of parts used to upgrade your Hideout.
Location of many quests, including a large quest chain where players are required to kill many, many, scavs on Shoreline. For this and other reasons, probably the best map for new players to learn the game with.
A good loot route is to hit the village (caches in it), scav island (2 med bags, 2 toolboxes, 2 weapon boxes, 1 cache), burning gas station (weapon boxes and a safe), pier (potential extract, 2 pcs 2 safes and lots of filing cabinets), and weather station. Scavs may spawn around these areas, but most players just head straight for resort anyway, so you are much less likely to encounter them, especially if you avoid Mylta power (most players hit it on the way to or leaving from the resort). Excellent route as a player scav as well.
Interchange
Detailed map
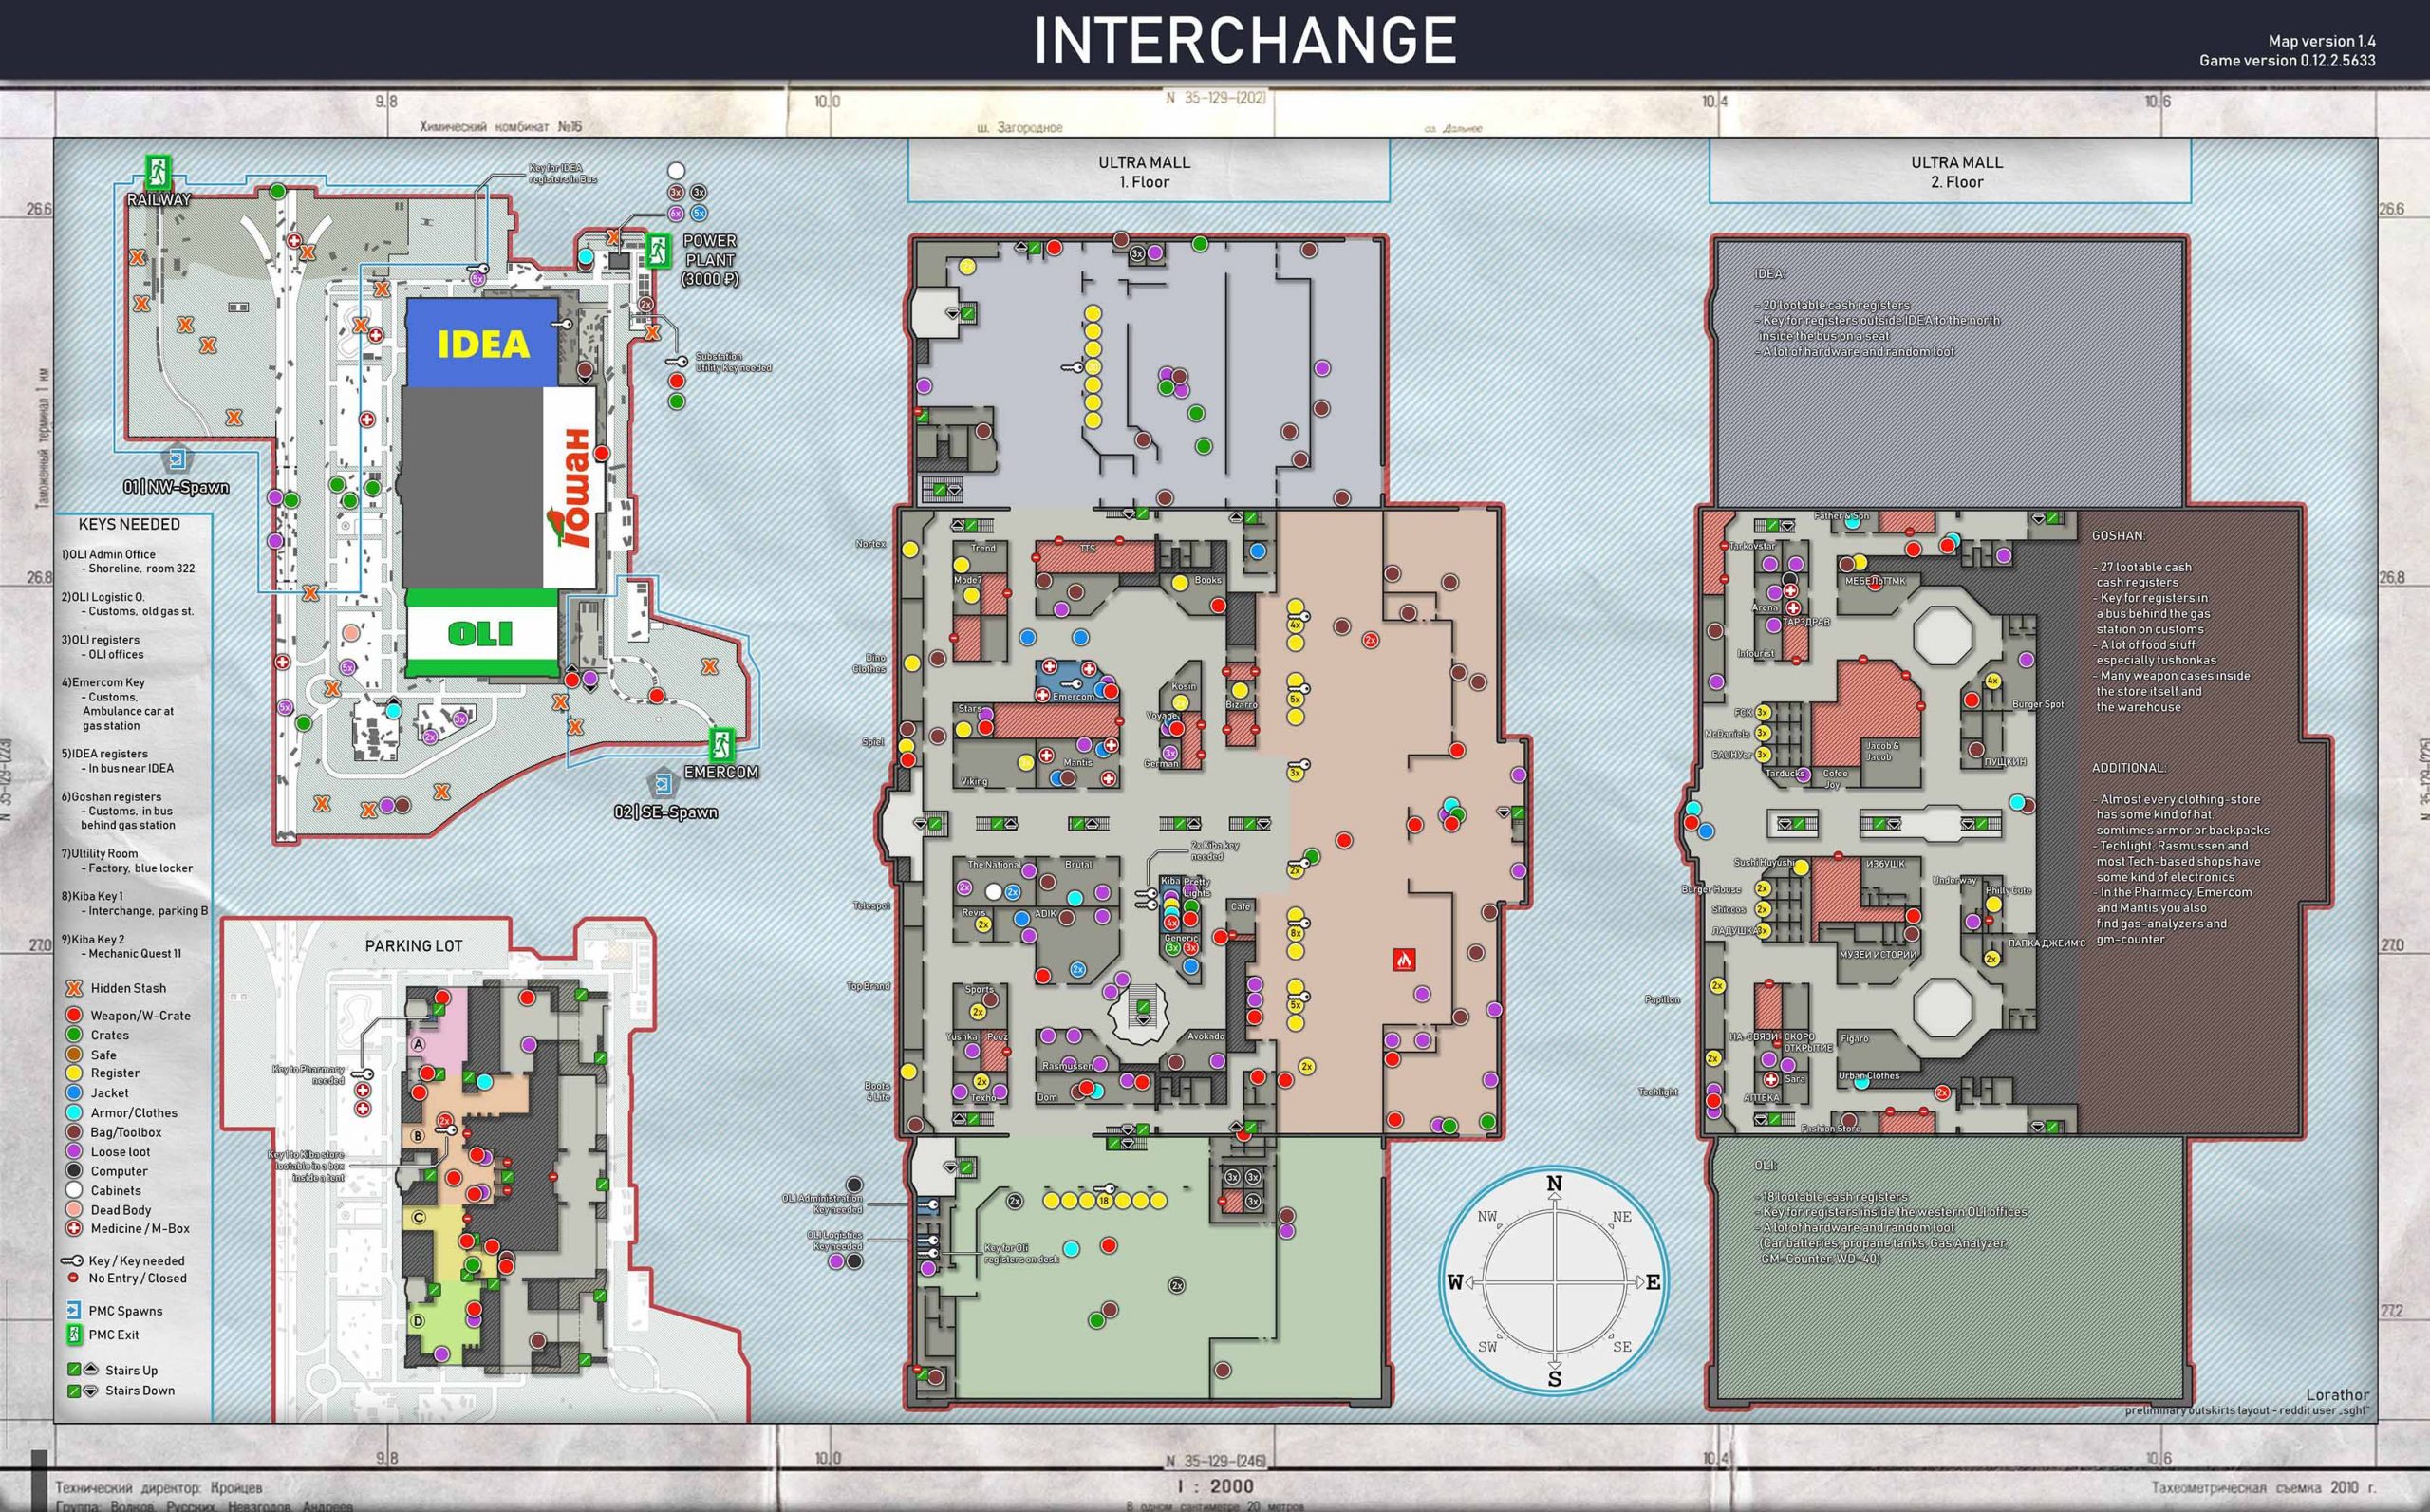
Great, great loot area, but very complex map. Old computers might face unique struggles with this map. Features a mostly-binary exfil system like Shoreline, but.. kinda worse. Exfil camping is fairly common on this map, but usually avoidable. Huge map with multiple floors and many many different stores. Communication with teammates is a challenge on this map, but the map is also fantastically detailed.
This map features a lot of loot that depends on the kind of store you’re in. It’s a great place to farm rare barter materials which are valuable to sell on the Flea market or to use for quests or for hideout upgrades. An early quest (from Ragman) sends you here to kill a large amount of Scavs. I’d recommend getting Ragman to level 2 and accepting his quest asap when going to Interchange, as getting this quest done can take a while as it is and you want all scav kills to count towards progress.
Both the tech stores (Techlight, Techxo, Rasmussen) and department stores (Groshan, Idea, OLI) are the primary places to hit. There’s also Kiba (weapons store) as well as Emercom and Mantis. Players have different strategies, but this map is unique in the sense that it really rewards exploring. Most stores will have things you can grab that are worth quite a bit but are often overlooked. Very popular place to go in as a Player Scav.
Reserve
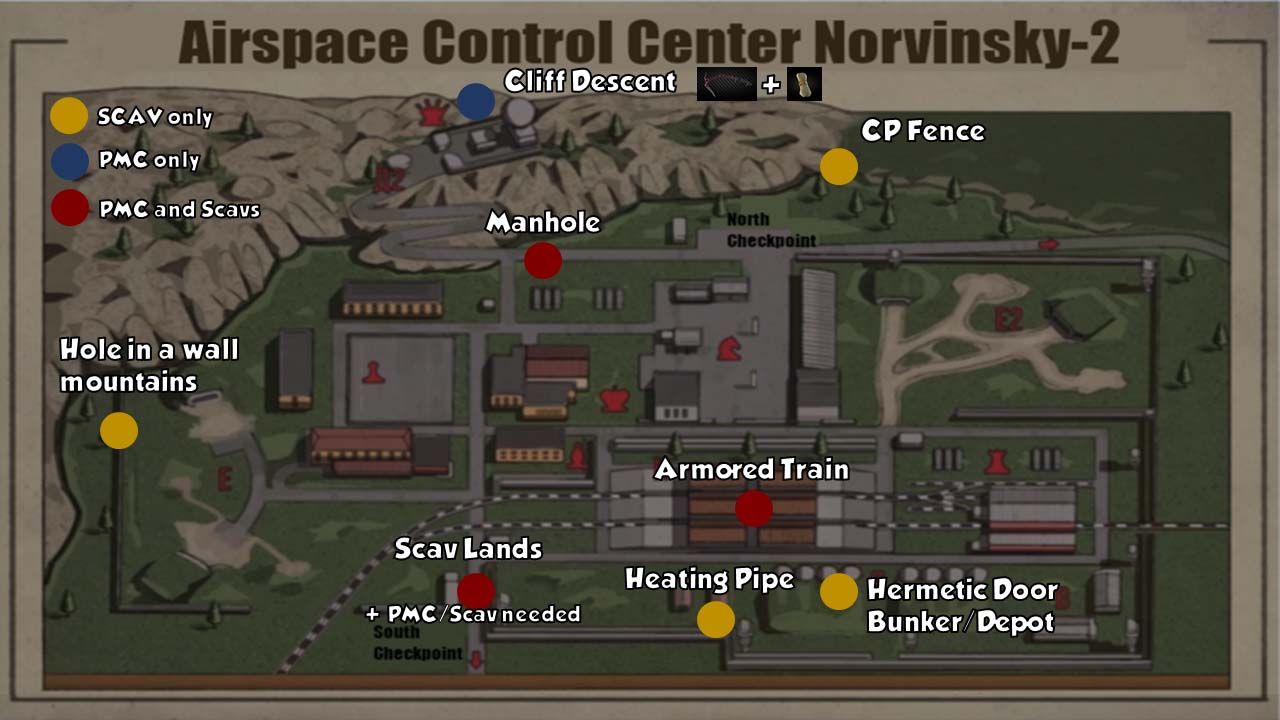
Brand new map, chock full of loot. Has more complex extracts than other maps, save for Labs. Excellent place to farm rare barter items, computer parts, and especially military hardware. PMCs have limited extracts, most being conditional, and the ones that aren’t require activation of ‘power’ to turn on the extract, which alerts the map the extract has been opened and can spawn Raiders (more on them below.)
Additionally, has a scav boss by the name of Glukhar, who has multiple heavily armed guards. He has multiple spawn locations and can arrive with the train.
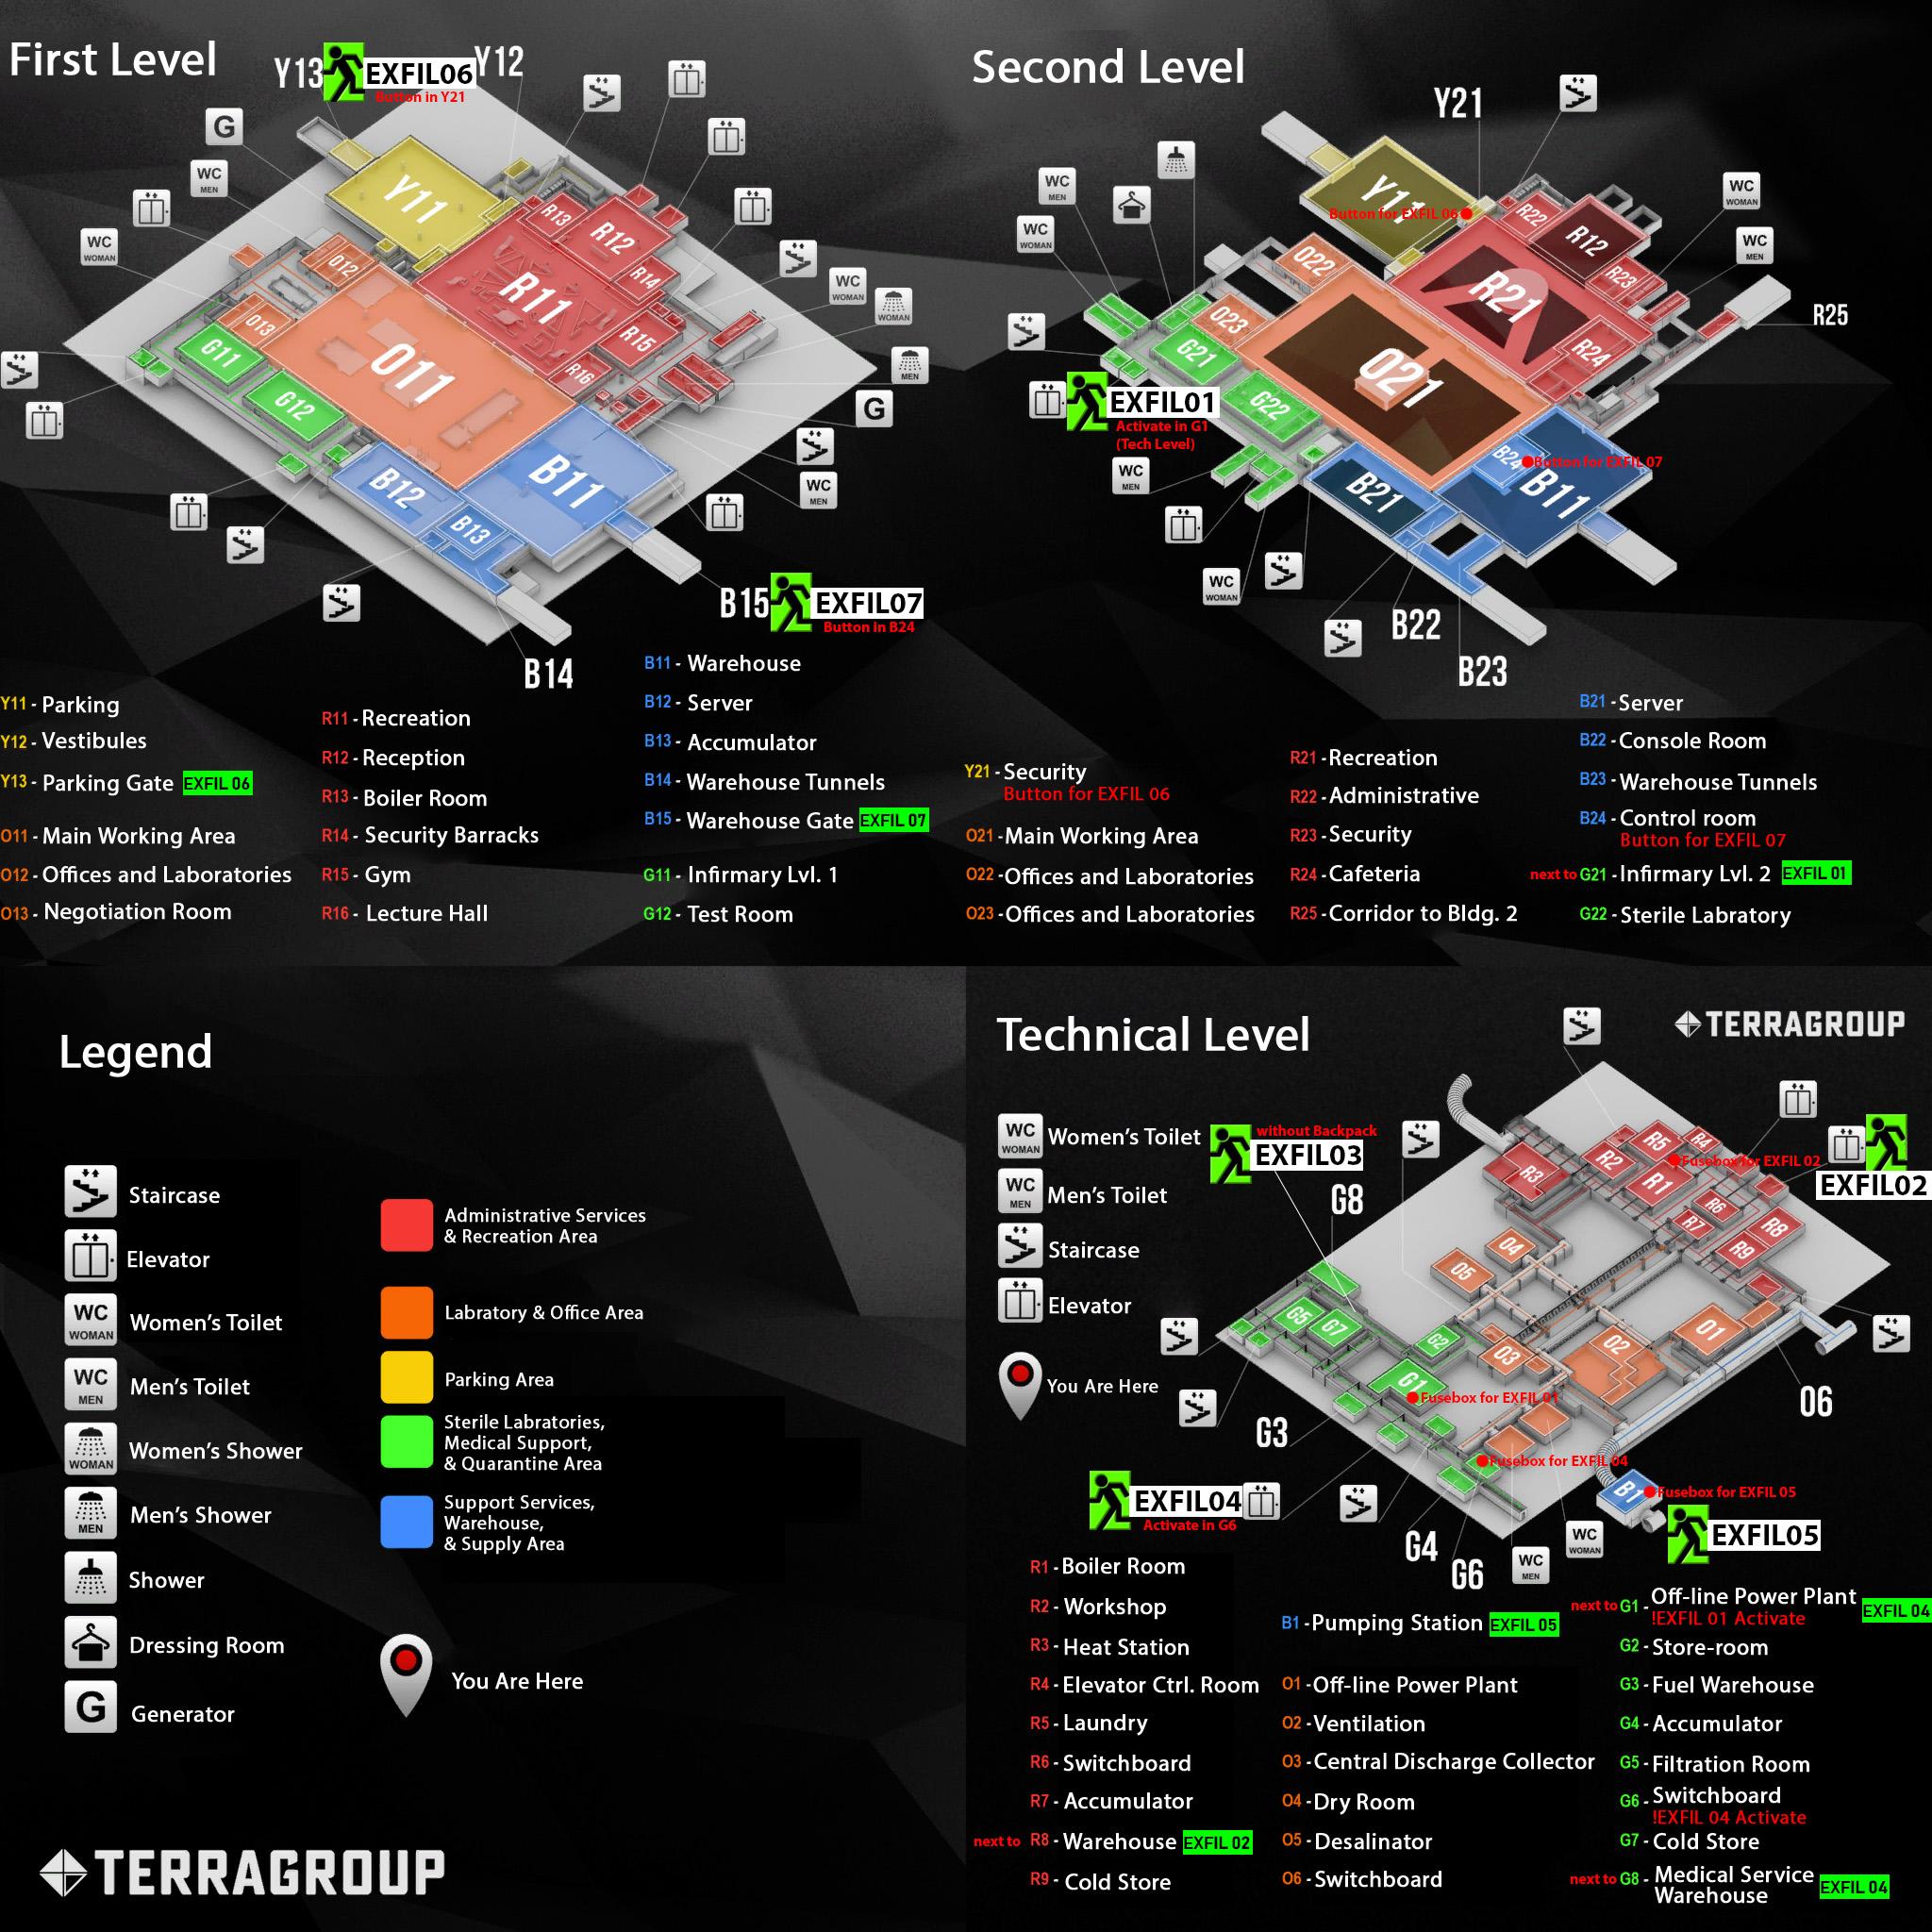
The Lab (‘Labs’)
Here’s a map.
DISCLAIMER: Labs, like much of Tarkov, is under constant development, so issues may be fixed or created without warning. Always check patch notes!
Labs is a very complex map compared to the rest of Tarkov. There is a great deal more exfiltrations but many of them have requirements or a sequence of events needed to be able to extract from them. It is recommended to read the Tarkov Wiki on Labs before raiding there.
LABS IS NOT LIKE OTHER MAPS. READ THIS SECTION CAREFULLY.
Labs is a lucrative end-game raid location, comparable to ‘dungeons’ in other games. They are populated by tougher enemies that give greater rewards. In order to go to labs, you need to acquire a keycard, this functions like mechanical keys but instead of opening a door, they unlock your ability to select Labs for a raid.
They may be found in-raid in various locations, most notably in scavs backpacks, pockets, and in filing cabinets. They may be purchased from Therapist at LL4 for 189K Roubles. Labs are populated by a unique kind of AI enemy, Raiders.
Raiders
Raiders are the Labs form of Scavs, or AI enemies. However, unlike other maps, they cannot contain player Scavs. Raiders have a much tougher than your average scav, they are capable of advanced tactics (such as flanking) and throw grenades and use other consumables as a player would. Once ‘locked’ onto you, they are typically capable of killing you very quickly, even if you are wearing high-end armor.
In Tarkov, Raiders act like the avatars of Death. They are clad in USEC and BEAR equipment, as they are effectively AI PMCs. Many changes have been made to labs and specifically how Raider AI works and to prevent exploits to easily farm them as well as bugs where they could be deadlier than intended.
A general rule of thumb is not to fight Raiders directly. They can and WILL kill you. Raiders can spawn with 7N9, or ‘big boy’ ammo. This ammunition type is incredibly lethal to players, even those wearing the toughest armor. If you get shot in the head, doesn’t matter what kind of helmet, face shield, killa helmet, etc you are wearing, you will almost certainly die.
Because Raiders are controlled by AI, they have zero ping. They may also end to immediately respond as if you were aggressive even if they did not originally know you were there – ESP Raiders effectively will prone and return fire even as you ADS and put them in your sights.
This is why engaging a Raider must be done very, very carefully. There are a few strategies that you may employ, most commonly some form of baiting them towards an area and then killing them when they arrive. Players may accomplish this by generating noise – gunfire, melee weapon hitting walls, crates, etc, player deaths, players Mumbling (F1 by default) can all attract Raiders to investigate your area.
Due to the high power of Raiders, players often go in with minimal loadouts and seek to avoid conflict with other players, especially geared ones. Most players avoid PvP in Labs, though a good portion of the playerbase thoroughly enjoys hunting down poorly-geared players after they kill a few Raiders for them.
As such, players will lay prone in a hallway, or crouch in a room, and attract Raiders to enter their domicile by opening the door, and immediately headshotting them. Few Raiders actually wear helmets (though some do) so most players specialize in ‘flesh ammo’ or, ammunition that foregoes armor penetration in favor of raw damage in order to kill Raiders more reliably, because Raiders have slightly higher head health than PMCs do.
Raiders spawn with a great variety of equipment, weapons, armor, and materials such as medication or hideout parts. They tend to have chest armor and may have different helmets. Their pockets can contain Labs keycards, morphine, Ifaks, cash, and other items. They’re always worth checking.
Raiders are a good source of grenades, they will often have F-1’s and Zarya’s in their rig or pockets that you can use to fight off players and Raiders alike.
Recently, changes have been made to Labs to make them less profitable so that other maps are more appealing. The cost and rarity of keycards increased, as well as reducing the frequency that raiders spawn, so that they come in more infrequent groups but also tighter in formation, while also lowering the overall output of individual Raiders, so that they are less likely to have a bunch of extra materials, such as grenades and other items.
Experience Farming on Labs
Labs is one of the best places to farm experience in the entire game. Killing a Raider with a headshot awards 1100 Experience. This does not include any looting, inspection (searching bodies), examine, streak, or other experience.
Killing a large sequence of Raiders gives additional bonus experience in the form of Streak rewards, usually 100 bonus exp per additional kill.
Surviving the raid multiplies all of these sources of experience by 1.5x
Changes coming to Labs
Disclaimer: I am not a BSG developer or employee. This is what I have seen on this subreddit and heard elsewhere. Some might be purely rumor, but other points are confirmed by Nikita Labs is undergoing constant changes. Nikita and BSG take feedback seriously, and always consider what the players are telling them. It known that Labs will eventually be accessed via the Streets of Tarkov map, and will require you to enter that map, make it to the labs entrance, and then extract from Labs to return to Streets of Tarkov and exfil from there as well. This will likely add an additional layer of risk to being ambushed for your goodies along your way out, as well as punishing damage taken in labs more severely. Additionally, keycards will have a limited number of uses, and may open more than one room.
The full extent of the changes coming is not known.
Remember, you can load a map in OFFLINE mode to practice against bots or to learn the map without fear of losing gear.
Tarkov’s Health System
Tarkov has a very advanced health system, and while it might seem overwhelming at first, you’ll get the hang of it rather quickly. It features a very wide variety of effects and injury, including hydration, energy, blood pressure, blood loss, fractures, contusion, intoxication, exhaustion, tremors and more.
Not all of the Health System is implemented yet. Expect changes!
Your character (PMC, or otherwise) has a combined Health of 435. Each of his limbs have separate health. Taking damage to a limb that reduces it to 0 ‘blacks’ that limb. Blacked limbs are a problem. They greatly impair the activities your PMC performs, and taking damage in a blacked limb amplifies the damage by a multiplier and spreads that damage among your other non-black limbs equally. You cannot heal a blacked limb without the use of a Surgical Kit.
Notes: Bloodloss applies damage to the affected limb and can be spread like other damage to a blacked limb. Treat immediately. Also causes significant dehydration! Bloodloss also helps level your Vitality skill, which in turn gives you experience towards your Health skill, which is necessary to reach level 2 of in order to improve your hideout.
Losing a limb applies additional effects. Fractures also apply these effects but not the damage amplification (Except for damage if running on fractured leg.) Fractures require specialized medical kits to heal.
Dehydration is what happens when your Hydration level reaches 0. You can view your Hydration level in your gear page, at the bottom left. Becoming dehydrated is extremely bad. You take constant damage. Taking dehydration damage can kill you if you have a black chest or head. Restoring hydration helps train Metabolism, which improves positive effects from food and drink.
Head/Chest: Bullet damage resulting in losing your head or chest is instant death. Note: Bloodloss resulting in your Head/Chest being black does not result in death, but any damage to them beyond that point will! A back chest will causes you to cough (much like your stomach!)
Painkillers: Prevents coughing that comes from your chest. Doesn’t help otherwise.
Stomach: Massively increased rate of dehydration and energy loss. You must find liquids or exit the Raid soon. Additionally, your PMC will cough sputter loudly, attracting attention. A black stomach multiplies damage taken by 1.5 and redistributes that damage across your entire health pool.
Painkillers: Significantly reduces the frequency and volume of the coughs.
Arms: Makes activities like searching, reloading, etc, take additional time, as well as adding a sway, reducing accuracy. Arms have a .7x damage multiplier.
Painkillers: Reduces sway, removes debuff Pain.
Legs: Blacked legs cause your PMC to stumble and be unable to run. Blacked legs have a 1x damage multiplier.
Painkillers: Allows you to walk at full speed and to run.
WARNING: Running while your legs are blacked or fractured WILL DAMAGE YOU.
Health Items
Tarkov features many health items – ‘Aid’ items, which can be used to restore your characters health and to fix ailments or injuries he receives as the result of combat or mishaps. The two most important health conditions to consider are bloodloss and fractures, which have both been covered above. Some food items may have ancillary effects, such as losing hydration.
Since in the current patch the only ailments to worry about are bleeding and fractures, it changes which health items are most necessary. We’ll go over them below.
Health Restoration
AI-2 medkit
The newb’s medical kit. You receive several of these when you start Tarkov – they’ll already be in your stash. Available from Level I Therapist, they are cheap and effective way of healing early in the game. They will not stop bloodloss. Because of this, you also need to bring bandages or a higher-grade medical kit. Affectionately called ‘little cheeses’ by the Tarkov community. Using it takes 2 seconds, and because of how cheap it is, it’s often brought in by higher level players to supplement their healing without draining their main kit (which is capable of healing bloodloss or sometimes fractures). Due to its short use time, it’s often very useful during combat as you can take cover and quickly recover damage taken to a vital limb. They’re also useful as you can buy them from Therapist to heal yourself if you died in a raid.
Bandages
The newb’s bloodloss solution. Available from Therapist at Level I. A better version, the Army Bandage is available at Level II, after a quest. Mostly obsolete after unlocking the Car Medical kit, but some players value them due to the Car’s overall low health pool. Activating takes 4 seconds, and removes bloodloss to one limb.
Splint
The newb’s solution to fractures. Cheap, takes five seconds to use, and takes up 1 slot. Fractures are much more common this patch, due to them being added back in the game from standard bullet wounds, not just drops. Available from Therapist at Level I, no quest needed. Can be used to craft a Salewa.
Alu Splint
More advanced form of the normal split. Works the same, but has up to 5 uses. Recommended to carry in your container if possible, due to frequency of fractures from gunfire.
CMS (Compact Medical Surgery) Kit
New medical item added in .12, fantastic item. Allows you to perform field surgery, removing the black limb state and allowing you to heal it beyond 0 hp. Takes 16 seconds to use, and cannot be cancelled so make sure you are safe if you are using it! Will reduce the maximum health of the limb it’s used on by 40-55%, but will effectively remove all negative effects incurred by having a black limb. Highly recommended to carry in your container for emergencies. Can be bartered from Jaeger LL1, and purchased for roubles LL2.
Surv12 field surgical kit
Same as the compact surgical kit, but takes 4 seconds longer, and the health penalty is reduces to 10-20% max health of the limb. Considering this kit is 1×3, taking up a huge amount of space, it’s probably not worth using. It’s just too large. Better this than nothing, though.
Car Medical Kit
The newb’s first real medical solution. Available LL1 as a barter (2 Duct Tape) and available for Roubles after completing Therapist’s second quest. Has a larger health pool than AI-2’s (220, vs AI-2’s 100), and removes bloodloss. Takes up a 1×2 slot, so requires to be placed in a tactical rig in order to be used effectively. Cheap and fairly efficient, takes a standard 4 seconds to use. Rendered effectively obsolete when the Salewa is unlocked.
Often kept in a player’s secure container as a backup health pool, before IFAKs are unlocked.
Salewa
Good medkit for use in mid and end-game. Contains 400 total health and can remove bloodloss. More rouble efficient form of a healing due to its high health pool, costs 13k roubles. Same size as the Car medical kit, so requires a tactical rig to use effectively. Because Tarkov does not currently have effects like Toxication in the game at the moment, this kit is favored by most players who go into a raid with at least a moderate level of gear. With a high health pool and relatively low cost, it’s also a more efficient way of healing damage sustained while in raids. Unlocked at Therapist Level II after completing a level 10 Prapor quest, Postman Pat Part II. Required as part of Therapist’s first quest, Shortage. This makes Salewas very valuable early on in a wipe as it gatekeeps the rest of Therapist’s quests, most of which occur on Customs early on. Can be crafted in your meds station with a painkiller, splint, and bandage.
IFAK
Fantastic medical kit, and is the one preferred by most players. Features 300 health and the ability to remove bloodloss and a host of other negative effects that are not yet implemented into the game. It does not, however, remove fractures. Taking up only a single slot, it is favored by players in all stages of gear, and it is recommend to carry one in your Secure Container in case of emergencies. Is available at Therapist Level II for a barter (Sugar + Sodium), and may be purchased for Roubles at Level III after completing Healthcare Privacy, Part I. It is a fairly expensive kit, but due to its durability, its small size, and ability to remove bloodloss, it is a very common medical item used by players of all levels. Can be crafted in Lvl 2 medstation.
Grizzly
The ‘big daddy’ medical kit, boasting an impressive total health resource of 1800. It is also a very large kit, taking up 4 slots (2×2) – in order to be able to use this quickly, it would require specialized tactical rigs that feature a 2×2 slot. It removes all negative effects (some costing HP resource), including fractures. Used by highly-geared players who intend on staying in raids for an extended period of time, or by players with additional Secure Container space available in case of emergencies. It is available for barter at Therapist Level II, and purchase at Therapist Level 4. Due to its price point from Therapist at just under 23k Roubles and its healthpool of 1800, it is by far the most efficient method of healing from raid damage, at a 1.3 roubles per health, dramatically lower than other options available. Can be crafted in Lvl 3 medstation.
Pain Management
Using any of these items results in your character being ‘On Painkillers’ which allows you to sprint on fractured and blacked legs, as well as reducing effects of fractures and blacked limbs, and removing the debuff Pain. Essentially, the only difference between most of these items are the speed of use, price, availability, and duration of the effect. Note that the Hideout has changed how some of these items are used, and because Tarkov is under constant development, it is very likely that these materials may be used to create higher-grade medkits or to upgrade your medstation. That being the case, it’s best to hoard the unknown items for now as efficiently as possible until you know you don’t need them.
Analgin Painkillers
The holy grail of pain medication. “Painkillers” have 4 total uses. The total duration is greater than Morphine and less risk of waste. Takes a short time to use, and is available from Therapist Level 1 for both barter and Roubles. Makes a loud, distinctive gulping noise. Can be used to craft Salewa kits.
Morphine
Quick application of painkillers. Favored by some highly geared players as it has greater usability in combat then it’s typical counterpart, Painkillers. Has a longer duration, but only one use. It is required for a fairly early Therapist (and a late Peacekeeper) Quest, so it is recommend to hoard 10 of them, then sell the rest unless you intend on using them. They are worth a good amount to Therapist and take up little space so they are a valuable loot item. Available from Therapist for Roubles at Level 4, after completing Healthcare Privacy, Part 3.
Augmentin
Basically a cheaper Morphine. One use, 205s. Not recommended over Painkillers due to its cost. No current barter for this item, so usually it’s just a fairly expensive, small loot item. Most likely a component of a medstation manufacturing process or upgrade. Keep it.
Ibuprofen
Powerful painkiller. Lasts 500 seconds and has 12 uses. This item is recommended as your long-term solution for painkillers. While it is valuable because it’s used to trade for THICC items case, it’s the cheapest component and is very useful as a painkiller. It has a long duration and a large amount of uses, so keep it in your container for use as a painkiller if your primary painkillers wear off. Don’t use it completely up, though. Keep the 1/12 bottles for the trade.
Vaseline
Powerful medical item. Cannot be purchased from dealers. Has a maximum of 10 uses. Removes Pain, applies Painkillers for 500 seconds (8.3 minutes). Useful to keep in your container as an alternative to Painkillers, though it takes 6 seconds to use, which is longer than other painkillers. Used as part of a barter trade for the Medcase.
Golden Star Balm
Fairly useful medical item. It can remove Pain and Contusion (not a big deal of a debuff, goes away on its own shortly) and provides a small bonus to hydration and energy. It also removes toxication and Radiation exposure, both of which are not yet implemented into the game. Like Vaseline, has a maximum of 10 uses. Painkiller effect lasts for 10 minutes, and takes 7 seconds to apply. Recommended to take only if you are going on large maps and you have extra room in your container. Can be used with Ibuprofen and 5x Med parts to craft 7 Propital.
Medical Injectors are a wide variety of medical items that take 2 seconds to apply, and have a wide range of effects and nasty side effects that act as tradeoffs for their powerful benefits. They are usually worth a decent amount of roubles to Therapist. They may also be used for late-game upgrades of your med station, we don’t yet know. If you wish, you may hoard them for that purpose. They are only found in Labs and in Raider backpacks/pockets, though some are sold by Therapist.
Combat Stimulant SJ1
Grants increased strength, endurance, and stress resistance for 3 minutes after use. Effectively, you are able to move more quickly and are less likely to have tremors in combat. Negative effects include energy and hydration as well as obscured vision. Mostly not super useful, though if you are desperate to extract in time the extra speed gained from lower overall burden of equipment may prove useful, but you are still most likely better off selling this to Therapist.
Adrenaline Injector
One of the more useful injections, it provides a number of benefits for emergency situations. It removes pain for a brief period (65s) as well as increasing Endurance, Strength, and Mag Drills for 60s, and provides passive health generation for 15s. However, it has bad side effects; You lose almost 1 energy and hydration per second for 30s, which can put you in the danger zone of becoming dehydrated which can easily kill you, especially because it also reduces your stress resistance by 10 for 1 minute, meaning you are much more likely to get tremors if you get shot or are damaged. Tremors are very bad as they really fuck up your aim. After the effects wear off, don’t try to fight anyone. You’ll have a bad time.
Sold by Therapist LL4 after completing the quest Athlete.
Regenerative Stimulant “ETG”
A powerful but dangerous injection. Provides a large healing benefit, 4.5 HP per second for 90 seconds is no joke, it will be hard to kill you. You also gain a boost to your Metabolism and your Immunity for the same duration, you also gain increased energy for a shorter duration. However, your PMC crashes hard. You lose 80 energy over 20s, and losing energy is effectively like being dehydrated. You take damage over time and will eventually die. It also applies a penalty of 10 to your Health and Endurance stats, which greatly hinder your ability to move and run around the map.
Combat Stimulant “SJ6”
A very interesting injection. One one hand, it makes you run like a crack addict after a little bit of juice hidden under the carpet across the map. On the other hand, you never really get that juice and as a result you end up very sick and very sad. It increases your max stamina by 50 and stamina recovery rate by 2.5 per second for 240s, or 4 minutes.
The side effects start to kick in after 200s, you start to get hand tremors for 60s. You also start to get a tunnel effect which makes it hard as fuck to see after the injection wears off for 30s. The overall result is that you can take this and run much faster and for much longer than what would otherwise be possible, the downside is that once it starts wearing off, you can’t really fight for shit. You can’t see anything and the hand tremors make it impossible to aim even if you could.
That being said, the duration of the side effects are rather limited. This makes this perhaps one of the best injectors in the game to keep in your container in case of emergencies, such as blacked legs but little time left on the clock.
Better to play around such occurrences and avoid them happening in the first place, but we don’t live in a perfect world, we live in Tarkov.
Propital
A very useful injection but is a bitch when it comes to side effects. This injection is effectively crack cocaine mixed with some PCP and with a little acid sprinkled on top with lovely brownies. That you inject, in your bloodstream.
The effect is that it removes pain and toxication and applies Painkillers for 245s. It also increases your Metabolism, Health, and Vitality by 20 for 300s, as well as providing a passive regeneration of 1 hp/s. This means it’s harder to get you to bleed and when you do bleed your wounds tend to stop bleeding on their own, and any damage you take from bleeding/running on blacked limbs is going to be quickly healed.
However, the side effects, like I said, are a bitch. During the last 30s of the duration you start to get tremors and the tunnel effect, obscuring your vision, much like the SJ6 stimulant. You also experience pain for 120s after the injection has mostly worn off. What really takes the cake though is that the hand tremors last 300s, as long as the positive benefits of this injection, though the blurry vision only lasts for 60s. The pain can also cause Tremors on their own.
The overall result is that Propital is best used in conjunction with Combat Stimulant SJ6, when you need to exit the raid asap but are a long distance away. SJ6 will allow you to run greatly, while Propital will greatly slow dehydration and bleeding and heal you for any damage, especially if you have to run for extract on a fractured or black leg. DO NOT attempt to fight anyone while you’re experiencing the side effects of Propital, you will lose. Only fight if you have absolutely no other choice. Run, if possible. The tremors make it impossible for you to aim and the blurry vision makes it so you cannot see who is engaging you.
Sold by Therapist LL3. Can be crafted from Med Station Lvl 3, for ibuprofen, golden balm, and med parts.
Zagustin
Not a very useful injection. It’s only useful in the sense that it removes bloodloss and prevents bloodloss for 180s, it’s not remotely worth using because by the time you run labs you are going to have access to bandages and other items that will remove bloodloss, without the extremely lethal side effects. Zagustin will remove 90 hydration after 120s. This will probably kill you. It also causes hand tremors near the ned of the duration and reduces metabolism. This means that it dehydrates you, increases how fast you dehydrate naturally, and reduces how you hydrate via liquids. Unless you have 0 bandages and no first aid and are going to bleed to death but can still somehow safely extract within 3 minutes, not worth using.
To be able to Hotkey a medicine item, they must be in a tactical rig or your pockets.
The Hideout
The hideout acts as the player’s base of operations, it is used for crafting, passive regeneration, as well as a form of income. It contains many different parts, or ‘modules’ that each perform a different function in your hideout as well as enabling you to improve those sections to both expand their passive benefits and improve your options with crafting.
The Hideout, like the rest of EFT, is constantly changing, and as such, is going to be difficult to keep 100% maintained. I will do my best to adjust for changes, but this section is going to be primarily advice for what to farm, where to farm, and what modules to prioritize.
Early modules are inexpensive, and usually do not take time to construct. Improvements to modules you acquire later will have different prerequisites, often other modules will need to be at a certain level, a trader loyalty level requirement, or you will have to have a soft skill to be a certain level (Ie, Metabolism lvl 3 for Nutrition unit 3)
The hideout has had a massive impact on the economy, as many items, previously useless, are now required to upgrade the hideout. You can find a (current) exhaustive list of all materials that will be needed for your hideout Here.
Modules
For ease of explanation/grouping, we’re going to add a few categories to the upgrades. Practical upgrades are going to be ones that are required for very basic parts, or have crafting associated with them.
Prerequisite modules are going to be ones that have no/little use, but are used mostly to enhance the visual aspects of the hideout as well as being required for more advanced upgrades.
Advanced upgrades are going to be ones that provide high level benefits (While typically having high requirements) while also having only one level.
Practical Modules
Generator
The Generator is the muscle behind your hideout. It’s what powers your hideout and allows you to craft and improve your passive regeneration rate. Level 1 currently costs ₽100,000 roubles and does not have a construction time. It will have two slots (level 1) for fuel tanks – purchase Metal Fuel Tanks off the flea market (often less than 10k roubles each) so you can power your hideout. If the fuel tank is empty, simply take it into a raid to refuel, they fill up immediately upon entering a raid with them, even if they are in your container.
Metal fuel tanks are also sold by Jaegar for a barter of 15 matches or for roubles after LL2 with him. Metal tanks are 2×3 (6 slots), so that is an issue for Standard players. Standard players will have a bit more difficult of a time when it comes to refilling gas tanks, because they won’t fit in their secure container. Instead, standard players will have to use the Expeditionary tank (the blue tank) which is 2×2, but only has 60 capacity versus the 100 of the metal tank. Expeditionary tanks can be crafted in the Level 2 Lavatory.
You can turn the generator off and on, in order to conserve fuel if you aren’t crafting anything. Note that without the generator turned on, you also reduce your passive regeneration of health, energy, and hydration.
To max: Level 3 Security and Vents, Mechanic LL3.
Medstation
The medstation is going to be your first priority, along with the Generator. The medstation allows you to craft meds so that you can heal yourself during your raids. Since Nikita added off-raid healing, this also helps alleviate this substantially, as it increases your passive health regeneration, in most cases fully healing your PMC in the course of one scav run.
Level 1 medstation can be constructed by paying ₽25,000 roubles, and does not have a construction time. This allows you to take med parts (pile of meds) and create AI-2 kits as well as the best craft the station currently offers: The Salwea craft. One split,one bandage, one painkiller, all purchasable from Therapist LL1, creates one Salewa kit. This is a very good deal. It’s excellent as a source of passive income, med stockpiles, and quest completion. Therapist’s first quest, Shortage, tasks you with finding five Salewa medical kits. Simply craft them, use them until they are very low durability, and then turn them in for her quest. Easy-peasy.
To max: Health Level 2, Vitality Level 3, Therapist LL3, Skier LL2.
Workbench
The workbench is your next priority. It can be constructed very cheaply, with 2 nuts, 2 bolts, and a leatherman multitool which can be purchased from Mechanic LL1. Level 1 does not have any construction time. It is important to note, that without the workbench you cannot mod your weapons. This means removing/attaching suppressors, stocks, etc. Nuts and bolts can be found easily in random shelves, in bags, scav containers, etc.
Beyond enabling you to mod weapons, the workbench also allows you to craft weapons (using weapons parts) and ammunition, using a combination of matches, gunpowder, and other items. It also has a few miscellaneous crafting options.
After the workbench, it’s time to craft your baseline passive regeneration structures.
To max: Lvl 2 Illumination, Lvl 2 Stash1 Mechanic LL3.
1 Stash refers to your stash level. Each edition of the game comes with a larger stash, EoD has level 4, Standard level 1.
Water Collector
Baseline hydration module to restore your hydration over time. Hydration falls quicker than energy, but is typically easier to regenerate via low cost hydration items from therapist or items found in raids. Can be constructed using 4 hoses, 5 bolts, 5 screw nuts and 3 duct tape. Takes 2 hours to construct Level 1. Can be used to purify water, at later levels.
To max: Lvl 2 Workbench, Lvl 3 Generator and Attention, Jaeger LL3.
Nutrition Unit
Baseline energy module to restore your energy over time. Energy depletes slower than hydration, but is often more difficult to restore. Best ways to restore energy are through MREs or Lunchboxes, but due to the rarity of the former and the value of the latter (due to trades, requirement for quests, etc) they are more expensive. You may also use humpbacks and other miscellaneous food items to restore energy but they often come with hydration penalties as a result.
Level 1 can be constructed with ₽25,000 roubles and 2 phase relays. Phase relays can be found in electronic stores, random bags, scav containers, and as a quest reward from Jaegar. Also requires a Level 1 Generator.
To max: Lvl 2 Generator and Stash, Lvl 3 Lavatory and Metabolism.
Lavatory
Your Lavatory should be your next priority. Or, specifically, level 2. Initial construction is ₽2,000 roubles, and has no construction time, but has no real useful crafting. Whereas level 2 has very useful/lucrative crafting available. Level 2 requires 2 hoses, 5 screws, 1 drill, and Level 1 water collector. Level 1’s crafting is turning paper into toilet paper, whereas Level 2 has crafting for corrugated hoses, magazine cases, and crafting expeditionary fuel tanks from zippo’s and cricket lighters, and some other smaller crafting options.
To max: Lvl 2 Water Collector
Prerequisite Modules
Rest Space
Your rest space has no crafting uses, but does offer passive regeneration benefits. Level 1 costs ₽10,000, and has no construction time. Level 1 increases the rate which negative effects are removed from your PMC, at the moment, primarily fractures, though this will obviously have a better benefit once effects like toxification and radiation exposure are added. Level 2 provides improved energy and health regeneration (as well as improving the negative effects removal) but costs ₽35,000 roubles, and requires a level 2 Generator and level 2 Heating, as well as LL2 Ragman. Max level has additional requirements, but offers an increase to your maximum energy, raising your maximum energy to 110.
To max: Lvl 3 Generator and Heating, Skier LL3, Dollars.
Heating
Your heating station provides improved energy regeneration, but less than the nutrition unit. Is a requirement for other structures, and Level 3 also improves your injury recovery rate. Level 1 can be constructed for ₽25,000.
To max: Lvl 2 Generator and Workbench, Ragman LL2.
Illumination
Your illumination module provides various forms of lighting for your hideout. It does not provide any form of passive benefit, and although it does improve the aesthetics of your hideout, this module is mostly used to satisfy requirements for upgrades to your other hideout modules. Can be constructed for ₽10,000. Level 2 requires Lvl 1 Generator and 14 light bulbs.
To max: Lvl 2 Generator, Mechanic LL2, roubles.
Vents
Vents are a prerequisite for a number of modules. Lighting can be toggled as an aesthetic choice. Level 1 can be constructed for ₽25,000.
To max: Level 2 Generator, Level 3 Strength.
Security
Another prerequisite module. Looks cool, though. Level 2 requires Lvl 2 Endurance, but that’s such a trivial requirement it practically shouldn’t be in the game. Level 1 can be constructed for ₽20,000.
To max: Level 2 Endurance, Level 3 Illumination, Mechanic LL2.
Advanced Modules
Air Filtering Unit
Module which allows you to use a FP-100 filter absorber to activate this unit, increasing the speed of you leveling your physical skills by 40% for 20 hours. Must be running to have an effect.
To construct: Level 3 Generator, Vents, Skier LL3, $10,000.
Bitcoin Farm
Module which passively farms bitcoin for you over time, as long as the generator is running. Requires graphics cards to farm bitcoins, and the more graphics cards you have placed, the quicker bitcoins are generated.
To max: Level 2 Intelligence Center, Level 3 Generator, Level 1 Solar Power
Booze Generator
Module which allows you to craft moonshine using sugar + purified water.
To construct: 4 Solicone Tubes, 2 thermometeres, 2 pressure gauges, 5 hoses, Level 3 Water Collector and Nutrition Unit.
Intelligence Center
The brain of the whole operation. Powerful module with passive benefits that makes your life easier and your quests more profitable. Reduces scav timer, improves quest reward money, reduces insurance time, and flea market commission rates.
To max: Level 3 Generator, Security, Medstation, Nutrition Unit, Attention, Prapor LL3, Mechanic LL2.
Scav Case
Gambling money-sink. Can bring back practically anything, and odds of good items increase the more you pay the scavs, can bring anything from a PM pistol to a red keycard. Can pay the scav with moonshine.
To construct: 2 Lions, 2 skull rings, 6 gold chains, 3 rolers, Level 2 Intelligence Center.
Note: On the current patch the most profitable is the bare minimum 650 rouble option. You likely won’t be hitting big-ticket items, but you’re pretty much guaranteed a profit off cd.
Shooting Range
Allows you to test firearms and practice your aim without having to go into Offline mode. Does not expend ammunition.
To construct: 3 Duct tape, 4 Packs of nails, 5 Screws, 5 Bolts, Level 2 Illumination.
Solar Power
The hippies have finally won. Dramatically reduces your dependence on fuel. Reduces consumption by 50%.
To construct: 4 Military cables, 2 Phased Array elements, 4 Military power filters, 15,000 Euros, Level 3 Generator and Workbench, Peacekeeper LL4.
Stash
For the most part, you’re either EoD or Standard edition. Bottom line, Stash level 2 is a requirement for some parts of the hideout. Upgrading the stash is ungodly expensive. 12 MILLION Roubles + 150,000 Euros, for a grand total of about 30 million roubles.
Stash 2 “only” requires 3.5m roubles, 1 hand drill, 7 packs of screws, and 4 wd-40 100ml.
To max: (You’re insane btw) 30 Million roubles; Level 3 Generator, Workbench, Heating, and Intelligence Center, Prapor LL3, Ragman LL4, Peacekeeper LL4.
Tarkov’s Quest, Progression, and Experience Systems
Tarkov features a very immersive progression system where your main character (PMC) is going into raids to acquire loot – goods that can be sold for a profit to other players, to Dealers (NPC Merchants), or used to fulfill quest requirements in order to complete them and receive your rewards. Additionally, your main character will increase their prowess in a number of skills, which increases everything from how much they can run, increases the ease of which recoil can be controlled, and even how far you can throw grenades. These are referred to ‘soft skills.’
Additionally, your PMC is assigned a Level. You can increase your Level by earning Experience – which is rewarded by performing numerous tasks throughout the Raid, completing quests, examining new items, killing other players and Scavs, etc. Successfully extracting from a raid will increase the experience you earn from the raid via a multiplier.
Increasing your PMC’s level will allow you to complete additional quests, which increases your Reputation with certain Dealers (and may reduce your Reputation with others) allowing you access to better equipment to purchase. Additionally, completing quests will often reward you with large sums of currency and sometimes equipment, and certain quests unlock items for purchase from that dealer.
A Dealer’s arsenal of available weapons, ammo, mods, medication, containers, and etc to purchase by you is determined by their Loyalty Level – or LL, for short. Certain Dealers specialize in different kinds of equipment, and they will pay different rates or straight up not buy particular items. In a future release, eventually Dealers will offer discounts to the player based off their Loyalty Level.
Increasing Loyalty Level
Increasing your Trader’s loyalty level is extremely important to your progression and overall success in Tarkov. Being able to purchase better Ammo and Equipment is essential to being able to fight other players and secure their loot for your own. Owning Prepare for Escape and Edge of Darkness (EoD) editions of Escape from Tarkov will increase your starting Reputations with Traders. It is unclear if this change will stay after the game’s full release.
Typically though, you need three things to increase your Trader’s level.
- Reputation
This is accomplished via quests. Completing a quest will reward you with an increase in the quest givers’ reputation, sometimes an increase in another trader’s reputation, and sometimes will reduce the Reputation of another trader. Not all Traders need a certain level of Reputation to increase their loyalty Level to II. Peacekeeper and Ragman, for example, just need you to spend a certain amount of money with them.
Note: Not to be confused with the Flea Market reputation.
- Character Level and Experience Gain
The primary gate behind your trade level (and thus your overall economy and gear leverage) is your Character Level. You increase this by gaining Experience. The easiest way to gain experience is to Loot high value areas, fight players, and kill scavs while completing quests. Generally speaking, your level will advance as you play the game at a moderate pace. One way to farm experience though is to avoid looting all-together and just focus on killing a large number of scavs from a safe distance, after learning where they tend to spawn on any given map. This patch however, labs is fantastic for experience gain. (See above.) Another strategy (albeit one that takes longer) is to loot everything, then drop what you don’t want. You gain experience for finding items and picking them up, so picking them up to drop them is technically the best way to gain the most exp per kill.
You can receive additional bonuses to Experience earned. Successfully extracting will increase your experience by a multiplier, typically 1.5x the experience gained during the raid, escaping also rewards a 300 exp Escape bonus which is added to your total before the multiplier is applied.
You can also receive experience bonuses for Exploration, so visiting different parts of the map will reward you with sums of experience, usually 100 to 300 or so. Killing multiple enemies in a row will reward you with Streaks, whose rewards increase as you get more kills. Getting a kill with a Headshot also significantly improves experience gain from kills. You also receive a (very small) bonus when you survive consecutive raids.
Note: Completing a Raid too early (via extraction) will cause you to receive a Run-Through status, which reduces experience earned in that raid by 50%.
Most Quests require you to be a certain level to unlock, and upon completion rewards you with a lot of exp and usually the ability to purchase specific equipment.
- Money Spent
This is pretty self-explanatory. As mentioned above, Peacekeeper and Ragman can be increased easily just by selling and buying from them. If you need to artificially inflate the amount spent, a good idea is to purchase a large amount of cheap items from them and sell them back to the Trader. You still take a significant loss, usually around 50-60% per purchase, but since the money spent counts both items sold to the vendor and purchases, you get about 140-150% credit per item at about half the cost.
Selling Efficiency
Not all dealers pay the same for certain items. It is important to note that a lot of this is my personal experience, and prices can fluctuate as the Developers may change them for any reason. Use your own common sense and check various dealers before selling particularly lucrative items, especially if you are going to put the item on the flea market.
Prapor
Sells AKs, Magazines, many different Ammo types, Grenades, and weapon modifications. I don’t tend to sell to him very often, as he doesn’t pay the highest for any items that I have personally seen and because you tend to buy most Ammo and mags from him it’s not a particular issue to level him up with money spent.
Therapist
Sells medical supplies, food and drink, and storage cases, which are items that effectively increase the size of your stash because they have more space inside than they take up. Most storage items are restricted to certain item types. Pays most for items like Keys, Statues, Rolers, Bitcoin, etc. Many of these items should be sold on the market instead of to her, but often times it’s not worth the hassle.
Fence
Pays least for items, sells items for more than other Dealers. Items other players have sold will appear here. Only sell items to Fence that other dealers will not take! Basically a placeholder for an expanded Market.
Skier
Sells various weapons, mods, ammo, Euros, and containers. Pays most for items like Armor, backpacks, headgear, facemasks, flashlights, sights, etc. It is important to note, that Skier will not buy Weapons or most Mods. That means for things like flashlights, you have to take the flashlights/sights off the mount or rail in order for him to buy them, but he pays the best.
Peacekeeper
Deals entirely in Western equipment, UN armor, helmets, etc. Will buy most items, but will pay USD for them. Deals entirely in USD. One good way to get his money spent requirement is just to buy USD, which is used for a later quest from Skier, which unlocks his quest chain. He has a lot of good deals, experiment for yourself. At the moment his MP5 for 10 ‘bars’ knives (scav knives) is an exceptionally good deal and easy to accomplish for new players.
Mechanic
Sells mostly completed weapons with various modifications and unique names, and mods. Sells magazines and some ammo. Offers containers as you progress. His quests are easy to complete, but often are money dumps in exchange for large sums of EXP more than anything else. Pays the most for modifications (except for sights and suppressors) and stripped guns.
Ragman
Sells backpacks, armor, tactical vests, and helmets mostly. Offers aesthetic clothing. Can obtain LL2 by just purchasing from him, does not require reputation. In fact, his first quest tasks you with that very objective. As far as I can see, he does not pay the most for any items in particular. But he is a very useful merchant once you have him at level 2. He will sell Scav Backpacks, which are an extremely efficient backpack to use as it’s fairly large but very cheap.
Jaeger (AKA ‘Asshole’)
Jaeger is basically the epitome of a drunk hardcore survivalist Ruskie man. e sells shotguns, medical equipment, some rations, etc. He pays the most for melee weapons. He has some of the best quests His quests are fucking retarded. He’s also incredibly sadistic, as anyone who has had the displeasure of attempting his quests should know. He’s a mad hippie in the woods. To be honest, none of his shit is worth the mental damage taken in order to complete his quests.
Rule of Thumb for selling items at most value
Weapons: Strip the weapon! Take apart ALL pieces of it (including gas tubes, separating flashlights from ring mounts, etc), sell what you can to Skier. For the rest, sell to Mechanic. Note: You can RIGHT-CLICK and select DISASSEMBLE to automatically strip the weapon!
Keys, Food, Medical Items, Statues, Bitcoin, Rolers, etc: Therapist or the Market. For items like this, ALWAYS check the Market first! A lot of these kinds of items are in valuable trades or are required for quests; this means that other players are often willing to pay more for them, far above trader prices. However, take into account that you have to pay a percentage tax up front, so the market value should be at least the current value to trader + the tax, plus a bit on top.
Character Skills
Commonly referred to as ‘soft skills,’ your Character Skills are a set of abilities that increase your effectiveness when performing different tasks, often providing significant quality-of-life bonuses that are worth achieving.
Most of these are either not worth grinding or extremely difficult to. In most cases, the best way to increase your experience in these skills (and thus increase their level) is to play the game normally. However, for some of these since they are so powerful it’s worth slightly adjusting your play as to gain experience for these very useful skills. I’ll only talk about skills that are worth focusing on. It is important to note that due to the frequency of Wipes, it is very difficult to achieve high levels of soft skills.
Once you’ve achieved the highest level possible in a skill, it becomes ‘Elite’ – providing some powerful bonuses to your skills and overall effectiveness in Tarkov.
BSG recently patched skills to make them much slower to level. Because that’s what tarkov needed! A bigger grind! =__=
Strength
By far, the most controversial Skill. Increasing your Strength allows you to jump higher, sprint faster (up to double), hit harder, throw grenades farther, and increase your maximum carry weight. Making this Skill ‘elite’ makes only items in your backpack count towards your weight, effectively meaning you can run longer.
To Gain EXP: WALK while overweight. How overweight you are does not matter! You can see your weight in the bottom left of your screen, The default carry weight is 40 kg. A pro tip to level up strength: Buy/Acquire an Ammo Case, and store a combination of Shotgun shells and other usable ammo inside of it – just enough to push you over your maximum. However, being overweight drastically increases the speed of which your Stamina drains. It is up to you to balance leveling Strength to be able to move faster in the long run with the large penalty being very overweight in Tarkov brings.
Additionally, you gain experience by throwing grenades and damaging enemies with your melee weapon.
Note: This skill is considered heavily controversial because the rate of gain is incredibly slow because of how insanely powerful this soft skill is. Being able to run twice as fast as other people while also having extremely low encumbrance (weight) means that they can always outrun you to crucial objectives, like rare static spawns, such as Marked Room and others. Some players abuse this by using scripts or macros to level it for them. The average player will not come close to Maxing Strength in your average wipe.
Endurance
By far the easiest skill to level and also one of the most noticeable. Endurance increases your amount of maximum stamina, decreases your stamina drain while running, jumping, and holding breath. Additionally, it reduces the required ‘recovery’ time to catch your breath, meaning you regenerate your lost stamina faster and are able to re-hold your breath more quickly.
To Gain EXP: Run. That’s it. Just run around. Exp gain is very slow, but since you’re running in every raid you ever play, it’s fairly easy to level over time.
Health
A difficult skill to level, because points are not earned directly. When you earn Experience for Strength or Endurance, you gain about 35% of that EXP in Health as well. Health is a measure of your PMC’s overall fitness and rate of recovery.
Eventually, this means that once the Hideout is released (and off-raid healing is added) that your PMC will heal more effectively and efficiently. At the moment, its primary use is to reduce the rate of fractures and drain of hydration and energy.
Health is currently used in two quests, mostly in the end game, tasking you with raising this skill to 7, then 12, by Therapist.
Metabolism
Very simple skill. Essentially, increases the effectiveness of food and water, reduces the drain of your hydration and energy (again, not usually a problem except for EXTREMELY long raids or a blacked stomach) and at the elite level essentially eliminates the need for food and drink during a raid. Additionally, the Elite level also makes Physical skills not forgettable.
Exp Gain: Recovery of missing hydration and energy. Since fluids are common, a good idea is to hold onto them for a while until about halfway through the raid, as most fluid items restore 20-40 hydration, and then use it once you can get maximum benefit. You can choose to use only part of it, but that takes a long time and also leaves the item in your inventory.
Note: Rollbacks (skills losing experience after not being used) cannot cause you to lose a level. This was removed in .8. You can lose allocated points towards the next level, but that’s it.
Vitality
Another simple skill. Essentially a numerical measure of how stubborn your PMC is how hard it is to kill you. Leveling Vitality is fairly difficult, but like Endurance, you essentially level it by playing the game normally. As this skill gains levels, you have a reduced chance of bloodloss to occur after being shot, while reducing your chance of dying by losing a limb. Raising this skill to the ‘Elite’ level allows your blood loss to spontaneously stop after a few seconds without having to use bandages or a medical kit.
Note: Everything in Tarkov is experimental. All the tests I have been able to perform still state that taking bullet damage on a blacked head or chest results in death. Naturally, it is hard to test certain things, so always use common sense and taking things with a grain of salt.
There are plenty of other Skills, but most aren’t practical to level or aren’t relevant for a new player’s guide.
Tarkov’s Hotkeys to Know
Tarkov has a lot of hotkeys and customization. Most of these you would think are fairly explanatory, but quite a few of them are deceptively complex. Below I’ll list the default controls for a number of important actions and functions, in addition to my recommended binds for some things.
Loot Management
Tarkov has an extensive loot system. Naturally, dragging and dropping is a pain in the ass. No longer!
CTRL + LEFT CLICK instantly puts the item in your inventory (or from inventory to stash) in an available slot. Does not tetris it for you, so it may be placed inefficiently.
ALT + LEFT CLICK instantly puts the item in an available equipment slot.
I recommend binding ‘discard’ FROM Delete key. Personally, I use CTRL + RIGHT CLICK. It does NOT interfere with normal inventory management, and feels very intuitive to me.
This allows you to loot items much more quickly; you can, for example, quickly drag items from your vest to your backpack, quickly discard your rig, then Alt + click to absorb all their stuff like a discount Majin Buu.
Ammo Management
CTRL + T checks your magazine. It gives you an approximate amount of ammunition in your magazine (this is improved by your Mag Drill skill) as well as the ammo type. Note: If multiple ammo types are present, it will only display the ammo type at the ‘top.’
ALT + T checks your chamber. This lets you know if a bullet is currently loaded in the chamber. Useful if you know your magazine is completely empty, otherwise not so useful.
T toggles your Tactical device. This is how you turn off pesky laser lights and flashlights.
ALT is the default toggle for Holding your breath. Holding your breath reduces sway (especially on scopes) and reduces horizontal recoil. Only functions when you are ADS’d (Aimed down sights).
ALT + Right Mouse Button Changes your scopes magnification. Not all scopes have multiple magnification levels.
CTRL + Right Mouse Button Changes your reticle type. Note: Due to bugs, it is not recommended to change this if you can avoid it.
R R (double tap) is a Combat Reload. Combat reload is a much quicker reload than your normal reload, but you drop your magazine on the ground.
Movement
CAPS LOCK is the default control to toggle Slow-Walk. Crouching while slow walking is very quiet. Slow walking while standing up is slow, but you still make a lot of noise, especially if the enemy is wearing an earpiece.
C is the default for Crouch. (Duh.) Crouching reduces your noise and speed significantly. Also moderately reduces recoil.
X is the default for Prone. (Duh.) Prone dramatically reduces your physical profile and massively reduces recoil. Going prone quickly is recommended if you have to spray at a target that is a moderate distance away from you. It is also VERY loud due to a bug at the moment! The sound is distinctive to going prone (sounds like rubbing loudly on gravel, no matter the surface) so other players will know you’re prone if you move. It doesn’t matter how slowly you move while prone, even if the sound doesn’t play for you, it does for other players.
Mouse wheel is the default for manually adjusting your speed. Tapping Caps twice will quickly reset your speed to maximum.
Q & E Leans left/right by default.
ALT + Q or E Sidesteps + leans in the direction you choose. Useful vs scavs and players as it allows you peek further. It is a bit slower to retreat than using a typical lean, but doesn’t expose your arm (and thus letting them know you’re peaking) a moment before you see them. If you are stuck in a perspective, tap Q or E to fix it.
If I’ve forgotten a keybind that you consider essential, comment below and I’ll look into adding it.
Getting Started
Whew, half way through the guide and we’re just getting started! Hahakill me.
Starting Equipment
Most people are going to be Standard Edition plebs (like myself) so that’s who I’m primarily going to talk about. Standard editions start with some pistols, an AK-74U, some basic meds (AI-2’s, bandages, splints), some pistol ammo, and 300k Roubles.
That 300k is going to go fast if you don’t know what you’re doing. But that’s okay. Gear comes and goes! You will die. A LOT. Dying is OK. Don’t be discouraged! This game has a huge fuckin’ learning curve. You’re basically climbing Mount Everest. It’s OK to freeze your balls off at the beginning. But, much like hyperthermia, as you keep going you’ll eventually be very much at home and taking all of your clothes off, and calling everyone shivering weak-ass pussies.
Your PMC also is equipped with a secure container (also called a Pouch) – it is a container that goes into your Pouch slot. Depending on your edition, you will start with a different Container. Most players will have an Alpha Container. Alpha containers are 2×2, so they have 4 slots. Secure containers do not lose their contents upon death. This being the case, you should always attempt to place extremely valuable items you find inside a raid in your secure container so that you will keep them even if you die. Items like Bitcoin, Rolers, Gold Chains, etc should be placed there. EoD edition players start with a Gamma (3×3). They are the primary source of hatchling frustration. Note: Apparently hatchlings got gutted because if you spawn without a weapon you’re Tagged and Cursed. LOL!
From level 1, you need to decide where you want to go and what kind of loot strategy you are going to employ.
If you are late in a wipe, then you should prioritize salvaging more than other strategies, but we’ll go over all strategies available to us.
Type of PMC Raids
These are not game modes. These are basically names that either I or the community have given to raids in which a player goes in with a certain strategy. The way you spawn in and how the game is played is entirely the same; it’s just about having a different goal in mind when you go in, and with different kinds of starting equipment. Your strategy can and will change throughout the raid, as battle conditions change. PMCs are the scion of evolution, and we must adapt to ever changing circumstances to be successful.
Hatchet Raids
Before I go more into this, people hate hatchet runners. They’re referred to as ‘hatchlings’ – players who run into a raid with zero equipment (except their melee weapon) in search of valuable items to place into their Secure Container. People despise hatchlings because they aren’t worth killing (as in, they have no real reward for killing them as Dogtags got nerfed and aren’t worth a ton of roubles) but they are a threat because they can hide weapons in their container (becoming a threat if they trust the hatchling) while also being likely to run to hot-spots to grab loot and shove it in their container without risk.
However, fuck that. Don’t let random people’s opinions determine how you play the game – if you have fun and you’re playing without cheating, then all is fair game in my opinion. Just don’t expect mercy if you go in as a hatchet – players will shoot you on sight. Your goal as a hatchling is just to get to your quest location or loot hotspot before everyone else and grab whatever you find there.
Recommended items: Nothing! OR: A cheap but effective Pistol: Candidates being, the TT, P226, etc. Basically any pistol but the shitty Makarov (PM) When bringing in a pistol, it’s recommended to have one stack of ammo in your container as well. Pistols are mostly recommended to deal with scavs at-need when running for a quest objective. For new players, pistols can be a significant chunk of their total worth if they have to constantly keep buying them.
Pistols can no longer go inside containers. (Or any other weapon, for that matter.)
Hatchlings will also spawn Tagged and Cursed. It’s still possible to run with a hatchet for specific purposes, but it’s much harder now. Generally, you’re better off just going with a cheap pistol.
Zero to Hero
Play your meme music if you wish, but this type of raid is a favorite of very skilled players and streamers alike; going in with minimum equipment (usually just a pistol) in an effort to cheese and kill players who are far more geared than they are. They will often find a scav and kill them with their pistol, then use the scav’s equipment to fight players or other scavs. This should, probably, be your primary raiding method until you are comfortable with the game’s controls and extracts. Once you have the gunplay down, this doesn’t have much benefit unless you are really, really, good and can regularly extract with full loadouts.
This is the recommended loadout for Labs, because of the prevalence of high-level loot on enemy raiders and their tendency to ignore most forms of protection players bring, the return-to-risk ratio is very good on labs.
Recommended Equipment: Pistols, Shotguns, or Mosins, primarily. You can also pick an item from the “How to deal with geared players on a budget!” section.
For labs: PP-19 setup (Check LABS section in MAPS for more), or an automatic pistol (PBM is 21k from Prapor III), or a strong single-fire pistol (SR1MP). If you’re less comfortable risking an early death (from player hunters) then you can go in with a full loadout, though if you die you risk more in gear and gain less from successful raids, as you can’t double up on loot using insurance tactics.
Questing/Salvage Operation
Effectively, all this is is the above, but you typically go in with either a hatchet, or slightly more gear, usually a shotgun and some shells or maybe a pistol. The latter allows you to take on scavs without much problems; Usually killing 2-3 scavs without taking a lot of damage is very possible, even without armor, as scavs are usually horrible shots and you can quickly murder them with a shotgun blast to the face.
This type of raid often entails either the player waiting in a corner for a period of time (especially on Customs, waiting 20+ mins for everyone to leave your quest area before heading there, before cleaning up scavs and grabbing your quests) or visiting the outskirts, avoiding high traffic areas in order to grab some of the more remote loot spots and scavs as they go, then hitting their quest points of interest, then grabbing whatever leftovers are available. This is most common on Customs, as Scav boss spawns with his elite posse (and a lot of gear) – usually players have difficulty getting away with all the loot and must leave some on the ground, a blessing for the poor hatchling or low level player.
Recommended Equipment: Shotgun and ammo in pockets, AI-2 and bandages hotkeyed. If you are going to be fighting scavs with regularity instead of avoiding them having meds handy is essential. Fortunately, the quick cast time of the AI-2 is well suited to this. A Mosin is also suitable for this, while being far less reliable against groups of scavs, it is better vs geared players. Pistols are also viable if you go for headshots but are harder to pull off for obvious reasons.
Juiced Boy
Essentially, bringing in gear that’s capable of killing players! This type of raid varies quite a bit between players. Some only consider ‘Juiced’ to be a player with Altyn helmets, fort armor, etc. But honestly, it’s completely subjective.
Recommended Equipment: Not just what you can bring, but what you are OK with losing. PP-19’s here are OK loadouts but not very good vs geared players. Try a Mosin or an SKS instead. Look under the ‘New Player Loadouts’ section for tips for what to bring.
Scav Raids
Scav raids are an excellent way to learn the game! It is an entirely different way of playing Tarkov for a few reasons, which we’ll get into, but the most important thing is that if you die, you do not lose anything. Scav raids are an alternative to raiding with your PMC, and it is an especially attractive option if you are a new player or running low on money and equipment. It is very important to note, however, that Scavs do not grant any Experience to your Character level, nor any Skills. You also get to transfer anything you find over to your main character’s stash!
When you spawn in as a Scav, it is into an already-existing Raid. You can spawn in at practically any time, at any location, and with random equipment, including in your bag (if you spawn with one.) As a player Scav, AI scavs will not be hostile to you. However, if you attempt to kill them, scavs within the area will become hostile, even if there were no witnesses. ALWAYS make sure that killing an AI scav is worth it! If they don’t have any significant gear, it’s likely not worth the time. Killing a fellow player scav will have the same result, even if they attacked you first. (Note: this is going to be changed!)
The best maps to go into as a Player Scav are Customs, Woods, and Shoreline. Customs is usually for PvP due to the fairly linear design of the map. Additionally, you can find the remains of scav bosses and loot what’s left there. Scav bosses WILL be hostile to you, even as a player Scav! Woods is good because Scavs’ backpacks can spawn Labs keys (very rarely) and are often farmed. There’s usually loads of gear laying around, albeit not of the best quality, but this is a great source of shotguns to work with. Shoreline is a good place to go for outskirt-loot! (Check Shoreline in the Maps section for more details.) Additionally, Resort also often has dead players to loot as well.
Player Scavs have different extracts than PMCs, but they also share some. Check your extracts, and look at the maps carefully. Plan your route, based off the time you spawn in!
New Player Loadouts – LL1
At the beginning of a wipe (or for a new player in the middle of a wipe) you will be presented with the starting equipment granted to all players, based on your Game Edition. Having a higher Edition gives you additional equipment to start off with, such as more guns and roubles.
Generally speaking though, it doesn’t really matter. Standard players will start with 300k Roubles, and an assortment of pistols, an AK, some basic medical supplies, and some backpacks. This isn’t much to start with, but we’ll go over the preferred starting builds and when to use them.
Your starting pistols aren’t super useful – they’re mostly going to be for super budget, zero-to-hero builds or you can just sell them. I’d recommend keeping them around for a while until you get the hang of the game and have a decent economy going.
What makes a good starting loadout?
We define a starting loadout by equipment that may be purchased using Level I traders, on top of providing efficient equipment that can be used versus low level players and well equipped players alike. Note that some builds are better later into the wipe than others. This is because some loadouts deal with heavy armor and face shields more efficiently than others, though there are usually drawbacks or caveats as to why they’re better vs stronger players.
We tend to favor SMGs and bolt-action weapons because they tend to be cheap, user-friendly, easy to modify, and your starting lineup of fully automatic weapons are AK variants, which tend to have very high recoil until modified by an experienced user. Despite their more powerful rounds, overall usability will lean towards weapons that are much more easily controlled.
Loadout I – the MP5
The MP5 is arguably one of the best SMGs in the game. With light recoil, high rate of fire, and being very cheap and compact, they are an excellent asset for new players. The MP5’s standard rounds to use are Pst gzh, which provides moderate penetration and damage, and penetrates Class II armor effectively (PACA, cheap face shields), but requires a full mag dump to penetrate Class III armor (UN vests + Kirasa), which is most face shields. Useless vs Class IV and above. This means that you predominantly want to go for headshots or leg sprays vs faceshields.
Later you may opt to use AP 6.3 rounds, which may be purchased from Peacekeeper Lvl III, which dramatically raises your effectiveness vs Class III armor, but still does poor vs Class IV.
The MP5 may be purchased from Peacekeeper for $364, or about 42k roubles. It may also be traded for in exchange for 10 Scav knives, which may be acquired from dead scavs or your player scav. It is a recommended loadout because not only is it a good gun, but can be obtained practically for free because of the scav trade. You may attach a Burris FastFire Reflex Sight (FF3) that’s also available from Peacekeeper for $122, or about 14k Roubles (You may need to remove rear sight to attach.) This is a total cost of about 56k, which was recently increased. However, it is still a very powerful SMG, so should be considered a go-to in medium, full builds.
The MP5 can accommodate 30 round and 50 round magazines, the latter which can only be obtained from the flea market or Mechanic’s barter trades. Due to the MP5’s very high rate of fire, it is recommended to bring in a larger rig, at least a Micro Rig Additionally, due to its initial cost, it is also recommended to protect your investment with a cheap helmet (NOT Kolpak!) and vest. I would prefer at least Class III, such as a UN vest or Kirasa, with a cheap helmet, like the 6B. Note that due to the prevalence of the Mosin Sniper Rifle, Class 3 is mostly only useful vs shotguns and pistol players and most scavs.
Looting note: When ‘swapping’ your main weapon slots, you can save space by taking out the magazine out of the weapon, reducing its overall size to a 1×3.
Loadout II – the PP-19
A cheaper MP5, the PP-19 is arguably an equal gun, though it has slightly less fire rate and more recoil. The main perk is that it has almost the same fire rate as the MP5, uses the same caliber (so is effective vs Class II armor and unarmored targets, but needs a mag dump to kill Class III face shields), is very compact (can be folded after acquiring new weapons in-raid, taking up only a 2×2 grid) and much cheaper.
It may be purchased from Prapor at Level I, for 19k roubles. You can also add a Cobra reflex sight (a cheap red dot sight) to provide much better accuracy and visibility for an additional 10k roubles, so you can have a fully functional, suitable weapon for 29k roubles. The reflex sight may also be purchased from Praper at level I and can simply be dropped on it, as is.
Due to its overall expense, it is recommended to bring in just a backpack and a scav vest with some loose ammo in your container for reloading. Since the weapon is so cheap, we want to make it as easy as possible to turn a substantial profit in the raid. Note: Originally I did not recommend armor, but low-class armor is much cheaper now, so you might as well bring it and swap it out if you find something better in-raid. Armor helps substantially verses scavs.
Loadout III – the MP-153
A fairly cheap, one size fits all solution. It devastates low armor targets and heavily armored targets alike, if used properly. The MP-153 is available from Skier Level I for a barter trade, but may be purchased at Level II for 30k roubles, though it is often sold for much less on the flea market (as it is a common drop on Scavs.) The MP-153 uses 12 gauge shells, and only is fed round by round, so you need only to keep the shells in your pockets to be able to reload. This is an added benefit as it essentially allows you to have an additional empty slot for you to loot enemies. If you don’t bring in a rig, you can take one off an enemy without risking your own.
As a semi-automatic shotgun it has the highest fire rate of all available shotguns. Additionally, you can modify it by adding magazine extensions, increasing its magazine capacity from 4+1 up to 8+1. Note that the +1 is due to the round in the chamber that you may place before the raid.
The MP-153 shotgun is capable of destroying a player’s legs in one shot. This being the case, it’s possible to kill a player with just two shots (though it’s not very likely) in the same leg. So if you’re verses a heavily armored player, just shoot their legs, as they are not protected.
Due to its low cost, and lack of requirement for a rig, it’s recommended to play cautiously and ambush players in advantageous positions with this weapon, as you likely won’t want to take in body armor with you.
Loadout IV – The Mosin
A lightweight, bolt-action sniper rifle, the Mosin is effective vs unarmored targets and armored targets alike. It boasts the 7.62×54 caliber, meaning that it possesses very high damage and penetration. LPS GZH (Your standard Mosin ammunition, available from Prapor Level I) can very reliably penetrate Class IV armor, and is moderately effective vs Class V and VI. Later, you may purchase SNB ammo from Prapor Level IV, which reliably penetrates ALL classes of armor. If you hit them in the head with SNB ammo, it does not matter what protection they have, they will die. SNB can also be found in the world fairly commonly, and is worth a lot of roubles.
That being said, the Mosin’s weakness is that it has a slow reload time, since it is bolt action, you must reload (from an internal magazine) after each shot, resulting in a measly 30 rounds per minute. While reloading, you are very vulnerable. Generally speaking, if you miss your first shot, you’re probably dead.
Similar to the MP-153, the mosin does not require a chest rig to reload. You can keep the bullets in a pocket instead. Adding to its very low cost, 25k for the mosin infantry (versions available at later trader levels allow for mounted optics), the mosin is naturally a very good low-budget answer to geared players.
I would recommend keeping no more than 20 shots in your pockets, and a full stack in your container. This is because the bullets are actually pretty expensive compared to most, so we want to avoid wasting roubles (especially early) if possible.
Loadout V – The SKS
Last, but certainly not least, the SKS is a semi-automatic dedicated marksman rifle. Essentially, it’s a rifle that’s also very good at long range. That being said, as the SKS (not the OP-SKS) cannot mount optics, it’s best used at medium and low range. It may be purchased from Prapor Level I for just under 24k roubles. Its magazines may be found at Skier level I.
The default ammunition is 7.62×39 PS, which is effective versus Class III armor, and mostly effective vs Class IV. Its effectiveness diminishes dramatically past Class IV armor. The SKS does not possess automatic fire, but it does host a decent fire rate regardless.
Note: The default SKS now has a top-loading internal mag. You can still buy the ProMag 20-round SKS mags from Peacekeeper LL2, and the 35-round magazine from Peacekeeper LL4. Remember that Peacekeeper LL2 only requires money spent, and not reputation, so he isn’t locked behind a grind.
Stash Management – What to loot, keep, and sell
Disclaimer: As of writing this, Quests are undergoing a lot of changes. BSG is gradually experimenting on changes, such as adding ‘found in raid’ requirements to items or unique versions which can only be found in raid.**
For a Standard player, stash management is key. There are several ways of increasing your available storage space via containers. At the moment, storage containers + upgrading your Edition of the game is the only way to increase your available stash space. Due to space constrictions, as a Standard player you will be forced to liquidate a lot of your stash into cash, and then purchase Cases in order to store more. It’s a long process, and often is less efficient than just storing full loadouts as-is. This is the primary disadvantage that Standard players have, though regardless due to flea market most players won’t have a problem with their economy in the long term.
Since Hideout has been implemented, Standard players will eventually have the full stash capability that EOD does, after grinding for Hideout upgrades. Beyond the container/stash size, EOD doesn’t have any in-game advantages over Standard players, though the price to increase stash size is honestly ludicrous, you’re better off just buying more cases.
What to loot
Tarkov is filled to the brim with random loot. Useful and useless alike, the world you play in will have scattered goods everywhere. Most of what you need to determine looting you will learn as you go. There’s so many items that it is really difficult to create an exhaustive list of what is and isn’t worth picking up, especially as you will get a good feel for it over time.
NOTE: The developers are going to implement new looting mechanics next Wipe – this will randomize loot and DRAMATICALLY change how the game is played! Very exciting. Just keep in mind that what you learn here is most likely going to be outdated next patch (as with all things) so if you’re from the future and reading this beyond 10.12, let me know of any changes!
Guns – Most of the time, guns are worth picking up. They’re usually a decent value per slot, with only certain exceptions (such as the AKS-74U, aka the shitty/baby AK) – better guns are things like non-mosin sniper rifles, any M4 variant, or heavily modified weapons. (Note: ‘better’ in this context is strictly for loot purposes.)
For modded weapons, you can take off the suppressor/sights to get a large value from the weapon for relatively low space in your inventory. For the most part, I only recommend this when your bag is already full of goods that are actually worth something.
Gun mods – Most of the time, worth picking up. Off of the top of my head, suppressors, AKM ‘MOE’ grips/stocks, and sights are usually worth keeping. Even the worst sights are usually 2k per slot. This is the one that takes a long time to get the hang of, this comes with experience.
Trader Goods/Quest items – Check out the quest items above. Most of the time, they’re worth keeping, especially if you’re early into a wipe. At the very least, storing them in your stash can dramatically reduce the cost of completing the quest later. Fuel Conditioner, Flat Tushonka, Graphics Cards, etc. They’re usually one of the highest items you can get. Avoid nuts and bolts, screw drivers, duct tape, and TP. Blue tape is usually worth it because it’s for a good trade.
Note: Nuts and bolts are used for early hideout upgrades and some crafting, so they may be worth anywhere from 4k to 20k per slot, depending on demand and how long the wipe has been around.
These can be found on the ground, in toolboxes, in scav backpacks, and other miscellaneous containers. These typically have blue backgrounds.
Medicine – 90% of the time, you want to pick these up. These are things like painkillers, morphine, ibuprofen, various first aid kits, etc. Even bandages are handy to keep around. You can always drop cheap medicine later if you find goods that are worth carrying, but if you drain your only healing and later start bleeding you’re going to feel really dumb that you didn’t hold onto that bandage when you had the space. These typically have blue backgrounds. Avoid using the more expensive medicine like morphine if you can, as they’re expensive and are required for some quests and trades.
Valuables – 100% always place into your container. These are things like Rolers, Bitcoin, Badges, Statues (non horses), etc. They’re usually very high value per slot and are often used for high-end trades, and are usually found in safes, but can be found more rarely in most other containers. They often have a purple background, and statues are used for Ragman quests and barters.
What to keep and sell
As mentioned previously, Tarkov has a crap ton of different items in it. Food, water, medicine, weapons, etc. Most of the time you’re only going to want to keep a limited amount of different goods, and as many as another as possible.
Food
Most food items in Tarkov are not worth picking up, except to use in raid to top off your energy or hydration. There are a few exceptions, though. Flat can tushonka, Redbulls, etc can be used in trades or quests. Always check available trades in the wiki and familiarize yourself with them. If you know what can be used for trades, you will have a greater understanding of what’s worth bringing out of a raid and what’s worth hoarding.
Most hydration non-medical items aren’t worth keeping, though if your playstyle has you playing a shit ton, they can be worth picking up in Scav runs to reduce the cost to improve ones hydration. (As of this writing, bottles of water cost 20k, for some reason.)
Guns and equipment
Keep guns in the beginning, unless you’re really low on space. If you’ve already optimized their space, (explained in the next section) then you can start selling the weaker guns and parting them out to get the most out of them. Once you have 2-3 solid loadouts and are fairly confident in your ability to come out of raids alive (if playing it safe) you don’t need to worry too much about hoarding low quality gear.
Generally speaking though, keep high-end armor and weapons until you’re more experienced in the game. It’s super easy to piss away your M1A given to you by BSG through sheer bad luck. It’s even easier if you’re bad at the game. This is explained further later on in the section where I talk about how to combat gear fear.
Mods you can usually sell, as most mods you’re going to use you can purchase as-needed from traders. They’re also a good source of early capital to finance your raids.
Medicine and valuables
Keep most medicine, sell bandages and shitty kits if space is really an issue. Sell most valuables on the flea market as long as they sell for more than you can sell them to Therapist.
How to manage stash space
TLDR: Maintain your space by selling unnecessary equipment, medicine, and other materials. Compress your weapons.
Weapon Compression
You can often dramatically reduce the size of weapons in storage by folding stocks, and taking off the handles and grips of guns. Often this can reduce a weapon from 2×8 to 1×8, saving you 7 slots (8 -1 for the part you’re storing next to your weapon.)
Containers
Buying containers should be your first major priority once you get going. I generally go for an Items Case, and then a Scav Junkbox, or vice versa. Those two items alone will massively increase your stash size themselves, especially if you like to hoard trading items like myself.
How to manage Gear Fear
“If it’s only ever in your inventory and never in the field, then you’ve already lost it.” – Tarkov Philosophy.
Gear fear is where players are paralyzed by the fear of losing what they have managed to acquire, to the point that they never take anything into a raid and never really learn and improve. This section isn’t to judge you Zero to Hero types. If you enjoy running around with nothing but a hatchet, hey, more power to you. You do you.
But most of the time players that do this aren’t really fully enjoying Tarkov. Fear of losing is stronger than the prospect of gaining gear. It’s something that every player must overcome.
The advice I give most players is to avoid using weapons unless you can easily replace them. Ie, you have the income/stash value to purchase an identical (or very close) loadout off the flea market. Once you are more comfortable, take in your heavier loadouts, but don’t be too worried if you lose them. Gear comes and goes.
”If it’s sitting in your stash and not shooting bullets at nerds, then what’s the fucking point?” – Baitham
TLDR, use your shit or liquidate.
Tarkov Economy – How do I make money?
Roubles, gold, cash, mulah, cheddah, grease, whatever you call it, you need money. Money purchases goods and services within Tarkov. Equipment, insurance, quest items, hideout upgrades, you name it. And standard players (Over 60% of the playerbase) need a ton of cash to afford the Hideout.
In this section we’ll go over some basic money-making strategies. The most effective ways are super boring, forewarned.
We basically have three tiers of money making:
Basic Tier – This is the tier that every pleb who has never read this guide, doesn’t visit /r/wallstreetbets, runs in with the ‘tank’ build involving a kolpak and paca, buys empty gas cans on the flea market, and plays Tarkov with crusted cheetos sticking to their keyboards. Ultimately, these are going to be strategies used by your average newbie to try and make money. They’re basic, not super efficient, though it can work.
Advanced Tier – This is the tier that your average Tarkov veteran is at. They watch /r/escapefromtarkov/top/ memes for financial advice, and as one might expect, it serves them well in life, love, and tarkov. They try basic tricks to improve their cash flow, but don’t really utilize the best economic tools within Tarkov to achieve success. They basically play the game at a somewhat competent level and utilize the Hideout to achieve a basic, if competent, level of income.
Russian Chad Money-Lender Tier – This is the tier that your average RMT asshole is at. Basically, they flip the market and use the hideout to help them do it. Now of course bots can do this 24/7 and much more efficiently than we can, but you can still do it and beat the bots to earn a truly ridiculous amount of money without ever even going into a Raid.
Basic Money Making Techniques
- Strip weapons – Stripping weapons is the easiest way to get more buck for your bang bangs. The reason being (as explained in the Dealers section) is that Traders pay different amounts for different goods, including weapon parts. Disassemble your weapons and sell all parts to skier that you can and the rest to Mechanic.
- Utilize Marketplace for Barters – The marketplace is one of the best places to liquidate your goods. Note that the fee for using it makes SOME trades non-viable, the market price just isn’t high enough to make it worth it, but this is where the majority of your barter items will be going. Make sure that the amount that you are getting for an item is at LEAST the maximum vendor value + the tax + 10% – most of the time I won’t even bother with selling an item on the marketplace unless the increase is at least 20% as the vast majority of people will undercut even without understanding how the market works – they can charge more for a vendor but get less due to the tax, and most people only have 3 slots.
- Utilize scav runs effectively – Scav runs are amazing for good sources of income. You can run Scav on interchange, hit tech stores, run Scav caches on many maps, scavenge boss leftovers, etc. There’s zero risk to what you carry with a Scav so if you are struggling financially you should be running these 24/7. If you do not have ANY loadouts or few loadouts for your PMC, just run 2-3 of these and immediately extract so you can store and build up some gear for your PMC to use for free.
Advanced Money Making Techniques
- Utilize Hideout efficiently – Your Hideout is a good source of income once you start investing in it a little. Your earliest form of income is going to be salewa crafts. Even if you don’t sell them on the market (average 12-15k as of this writing) you can use them as healing items or sell them to Therapist for a straight up Rouble profit. Crafting this consistently and shutting off the power when you aren’t crafting is a good way to make money in Tarkov early. Once you unlock Lavatory level 2, you can start crafting Ammo Crates with an initial investment of around 160k to make 200k+ regularly, effectively making 40k a day for your purposes. After your first bitcoin farm and Scav Case you’ll start rolling in passive income to the point that you’ll always have money for a loadout.
- Better Loot Routes – Veteran players know maps. They know where loot is. If you can, either pull up maps on a separate screen or have them printed from your local staples or some shit for like $1. They’re super valuable. There’s loads of good maps linked in the Maps section!
To add to this, Veteran players know what ‘Hotspots’ attract other players, where they are going to come from, and to be prepared for them. The only real solution for this is to know the map like the back of your hand. Offline is a fantastic tool for this. Online maps will also show you where loot spawns and where PMCs and Scavs can spawn – this lets you prepare common routes and how to ensure, or avoid, conflict with players.
- Labs runs – As mentioned in the Maps section, labs are potentially a very very lucrative raid opportunity. It takes a very good player to routinely take advantage of this though; there will, of course, be games where cheaters or bad luck or what not ends up murdering you, but labs makes so much money that it’s worth the risk.
You can easily make 1 million roubles off a 30m raid if it goes right. Key cards are 200k a pop though, which hurts for sure. Fortunately, the raiders in Labs can drop key cards for free entries.
Money-Lender level money maker techniques
- Quest rushing – Some quests are more lucrative than others, but more importantly, they provide experience. EXP and REP are the primary gatekeepers for trader levels. Trader levels allow you access to higher level weapons and equipment and parts that you can resell on the market (huge income stream in and of itself) but are also used to give one an edge in combat vs people who are less well armed. This means more successful extractions, and much higher profit margins for their average raids.
- Playing the Marketplace – The most efficient method by far to earn roubles; there’s a reason scumbags use bots to do this. The easiest way to do this is to buy items that sell below the price Therapist buys them. All kinds of items will sell far lower than market average, but it’s hard to make a profit on those items as it is hard to predict if random barter items will resell after you purchase; however, if you buy below a vendor price, you are guaranteed to make money if you simply purchase the item.
Perfect example: Fuel conditioners. They sell to Therapist for 121k, I regularly see them posted for 80-90k, so every single time I buy one, I basically print 31k roubles. This regularly happens with items like gphones, books, cat statues, etc.
Tip to purchase items more reliably: There’s quite a few tutorials out there about how to sync your system clock to the game trader timer, but basically set it forward 2-3 seconds and see if you can buy out items reliably. If not, set it further and try again. If you get an error message stating “offer not yet available” then you need to reset your clock and try again.
What now?
Keep playing Tarkov! Improve your gunplay, find out good loot routes, hoard loads of equipment, and painkillers, whatever you want. Remember, it’s your Tarkov. You make the rules.
This concludes my guide, but I don’t mind expanding, improving, and correcting the guide as necessary. If you have any questions or concerns, please comment. Thanks for reading!

Recent Comments