Brave Frontier Maxwell Trial Guide
Brave Frontier Maxwell Trial Guide by anubs
Hi there!
All the information written up next is based on my own experience with Maxwell trial and the experience of the many friends I’ve heard from in the last few months.
Credits on the battle steps and images go to Hyperion @ Appinvasion. Credits on the teams used on the trial go to Trystansr @ Appinvasion.
I hope that you are all as excited as I was when I finally was able to gather the resources needed for this trial.
Before any tips or walkthrough there are some things you need to realize:
- Even with the perfect combination of units, spheres and items, Maxwell trial is a heavily RNG-based battle. Even if you get your mitigation and/or guarding at the proper time you might still get screwed by a Crit Endless or a double Destiny to the face of 1 of your units.
- This trial is very difficult. It is supposed to be difficult since the reward for completing it is the best unit in the game.
- All this wall of text is based on the jp version of the trial. Gumi can change any of the aspects of this battle.
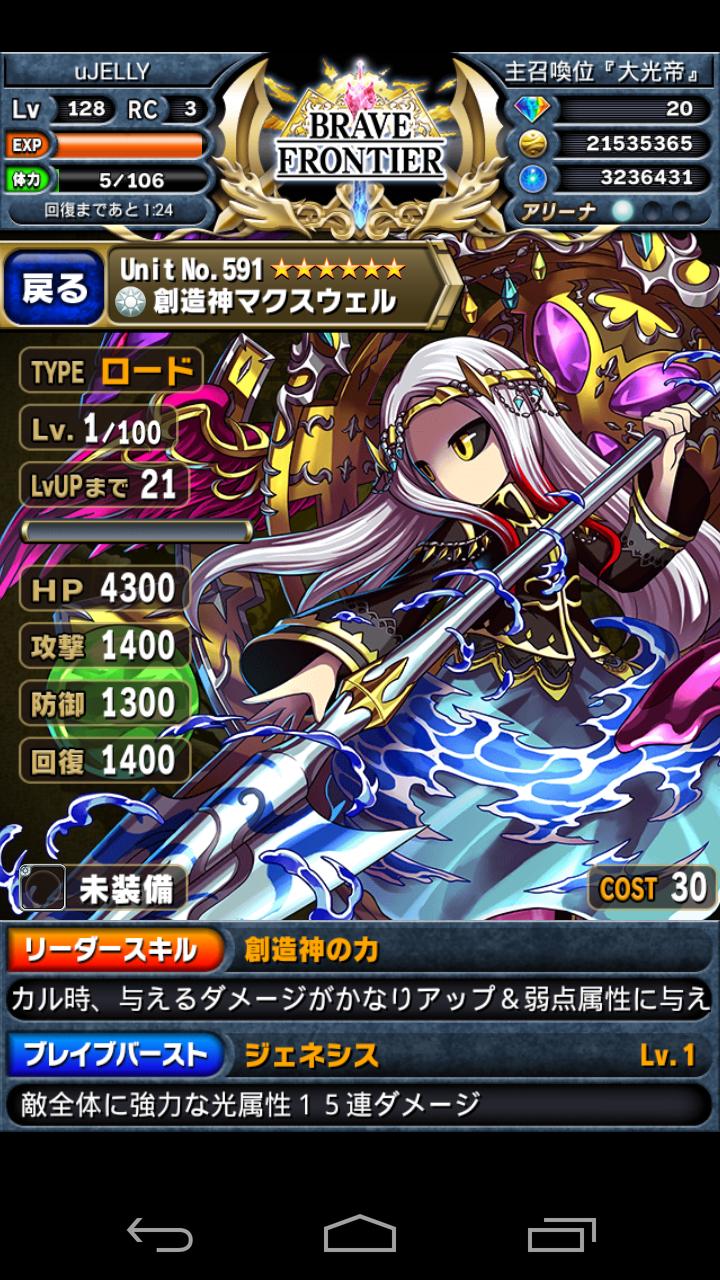
Creator Maxwell
- Trial Number 03 – 50 Energy, 3 battles, Endless fun ( get it? :) )
- No gems can be used to revive
- 3 squads can be used:
- Limited to two times your total cost.
- You can’t use the same unit in more than one squad unless you have multiple copies of the unit.
- A different friend is used for each squad.
Clear Rewards
- 1 Gem.
- 2,000,000 Zel.
- 6* Maxwell (Lord).
- Stats at level 100: 6,200 HP / 2,000 Attack / 2,000 Defence / 2,000 Recovery.
- Leader Skill: Large boost in critical hit and elemental weakness damage.
- Brave Burst: 15 combo powerful light elemental attack to all enemies.
- Super Brave Burst: 33 combo massive light elemental attack to all enemies, and buffs all allies with increased critical hit chance for 3 turns.
A – PREPARING YOUR SQUAD:
This is kind of hard since I have no clue of what units will be available when this trial hits global. Also, some units are significantly different in the two versions of the game. For instance the value for Critical Damage Bonus in Zebra 5* is halved in the JP version. I decided to only use units that are currently available in the Global version and some that might get their 6* soon.
Required Tier Units:
- Oulu : This is a no-brainer. The only unit with damage mitigation on its BB in the game. Also usable as a leader.
- Grah: His leader skill was made for this battle. 20 % stats for everyone, that sweet reduction in light damage taken and dark buff? Yes please.
High Tier Units:
- Lilith : We’ve all heard the hype around this unit in the last few days. Incredibly useful for bosses, Lilith’s SBB in combination with dark buff will melt through Maxwell like butter.
- Eltri: The first two stages of the trial are way easier if you somehow manage to keep ailments away from your team. If you combine Eltri and a Refined Gem you get a free pass through all that. It will be a huge advantage if Gumi decides to release Lance’s dungeon before Maxwell because one of the rewards is a sphere that combines stats improvement with the anti-ailments feature.
- Felneus: This trial may require the use of Oulu’s BB or heals in 3 turns in a row while hitting one single target boss. Until Uda gets his 6* Felneus is the best BC fill unit in the game.
Useful Tier Units:
- Melchio/Lunaris: If you lack an Eltri and you’re not stacked in Refined Gems you might want to consider using one of these units to help you through the first 2 stages.
- Rickel: Often overlooked, Rickel has a good hit count and damage which makes her a possible replacement for Lilith.
- Lodin: His BB is good if you desperately need Oulu’s BB/burst heal and his SBB boosts a nice BC fill.
- Themis: Besides the obvious healing she is also a dark buffer. Usefull if she gets her 6* before Maxwell reaches Global.
- Aryuto: His 6* is amazing for Maxwell. Nice damage plus heal over time plus a sweet BC fill makes this underrated unit in JP a solid partner to bring along.
- Elimo: Even though you probably won’t get to use her SBB in the trial (there are situations where her BB is required in consecutive turns ) she’s still a useful healer and a nice replacement for Eltri for the last stage since the last fight isn’t that heavy in terms of ailments. Her Defense buff won’t mean much since Maxwell will have a Defense ignore buff half of the time.
- Ronuel/Twins/Reeze : A lot of people who managed to get Maxwell in the first few days used a 2 squad tactic where the 1 squad was purely meant to deal with the first 2 stages. These 1st squads usually picked one these units as leader to deal with the status ailments.
- Michele: While survivability is the most important aspect of this trial, taking Maxwell down fast is also important. Less turns means less chance of having your units smashed with double Destiny or random crits. And there’s no unit in the game that can do that as well as Michele in terms of attack buff.
- Zelban: If you’re planning on using a first squad to clear the first 2 stages he’s a great unit. Earth buff makes you melt through Juggernaut and his 115% DEF buff is a huge and useful bonus.
- Tilith: Used for a 1-turn all-out attack. Explained below.
B – SQUAD BUILDING:
- Survivability is the word for this trial. Correct. But the most common reason for failure besides dying horribly at the hands of Maxwell due to incorrect usage of Oulu and guarding, is picking squads that lack the damage output to kill Maxwell the second time before she casts Sacred Song again (she revives with 100.000 HP).
- You MUST have a squad/plan to deal 100.000 damage in 3 turns (if you kill her right after she casts the buff ). I’ve seen numerous people trapped in a loop where they couldn’t do that amount of damage that fast.
First you want to know what is the best choice in terms of squads for the units you have. There’s a countless number of squads that beat the trial and a ton of new ones to discover. Just because you don’t have those 2 maxed SBB10 Lilith it doesn’t mean you can’t do it. Remember that the first 2 stages require some source of protection against status ailments but the Maxwell stage does not.
Examples of 1-squad clearing (tested) :
| e.g. 1 | e.g. 2 | e.g. 3 | e.g. 4 | e.g. 5 |
|---|---|---|---|---|
| Grah (L) | Grah (L) | Grah (L) | Grah (L) | Grah (L) |
| Lilith | Lilith | Lilith | Themis | Eltri |
| Lilith | Lilith | Oulu | Aryuto | Lilith |
| Elimo | Oulu | Rickel | Eltri | Michele |
| Oulu | Lancia | Themis | Oulu | Ruza |
| Grah (F) | Grah (F) | Felneus (F) | Lodin (F) | Oulu (F) |
- If you can’t build a single squad to deal with those status and deal with Maxwell just plan it accordingly. Build a sacrificial lamb squad for the first 2 stages and have it killed before you take down Abbadon. I strongly advise you not to do it after that because you’ll be ending with a fresh new team with no BBs against a Maxwell that could be in a very bad mood (Destiny/Sacred Song turns).
- Also if you’re lucky enough to have your own Tilith or a friend with her as leader, you can use her to build a finisher squad. After you kill Maxwell for the first time just let him wipe your team while saving a Fujin pot. Use it on Tilith and unleash the power of your crit squad to quickly take her down. Or you can also use the same tactic to wipe the first 2 stages. A couple of Fujins on Tilith and a good crit squad can easily take Juggernaut and Abbadon.
Examples of 2-squad clear(also tested):
| Sq. 1 | Sq. 2 |
|---|---|
| Felneus (L) | Grah (L) |
| Melchio | Lilith |
| Michele | Lilith |
| SGX | Oulu |
| Eltri | Elimo |
| Lodin (F) | Grah (F) |
| Sq. 1 | Sq. 2 |
|---|---|
| Gravion (L) | Grah (L) |
| Lodin | Lilith |
| Elimo | Lilith |
| Zelban | Themis |
| Lilith | Aryuto |
| Ronuel (F) | Oulu (F) |
| Sq. 1 | Sq. 2 |
|---|---|
| Ronuel (L) | Grah (L) |
| Themis | Lilith |
| Ruza | Lilith |
| SGX | Lunaris |
| Raydn | Elimo |
| Oulu (F) | Oulu (F) |
| Sq. 1 | Sq. 2 |
|---|---|
| Ronuel (L) | Grah (L) |
| Lebra | Lilith |
| Zelban | Narumika |
| SGX | Oulu |
| Tiara | Eltri |
| Grah (F) | Grah (F) |
Note that I left out all the squads that had Daruvanshel or Zelnite since their 6* release won’t happen in the near future. Once they are released, Daruvanshel and Lily Matah are great team leaders for this trial and significantly increase the success rates for 1-squad clearings.
So don’t get too frustrated if you still don’t have the proper units to attempt and get Maxwell day 1. She will stay there waiting for you.
You can check some other team comps used here.
C – SPHERES:
I’ll assume that by the time this trial reaches Global, Sphere Frogs will already be a reality.
Not much to discuss in this department. 1 slot is reserved for those Legwands/Medulla you were able to collect so far. If you managed to get Dandelga, equip it on your Oulu. Most healers have a lower BC cost on their BB when compared to Oulu so that’s problably the best option. Remember that survivability is the word and that little BC refill might save you a Fujin for later.
As for the other slot I recommend you start farming those Tech Gizmo 2 and turn them into Soul Generators once the upgrade is available. Hitters should be generating enough BC to sustain constant heals/ Oulu’s BB. Omni Gizmo is also a good choice.
As for your healer and your Oulu I strongly advise you to equip them with some Evil Shard/Magic Ore. If you don’t possess any of those you can try other less reliable BB-fill spheres like King’s Crown/Holy Crown.
Divine Stone is a great stat booster for Lilith since her SBB will be always available. If you don’t have any way of dealing with status ailments through your units, saving a slot for Refined Gem can be an option.
D – ITEMS:
There aren’t much options here.
Fujins and more Fujins for those clutch heals or damage mitigation, revives and Holy Flute. Setup should look like Cure, Fujin Potion, Fujin Tonic, Revive Light, and Holy Flute .
Some people deal with the lack of anti-status ailments with some stimulants, others like to bring an extra Revive instead of HP potions but most use the setup above.
The new revive item from the Moonlight event can also be useful since it allows you to revive someone without having the trouble of using an heal in the same turn.
E – BATTLE:
Before the battle grab a pen and paper and start counting your turns at the start of the 1st stage (JUGGERNAUT). Failing to do so will most likely result in a failed attempt.
Stage 1
JUGGERNAUT
- Thunder Element
- Inflicts injury, paralysis and weakness.
- Has powerful AoE attack every 4 turns (use mitigation AND guard water units or those with < 50% hp)
Notes: This should be the easier part of this trial since there are no HP thresholds where he performs a special move. Make sure all your units are >50% hp when you kill it because Abaddon attacks before your turn as soon as Juggernaut dies. AND MAKE SURE YOU ARE STILL COUNTING TURNS.
Stage 2
DEMON ABADDON
- Dark Element
- Inflicts curse, injury, paralysis, poison, sickness, and weakness.
- Has a single-target dark elemental attack that removes buffs at random intervals.
50% HP
- 2x Massive single-target dark elemental attack.
- Heal your units to > 70% HP.
- Trigger your damage mitigation (Oulu’s BB)
- Guard on remaining units while the 6th unit lowers Abaddon below 50% HP.
30% HP – [Click for visual picture]
- 4x Massive single-target dark elemental attack.
- Heal your units > 90% HP.
- Trigger your damage mitigation (Oulu’s BB)
- Guard on remaining units while the 6th unit lowers Abaddon below 30% HP.
Notes: Before dealing the final blow to Abaddon check the turn you’re currently on. Avoid killing him in a turn when Maxwell is about to cast Sacred Song, especially Destiny if possible. (See table below). Even if you’re killing him in a “safe turn” make sure all of your units are at > 60-80% HP (guard if they’re not), because Maxwell attacks before your turn as soon as Abaddon dies.
Stage 3
CREATOR MAXWELL
- Inflicts injury and weakness.
- Genesis: 1-2x AoE light elemental attack at random intervals.
- Rune: Single-target light elemental attack that removes buffs every 4 turns.
- Sacred Song: Angel Idol buff, 3 turn attack and defense buff, 2 turn ignore defense buff every 4 turns.
- Trigger your burst heal if necessary, but it’s better to use it after she’s buffed.
- Guard on all dark units or those with < 60% HP.
- Destiny: Massive single-target light elemental attack every 5 turns.
- 14.000 damage.
- Trigger your damage mitigation (Oulu’s BB).
- Guard on all dark units or those with < 80% HP.
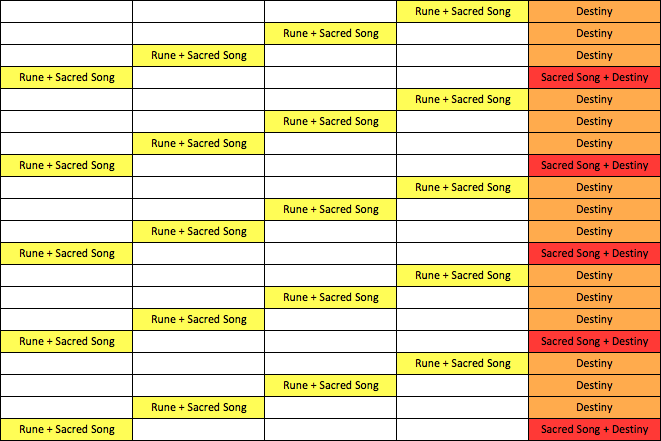
Every 20th turn trigger your burst heal if necessary, but it’s better to use it after she’s buffed. Trigger your damage mitigation (Oulu’s BB), and guard on all remaining units, because of Sacred Song, Rune, and Destiny coinciding with each other.
This is the attack pattern. If you counted your turns correctly you can easily know when to use Oulu’s BB or/and guard (start in the first cell and go right). If you lost count somewhere along the way, see the turn distance between the first Sacred song you encounter and the first Destiny and compare it to the table (Click for visual picture).
Aside from the turn-based attacks there are 4 HP thresholds:
70% HP- [Click for visual picture]
- Meteor: Powerful single-target light elemental attack.
- 4.800 damage.
- Guard on 5 units while the 6th unit lowers Maxwell below 70% HP.
- Casted at random intervals afterwards.
50% HP
- Resurrection: AoE light elemental attack and heals 5,000-6,000 HP.
30% HP
- Genesis
- Destiny is now cast twice every 5 turns instead of once.
20% HP – [Click for visual picture]
- Endless: Massive AoE light elemental attack.
- Trigger your burst heal if necessary, but make sure you have a Fujin’s Potion/Tonic available afterwards.
- Trigger your damage mitigation (Oulu’s BB).
- Guard on remaining units while the 6th unit lowers Maxwell below 20% HP.
0% HP
- Revives with 100.000 HP.
- If you fail to kill Maxwell before the next Sacred Song she will have an Angel Idol buff again, so this revive cycle starts over.It’s always best to kill Maxwell the turn after she casts Sacred Song, which will give you a 3 turn window to nuke her down before the next Sacred Song.
Final tips:
- Grah is recommended for his leader skill. Sometimes it’s better if you don’t waste an early revive on him since your units will receive a bigger cut of the BC cake. Revive him only for the dark buff in the final blow.
- Get those BB’s/SBB’s maxed! Seriously this can be the difference between success and failure. There’s a 9 BC cost difference between a lvl 1 and lvl 10 Oulu’s BB!!
- New units will make this trial easier. If it’s impossible for you to get Maxwell in day 1 just wait for new batches. Daruvanshel / Lily Matah are great leaders for the trial, Zelnite is a godly unit.
I sincerely hope I helped you in some way. Good luck and I wait to see you all join the Maxwell Club soon.
Related Videos:
- A good 1-squad clear with good walkthrough
- Ushi’s 3 squad clear (bad walkthrough)
- Ushi’s 1 squad clear
- Deranged from appinvasion clears the trial using a 5 unit squad
A big thank you to Phoenix and Volf from irc chat for their suggestions.
Also, thank you mighty Twofu for all the help provided and for challenging me to do this

![30% HP – [Click for visual picture]](http://guidescroll.com/wp-content/uploads/2015/01/BcbDM1B.jpg)
![70% HP- [Click for visual picture]](http://guidescroll.com/wp-content/uploads/2015/01/ChtnTZr.jpg)
![20% HP – [Click for visual picture]](http://guidescroll.com/wp-content/uploads/2015/01/7Tb3njz.jpg)
Recent Comments