World of Tanks Shell Types and Mechanics Guide
World of Tanks Shell Types and Mechanics Guide by Lert
HE, AP, APCR, HEAT, HESH – what does it all mean and what does it all do?
Well, simply put, all of these help remove hitpoints from enemy tanks. As we’ve seen before, removing hitpoints from enemy tanks is a good thing.
However: all of these shells work differently, have different mechanics, different pros, different cons, different strengths and different weaknesses.
Understanding shell mechanics is one of the most important aspects of being successful in this game.
However, before we look at the different shell types in depth, there are a few other mechanics that need some light shed on them: spaced armor, normalization, ricochet, overmatch, module damage and splash.
Spaced armor:

Many tanks have spaced armor. Spaced armor is a fancy way of saying “Two layers of stuff with some air between them”. A shot that hits the outer layer of armor and penetrates still has to punch through the inner layer of armor as well before getting to the juicy, splatty, gooey bits inside the tin can. However, since it’s lost some of its penetration on the outer layer, the shell will have some difficulty punching through the inner layer, as in my example.
When this happens, you’ll see a penetration decal on your target, but hear ‘that one bounced’, and not do hitpoint damage. No, it’s not a bug, it’s spaced armor.
Many tanks have spaced armor, in many different locations. For example, when shooting at a tank from the side, tracks count as spaced armor for the hull. Learning what tanks have spaced armor where will go a long way in making you a more effective player.
Normalization:
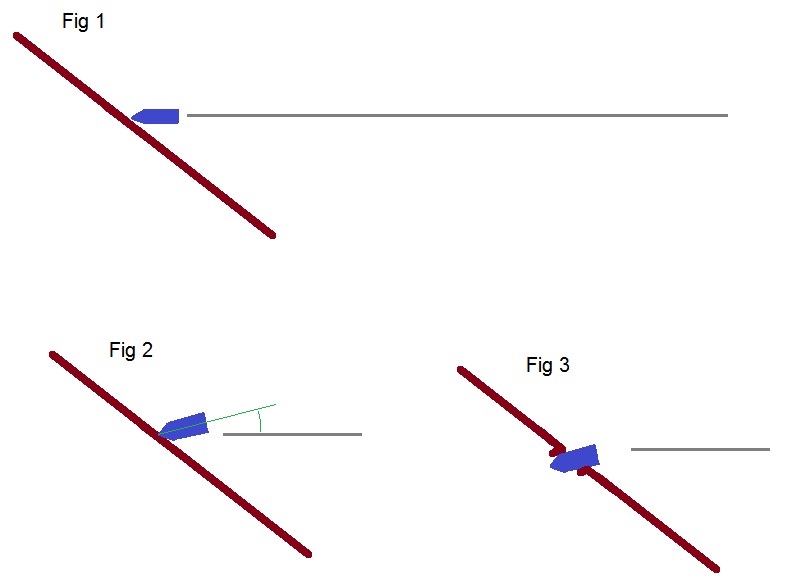
Fig 1: A shell is approaching a piece of angled armor.
Fig 2: The pointy end of the shell ‘bites’ into the armor, and the forward momentum of the shell combined with the angle of the armor plate slightly turns the shell away from the slope
Fig 3: The angled shell penetrates the armor.
The shell tilts upwards upon impact because the tip bites into the armor plate which slows it down, yet momentum carries the rest of it forward – the shells are designed to do this.
The amount in degrees that the shell tilts is called the ‘normalization’, as the shell ‘normalizes’ (IE, tries to approach a 90 degree angle relative to the armor plate) upon impact. Shells that normalize have a better chance of penetrating than shells that don’t normalize, because a shell normalizing 5 degrees upon hitting a 45 degree armor plate only impacts at a relative 40 degree armor angle, and less angle = more chance of pen.
Addendum: If a shell is twice the caliber of the thickness of the armor plate it hits (for example, a 120mm shell vs 60mm plate), it will normalize more than a smaller shell would.
Ricochet:
Ricochets are functions of sloped armor, or shooting at tanks that are angled relatively to your shell flight path. Here is a little bit about armor angling, and how it serves to increase functional thickness:
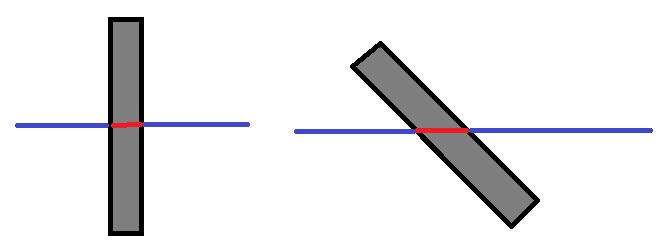
Two armor plates of identical thickness. One at 90 degrees, one at 45 degrees. As you can see, the effective thickness (IE, the amount of armor the shell has to punch through) is significantly more with the angled plate. This is how a 100mm plate can stop a 200mm pen shell, if it’s angled enough.
When a plate of sufficient thickness is at an angle of 70 degrees or greater, post-normalization, your shell will automatically ricochet, regardless of how much pen your shell has. A 300mm pen shell will bounce off of a 80mm plate, if said plate is angled beyond 70 degrees post-normalization …
Overmatch:
… Unless your shell is simply so huge and your target simply so flimsy that your shell simply overmatches your target’s armor. If a shell’s diameter (caliber) is 3 times the thickness of the armor it hits (For example, a 120mm shell impacting a 40mm armor plate), it will overmatch the armor and go through, regardless of angle-of-impact or normalization. Overmatch beats Ricochet.
Module damage:
Every tank has modules. Be they external (gun, tracks, turret ring) or internal (ammorack, engine, radio). Every tank also has crew, between 2 and 6 of the following: commander, gunner, driver, radioman, loader, sometimes with multiples of the same. (for example: E-100 has two loaders, AC Mle 48 has two gunners).
All these modules and crew have hitpoints.
How many depends on the tier and type of vehicle, but usually much less than the total hitpoint pool of the vehicle itself. For example: the ammorack in an E-100 might have just a few hundred hitpoints, even if the vehicle itself has 2700.
When a module is hit, it gets a saving throw. The exact mechanics of this are on the wiki. A saving throw basically means that if a module would become damaged, dice are rolled, and depending on the dice roll the damage might be ignored completely.
If a module reaches 50% or lower hitpoints (after saving throw), it becomes damaged. A damaged module, shown in orange, functions at reduced efficiency:
– A damaged gun is considerably less accurate
– A damaged engine has only 50% power output, slowing the vehicle down and getting hit has a chance of setting the vehicle on fire
– A damaged radio has significantly reduced range
– Damaged optics do not reduce spotting range
– A damaged turret rotates only half as fast
– Damaged fueltanks increase the chance of being lit on fire by consecutive hits
– A damaged ammorack causes the reload cycle to take twice as long
– Damaged tracks are more prone to breaking completely, but contrary to popular belief do not slow down a tank
– An injured commander gives reduced viewrange
– An injured driver reduces tank mobility and speed, same as a damaged engine
– An injured gunner gives reduced accuracy, longer aim time and a slower turning turret
– An injured radioman gives reduced radio range
– An injured loader gives longer reload time
If a module reaches 0 hitpoints (after saving throw) it becomes destroyed. A destroyed module is marked in red. A destroyed module does not function at all.
– Destroyed tracks immobilize your tank completely
– A destroyed gun can not fire
– A destroyed radio has even further reduced range
– Destroyed optics have reduced viewrange
– A detroyed engine immobilizes the tank completely and becoming destroyed has a chance of setting the vehicle on fire
There are however a few additional exceptions, if’s, and’s and but’s:
– A destroyed module (IE, red) will automagically repair based on the remaining alive crew’s repair speed, up to orange status.
– Crew can not become destroyed, only injured.
– A fueltank can not become destroyed, only damaged.
– An ammorack getting damaged to red status immediately detonates, destroying the entire vehicle.
– Having your entire crew injured renders the vehicle defeated, same as having 0 hitpoints would.
Splash:
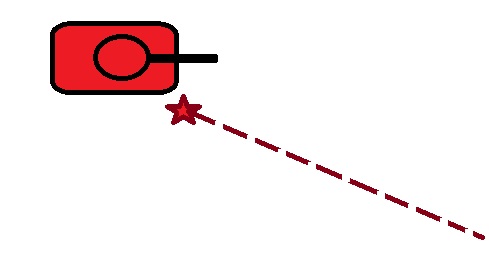
Oh teh noes! Our shell has missed the evil red tank! Surely all is lost!
Well, not necessarily. Some shells (the explody kind) have something called a ‘splash radius’. That means that when the shell hits something, the game calculates a circle around it, like so:

… and anything within that circle takes reduced damage to its armor. Because of HE mechanics (explained below) thick armor eats away more damage, so while landing a shell close enough so that the damage radius still overlaps the tank (called ‘splashing’ the target) takes much less damage than a direct hit would, it’s still damage.
Plus, if you manage to catch multiple tanks within the shells splash radius, you’ll do damage to all of them. I’ve seen people kill three tanks with a single shell.
Ok, now that we have basic mechanics out of the way, time to look at the various shell types in detail, right?
Wrong.
First there are some more basics to learn:
When you look at a gun, you’ll see multiple numbers for penetration. For example, 115 / 180 / 75. This means that that gun will have an average of 115mm of pen (+/- 25% RNG) with AP, 180mm average pen (+/- 25% RNG) with its premium shell and 75mm average pen (+/- 25% RNG) with its HE shell.
Some guns will have less than three values listed. For example: 80 / 150. This means that that gun will for example not have an AP shell, or not have a HE shell.
It is also important to remember that the listed damage values for the shells are also +/- 25% RNG. So, a 150mm pen shell with 80 damage can do anything from 112.5mm pen and 60 damage to 187.5mm pen and 100 damage.
Final note: Not all guns will have all shell types available. Sometimes you’re just limited in shell choice by what guns you’re using and what tanks you’re driving. Still, knowing shell mechanics and strong and weak points will benefit you as a player.
Ok, now the shell types:
AP:
Stands for Armor Penetrating. This is a solid slug, thrown out of the barrel at high velocity. It is intended to brute-force through any armor plate it hits, doing hitpoint damage to the gooey, splatty bits inside the tin can.
AP shells lose penetration over range. This means that when shooting at a distant target, your shell will lose some of its penetrating power over the distance it travels, meaning it will have more difficulty punching through armor at range than close by. They will start losing penetration at ranges of 100m or more.
AP shells have a penetration value based on their kinetic energy. Kinetic energy is a function of velocity and mass. So, a faster shell has more energy thus more penetration than a slower shell of the same mass, and a heavier shell has more energy thus more penetration than a lighter shell of the same velocity.
When looking at AP guns, barrel length is a great indication of armor penetration. If barrel length is listed, it is listed in caliberlengths. For example: 75mm L/48. This means that that gun has a barrel that is 48 times 75mm long, or 3600mm = 3m60. To compare, the 75mm L/70 has a barrel that’s 5m25 long. And, as you can see in your WoT tech tree, the L/70 has higher penetration than the L/48.
Caliber, in turn, is a major factor in shell damage. The two 75mm guns listed above have the same damage output per hit, because they’re the same caliber. Sometimes this varies though (for example: 88 L/56 vs 88 L/71) based on shell design and game balance reasons.
AP shells normalize upon impact with an angled plate. IIRC, about 2 degrees.
AP shells overmatch.
AP shells do not splash.
AP shells have a normal chance to do module damage.
What guns to use AP shells in?
High penetration guns. Look at your gun’s pen attributes for AP, then compare that to the armor thickness of same-tier and above-tier vehicles. If your gun’s penetration is comfortably above the armor thicknesses you’re going to face, AP is your shell of choice.
When not to use AP?
In large-caliber, shortbarreled guns. Howitzers, mortars. So-called ‘derp’ guns.
HE:
HE stands for High Explosive. This is basically a thin-skinned shell filled with an explosive compound and an impact-fuse. Basically, a grenade that explodes upon hitting its target.
HE shells also have a penetration value and a damage value, however: they work very differently from AP shells.
Upon hitting its target and passing its ricochet test (IE, not ricocheting off), an armor pen test is made. If the shell passes the armor pen test, the shell’s full damage is applied to the inside of the target vehicle. (hitpoints, internal modules, crew).
If however the armor pen test is not passed, the shell explodes on the other armor of the target, losing fully 50% of its damage potential to thin air. But that’s not all: the 50% damage potential that’s left still has to make it through the enemy’s armor before doing actual damage. To do this, it tries to ‘bleed through’ the armor plate it hits, losing some damage for every mm of armor it has to go through:
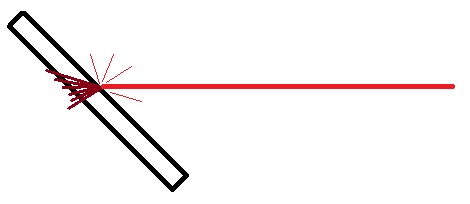
When the shell explodes as in this example, a 45 degree cone of rays is created, and damage reduction through armor thickness is calculated on the ray with the least armor thickness to go through. However, because the multiple rays have a chance to hit multiple modules or crew, HE has an increased chance of doing module damage.
As for the damage potential:
– If it bleeds out of potential damage (IE, has no more potential damage left) before having made its way through the armor plate, you’ll hear “ricochet” or “bounced off”, and no damage will occur.
– If there is some potential damage left upon bleeding through the armor plate, this damage is applied to the vehicle.
– If it bleeds through armor, then finds another plate of armor (like in spaced armor for example), it loses even more damage.
Hovering your mouse over a HE shell option in your ‘service’ screen will show something similar to this:
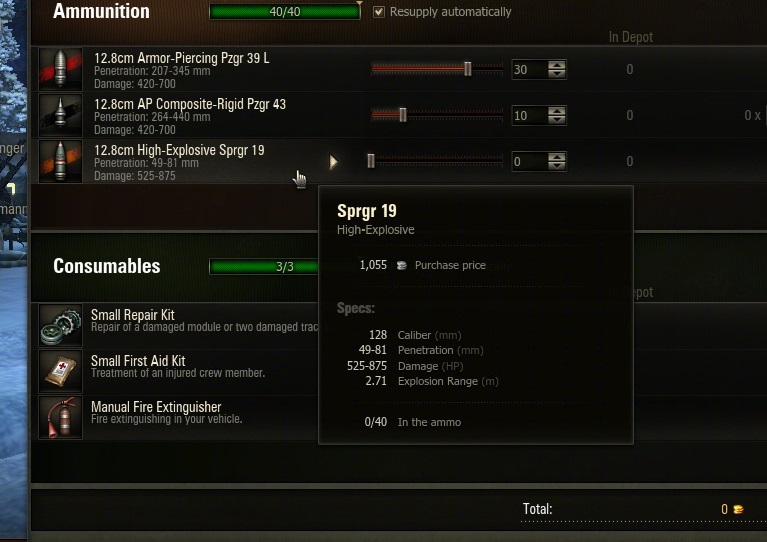
Note the ‘explosion range’. This is the splash radius mentioned earlier. In this case, this 128mm HE shell has a 2.71 meter splash radius, so landing a shell closer than that to an enemy tank will ‘splash’ that enemy tank and apply some damage. This is counted as a non-penetrating hit, so 50% damage is already lost to thin air. Also, the damage has to go through air to reach the tank, losing some damage there. Then it still has to go through the tank’s armor, losing even more damage. So, splashing a tank will never do a lot of damage. But sometimes enough.
HE shells do not lose pen over distance.
HE shells do not normalize.
HE shells do not overmatch.
HE shells splash.
HE shells have increased chance to do module damage.
What guns to use HE shells in? HE shells benefit most from shell diameter, almost to the exclusion of everything else. So, the larger the HE shell is, the more damage it will do. Use HE shells in large-bore guns, when those same guns have very low AP values or no AP shells at all. HE is also effective at taking out external modules (tracks, optics, gun) when it doesn’t pen and internal modules (engine, ammorack, crew, radio, etc) when it does.
When not to use HE?
In low-caliber guns. The smaller the shell, the more pitiful the *pop*. Also, HE is weak against spaced armor.
APCR:
APCR stands for Armor Piercing Composite Rigid, and is very similar to AP shells. They’re solid slugs, but made from a composition of different metals, with different hardnesses. This gives them superior penetration capability. In WoT this translates to them being the most common premium shell, with higher penetration values than AP shells from the same guns. Other type of armor piercing ‘special’ ammo, like APBC (Armor Piercing Ballistic Cap) works functionally the same.
In essence, this is a super-AP shell. It works the same. Just like AP shells, APCR shells lose penetration over distance. However: APCR shells do so more quickly, losing more penetration over shorter distance. So, at extreme ranges, your expensive APCR shell can possibly have less functional pen than an AP shell from the same gun. (exception: the APCR shells that are the standard shell in tier 10 medium guns)
APCR shells lose more pen over distance than AP shells. (exception: the APCR shells that are the standard shell in tier 10 medium guns)
APCR shells normalize.
APCR shells overmatch.
APCR shells do not splash.
APCR shells have a normal chance to do module damage.
What guns to use APCR in? Same guns that AP works in, since APCR is just a super-AP shell. Use APCR when faced with thickly armored tanks that your AP can’t quite penetrate. However, use them sparingly: they’re incredibly expensive compared to regular AP shells.
When not to use APCR?
When you’re low on credits and AP works just fine.
HEAT:
HEAT stands for High Explosive Anti Tank. This name is entirely misleading. It isn’t a HE shell variant at all. In fact, it’s a very unique shell. It’s a small, shaped piece of copper inside a specially shaped charge. When the shell impacts and detonates, the explosive force is thrown forward by the shape of the shell, melting the piece of copper. Which, due to its own shape and the force of the explosion, melts into a superheated form and jets forward into the target’s armor, and – hopefully – through it.
In WoT it functions somewhat like an AP shell, yet with unique characteristics. It has very high pen, and doesn’t lose pen over distance. However, it is very poor against sloped and spaced armor. Spaced armor specifically ruins HEAT’s ability to do damage.
Unlike HE shells, if a HEAT shell fails to pen, it loses all ability to do damage. There is no bleed-through.
HEAT shells do not lose pen over distance.
HEAT shells do not normalize.
HEAT shells do not overmatch.
HEAT shells do not splash.
HEAT shells have a normal chance to do module damage.
What guns to use HEAT in?
Fat guns. HEAT benefits from gun caliber more than barrel length. Shell velocity doesn’t give a HEAT shell its damage potential, sheer size does. Anything that throws good HE also throws good HEAT – if a HEAT shell is available for that gun, that is.
When not to use HEAT?
HEAT shells are very weak against spaced armor, and don’t normalize. So, heavily angled tanks with spaced armor have good defense against HEAT shells, and you’re better off using another shell type.
HESH:
HESH stands for High Explosive Squash Head, and is a very silly ammo type that the brits are fond of. Real life HESH shells have a very unique way of working: they don’t actually go through the armor. How a real HESH shell works: inside the HESH shell is a highly explosive putty of sorts. When the shell hits, this putty goes *splat* on the targets armor, kinda like a putty ball thrown at any flat surface would. Basically, the highly explosive head squashes on the target, spreading out over an area.
This putty then detonates, sending a shockwave into the tank, fracturing the armor on the inside and sending tiny, razorsharp fragments of armor flying around inside the target tank at riflebullet velocities. This is called spalling, and something that real life spall liners (try to) work against.
In WoT, HESH is basically just a super-HE shell. Compared to HE It has inflated penetration values and subdued damage values. Upon impact, it checks for ricochet, before checking for armor pen. If it doesn’t pen the armor it explodes on the outside, just like HE, then tries to bleed through the armor, just like HE. This is very much not like how the real HESH shell works, and WG is working on a solution for this, trying to find a way to mimic the real life function of a HESH shell better than the current system.
HESH shells do not lose pen over distance.
HESH shells do not normalize.
HESH shells do not overmatch.
HESH shells splash.
HESH shells have an increased chance to do module damage.
What guns to use HESH in? Only high tier british high-velocity guns get HESH, along with the mighty FV215b 183’s doom cannon. When using HESH, try to aim at a flat surface with minimal angling. Also watch out for spaced armor, tracks in particular eat HESH.
When not to use HESH? HESH is not good at defeating spaced armor, or very thick and very angled armor. It also doesn’t normalize or overmatch, so even thinner plate at sufficient angle will cause the HESH shell to harmlessly bounce off.
To recap:
AP loses some pen over distance, normalizes, overmatches, is moderately useful against spaced armor, good against moderate armor, does not splash, has a normal chance to do module damage.
HE doesn’t lose pen over distance, doesn’t normalize, doesn’t overmatch, is useless against spaced armor, good against thin armor, splashes, has an increased chance to do module damage.
APCR / APBC loses a lot of pen over distance, normalizes, overmatches, is good against spaced armor, good against thick armor, does not splash, has a normal chance to do module damage.
HEAT doesn’t lose pen over distance, doesn’t normalize, doesn’t overmatch, is worthless against spaced armor, good against thick armor, does not splash, has a normal chance to do module damage.
HESH doesn’t lose pen over distance, doesn’t normalize, doesn’t overmatch, is worthless against spaced armor, good against moderate armor, splashes, has an increased chance to do module damage.
And mind your angles!

Recent Comments