Pangya Chipping Guide
Pangya Chipping Guide by Kotoru
Hello hello. I’m Faye and although I do not claim to be the best chipper around, I can certainly teach the basics of mathing to people who wish to learn these methods. But before I begin, I’d like to politely ask that anyone wishing to express their distaste for this method of play post their feelings in a different topic. I’d like for this topic to be purely educational and very encompassing, without the side arguments of ‘should you use math to put that ball in there?’
Then without further ado, let’s begin!
…Is what I would like to say, but there are some things you must learn about first in order to learn how to chip. First, there are two ways of ‘measuring’ how far to aim. One is known as tiles and the other is known as the powerbar.
Tiles are like so:
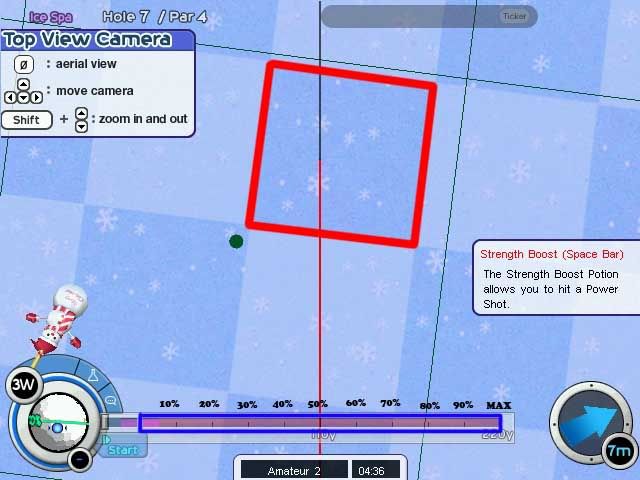
The red-bordered area is One Tile. That means, when something tells you to aim one tile, you aim 1 full length of the tile.
Tiles have the advantage of being able to be used in any resolution and not just 640×480.
The blue-bordered area is the Powerbar. Now, there are a number of things that are unique about the powerbar. One, is that to aim with your powerbar, you MUST, MUST, MUST, be in the 640×480 resolution. In this resolution, the 50% mark will be in the middle of your screen, and you will be able to use the ‘tick’ marks to aim.
Both methods, when aiming require that you be zoomed completely into the hole. (to where it won’t let you zoom anymore)
As there are two different methods of aiming, there are usually two different sets of numbers of “HWI’s” , or Horizontal Wind Influence numbers. (I used to call them differently but as time went on this acronym caught on.) In any case, there are a different set of these numbers for each individual drive you have. Why? Because when you increase your max power, the curve of your shot becomes changed and the way wind interacts with the curve of your shot also changes.
Exception: Irons. Since Irons do not depend on the *power* stat, they are thus unaffected and one set of HWI numbers will work for all drives, unless you have a -Crimson Ring-, or any other effect that changes the drive of your iron.
These numbers are made by you and me the players, and serve as a sort of communal notebook, logging what aims got the chips in. I _Highly_ recommend you create your own HWI (the methodology of which will be discussed later) but for convenience’s sake, you may search out an HWI table of your own.
Abacus Archives has more information about the details, and they come with HWI numbers for 6i, 250, and 260y drives.
Aside from having a way to measure, and these magic numbers, you also need to know how to recognize the _exact_ angle of the wind. My wind reading guide was buried somewhere on these forums, and I will post a link to them momentarily.
>> Pangya Wind Angle Reading Guide
I will first teach the tomahawk chip, the bread and butter of any chipper. As you advance, hopefully you will use backspins, spikes, and dunk chips more but for beginners, this is where you begin. (Tomahawks have arguably the easiest calculations)
The first thing you should do when attempting a tomahawk chip, (besides knowing how to do a tomahawk) is to set your spin to Seven. Obviously the easiest way to do this is to have your maximum spin be seven, but most people don’t to make room for the backspin chip. Seven spin is when the top bar of your spin dot is on top of the green line through the middle. (This only applies if you are on flat ground, if you are not you will have to feel it out)
(I’m borrowing this image from another topic, ‘Setting 7/9 Spin)

In any case, a general formula for the aim of the Tomahawk chip is as follows (Follow order of operations closely): HWI x Wind Magnitude x sin(angle)
Now, if you follow this formula you will not chip most of them in. Afterwards, after second guessing your wind reading work, you will come to realize that the HWI is not as it seems. There are a number of factors that influence what HWI you would use on a hole.
To clarify, here is an example:
235y, +2.00m, 3m wind at 56 degrees southwest. (with south as 0). Your drive is 256y, and you are on 100% lie.
So you have your HWI chart, and you look it up for your 256 yard drive, and you match up 2.91 powerbars. Okay, so 2.91 is what we use? Wrong. Because of the conditions of the hole, we have to change the HWI due to elevation. We are 2m under the hole, and the elevation modifier for 2m is .03. So, we subtract .03 from 2.91. (2.91-.03 = 2.88) (Because the hole is higher, the wind has less time to change the course of the ball, so we move less)
So we have 2.88 after that. This is the HWI that we use. in the general formula.
We do:
2.88 x 3 x sin(56) = 7.16 Round to three significant figures.
So move 7.16 ( which is around 7.2) powerbars in the direction that the wind is coming from. So that’s 5 bars (click the end of your power bar) and 2.16 additional power bars. (This would mean you click at around the 72% mark)
Congratulations, you have successfully aimed a tomahawk. Now for the powering.
we have 235y. but it’s up 2.00m. and the elevation modifier that applies to 235y is 1.27. So, we try to find the ‘true distance’.
So that’s 235+(2.00 x 1.27) = 237.54
But wait! we still have the wind to worry about. now, 56 degrees isn’t really all the way, and it’s a bit more than half. I’d approximate that to 2m towards me. So i’ll add 2y to my answer. 239.54~ 240.
So i want to hit a 240y tomahawk. According to the chart, it’s 90.63% (a pixel or two above the ninth tick mark on the power bar) But Faye, why is it 90.63%? 240/266 is 90.22%!
Well Billy, when you hit a tomahawk at max distance, it doesn’t travel 266y. It actually travels something like 270y ( on flat ground, with no wind) Because of this, people have carefully recorded how far each pixel makes the tomahawk travel. (The power of the tomahawk is not linear, but a curve.)
So, if you aim 7.21 powerbars and hit a successful tomahawk, you should get your ball in the hole.
This is a simple situation.
——————————-
Addendum- 6i Beam impacts.
6i have their own HWI chart, and behave much like the tomahawk does. You pick out an HWI, and plug it into the equation Wind x angle x HWI.
the 6i is unique in that because your shot is (usually) so close to the hole, you don’t have to worry about elevation modifiers.
Powering the 6i is a bit more tricky. Usually, it’s whatever yards you’re at -2 = % (So if you are 20y away, you want to hit 20-2 = 18%)
High winds do play a part in the power here as well. if you feel the wind is high enough to affect the ball, take a little off or put a little on.
The -2 rule I have found only applicable on 95% rough and up to ~30y chip ins.
for 100%, -3 seems to work most of the time.
I hope you found this helpful, I will post another lesson when I have a free moment. Also, I hope this shows some of you skeptics that calculating is not as simple as you may think, that work and practice do come into play here and that this is not a perfect method.
Backspin Chip
So last time, I talked about tomahawks. This time, I’m going to go over a typical backspin chip. These screenshots are taken from Blue Lagoon 3, at the end of maintenance, so i wasn’t able to get a proper backspin pin, but it will suffice for what I’m trying to do.
Anyway, the formula is as follows.
hwi x (wind magnitude) x sin( wind angle) + (green bounce) + (ball slope) = aim
Sometimes, you may have negative ball slope or green bounce, which may change the direction of your shot! Be careful of this.
The Powering is a real pain for backspins. because of the nature of the shot, (It ‘cuts’ off a lot of yardage off of your power), we must power a lot harder. This is variable, because (dummy number) 80% of 258 is different from 80% of 236. (assuming your drive is higher than those two)
The math actually works out to something like this: Near 100%= +16y , Near 90% = +21y , Near 80% = +27y
Crazy, huh? 
So let’s get started: This is a typical shot, with 203y to the hole, and +1.6m elevation. ( I have a 256y drive, by the way.)

Okay, so 6m tailwind, that’s -6 usually, but at such a low distance I just take off 5.5 or something. 203-5.5= 197.5 . Okay, so there’s also 1.6m, but it’s a close a pin, so i’m going to add 2.2y instead, because elevation affects shots more when you are close to the hole. 197.5+2.2 = 199.7 ~ 200.
So this is in actuality a 200y pin, and…. I’m going to add 23y, because that’s about 87%, (after adding the 23) so i’m going to try and hit 223y on my calipers. ( this power thing is weird, it’s best if you use a chart that displays all the respective +y or caliper shots to the respective pin)
On to aim~ The first thing i notice is the small angle. So according, to my angle reading guide…the flat is about 8 degrees, and 2 breaks down is about 6… (breaks are circled)

And then, on to breaks!

that’s a big long break going to the left, and a tiny one to the right. I read that as about .75, or .8 breaks to the left.
(If you remember from the tomahawks, the slope correction was hwi x slope x slope modifier)
Plug those numbers into the formula….
hwi x 6sin(6) + (hwi x .8 x slope modifier) + green bounce.
Greenbounce is tricky. Typically speaking, in 0.00m elevation, the ball will bounce four squares from where you want it to land.
#4 is where it will land, but this green doesn’t tell me what it is
However, to give you an idea of how to find a green slope, this is the third tile down:

Center your aim to the middle of the box, and the power bar difference from the center and the dot is your green bounce (there’s actually another bounce, but that’s a bit beyond the scope of a 101 guide)
In the picture, it’s about 1.1 powerbars against your aim.
So again, hwi x 6sin(6) + (hwi x .8 x slope modifier) + (-1.1 powerbars)
With these low angles, you sometimes have to worry that the slope or bounce shifts your aim to the other side of the hole. Be careful of this! This means you need a new green bounce, because the ball is now bouncing on the other side of the hole. Imagine in your mind the four squares, and move it left or right as you imagine the ball landing on the green. (Don’t do it for this hole, it doesn’t. It lands on the fairway here) Fail Faye, I know
Anyway, once you do all of that, you have your aim and your power! Don’t forget to set 9 spin, set correct power (223y caliper)
And always, always, always, Hit Pangya

Recent Comments