APB Reloaded Newbie Guide
APB Reloaded Newbie Guide by TheRogueWolf
Hello! And welcome to All Points Bulletin: Reloaded. I am The Rogue Wolf, and this is my APB 101 guide- a primer for people who are brand-new to APB:R and need help understanding how to play the game.
Firstly, let’s get the obvious stuff out of the way: APB:R (also known as APB, which is what I will call it from here on in, because, man, colons) is a third-person, massively-multiplayer shooter game that takes place in the fictional city of San Paro. You play either a Criminal, a hoodlum looking to make a name in this lawless place, or an Enforcer, a vigilante tasked to pick up where the police have failed and restore law and order. There are several differences between these factions, and we’ll get to those later on, but for now let’s start off on Step 1.
Before you can play the game, you must “roll” (create) a character. This involves choosing your faction, Criminal (also known as “Crim”) or Enforcer (sometimes called “Enf”). For your first time in, feel free to choose whichever appeals to you- you can delete this character later (or buy a second character slot and create another character) if you decide you don’t like your choice.
After an introductory video, you’ll be presented with the character customization screen. Note that here, you can press Escape and change the video settings if you find them unsuitable.
There are a number of basic variables here that you can change (all but the gender require that you click “randomize” to see the changes you’ve made), if you want to simply get a character quickly and play. However, for those wanting to create a specific look, the “Advanced” button will give you access to the full customization menu, allowing you to change almost every aspect of your character. (You may notice that tattoos are not available- those can be applied in the Social District, which will be explained later.) How to use the customizer is beyond the scope of this post; you can experiment, or watch videos on YouTube that show detailed examples. Note that you will be able to change pretty much anything you want after you finish creating your character, but it will cost you APB$ (the money you earn in-game) to do so, so it’ll be worth your while to spend the time needed to get it right on your first try.
(A side note- the height and weight of your character have no bearing on his or her running speed, health, or ability to be shot; every character uses a standard hitbox- the invisible space around your character that determines if bullets will hit- regardless of their look. However, taller characters may be somewhat easier to see behind obstacles. The amount of difference this makes in gameplay is negligible, so feel free to alter to your heart’s content.)
Once you’ve finished customizing your character’s look, you will be asked to name him or her (if the name is already taken by another player’s character or a non-player character (NPC) in the game, you’ll be asked to choose a different one). Then you will be given a list of servers to choose from. Choose carefully- once a character is placed on a server, it cannot be moved to another. It is recommended that you choose whichever server is closest to you, as this will give you lower latency, meaning that there will be a shorter delay between you and the server (high latency can make playing well difficult). If you’re unsure of which server would be best for you, search the forums for any threads containing the information, or create a post of your own if you can’t find any.
Your next stop will be the Tutorial District. This is a copy of the Financial District (one of the three districts, or city sections, in the game) specifically reserved for new players. Here, you will be given missions from your starting Contact- NPCs in the faction you’ve chosen who will give you tasks to accomplish, and from whom you can buy things such as weapons and vehicles. These tasks will be relatively easy, so this is a good time to learn the basics of APB gameplay. But before we get going on that, let’s set things up to your preference.
Pressing “O” or Escape will bring you to the Options menu, where you can change a variety of settings, including video, audio and controls. I strongly recommend you do this first, and concentrate on setting the movement and combat keys to whatever is comfortable for you; you’ll be using these a lot. Feel free to move about, practice running and jumping around, and using the Marksmanship mode (default Right Mouse Button) to aim; unless you are opposed in a mission or at Prestige / Notoriety 5 (more on that later), you cannot be shot or otherwise harmed by other players.
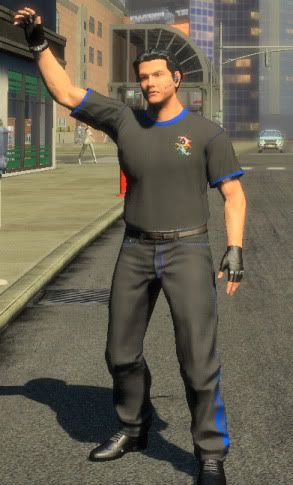
Here is an example of what you’ll see once you begin playing the game. Standing in today as the example will be my Crim, Tanstaffel.
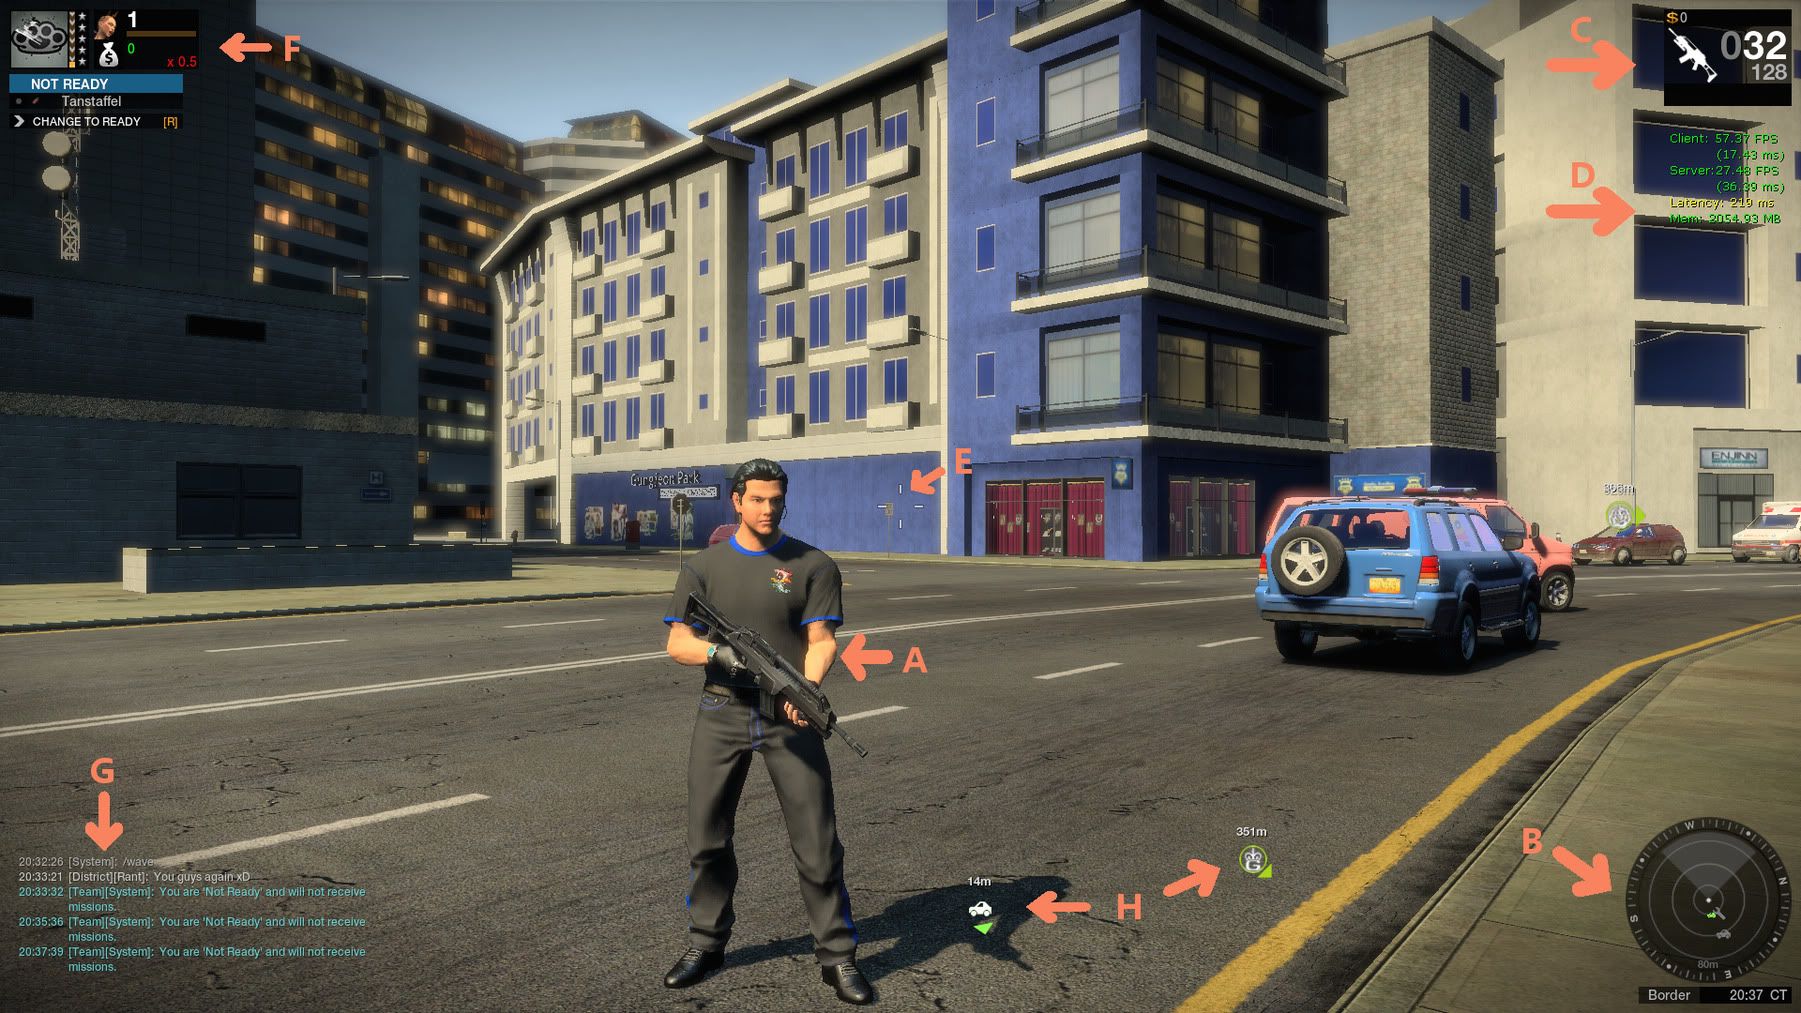
A: Totally awesome dude
B: Radar (showing: Vehicle location icon, gas station icon [for repairs], vehicle spawn icon)
C: Money, equipped weapon with ammo count, grenades (if any on hand), small items carried (if any)
D: Basic FPS and latency readout; type /fps into your chat box to turn on and off
E: Crosshairs (will be a single dot if you are not holding a weapon)
F: Your Notoriety/Prestige, pledged Contact, dirty money pool (with Heat Multiplier), mission status, your name and Threat Level (to the left of your name)
G: Message box
H: HUD icons (showing: Vehicle location, distance to an unlocked Contact)
You will notice that you begin the game with only two weapons: An assault rifle as your primary (main weapon), and a snub-nosed revolver as your secondary (fallback weapon). You are also given a small car, which can be spawned at any parking area (this will be explained soon). As you progress through the game and gain reputation with your Contacts by completing missions and accomplishing other various tasks, you’ll gain the ability to buy more weapons, clothing, vehicles, modifications (items that modify aspects of your character, weapon or vehicle) and equipment (gear that allows you to accomplish tasks, like spray-painting and planting or disarming bombs, more quickly). In the meantime, though, what you have now will be adequate for the opening stages of the game.
One of the first things you may notice is that San Paro is quite a busy place. Pedestrians walk the streets and citizens cruise about in their cars, heading from one place to another about their own business. There are highways, side roads, rooftops and alleys you will have to navigate to get where you need to be. Let’s cover how to make your way around on foot first.
You have four “speeds” while on-foot: Crouching (which also helps accuracy and makes you a smaller target), walking (not good for much aside from looking cool), running (default speed) and sprinting. You cannot enter marskmanship mode while running (you’ll automatically slow to a walk), and you cannot fire your weapon while sprinting. You can also jump over small obstacles and onto low surfaces like platforms, wooden pallets and the hoods of cars.
There are also certain objects you can interact with (by using the Interact key; “F” by default) to get into or on top of places. You will always see a tooltip on your screen when you are aiming at these. Here are the kinds of doors that you can open in San Paro:
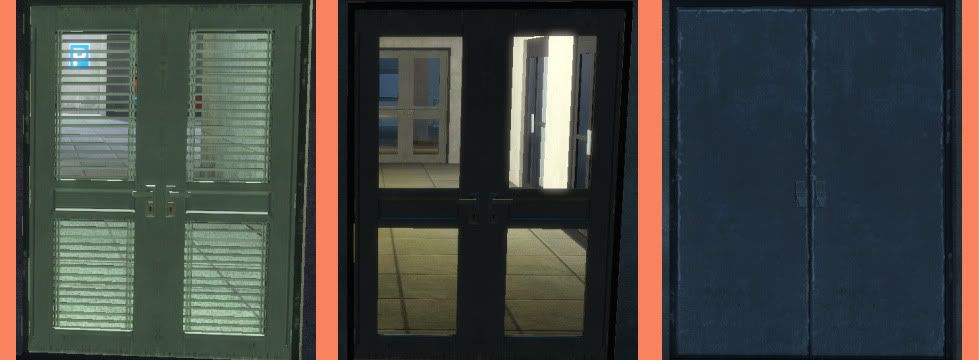
We open doors with our feet around here. Use caution- you’ll be vulnerable for a moment after opening a door.
No other doors can be entered by players, so don’t bother trying. (Remember that when raiding a building while on a mission, you will be able to Interact with that door you’re tasked to break open. You won’t be able to get inside, though.)
There are also ladders you may climb to rise above it all:

Sometimes you want to get up. Sometimes you want to get down. Ladders are here to help.
Only one person can be on a ladder at a time. Remember that you are vulnerable while climbing- you cannot fire your weapon or make any sort of maneuver other than to jump back off the ladder (and possibly suffer falling damage). When descending ladders from the top, your character will slide down, making it much faster to go down than up.
Last but not least, there are some fences you may climb over in order to bypass walls without having to find a door. More than one person can hop a fence at the same time, but don’t crowd up.
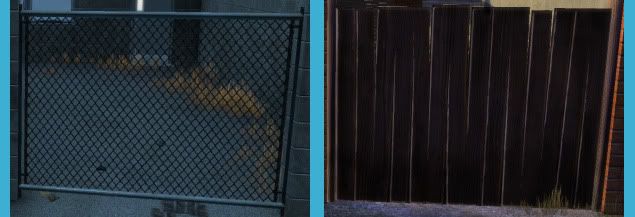
Dude, just get over it.
Apart from these, there are larger road fences that you can drive through (or break open with enough damage from your weapons).
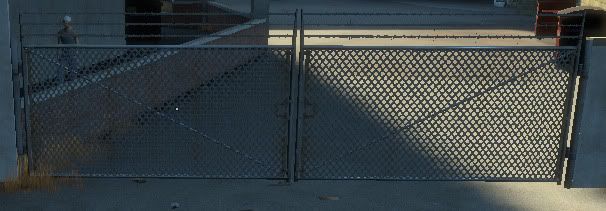
Remember that scene from Terminator 2? With the canals? You can totally do that here.
You cannot climb these. All fences may be fired through, even the wooden-slat ones.
That’s enough about the boot-leather express. Now to the meat of the game- vehicles. Aside from your own vehicle and those of the group or team you are in, you may also steal or commandeer vehicles from the civilians of the city, or break into most parked cars and drive them away. However, you cannot get into the owned vehicles of players who are not on your team, or vehicles that are restricted by a mission (either it’s a part of the mission of other players, or an objective of your opponents that you are not allowed to move). You will see “Not Usable” when aiming at these vehicles.
To take a vehicle, approach one of its sides and press Interact. Your character will either simply get inside if it’s an empty and usable car, force the occupant out and take over if it’s being driven by an NPC, or break into the vehicle if it is parked. You will automatically take the driver’s seat if you are the first one into the car. (Criminals should be careful about stealing vehicles under certain conditions; the reason why will be explained later.) Now that you’re behind the wheel, feel free to drive around! Just like you, your vehicle can’t be harmed by the weapons or vehicles of players who aren’t opposed to you, but it will take damage if you hit buildings, other objects (like traffic lights or parking meters) or empty or NPC-driven cars. A sufficiently-damaged vehicle will start smoking, then catch fire (which causes it to sustain continuous damage and lose a great deal of its speed), then explode- you WILL be killed if still inside, and can be killed or injured if you are too close when it goes up. Fortunately, repairing a vehicle you’re driving is easy- simply stop at a gas station. You will see a circular gauge begin to fill (how long this takes depends on how tough the vehicle is and how much damage it took) and the car will begin to meld itself back into pristine shape. (You also get a free car wash, excellent for removing the grime of city streets.) The repair process stops for a few seconds if you take further external damage, so don’t expect your car to last forever while enemies are putting bullets into it! To get back out of the car, just tap the Interact key again.
(Note that your bullets will pass through vehicles you cannot damage. For this reason, do not take cover behind the owned or driven vehicles of players not in your mission- they will offer no protection!)
There are more than a dozen different types of vehicles in San Paro, most of which are driven by the NPCs and all of which vary wildly in handling, acceleration, strength, speed and torque. Feel free to drive around, experiment, see how each vehicle handles. Using the handbrake is vital to high-speed maneuvering, so don’t forget to practice with it. And if you’ve just entered a district, your car is destroyed, or you simply don’t feel like going back to get it, you can spawn it at any (non-faction-restricted) parking station, like these.
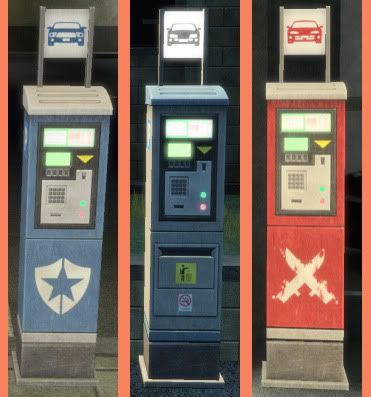
From left to right: Enforcer, neutral, Criminal. Never bum rides from friends again!
(Note that you may change your available vehicle at usable parking stations by going into your Inventory, default “I”.) For more expensive cars, there is a small fee charged for spawning your car every time after the first once you enter a district.
If you get lost, just check your Map (default “M” key). This will bring up a map of the district with all of its major roads and any Contacts you have unlocked. You can also check the small icons to the right, and they will show up on both your Map and your radar (if you are within range.)
Okay, now that you know how to get where you’re going on foot and on wheels, it’s time you got a job, you slacker. First, you will want to pledge to your contact (by either Interacting with them face-to-face or double-clicking them on your map; click “Pledge to [Contact’s name]”). Remember that you can only be pledged to one Contact at a time, and any new Pledge will break the old one (there is no penalty for this, and you can switch between Contacts as you see fit). Once you’ve pledged with a Contact, their portrat- along with the level you are at with them, and a small bar showing how far along you are towards the next level- will appear above your name.
Press your Ready button (default “O”). Your starter Contact will, sooner or later, give you a mission. The upper-right corner will have the name and a brief description of the mission and show your goals (raiding buildings, spray-painting areas, etc.) to accomplish. Also, markers will appear on your display; these signify mission-important objects or places and the distance to each of them. (Note that each objective has a letter to identify it- useful for teamwork. Telling a teammate you’re heading towards “Point F” is much easier than saying “I’m going to that door over in the corner near the trainyard”.) You won’t be opposed on these Tutorial missions, so take your time to understand how each objective works.
Once you’ve successfully completed a mission, you will receive money, Contact standing, and other rewards. You will get these whether you win or lose a mission, though naturally the winners see greater rewards; however, you will usually get greatly reduced (or no) rewards at all if you drop out of a mission before its completion. If you open your Character panel (default “J”), and click the Progression tab, you can see how many standing points you have with each Contact and how many you need to reach the next level. The more levels you have with a Contact, the more of their items become available for you to buy. Also, you must reach level 10 with a Contact in order to be referred to the next-higher Contact associated with him or her. (For the sake of simplicity, you only need to get the starter Contacts up to level 5.)
If you’re running low on ammunition, you can resupply at any Joker Ammo station (unless it’s faction-restricted). Just press “T” (default) to refill your ammunition stores. This also serves as a “resupply” point where you can change your weapons, modifications, and so on in your Inventory screen.
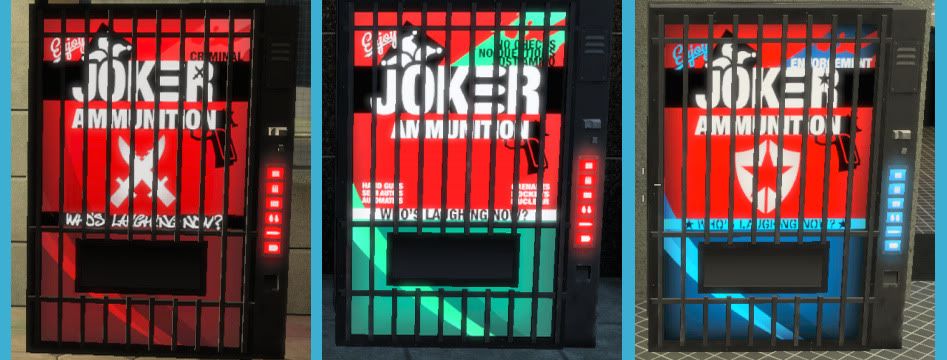
From left to right: Criminal, neutral, Enforcer. Color-coded for your lead-slinging conveinence.
You also may receive (or buy) the Field Ammo modification; this basically makes you a standing ammo supply point (with all the benefits that the Joker Ammo machine provides). The default to activate this modification is the “5” key.
If you have unread mail (a mail icon will appear in your lower left corner), or want to send mail or items to others, just run over and Interact with any mail kiosk to check it.
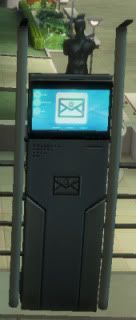
Get this: You can Email clothes in this game. And guns. And cars. Why can’t we do that in real life?
IMPORTANT NOTE- you may receive weapons (such as grenades) from Contacts or other items from friends or the Marketplace in your mail, and if you delete these without retrieving them (push the paperclip button to retrieve an attached item), you CANNOT get them back. Always double-check your mail before deleting it!
There are other ways to make money aside from missions, and we’ll go into that shortly.
Want to play some tunes? You have a music player! (Default key: “P”) Here you can choose different playlists of APB’s included music, or import your own songs. APB uses Last.FM to identify your music, and if someone else with your song comes by as you’re playing it, they’ll hear it as well; if they don’t have the song, the game will play something similar in their library.
Take a moment to examine the Character panel (default key “J”).
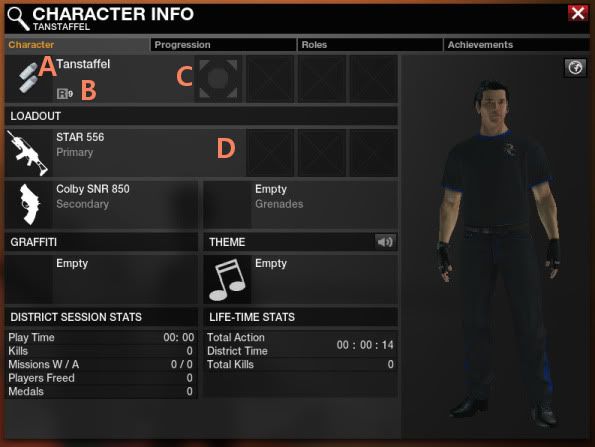
A: Threat Level
B: Rating
C: Personal modifications (an empty box with a circle means you can place a mod here; an X means the slot is still locked)
D: Modifications for your equipped primary weapon (same rules as above)
You will notice that there are a few symbols and numbers on it. These affect how missions will be assigned, and what items you can buy. Here’s a brief overview of each:
Threat Level- this is a rough estimate of your overall skill. There are three tiers- Bronze, Silver, and Gold- and ten levels in each tier. These are often abbreviated as B7, S4, etc. In a nutshell, the higher your TL, the more skilled the game believes you to be, and the more skilled (or more numerous) the opposition you will be presented with when you are opposed. Those who are the highest Threat Level (TL 30, or Gold 10) will always appear on the map, but are otherwise restricted by the same ruleset as other players- i.e. you can’t shoot or otherwise harm them outside of missions. You will be given a special “In Training” Threat Level until you’ve finished ten opposed missions.
Rating: This number represents your progression in the game, marked by how many contacts you have unlocked and leveled. Many weapons, clothing and vehicles have a minimum Rating requirement for you to be able to purchase and use them. It is separate from Threat Level and has no impact in matchmaking.
Aside from that, there is your Prestige or Notoriety, which is displayed by an icon, five (lit or unlit) stars and a vertical bar on top left corner of the main playscreen.
Prestige (Enforcer) / Notoriety (Criminal)- This is displayed in the upper left corner of the main screen near your name. It is measured in stars, from 0 to 5, and is commonly referred to as N4, P2, etc. The bar next to the stars shows the amount you have towards the next star.
. Criminals have Notoriety. They begin at N0, and gain Notoriety by breaking the law (damaging public or private property, committing crimes, killing civilians or enemies) and winning missions, and lose it by being killed and losing missions. Notoriety will gradually decrease over time if no crimes are committed and will eventually return to 0.
. Enforcers have Prestige. They begin at 2 1/2 stars and will gradually increase over time to that level if lowered; however, it will not decrease over time if it raises above that level. Enforcers lose Prestige by breaking the law (damaging public or private property, killing civilians), being killed and losing missions, and gain it by enforcing the law (killing or arresting opponents in combat, returning stolen goods) and winning missions.
The higher a player’s Prestige/Notoriety, the better their cash and Standing rewards for completing missions and open-world tasks (like turning in stolen cars and loot). However, when a player reaches N5 / P5, a Bounty (on a Criminal) or a Contract (on an Enforcer) is put out on him or her, which will allow that player to kill anyone else in the district regardless of whether or not they are opposed. Any Criminal can kill an Enforcer with a Contract (an Enforcer who kills another if either of them is P5 is heavily penalized); any Enforcer OR Criminal can kill a criminal with a Bounty. Killing or arresting an N5 / P5 player will award cash and Standing with your pledged Contact (but you will not gain Standing if you are not pledged).
N5 / P5 players will show prominently on the map, and as a yellow circle on the radar (except that P5 Enforcers will show as a green circle to other Enforcers).
In the Character screen, you will also see Roles and Achievements. Both are progressed by performing certain actions in the game (kill a certain number of opponents with a certain weapon, turn in a certain amount of cars, spray-paint a certain number of times), but while Roles unlock things such as modifications, car parts and accessories, Achievements are solely for bragging rights.
Finished with the tutorial? Want to take a break, try on new clothes, change the color of those pants or slap on a tattoo? Head over to the Social District, otherwise known as Breakwater Marina. (To do this, press Escape, then choose “Change District”; this brings up the three districts you may enter. Click the Social District image, then “Enter District”. Once the map loads, click on one of the white circles to choose where to enter the district.) This place is much different than Financial or Waterfront- there is no combat, no missions, but rather two nightclubs, a mini-mall and a handful of other places where you can chat with your friends (and enemies) and indulge in the game’s customization features further. Below are listed the various kinds of kiosks you can use:
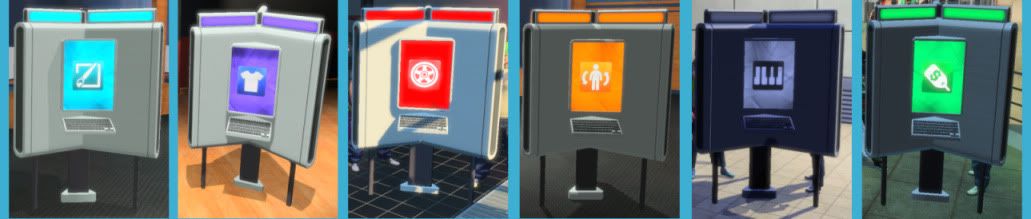
From left to right, in order of least to most likely to flip out and kill you like a ninja:
– Design studio (where you can create complex symbols for easy application)
– Clothing studio (change, buy and customize clothing)
– Vehicle studio (choose your available vehicle, buy a new car, kit out and paint up your ride)
– Body studio (change your appearance, apply tattoos)
– Music studio (put together new death themes or even full instrumental songs)
– Marketplace (sell your awesome stuff, buy someone else’s awesome stuff)
There are also two Contacts (one of each side in the faction) in Social, which allows you to do your shopping in a quieter place. Note that you can also buy new clothing and vehicles that you’ve unlocked through their respective kiosks. Some items (weapons and vehicles) are leased rather than bought, meaning that you may only use that item for a limited time before it is no longer usable; it may be leased repeatedly to extend the lease timer.
Your character’s body (tattoos), clothing and vehicles are all customizable. Free accounts are much more restricted in customization complexity than Premium accounts. However, you may purchase one month of Premium, use that time to create more complex customizations, and then continue to use or sell that item after the Premium period has expired (though you will not be able to re-edit the item without either re-buying Premium or returning the item to Free levels of complexity).
Speaking of selling, you can sell your creations on the Marketplace! And buy the creations of others! You are not bound by complexity restrictions when it comes to the designed items of others, but you must meet Rating and faction requirements (and gender requirements for clothing) to use them. You may also create copies of an item you bought from a Contact or kiosk (not someone else’s customized item) for the same price you paid for the original. If you have used an item and then wish to sell it, you must first Refurbish it (this is a choice in the Edit menu for the item’s description box) for a percentage of its sell price. There will be a 20% tariff on any sale made through the Marketplace. If you’d rather not bother with listing an item for auction and want to be rid of it quickly, you can also sell it back to a Contact, though you will receive much less than you paid for the item.
So, here we have this city full of Criminals and Enforcers, running around shooting each other… but is that all there is to it? Not quite. There are a handful of things you can do outside of missions, that will gain you money and Standing (though not as much as missions). Note that, just like missions, a higher Notoriety or Prestige will increase the amount you get for these actions.
Criminals, as their name suggests, can commit crimes. There are a handful of crimes you can commit in the city, alone or with a group.
– Ram raiding. This is the simple act of ramming a vehicle into a store’s window until it shatters, then taking whatever falls on the ground. There are three different sizes of items that you can take: Small (cell phones, gold bars, necklaces, etc.), medium (briefcases, guitar cases, duffel bags, etc.) and large (safes, televisions, microwaves, etc.). While your character can carry a large amount of small items (and the number of small items you’re carrying will show underneath your ammunition count when you’re on foot), you can only carry one medium (which prevents you from sprinting or firing a weapon) or large (which slows you to a walk and also prevents shooting) item at a time. If you need to drop the item, either press “D” (default) or tap your fire button. Medium and large items can also be stored in a vehicle; go to the back of the vehicle and press Interact in order to stow the object. Different vehicles have different amounts of cargo space, which limits the amount of cargo they can carry (this will show as a number beneath your ammo count when driving, such as 0/10); medium items take up 2 cargo space, while large items take up 5. These items can be taken to a Fence (any Criminal Contact, whether or not you’ve unlocked them) and turned in for dirty money. How to convert dirty money into cash is covered a little later.
(Important note: If you are using a stolen vehicle for ram-raiding, it is entirely possible for other players to get into that vehicle and drive off if you’re not inside, and steal everything you’ve put in it. To prevent this, either perform your ram-raiding out of sight, or use your owned vehicle.)
– Mugging. Pedestrians can be mugged for their valuables. Walk up to a pedestrian and Interact; your Crim will begin to beat the merry bejeezus out of the poor sap, while a circular gauge fills up. Once finished, the pedestrian may drop one or several small items and then run away. You may pick up and fence these items for dirty money just like those gained from ram-raiding.
– Car theft. Steal a parked or driven vehicle, and then drive it to a Chop Shop to turn it in. You will gain a base amount for the car, a “class bonus” depending on the kind of car it is (cheap, medium, expensive, or armored van), and a small extra bonus if the car is undamaged on turn-in. All of this will be given to you in dirty money.
You’ll notice that the dirty money is not immediately put into your cash reserves, but is placed in your money pool (the small box with the moneybag icon above your name). Next to this is your Heat multiplier, which is increased by higher Notoriety. To convert the dirty money into cash you can spend, you must visit a Money Launderer (this can be found on your Map, and will bring up an icon on your HUD once you have more than $100 in dirty money). This will drop Notoriety for you (and anyone in your group, if you have one) to 0 (unless you are already N0, in which case it will not be affected), and convert the dirty money to an amount of cash determined by your Heat multiplier. For example, if you are carrying $2000 worth of dirty money at Notoriety 4 (1.5x multiplier) and turn it in, you will gain $3000 in cash.
(Warning: Leaving the district, voluntarily or by a game or server crash, will wipe out your money pool. If you are killed with money in your pool and/or carrying small items, you will drop the money in a small money bag, as well as the items. Anyone may pick these up.)
Committing crimes comes with a risk. When you commit a crime, you become Witnessable. A small badge icon  will appear to the left of your radar, filled with orange; it will slowly drain away to clear, depending on your Notoriety and the amount of dirty money you have. While this icon is visible, no matter how much orange is left in it, you can be Witnessed by an Enforcer. (The Enforcer must aim at the offending Criminal; an orange circle will appear in your crosshairs, and the amount of loot he/she is carrying will show beneath it. Press the Witness button, default “Alt”, to proceed to witness the crime.) If this happens, you (and your group, if any) are forced into a mission against that Enforcer (and any group he/she is a part of), and your dirty money is converted into a small item. The purpose of this mission will be to turn that item in at your Money Launderer, while the Enforcers must take it from you and bring it to their Evidence Vault. Whoever is successful earns the money that was in the pool (split amongst the group, if there is one). To avoid being Witnessed and killed, either perform your crimes out of sight of Enforcers (and keep your eyes open for their patrols), or commit crimes with a group who can repel any Enforcers that come after you.
Enforcers may do similar things to Criminals to gain money, but only with items that have been stolen or dropped by Criminals. For instance, while Criminals may steal any vehicle and turn it in to a Chop Shop for dirty money, Enforcers can only do this with cars that have been stolen and then abandoned by Criminals. (These vehicles will show the status “Stolen” when aimed at.) Enforcers may bring stolen vehicles to Impounds the same way Criminals bring them to Chop Shops, and may turn in items dropped by others or dumped from a storefront by a Criminal’s ram-raid to their Contacts. When an Enforcer turns in their dirty money to an Evidence Vault, their Prestige (and that of anyone in their group, if they have one) will reset to 2 (unless already at that level).
Enforcers also have the opportunity to arrest Criminals they are opposed to, rather than killing them. There is a specific class of weapons for this, called Less than Lethal (or LtL). These may be unlocked and purchased just like regular weapons. LtL weapons, rather than damaging health until the opponent is killed, damage stamina instead. Stamina can also be damaged by a heavy fall, or drained to low amounts by sprinting for long distances. There is no way to gauge stamina in these conditions, so Criminals who don’t want to be arrested should be careful about falling or sprinting needlessly. (You can only be stunned by an LtL weapon, so taking heavy stamina damage and then falling will not result in your being stunned.)
A player shot with an LtL weapon will see their screen going grey (rather than red), and once drained of stamina, will be left stunned, kneeling helplessly on the ground for a few seconds. A stunned Criminal may be arrested by any opposed Enforcer (not just the one who stunned him/her) by running up and Interacting with the Crim from behind; there is a short timer for the arrest, after which the arrested Crim is left waiting for a short time before respawning as if killed. An arrested Crim may be rescued by his/her teammates, who will approach and Interact with him/her the same way as the arresting Enforcer did, only opening the handcuffs rather than applying them. The rescued Crim is then free to rejoin the battle. (Note that if an Enforcer kills an arrested Crim in a mission, this gains the Enforcer the Police Brutality demerit, which can heavily lower rewards in a mission.)
The downside to LtL weapons is that they do very little health damage (though it is still possible to kill a heavily-wounded opponent) and almost no damage to vehicles. However, stunning and arresting Criminals provides greater bonuses than killing them, and there are several items that can only be unlocked by a certain number of arrests.
There are a number of things to be aware of in combat, but most of them involve either the HUD or the radar. Keep in mind one important fact: Anyone who is more than 100 meters away will not appear, but it is possible to target (getting a red or green crosshair when aiming at them) and hit them at up to 105m.
HUD
When you are on a mission, any important objectives will show up as either an orange or blue shape, along with their objective letter and distance from you. This shape will be filled in when the objective is not in your line-of-sight, and hollow when it is. If you place a waypoint on the Map (by left-clicking a spot on it), this will show as a blue circle with a thumbtack; team waypoints (set by right-click) will instead be green. Neutral players that you can see will have names that show up in grey; players in your group/team will be green, and enemies will be red. (Names will not appear if the character is not at least somewhat visible- hiding behind cover, behind a corner, etc.) Teammates you can’t see (either due to obstacles or being beyond 100m) will have a small green arrow underneath a nametag, showing their location and distance. In certain missions, this will be the same for enemies, only with red arrows and nametags. Also, your vehicle’s location and distance are always shown (unless, of course, you’re driving it, or it isn’t spawned or was destroyed).
RADAR
The range of your radar is 80m. Any icon (mailbox, ammo vendor, etc.) you have selected to be visible in your Map screen will also show on your radar. Also, you can see your vehicle (as a small green car shape) and your teammates (as small green dots) if they are within range. Enemies will only appear on your radar, as red triangles, if they are either driving a vehicle or firing a weapon; they will disappear from the radar within a few seconds once neither is the case.
From least to most accurate, you may fire your weapon while doing the following: running, walking, crouching, aiming (with marksmanship), aiming while crouching. You cannot fire while sprinting. Some weapons get little or no benefit from marksmanship, or can be reasonably accurate while moving, so check your gun’s information in the Vendor panel or your Inventory screen. Each weapon has varying stats for “soft” (versus people) and “hard” (versus vehicles) damage, accuracy, ammunition count, mobility (ability to move while carrying the weapon) fire rate and so on, so practicing with any gun you intend to rely on is encouraged. Note that some weapons prevent you from sprinting (and the rocket launcher prevents you from even running), but if you switch to your secondary weapon, those restrictions are not carried over. You can also lean to prevent less of a target around obstacles (“Q” and “E”, default), though in order to do so you must be in marksmanship mode.
All weapons are affected by two negative conditions when firing: recoil (your aim will be pushed upwards slightly at a semi-random angle) and bloom (the crosshairs will spread, and any shot you fire will randomly hit somewhere within them, meaning that wider crosshairs equals lower shot certainty). More powerful weapons will quickly become very inaccurate if fired at a high rate, so practice using burst-firing (firing small groups of two or three shots a second or two apart).
As your health or stamina are damaged by your opponents’ weapons, your screen will show greater distortion and sound will be muted and warped. There is no health gauge to show exactly how much more damage you can take before death, but with some practice a player can determine how badly off they are by the audible/visible effects. There is a short delay between when you stop taking damage and when you begin to heal from it, and another delay as your health returns to full. So long as you are able to keep from being harmed further, your health (and stamina, if you don’t sprint) will return to full. The amount of health you have and how quickly it regenerates can be altered by modifications, but that falls outside the scope of this tutorial.
If you’re a passenger in a vehicle, you can lean out of the window (or the door, if in a van) by using the movement keys. You can also return to your seat by tapping the movement keys again. Keep in mind that, unlike sitting inside the vehicle, leaning out means you can be hurt by gunfire; also, it takes longer to get out of a vehicle (since your character must first get back into his or her seat before exiting), so if you’re approaching a dangerous area where you might need to get out of the car quickly, return to your seat beforehand.
During the course of a mission, you may acquire medals (for things such as killing enemies with a grenade or by hitting them with a car, or killing the entire enemy team at once) or demerits (for things such as teamkilling or, for Enforcers, killing an arrested Crim). These will apply small bonuses (or penalties for demerits) to your rewards at the end of the mission. The names, Threat Levels, medals/demerits, Clan, primary weapons, scores, modifications and graffiti of yourself and your teammates and opponents can be seen on the scoreboard (default key: Tab); you may have to click on a particular player to find some of the information about them.
If the matchmaking system believes that you are outmatched in a mission, you will be given the opportunity to Call for Backup (default “B”), shown beneath the names of you and your teammates (if any). Once requested, the system will attempt to find any players or groups who are Ready but aren’t currently in a mission and add them to your group. If this unbalances the match in your favor, the opposing group will usually be given the same opportunity. This can often end up in missions with six, eight or even more people on each side. Epic gun battles!
Playing solo gets lonely after a while, so you can see about joining groups or starting your own in the Group panel (default “U”). A premade group is limited to four people, though as discussed above, can temporarily go above this when you join other missions, or other players join yours. You can also add players to your Friends list, or keep track of people you’ve ignored (by typing /ignore Blargh in the chat box, only with the player’s name rather than Blargh, unless the player is named Blargh, in which case that’s kind of sad), or look into what’s going on with your Clan if you’ve joined one.
I won’t lie to you: Even with the knowledge this guide gives you, and all the tactics you learn from other sources, there’s nothing like learning by doing. And because of that, you may end up losing a lot of missions as you’re starting out. Don’t get discouraged by this. Even in losing, you will still gain rewards from finishing opposed missions (quite a bit more than you would from missions where you got no opposition at all). Not only will you get experience under your belt, you will progress with your Contacts, unlocking different weapons that may be more suitable for your playstyle.
This should cover at least a majority of what you need to know to get started in San Paro. Once you have the basics down, I strongly recommend you get some friends or join a newbie-friendly Clan, don’t be afraid to ask questions, and read up or watch videos on advanced APB tricks and tactics. And don’t get frustrated- there’s a number of roles to fill in this game, and if you can’t quite get the hang of one, perhaps another is more your style. Experiment and find out!
See you on the streets!
And if I end up shooting at you? No hard feelings!

awesome thanks and no hard feelings if i shoot at you aswell