SWTOR Sniper Imperial Agent Guide
SWTOR Sniper Imperial Agent Guide by Karaokelove
This guide is for all of you who have questions about the Sniper class and are tired of having to look at a dozen contradicting sources for information. It consists of a compiled and organized list of every aspect of creating, playing, and leveling your Sniper. I wish I could take credit for this information, but most of it was simply taken from multiple sources (cited below) and compiled for your convenience. If you find anything in this guide to be incorrect or misleading, please don’t hesitate to post your concerns.
Table of Contents
This Post: Important Abbreviations & Sniper Basics
Important Stats
The Cover System
Energy Management
Rotations
Talent Trees
Key Bindings
Important Abbreviations:
AoE: Area of Effect: Abilities that affect more than 1 target in an area.
CD: Cooldown: How long it takes an ability to become usable after the previous use.
CC: Crowd Control: Abilities that stun, stop, and otherwise inhibit your enemies’ ability to move or attack.
DoT: Damage over Time: Damage that lingers, affecting the target at intervals for the duration of the effect.
DPE: Damage per Energy: A measure of combat efficiency. The more damage an attack can do per energy it uses, the more efficient that attack is. For instance, if your attack does 30 damage at the cost of 10 energy, then it has a DPE of 3.
DPS: Damage Per Second: Another measure of combat efficiency. How much damage an attack (or series of attacks) does, divided down to the second. For instance, if you do 30 damage over 10 seconds, you are doing 3 DPS.
GCD: Global Cooldown: The 1.5 seconds it takes to use any ability after any other ability has been used (applies only to those abilities affected by the GCD).
Sniper Basics:
As I’m sure you’re well-aware by now, the Sniper is a pure dps class. Your job is simply to cause as much damage as possible to your targets. While that sounds like a simple task (and a good Sniper player can definitely make it look simple), it actually requires quite a bit of planning and precision execution. The 2 most important things you must learn as a Sniper are how to manage your energy reserves and how to effectively use the Cover system. Both will be covered in-depth in their own sections.
The Sniper handles much differently than any other class in the game due to its reliance on the Cover system. Unless you specifically spec your character to be mobile, most of your combat time will be spent hunkered down behind cover, doing large amounts of single-target dps. Yes, you will have access to some of the best AoE abilities in the game, but your single-target damage is where you really shine, even as an Engineer spec. If digging in and dishing out serious damage is your thing, then you will enjoy playing a Sniper.
Important Stats
Now let’s talk about what stats are important to a Sniper. Of the Primary Statistics (Strength, Endurance, Aim, Cunning, Willpower, Presence, and Expertise), only Endurance and Cunning apply to the Sniper (I’ll cover Presence and Expertise in a second). It’s natural to assume that Aim would be important to us, but Aim only increases basic ranged damage. Most of a Sniper’s attacks cause “Tech” damage, which is covered under Cunning. So when it comes to primary stats, you should only be concerning yourself with Cunning and Endurance. The only exceptions to this are Presence and Expertise. Presence increases your companions’ health, damage, and healing, making it a good choice for solo players. Expertise increase your damage, healing, and defense in PvP, making it a necessary choice for PvP players.
Things get a little more complicated when you start to factor in Secondary Statistics (Absorption, Accuracy Rating, Alacrity, Armor, Critical Rating, Defense Rating, Force Power, Power, Shield, Surge, and Tech Power). Obviously some of those we don’t need to concern ourselves with, such as Force Power, so I’m only going to concentrate on the Secondary Stats that significantly benefit a Sniper or are mistakenly thought to benefit us.
Accuracy Rating: This increases your chance to hit with attacks. Once you get it past 100%, it starts to reduce your opponent’s armor or resistance. For instance, if your Accuracy Rating is 105%, your attacks will have a 5% armor-piercing effect.
Alacrity: This decreases the cooldowns on most abilities. It does not affect the GCD (Global Cooldown), limiting its usefulness to Snipers. There seems to be quite a bit of debate over the usefulness of Alacrity. My personal feeling is the same for all stats and abilities that reduce cooldowns: they only allow you to burn through your energy that much faster without doing any additional damage. I’ll get into this in more detail in a later section.
Armor: This reduces the amount of damage you take from kinetic and energy attacks. Armor does not reduce the effect of attacks which deal Internal or Elemental damage. If a weapon or attack doesn’t specify a damage type, odds are it is either Kinetic or Energy, and will be affected by armor. I’m still doing research to find out more information about the various damage types.
Critical Rating: This increases your chance to score critical hits with all types of abilities, from attacks to heals. This skill is incredibly important to Snipers of all builds. PvP players will find it especially useful for maxing out their burst damage potential.
Defense Rating: This is your chance to avoid attacks outright. The Imperial Agent’s “Cover” ability grants a bonus of 20% to your Defense Rating as long as your opponent is within your 45-degree cone of effect.
Power: This increases the base damage of all your abilities and is probably the most powerful stat you have. Though you hit diminishing returns when trying to boost specific stats by stacking equipment, you can use Stims and Adrenals to temporarily boost your Power to great effect. Since Power increases your base damage, and Crit and Surge ratings are based off of your base damage, when you score a critical hit while your Power is boosted, the damage you cause can be quite absurd. There’s an excellent article on Power as it pertains to Snipers here.
Surge: This increases the damage you do with a successful critical hit. This stat is completely dependent on your Critical Rating, meaning the higher your Critical Rating gets, the more powerful Surge becomes. What I mean by that, is if you can’t get a critical hit then Surge has no effect. The higher your Critical Rating, the more critical hits you will get, and the more often Surge will come into play. Thus you typically want to hold off on boosting your Surge until you’ve gotten your Critical Rating to an acceptable level.
Tech Power: This increases the strength of tech abilities. Since almost all of a Sniper’s abilities are tech-based, this is an incredibly important stat for all Sniper builds. (I plan to post a list of exactly what abilities are tech-based, as soon as I can find some concrete information on the subject).
And finally, here’s one last little bit of stat-centric information for you. All primary stats give 1% crit for every 140 once you hit level 50. While each primary stat affects a different type of damage, Cunning gives 0.2 tech damage. Keep this in mind as you start to mod and customize your high-end equipment.
The most important thing to remember is not to get too caught up in maximizing the efficiency of your gear until you are very high level. In fact, the only real way to gimp your character is by trying to max out 1 or 2 stats at the expense of others. It may seem like a good idea, but there is a ton of research that proves it only makes the character weaker. Also remember that this was just a general crash-course in Sniper stats. Later, when I get into specific Sniper builds, I’ll talk about what stats are more or less important to what builds.
The Cover System
Now that we’ve got a clear understand of what stats are important to our Sniper, let’s move on to understand the “Cover” mechanic. “Cover” is the backbone of most Sniper builds, and learning to use it effectively is paramount to achieving success with your Sniper. When in Cover, there is an invisible 45-degree cone sticking out from the front of your Sniper (I call this the “Cover Cone”). You gain a 20% bonus to your defense vs any enemy attacking you from within the Cover Cone. In addition to the defense bonus, being in Cover gives you access to your best combat abilities, such as Snipe, Ambush, and Explosive Probe. There are 2 types of Cover you need to be familiar with:
1. Basic Cover: If you have an enemy targeted, odds are you will see a green figure appear somewhere nearby. If you press the “Cover” button, your Sniper will roll into the spot occupied by the green figure and crouch down. This is your basic Cover stance. Not only do you gain the 20% bonus to defense, but you become immune to any basic attacks from within your Cover Cone as long as you stay inactive (ducked behind your cover).
2. Crouch in Place: You use this when you need to access your cover-only abilities (like Snipe) but don’t have access to a cover spot. Instead of rolling into a cover spot, your Sniper will simply crouch in place. Initially this grants none of the benefits associated with being in Cover, aside from granting access to your cover-only abilities. However, once you hit level 10 you will gain access to an energy shield that grants you the 20% bonus to defense via the Cover Cone. This does not grant the immunity to basic attacks while inactive.
A lot of players dislike using Basic Cover because it can sometimes cause them to accidentally roll into a previously unseen cover spot, perhaps gaining the attention of nearby enemies. I pretty much use “Crouch in Place” exclusively, in order to avoid such problems. The only time I ever really use the Basic Cover option is when I’m facing a particularly tough ranged enemy, so that I can sit back and relax while his powerful ranged attacks impact harmlessly on my cover. I highly recommend changing your default keybinding for Cover and Crouch in Place. I’ll get into specifics in the “Keybindings” section.
Energy Management
Energy management is probably the single most important thing you need to learn in order to play an effective Sniper. At first glance it seems to be a simple system: abilities cost energy, so when you use an ability it subtracts from your energy bar, which continuously regenerates the lost energy over time. And while this is true, there is one factor that significantly complicates matters: the more energy you use, the slower it regenerates. You can tell how fast your energy is regenerating based on the small “arrows” to the right of your energy bar. As you use up your energy, you will notice the arrows start to fade, indicating that your energy regeneration rate has slowed. Here are the exact numbers and ratios (as of the time of this writing):
Energy: 60 to 100 = 5 energy per second (eps)
Energy: 20 to 60 = 3 eps
Energy: 0 to 20 = 2 eps
Let’s do some math!
Agent Robocop keeps his energy level above 60, allowing him to regenerate 5 eps. Over the course of a 5-minute fight (or 5 minutes of pvp), this allows him to spend (5 x 300 seconds =) 1,500 energy freely without ever dipping below the 60 energy threshold.
On the other hand, Agent Fancypants spams his hardest-hitting attacks immediately, taking his energy down to below 20, allowing him only a 2 eps. Although he got off to a better start, during the course of that 5-minute fight he was only able to spend 600 energy!
Agent Robocop was able to use more than twice as much energy as Agent Fancypants purely because he didn’t blow all of his energy on his best attack up front! In case you were wondering, twice as much energy basically equates to twice as much damage. Robocop was able to do more than twice as much damage as Fancypants in the same amount of time simply by conserving his energy.
Now don’t get me wrong, different situations call for different tactics. That’s why I’m going to talk about sustained dps vs burst dps.
The situation described above would be an example of sustained dps. It is almost always a good idea to keep a reserve of energy built up. Most good Snipers try to stay above 60 energy at all times in order to maintain a 5 eps. Every now and then, however, you will want to convert to “burst” dps, busting out all of your most powerful attacks in order to take down an opponent as quickly as possible. As you play your Sniper you will start to get a feel for when to resort to burst dps and when to maintain sustained dps. A good rule of thumb is not to initiate burst dps unless you have a target that has to die “right now”, or you have access to an ability that will allow you to jump back up to the over-60 mark, such as Adrenaline Probe. Even if you think you are safe burning through your energy reserves, you never know when you might get attacked, and you definitely don’t want to get caught with your pants down, so to speak.
One last thing to consider is that energy management isn’t a black-and-white ordeal. You might use sustained dps through the majority of a fight before transitioning to burst dps in order to finish off the last enemy. Just remember that it’s a lot easier to transition from sustained dps to burst dps than it is the other way around.
Rotations
Ok, so now that we know the importance to energy management, how do we do any decent amount of damage while staying above 60 energy? We do this by planning out our attack rotations. What is an attack rotation? An attack rotation is a series of abilities executed in a specific sequence in order to maximize their combat effectiveness. Because there are so many different situations you can find yourself in, I’m not going to lay out every rotation imaginable. What I will do is lay out some theory so that you can begin to intelligently craft your own rotations to get you through whatever combat scenarios you find yourself in.
When putting together your rotation, you need to know exactly how your abilities work. For instance, Snipe has a 1.5-second charge-up period. However, your energy continues to regenerate during this period, and doesn’t actually lose the 20 energy for Snipe until the shot is actually fired. This means that if you’re in the middle of combat with full energy, you are essentially wasting energy if you use Snipe. You would be better off using an instant ability like Shiv or Fragmentation Grenade before activating your Snipe, in order to make sure that the 1.5-second charge-up period is put to good use by allowing your energy to regenerate. Thus, knowing when an ability uses energy is almost as important as knowing how much energy the ability uses. When initiating combat, such things don’t particularly matter. I enjoy using Ambush as a combat-starter because, although it has a 2.5-second start-up, combat hasn’t started yet so I’m not wasting any time or energy by using the ability. In fact, I see using abilities with long start-ups to initiate combat as an efficient use of time. It’s almost like getting an instant use of the ability.
Another thing to consider is your damage per energy, or dpe. This is a direct measure of your attack’s efficiency. You can calculate this by dividing the damage of your ability by the amount of energy it costs. If the ability has a charge-up period like Snipe, you can even subtract the amount of energy that will recharge during the charge-up period from the ability’s energy cost (I would average the recharge rate at 3 or 4 eps, just to be on the safe side). So for instance, let’s say Snipe, which has an energy cost of 20, does 5,000 damage. During the charge-up period I’m going to regenerate approximately 6 energy, meaning I should calculate 5,000/14, which equals a dpe of 357.14. Not too bad. Even without accounting for the charge-up regeneration, you’re still looking at a dpe of 250. Now let’s say that for some odd reason I throw a Frag Grenade at a single enemy. The Frag Grenade costs 20 energy, and because it’s an instant-cast ability we can keep its calculation at 20. It does approximately 1,600 damage to up to 5 enemies, but since we are only attack a single target, we are looking at a dpe of (1,600/20=) 80. Yuck! Let’s imagine that we managed to catch the maximum of 5 enemies in the blast. At that point we would be up to a 400 epa, making the Frag Grenade more efficient than Snipe in that situation. (These damage values are based off of information provided at torhead.com, which they admit may not currently be accurate. The values are merely being used to demonstrate my point.)
Now let’s look at the other factor for measuring combat efficiency: damage/second, or dps. Since Snipe has a 1.5-second charge-up period and we’re assuming it does 5,000 damage, you’re looking at a dps of 3333.33/second. Fragmentation Grenade, on the other hand, would have a dps of 1,600 per enemy affected. Thus it would take 3 enemies caught in the blast in order to make Frag Grenades a more efficient attack than Snipe, even considering the fact that Snipe has a charge-up period and can only target a single opponent at a time. Again, though these numbers may not be representative of actual in-game values, they demonstrate my point of what to consider when determining your attack rotations.
One last thing to consider is what I call “leeway period”. There is a period of about .5 seconds (you can actually make it longer in your preferences) during the final moment of charge-up abilities where you can input the command for the next ability to execute. Assuming the next ability is an instant ability, both abilities will execute at almost the same time. So, for instance, a lot of people are using this fact to cast Snipe or Ambush, wait till it’s almost fully charged, and then cast Explosive Probe. This causes the Probe to launch at the same time as the Snipe or Ambush, causing the Snipe or Ambush to immediately ignite the Explosive Probe. This results in a devastating burst of damage to your opponent. Experiment with your abilities to see where you can shave off a few seconds of GCD by queuing up your moves in this manner.
Talent Trees
So now that we’ve got energy management and the theory of rotations covered, let’s look at the 3 different Sniper Trees. What you will find below are links to the torhead.com calculator showing each of the builds, as well as a level-by-level walk-through of when each point was invested and why.
Marksman
This seems to be by far the most popular Sniper tree, and for good reason. The Marksman is a straight-up single-target dps machine. You know exactly what you’re getting into when you spec into Marksman. This tree is for those Snipers who like the simplicity of cover-oriented long-ranged combat. You can find a fairly straightforward Marksman build here. Here’s the reasoning behind many of the build choices:
Level
- 10 Energy Tanks This is a necessary choice for almost any Sniper build. Even though it’s not part of the Marksman tree, it’s worth taking right off the bat.
- 11 Energy Tanks
- 12 Gearhead The same goes for Gearhead.
- 13 Gearhead
- 14 Gearhead
- 15 Steady Shots This and Marksmanship are no-brainers for a Marksman spec.
- 16 Steady Shots
- 17 Marksmanship
- 18 Marksmanship
- 19 Marksmanship
- 20 Ballistic Dampers This is seriously one of the best Sniper abilities, period. Any non-mobility spec would do well to grab this as early as possible.
- 21 Ballistic Dampers
- 22 Precision Ambush Another no-brainer for a Marksman spec.
- 23 Precision Ambush
- 24 Heavy Shot Not a huge fan, but the point had to go somewhere.
- 25 Diversion Awesome for pvp.
- 26 Reactive Shot Meh. Points had to go somewhere.
- 27 Reactive Shot
- 28 Cover Screen I had to choose between wasting 2 points on Snap Shot or 2 points of Cover Screen. I’m just not a fan of the insta-Snipe abilities, as you lose your energy regen time during the charge. I figured the added defense from Cover Screen couldn’t hurt.
- 29 Cover Screen
- 30 Sniper’s Nest You need this ability. That’s all there is to it.
- 31 Between the Eyes Another no-brainer for a Marksman spec.
- 32 Between the Eyes
- 33 Sniper Volley Not a huge fan, but the point had to go somewhere.
- 34 Sniper Volley
- 35 Followthrough A staple of the Marksman build. There is no reason not to take this.
- 36 Recoil Control A staple of the Marksman build. There is no reason not to take this.
- 37 Recoil Control
- 38 Pillbox Sniper Meh. Points had to go somewhere.
- 39 Pillbox Sniper
- 40 Imperial Assassin A staple of the Marksman build. There is no reason not to take this.
- 41 Imperial Assassin
- 42 Imperial Assassin
- 43 Imperial Assassin
- 44 Imperial Assassin
- 45 Rapid Fire A staple of the Marksman build. There is no reason not to take this.
- 46 Lethality Useful for any Sniper build.
- 47 Lethality
- 48 Lethality
- 49 Vital Regulators These last 2 points could have gone anywhere. I debated between an extra 10% damage to Explosive Probe/AoE and the healing from Vital Regulators. I figured the pure dps build could use a little extra survivability but it could have gone either way.
- 50 Vital Regulators
Now I want to talk about a few of the abilities that I decided not to take.
Snap Shot, which allows a Snipe to activate instantly, seems to be a very popular ability. However, I have never been a fan of abilities that reduce cooldowns or activation times. The way I see it, energy management is enough of a pain with your abilities in their current state. Activating abilities quicker only allows you to burn through your energy faster without actually doing any additional damage. I firmly believe in the old adage “slow and steady wins the race”. However, this is merely my opinion and you will find many players, particularly pvpers, who find great utility in Snap Shot.
Sector Ranger, which causes Cover Pulse to knock targets back an extra 2 meters, is just not that important to me. Strangely enough, my Sniper is perfectly comfortable fighting from within melee range, and an extra 2 meters is really nothing, anyways.
Sniper Volley is another skill that I don’t like, simply because it allows you to burn through your energy faster without any increased returns. The only reason I even put 2 points into it was because I didn’t really have a choice.
The Engineer
This is the spec that I am currently using. Despite the common misconception that the Engineer is an AoE-oriented build, it is actually just as adept at dishing out single-target dps as the Marksman. The difference is that you also gain access to vastly enhanced AoE abilities to augment your powerful single-target attacks. You are also able to stack multiple defensive buffs to become nigh-unkillable for a short time. While certainly more complicated to play than the Marksman spec, the payoff is a vastly increased level of utility. Probably one of the most versatile classes in the game. The following build is what I am currently using. I have followed this level progression to the letter, and am currently level 33. Here’s the link to my Engineer build.
Level
- 10 Energy Tanks As with most builds, you would do well to pick up Energy Tanks as early as possible.
- 11 Energy Tanks
- 12 Gearhead Same with Gearhead.
- 13 Gearhead
- 14 Gearhead
- 15 Steady Shots Even for an Engineer, you will be using Sniper so much that this ability is definitely worth picking up.
- 16 Steady Shots
- 17 Marksmanship Higher accuracy equals more damage. Useful for any Sniper build.
- 18 Marksmanship
- 19 Marksmanship
- 20 Ballistic Dampers By this point you already know how I feel about this skill. However, it mixes especially well with the Engineer’s other abilities. A must-have for any Engineer build.
- 21 Ballistic Dampers
- 22 Explosive Engineering It may seem weird that for an Engineer build, we are only now starting to invest in the bread-and-butter Engineer abilities. However, this is a natural progression. Those Marksman abilities we took will form the backbone of our build, and gaining access to Ballistic Dampers as early as possible makes leveling that much easier. This is the point where you see your Engineer start to take shape.
- 23 Explosive Engineering
- 24 Explosive Engineering
- 25 Vital Regulators There’s a lot of debate between taking Vital Regulators or Vitality Serum. While neither ability is particularly mind-blowing, I choose to go Vital Regulators for reasons I will explain in a later section.
- 26 Vital Regulators
- 27 Cluster Bombs As an Engineer, you will be relying heavily on your Explosive Probe. This ability is a no-brainer.
- 28 Cluster Bombs
- 29 Interrogation Probe As an Engineer, you will come to rely heavily on your Interrogation Probe. This will be one of your most important abilities to master.
- 30 Efficient Engineering Another no-brainer. The Engineer tree is quite energy-hungry, so any skill that saves you some energy is worth taking.
- 31 Efficient Engineering
- 32 Imperial Methodology This is just a natural progressions from Efficient Engineering.
- 33 Lethality At this point it might seem strange to jump down and invest 3 levels into increasing Lethality. The reason is that the next skill to take will be Experimental Explosives, which is dependent on getting critical hits. By maximizing our critical rating now, we are insuring that we get the most out of Experimental Explosives.
- 34 Lethality
- 35 Lethality
- 36 Experimental Explosives And here we go. A staple of the Engineer build, made all the more powerful through all of the critical-enhancing skills we’ve taken thus far.
- 37 Experimental Explosives
- 38 Inventive Interrogation Techniques This is really more of a pvp skill than anything else, but we needed to spend 2 points and there is no harm in maxing out the effectiveness of our Interrogation Probe.
- 39 Inventive Interrogation Techniques
- 40 EMP Discharge I can’t express how important this skill is. Gaining a 2nd use of Adrenaline Probe is a huge deal, especially when you have also taken Vital Regulators. This single skill allows you to be much more free with your energy expenditure.
- 41 Energy Overrides Again, any ability that saves you energy is worth taking.
- 42 Energy Overrides
- 43 Augmented Shields This is one of the primary abilities that makes the Engineer very difficult to kill. Between Shield Probe and Ballistic Dampers, you are able to ignore somewhere around 75% of all damage for the duration of their effect! That’s 15 seconds of near-invulnerability.
- 44 Augmented Shields
- 45 Electrified Railgun Since elemental damage ignores armor, this ability adds a nice little sting to your Series of Shots ability. The best part is it’s passive, so you don’t have to do anything except watch those big numbers appear above your enemy’s head.
- 46 Electrified Railgun
- 47 Electrified Railgun
- 48 Deployed Shields Another great defensive ability that benefits your team as well as your Sniper! When added to Ballistic Dampers and Shield Probe, it brings you up to 81% damage reduction!
- 49 Deployed Shields
- 50 Plasma Probe And finally, the almighty Plasma Probe. Its damage values don’t seem that impressive until you realize that it ignores armor. Definitely a nice ability to have.
Now I want to talk about a few of the abilities that I decided not to take.
Engineer’s Toolbelt is another ability that just lets you burn energy without any real benefit. It’s been argued that the real use of this is the ability to use more Flashbangs in pvp. While that is a legitimate point, I feel that the points you would be putting into Engineers Toolbox are almost always put to getter use elsewhere.
Calculated Pursuit is kind of an odd ability. The only times you will be attacking while not in cover are when you are chasing or fleeing. In both of those scenarios you have plenty of other abilities to fall back on. This leads me to the conclusion that points invested into Calculated Pursuit are wasted.
Ok, I’m going to go ahead and deal with the “Vital Regulators or Vitality Serum” issue. While neither skill really stands out, when you do the math it becomes an obvious choice. Vitality Serum gives you a flat 4% bonus to your bonus health. This is an important distinction, because that means at most, even at level 50, you are gaining a 400 to 500 bonus to your health. That is basically a negligible amount. On the other hand, Vital Regulators allows you to regenerate 6% of your total health. This is going to be a much bigger number than what you would get out of Vitality Serum. However, it doesn’t end there. When you eventually gain access to EMP Discharge, you gain another use of Adrenaline Probe, and thus another use of Vital Regulators. So now you’re up to 12% health regeneration. And finally, for those of you soloing with your companions, Advanced Recon gives you yet 1 last use of Adrenaline Probe, bringing you up to a total of 18% regeneration based on your total health. Hopefully you see that there is simply no comparison between the 2 skills.
Stroke of Genius is another insta-snipe ability, and you should already know my feelings regarding those.
You’ll notice with both the Marksman and Engineer builds that I ignored Deadly Directive. This was not only because I felt that the points were put to much better use elsewhere, but because of my opinions that Alacrity can easily work as much against you as for you by allowing you to burn through your energy without seeing any increased returns.
Lethality
Unfortunately I do not currently have enough experience or information to make a very informative post about a Lethality spec. I will continue to research effective Lethality builds, and will update this post as soon as I’m able.
Hybrid Builds
As of the time of this writing, there is no evidence available to suggest that it is possible to spec into an effective hybrid build. All of the information I have been able to find has cemented the fact that the most solid builds are 31/x/x, x/31/x, and x/x/31. Every single hybrid build I’ve seen has suffered some major flaw, from lack of damage output, to unsustainable energy usage. As I find out more information I will continue to update this section, but as it stands, you should avoid hybrid builds if you wish to play an effective Sniper.
Final Thoughts
The way you decided to spec your character is ultimately a personal choice. Though I’m a fan of Ballistic Dampers and try to avoid insta-snipe and alacrity boosts, you might find great success using those abilities. Ultimately you should take talents that enhance the way you like to play the game, and not let your talents dictate how you play the game. Your preferred area of play will also dictate what skills are and aren’t good choices. For instance, what makes an awesome skill for a pvp player may not hold up so well in a pve raid environment. Remember that you can always respec your character, so don’t be afraid to experiment and see what skills and abilities you find the most fun and engaging.
That said, there are some abilities that are just natural fits to specific play styles. For instance, if you create a Marksman build based around cover-oriented combat, it would be silly not to take Ballistic Dampers and Snipers Nest. However, if you make a mobility-oriented Lethality spec, it probably wouldn’t make much sense to take Ballistic Dampers since you will rarely be fighting from cover. Keep these things in mind and you should never have to wonder which skills are good choices for your build.
Keybindings
This can be one of the most frustrating aspects of playing an mmo. Before you know it, you’re going to have access to more abilities than you know what to do with. Trying to figure out where to put all of these abilities can be a matter of great contention, but hopefully with a little planning and practice we can work out a system that is easy to use and remember.
I want to start by addressing something that applies specifically to the cover-oriented classes: the cover bar. This is an ability bar that only shows up while you are in cover. While this is a good idea in theory, I find that it messes me up more often than not. For instance, if I am in cover and go to use an ability, there is a chance that I can get knocked out of cover and end up using the wrong ability when my bar changes. While some people find the cover bar quite useful, I have found combat to go much smoother with it disabled. It’s totally just a matter of personal choice.
So with that out of the way, the first thing you want to do is enable your left, right, and bottom-center ability bars. The option to do so can be found in your Preferences menu. Once those are enabled, you want to start to think about how you want your abilities to be organized. This is going to be a constant issue as you continue to gain new abilities. Very rarely will you gain an ability that you simply don’t ever use. And you never want to make the mistake of not using an ability because you can’t find a convenient quickslot for it, or are too lazy to mess with it.
In a little bit I’m going to show you my setup, but as always what works for me may not work for you, especially if you don’t play an Engineer spec. In the meantime, let’s cover a little theory about what makes a good setup.
First off, I’m going to assume you use WASD to navigate. I hold down the right mouse button while I move, allowing “A” and “D” to function as my strafe keys, freeing up “Q” and “E” for use as ability keys. So since you know your left hand is going to be in the general area of the WASD keys, it only makes sense to start branching out from there for your keybindings. A few things to consider when determining what should be mapped where are as follows:
1. When am I going to be using this ability? If it’s an ability that you will be using on the move, you want to place it where you can easily access it while still navigating with WASD. For example, I mapped my basic attack to the “E” button, so that I can easily fire off free shots while chasing, fleeing, or changing positions. On the other hand, I know that any cover-based ability, like Snipe, can only be used while I’m immobile. Thus I used that as an opportunity to map those skills using the shift-key modifier and keys “q”, “w”, and “e”. Since I’m staying stationary, I have no problems using the shift-key in addition to another key, and now my “W” key serves a purpose while in cover. One last example involves your out-of-combat abilities like Recuperate, and your ability to check your Inventory Screen. Any ability that isn’t used in combat should not have a hotkey. Period. You are going to need access to every free key you can find, and having your inventory mapped to “I” may be convenient now, but it won’t save your life when you’re being attacked by rebels. Non-combat abilities like Recuperate and Quick Travel I keep slotted in the upper section of my right toolbar, out of the way of my other abilities. I don’t hotkey them, I just click them when I need them.
2. How often am I going to be using this ability? If this is one of my bread-and-butter abilities, then I need it to be within easy reach from my position over the WASD keys. As an Engineer, I rely heavily on Fragmentation Grenade as my primary source of AoE damage. Thus I mapped my Frag Grenade to the “F” key. Not only does that make logical sense in my mind (“F” for Frag), but I barely have to move my index finger away from the “D” key in order to access it. It’s comfortable, easy, and memorable, making it a perfect fit.
3. How does this ability relate to my other abilities? Having your abilities keyed into a perfect pattern on your keyboard won’t do you any good if you can’t remember what keys activate what abilities. Mapping your abilities out in a logical progressions helps you remember where you mapped them. For example, I keep my 3 melee abilities mapped to “1”, “2”, and “3”. Not only is that close to my WASD home, but the idea of melee skills being related to smaller numbers makes sense in my mind. And the fact that they are grouped together not only helped me remember where they are mapped, but it actually makes my life in combat easier as I tend to use them 1 after another, anyway.
4. How easily will I need to access this ability? If I had to press ctrl+alt+shift+”p” every time I needed to use “Escape”, the effect would be over by the time I was able to escape it! Any reactive abilities, such as Escape, Distract, and even Medpacks, should be mapped to easily-accessible keys. You should be able to trigger those abilities on reflex alone. If you have to stop and think about how to activate the ability, or stop and look at your keyboard to find the ability key, then you need to reevaluate your setup or just practice using them.
5. Do I need to pay attention to the ability’s cooldown? If you do, then you should probably put it with all of your other main abilities in an easy-to-see location on your screen. I keep all of my major combat abilities on the top and bottom middle bars, going from left to right. This allows me to easily keep track of my cooldowns without having to take my attention off of what’s happening on screen.
Ok, so that about covers the theory behind my keybinding philosophy. Just remember to stay organized, and keep everything up to date with your newest abilities, and you should be fine. I do have one last very important thing to remember. I know trying to learn a new setup can be frustrating, but don’t fall into the trap of ignoring your keybindings and just clicking on the skills. You won’t get any better this way, and will only be hurting yourself in the long run. Force yourself to use your keybindings. Sure, it might be a little slow at first. It might take you an extra 4 or 5 seconds to remember where you put that Stim Pack, and it might even get you killed a few times. But in the long run, knowing your keybindings is what will separate you from the mediocre players. Also, make sure to use all of your abilities regularly. I am bad about not using Leg Shot, and I know as soon as I start doing more pvp it’s going to come back to bite me, as I fumble around my keyboard trying to remember which key will stop the rampaging Marauder from reaching me.
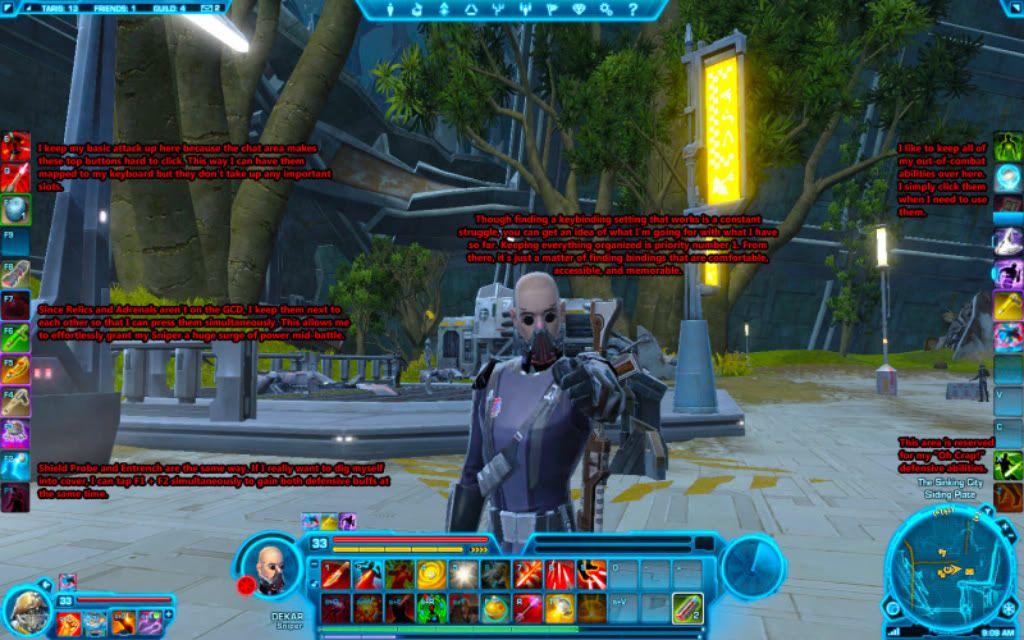
In any case, here is the setup that I currently use. Please remember that I am purely posting this as an example, and that what works for me might not work for you. You can check out a screenshot of my setup screenshot here. For some reason the imagine is a lot smaller and fuzzier that it should be, so I might need to replace it with something better. If you can’t read the text that I’ve added to the screenshot, please let me know and I’ll try to get a better image up. In the meantime, here’s the basis of my layout:
I’ve got the left, right, and bottom-middle hotbars enabled, and my cover bar disabled. Since the chat box slightly overlaps with the top slots of the left bar, I decided that was a low-priority slot and would be a good place to map my basic attack. As I mentioned, my basic attack is mapped to “E” so that I can easily access while navigating with WASD. Directly below my basic attack is Overload Shot, which is mapped to “Q”. Since I basically never use Overload Shot, I’ll probably be changing that up soon.
In any case, going down to the bottom of that bar, I’ve got all of my in-combat recovery abilities and consumables. At the very bottom I’ve got Shield Probe and Entrench mapped to F1 and F2. Since they aren’t bound by the GCD, I can press both buttons simultaneously in order to activate both abilities. This grants me a nice, instant, easily accessible buff at a moment’s notice. I do the same thing with my relic and adrenal mapped to F6 and F7. Pressing those grants me a huge 15-second bonus to Power and my Critical Rating.
Moving over to the right bar, you can see that I’ve got all my out-of-combat abilities grouped together, but not bound to any keyboard shortcuts. I just click them when I need them. At the very bottom of the right bar I’ve got a few of my “oh crap” abilities mapped to keyboard shortcuts.
The top middle bar I basically left mapped to “1” – “=”. You can see I’ve got my 3 melee abilities grouped together at 1, 2, and 3. I made sure Distraction was mapped to “4” so that I would have easy access to it, since it is used often and on reaction. Past that I’ve just got a random assortment of abilities that I have gotten used to having in that order. I’ll probably better organize them later, but in the meantime that order has served me well.
The bottom middle bar is where things start to get interesting. You can see that the 3 left abilities are greyed out. These are my 3 main cover abilities, Ambush, Explosive Probe, and Snipe. They are mapped with the shift-key modifier to “Q”, “W”, and “E”, allowing effortless activation during combat. I keep Laze Target next to Snipe, and mapped to shift+R so that I can easily press shift+R-E in order to do my auto-crit Snipe. Takedown is next, mapped to shift+T, both for easy access and because of the logical sense of “T” for “Takedown”. I’ll probably end up moving Shatter Shot, Cover Fire, and Leg Shot down into that group sometime soon, in order to keep my main Sniper attacks grouped together.
Next I’ve got a lot of my good Engineer-spec utility abilities grouped together. My 2 DoTs, Corrosive Dart and Interrogation Probe, are mapped to “R” and “T” respectively, allowing easy access during a fight. My Frag Grenade, as already stated, is mapped to “F”. Cover Pulse, I’m embarrassed to admit, is not currently mapped to a keyboard shortcut.
I hope you can see the pattern of how I reserve specific areas of the keyboard for specific types of abilities, such as recovery, attack, defense, and travel. I also hope you can see how all of my most important abilities orbit around my left hand’s resting area, just waiting to be activated. As I continue to gain new abilities I will start to make use of the bottom row of letters (“z” through “m”). My layout is far from perfect, but it should suffice in showing you me keybinding methods.
Mapping Cover
Cover is such an integral part of the Sniper’s gameplay, I went ahead and mapped “Crouch in Place” to my space bar. The standard “Take Cover” ability is mapped to shift+space. This means I never have to worry about missing the Cover button or hitting it accidentally. I mapped jump to “B”, just so I can tap it with my thumb when need be. Because I rely so heavily on Ballistic Dampers, during combat I can tap “W”, “space-bar” in rapid succession in order to quickly leave and re-enter cover, thus gaining 3 new charges of Ballistic Dampers. The exiting and re-entering of cover occurs so quickly that this maneuver has no detrimental effects on my combat rotations.

This is just a brilliant help for newbees like me ! great job
Late discovery of this as I was thinking about changing from Marksman to Engineering. Good guide.
I know you've probably heard it before, but the biggest defense I can offer for the insta-snipe abilities is the greatly improved burst they allow. In trash fights it means I can drop a target before it has a chance to contribute more damage (then let the energy regen), and in close fights where energy won't matter (because I'd be dead) I can just cut it loose. I understand your point about energy management, but if nothing else you can fill the activation time with a simple Rifle Shot – no extra energy used, and still an overall DPS increase. More for Marksman than Engineering, because you can cover-bounce to get the instant, but I see it helpful for both.
But mostly I like to have the choice to really burn out the energy if I have to. There were enough "I don't like this but the points have to go somewhere" abilities in your build that you wouldn't really lose anything by taking the instant Snipes. Why not have them in the toolkit?
Plasma probe sucks imo. Its stationary and easily avoided as well as being blatantly obvious. Might work well if you just put it next to your head to burn operatives and scoundrels.
Excellent work! I just started a sniper and this is one the best guides I've seen. I hope you include the Lethality info soon.
Thank you for your well though out guide. Your time helps all of us more than you know and makes the game more fun for me to play. AWESOME!!!
Important note on Sector Ranger is reduced activation time for Orbital Strike as it is an awesome DPE ability for even single target fights.
would love to find more on tech for snipers and what skills use it the most out side of probes
Thanks for this awesome guide. However why don't you choose Imperial Demarcation instead of Sniper Volley ? If you don't like this skill the other one could be useful either
Awesome guide! Thanks for making me a little less crappy :D
Brilliant! Thanks a lot, you've given me a lot of food for thought.
Great guide! Bookmarked.
best guide i've seen so far :) nice and technical!