SWTOR Sith Warrior and Juggernaut Tanking Guide
SWTOR Sith Warrior and Juggernaut Tanking Guide by Phottek
Hi everyone, my name’s Phottek and i’m writing this guide as an introduction to Sith Warrior PVE tanking in ToR. To be clear from the outset, this is mostly aimed as an introductory guide for non-tanks and those with limited experience. This guide may also be an informative read for those looking to play SWTOR who do not have MMORPG experience but are playing soley due to their interest in Star Wars Universe. For the experienced raid tanks interested in the mechanics and numbers behind each of the tank types I would suggest reading this resource posted by Gangstah.
I have selectively sprinkled MMO terms throughout the guide, so if you are new to these types of games and you see a foreign word, go straight to the glossary at the end. Due to the length of the guide I’ve color coded the sections to make navigating your way around easier.
If you are completely new to the MMORPG genre and want to know what tanking is all about go to the green section.
If you know your way around the MMO sphere and want Sith Warrior specifics such as talents, abilities and rotations, go to the purple section. Sith Warrior Companions are also here along with basic tank stats and setup.
If you are familiar with MMOs but want to know the ins and outs of tanking techniques such as the different ways of pulling mobs, NPC positioning, the use of Focus Fire and Crowd Control, or the preparation stage of a run, go to the Red Section.
If you want to know about the tanks role in Flashpoints, Operations, and PVP head over to the yellow section. The appendixes and glossary are also located here.
As those who have gamed with me in the past and read some of my guides will know, I always preface my material with… “This guide, with the exception of those sources noted within, is entirely my work and the sole property of myself. As such it is not to be reproduced or distributed without my prior express consent. Thank you”
Now let’s get to it…..
1.0 What is a Tank?
2.0 How Tanks Work
*****2.1 Balance
*****2.2 Aggro/Threat
*****2.3 Damage Soak/Mitigation/Avoidance
*****2.4 Cooldowns
*****2.5 Off Tanking
*****2.6 Organization and Communication
3.0 Setting Up Your Sith Warrior Tank
*****3.1 Warrior Basics
*****3.2 Advanced Class
*****3.3 Warrior Attributes
*****3.4 Gearing up
*****3.5 Item Enhancements
*****3.6 Consumables
*****3.7 Macros/Scripting
*****3.8 Companions
*****3.9 Crew Skills
4.0 Sith Warrior Specifics
*****4.1 Sith Warrior Abilities
*****4.2 Sith Warrior Tanking Rotations and Builds
*****4.3 Sith Warrior Talents
*****4.4 Tanking Formulas
5.0 Before the pull
*****5.1 Buffs
*****5.2 Target Designation
*****5.3 Communication
6.0 Pulling Mobs
*****6.1 Straight Pulls
*****6.2 Line of Sight Pulling
*****6.3 Crowd Control and Focused Fire
*****6.4 Positioning
*****6.5 Taunting
7.0 How to hone your skills
*****7.1 Leveling as a tank
*****7.2 PVP
*****7.3 Rotation Practice
8.0 Inside the Flashpoint
*****8.1 How ToR Flashpoints are Structured
*****8.2 Coordination and Leadership
*****8.3 Objectives and Ground Rules
*****8.4 Healers
9.0 Operations Tanking
*****9.1 Know your enemy
*****9.2 Teamwork
*****9.3 Loot
10.0 PVP
*****10.1 Tanks in duels/World PVP
*****10.2 The tanks role in Warzones
11.0 Glossary
12.0 Contributors
Well let’s start with a definition from Wikipedia “A tank (also known as a meat shield) is a style of character in gaming, often associated with a character class. A common convention in real-time strategy games, role-playing games, MMORPGs and MUDs, tanks redirect enemy attacks toward themselves in order to protect other characters or units. Since this role often requires them to suffer large amounts of damage, they rely on large amounts of health or armor, or alternatively evasiveness and misdirection.”
TLDR version “A Tank is designed to absorb damage whilst making enemies want to hit them more than they want to hit anyone else” Sounds pretty simple huh? Well, there’s a lot more to it than that. Along your journey to becoming a better tank you will find yourself improving to become a better player all round that..
• Has a high degree of situational awareness
• Has the ability to react quickly to changes and modify their strategy to compensate
• Is able to multitask, monitoring multiple Characters, NPCs, Debuffs and Cooldowns simultaneously
• Has the ability to form and lead groups in combat
• Has knowledge of the terrain and layout of flashpoints in advance
• Is able to position themselves and enemies to reduce the incoming damage from NPC’s
• Knows most or all enemy and player abilities and how to best use them to achieve the groups objective
• Is able to know how to modify their tactics, abilities and setup to suit a particular fight
• Is able to effectively co-ordinate with other tanks
• Is capable of explaining strategy and organizing other players in the group
• Is able to deal with pressure (During progression fights, lots of it  )
)
Now I know some of you are saying “All that sounds like hard work, I just wanna bash Republic skulls” and you’re right, tanking can be hard work, but the rewards can be second to none. As a tank the rewards for your efforts include being able to stand toe to toe with the toughest enemies in the game not just whaling on them from behind or from afar. You will also end up with some of the best gear the game has to offer as tanks make up a smaller proportion of any large group than any other class type. At the end of the day you will know that your contribution to the group has not only made your play time satisfying, but your entire teams as well.
One of the other, not often discussed responsibilities of the guild tank is maintaining the guilds reputation. A geared tank is held up by those outside of the guild as representative of the quality of the guild itself. Well geared and skilled tanks encourage others to apply to the guild and ensure the guild is held in high regard. A guild tank needs to take the higher moral ground and not be party to flaming, trolling and general griefing. A guild tank that dishonors the guild they represent is a liability no matter how skilled they are. Always remember, if you wouldn’t like to see it from someone else in game, don’t do it yourself. Your reputation and that of the guild is forever.
Originally Posted by Ben Parker With great power comes great responsibility |
2.1 Balance
When it comes to setting up your character tanks have to balance many different attributes to be at their most effective. Having twice the health of anyone your level is worthless as a tank if you do not have any avoidance and low mitigation. Similarly having very high health, avoidance and mitigation is useless if you can’t put out enough threat to get the NPCs interested in hitting you. A good tank will have an optimum balance of Threat, Health, Avoidance and Mitigation in order to perform at their best.
2.2 Treat em mean to keep em keen
Threat or “Aggro” generation is a primary concern of any tank and is essential before any other consideration. Threat at its most basic definition is getting the NPCs to want to focus their attacks on you more than anyone else. The tank does this by making use of special tank talents and abilities that enable them to do more threat per point of damage done than any other AC type in the game. For the Sith Warrior this is achieved primarily by the Soresu lightsaber form.
2.3 Give me your best shot
Once you have all the NPCs beating on you a tanks’ second primary attribute is the ability to soak up, mitigate and sometimes altogether avoid incoming damage, during which time the DPS and the tank eliminate the NPCs.
A tanks first way of soaking incoming damage from mobs is a having a high health pool. High health pools allow the tank to take much larger strikes than other ACs and give healers time to respond to incoming damage in a controlled manner. Cooldowns (explained in next paragraph) can also help a tank soak damage by temporarily granting extra health.
Mitigation is the tanks ability to reduce incoming damage below its regular level. This is achieved in several ways
• Armor : Static modifier that reduces the value of incoming melee and energy damage
• Resistance: Static modifier that reduces the value of incoming elemental and internal damage e.g Fire resistance
• Shield: Random percentage based modifier that reduces the value of incoming melee and energy damage
• Cooldowns: On use abilities that reduce damage by a certain amount or percentage, or increase resistance to certain types of damage
• Permanent abilities: Static modifiers that decreases damage taken (e.g. Sith Warrior Form)
Avoidance is the tanks ability to completely avoid incoming damage. This is achieved by dodging, parrying, missing and deflecting incoming damage. Some Cooldowns may also be considered avoidance such as those that grant temporary immunity to damage (None yet confirmed ingame)
For a more advanced breakdown of these mechanics go to the Tanking Formulas section
2.4 I win buttons
Cooldowns are a key element in the tanks toolkit. Cooldowns in tanking circles are abilities that are on relatively long reactivation timers and that greatly increase a tanks primary attributes (Threat/Health/Avoidance/Mitigation). Understanding the mechanics of the flashpoint you are running and the main bosses’ abilities are vital in knowing the best time to make use of your defensive and offensive cooldowns. A well timed cooldown can often make the difference between a clear and a wipe. In progression raiding and with some of the harder bosses in game proper use of cooldowns is an essential to staying alive.
2.5 Not quite leading from the front
Often a second tank will be required to operate in an offtank role. An offtank can be needed for several reasons
• To tank multiple bosses at a time when encounters have more than one
• To pick up trash that are called in to aid the main boss (Confirmed boss ingame calls for reinforcements while moving to cover)
• To pick up stray trash while the Maintank concentrates on the primary raid target
• To swap threat between yourself and the main tank. An example would be that a particular boss or NPC has a stacking DoT that needs to be rotated between tanks to allow the DoT to expire and avoid stacking too high on any particular player. (If this sounds like gibberish don’t worry, by the time you have to do this, you’ll know exactly what it means  )
)
2.6 Leadership
Tanks may and I repeat “MAY” be asked to be responsible for the setup and coordination of group runs and raids, especially in small flashpoints. This has come about as a result of the expectation that the tank knows the layout and tactics for the flashpoint about to be attempted. Getting groups together can be an arduous task and often requires a degree of patience. If you haven’t run with the particular players before always enquire as to their knowledge of the flashpoint before setting out (Often you will discover new strategies and knowledge about a flashpoint this way) Also you will often be responsible for forewarning other players of any important mob abilities and just generally setting the pace throughout the flashpoint. Try not to be an egomaniac about your position of responsibility and treat other players as you yourself would like to be.
That’s enough basic tank theory, now let’s get into the nitty gritty 
Originally Posted by Sun Tzu If you know the enemy and know yourself, you need not fear the result of a hundred battles. If you know yourself but not the enemy, for every victory gained you will also suffer a defeat. If you know neither the enemy nor yourself, you will succumb in every battle. |
3.1 Warrior Basics
Parent Class: Sith Warrior
Mirrored by: Jedi Gaurdian
Primary Weapon: Single Blade Lightsaber, Vibroswords
Off-Hand Items: Shield Generator, Force Focus
Armor Class: Heavy
Primary Attributes: Strength, Endurance
Aesthetic Inspirations: Darth Vader, Episode 3 Anakin Skywalker
Skill Trees: Immortal (Tank), Vengeance (Melee DPS), Rage (Shared Tree)
Resource: Rage. (Max: 10; Combat Rage Recovery: 1 Pt / 6 Seconds in tank form untalented)
An unstoppable force of darkness, the Sith Warrior is entrusted with the task of destroying the Empire’s enemies and enforcing Sith domination across the galaxy. The Warrior channels the destructive emotions of fear, anger, and hatred to purge weakness from body and mind and become a being of pure, brutal efficiency.
A Sith Warrior’s skills with a lightsaber are unrivaled. Driving at their enemies with strong, crushing blows, the Warrior quickly beats his foes into submission or death. Though the lightsaber is the Warrior’s primary method of attack, he also uses his dark command of the Force to paralyze, terrify, and kill. Protected by heavy armor and his powers of intimidation, the Warrior wades into the thick of the fight and unleashes pure hatred and fury to eliminate all who would stand against him.
Sith who train in the stalwart arts of the Juggernaut boast unrivaled stamina in battle. Through diligence and clarity, the Juggernaut shapes the Force to his will to become nearly invulnerable. Damage that would destroy others is shrugged off, and futility fills the Juggernaut’s foes with doubt and despair. Protecting their allies and punishing their adversaries, they charge into the thick of any fray, and take the brunt of the assault and are even able to drain the energy of their enemies to further strengthen their resolve.
Quoted from various areas of SWTOR Holonet
3.2 Advanced Class
The first step to tanking greatness is selecting the tanking AC, this can be done at level 10 at either Valkien Station or Drommund Kass. The advanced class trainer is displayed as a quest giver located next to the class trainer. Once you have selected the Juggernaut AC you should start taking the appropriate abilities in the Immortal tree. I’m sure Yoda would agree that “Heavy armor only, does not a tank make” Talent points to be selected are those within the tanking AC that increase your primary tanking statistics and abilities; Threat, Health, Mitigation and Avoidance with a lesser focus on other helpful tools such as increased movement speed and resistance to impairments such as stuns and slow. I have listed current builds from myself and others in section 4.2.
3.3 Warrior Attributes
When prioritizing your character stats the primaries for tanking will be Endurance and Strength along with any straight modifiers to defensive capabilities such as defense,absorption. Remember that a good tank balances his stats and don’t fall into just stacking endurance 
Currently the main tank stats do the following
Strength
* Melee Damage
* Glance Absorption
* Critical Chance
Endurance
* Health
* Health Regeneration
Defence DFR
* Increases Avoidance (Deflection/Parry)
Absorption
* Increases the amount of damage absorbed when shielding a blow
Armor
* Increases baseline mitigation to physical and energy damage
For more detailed information of tanking stats go to the Tanking Formulas section
3.4 Gearing up
Choosing gear is easy for a tank. Make use of the GTN, crafters and quest rewards to accumulate a set of armor with defensive stats. If you regularly tank Flashpoints you will find yourself neck deep in appropriate tanking gear quickly. You do not however “need” to purchase or craft gear to keep your tank or your companion geared on your way to max level. Quest and Commendation rewards will keep you adequately geared throughout the leveling experience.
Two important notes with regards to gearing are 1; It doesn’t have to look good as long as it gets the job done, always take the ugly gear with the better attributes (with the following proviso) 2; Don’t take medium armor over heavy armor no matter how good the attributes look.
3.5 Item Enhancements
In SWTOR you have the ability to enhance your armor and weapons. Lightsabers have up to four modification slots and armor with three (Underlay, Overlay and Circuitry). Always modify your armor and weapons with the best enhancements possible within your budget if you wish to boost your tanking performance. Enhancements to armor and weapons should boost your defensive and threat capabilities. The mods are sometimes given as quest rewards and can be purchased from vendors for both credits and commendations. Never fit a fancy looking lightsaber crystal over a tank specific one. What good is a cool looking weapon when it’s lying next to your corpse?
3.6 Consumables
Always keep your tank topped up on consumables. At current the confirmed consumables ingame are medipacks, cantina buffs, and adrenals, but you can expect other forms of combat enhancement to be available at launch.
Medkits restore health. If you possess a medkit and take damage that would normally kill you, your medkit will be automatically used and save a possible wipe.
Adrenals are 15 second very strong buffs on a 3 minute cooldown. They do not stack.
Stimulants take one character stat and boost its value for a set time (1hour adrenals confirmed thus far). They do not stack with each other.
Cantina Buffs can either boost presence which improves your companions’ performance or increase out of combat regeneration.
Special Hint: Both Cantina buffs can be stacked with adrenals allowing all 3 types of long duration buff to run concurrently. Cantina buffs are cheap and very useful whilst leveling or grinding.
3.7 Macros/Scripting
Bioware has announced that Macros and Scripting is being developed. Macros are a set of commands that are a set of input commands that you map to an action button to achieve a set of output outcomes. These are written in a particular script (language) that is unique to the game. In layman’s terms, type a series of actions that you wish to be performed in sequence or together and bind them to a button on the GUI. When you press that button the macro runs, performing the actions where possible. An example would be.
/Target Republic Scum [exists]
/use Thermal Grenade
/laugh
The script language here may be different from that ingame but in this case your character upon pressing the button mapped to this macro would target Republic Scum if there were any in range, throw a Thermal Grenade, and then laugh.
These macros can be invaluable to streamline your tanking experience. Common uses are to combine targeting and taunting, to combine defensive CDs, and to combine targeting and threat rotations.
3.8 Companions
Depending on the content you are completing you may have a companion with you. Companions can be set to operate in several different roles such as DPS, healing, and tanking. As a tank you will have to decide on which companion best suits your circumstances at the time. Having a DPS companion at you side will decrease the time taken to burn mobs at the expense of and healing. Whilst having a healer will make you more robust when facing harder NPCs, it will take more time to defeat them than if you had a DPS companion at your side. A companion in tank setup may be useful for swapping threat and bouncing a target between the two of you.
The Sith Warrior Companions and their roles are as follows. I have posted them in the order in which you unlock them. While I list the planets you can acquire them on, I don’t want to give away any of the story so Ive placed spoilers for all entries.
Korriban
Role : Ranged DPS
Armor : Medium (IA Type)
Planet Acquired : Korriban
Crew Skill Bonuses: +5 Underwould Trading Efficiency, +5 Treasure Hunting Critical
Special : Romance possible with males. Like decisions that talk yourself up and Lightside.
Drommund Kass
Role : Heals/ Ranged DPS
Armor : Droid
Planet Acquired : Drommund Kass
Crew Skill Bonuses: None
Special : Your ship driod, comes unequipped but can be fitted out to enter combat. Identical abilities to Quinn.
Balmorra
Role : Heals/Ranged DPS
Armor : Medium (IA Type)
Planet Acquired : Balmorra
Crew Skill Bonuses: +10 Armstech Efficiency, +10 Diplomacy Efficiency
Special : Has both DPS and Healing Stance. Likes decisions that benefit empire or follow orders. Romance possible with females
Post Alderaan
Light Jaesa Willsaam
Role : Force User DPS
Armor : Light (SI Type)
Planet Acquired : Post Alderaan
Crew Skill Bonuses: +5 Archaeology Efficiency, +5 Synthweaving Critical
Special : How you aquire her determines her alignment to Dark or Lightside. Romance possible with males.
Taris
Role : Ranged Tank
Armor : Heavy (BH Type)
Planet Acquired : Taris
Crew Skill Bonuses: +10 Cybertech Efficiency, +2 Research Critical
Special :Romance possible with females, Dark Side Alligned
Hoth
Role : Melee Tank
Armor : Heavy (SW Type)
Planet Acquired : Hoth
Crew Skill Bonuses: +10 Scavenging Efficiency, +2 Bioanalysis Critical
Special : Only non humanoid companion for SW (Talz)
Special Hint: The gear that the companions start with is at the level that Bioware “expects” you to acquire them. Malavai Quinn for example comes with gear that is at approximately level 20 greens. Should you rush through the class quest on Balmorra and acquire him at 15 or 16 he is extremely powerful as even though he is equal to your level his gear is not. At 15 to 16 his level 20 gear is like having full kitted purples.
3.9 Crew Skills
Every player has a choice of up to 3 crew skills. They are separated into 3 catagories, Crafting, Gathering, and Mission skills. You can have a maximum of 1 Crafting skill. For Force using tanks there are 3 primary crafting skills available. Each of these has an associated gathering skill and at least 1 complimentary mission skill. Your crafting trainer will tell you which gathering and mission skills are needed when you pick up the craft.
Each crafting skill is still being altered throughout beta so I will only list the general outline of them. I expect all 3 force crafting skills to be viable for tanks at launch and all (some easier than others) should be able to make a good income.
*This skill specializes in creating modifications for items, including lightsabers – something Sith will covet during their journies. The item categories the Artifice skill can craft are: Circuitry, Emitter Matrix, Focus Crystal, Focus Lens, Gadget, Harness, Overlay, Underlay and Resonance Crystal.
Artifice not only makes upgrades for yourself but other force users as well. A good example would be purple lightsaber color crystals which are very rare ingame but may be crafted if you are lucky enough to get the recipe. The mods to go into armor and weapons will always be in high demand.
*This skill specializes in creating armor, allowing a player to craft light, medium and heavy variations for force users.
Synthweaving is good at making armor both for yourself and your force using companions while you level and in preparation for operations once you hit maximum level.
*Allows the creation of performance-enhancing serums and various implants. You can consider this the ‘potion maker’ of The Old Republic.
Biochem is good at max level by allowing the use of “infinite use” adrenals and medikits. Meaning that every time you wipe you don’t need to waste money on replacements.
4.1 Sith Warrior Tanking Abilities
Here I will outline the abilities essential to a Sith Warrior tanks survival and threat generation. As there a quite a few I’ll separate them out into Offensive, Rage Builders, and Defensive Abilities to make it a little less overwhelming. Some abilities fall into 2 or more categories such as Force Choke which can be used as a Single Target Ability, Rage Building Abilities, and Defensive Abilites.
Offensive
Force Scream
Instant – 4 Rage
Cooldown: 12 seconds
Range: 10m
Blasts the target with a Force-enhanced scream, dealing X kinetic damage. In addition, standard and weak enemies are stunned and deafened for 4 seconds.
Combined with talents it grants a defensive shield and should be used every time it comes of CD. One of the warriors highest damage abilities.
Retaliation
Instant – 3 Rage
Cooldown: 6 seconds
Retaliates against the target for X weapon damage. Retaliation can only be used after a successful melee or ranged defense and it does not respect the global cooldown. Attacks with both weapons if dual wielding. Cannot miss, be parried or dodged.
Should be used every time it comes off CD after level 22. Combined with talent in tier 3 it grants 2% to 6% defense for the duration of the CD.
Smash
Instant – 3 Rage
Cooldown: 15 seconds
Smashes up to 5 enemies within 5 meters, dealing X kinetic damage. Also stuns weak and standard enemies for 1 second.
Combined with tier one talent is a potent defensive ability, lowering multiple NPCs accuracy. Should be used every time it comes off cooldown if untalented.
Crushing Blow
Instant – 4 Rage
Cooldown: 15 seconds
Crushes the target with a mighty blow, dealing X weapon damage and applying 3 stacks of armor reduction for 1 seconds. Targets affected by 5 stacks of your armor reduction suffer Y weapon damage instead.
31pt Immortal Talent. Gold
Backhand
Instant – 3 Rage
Cooldown: 1 minute
Bashes the target for X kinetic damage, stunning it for 4 seconds. This ability generates a high amount of threat.
Your go to threat ability, does good damage and great threat.
Ravage
Channeled: 3 seconds – No cost
Cooldown: 30 seconds
Performs a series of lightsaber attacks that deals X weapon damage over 3 seconds. Standard and weak enemies are additionally stunned for the duration of the effect. Strikes with both weapons if dual wielding.
No rage cost and good damage over 3 seconds. Due to channeled nature can be shortened by taking blows and is best used against single targets.
Vicious Slash
Instant – 3 Rage
Slashes the target for X damage. Attacks with both weapons if dual wielding.
This is your single target rage dump ability. Has no CD and does moderate damage.
Force Push
Instant – No Cost
Cooldown: 1 minute
Range: 1m
Deals X kinetic damage, knocks the target back several meters, and knocks the target down for 2 seconds.
Position NPCs against a piece of environment before using to ensure they remain in melee range whilst prone.
Savage Kick
Instant – No Cost
Cooldown: 15 seconds
Kicks the target, dealing X kinetic damage to weak and standard targets, and Y kinetic damage to strong targets. Only usable on slowed or immobilized targets.
Pommel Strike
Instant – No Cost
Cooldown: 45 seconds
Bashes the target, dealing X kinetic damage to weak and standard targets, and Y kinetic damage to strong targets. Only usable on incapacitated targets.
Does great damage to standards and weak NPCs.
Sweeping Slash
Instant
Slashes up to 5 enemies in front of you for X weapon damage each. Attacks with both lightsabers if dual wielding.
Second AoE ability. Has low damage but no CD and can be used as an AoE rage dump.
Rage Builders
Force Charge
Instant
Cooldown: 15 seconds
Range: 10-30m
Jumps to a distant target, dealing X damage with the main-hand weapon, immoblizing the target for 1 second and interrupting the target’s current action. Builds 3 rage. Cannot be used against targets in cover.
Used to open when making a pull. Can be used during a pull as a rage builder if you strafe out to 10m.
Sundering Assualt
Instant
Cooldown: 4.5 seconds
Strikes the target for X damage, and reduces the target’s armor by 4% for 1 second. Stacks up to 5 times. Builds 2 rage.
Your number 1 low CD rage builder. Can be talented to grant 2 rage even in tank form.
Force Choke
Channeled: 3 seconds
Cooldown: 1 minute
Range: 1m
Chokes the target, crushing and stunning it while Force Choke is channeled. Deals X kinetic damage every second. Builds 1 rage per second.
Can be talented to remove channel, effectively doubling its DPS, as you can continue to use other abilities during that 3 seconds. Useable as a second interrupt on some NPCs.
Assault
Instant
Inflicts X damage with a series of quick melee attacks. Builds 2 Rage. Attacks with both weapons if dual wielding.
Rage builder with no CD. Only generates 1 rage whilst in tanking lightsaber form.
Saber Throw
Instant
Cooldown: 30 seconds
Range: 30m
Throws the main-hand lightsaber at a distant target, inflicting X damage and building 3 rage.
Enrage
Instant
Cooldown: 1 minute
Immediately generates 6 rage.
Defensive and Utility Abilities
Taunt
Instant
Cooldown: 15 seconds
Range: 30m
Taunts the target, forcing it to attack the Warrior for 6 seconds. Player targets deal 30% less damage when attacking anyone other than you. Lasts 6 seconds.
Prior to obtaining Threatening Scream at level 30 if multiple party members have threat use based on priority. If the NPCs are all of equal difficulty always taunt off the healer first, then highest DPS, the second highest DPS etc. Great for PVP.
Threatening Scream
Instant
Cooldown: 45 seconds
Taunts all enemies within 15 meters, forcing them to attack the Warrior for 6 seconds. Player targets deal 30% less damage when attacking anyone other than you. Lasts 6 seconds. Another great ability for PVP.
Guard
Instant
Range: 30m
Guards the target while it remains within 15 meters. While active, the target takes 5% less damage and generates 25% less threat. In addition, 50% of all incoming damage from enemy players is transferred back to you. Requires Soresu Form.
Make sure this is applied to the healer or highest threat party member before commencing a pull. If using a companion apply it to them. A Great PVP ability.
Invincible
Instant
Cooldown: 3 minutes
Reduces all damage taken by 40% for 10 seconds.
Saber Ward
Instant
Cooldown: 3 minutes
Raises a lightsaber ward, increasing melee and ranged defenses by 50% and reducing the damage taken from Force and tech attacks by 25%. Lasts 12 seconds.
Call on the Force
Instant
Cooldown: 20 minutes
Calls upon the Force to aid you and your companion, immediately finishing the cooldown on Saber Ward and restoring 2% of your maximum health every 3 seconds. Requires an active companion. Lasts 1 minute.
Endure Pain
Instant
Cooldown: 3 minutes
Temporarily increases maximum health by 30% for 10 seconds. Health is lost at effects end.
Good for boosting health when big boss abilities are about to land.
Disruption
Instant – 1 Rage
Cooldown: 8 seconds
Smashes into the target, disrupting its current action and preventing that ability from being used for the next 4 seconds.
Low rage cost interrupt on all casting NPCs below boss level (And even some at boss level)
Unleash
Instant
Cooldown: 2 minutes
Unleashes you from all incapacitating and movement-impairing effects.
Standard CC breaker with no rage cost
4.2 Tanking Rotations
A rotation is the sequence of abilities a tank uses to build threat and increase defense.
The Sith Warrior uses rage to make special attacks and will start a pull with little to none of it initially. The Warrior will then concentrate on building rage using abilities such as Assault and the lightsaber form Soresu, then expending that rage using a priority rotation. A priority rotation is where you rank your abilities from most to least effective and use the highest ranked ability you have resources for every time the GCD resets.
Depending on the number and difficulty of the NPCs being fought several varieties of a priority rotation may be used. When fighting single bosses or other NPCs a tank will use a set of abilities designed to do maximum damage to one mob. When pulling large groups the tank will concentrate on using AoE abilities to ensure they have threat on all the NPCs. Both during single target and AoE rotations a tank must decide on the proper threading of defensive cooldowns within their rotation. These abilities are generally on high CDs and must not be used rashly. A Sith Warrior blowing his 3 minute cooldown on “Invincible” 10 seconds prior to a bosses massive explosion ability will be something they quickly come to regret it.
Here is a breakdown for the Sith Warrior builds and matching single target rotation at various stages of the leveling process. I start at 14 as this is when you acquire your tanking lightsaber form. Prior to this you are a DPS in heavy armor despite having selected the Juggernaut AC. For multiple NPC target rotations always use Smash immediately after force leap and Sweeping Slash throughout the early stages of the pull while multiple targets are still active. Force choke is listed in rage building priority and is situational.
You should always use Force Scream, Smash and Retaliation whenever they are off cooldown (or close to it) above all other abilities. These three abilities are tied to defensive talents in the immortal tree and maximum uptime is essential. For the most common talent build progression Force Scream grants a damage shield at level 31, Smash applies an accuracy debuff from level 11, and Retaliation grants a 6% defense increase from level 22
Talent Build 1 is what I run with. It concentrates on single target and AoE threat through Accuracy and with extra internal and elemental damage reduction with Dark Blood. More of a focused MT single target build.
Talent Build 2 is as suggested by Gankstah that contains a decrease on the CD of AoE taunt in Thrown Gauntlet and a rage builder whenever the subject of CC with Unyielding. More of an increased utility build and would work better than mine in flashpoints and with multi-target pulls.
Talent Build 3 has come from Lyon and is specifically designed with leveling through quests in mind. The build concentrates on the ability Smash, lowering its cooldown and boosting its damage to make carving your way through packs of low level quest mobs a breeze. At the early stages you sacrifice some defensive capabilities but gain greatly in DPS (and therefore threat).
If you have a build you would like to recommend for PVE tanking, please PM me with a link and an explanation of its benefits and why you took the path you did. The more diverse opinions we can show in this thread the better. Once endgame has sorted itself out at launch I will label one build up as the “Cookie Cutter Spec”
Level 14-24 Rotation
Talent Build 1
Talent Build 2
Talent Build 3
Lead off with Force Leap and immediately Force Scream and Smash (Order dependent on single or AoE pull) followed by Sundering Assault. After that, use a priority rotation for both offensive abilities and rage builders.
Offensive Priority: Force Scream, Smash, Retaliation, Ravage, Vicious Slash
Rage Build Priority: Sundering Assault, Assault
From 14 to 18 your single target threat is pretty good compared to the DPS classes as they have yet to sink many points into their trees. Your AoE is weak compared to classes such as BH, where Death from Above will rip threat off a mob even after 2 applications of smash. Use target priorities and ensure the hardest hitting NPC is aggroed to you. Most pulls contain 1 or 2 hard hitters or elites and 1 to 3 weaker NPCs. Get your sunder up to 5 stacks on the main target as soon as possible and once at full it is extremely difficult for any DPS to take threat. From around 19 onwards the DPS roles start getting more powerful and correct target selection becomes important as you will rarely have all the NPCs sticking to you.
Level 25-30 Rotation
Talent Build 1
Talent Build 2
Talent Build 3
Enrage first then lead off with Force Leap and immediately Force Scream and Smash (Order dependent on single or AoE pull) followed by Sundering Assault. After that, use a priority rotation for both offensive abilities and rage builders.
Offensive Priority: Force Scream, Smash, Retaliation, Pommel Strike, Ravage, Force Push, Vicious Slash
Rage Build Priority: Sundering Assault, Force Choke, Assault
Level 20 to 30 is probably your weakest stage as a tank. The DPS have been accumulating large amounts of damage boosting talents and you are yet to receive backhand for single target threat or sweeping slash as a second AoE. Your rage depletion is decreasing through talents and your survivability is high. The real trick will be trying to get as many NPCs to stick to you as possible. Use target selection to prioritize the NPCs you want to ensure are not hitting the party. Taunting becomes easier when you are given your AoE taunt at level 30.
Level 30-39 Rotation
Talent Build 1
Talent Build 2
Talent Build 3
Enrage first then lead off with Force Leap and immediately Force Scream and Smash (Order dependent on single or AoE pull) followed by Backhand and Sundering Assault. After that, use a priority rotation for both offensive abilities and rage builders.
Offensive Priority: Force Scream, Smash, Retaliation, Backhand, Savage Kick, Pommel Strike, Ravage, Force Push, Sweeping Slash, Vicious Slash
Rage Build Priority: Sundering Assault, Force Choke, Saber Throw, Assault
At this stage you are almost fully developed, your rage depletion is very low and your survivability and threat generation much improved. You will find yourself using rage dumps (Vicious Slash and Sweeping Slash) much more often. Savage kick is acquired at level 34 and does high threat to targets under movement impairing effects or stuns.
Level 40-50 Rotation
Talent Build 1
Talent Build 2
Talent Build 3
Enrage first then lead off with Force Leap and immediately Force Scream and Smash (Order dependent on single or AoE pull) followed by Crushing Blow and Sundering Assault. After that, use a priority rotation for both offensive abilities and rage builders.
Offensive Priority: Force Scream, Smash, Retaliation, Crushing Blow, Backhand, Savage Kick, Pommel Strike, Vicious Throw, Ravage, Force Push, Sweeping Slash, Vicious Slash
Rage Build Priority: Sundering Assault, Force Choke, Saber Throw, Assault
You are now tanking to your full capacity. Crushing blow is your 31 point talent and becomes your top priority ability when off cooldown. Vicious throw is your execute ability granted at level 46 and does good damage to targets below 20% health. From level 41 onwards you start sinking points into the vengeance and rage trees to further improve threat generation through such means as increased damage, a cooldown reduction on smash, and increased accuracy.
4.3 Sith Warrior Talents
The primary Sith Warrior talent tree is Immortal and you will want to go the full 31 points up it. Lower level talents in the other trees tend to rely on the associated trees lightsaber form. What use is a great damage talent for a tank if you need to be in a DPS form to use it? I will outline all the talents in the Immortal tree and my opinion of them, as well as those in the bottom 2 tiers of Vengeance and Rage you may wish to take to fill up your last 10 spots.
Please Note: My opinions of these talents is based on endgame single target tanking as a priority with the ability to tank flashpoints as being viable rather than primary. I am not focused on trash tanking or CC protection because to be quite honest there are far better AoE tanks out there. The BH PT is an AoE monster and SIN’s wither does more threat than smash. My focus is on improving the SW’s strengths as I see them, single target threat and mitigation/avoidance. For diversity of opinion I have included the strengths of talents I would personally not take but are seen in many builds. You should try the various talents out and make up your own mind, it is certainly not for me to say which talents are best for you.
Tier 1
Battle Cry
3 Points
Passive
Force Charge and Obliterate have a 33/66/100% chance to make the next Force Scream activated cost no rage.
Good when leveling but not an endgame tanking talent imo. Force charge gets used only once on most boss fights. In a 6 minute fight you are spending 3 talent points for 0.5 rage points extra per minute. See Enraged Sunder for more details on rage generation comparison. At the moment I add one point as a filler to get to tier 2, but if you like a free scream every charge then take all 3.
Enraged Sunder
2 Points
Passive
Sundering Assault has a 50/100% chance to build 1 additional rage.
Good talent for generating more rage from your primary rage builder. Over every 13.5 seconds in combat using Sundering Assualt every CD this talent will grant 3 extra rage. That’s equal to the rage benefit from Battle cry for 3 points spent and over 15 seconds. Every fight that lasts longer than 18 seconds makes this talent all the more superior to Battle Cry.
Quake
2 Points
Passive
Smash has a 50/100% chance to lower the accuracy of affected targets by 5% for 18 seconds.
A must have for any tank. Lowers damage taken significantly. The more targets you engage the better it gets. NOTE: Due to the Smash mechanics the debuff will not apply to more than 5 NPCs.
Tier 2
Guard Stance
3 Points
Passive
Increases your melee and ranged defense by 2/4/6% while in Soresu Form.
Another must have talent that grants non DR avoidance whenever you are in tanking form.
Lash Out
2 Points
Passive
Reduces the rage cost of Retaliation by 1/2 while Soresu Form is active
Retaliation is a priority ability to be used upon every CD as such this talent is a must for any tank and enables the use of retaliation more consistently.
Intimidation
Passive
2 Points
Reduces the rage cost of Chilling Scream and Backhand by 1.
Chilling Scream is only of use for the Jug to apply a Savage kick and both it and Backhand are on long Cooldowns. This talent is more of a PVP orientated one imo but on the other hand, backhand is a great threat ability and some people will want to reduce its cost.
Tier 3
Blade Barricade
3 Points
Passive
Retaliation now increases melee and ranged defenses by 2/4/6% for 1 second.
This talent is the primary reason that you spam Retaliation upon CD. Another 6% of non DR avoidance. Take all 3 points.
Invincible
1 Point
Instant
Cooldown: 3 minutes
Reduces all damage taken by 40% for 1 second.
Your first ability available through the Immortal tree. Great damage reduction and an easy point spent.
Heavy Handed
3 Points
Passive
Increases the damage dealt by Backhand, Smash and Sweeping Slash by 5%.
A nice damage and therefore threat increase to 2 primary and 1 situational ability. Take one point to get to Tier 4, one point when getting to Tier 5 and 6 to fill at level 34.
Unleashed
2 Points
Passive
Reduces the cooldown of Unleash by 15/30 seconds.
If being CCed worries you (And a lot of trash loves to CC you in ToR) look at taking this talent. When combined with Payback in the Rage tree Unleashed grants a potent self heal.
Tier 4
Revenge
3 Points
Passive
While in Soresu Form, parrying, deflecting, shielding or resisting an attack has a 33/66/100% chance to grant Revenge, reducing the rage cost of your next Force Scream or Smash by 1. Lasts 10 seconds and stacks up to 3 times.
Rage reduction on 2 priority abilities that procs from avoidance. This talent should be filled and will help keep your rage bar healthy at all times.
Shield Specialization
2 Points
Passive
Increases shield chance by 2/4%.
Adds to your passive ability to shield incoming blows. When you take this your shield chance will increase from 20 to 24%. Not on diminishing returns.
Thrown Gauntlet
2 Points
Passive
Reduces the cooldown of Threatening Scream and Force Push by 7.5/15 seconds.
Both abilities are already on long cooldowns and not part of your primary rotation. However lots of people like this talent so check it out for yourself if you want to shorten the CD on your AoE taunt.
Tier 5
Backhand
1 Point
Instant
Cooldown: 1 minute
Bashes the target for X kinetic damage, stunning it for 4 seconds. This ability generates a high amount of threat.
Your go to threat ability. Stuns almost anything and does really good damage even when untalented. A must have.
Sonic Barrier
2 Points
Passive
Force Scream has a 50/100% chance to grant Sonic Barrier, which absorbs a moderate amount of damage. Lasts 10 seconds.
Turns one of your primary threat builders into a damage shield. Now you have even more reason to spam Force Scream on CD. Take both points.
Force Grip
1 Point
Passive
Force Choke no longer needs to be channeled, applying its full effect over 3 seconds.
Effectively doubles the damage done over the 3 seconds of force choke by enabling the use of other abilities. Allows the use of abilities such as Savage Kick while the target is being choked. Definitely worth the single point if you have one spare.
Crash
1 Point
Passive
Force Charge now stuns the target for 2 seconds.
A PVP Talent imo, anything you would want to avoid 2 seconds of damage from in PVE is immune to the stun anyway.
Tier 6
Sweeping Fury
3 Points
Passive
Increases the frequency at which Soresu Form can generate rage by 1 second. In addition,
Sweeping Slash and Vicious Slash have a 33/66/100% chance to reduce the active cooldown of Enrage by 1 second.
Increased rage = increased damage and threat. The proc from Sweeping Slash and Vicious Slash also reduces the long CD on Enrage which also grants 6 rage. Take all 3 points.
Dark Blood
2 Points
Passive
Increases the duration of Endure Pain by 2.5 seconds. Increases elemental and internal damage reduction by 2%.
Increases the uptime of one of your defensive CDs and also helps reduce elemental damage, something which all tanks are weak at mitigating. Take both points.
Tier 7
Crushing Blow
1 Point
Instant
Cooldown: 15 seconds
Crushes the target with a mighty blow, dealing X (high) weapon damage and applying 3 stacks of armor reduction for 1 seconds. Targets affected by 5 stacks of your armor reduction suffer Y (very high)weapon damage instead.
Our 31 point talent and a very good PVE one at that. Gets your sunder up very quickly and does a good amount of threat. I shouldn’t even have to say “Take It”
Tier 1
Decimate
3 Points
Passive
Increases the damage dealt by Smash by 10/20/30% and lowers its cooldown by 3 second.
Good for adding AoE damage and threat. The cumulative effect of 30% damage increase and 3 seconds less CD is 61.5% more damage with Smash over time. A well spent 3 points.
Improved Sundering Assault
2 Points
Passive
Sundering Assault has a 50/100% chance to apply one additional stack of sunder armor.
Getting to maximum stacks of Sunder quicker means more threat over time and easier recovery should you miss with a refresh and have to rebuild. Good 2 point filler to get to Tier 2.
Single Saber Mastery
3 Points
Passive
Increases melee damage by 2/4/6% while in Shien Form and Shii-cho Form.
Good damage increase… pity it’s to non-tanking lightsaber form. Don’t touch this talent.
Tier 2
Dreadnaught
2 Points
Passive
Increases total Strength by 3/6%.
A good threat and absorption increase. Worth 2 points if you have them spare.
Accuracy
3 Points
Passive
Increases the accuracy of melee and Force attacks by 1%
A flat out threat increase. We only have 90% accuracy with many attacks and this boosts it.
Accuarcy is not something tanks look for as a primary stat on armor or weapons. Same as Dreadnaught, take it if you have the points and making sure every hit lands is your thing.
Unyielding
2 Points
Passive
Generates 2/4 rage when stunned, put to sleep or knocked down.
Taken by many tanks due to the large amount of this type of CC in the PVE environment. Not essential, take if your personal preference.
Tier 1
Ravager
2 Points
Passive
Reduces the cooldown of Ravage by 1.5/3 seconds and Force Choke by 5/10 seconds.
Ravage is a medium damage attack but its need to be channeled is its downfall, however the CD reduction is welcome and will get use. Force Choke does get used especially in conjunction with Savage Kick. Overall not a bad talent, take it if those abilities are important to you.
Malice
3 Points
Passive
Increases the critical strike chance of your Force attacks by 2/4/6%.
Increase to burst threat and damage. Works out to around 3% more damage and 5% more threat over time. Worth taking if you have the points.
Stagger
2 Points
Passive
Increases the duration of Force Charge’s Immobilize effect by 0.5/1 seconds.
Not worth it for the same reasons as Crash in the Immortal tree.
Tier 2
Payback
2 Points
Passive
Unleash has a 50/100% chance to heal you for 10% of your maximum health.
Definitely worth picking up if you have taken Unleashed in the immortal tree. One for those who are finding themselves pinned by CC often.
Brutality
2 Points
Passive
Increases the critical strike chance of Vicious Slash by 7.5/15%.
Gives a healthy damage boost to your single target rage dump which already does decent damage. Take for the same reasons you would Malice in Tier 1.
4.4 Tanking Formulas
All credit must go to Gankstah for compiling the folowing information, check out his Tanking Primer for more info.
Character Stats
- Armor Damage Reduction = AR/AR+(200*Level+800)
- Deflection/Parry = (5% Base Chance) + 30*(1-(1-(0.01/0.3))^((DFR/Level)/0.55))
- Shield Absorption = (GeneratorBonus) + 50*(1-(1-(0.01/0.5))^((AbsorbRating/Lvl)/0.18))
- Shield Chance = (GeneratorBonus) + 50*(1-(1-(0.01/0.5))^((GlanceRating/Lvl)/0.32))
- Accuracy = (90% Base Chance) + 30*(1-(1-(0.01/0.3))^((AccuracyRating/Lvl)/0.55))
- Ability Tooltip Damage = x*MainHand + x*OffHand*0.3 + y*Bonus + z
- x = weapon damage modifier for min and max values and all ranks of the ability
- y = force/tech/melee/ranged damage bonus modifier for min and max values and all ranks of the ability
- z = base damage, which can vary for the min and max values and varies for each rank of the ability
- Crit% from Stats: 5+30*(1-(1-(0.01/0.3))^((Str/Lvl)/2.5))
- All Primary stats yield +0.2 damage per point
– – Credit for the above calculations goes to LagunaD over at SithWarrior.
– Thanks to JDee and Freehugs for helping to maintain accuracy.
Resistance to Critical Hits
- Accuracy – (A)voidance = Hit%
- Hit% * (S)hield Chance = Window To Crit
- Window To Crit * (C)rit Chance = (O)dds of getting crit
Or
[(100-A)*S]*C=O
So to put that into context we will use the following values:
- (A)voidance: 50%
- (S)hield Chance: 50%
- (C)rit Chance: 30%
Plug it in and come up with:
[(1-0.5)*0.5]*.3=0.075
Or 7.5% chance to get crit i.e. 92.5% Crit Immunity.
Baseline DR/Shield/Avoidance
The provided calculations all assume Level 50 Premium armor values. The BAV (Base Armor Value) is representative of a full unmodded suit of armor.
Modified Armor Value (MAV)
(BAV Heavy 3601)*(Stance 1.6) or 3601*1.6 = 5761.6
Base Armor DR (BADR) = 34.78%
Modified Base Armor DR
TOR handles passive skill bonuses additively and NOT multiplicatively so let’s plug in current DR passive skills:
(BADR 34.78%) + (Stance 6%) = 40.78%
Resistance: Elemental/Internal DR
(Stance 6%) + (Dark Blood 4%) = 10%
Situational Modifiers
These are situational modifiers from abilities that directly affect DR or damage taken. The effects are longer or equal to the CD so they can be applied constantly but are situational as not ALL targets will be under their influence at ALL times.
For the Warrior this is Sonic Barrior and at present its value is unknown (TBA)
Shield Chance
(Premium Shield Base 20%) + (Stance 15%) + (Shield Specialization 4%) = 39%
Shield Absorption
For purposes of simplicity we are going to assume a AbsorptionRating of 0.
(Premium Shield Base 20%) = 20%
Avoidance: Ranged Deflection & Melee Parry
For simplicities sake we’re going to assume a base DFR of 100.
SW: (Base 5%) + (Guard Stance 6%) + (Blade Barricade 6%) =17% or 22% w/Smash
Mean Mitigation
Mean Mitigation is the average mitigation you have after factoring DR, Avoidance and Shield Chance/Absorption. This gives you the average (or mean) mitigation you have. To find your Mean Mitigation use the following process:
A=Avoidance
B=Shield Chance
C=Shield Absorption
D=MBADR
{[((100-A)*B)*(1-C)]*(1-D)} + {[(100-A)-((100-A)*B)]*(1-D)} = T
100-T= Mean Mitigation
Example:
A= 22 <B= 0.39
C= 0.2
D= 0.4078
{[((100-22)*0.39)*(1-0.2)]*(1-0.4078)} + {[(100-22)-((100-22)*0.39)]*(1-0.4078)} = 39.86
100-45.32= 54.68% Mean Mitigation Baseline
To give you an idea of comparison between the classes. the SI is 53.17% and the BH is 55.99%. As my friend Gangstah has said “We aren’t factoring in in-depth processing of Resistance or Criticals. This is only a generalization OR average. Specific parsings will yield + or – results. So don’t come back here saying, “DERP! I parsed at 84% against boss such-and-such! YARP! YARP!” before thoroughly researching the definition of average/mean.”
So you’ve specced into the tanking tree, gotten some gear, rounded up some friends. Now it’s time to zone into the flashpoint and start takin names. Before the first pull and for the pulls following there are a few things that need to be taken care of.
5.1 Buffs
First up you need to apply your tanking buffs such as guard and aura and take any consumables you have decided to use to increase your capability. Make sure that every class capable of applying a buff both to you and the rest of the party has done so and keep them up throughout the run.
5.2 Target Designation
If required designate the focus fire order for the mobs to be killed if needed. At times the use of focused dps to burn down specific targets can drastically lower incoming damage (As discussed in section 6.3). Right click a selected NPCs portrait and select the marking you want to apply. You may need to inform the group via text or teamspeak/ventrillo as to which mobs are priority burns. If crowd control is desired throughout the run inform the group of the targets before the pull and designate those responsible for maintaining the CC. I like to tell all the party members at the start of a run what the kill order is and which symbol means CC.
If macros make it into game I usually have this prepared
/p Hi everyone, lets have a good run Bullseye is first target, Flame second, Saber Third. Lightning is for CC. I’ll stop pulling if I see your resource get low heals. Lets buff up and start clearing when your all ready.
NOTE: Don’t mark more than you have to, it just slows runs down unnecessarily. If you can get away with 1 mark per pull then do it. You can also keybind marking to speed things up. I use keybind mark “Lightning” for CC then keybind mark “Bulls-eye” for FF, make the pull then mark another Bulls-eye as the first is about to die. At the end I change the Lighning target to Bulls-eye right as the second last mob is about to die.
5.3 Communication
Finally, if required issue any warnings on possible mob abilities that could wipe the group prior to pulling. Just because you know that the red glowing stuff at the bosses feet is fire, doesn’t mean the DPS do  Trash droids that self-destruct when defeated are a prime example of an ability that the others in the group should be made aware of.
Originally Posted by Napoleon Bonaparte The secret of war lies in the communications |
It’s time to pull some mobs. A pull is the action of entering combat with previously neutral NPCs, accumulating threat on the NPC’s and positioning both them and yourself to best lower incoming damage. Pulling a single enemy is easy, just hit the NPC really hard and keep him in front of you while you and the DPS burn him down. When pulling groups of NPC’s with various abilities, there are several ways in which to pull them depending on the circumstances.
6.1 Straight Pulls
Straight pulls are used for melee and mixed ranged/melee packs where it is safe to engage the NPCs without pulling extras. A diagram of the standard pulls for a melee tank is as shown below. For ranged tanks ignore the tank movement arrows and stand in place at maximum range and commence attacking.
The chronology of the all melee straight pull is simple.
1. Stand outside max range and check the composition of the group of NPC’s. Make sure that they are not likely to call for help or flee in the direction of other packs of mobs, and that there are no patrolling packs of NPC’s that will add to the pull if you charge into the first pack.
2. If you are a melee tank, jump in or throw a ranged ability at the lead NPC. As a ranged tank simple begin using ranged abilities on the lead NPC or if the NPCs are closely grouped throw a ranged AoE ability.
3. Follow immediately with an AoE attack to ensure that the healer does not draw threat from the non-lead NPCs whilst healing you.
4. Ensure that you are positioned with all the NPC’s in front of you to increase your avoidance and lower incoming damage.
5. Continue to building threat on all targets, if you notice any of your group gain threat immediately taunt the NPC onto yourself and use your highest threat abilities to overtake your group members’ aggro before your taunt expires in six seconds.
The chronology of the mixed ranged/melee is similar with a little more complexity in the tank positioning required for melee tanks.
1. Stand outside max range and check the composition of the group of NPC’s. Make sure that they are not likely to call for help or flee in the direction of other packs of mobs, and that there are no patrolling packs of NPC’s that will add to the pull if you charge into the first pack.
2. If you are a melee tank, jump in or throw a ranged ability at the lead NPC. As a ranged tank simple begin using ranged abilities on the lead NPC or if the NPCs are closely grouped throw a ranged AoE ability.
3. As a melee tank if you have not used a range closing ability off CD, run towards the packs of NPCs and position yourself within melee range of the ranged NPCs. Position yourself behind the ranged mobs and turn 180 degrees in order to have all the melee and ranged mobs facing you.
4. Follow immediately with an AoE attack to ensure that the healer does not draw threat from the non-lead NPCs whilst healing you.
5. Continue to building threat on all targets, if you notice any of your group pull threat immediately taunt the NPC onto yourself and use your highest threat abilities to overtake your group members before your taunt expires in six seconds.
6.2 Line of Sight Pulling
LoS pulls are a way of pulling which uses a piece of the environment to break the NPCs line of sight to you and force them to move toward you to engage. Line of sight pulls are used to engage packs of NPC’s where there is a danger of aggroing another group of enemies should you use a standard pull. The first way in which this occurs is if you are pulling NPCs that flee when at low health and may run into other packs of NPCs in the vicinity. Another common way of pulling a second group of mobs accidently is if you have a second pack of NPCs that are patrolling whose aggro radius will overlap the position you wish to engage the first.
LoS pulls are performed in the same way whether you are a ranged or melee tank. They may be started either by yourself or by one of your party members using a ranged ability. If a party member is utilized to initiate the pull you will be required to aggro all the incoming mobs before they re-attain LoS with the party member. The party member method is used when you wish to position the NPCs prior to them reaching the object used to break LoS. A standard LoS pull is shown below.
The chronology for a Tank initiated LoS pull is as follows.
1. Ascertain that a LoS pull is the preferred method of engaging the pack of NPCs. This can be done by identifying that there is a nearby patrolling pack of mobs that are likely to be aggroed during a standard pull, or that there is a high probability of extra NPCs being brought into the pull by the first group on mobs either fleeing or calling for help.
2. Position yourself beside an environmental obstacle that will act to break LoS with the NPCs, making sure you are outside of their aggro radius.
3. Attack any one of the mobs with a ranged ability and immediately strafe behind the obstacle. This will force the pack of NPCs to move to flank the obstacle in order to engage you. NOTE: Ranged mobs will move at a slower pace than melee and will arrive at your position at a later time.
4. Once the NPCs move around the obstacle to face you begin applying threat to them. If more than one enemy arrives at a time, commence by using AoE abilities to ensure the healer does not obtain threat.
5. Continue to building threat on all targets, if you notice any of your group pull threat immediately taunt the NPC onto yourself and use your highest threat abilities to overtake your group members before your taunt expires in six seconds.
For a LoS pull initiated by a team member the sequence remains the same, the only difference being that it is the party member who moves behind the obstacle whilst you may remain in front at the position you wish to fight the pack. You then begin applying threat to the every NPCs as they reach you. Do not allow them to move past you to the obstacle as they will attack the party member that initiated the pull.
6.3 Crowd Control and Focused Fire
The purpose of CC along with focused fire is to reduce the amount of incoming damage to yourself or the party by removing the ability of NPCs to attack your party members for a fixed time. Focused fire is the coordination of the party to concentrate their damage on a single target at a time. CC and focused fire are extremely effective at making harder level packs or mobs within them easier to handle.
Let’s look at a common scenario both with and without CC and focused fire.
You are in a 4 person flashpoint and about to pull 4 droids. Each droid has the same health does 100 damage per second and takes 1 minute for a single player to kill.
1. With no CC, and each of the 3 players dealing damage (Tank and 2 DPS) to different NPCs before finishing the final NPC together.
Length of combat : 1 minute and 20 second.
Damage Taken by tank: 26,000
Maximum damage per second taken by tank: 400
Time at maximum DPS taken by tank: 60 seconds
2. Using a 60 second duration CC, and each of the 3 players dealing damage to different NPCs before finishing the final NPC together.
Length of combat:1 minute and 20 seconds
Damage Taken by tank: 20,000
Maximum damage taken by tank: 300
Time at maximum DPS taken by tank: 60 seconds
3. Using a 60 second duration CC and all 3 players dealing damage focusing fire on the same target at all times.
Length of combat: 1 minute and 20 seconds
Damage Taken by tank: 14,000
Maximum damage per second taken by tank: 300
Time at maximum DPS taken by tank: 20 seconds
As you can see the differences in damage taken and time at maximum incoming damage between the examples is huge. This example was actually on the low side of reduced damage and time at max incoming DPS. Often the advantages of CC and FF are even greater if you are using your CC on mobs that do higher damage than the surrounding NPCs. FF works best on NPCs that have high damage to health ratios, allowing you to deal with the largest threat very quickly. High damage/ High health mobs and those that use certain special abilities such as stuns are the best to CC.
A common misconception with CC is that it slows down the running of a flashpoint. While it is true that CC does slow a pull if AoE abilities are used to damage whole packs, if single targets or limited cleave type abilities are used, the CC will not add to length of time required to complete a pull. Crowd control is usually coordinated by designating markings to place above the NPCs you wish to CC and informing the team member that each NPC marked with that symbol is to be CCed. You may wish to use Teamspeak/ventrillo or simply type your instructions on which mobs are to be controlled.
Focused Fire is also usually coordinated using designated markings above the NPCs however it can be coordinated easily without the use of marking if you simply instruct your DPS party members to always attack your current target.
6.4 Positioning
Whatever type of tactics you decide to use to pull packs of NPCs, positioning of yourself and the mobs you pull remains very important. Wherever possible always position yourself with any active mobs directly in front of you. Some types of tank avoidance such as dodge will not work if a mob is situated at your back and you will find yourself taking significantly higher damage over the course of a pull. NPCs at your back are also likely to receive a lot less damage from yourself and therefore threat.
Positioning yourself is often necessary to facilitate better damage by the DPS and lower damage to yourself. Wherever possible turn the NPCs so that their backs are facing the DPS as this means less avoidance of your parties’ damage by the mobs. When confronted by NPCs that have knockback abilities, try to position yourself in front of the mobs with your back to a wall or other structure.
Whenever CC is used make sure you position the other NPCs in the pull at a fair distance from the CCed mob. Most CC breaks upon the mob taking damage so you need to position the rest of the pull far enough away from the CCed mob so that AoE effects will not break the mob free.
6.5 Get over here!
One of the tanks greatest tools is the taunt. There are two kinds of taunt in the MMO world, forced attack and threat equalization. Thus far only the forced attack taunt has been confirmed as being in SWTOR so we won’t discuss equalization taunts yet.
Forced attack taunts literally force an NPC that is not currently targeting you to become the focus of your attacks for a fixed time frame. Forced attack taunts do not equalize your threat with that of its current target at the time you taunt it. With this in mind the correct way to taunt is as follows.
1. Spot other party members frame go red as they attract threat from one of the NPC’s in the pull
2. Identify which NPC is targeting the party member (Should be pretty obvious, it’s usually the crazed mob charging at them or shooting blaster bolts at their head )
3. Click on the NPC and activate your taunt button.
4. Starts hitting the NPC as soon as you can to have your threat overtake that of your party members before the taunt wears off.
At present taunt has a 6 second effect with a 15 second CD, so you’ll want to hit a taunted mob hard for that six seconds. You don’t want a hard hitting mob whaling on your healer for 9 seconds if you have failed to put threat on the mob during the taunts duration
There are many ways to increase your skills as a tank, both during the leveling process and when at max level. Making use of all of the following methods will make you a better tank and prepare you for the uncharted waters of progression tanking.
7.1 A Hero is born
At the moment Bioware has not stated whether it will be possible to change your AC throughout the game. However they have stated that the tanking ACs will be able to operate as viable DPS should they wish to select all of the talents within the tree which increase their damage output. However my suggestion to anyone seriously considering being a fulltime tank at endgame to start early and go down the tanking talent path from level 10 onwards and participate in flashpoints regularly as you go. Whilst your personal DPS may suffer slightly leveling as a tank has several benefits some of which will offset this.
* You learn to use your tanking abilities over time as they are unlocked and are not overwhelmed when trying to use them all at once if you were to switch to a tanking build at a higher level.
* Running Flashpoints regularly will ensure that your toon is always in the best gear available for your level and help make up for any lost DPS
* You will be extremely hard to defeat in open world PVP by equal level characters
* You survivability against higher level mobs in heroic quests will be significantly higher than equal level DPS and Healers
* You will be more easily able to find groups for flashpoints than DPS ACs limiting downtime
7.2 PVP
Participating in PVP is one of the best ways to increase your tanking prowess. Unlike AI which is repetitive and predictable a human player will learn from their encounters with you and alter their strategies (See section 10.0-10.2 for more on tanks in PVP). Performing in PVP as a tank will help you to learn all of the best variations of your damage and defensive abilities as well as increase your skill in adapting to new situation when you are back in the PVE tanking sphere.
7.3 Practice makes perfect
Practicing your different threat and defensive rotations will make you a better tank. The ability to perform your primary rotations without thought will enable you to focus more on your situational awareness and concentrate more on your surroundings. Rotation practice can be achieved in several ways.
* Get a healing companion and find a high level mob. Fight till the healer is out of resources then run away until the NPC resets to its initial position (Rinse repeat)
* Find a mob at a much lower level than you that can only be defeated with the help of a quest item and don’t use the item, bring a healing companion with you. (E.g. Rogue droid need to have a restraining bolt fitted before you can best him. Get the quest and item. Destroy the item. Whale on Droid to your heart’s content)
* Practice targets (Yet to be confirmed ingame). Usually located in high traffic centers, a practice target is simply a pretend NPC that has infinite HP that you can bang away on.
8.1 How ToR Flashpoints are Structured
Flashpoints in ToR are structured in a similar way to the small group instances in other MMORPGs. The flashpoints in ToR are instanced multiplayer content involving high level difficulty NPCs and are accessible on Valkien Station at the Imperial Fleet. They are designed to be run in most cases with 4 players, however the first 2 (Black Talon and Hammer Station) have been tuned for as little as 2. While 4 players are advised you can often succeed at clearing a flashpoint with up to two companions.
One of the things that sets ToR flashpoints apart from other MMOs is the composition of the trash packs within them. In ToR many of the packs will contain a variety of NPC difficulty types. Most pulls contain one to two Elite level mobs and an assortment of weak, standard, and strong. As a tank you will need to prioritize the order in which the NPCs are killed and also which mobs are important to maintain threat on. Generally speaking in a pull with 2 elites, 2 strongs, and 1 standard mob you will want to hold threat on the 2 elites at all times. The preferred order of kill will be Weak then Strongs then Elites. NPC abilities may influence both threat and kill targets eg. Those with CC likely to effect the healer would be a priority. The highest damage mobs should be kept on you regardless of type.
Flashpoints award high level rewards such as armor, weapons, and mods. They provide good XP through their associated quests when leveling and help hone your tanking skills as you progress. They also help cement relationships with other players you may end up running with at endgame and are well worth the effort to complete.
8.2 Too Many Chiefs
Prior to endgame and perhaps even during it you may often find yourself as a tank being responsible for the coordination and leadership of the flashpoints you run. As a tank at an early level you will find yourself receiving tells from other players asking if you would be interested in running a particular flashpoint, or being asked if you would like to team up to achieve harder quest objectives. Once inside you will often be required to lead the team through and will be expected to know what you are doing. The logical extension of this is that often you will be required to lead other party members and coordinate strategy. Don’t be phased by this and simply do your best to communicate with the team. Try to avoid saying stuff like “**** NOOB! I TOLD YOU NOT TO STAND THERE!!!” It doesn’t help anyone and it makes you look like a *****.
8.3 Setting the Scene
One of the best ways to avoid disagreements within the group when running content is to be clear on your objectives and ground rules from the beginning. Things you will want to agree upon before starting a run may include.
* Will all party members be available for the entire run? (It’s no use starting a 90 minute run if your DPS needs to go in 30 minutes)
* Will we be completing bonus objectives?
* Will the party members be selecting lightside or darkside options? (e.g do they want to kill or spare the captain?)
* Does anyone want any particular pieces of loot (i.e. Will anyone else be rolling on tank loot, or does anyone else want the lightsaber that drops off the last boss)
8.4 Your Healer…Your Wingman
Always keep the lines of communication open with your healer. Ask him questions throughout the run to let them know their opinion is needed/valid. “How much resource do you want before i make every pull?”, “How do you think the DPS are doing?”, “Am I taking too much damage? Would you like some CC?” If you are new to a flashpoint let the healer know at the beginning in whisper and ask them to send you a tell if they see any pulls done incorrectly. Healers will often notice a lot more than you simply due to standing at the back watching what everyone else is doing. Lastly ALWAYS thank a good healer for a job well done at the end of a run. The DPS stroke their own epeen enough already without needing praise from you
9.1 Know Your Enemy
Raid mobs have significantly more health and hit harder than regular flashpoint mobs. Trash pulls in raids can have many more mobs than flashpoints and the bosses can have quite interesting threat mechanics and abilities. For these reasons and others, when preparing to raid any instance for the first time prior research is of the utmost importance. Not only should you read the strategies posted on the guild forums and other prominent tanking websites, you should also endeavor to watch (where possible) video guides posted for the boss encounters. You may be required to explain the fight to the OT/DPS/Healers and video guides will assist you by showing you raid placement, the length of the various phases, and healing priority. A tank who doesn’t know the fights in a raid can quickly cause a wipe and most likely will not remain in the raid group very long.
9.2 There’s no I in Team
Always work hard with your other tanks in raid to support each other. Tanking is not a competition with each other. If you are an OT and the MT only selects a target for themselves, pick another target and hold aggro on it while the raid burns the primary. Ask if they would like to give you an assist to mark the secondary. As an OT you should always be on the lookout for mobs that add to the pull or split from the pack to run towards dps and taunting them (except for the primary) The MT is concentrating on keeping his TPS above the best single target dps in the raid on the primary target and will not often pick up these adds in time to stop a dps from death. NEVER taunt off the MT unless asked to do so (having your taunt button spaced away from your primary tank rotation, whilst still within reach is advised) If you are given an assist, never run organizational functions unless asked. Allow the raid leaders to do their job. If the RL forgets an important part of any encounter always wait for them to finish explaining the fight before adding anything. Constant interjection during instructions to raid is not good raid etiquette.
9.3 Raid Lootz
Loot systems and rules in raid are often not the same as in 4 mans. In almost any heroic raid a Master Looter system will be set (Not yet confirmed ingame). This is done to stop ninjas or misloots of high quality and rare items. If you are in a pug always ask at the beginning what the loot rules are so that misunderstandings and nerd rage can be avoided. If you don’t like the pugs loot rules then leave in a nonchalant manner and no harm has been done. NOTE: You should always check with the guild leader/officers to determine what content can be pugged. Having yourself saved to a raid when the guild needs you is definitely not cool.
If you are running with a guild, loot will often be distributed based on raid/guild needs rather than a simple all main sets roll system. As with pure pugs when you are participating in a raid made up mostly of members of a particular guild always ask about loot rules prior to commencement.
Please Note: This section will be clarified when I have more first-hand information on endgame content.
Originally Posted by Shurik When it comes to endgame progression ; DPSing is Fun, Healing is Responsibility, Tanking is Work |
Just because a tank is considered a primarily a PVE class doesn’t mean you can’t kick *** and take names in PVP. Tanks when properly geared and played can have great success in all forms of PVP, and fill some specialty PVP roles as good as or better than any other.
When in PVP you will notice that some classes do far more damage to you than others. This is due to the type of damage they are putting out.There are four damage types in TOR. Kinetic, Energy, Internal and Elemental. There are three important things to note about damage types:
- Force powers and Tech powers, unless otherwise listed, are considered Kinetic damage.
- Armor increases DR to Kinetic and Energy damage only.
- Some skills/equipment/abilities increase specific types of damage (i.e. Dark Blood in the Immortal tree).
What does this mean? This means that certain trees will have a DPS advantage vs. tanks. Trees with a high yield of Elemental and Internal damage which bypasses our high armor rating. Examples would be Lethality for Agents (Elemental), Madness for SI’s (Internal) and Advanced Prototypes for BH’s (combination of both).
Credit to Gankstah for this info
10.1 Mano a Mano
In one on one combat a tank must make use of all of their abilities to survive. Having a large health pool and high avoidance will not guarantee victory. The use of your CC is essential in order to burn down both DPS and Healing classes. One of the toughest matchups for tanks is when facing a healer. The best strategy to defeat a healer is to work their health down below 50% while building your resources up. Once they are below 50% immediately use CC to stun or prevent casting and use all of your highest damage abilities to burst DPS the healer down. The longer a fight with a healer continues the less your chances of winning get. No matter what class you are fighting, remember to make use of your defensive and offensive CDs.
10.2 The Tanks Role in Warzones
Tanks can fulfill many important roles in warzones better than any other AC. Depending on the objectives of the warzone in which you are participating some of the tasks to which you are best suited are.
• Damage Soak Assist. Your guard ability as well as your taunts allows you to soak up and reduce damage to other players on your team. You can transfer damage to yourself using guard as well as reduce the damage done to a team member using taunt. In ToR these are the tanks greatest PVP tools.
• Holding a strategic point. A tank and healer can hold off strong zerging groups of opposition for long periods while help arrives. (No 1 priority is protecting the healer. Use CC and interrupts on those focusing on the healer)
• Ball Running. Your high health and avoidance makes it easier for you to absorb the focused damage of large groups of republic scum
• Baiting. When a strategic point needs to be taken from the enemy, run in (preferably with a healer in tow) and try to draw off as many enemies as possible. This allows your teammates to swarm in after you and capture the now less secure point.
• DPS. Tanks in ToR can do a surprising amount of damage (some more than others). Don’t overextend yourself and fight within the group and you can often see yourself doing a decent chunk of a battlezones damage.
Here is a excerpt from an interesting post by Tersidre on Sith Warriors in PVP. He describes the use of our defensive abilities in the PVP context.
Originally Posted by Tersidre PvP of course. As a tank i was THRILLED to learn that TANKING IN PVP IS MORE THEN JUST VIABLE ITS DOWNRIGHT NECESSARY SOMETIMES. |
You have two abilities at your disposal that make life as a tank in pvp awesome. The first of which is “guard” Ill put it into context for you guys.
Lets say your playing huttball and your bounty hunter or sith inquistor buddy pick up the ball and FOOLISHLY decide to run it themselves instead of giving it to you. Well you can literally act as an escort. Apply “guard” to them now 30% of the damage they would be taking is automatically transferred to you. On top of that if you “taunt” anyone who is attacking them they will again do 30% less damage to their target until the debuff wears off at which time you can just apply it. While all of this is going on you also have saberward which again reduces the incoming damage.
So how does all this work? Lets just put it this way. 5-6 People could be focus firing on the ball carrier and not killing him with you supporting him. of course he will die eventually but if you have a healer around then they will have no problem keeping them alive.
Here is a great example. Me and three buddies teamed up for some huttball action. two sith warriors (both of us tank specced) one sith inquistor (healer) and one imperial agent (sniper) We decided to experiment. The IA would run the ball.. i would put guard on him.. and then the other tank would put guard on ME.. and we would be taunting like crazy and if someone decided to switch and try to kill our healer he would take guard off me and put it on the heals.
The end result? 15 straight wins as complete shut outs. Nobody could stop us once we got the ball rolling even with an entire team focusing on the ball carrier then the healer then back on the ball carrier… they combined could just not do enough damage even with CC applied to one or more of us.
Alot time people would make the mistake of trying to focus down one of us tanks. Personally even without a healer around 4-5 people can focus me and I will sit there and laugh as i can just stand there and take it. Of course i personally did not get many kills. You lose the ability to kill to gain the ability to basically become a moving wall.
This worked out great on the battle of alderaan warzone as well. Once i started defending a point there was absolutely no point for one.. two.. or even three stray DPS to come up at a time and try to take the point from me. No i couldnt kill them but i was able to hold them off laughing the entire time while my team would come and mop them up.
I was pretty much always on the bottom of the “kills” list for a warzone but i always placed number 1 as defense and often times people would vote me as MvP for the warzone because i would try to seek out the most deadly DPS i could find on our team and basically act like his personal body guard.. so he would go around killing and killing and killing and just not dying. Or i would act as an escort to a healer.
Really the possibilities are endless. Especially once you start to aquire some PvP gear. Oh man at lvl 50 in full pvp gear it was basically pointless to try and kill me. You didnt need to RUN from me because i couldnt kill you unless you were already low but acting as a bodyguard to someone who COULD kill them i was something to be reckoned with.
Easily the most fun ive ever had in pvp as a tank in any mmo ive ever played.
AC- Advanced Class. Selected at level 10, allows the selection of talents pertaining to a particular class role or playstyle
AoE- Area of Effect. Abilities that effect a large area or multiple targets.
Aggro- Another term for threat.
Avoidance- Avoidance is the negation of all damage from an individual attack via in game mechanics such as Parrying or Deflection.
Buff- An ability that increases a Player or NPC statistics for a fixed period of time
CC- Crowd Control. Removing the ability of NPCs to attack or move for a fixed time
CD- Cooldown. The period of time before an ability or attack can be reactivated
Clear- When a group or player successfully completes a flashpoint or encounter
DR- Damage Resistance, This is the % that incoming damage is reduced by. If your DR is 50% and you are hit by a 100 dmg blast you only suffer 50 points of dmg. DR can also refer to Diminishing Returns (See next entry)
DR- Diminishing Returns, In laymans terms this means that as you accumulate a high amount of a particular stat is effectiveness is decreased above a certain level. In ToR this only applies to secondary attributes such as Defense and Critical Chance. Endurance and Strength are exempt.
DFR- Defense Rating, This is a stat found on tanking armor and directly effects your Parry/Deflection on a 10:1 scale. That is to say, for every 10 points of of DFR you gain 1% Parry/Deflection.
Debuff-An ability that decreases a Player or NPC statistics for a fixed period of time
DoT- Damage over Time. An ability that is applied to a player or NPC that does a set amount of damage over a fixed time period.
DPS- Damage per second. Refers to either damage being done or the advanced classes of player that specialize in doing damage.
Epeen- Slang for Electronic ego
FF- Focused Fire. Concentrating all damage on a particular target.
GUI- Graphical User Interface. What you interact with to control the game
LoS- Line of Sight. Using a piece of the environment to break a player or NPCs line of sight to you
Mob- Refers to an enemy non player character
MT- Main Tank. The primary tank (You may also see this in chat channels when someone makes a miss-tell)
NPC- Non Player Character
OT- Off Tank. A secondary Tank
Pug- Pick up group. A group of players assembled at random
PVE- Player versus Environment
PVP- Player versus Player
RL- Raid Leader
SW- Sith Warrior
Threat- A measure of how much a NPC wants to attack you
Toon- A players character
TPS- Threat per Second
Trash- NPCs within a flashpoint that are not bosses and easy to defeat
Wipe- When all characters attempting an objective die
Zerging- Rushing in or attacking with all available forces
A big thanks goes out to Gankstah his thread covers a lot of the math behind the tanks.
Quoted Tersidre on his PVP thoughts and experiences.
Used a talent build for leveling kindly provided by Lyon.
Respect to the people at Sithwarrior.com for the numbers in tanking formulas.
Special mention to Freehugs, Vilda, Xalkyrie, Talyn_Rahl, Astares, JDee, LagunaD, Takira and MercArcher for all their hard work on various figures contained throughout.
Wikipedia quote in What is a Tank? section.
Quoted SWTOR holonet in Warrior Basics section.

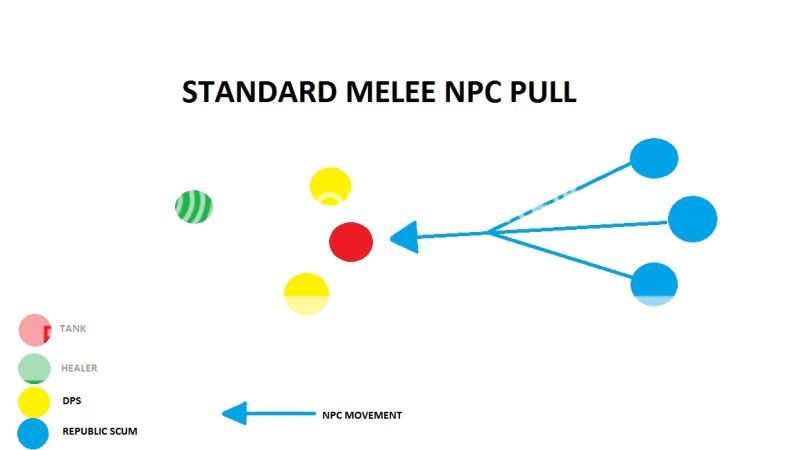
Amazing guide! I went from Newb to less of a Newb in ten minutes!! thanks!!
Excellent ! Thanks a lot
Oh nvm, found it. Your value does not include the 5% avoidance from smash, whereas my value does.
Hi! Great Guide. I was checking your math to try and determine which tanking stats are best for min/maxing. When I plug in the numbers you use into the formula you give, my spreadsheet spits out Mean mitigation (100-T) of 57.41 compared to your 54.68. It may be that Jugg mitigation is slightly better than suggested here. Not sure though. I may have missed a parenthesis or something. Either way, Great Guide! I will refer my guildies to it.
nicer guide guys ty, just to stop my head exploding im trying to find what Defence i need what endurance is best to aim for what absortion rating and what shield rating to aim for. Numbers help not really the math to calculate it.
so flash point / oporations require,
Defence of: ?
Shield rating: ?
Absorbtion Rating: ?
etc etc etc.
This is a thorough and well organized guide. I found it extremely helpful. Thank you.
Very usefull, Thank you :-)
Great Guide.
I've been primary tanking sence EQ, through all the main mmo's.
Once i'm in a guild and established i like to push for all team members to play alts and read other classes guides so everyone knows what is possible or not possible. It always helps form a closer group.
This is a great intro to tanking and will hands down be a new guild to send everyone to.
Good job!
Wow, nice job. Lot of work in this site and I certainly appreciate your effort. :)
Great guide! Been using it since the start, keep it up!
One request tho. If possible, could you please see if you can post some PvP builds and leveling tips as well? Like Rage PvP build does more spike dmg, Vengence bleed and Immortal soaks up dmg etc. And what build is fastest for solo or group leveling.
Cheers
Gl hf
Hi. I currently have a level 37 Juggernaut and this being my first MMO it's also the first time I played as a tank. This guide has been a tremendous help to me in my efforts to more fully understand tanking as a specialization.
I only have one criticism regarding this guide.
At one point you say
"Never fit a fancy looking lightsaber crystal over a tank specific one. What good is a cool looking weapon when it’s lying next to your corpse?"
I'm sorry, but that's the silliest question I've ever heard.
Wonderful guide! Thanks soo much!!
My question is, how do we get uncrittable? Is it possible and what sort of stats should we look at stacking to achieve such a feat.
Love the guides but is there one coming for warrior DPS.
mental read m8! i played in beta and on early launch had no clue except just for pratting with aggro spells etc.
but this has give me a massive boost in game.
Tbh you've answered my questions so thanks m8 awsome job!
fantastic!
Awesome guide! I shall be referring other people to this guide also.
What's great about this is that you literally left nothing out :-)