Apex Legends Tips and Advice for Ranking Up
Preface
I consider myself an “average” gamer. I play between 2-6 hours a day, which I believe makes me a “gamer”. However, I’m not the most mechanically adept person. I’m not as talented or skilled as your favorite streamers or pros, but I wouldn’t say I’m worse than the “casual player”.
Because I’m not so naturally inclined as the pros or streamers, I generally have to learn how to do things: I have to ask questions, do research, test things myself, & go through trial & error. So this guide essentially serves as the collection of the things that Ive researched, learned, & figured out myself when it comes to Apex Legends, one of my favorite games in the past decade.
Settings
There is no magical copy-paste settings that will instantly improve your gameplay. However, there is a unique set of settings that will make your gameplay feel a lot more comfortable, & make you feel like a more confident player. You won’t immediately turn into a God, but your kills will feel a lot more satisfying & comfortable than they used to. These settings are different for everybody, & it is a process of trial & error to find your perfect settings.
- To find your settings use training mode.
Video
We start here because, though they don’t directly influence the rest of the settings we will go through, these settings will be the basis of what your brain processes & how you will react with the settings you will have.
There are 2 types of gamers, immersion based & performance based. For single player games, I personally crank up all the HD settings & set it to a more cinematic experience. However, for FPS & competitive based games I want that edge on my opponent no matter how small, & will sacrifice immersion. Just don’t forget to appreciate the hundred of hours that the artists & developers put into their graphics!
Brightness
A more cinematic experience would call for a lower brightness, as it will make the colors & shading a lot more deeper. However, lower brightness will also make it a bit harder to see enemies & youll end up getting frustrated that you couldnt see who was shooting you.
- Up the brightness high enough that you can see in the dark, but not to the point where the brightness affects your depth perception.
- Too high & the distance will look like a 2d whiteboard.
- Too low & you won’t be able to see people in the shadows.
FOV
The higher it is, the more you can see around you. The lower it is, the clearer you can see in front of you. Ive done a lot of research & digging to find how to figure out your own personal FOV setting.
I stumbled upon the dedicated community of sim racing, & its an amazing community with a fixation on efficiency. FOV is especially important to them because it allows them to react more efficiently & determine their spacing to other cars. They use trigonometry to figure out their most accurate FOV setting: FOV = 2*arctan(Screen Width/2(Distance to Screen)). The most immersive FOV setting is the one that matches your own degree of view of your screen to the degree of view in the game.
However, this immersive FOV is not practical to FPS gaming. If you use that equation youd find your degree of view to be lower than what you can even set it to. So we have to make our own theoretical approach to it. We need to be able to see around us, but also be able to shoot in front of us. If you max out your FOV youll end up trying to shoot ants, but if its too low you will have huge blindspots. So we have to figure out a setting that maximizes your FOV while not affecting your depth perception & targeting:
- Enter training mode, grab your favorite AR & a Kraber.
- The AR as a basis because its the weapon archetype that has the most average range of all the guns
- The Kraber has a scope we can use to determine our distances.
- Max out your FOV
- Figure out your MAXIMUM effective distance (MED) that you can hit the majority of your shots by shooting Bloodhound.
- This will be different for everyone, since people will have different levels of recoil control
- Use the Kraber to figure out your distance & start aiming & shooting at Bloodhound
- Start close & gradually distance yourself from Bloodhound
- The moment youre at a distance where less than half your bullets hit, thats your maximum effective distance
- Gradually lower your FOV until you feel like the FOV represents the distance to Bloodhound where you can be in a game & think to yourself “I can engage at this distance”
- Most people will probably end up lowering their FOV greatly, & it may be off-putting but trust me your engagements will feel a lot better.
- Youll also have an edge over someone using the a high FOV by allowing you to shoot first due to your enhanced view.
- Doublecheck your FOV represents your confidence to engage by running up to BH from a distance at a different angle.
- Use your Kraber & see if your distance from Bloodhound is actually your MED. Adjust your FOV.
You now have a FOV that accurately represents distances at which you can comfortably engage someone.
Sprint Viewshake
- Have this at minimal so you can see around you clearly while youre running.
Controls
These are a much more important setting for console players than PC players since the keyboard has a lot more buttons they can map controls to & the mouse is a much more efficient method of aiming than an analog stick.
Button Layout (Xbox)
The goal of setting your controls is to be able to look, use abilites, & move efficiently. Theoretically, you should be able to move, look, aim, jump, & use your abilities at the same time. This is why for console players, elite controllers with paddles are HUGE. But theyre crazy expensive, & I don’t have that type of money to throw around, I am an average gamer after all.
To find the most efficient layout I used a conditional logic game that they use in LSAT tests. Moving & looking are dictated to L/R stick, Shooting/aim r/LT, leaving Jump, Ping, Tactical, Slide, Sprinting, & Grenade to map. The problem is those are 6 actions & we only have 4 buttons that allow us to use them while we move & look/aim: LB, RB, L3(click), R3(click). To fix this, we can use the back button which is close enough to being an efficient button & use auto-sprint to remove the mapping of sprint.
So we have: Jump, Ping, Tactical, Slide, & Grenade to map to LB, RB, L3(click), R3(click), & Back. But each action has its own condition. You want to be able to Jump & Shoot, so your right pointer finger is gone. Meaning you can’t use RB as jump. You want to be able to Slide & Aim/Shoot for those slide kills, & Slide/Jump for the extra speed. Meaning Left/Right pointer finger are gone for the triggers, you can’t use RB/LB. You want to be able to Ping while you aim so you can notify your teammate without losing your ability to threaten them by still being aimed & pulling the trigger. Meaning your left finger is gone, & you can’t use LB. You want to be able to use your Tactical & Look/Move, so it can go anywhere except Back. Finally, Grenades, can go anywhere. These are the conditions written in a LSAT logic game format:
There are 5 spots & 5 items, one item to go in each spot each spot.
There are spots: RB, LB, L3, R3, & B
There are items: J, P, T, G, & S
However, there are conditions for the items & some can’t go into certain spots.
J: can only go into LB, L3, R3,
S: can only go into L3, R3
P: can only go into RB/L3/R3/B
T: can go anywhere except B
G: can go anywhere
What are the suitable combinations the items can go into?
This is the most efficient layout, for me, for non-elite xbox controllers:
- Sprint: Auto-Sprint/D-pad
- Jump: L3
- Crouch: R3
- Grenade: Back Button
- Tactical: LB
- Ping: RB
- Trigger Deadzone: None.
- Some key things to note:
- Sprint now solely becomes your variable zoom button, Id recommend putting on your D-pad so that you can still aim & shoot with your right h&
- The back button is bugged where you can’t use the grenade wheel, or any wheel at that. Holding it down will bring up the text-to-talk keyboard instead of the wheel (whether you settings are on or off). But you can change grenades by tapping it.
- Melee is rare enough you can put it on a button & still be effective.
- The rest of the buttons are to fill at your discretion.
Aiming & Sensitivity
There is no one size fits all when it comes to sensitivity, but there is a perfect sensitivity that you can find with a little trial & error. The goal is to be able to comfortably track your enemies without undershooting or overshooting. Generally, if you find yourself overshooting your sensitivity is too high, & if youre under shooting your sensitivity is too low. For consoles, lower is generally better as it accentuates the aim assist you get.
Overall sensitivity is a function of 5 values for controllers: Yaw Sensitivity, Pitch Sensitivity, Response Curve, Outer Threshold, & Deadzone. Yaw/Pitch Sensitivity are the raw values of how much your movements are illustrated in the game, aiming side to side (Yaw) & aiming up & down (Pitch). Response Curve acts like a multiplier to your raw sensitivity values across the motion of the analog stick. Deadzone is a circular zone that defines an area in which your analog stick can move but not work in game. Outer Threshold is similar to but opposite of deadzone, in that this is a circular zone that sets where the maximum output of your stick lies.
Response Curve is a little tricky to understand. Response Curve generally involves 3 zones in the motion of your analog stick, the zone which fine adjustments are made, medium adjustments, & big adjustments. Depending on which zone youre in, your sensitivity will be multiplied by a x amount. In the smaller zone, your sensitivity will not be as responsive because that zone will multiply your sensitivity by maybe 0.35, where the larger zone (towards the end of your analog movement) might multiply your sensitivity by 1.5. Hence where Sensitivity controls the general speed of your aim, Response Curves control the fluid motion of that speed from going fast to faster. A Linear “curve” will multiply your sensitivity in even increments, where your sensitivity values arent multiplied & your input = output, whereas huge curve will be slow at the finer movements of your stick into a large increase at the larger end of your analog movement.
To further understand our values, well look at how theyre represented on the XY Axis:
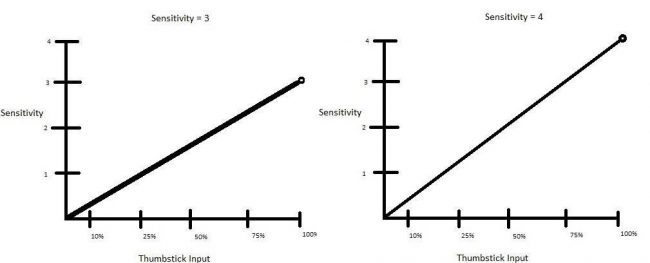
As you can see here, as you increase your input on your stick, the amount of sensitivity you get rises. Heres what we can take from sensitivity:
- Overall Sensitivity = Slope of the Line/curve
- Sensitivity Value = Maximum sensitivity at Maximum Input
- Increasing Sensitivity = Increases Slope (Overall sensitivity), & Decreasing = Decreasing Slope
Now lets add deadzone:
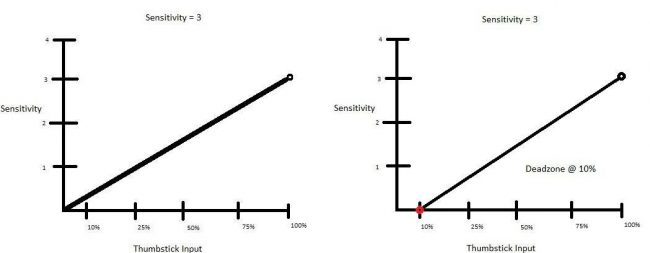
Here we add the deadzone @ 10% stick input, meaning your stick won’t work until its passed 10% of its analog function. Deadzone exists because analog stick can be plagued with false positives or “drift stick” in which your stick will move without your thumb even being on it. Setting your deadzone will eliminate that problem, however its at the cost of not being able to control finer more responsive stick movements as well: your thumb will have to move more to work the stick. Heres what we can take from deadzone:
- Higher Deadzone = Higher Slope/Overall Sensitivity, Lower = Lower Slope/Overall Sensitivity
- Higher Deadzone = Less responsive small movements, Lower = More Responsive
Lets add Outer Threshold:
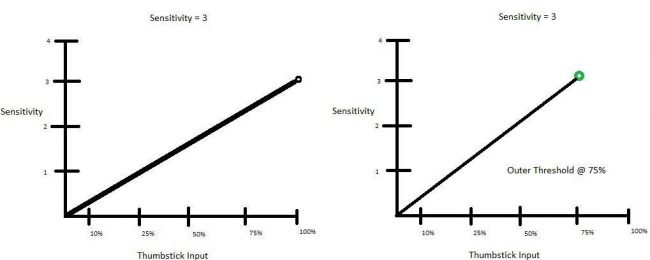
Here is the outer threshold set @ 75% input, meaning your maximum input will come quicker at 75% of your sticks tilt instead of the usual 100%. This exists for the rare false negatives that can happen to some analog sticks, where if you put your stick to the end of the zone it may not pick up the maximum effect of it being there. So it allows you to set it earlier. Heres what we can take from the outer threshold:
- Decreasing Threshold = Higher Slope/Overall sensitivity
- Decreasing Threshold = Quicker large movements
*Increasing the slider setting in game, decreases threshold.
Deadzone & Outer Threshold can be set to even out the slope! Outer threshold is rarely relevant & can be used as a great tool to fine tune our sensitivity, especially when we have a deadzone influencing the rest of our overall sensitivity.
Finally lets look at the Response Curves:
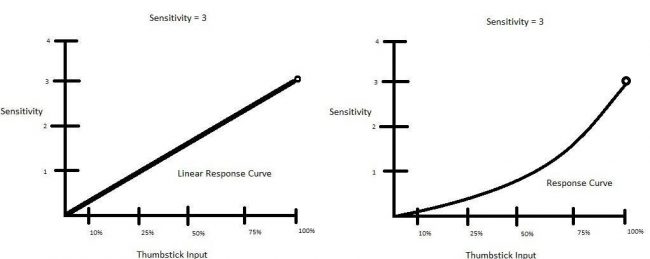
As you can see here, the response curve affects the amount of input across the range of the stick, where smaller movements of 10-20% will have less sensitivity than a linear response. This is good for helping fine movements, where a small accidental response might throw off your aim completely. This is good for most people, since having such control of fine motor movement is difficult. However, if you train & are able to control your fine movements, curves then become an impediment on your ability. Hence the tool bar tip says bigger curves can feel dull, & smaller curves can feel twitchy. Heres what we can learn from curves:
- Increasing curves = Decreases Overall Sensitivity/Slope, Decreasing = Increases Sensitivity
- Linear Curve is when Input = Output
- Smaller Curves = more responsive twitchy
- Good for fast fine controlled motor movements
- Bigger Curves = more large controlled movements
- Good for most people
Understanding these values, we can create a theoretical order of operations to be as precise as possible in finding our personal perfect sensitivity:
- Make sure youve already set your FOV as I outlined above. It doesnt actually affect your aim, but it does affect your brain to make you think it does, & thats enough to psyche you out.
- You will think you can control recoil better at a higher fov because your gun will be at a distance where its not moving as much
- At a lower FOV your guns movements will seem exaggerated
- Nothing actually changes except your perspective of what is happening.
- BE COLD. This should be before you first game of the day.
- Enter Training mode until you get to use the guns, & pick up a Kraber & a gun.
- Turn on Advanced Aim Settings, & we will begin to edit.
- Set Deadzone, ADS Yaw/Pitch Sensitivity, Outer Threshold, & Response Curve to 0 (linear response)
- First we set the parameters of our stick:
- Increase your Deadzone until your aim stops moving by itself (stick drift)
- Max out your ADS Turning Extra Yaw & Set ADS Ramp Time & Delay to 0
- ADS & move your stick in one direction slowly until you hit maximum output
- Increase your threshold if you don’t receive your extra yaw boost, until it occurs.
- Once set, return the delay/time to default
- Go to one of the moving targets & stand in the middle of it 10 meters away.
- Use your Kraber to figure out how far you are
- Make sure youre in the middle by making sure youre at an equal distance from both ends of where the target moves (Isosceles triangle)
- We use 10 meters as the distance cause this is the lowest distance you should be aiming while requiring the most amount of sensitivity. Anything below 10 meters is when you should be hip firing.
- The moving target works as a good movement speed to base our aim off of, as its similar if not the same as an ADS strafing speed of a SMG.
- Start aiming at at the middle of the moving target, & gradually increase your ADS Yaw Sensitivity
- Keep your Response Curve at 0, we want the raw value of your sensitivity unfiltered by the multipliers it gives.
- You want to be able to Smoothly track the target, at the lowest possible sensitivity value to maximize the effect of aim assist.
- Dont worry if it feels twitchy, thats the linear curve in effect & we will fine tune this, just get as close to smooth as possible
- How to correct your sensitivity:
- If youre overaiming, decrease sensitivity, & if youre underaiming increase sensitivity.
- Now move to your MED & ADS at the target, gradually increase your Response Curve
- We go to our MED because this is where our smaller fine movements will be most relevant, which the response curve affects the most
- You should start feeling your aim becoming smoother & smoother. Small jerks you used to make should now start turning into one fine movement.
- Now you have your Response Curve, we have to double check our deadzone.
- Sometimes response curves will move the deadzone further than it needs to be
- Gradually increase your Deadzone from 0 until your aim stops moving by itself.
- If its less than what you set before, go back & edit your response curve again, repeat until you can no longer move your deadzone
- Now set your ADS Pitch Sensitivity by picking up the gun you have the most difficulty with in controlling VERTICAL recoil, & shoot Bloodhound at your MED.
- Increase your ADS Pitch Sensitivity until you can control that vertical recoil comfortably, without a harsh jerking movement to correct the vertical recoil.
- Play a few games, & make small adjustments if you have to. This is going to be a process of trial & error.
- Remember these settings won’t give you instant God-like aim, but rather a more precise representation of your fine motor movements. You have to practice to aim well.
- If you find yourself overaiming try increasing your response curve.
- If youre underaiming decrease your response curve
- If you decrease your response curve but find yourself overaiming, go back to what you had it as & increase your outer threshold instead
- If youre stuck between 2 curves, overaiming in one & underaiming in the next, try reducing/increasing your ADS sensitivity value, & go through these steps again
You should feel a lot more comfortable with your kills & aiming. Kills will feel a lot more like “I consciously did that” & youll become a lot more confident in your game.
Vibration
Theoretically, in terms of effective aiming, off is the best option. You don’t want your controller vibrating & ruining the fine movements youre trying to make with your thumb.
However, there are some benefits of keeping it on. It acts as another level of feedback for you, for things like damage, & gun control. You will know youre taking damage a lot faster & easier instead of having feedback through just your eyes. You can also feel the gun, & equate certain vibrations to muscle memory.
- If youre purely interesting in aim. Off is the way to go.
Gameplay
Theres a lot of personal preference here, & not much objectivity so use the settings youre most comfortable with. But heres a run down of my thoughts:
- Interactive Prompt Style: Compact
- Saves HUD space
- Crosshair Damage Feedback: Off
- Off doesnt really add any more information than what the damage numbers give. If you see numbers, youre getting hits. If the numbers are white, blue, purple, or gold, then those are body shields theyre wearing.
- Having them on also makes it harder to see some targets through certain Iron Sights (Hemlock).
- Damage Numbers: Stacking
- I want to know the total damage Ive done, & not have to do the math myself (floating).
- Both is overkill & just takes up space, especially since floating is useless to me.
- Obituaries: On
- Its key to know if someone went down or not.
- Auto Sprint: On
- Pivotal for efficient button layout.
- Incoming Damage Feedback: 2D
- 2D is a directional circle & 3D is an actual 3D arrow that points at the person.
- 2D only is the most consistent for me, the 3D arrow can be super slim at angles & make it hard for me to see the direction.
- Both is overkill for me.
Mechanics
Guns & Shooting
Recoil
All the guns in the game have predictable recoil patterns, & because of this you can learn the pattern of each gun & how to control it better.
- Take the gun you want to learn, aim at a wall, & shoot it WITHOUT controlling for recoil.
- notice the pattern it makes, & practice recreating the inverse of that pattern on your mouse/stick.
- Generally, with Light Ammo guns you want to recoil control in a down left fashion, & with Heavy Ammo guns a down right fashion.
Aiming, Hipfiring, & Bullet Spread
There are 2 styles of aiming: tracking & flicking. Generally with automatic weapons, you are “tracking” or constantly aiming & holding the trigger at the enemy. “Flicking” is the general style of single fire weapons & involves you quickly flicking your aim to the enemy, shooting, & then flicking to them again when your next shot is ready.
- Burst fire is a tracking movement, but its single fire method throws a lot of people off because they are used to incorporating flick shooting.
- The trick is to track & continue aiming at the enemy after you pull the trigger.
Some guns don’t require aiming, as their spread stays the same or barely changes, & using this to your advantage can be pivotal in CQC.
- Movement while ADS is different for each archetype of gun
- Fastest to slowest strafing speeds: Pistols, SMGs, ARs, LMGs, Snipers.
- Hipfiring movement stays the same for each archetype.
- Fastest to slowest strafing speeds: Pistols, SMGs, ARs, LMGs, Snipers.
- Hipfiring is one of the most effective ways to fight CQC, as its easier to track your opponent while also giving you a boost to your strafing speed enabling you to avoid significan’t damage.
- 10 meters is the maximum range Ive found hipfiring to be accurate.
- Peacekeeper & EVA-8 stay exactly the same spread ADS or Hipfired
- The other shotguns should be used ADS.
- Prowler, Hemlock, & P2020 are extremely accurate hipfired.
Consumables, Throwables, & Inventory
Healing
In general, its more efficient to heal your shields first then your health, as shielding times are significan’tly less than healing times. There is an exception though: when you have a white shield & med kit. Always medkit first in that situation.
- The most efficient orders to heal is: 1. grab body shield & med kit, 2. phoenix kit, 3. Battery & then Medkit.
Grenades
Grenades are often overlooked, but are extremely useful.
- Arc Star first, Grenade, then Thermite
- Arc star slows your enemies enough where they can’t retreat from the delayed explosion of the Grenade, while also still being slowed to aim & burn them with your Thermite.
- Thermite first, Arc Star, then Grenade
- Thermite first effectively zones & controls the movement of your enemy, which then you will be able to place your Arc Star in the only place they have to go, while finishing them off with the grenades explosion (since the arc star slow also sets it up).
Backpack
What you put in there is completely up to you, but I found having a certain amount of ammo, & healthy supply of grenades, & a variety of healing to be the best way to go.
- Single-fire guns generally only need 1 stack of ammo, as their damage to ammo ratio is extremely efficient.
- Automatic guns generally need between 2-3 stacks of ammo depending on their rate of fire.
- High-rate of fire guns need 3 stacks to be safe.
- Low-rate of fire guns can survive off of 2 stacks.
- Shotguns, LMGs, & Energy Based guns are a little different
- Shotguns needs 2 stacks to be safe but you can get away with just 1.
- LMGs hold a lot of ammo per mag, so having 4 stacks for them is safe, but you can get away with 3.
- Energy ammo is *rare* so hording it is a safe practice, 4 stacks is safe, but you can get away with 3.
- I generally try to have 1 of each healing item & 1 of each type of Grenade
- When healing minimum damage its much more efficient to heal with cells/syringes, & phoenix kits come in clutch in sticky situations. So its efficient to carry 1 slot of each healing item.
- Having a variation of grenades also expands your threat to other players.
Dropping & Redeployment
I still have testing to do & I want to get the exact math/formula to determine the absolute most efficient way to drop, but for now based on experience this is how I feel the most efficient way to drop is: it depends on where youre trying to go, & where that location is in relation to the path of the dropship.
- If the path of the dropship is extremely close to where you want to drop, then you want to jump between 400-600m away.
- You want to drop at a 45 degree angle towards your target, to get the most speed without sacrificing your distance.
- If the path of the dropship is far from where you want to drop, then you want to jump between 800-1000m.
- You want to drop at a 45 degree angle till you reach about 145 speed, level out until you reach 130 speed, then drop at a 45 degree angle again until you go back up to 145 speed. Repeat in this staircase like drop until you get to your destination.
- To get the maximum distance on a redeploy balloon:
- Look straight up while youre going up the zip, the moment you deploy look straight down, then quickly even out. This must be done as fast as possible.
Movement
Get used to holstering your weapon. You gain a huge movement boost. Only have your gun out when youre ready to get in a fight. There are efficient ways to move depending on the type of terrain youre on.
- On flat terrain: Sprint, Slide, Jump, Repeat.
- On down hill terrain: Sprint, Slide off ledge or down slope, continue slide when you l&, Jump, Slide again if your on a slope
Gameplay
Fighting
Headshots
Headshots are the most effective way of downing people, & practicing aiming for the head will make you an extremely effective player as while it greatly decreases your ttk, you get the added benefit of reducing your incoming damage, being able to then focus on other players or teammates, as well as conserving your ammo.
- I found the most effective way for me to consistently get head shots is aiming for the upper chest/sternum/neck area.
- By the time you correct for vertical recoil your gun should be at headshot level, while also guaranteeing damage to the body.
- The best way Snipe headshots is to aim at the crown of the head, not directly at the face or above the head.
Dropshot & How to Counter
The dropshot is one of the most impactful techniques you can employ to kill your enemies. The majority of players can’t handle or react to this technique, but there are some downsides: You risk giving your enemy free headshots as you crouch, if you stay crouched too long the enemy will be able to easily get headshots on you. Against a high skilled enemy, youre basically giving them a free kill trying to dropshot. That being said, not a lot of people are skilled enough to react.
- Take advantage of the dropshot, especially when hipfiring
- Crouched hipfire reduces the spread of your bullets.
- Dont stay crouched for too long
The best way to counter the dropshot is outrageously simple: Jump. More than likely, when someone dropshots you they won’t correct their aim, & you can simply jump out & over their aim. Now youre massively out of their aiming range, & they are stuck in a crouch position. The faster you react to their drop shot the more effective this becomes. This isnt a fool-proof way of countering, but it is effective. Though skill is generally going to be the indicator of who wins a fight.
Strafing
Being able to deal damage while avoiding it is extremely effective. Strafing is the door to making that concept a reality, though a very hard skill to master. There are no secret tips for this, except for practice. Youll find that while strafing you also sacrifice your own accuracy. Just keep at it, & youll soon fix your aim & be more & more accurate. Heres some tips:
- Be unpredictable, doing the save movement back & forth will make it easier for them to see your pattern. Switch between quick back/forth movements into long back/forth movements.
- Read your opponents aim, once you start getting really good you can see them trying to correct their aim, & you can use this to your advantage to throw them off.
- If youre strafing in one direction, & youre not getting hit KEEP GOING in the that direction, strafing back into those bullets is unwise. Only strafe back that way once you see their aim catching up to you, then try to juke again.
- Heres a neat trick:
- Strafe, Jump, & Slide. Youll be able to look forward, while sliding side ways. You can do a backwards slide too, which is useful when youre trying to avoid shotguns.
Looting
Third partying is quite common & effective, so because of that theres a theoretical order of what to do first:
- Reload while you grab an enemy body shield, grab ammo, heal your health, then pick up any downed teammates, loot.
Skins That Buff
There are legendary gun skins that change the iron sights of some guns, making it easier to see through them. These skins are: R99s Outls/KillSwitch, Spitfires Continuum/HeavyConstruct, & Wingmans Mericless/DeathRay.
As for character skins, its all very subjective. Sometimes blending in with your environment helps, & sometimes wearing that glowing skin makes you extremely visible in dark areas.
Wall Jumping
You can get an extra boost & save time climbing by wall jumping. Heres how to do it:
- Sprint & gather momentum
- Slide Jump into a wall at an 45ish degree angle
- While mid jump, turn your head to face the wall at a 90 degree angle
- While mid jump, release your movement control to neutral
- As you hit the wall jump again, you will shoot off of it.
- As you shoot off of the wall look towards the direction you wanted to go, & you can start moving your direction
Ranked
Teamwork & Communication
This is a team game, & players that play as a unit are at an extreme advantage over people that do not put the squad before themselves. Teamwork increases your offensive effectiveness, reduces the ability of other teams exploiting your mistakes, & overall is one of the primary influences of your success in this game.
- Always communicate. Let each other what youre doing or what youre planning on doing, whos where & so on.
- Dont just listen to your teammates, REACT.
- Shoot the same guy.
- Spreading out your firepower is inefficient.
- Stay Close to each other.
- You want to be in a range where you can help your teammates out immediately. Being spread out leaves you all easy to exploit.
- Push together, in fact, do everything together. 3 is better than 1.
- Cover for each other, sacrifice & be vulnerable for the sake of your squad.
- Its better to die & win, than to live & lose.
- You can’t shoot 2 people at the same time.
Practice
Youre not going to climb without getting better or improving yourself. You have to gradually work to get there. Like anything, if you want to get better than you have to put time & effort into it. I’mprove your weaknesses & sharpen your strengths.
- Go into Training mode & practice shooting Bloodhound.
- Learn the recoil patterns of all the guns & practice at all distances.
- Create your own shooting drill.
- Play pubs & practice the things youre weak at
If youre peaking at a certain rank, then you have to switch up your playstyle or practice mechanics.
Strategy
The Numbers
D4-Predator = 2800 RP
Winning + 5 Kills/As = 16 games
2nd Place + 5 Kills/As = 25 games
3rd Place + 5 Kills/As = 31 games
4th Place + 5 Kills/As= 42 games
5th Place + 5 Kills/As = 50 games
Winning + 0 Kills/As = 53 games
6th Place + 5 Kills/As = 67 games
7/8th Place + 5 Kills/As = 88 games
9/10th Place + 5 Kills/As = 128 games
2nd Place + 0 Kills/As = 234 games
11+ Place + 5 Kills/As= 1400 games
3rd/4th Place + 0 Kills/As = Cant Climb (-2)
5/6th Place + 0 Kills/As = Cant Climb (-18)
7/8th Place + 0 Kills/As = Cant Climb (-28)
11+ Place + 0 Kills/As = Cant Climb (-48)
As you can see, the game does not reward camping. Kills/assists are pivotal to climbing, & you are exponentially rewarded for being able to Place & Kills/Assists. Luckily, they added assists to your point count, so to obtain the max total of 5 kills/assists a game isnt going to be as difficult as having to get just 5 Kills. This means you can end up with 1 kill & 4 assists & still end up maxing out your points! That being said, each enemy squad of 3 player can potentially your team a total of 9 points, meaning each person gets 3 points off of one fight. Thats pretty much half the battle. But more than likely, youre all not going to get an assist off of that & will have to fight another squad.
- Hence, you want to force at least 2 fights, & then try your best to place.
- A safe way of doing this is getting in an early fight, then avoiding fights until the very end. Leaving your last fight to the last couple of teams.
- However, if you fail to make it to Top 8 with 3 points, you will be punished heavily.
- Therefore, it may be safer trying to force your 2 fights early guaranteeing your 5 Kills/Assists & thus guaranteeing your points no matter what you place.
- Though forcing fights early is a double edged sword, & can also take you out early without the points you need.
- A safe way of doing this is getting in an early fight, then avoiding fights until the very end. Leaving your last fight to the last couple of teams.
The Drop.
You want to drop somewhere with enough loot for your squad, but without there being more than 1 other team there. If youre in a spot with 2 teams or more, pick up whatever is next to you & run away. You have to realize youre in lobby filled with people just as good as you or better. Theres no more pub stomping.
The Rotation.
Theres 2 strategies that have been successful for me: Playing inner circle, & Playing edge of circle.
Playing inner circle is the safest most consistent way of earning RP. Use Pathfinder to guesstimate where the circle will end, & post up/defend a building in the final circle. This gives you the strongest position in the late game, & is almost a guaranteed win if the circle is on your fortress. However, the downside is theres a good chance you will be under looted & you will be at a disadvantage against the people who played the edge of the circle in a heads up fight. Heres some tips for this playstyle:
- Avoid bottle necks, & get into the inner ring ASAP. The edge of circle is where all the teams will be colliding to avoid the storm. Chances are there will be around 3-5 teams in the area.
- Loot inwards toward the circle.
- Pick up as many consumables as you can
- Set up as early as possible.
Playing edge of circle is high risk high reward. It takes the most mechanical skill & IQ to play this way. But even if you do everything right, theres still a high chance of you getting 4th/5th/6th partied. Nonetheless, you earn points fast & get kitted for the end game. This strategy you pay more attention to where the entire lobby drops, & you want to push towards the side of the map where the least amount of teams are. Play the edge of the circle, & push or third party the teams straggling or getting caught in the edge of the circle. Once you clear them out, you now control that entire side of the map. Knowing no one is behind you, makes it easier for you to third party the people inner circle. Heres some tips for this playstyle:
- If youre not third partying & are in a heads up fight, leave if you havent merked the entire squad after a minute or 2. Pick & choosing your battles is super important on the edge of the circle, because there is a high amount of people going to be there.
- If youre going to gatekeep people coming into the circle, don’t do it at the immediate edge of the circle. Do it a little bit inwards, that way youre in a better position to avoid 3rd parties & instead BE the 3rd/4th party.
- Once you get to lategame/inner ring. Harass & contest the most powerful positions. If you were successful in controlling the edge of the circle, you should have quite a lot of valuable loot. Chances are your loot is better than most peoples so you want to exploit that.
Loadout
Charge Rifle.
Worlds End is built in a way where not one load out will always be effective throughout the entire map. Theres areas where if you don’t have a sniper youre in trouble, areas where if you have a sniper & no close range youre in trouble, & areas where ARs excel.
- Your loadout should change as you get more information about the circle.
- If the circle is ending in a close quarters portion of the map, you want the AR/CQC
- If the circle is ending in an open area, you want the AR/Sniper
- If you don’t change up your load out for your environment, play around your loadouts strengths to your best ability.
- When looting, prioritize Heals & Shields.
- Youre playing with more skilled people, & youre going to be taking a lot more damage.
Team Composition
Meta: Pathfinder & Wraith
This new map change quite a bit of the champion meta, there are Legends that are much better than before. However, 2 Legends are still the same if not accentuated: Pathfinder & Wraith. Worlds End is focused a lot on rotations, Pathfinder & Wraith are the best at rotating. Pathfinder knows where the circle will end so you can rotate early & avoid a high amount of teams, & Wraith is the best at rotating her team out of sticky situations.
From here you can define your teams playstyle with your third legend, as quite a bit of them are viable now.
- Rotation Focus Legends
- Gibraltar: Theres a lot of open spaces making his bubble shield & ultimate extremely strong, hes also broken in high tier 1v1 gunfights due to his gunshield & fortified perk.
- Bangalore: Her smokescreens become invaluable when trying to rotate on a map that focuses on rotation. Her ultimate also provides excellent spacing against enemies.
- Defensive Based Legends
- Wattson/Caustic: Although they nerfed the camping meta, being able to lock down a building is still extremely strong. Theyll need a Crypto on their team to be able to effectively push you.
- Offensive Based Legends
- Crypto: Not only does he instantly counter an entire defensive squad, but the information he provides with his drone is powerful information. He can scout with no repercussions, & can tell how many squads are in an area. That information is strong in high tier decision making.
- Lifeline:fast heals & her revive shield is super effective in sniper like environments, & if youre low on loot her Ult can potentially clutch your situation
- Bloodhound: Still Niche, but becomes decent in verticality based environments with their scan.
Conclusion
Have fun. Dont forget this is a game meant for you to enjoy. Take breaks, & get sleep. If you get caught up in the grind, you will lose your skills/focus. Make sure you get enough sleep, & make sure you don’t get too attached. Play other games, & take a couple days off. Self-improve. Dont get mad at the game or at other people, were all playing under the same rules as you. The only thing you can control is yourself, use that & practice. Set realistic expectations, youre not going to be a God overnight, & youre not going to get immediately better after just reading a guide or tips. You have to practice!
Thank you to all the people that share information on the internet. Spreading that information is enabling humanity to grow & improve upon itself. The thought is never lost on me that we live in a day & age where information is at our finger tips. Without you a lot of people will still be living under a rock, or living life in a much more difficult way. Doors are opened when you share information. Thank you so much.

Recent Comments