Fortnite BR How To Win Solos Comprehensive Guide
Fortnite BR How To Win Solos Comprehensive Guide by amirholas
Contents
- Introduction
- Dropping and landing
2.1 Where to drop
2.2 Dropping fast
2.3 Spotting other players - Inventory management and weapon choice
3.1 Items
3.2 Differences in weapon rarity
3.3 Inventory setup and order - Movement
4.1 General considerations
4.2 Sound
4.3 The Storm
4.4 Be aware of your surroundings - Building
5.1 Basics of building
5.2 Materials
5.3 What to build in different situations
5.4 The importance of editing
5.5 Traps
5.6 Base building
5.7 Base pushing
5.8 Building duels - Gunfights
6.1 Pick good fights
6.2 Getting an angle
6.3 Getting the high ground
6.4 Rotations and deciding whether to push or to stay defensive - Early game
7.1 Pathing - Mid game
- Late game
- Game settings
10.1 Consoles
10.2 PC
10.2.1 Keybindings - Final notes, edit log and about me
1. Introduction
Coming out on top of a hundred players is no easy feat. You will have to battle your way through a torn apart battlefield and build your way up to that Victory Royale screen. There is, however, something you can do to improve your chances and that is reading and applying this guide. I have written it with the very intention of you getting your win rate up (or even your first win) and getting the most out of your games. This guide is of a very detailed nature and will hopefully help improve the game of those who read it.
Before starting, I would like to make clear that this guide is particularly aimed at those players that struggle with getting wins and the tips and tricks I detail are focused on the goal of helping them win. It does still contain, however, a lot of good information for players that already win on a consistent basis.
This is not a guide of the very basics, instead, it assumes that its readers have already played some games and are familiar with the fundamentals.
As this guide is over 40 thousand characters, I will use two comments to complete it. If this is not allowed, just let me know as I am new to Reddit and this is my first post ever.
This guide is original and written by me specifically for the benefit of players in this subreddit. Feel free to scroll down and jump to specific parts of the text if you don’t want to read the whole of it.
Feel free to comment and criticise this guide down below, I will update it regularly with the help of your best comments.
2. Dropping and landing
2.1 Where to drop
Before dropping from the battle bus, you should know where you are going. Nothing screams bad early game as loud as dropping from the bus and looking for a place to land while on the air. The best strategy to land in a good spot and start the game with some decent items is to have a mental list of comfortable landing places. The choice of these places is up to you, but if you want to get consistent you must stick to these. You want to have approximately four landing spots, preferably far from one another (to account for the bus’s ever changing path) and get to know them as well as you know yourself. Having too many landing spots will make being comfortable in them more difficult. As I already mentioned, you can pick any spot you like as a comfort landing spot but I would like to share some thoughts on some of the best areas of the map as comfort landing spots, in my opinion.
Anarchy Acres and Fatal Fields
Both these areas are perfect comfort landing spots. The amount of players that drop here normally does not exceed three or four (depending on the bus trajectory)and once you finish gathering gear and materials in these areas, you are usually well equipped to head into the mid-game. Personally, these are my personal comfort landing spots, and I prefer Fatal over Anarchy because it lets me farm more wood and is closer to more places.
Greasy Grove
This is an underrated landing spot as there is a lot of collectable loot with relatively little risk as not much players use to drop there. I would definitely recommend it as one of your comfort landing zones.
Retail Row
Retail Row is a common landing spot, but don’t let that frighten you, if you feel that you have already learned how to handle early game, dropping in Retail Row will allow you to gather up a significant amount of loot and be in a center position in the map, which will make the storm move in your favour.
Unmarked landing spots
These are the most underrated landing spots in the game. There is usually more loot in marked places (such as the ones mentioned above), but only because they tend to be bigger. There are, however, many unnamed places that make perfect landing zones. For example, the factory between Shifty Shafts and the Flush Factory is usually empty of players and has enough pallets to make you walk out with 800 wood and enough chests to give you full shields and decent weapons.
These, however, are only examples and it is up to you to find the areas you are more confident landing in.
2.2 Dropping fast
Once you get your comfort landing places down, you should aim to drop fast. Having comfort landing spots will help you know when to start dropping and when to open your glider. You should wait until the very last moment to open it, in order to land faster and beat other players to the first weapon. If you can, just drop and wait for the glider to deploy automatically. The best piece of advice that I can give to land faster is to take into account the terrain below you. If there is a mountain underneath you, your glider will auto deploy faster that if there was a valley below. Think about this when dropping. You should not blindly just wait for the glider to autodeploy in all situations. If your landing spot is a bit far off, you should deploy your glider and let it get you on top of your preferred building in order to get to the first chest without any delay.
Another tip is knowing where to land inside your landing spot, that means that you should have a couple of go-to building where you know you can get your hands on a chest or weapon and be ready to fight any closeby players. This leads us to our next point, spotting players.
2.3 Spotting other players
It is very important to watch out for other players dropping in the same area than you. You should map how much players will land near you and in what exact house or building they drop. Once you have this information, your first movements will be much more safe and confident. Before jumping into the next point, we shall address what to do if someone lands at the same house or building that you do. If you can’t avoid it, you will be stuck with another player on a roof. What you want to do is try to beat the other player to the first weapon or chest and start blasting bullets at him. This, however, might prove more a feat of luck than of skill. That is why I do not recommend landing in the same house as someone else as it turns into a game of luck rather than skill. If you can avoid it, do, if you can’t, just try to get to the first weapon you locate faster than the other player. If you see him grab a weapon before you, try to run out the house to the next one to find a weapon of your own.
3. Inventory management and weapon choice
Here I will try to lay out the different items that currently exist in Fortnite BR and establish some kind of priority list amongst them, to show you exactly what should you drop and what should you take.
3.1 Items
First, let’s get to know every item currently available in Fortnite BR. We can divide these items in four categories; traps, grenades, shields/healing and weapons. There are four different rarities in items, represented by colors (the differences amongst which we will discuss in the next point), which are; common (white), uncommon (green), rare (blue), epic (purple) and legendary (orange). Let’s start sorting;
Traps
Traps are fully stackable, which means that whenever you see one, you should grab it as it will take no space in your inventory. Further discussion in the use of traps will be held in the building department.
Launchpad
The launchpad is the most valuable trap and comes in epic rarity. It allows you (or other players) to jumpad if you step on it which makes it very useful when pushing someone or when escaping the storm or a lost fight.
Campfire
The campfire comes in rare rarity and heals you and everyone in your surroundings for 50 hp over 25 seconds. It is a very useful trap as it lets you drop medkits in favour of weapons as you don’t have to worry about healing.
Spike trap
The spike trap comes in uncommon rarity and allows you to do 125 damage to any unsuspecting players who come by.
Grenades
Grenades take a space up your inventory and generally will have to be dumped in favour of healing or weapons. That said, there are certain grenades that can come in handy in specific situations.
Damage grenade
The damage grenade is an explosive which deals 105 damage and blasts through any buildings. It is good to have if nothing else is available if someone is hiding in a house and you can see an opening through a window, for example, but, generally, you will leave it in favour of other items.
Impulse grenade
The impulse grenade does just what its name says, it impulses whoever it impacts upon. It can propulse people up or sideways be it foe or ally, or even yourself. It can be used to throw people off of bases or to get you up there taking anyone by surprise. It can also be used to escape the storm if it is closing by by throwing it right below you and letting it propulse you towards safety. I would generally prefer having an impulse grenade over any other, except perhaps C4.
Boogie bomb
This thing is really good early game. If you find a boogie bomb at the start of a match and you have a player nearby, just make him dance while you line up your shotgun headshot to take him out without taking damage. Just be aware of the time it lasts, which is not much and also of note boogieing yourself. However, I would drop it in favour of a weapon or other grenade.
C4
C4 is exactly what it sounds like. It will come in packs of four and will allow you to place charges anywhere but on players and remotely detonate it. 3 charges will kill anyone (as each charge does around 70 damage) and it is a good grenade to keep to demolish bases of unsuspecting players.
We can then conclude that, in grenades, the preferred order is C4 > Impulse grenades > Boogie bomb > Explosive grenade. This is however, very personal, but if you have no idea how to go about prioritizing grenades, this should be a good orientation.
Healing/Shields
Bandages
Bandages come in packs of 5 and will heal 15 hp each up to a maximum of 75 hp. This means that you cannot fully heal even if you are fully stacked with bandages. Bandages should only be in your inventory if no other healing item is available to you.
Med-Kit
The Med-Kit heals all your missing health over 10 seconds. You can stack up to 3 kits. Med-kits are really useful when the storm is eating you up as they let you fully recover. You should drop 15 bandages in favour of 1 Med-Kit, generally.
Small shield
Small shields give you 25 shield very rapidly, up to 50 shield. You can stack up to 10 minishields. Late into the game, the best consumable to have are shields, because only taking up one slot, you get 250 shields, which is more than twice as much as the next best alternative. Plus, it takes a relatively low time to take.
Big shield
The big shield gives you 50 shield points over 5 seconds, up to a 100. You can only stack up to two, which normally means that you should give them up in favour of minis.
Slurp juice
The slurp takes two seconds to use and gives you 25 of each shield and hp overtime. You can stack up to two. If you find a slurp, are full health and don’t want to give up inventory space, you should drink it in case you get in a fight, as it will heal you overtime, also, that denies it from other players.
Chug Jug
The Chug heals you for all your health and for all your shield. It is a legendary item and a very good one at that. The downsides are that it is not stackable and it takes 15 seconds to drink it, rendering it useless in a fight. Because of this long drink time, if you find one and you already have some minis stacked, you should drink it on the spot and keep the minis, which come much more in handy in a gunfight.
Now that we have talked about the different types of healing items, an important notion to have is to not be conservative of healing items. If you have 75 shield and get a big shield, don’t wait to lose that 25 to drink it, just drink it right away so that you don’t have to carry it and you are more likely to survive a sniper shot or an unexpected gunfight. Same goes for health and medkits. If you are clear of the storm, just use the medkit for that 20 health you lost when you fell down the mountain, you never know when someone might shoot at you and drop you really low, just think that a med-kit won’t do much if you are dead (same for shields). We can now establish a priority in healing items, although, as with everything else, it depends on personal preference. This priority means what you want to carry if you are out of slots, so, as I remarked, if you can’t bring it, drink it.
Small shields (5+) > Chug Jug > Big Shields > Med-Kit > Slurp > Bandages
Shields should always have preference over hp healing items because that is what you lose first on a gunfight and being able to quickly regain shield will allow you to win more fights. Plus, bandages and Med-Kits are more common and will generally be carried by other players so you can heal up after killing them, while shields are more scarce as they are more likely to be used by players and because of the rarity difference.
Weapons
I would like to establish a priority right away, just to give you a general idea. First, there are six weapon categories, let’s start with Assault Rifles. As a note, and to avoid controversy, these are MY preferences and it is not necessarily what you should run. Again, this priority list is for those that don’t know what to take in a situation when they are faced with a weapon choice.
Assault Rifles (I will count the Scoped AR as a sniper)
Scar > Blue AR > Blue Burst > Green AR > White AR > Green Burst > White Burst
The Scar is undoubtedly the best assault rifle in the game. Little drawback, great precision and even greater damage, if you manage to get your hands on one, you will have a good advantage over other players with inferior rifles. The blue AR is similar to the scar, with lower damage and worse stats overall. It is, however, a very good weapon that you can carry over to the end of the game. I prefer it over the blue burst because of the ability to spam bullets to break fortifications, which can be difficult with a burst weapon. Next follows the blue burst, which is actually amazing. If you can manage to line up a clean headshot (which, thanks to the weapons precision, is not extremely hard), you will one shot anyone. It is a great mid-long range weapon but falls off in short distances and that’s why it is ranked below the automatic blue AR. The same goes for the other side of the priority list. Regarding the burst vs AR discussion, while it is true that the burst can laser anyone if you hit a good shot, and AR is generally more versatile because of the fire rate and the damage loss is not that significant. That said, the purpose of this weapon ranking is not to establish some absolute truths, just to orientante those players who do not know what to choose. Every player should use the gun they are more comfortable with.
Shotguns
Purple Tac > Green Pump > Blue Tac > White Pump > Green Tac
The Purple Tac is, in my opinion, the best shotgun in the game. The ability to shot multiple times at someone at close range compensates the possible misses you may have and due to the amount of damage it does, you should be able to one-hit headshot most people. The possibility on headshotting someone is increased as multiple shots are fired, which is why it outweighs the pump. Next we have the pump, which can one shot people in the head. The only problem is that the time between firing each round is pretty large in the context of a close combat which forces you to change to your automatic weapon after firing just one shot, and if that one shot is a miss, you are in a huge disadvantage. This is compensated with its sheer output of damage, almost a 100 to the chest. Next, and for similar reasons come the Blue Tac, White Pump and, at the bottom, the Green Tac.
A great strategy regarding shotguns is carrying two. If you carry a Pump and a Tac, you can fire your Pump for a great amount of damage and quickly switch to your Tac for an increased firerate. This way, you bypass the limited fire rate of the Pump while accessing its damage. The downside is obviously that you effectively lose one slot to carry two weapons but if you like being overaggressive, I recommend trying it out.
SMGs
SMGs are underrated in Fortnite BR. These weapons can dish out a ton of bullets in a split second and demolish bases on their own. That said, if you had to choose, an AR is generally better for its versatility.
Purple SMG > Blue SMG > Blue Silenced SMG > Green SMG > Green silenced SMG > White silenced SMG > Minigun (any rarity)
The reason the minigun is down there is because it is to useless in most situations. When you fire it, you have to wait a moment before it starts dishing out bullets and when firing, it leaves you to exposed. Although I reckon it has its uses in certain situations, I would not take it over another SMG.
Pistols
Pistols are generally not a good choice of weaponry. However, there are some situations when you might want to have one at hand. There are four variants, the normal pistol, the revolver, the suppressed pistol and the hand cannon. The normal pistol is useless and only should be used if nothing better is available. Same goes for the revolver, which at a really low fire rate, can’t compare with a shotgun, while it offers the same relative utility. The suppressed pistol, however is a good substitute for an AR when paired with an SMG. I would take a orange or purple suppressed pistol over any white AR or burst or even above a green burst. Suppressed pistols are very precise, make little noise, and dish out a decent amount of damage. The only downside is fire rate which is why you should pair it with an SMG. The hand cannon, on the other hand, acts like a sniper mixed with a shotgun. It is good to finish off players after you damaged them and have to reload and also to snipe people at mid range. It is however, not worth it to give up meds or other weapons to have a hand cannon in your power.
To sum up, you should only consider carrying a suppressed pistol if you don’t have a good AR and a hand cannon if you have a spare inventory slot.
Snipers
Legendary Bolt > Purple Bolt > Blue Bolt > Purple Scoped Ar > Blue Scoped Ar > Legendary Auto Sniper > Epic Auto Sniper > Hunting Rifle > Crossbow
At the top of our list we have the legendary bolt-action sniper. It is awesome. If you manage to hit someone, he will die or be so low that a couple AR hits will finish him off. The only downside is that you have to be able to aim properly because of the low fire rate. Same goes for the other bolt action snipers. Then we have the scoped Ar which is often overlooked. It is basically an AR with a sight. You would be surprised how much damage it can output to people at the other side of the map. Plus, you only have to reload every 20 shots, compared to the 10 of the Auto Sniper. I would rather take the scoped AR than an Auto Sniper. This leads us to the Auto, which is good but not great. It does not do much damage and, for a Sniper rifle, that’s what you need as, most times, you will only get one clear shot. The Hunting Rifle is not too good as it is not very precise and its low fire rate makes it inferior to any other sniper, except the crossbow, which is by far the worst one of all. It is useful only if you want to joke around with your enemies, but for any other purpose, use a proper sniper.
Explosive weapons
Rocket Launcher > Grenade Launcher
If you manage to get your hand on a Rocket Launcher, you are set on to win the game. It is a rather versatile weapon. You can use it to demolish bases, as a shotgun and even as a sniper. You should almost never renounce to a Rocket Launcher if you see one, maybe even if you already have one as double Rocket Launchers is really hard to counter for your enemies. It is superior to the grenade launcher because of the delay on the launcher explosions and the limitation on range. The only advantage on the grenade launcher is the fire rate. Explosive weapons, because of the building mechanics of Fortnite, are a really powerful weapon and having one puts you in a good position to counter other strategies. To effectively use the Rocket, you should not just spam it at other peoples’ fortifications as they will just build up the walls you exploded and you will waste amo and be exposed to potential sniper shots from other players. What you should do is pair Rocket shots with AR shots so that you can destroy walls and let either your ammo or your rockets hit the enemy.
We shall now mention counter strategies to both explosive weapons.
In the case of the grenade launcher, you want to move a lot. The strength of this weapon is its fire rate. It can easily slip grenades under your structures faster than you can rebuild them. What you want to do is to leave your position using the chaos caused by the explosions and reposition yourself. You should move either to a spot were the low range of the launcher wont allow it to hit you or you should push directly using a disengaged double staircase. A disengaged double staircase is a double staircase that you build up to two stairs high, drop to the floor and then, before you hit the ground, build another set of double staircases two stairs high and you repeatedly do so until you get near enough the enemy as to make launching grenades dangerous for him. Using disengaged double staircases will allow you to push while avoiding taking fall damage if one of the grenades destroys the first stairs. It will also act as an effective cover of incoming bullets.
To counter rocket launchers the best strategy is to push. Staying still will give a massive advantage to the enemy as all you will be doing is rebuilding walls and all it takes is one mistake for one rocket to send you to the login screen. You either want to escape to a higher ground to get an angle using disengaged double staircases and walls or to directly push using the same kind of building mechanics. You have to be more careful when pushing than in the case of the grenade launcher as you may have rockets inbound directly aimed at you while on top of your stairs, which is why you should move really quickly and try to put the enemy in a position of close quarters. Also, you should use the time between each launch as a window to push more aggressively as it takes about 2 seconds to reload a rocket launcher.
3.2 Differences in weapon rarity
Most weapons come in different rarities. If you have a green weapon X and find a blue weapon X, you should change gear. But, what exactly changes from every rarity? Well, if you want to know exactly, you can check at https://db.fortnitetracker.com/weapons, but in summary, more damage, more precision and a lesser reload time.
3.3 Inventory setup and order
Now that you know every item in the game and how it ranks with its own category, what should you be running?
In Fortnite BR you have five inventory slots which can be filled with the items mentioned above. The ideal setup would be a mid-long range weapon, a close-range weapon, an explosive weapon and meds. Sometimes, it is wise to renounce to some meds in favour of another weapon but you should try to have at least one slot dedicated to healing as you never know when you might get into a fight. If I had the choice of dropping somewhere and finding any loot I wanted, without counting traps or double launchers, I would choose a Scar, a Purple Tac, a Rocket Launcher, a Bolt and 10 minis. With this setup you should be able to beat anyone in the late game. This kind of setup, however, is normally only possible towards the end of a game, if at all. The common setup you should run consists on an AR, a shotgun, a sniper and some meds. The sniper, if you have a hard time aiming at long distances, should be substituted with something else but keep in mind that this limits your game to mid-short range. It is possible to run double tac renouncing to a med slot to get more shells per second but most times, you won’t need to do that to kill someone. On that topic, at the present day the only weapon you should consider running double time is the Rocket Launcher or the shotguns (Tac-Tac or Pump-Tac).
The minimum core for dealing with most situations consists of an AR and a shotgun, and you should not give that up. The shotgun, in exceptional situations might be substituted with a Launcher, but it is not common that you will need to do that.
Now that you know what to run on your slots, you will have to order them in a way that it is easy to switch from weapon to weapon. This is especially important in console where you cannot bind weapon slots. You should put your shotgun next to your AR in order to be able to rapidly change between these two midsfight. Generally, you have to think of your AR as the cornerstone and the rest of the weapons as the pillars. Your AR is the most versatile weapon and you should be able to access it at all times. That said, you should find your own setup and order and always run the same. That way, you will build muscle memory and will be able to change weapons with ease.
4. Movement
4.1 General considerations
Running is what you will do most in a game of Fortnite BR. You should learn how to do it properly. First, you can run, crouch or sprint. That said, you should never run. It makes you an easy target and gives you nothing in return. The only time you should do it is when shooting at mid-range, to be able to rotate while dishing out bullets. When moving, you should sprint. In BR, you can sprint forever. Sprinting takes you from A to B faster and makes you a harder target to hit. Crouching is good for long-mid range shooting but makes you easier to hit and slower. You should only crouch when in cover and de-crouch as fast as the other player starts shooting at you.
When running through the fields of Fortnite, you don’t want to be an easy target for snipers. That’s why you jump while running periodically but unpredictably and why you don’t run in a straight line but rather move in a Z shape. This is not exclusive to Fortnite and for good reason. You want to make yourself a hard target to hit so that you can avoid damage if someone starts shooting at you. When sprinting, you should always be trying to cover yourself up with trees or rocks or whatever you can find in order to avoid being hit if someone starts shooting at you. The combination of these two practices will let you dodge incoming bullets that would otherwise give the advantage to your foe. Also, you should try to use the hills as cover and, when given the choice, try to go in the higher ground. If you are higher than your enemies, you can see them while they can not and you can cover while they can not. It is vital that you actively search for high ground when moving as that will avoid being surprised by other players on the field.
Also, when collecting resources, you should not stand still pickaxing but rather jump or move around.
Lastly, my recommendation is that you always keep moving. Camping will not allow you to have good enough loot and materials to survive in the late game. Plus, moving is more fun. This leads to my next point and that is, be aggressive. As you become better at the game, you will see that this will come naturally. An aggressive player has more control over fights and the map in general as he gets to set the pace. Also, people do not expect you to put up an offensive early which may let you land some easy kills. That said, if you are still learning, it is okay to be more defensive in some situations as you are still learning building and other useful mechanics but, in the end, you will see that being aggressive will just come out naturally and will give you a good advantage over other players.
4.2 Sound
Before playing Fortnite, buy a good set of headsets. Sound is really important, REALLY important. If you have good environmental headsets you can echolocate every player around you, if not, anyone can locate you and you can’t locate anyone, you will die before you even know who hit you.
When traversing Fortnite’s fields, you will hear gunfights. Most of the times (if you have enough health and the you are safe from the storm), you want to go to the source of the gunfire. This will let you get the jump on people as they will be focused on killing another player. If you arrive late, there is a high chance that the remaining player is low on health and you can get a free kill.
4.3 The Storm
The Storm is a double edged sword. It can be detrimental to you but, if you know how to use it, it can also work for you. First of all, you should always know where the circle is closing in and the time it would take to get there from your position. You have to keep in mind that the first circle closes in the fastest but does the least amount of damage, the second moves a bit slower but does more damage (2 when it settles), etcetera. From the third circle onwards, you can outrun the storm.
To make the circle work for you, especially in mid to late game, when the circle has a lesser radius, you can ride the storm. Keeping the storm right behind you or at a lateral will allow you to catch people off guard and low on health as well as serving as an effective angle coverer. Another tip about the storm is not to fear being inside of it if you have a healing items. Being inside the storm will allow you to shoot at enemies before they notice.
In the earlier parts of the game, you should try to stay always moving towards the circle to avoid getting caught in a fight and having to endure the Storms’ punishment.
The last advice regarding the storm is that when you come out of it, before healing up, you should box yourself so you don’t get shot at while healing. This will save your life countless times so do it.
4.4 Be aware of your surroundings
When you move through the map, you have to have eyes everywhere. Check bushes, dark places and every mushroom because a player may be there. While you move, you have to constantly rotate the camera to your surroundings and, once in a while, do a full spin and check that no one is creeping up behind you.
Also, you have to always think of the terrain as something you can use to your advantage in advance to the initiation of a gunfight. Are you near a mountain?, think how would you get up there if someone started shooting at you. This way you will be able to magnify your chances of surviving fights and getting closer to the win. More on this topic later on the guide.
5. Building
If there is something unique about Fortnite, it is its building mechanics. It is impossible to get good at the game without building. Building is what you have to think when Fortnite is mentioned so let’s get right down to it.
5.1 Basics of building
We all know what building in Fortnite is. You can build walls, stairs, pyramids and floors to build yourself some cover or to overcome some geographical obstacle. You just need ten pieces of materials of any kind to be able to build any of the available objects. In order for you to become good at Fortnite, you need to flawlessly transition between building and shooting. The basic difference between a good player and an average one is its ability to build quickly and efficiently in every situation.
5.2 Materials
We have wood, bricks and metal. Wood is collected mainly from trees, house furniture and wood pallets. Bricks are collected from stone constructions and metal, from cars and containers, mainly. Wood is the fastest to collect while metal is the slowest, and bricks are in between. There are three variables that change from material to material. First, building health is the health that the structure has while it is in the process of forming (when it is half light blue). In that department, wood has the most health while brick and metal have less. If you are getting shot at, the best material to pull out is wood as it will take more bullets to destroy it in contrast with the other two materials. Another variable is forming time, and again, wood is the quickest, metal the slowest and bricks are in between. The last variable is health at full build. Here, metal has by a large margin the most amount of health, wood the least and bricks are in between.
So, you want to always have selected wood as the default building material because it will resist more in a panic building situation. If you want to build a base, metal and bricks might come more handy.
The easiest material to gather is by a large margin, wood. You should always be cutting trees down and breaking pallets in order to be able to defend yourself efficiently in a fight. Try to never be lower than 250 overall materials and, going into the late game, you will most likely need about 600 total.
5.3 What to build in different situations
I will now list a series of situations and explaining how and what you need to build in order to overcome them. More specific situations are explained below.
Suddenly getting shot at in the fields
This is the most common situation. You are running and suddenly some shots pop your shields and you are helplessly left to die. Well, not anymore. The next time, you will know that as soon as you hear shoots coming your way, you will build a wall in front of you, in the direction of the bullet, if you see it, and then three more walls in every side of you. Now, you will build a stair in the middle and you will have your little box. You can even build higher by placing four more walls on top of the four bottom ones and a floor and a stair or only a stair. Now you can look around and identify the enemy and shoot back or heal and shoot back.
You are in the low ground and you see someone shooting you from high ground
Although this is a disadvantageous situation, you, as a building prodigy will be able to respond. If there is no terrain around you and you are in the open, you should place a wall and then a floor above your head, to prevent yourself from getting shot in the head. Then, place 3 more walls and box yourself in. Now, identify some natural cover nearby, such as a mountain and create a door in one of your walls and run to the natural cover while creating floors above your head. This should allow you to reposition and gain a better angle at your shooter.
Someone is shooting you while you run from the storm so you can’t stop and box in
In this situation, what you have to do is to keep running, maybe zigzag a little while placing walls between you and the shooter not only where you are in the present but also where you are going to be one second later preventing the shooter from killing you. Once you are clear of the storm, box in and try to gain the high ground.
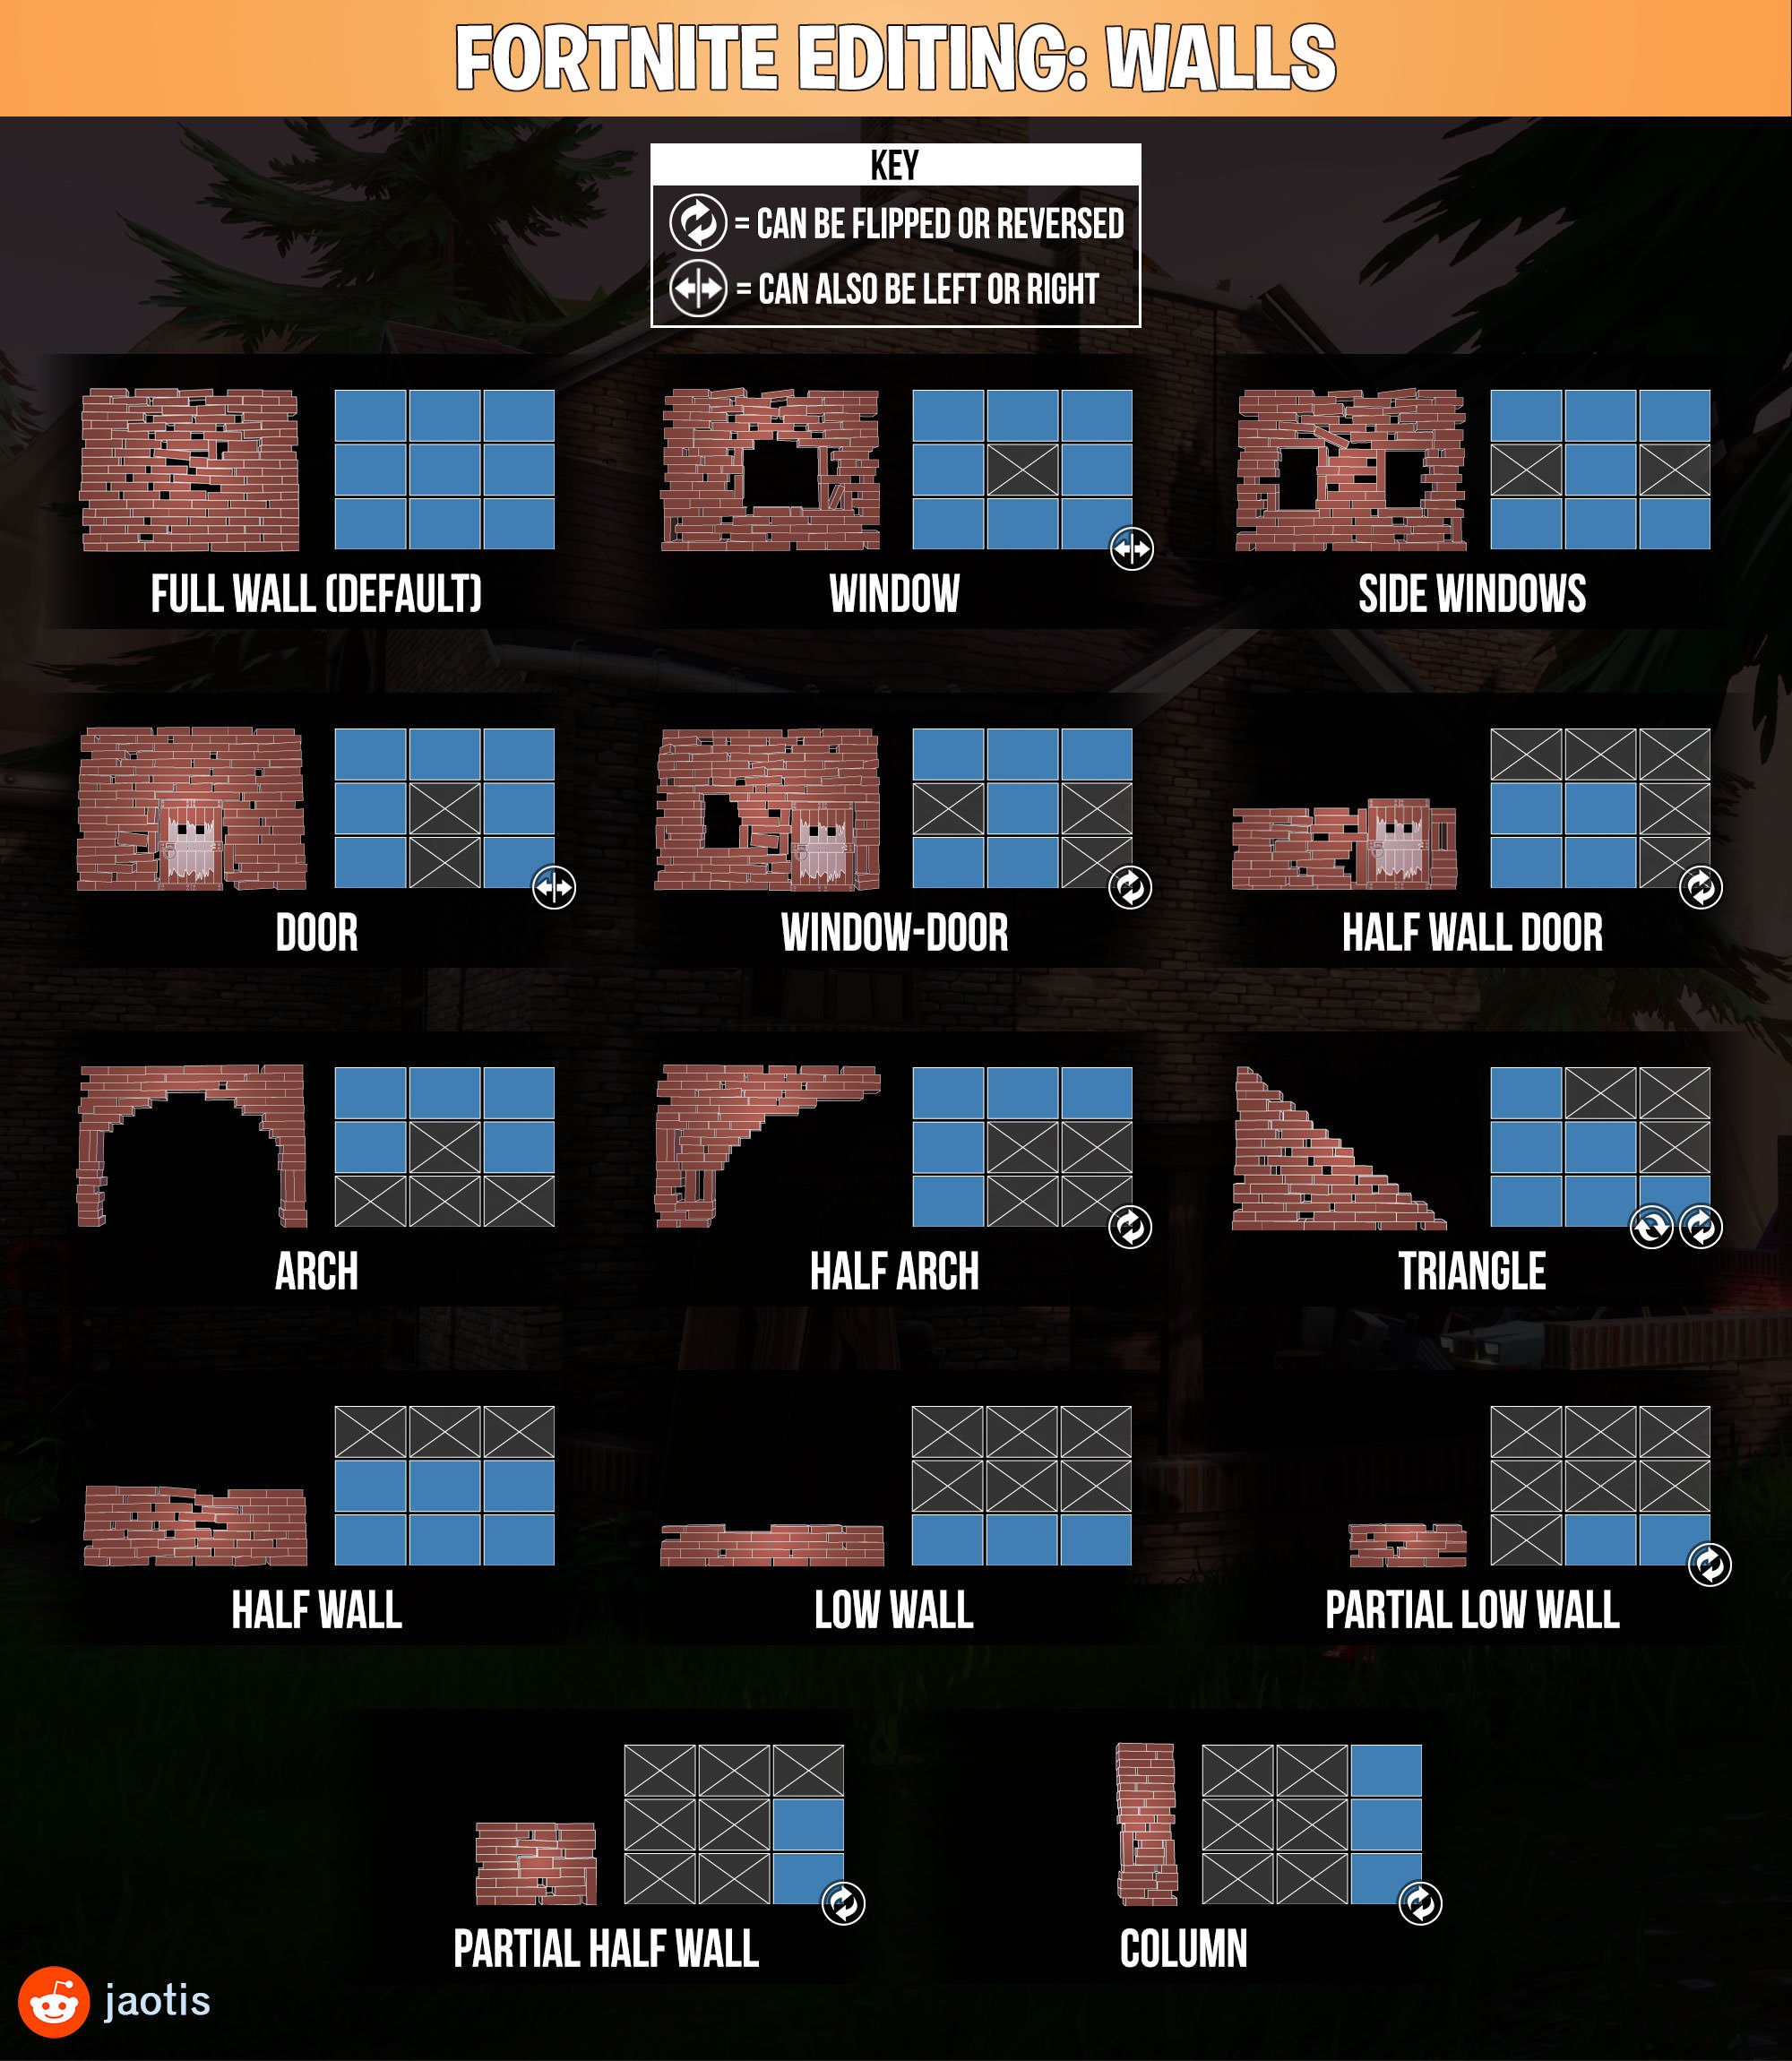
5.4 The importance of editing
Once you get your building down, you want to practice editing. You can edit walls to make doors, windows, arches, or even horizontal pillars, stairs can be rotated and you can even create a spiral staircase, floors can be opened up and pyramids can be turned into stairs and opened on some side. There are multiple possibilities and you have to learn them. It is very important that you get down as that will allow you to take your game to the next level. Just to put an example, if you box yourself in and place a roof on top, and the enemy gets on top of your floor and starts shooting down you could wait until he shoots it and you down and die or you could edit the piece he is standing on and make him fall confused while you shotgun him in the face. Or, another example, in a building standoff, you end up boxed in below your opponents stairs and he starts shooting down at you. You could just wait up and die or you could edit one of the walls, make a door, then place a floor in front of you, some stairs, and boom, you have regained the high ground and are now in a position to kill your opponent. If you had pickaxed your wall, you would have been rendered vulnerable and have gone much much slower, allowing your opponent to finish you off. Editing is important when getting up your base after going down without placing new stairs, it is important to make a fast escape, it is important for every reason you can imagine and you have to learn how to do it. There are many tutorials on reddit and on youtube such as:
5.5 Traps
Traps are an interesting mechanic. We have already gone through the different traps that exist in Fortnite so let’s explain now when to place them down and how. Note that you can not place traps on other player’s fortifications.
The spike trap should be placed down where it is hard to see, preferably facing downwards and right after a door. This way, unsuspecting players will get killed and you can go back and grab their loot. Also, when building a base, it is often wise to place some traps at your sides to work as a welcoming gift to any unrequested visitors (especially for dealing with people who jump pad onto you), as traps do not damage its placer.
Campfires should be used on top of a floor and you just have to wait around to get healed. A good strategy to heal yourself while you shoot is to box yourself, place a floor on the bottom, place the campfire and then place a stair on top. You will get healed while also being able to respond to enemies by shooting them in the face.
Lastly, we have the most fun trap of all, the launchpad. Place it down on a floor and when you or any player jump on it, you will fly across the sky. It is a very useful trap and very versatile. You can use it to escape the storm, to escape a tricky situation or to push your enemies. A good use for it is to push bases of unsuspecting players, to do so, just go to a high enough place, place your jump pad and jump behind the enemies. If they don’t turn, just shotgun them in the face, if they do, place a floor by their wall and then use stairs to push them.
It should be noted that traps cannot be picked up once placed and will be destroyed if shot at. The only trap that does not have unlimited uses is the campfire, that extinguishes after its use.

Recent Comments