Megaten Instance Guide
Megaten Instance Guide by lightcoral
Feel free to post additions and corrections. Exact demon levels taken from the JP Wiki. Don’t quote the first post. Use ctrl+F.
Strategy listed here is mostly party oriented, because I WAS tired of clueless gits nuking Decarabia and causing parties to wipe out on Troll groups.
Demon weaknesses listed are from the perspective of a caster- I know the elemental weaknesses and not melee damage weaknesses (blunt, slash, whatever else), so I’d appreciate if someone could post the melee damage weaknesses.
Note that I’m aware Plates I haven’t listed exist, like Gold Suginami, I just can’t be assed to write about them.
If you want to contribute, please TRY to use this version’s terminology. Area names, item, demon, instance, skill names, whatever else varies between versions. Having japanese and whatnot names here just creates confusion.
General instance information;
1. Always keep track of the map and make sure the party splits up if it’s needed.
2. Don’t rush in and AOE a group of demons unless you’re sure you can stunlock or take them.
3. Make use of your demon.
4. If someone joins the party after the instance is created they will not be able to get in.
5. If someone disconnects while inside the instance, they can reconnect and be repartied to continue the run.
6. Instance demons CAN be contracted just like any other sort (yes, Deformed ones too). That doesn’t apply to “special” demons- bosses and minibosses, which can be recognised by titles such as “Imp of Chaos”, “Dangerous Matter”, and so on.
 Suginami Tunnels
Where: South part of Suginami area
Notes: Glittering Ores are used to open the doors leading to side rooms. You don’t have to use them and it’s recommended not to do so if you’re running a G1 trial. Unused Glittering Ores MUST be dropped, sold, or traded in at the Yagiya- having any on you will make you unable to get in the instance. Trading them in earns you 1 Revival Bead each.
Bronze plate; recommended level: up to 16-17
- Jack Frost, level 11; Weakness: fire, spread
- Cait Sith, level 7; Weakness: long range
- Onmoraki, level 1; Weakness: force, penetrate
- Slime, level 6; Weakness: fire, expel, almighty
- Angel, level 11; Weakness: death
- Kodama, level 3; Weakness: fire
- Sudama, level 17; Weakness: fire; NOTE: suicide bombs occasionally
- Nekomata, level 26; Weakness: electric
- Accomplished Nekomata, level 26; Weakness: electric
- BOSS Great Beast: Garm; Weakness: fire, long range
Strategy; Kill everything. Yep.
Silver plate; recommended level: 15-25 with a good party, 25-30 with a bad one I guess
- Troll, level 38; Weakness: fire, spread
- Deformed Jack Frost, level 51; Weakness: fire, spread
- Deformed Cait Sith, level 33; Weakness: long range; NOTE: huge aggro range
- Deformed Archangel, level 53; Weakness: ice, death; NOTE: huge aggro range
- Deformed Troll, level 48; Weakness: fire, spread
- Slime, level 6; Weakness: fire, expel, almighty
- Blob, level 16; Weakness: ice, almighty
- Onmoraki, level 1; Weakness: force, penetrate
- Lucky Nekomata, level 52; Weakness: electric
- Deformed Onmoraki, level 19; Weakness: force, penetrate
- Black Ooze, level 31; Weakness; electric, almighty
- Deformed Black Ooze, level 46; Weakness: electric, almighty
- BOSS The Column Dwellers: Decarabia; Weakness: expel, long range, blunt;
Strategy; Don’t bumrush the groups of Trolls, try to pull out 1-2 at a time. If you see Deformed Archangels spawn be extra careful and make sure you don’t lure anything else with them. The boss room will most likely wipe you out multiple times unless you’re very careful. Try to pull as little Cait Sith as possible. If Decarabia gets pulled, cast Shibaboo on it if you can and leave it alone until all the minions are gone. Try not to nuke, the only spell that works on it other than Megido is Hama. All other destruction magic (save for ice element) will be blocked and possibly reflected.
How to get to treasure rooms: Glittering Ores can be gotten as negotiation gifts from any Insufferable Chatterbox demon. The treasure rooms have Lucky Nekomatas as well as boxes with a small chance to drop Necklace of Kisshoten and a spear that I can’t remember the name of.
DrayGon777 wrote: |
In the boss room, to avoid a party wipeout, it is imperative that most of the party stays by the door, and one (maybe two) people do the pulling. When pullng, position yourself between the pillars on either end (preferable the opposite in of Decabria) and Charge-Cancel till you get one or two cait siths coming at you. Be ready to run back to the door the moment they clear the pillars. Do not, I repeat DO NOT stand there and take them out in that spot. You will only continue to draw more Cait Siths until a mob is on the party’s side of the pillar. It is almost a garantee that the lurer will also be killed. |
Gray plate; recommended level: whenever you get it, but do take a party, ESPECIALLY if you’re a spellcaster.
- Troll, level 38; Weakness: fire, spread
- Slime, level 6; Weakness: fire, expel, almighty
- Blob, level 16; Weakness: ice, almighty
- Black Ooze, level 31; Weakness; electric, almighty
- Onmoraki, level 1; Weakness: force, penetrate
- Nekomata, level 26; Weakness: electric
- Deformed Onmoraki, level 19; Weakness: force, penetrate
- Deformed Jack Frost, level 51; Weakness: fire, spread
- Deformed Cait Sith, level 33; Weakness: long range; NOTE: huge aggro range
- Sudama, level 17; Weakness: fire; NOTE: suicide bombs occasionally
- Jack Frost, level 11; Weakness: fire
- Cait Sith, level 7; Weakness: long range
- Decarabia, level 50 (boss room only); Weakness: expel, long range, blunt
- Forneus, level 29 (boss room only); Weakness: electric
- (miniboss) The Column Dwellers: Forneus; Weakness: electric; NOTE: often reflects the four basic elements and absorbs ice additionally
- (miniboss) The Column Dwellers: Decarabia; Weakness: expel, long range, blunt;
- BOSS The Column Dwellers: Andras; NOTE: reflects force
Strategy; Difficulty-wise this is a little harder and much longer version of Bronze. Be careful around Trolls and Deformed Cait Sith. Near the end of the second level you’ll face Forneus- it can get very annoying with its AOE and it reflects magic as well as bullets from what I can remember, so obviously have a melee fighter take it out. A while later you’ll face the second miniboss, Decarabia. Strategy here is same as for the Silver boss- do not nuke, only use expel spells and ice if you must, do shoot a lot. Boss room isn’t nearly as difficult as the miniboss Decarabia- Andras will reflect force and take lowered damage from electric, but is easy to take out otherwise.
How to get the Jack Frost Pendant: at the beginning of the dungeon you’ll notice a NPC called Jack Frost. Remember this. After killing each of the minibosses, Forneus and Decarabia, you will earn a valuable item. Once you have both, backtrack all the way to the Jack Frost and choose to give the items to him. You’ll get the Pendant as well as gain access to his super secret shortcuts. Use the biiiiig one so you don’t have to run to the end of the instance again. NOTE: to gain access to the shortcuts, just showing the Jack Frost one OR both of the items will do. You might as well give them to him though since he’s hella cute and you don’t need the items for anything else.
Kingdom plate; recommended level: whenever you get it, but do take a party
- Forneus; Weakness: electric
- Decarabia; Weakness: expel, long range, blunt
- Eligor, level 43; Weakness: electric
- Andras, level 14
- BOSS Eligor; Weakness: electric
Strategy; On the first floor enemies are only in a few rooms- last, first room and the two side rooms containing ores which you need to pass. The first side room is tiny and swarming with Forneus’, so be careful there because their Absolute Zero hurts. Make sure someone (plate owner recommended) gets the ore from the chest. Second side room features Decarabia, but it’s considerably easier because there’s more space. Second floor rooms feature Andras, Forneus, Decarabia and Eligors. Usual boss room rules apply, don’t lure too many, spread out, take things out one by one.
 Shibuya Quartz
Where: Almost in the middle of Shibuya
Notes: To get in, gather 10 Altered Magnetite dropped from most demons in Shibuya. You can then trade it in at the Yagiya for a Bronze Plate.
The navigation inside this instance is pretty tricky- A lot of the doors don’t open and to progress you need to interact with the crystals. Note that you will not necessarily encounter all demons on this list and the boss as well as its minions will also change depending on what crystals you’ve used- see the quote below for details.
theyummykenshin wrote: |
Making a str crystal (40-50 str needed, bonuses count) glow will lead you to rooms where Elves, Mirror Inugami, and Dangerous Matter: Sudama spawn. |
Making a Magic crystal glow leads you to rooms where mass amounts of Lucky Hua Po spawns.
Making a Speed crystal glow leads to rooms with Ocypete, Kelaino, and Accomplished Aello.
Luck crystals (20 luck min) will lead to luck rooms with 5 chests, each chest contains an average of 100 mags (anywhere from 96-106 from experience) or 3 altered mags (rare).
Whichever crystal you make glow first will change the boss’s weakness/resistances.
Neutral boss (Must have the Str, Mag, and speed crystals glowing) has no weakness/resist from knowledge. Will also randomly block gun shots. Mobs are Harpies, Elves, Dangerous Matter: Sudama, Mirror Inugami, Lucky Hua Po, and Accomplished Aello from memory. The boss gave close to 16k xp in a group of 3.
Bronze plate; recommended level: 15;
- Harpy, level 7; Weakness: long range, force
- Ocypete, level 25; Weakness: long range, force
- Kelaino, level 30; Weakness: long range, force
- Aello, level 36; Weakness: long range, force
- Elf, level 31
- High Pixie, level 15
- Accomplished High Pixie, level 15
- Inexperienced Harpy, level 3; Weakness: long range, force
- Inexperienced Ocypete, level 14; Weakness: long range, force
- Inexperienced Elf, level 16
- Inexperienced Aello, level 28; ; Weakness: long range, force
- Mirror Inugami, level: 27; NOTE: reflects all magic damage and occasionally long range
- Lucky Hua Po, level 33; Weakness: ice
- Inexperienced Oberon, level 36
- Inexperienced Titania, level 38
- (miniboss sort of thing) Dangerous Matter: Sudama; Weakness: fire
- BOSS Furiae; Weakness: varies; Speed crystal boss: long range; Magic crystal boss: ice, fire; Strength crystal boss: melee; Neutral boss: none
Strategy; An annoying thing here is that most of the demons are able to dodge long range and magic attacks. Shooting while your demon attacks at the same time will remedy that. Kelaino have a huge aggro range and are very aggressive, so go for them first if they spawn. Melee the Mirror Inugamis. Elfs will heal whole groups, try to keep them busy or take them out soon. Boss room group varies, be careful if you see Kelaino spawn. If they do, back up and take them out with long range attacks before you go for the Furiae.
Eliayth wrote: |
For the dangerous Matter Sudama, much quicker kill if you have ONE melee person aggro it, make it rush than have them use counter. 1-hit kill. |
In the boss room, you can make your demon target Fury and go pull her using your demon – this makes no other demons spawn (running in yourself does). It’s easy if you pull her to the entrance and just kill here there, then take on the smaller demons.
The weaknesses of demons in the boss room are sometimes different to their usual weaknesses.
 Celu Tower
Where: Southwest part of Shibuya
Notes: This instance has a miniboss, Omoikane, which will appear either on the first or second floor. You’ll know when it’s coming because its room always has the Robed Guard NPC at the entrance. Omoikane is known to drop debuff stones- and the highly sought after Makanda stones among them.
Eliayth wrote: |
If you want Omoikane to spawn, you need to make sure you don’t hit the switch on the first floor. |
Bronze plate; recommended level: 15;
- Apis, level 24; Weakness: magic, death
- Slime, level 6; Weakness: fire, expel, almighty
- Harpy, level 7; Weakness: long range, force
- Koppa-Tengu, level 15; Weakness: penetrate
- Inexperienced Koppa-Tengu, level 12
- Ogre, level 25; Weakness: death, magic, long range, electric, charge
- Nozuchi, level 14; Weakness: fire, electric, magic
- Archangel, level 17; Weakness: ice, death; NOTE: boss room only
- (miniboss sort of thing) Omoikane; Weakness: charge, slash
- BOSS Embodiment of Form: Hathor
Strategy; Some of the closed doors here will require you to interact with terminals in other rooms. Omoikane is a total wuss, don’t worry about it at all. Watch out for Hathor- she’ll cast Makarakarn on herself occasionally (a green defensive looking spell), which makes her reflect the next spell that’s cast on her. Now this is a bit obvious, but here’s how to dispel it easily (assuming you can’t interrupt her casting in the first place): just make your demon cast a spell that you know it would block or absorb if hit with it. It will bounce off and dispel Makarakarn, which is only good for one time. After that you can nuke Hathor without any problems, unless she casts it again.
Silver plate; recommended level: easily cleared and decent exp around level 30, possibly lower
- Macha, level 12; Weakness: force, long range
- Principality, level 25
- Inexperienced Principality, level 20
- Tarasque, level 17; NOTE: absorbs fire
- Onkot, level 37
- Omoikane, level 31; Weakness: charge, slash
- Bicorn, level 17; Weakness: electric; NOTE: Omoikane room only
- Sleipnir, level 62; Weakness: magic; NOTE: boss room only
- BOSS Embodiment of Form: Odin; Weakness: force
Strategy; This instance is a bit long, so make sure you come prepared. There’s a Yagiya shop just before the boss room. Enemies will usually spawn in waves, second wave often having multiple Tarasque. Be wary of that because they are annoying and take long to die. Boss room is pretty tedious, Sleipnir and Odin both hit hard and have a lot of HP. Odin has an ice AOE additionally. Those demons don’t have a very big aggro range however, so you shouldn’t have problems with luring them one by one. Use your demon to interrupt Sleipnir’s charge before it can hit you, because if you’re squishy it will most likely one hit kill you.
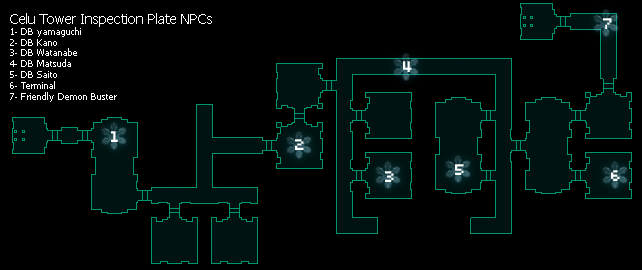
Inspection plate; recommended level: as soon as you get it you’re good to go, but don’t forget a party- it only looks easy until the boss room;
- Deformed Archangel, level 53; Weakness: ice, death; NOTE: huge aggro range
- Deformed Principality, level 62; Weakness: death
- BOSS Embodiment of Form: Power
Strategy;
 This image has been resized. Click to view the full Size Image.
First part is very straightforward, killing shouldn’t be too hard. Make sure the person with the plate and quest talks to every NPC on that level, you won’t be able to progress otherwise. Boss room is very challenging since the minions are Deformed Archangels- back up and spread out so the whole group doesn’t get AOE stunlocked.
DrayGon777 wrote: |
For Celu Tower Inspection, I’ve come up with a strategy that usually works pretty well. The idea is to have one person go in first, and run along the edge to the back of the room. There’s a line of what appears to be tombstones that can be hidden behind back there. Just before the decoy cross behind them, they should charge up an attack and then duck behind. If done properly, they should have gained the attention of most of the Deformed Archangels. They should make sure they are positioned in such a way that they and their demon are not leaving an open direct path between them and the Deformed Archangels. Then the other party members can come in and take care of the remaining forces not on the decoy. If the decoy is particularly skilled with their demon, and doesn’t mind taking a bit of a risk, they can control their demon to knock one of the Archangels to the other side of the tombstones. They also should be sure that they are also capable of fighting one on one without moving from their spot. |
 Old Ichigaya Camp
Where: Southwest part of Ichigaya
Notes: This dungeon varies a lot depending on the plate.
Bronze Plate; recommended level: 25;
- Inexperienced Quilin, level 29
- Quilin, level 41
- Slime, level 6; Weakness: fire, expel, almighty
- Gaki, level 7; Weakness: fire, expel
- Koppa-Tengu, level 15; Weakness: penetrate
- Karasu Tengu, level 28; Weakness: penetrate
- Deformed Karasu Tengu, level 40; Weakness: penetrate
- Datsue-Ba, level 14; Weakness: electric, force; NOTE: boss room only
- Former SDF Soldier: Mou-Ryou; Weakness: expel, shot; NOTE: Appears in boss room, only if you don’t use Repaired File (Mou-Ryou). Reflects ice;
- Scorched by Flames of an ICBM: Ghoul; Weakness: expel, fire; NOTE: Appears in boss room, only if you don’t use Repaired File (Ghoul)
- Goto’s Loyal Henchman: Choronzon; Weakness: expel, electric; NOTE: Appears in boss room, only if you don’t use Repaired File (Choronzon)
- BOSS Embodiment of Power: Kikuri-Hime; Weakness: fire
Strategy; The boss room here can be very hard or very easy depending on if you have used any Repaired Files. Assuming you used all 3 of them, take out the Datsue-Ba first so you don’t get binded constantly. Kikuri-Hime has a big aggro range, so take note of that. If you have the Nimble Cerberus, which you most likely do, use one of its borrowed skills (Mega Blaze, Scorching ****) on her and she’ll go down fast.
If you haven’t used the Repaired Files, it’s going to be more difficult.. Choronzons can and will paralyze you, try to take them out early on. The Mou-Ryous are super annoying, take way too long to die and have a force AOE- try not to bunch up because the whole party getting caught up in it and stunned won’t be pretty.
Silver Plate; recommended level: no idea[list]
This section is empty, I need to fix that sometime o_o
Gold Plate; recommended level: 50 and up;
- Deformed Quilin, level 70
- Deformed Koppa Tengu, level 32; Weakness: magic, penetrate
- Deformed Karasu Tengu, level 40; Weakness: magic, penetrate
- Nightmare Spector (can only be hit with melee attacks)
- Nightmare Chatterskull (can only be hit with force affinity magic)
- Guardian of Sin: Gaki; Weakness: fire
- Guardian of Sin: Gandharva
- BOSS Guardian of Sin: Jikokuten; Weakness: fire
Strategy; This instance requires that you gear up properly and get the right demons for it. Note that I am only covering a simple one floor boss run- if you decide to venture to other floors there will be different demons, bosses and strategies required. I also haven’t listed ALL soul fusions, demon and pieces of equipment that are useful in here, just provided the basics.
Running the first floor is perfectly straightforward, kill everything, have a demon that can heal the status effects that Nightmare Spectors and Chatterskulls will inflict on you (Etnadi for curing muddle/amnesia most importantly, Petradi also comes in handy).
For boss room, it’s useful to have a demon which nulls or drains magic affinity damage, which the Gakis do. Some of those are- Omoikane, Loki, Hecate (iirc Hecate will be patched to not absorb magic damage later on, not sure about that). You should have that demon tank Gakis and let a Demolition Dash user take care of them with Delorean.
Gandharvas take longer to kill, but if you manage to muddle/amnesia them they won’t cause you any trouble. Soul fused Mothman crystal increases the chance of inflicting it, so have your Magic Bullet/Erosion Hex user equip a talisman with it. Gandharvas also respawn, so it might be a good idea to leave them alone until everything else has died.
Jikokuten is of course weak to fire. He does hurt a lot, so try to keep him occupied while having your demons heal. For damage dealers, Orthus + Cerberus soul fusion combo is very nice to have as it boosts fire damage. Agi, Agilao and Maragi Accels are a decent alternative if you’re a mage without Delorean.
Ogami Plate; recommended level: no idea, but no matter what, don’t try it alone
- Imp of Chaos: Shikigami; Weakness: fire, penetrate
- Imp of Chaos: Taraka; Weakness: ice
- Imp of Chaos: Oni; Weakness: magic, nerve
- Ultimate Fanatic: Assassin; Weakness: expel, NOTE: extremely strong
- BOSS Imp of Chaos: Shiki-Ouji; Weakness: fire, penetrate
Strategy; You will have a 20 minute timer to clear this. If you let the time run out you will fail the trial and need to start over, though it shouldn’t be hard to make it seeing as you’re only doing a single floor. Demons will be swarming you constantly and you need to be quick. Once you reach the boss room, the timer stops and the real battle begins. Inside the boss room, there will be swarms of Taraka, Oni and Shikigami yet again. They respawn, so try not to let them distract you and focus on the boss instead- it has a lot of hp but once you take it out you’ve won.
Seance Plate; recommended level: no idea, don’t try this one alone either
- Imp of Chaos: Shikigami; Weakness: fire, penetrate
- Imp of Chaos: Taraka; Weakness: ice
- Imp of Chaos: Oni; Weakness: magic, nerve
- Imp of Chaos: Pisaca; NOTE: boss room only
- Imp of Chaos: Nue; Weakness: fire; NOTE: boss room only
- Ultimate Fanatic: Assassin; Weakness: expel, NOTE: extremely strong
- BOSS Ogami
Strategy; Longer instance for a change, make sure you’re all stocked up and repaired. First, you have to talk to DB Mikanagi. After that head for the elevator. You will have to talk to Gaian Priest Todo along with several gaians, and then Knight Templar Hiragi along with several messians. After you’re done with that, return to where DB Mikanagi is and prepare for the boss battle. Boss room is swarming with demons yet again- every kind encountered in the instance as well as Pisaca and Nue. They will respawn, and after killing them over and over for a while you can hit the four switches in the corners of the room to make them stop spawning. Here’s a strategy that seems to work well for me: four party members should distract as many Assassins as possible while a strong mage takes out Nue and Pisaca one by one. They should die in 1-2 Agi, and as soon as you kill the entire spawn of them you should be able to hit one of the switches. After those two, move on to Taraka, and next Shikigami. Ogami hurts a lot, though she only uses a basic melee attack and has no AOE. Not the hardest boss battle if you make sure you haven’t pulled too many minions, especially Assassins.
 Kagurazaka Zhu Que Cavern
Where: Northeast part of Ichigaya
Notes: To get to the next floor, you have to kill the Deformed Poltergeist and unlock the doors leading to Wandering Spirits. Upon interacting with one, it will unlock the teleport leading to next floor for you. There’s also the whole Lost Angel deal I read about on this forum, but I’m not going to punk a guide someone else wrote so just click here and read the post.
Tyson411 wrote: |
There are two variations to the boss room here. The normal version features Legion. Randomly, the boss will be Suzaku instead of Legion. |
if the soul tells a person they are “the chosen one” then suzaku will appear as boss
Bronze Plate; recommended level: 20-30;
- Inexperienced Orthus, level 15; Weakness: ice
- Inexperienced Bai Ze, level 23; NOTE: due to a bug its name is just “Inexperienced” at the moment.
- Turdak, level 23; Weakness: force, spread
- Accomplished Turdak, level 23; Weakness: force, spread
- Deformed Poltergeist, level 26; Weakness: electric
- Mou-Ryou, level 11; Weakness: expel, shot
- Blob, level 16; Weakness: ice, almighty
- Accomplished Mou-Ryou, level 11; Weakness: expel, shot
- Yakka, level 24; Weakness: fire, ice
- Swarming Beast: Bai Ze; NOTE: they make up the boss group if the boss is Suzaku
- BOSS Lustful Fiend: Legion; Weakness: electric
- BOSS (rare) Beast of Red Mist: Suzaku ; Weakness: ice; NOTE: absorbs fire
Strategy; A lot of running around yet again. Inexperienced Bai Ze are annoying and have a rather big aggro range. Boss room is a pushover- the Poltergeist are weak. They will suicide bomb you occasionally. Legion must be blind or something because you can walk right up to it without any sort of reaction for a good while. It casts a mdef down curse but is very easy to stunlock, though it takes a while to kill.
Tyson411 wrote: |
Suzaku is a much tougher boss then Legion, and the Hakutakus that spawn with it have no weaknesses. Avoid using area attacks. |
 Shinagawa Catacomb of the Templar Knights
Where: West part of Shinagawa
Notes: This instance is different from regular when created during New Moon. You will randomly get status effects in certain places- namely as soon as the statues in W shaped rooms “see” you, as well as in boss room if you step on the lettering on the floor. In the regular version, the status effect is bind. In the New Moon version, it will be Panic status instead.
About half way through the instance there’s a NPC. In regular version, it’s an Archangel who will give you Serenity Aura, a 2 hour buff that prevents panic status. In New Moon version it’s Artemis who will give you Sorrow Aura, which prevents bind. Also, after getting their respective blessings, you can talk to them again for a gift- Archangel gives you Messian’s Possessions, Artemis gives Scarlet Stone. Scarlet Stones can be used to create the New Moon version dungeons anytime as long as you have 20 on you. Messian’s Possessions can be traded in for macca as long as you have the Serenity Aura (talk to a female Messian on Arcadia square). Throughout the dungeon you’ll find several treasure chests. There’s a Yagiya shop here just before the boss floor.
Bronze Plate – regular version; recommended level: no idea
- Accomplished Principality, level 25; Weakness: death
- Accomplished Archangel, level 17; Weakness: death, ice
- Deformed Macha, level 41; Weakness: force, long range
- Badb Catha, level 54; Weakness: force, long range
- BOSS Glaring Soul Giver: Hresvelgr; Weakness: fire, long range; NOTE: reflects ice
Strategy; Yes, the W-shaped rooms are going to suck. They ARE annoying, but you only need to get through a few of them. In the square rooms, enemies spawn in pairs. This is a bit tricky- Accomplished Archangels and Deformed Machas can do quite a bit of damage when paired up. The pillars can be a huge advantage- hiding behind one will make the enemies on the other side unable to rush at you. Boss room has a lot of highly aggressive Deformed Machas which can get quite bothersome, so try to back up and not attract too many.
Bronze Plate – New Moon version; recommended level: high?
- Vetala, level 44; Weakness: expel, electric, force, spread
- Deformed Choronzon, level 35; Weakness: electric, expel
- Deformed Legion, level 48; Weakness: electric, expel
- Deformed Ghoul, level 30; Weakness: fire, expel, spread
- Deformed Spector, level 52; NOTE: immune to all magic damage
- Yomotsu-Ikusa, level 44; Weakness: fire, force
- Yomotsu-Shikome, level 35; Weakness: force, electric, fire
- Deformed Tarasque; NOTE: boss room only
- BOSS Trampling Soul Vandal: Nidhoggr
Strategy; The Deformed Ghouls are your first problem here. Their rush does a lot of damage and they tend to spawn in groups of 4. Thankfully they go down fast. Again, use the pillars to your advantage to protect yourself from the Ghouls’ rush. Another dangerous thing about this instance is the hallways- they will have large and respawning groups of Deformed Ghouls, Vetalas and Yomotsu-Ikusa. You might find yourself sorrounded by two groups of rampaging Ghouls, so be very careful. One way to get past is rushing through and trying to lose aggro along the way, which is risky. If you want to kill everything to pass, remember that there will be a LOT of enemies and you have very little time before the last killed group respawns. Another lovely surprise- the last floor, which is completely devoid of enemies in all other instances, is swarming with demons here.
Boss room might make you lose all exp you’ve gained throughout the instance and possibly your whole life, depending on how unprepared you exactly are. Deformed Tarasque have huge aggro range, ungodly amounts of HP and they really, really hurt. Same goes for Nidhoggr who has some lovely AOE spells in addition. One strategy that seemed to work for me was using a Unicorn, which would block and null the Tarasques’ attacks while stunlocking Nidhoggr at the same time.
 Virtual Battle
Where: Northwest part of Home III
Notes: Although technically not an instance, I decided to list it anyway because I can. This area serves as a tutorial of sorts. You cannot contract any of the demons you’ll find here, and they are constantly respawning. None are aggressive.
- Green room – Slime (doesn’t attack)
- Blue room – Gaki
- Purple room – Will O’Wisp
- Yellow room – Onmoraki
The green room with Slimes is cheapest so far way to level some Expertises. All you need to do is spam the appropriate skill on the Slimes, which can’t hit back and respawn very fast. If you notice they’ve stopped spawning in the spot around you, move to the other side of the room. Unequip your weapon (and armour if you want) so you don’t have to worry about any repair costs. If you’re trying to level Curse magic, use Sukunda stones instead of casting and using potions- it’s cheaper. If you’re trying to level Destructive magic, buy all four kinds of stones (Agi, Bufu, Zan, Zio) and use them in succession so the cooldown period won’t slow you down. Respect all others who are there to level their Expertises- they are likely using incenses and do not want to waste time. Respect the newbies doing the tutorials as well, and if you see that the room is getting crowded, switch channel or move on to the next room.
 Shinjuku Docks
Where: Shinjuku Babel centre
Notes: Another non instance, just a regular dungeon but here it is anyway. A lot of contractable demons and quite diverse families if you’re looking for fusion material. The bosses are very tough, I recommend to stay away from them unless you’re sure you know what you’re doing. There’s a small level 30 restricted area here, the robots as well as some Lilims and Alps spawn in it.
- Lilim, level 20
- Inexperienced Lilim, level 11
- Alp, level 8
- Incubus, level 31
- Dis, level 23
- Lucky Dis, level 32
- Accomplished Dis, level 23
- Isora, level 14
- Apsaras, level 8
- Nozuchi, level 14
- Inexperienced Nozuchi, level 1
- Naga, level 24
- Poltergeist, level 4
- Blob, level 16; Weakness: almighty
- Ghoul, level 11
- R07A Arcturus; Weakness: electric; NOTE: not a demon and therefore impossible to contract
- BOSS Queen of Shinjuku: Succubus
- BOSS King of Shinjuku: Tarasque
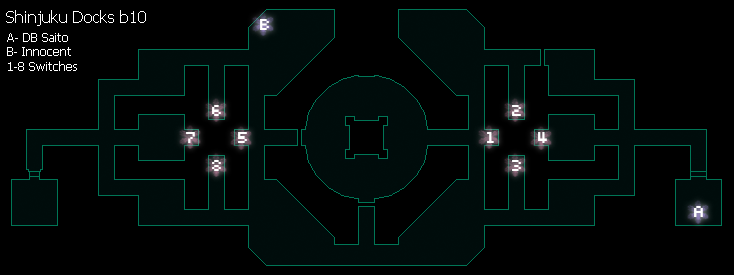
Shinjuku Docks b10
- Imp of Chaos: Shikigami; Weakness: fire
- Imp of Chaos: Taraka; Weakness: ice
- Imp of Chaos: Oni; Weakness: magic, nerve
- Inexperienced Shiki-Ouji, level 47 x4; Weakness: fire; NOTE: boss room only. Those demons are possible to contract, if you want to.
- BOSS Ultimate Fanatic: Assassin; Weakness: expel
Strategy;
 This image has been resized. Click to view the full Size Image.
Not a very difficult instance, however you need to do a bit running around to flip all the switches. The order they’re numbered in on my map doesn’t matter- you can hit them in any order as long as you start with the E switches. Head east first, you’ll need to visit DB Saito in the square room there before going to the other side to the boss room. Be careful at intersections since there is a possibility that you’ll pull more than one spawn, which you don’t want. The Innocent marked on map is entirely optional, you will receive a Valuable Card if you talk to him. That item has no use as of yet. Boss room is pretty chill, just take out the Assassin first.
How to tame an Inexperienced Shiki-Ouji: from what I know anything that isn’t macca bribe will make them truce straight away or very soon, therefore macca bribe is the only (however pretty expensive) way to do it.
 Act Instances
These are instances that need clearing in order to complete Act quests. Only ones that DON’T belong in any specific instance (such as Suginami Tunnels) are listed here. This list is even less complete than the previous one so bear with me =] Also, no strategy will be given unless the instance involves more than just a boss group to kill. You cannot contract any of the demons inside these instances.
Act 0; Home II Industrial Area
Not much to add about this one- you get very clear instructions and all you have to do is follow.
Act 3; Service Entrance Card A
- Imp of Chaos: Shikigami, level 5 (x8); Weakness: fire, penetrate; NOTE: aggressive
- BOSS Imp of Chaos: Taraka, level 25; Weakness: ice; NOTE: either not aggressive or very small aggro range
Act 7; Service Entrance Card B
- Imp of Chaos: Shikigami, level 5 (x10); Weakness: fire, penetrate; NOTE: highly aggressive
- BOSS Imp of Chaos: Oni; Weakness: magic, nerve
Act 13 Chaos/16 Law – Doukan’s Spirit World
- Deformed Fenrir, level 77 (x4); Weakness: long range
- BOSS Surt, level 72; Weakness: ice; NOTE: absorbs fire
Act 13 Law/16 Chaos – Judah’s Spirit World
- Inviolable Angel: Angel; Weakness: death, force
- Inviolable Angel: Archangel; Weakness: death, ice
- Inviolable Angel: Principality; Weakness: death, mind
- Inviolable Angel: Virtue; Weakness: death, force
- BOSS Uriel, level 80; Weakness: death, ice; NOTE: absorbs fire
Thanks to: To my lovely boyfriend for helping with and correcting a lot of things; Everyone from clan Hotness and ouside of it that’s done runs with me; To all other contributors: Eliayth, DrayGon777, minifive, Cenauge, mexmer, theyummykenshin, William Chu, elevelm, kurosX, Alcadeiass.

Recent Comments