Skyforge Lightbinder Guide
Skyforge Lightbinder Guide by NikaPoveda, Douglas Poveda
1. General Characteristics
Hi people, I will talk about Lightbinder and this information can be used in this patch that we are because Lightbinder was changed (somebody tell that was nerfed) after CBT3, and I could see that he had some modifications in the damage.
Lightbinder or Guardian of Light is a resistant warrior and he helps the party with support, using damages buff or casting shields, repeling enemies and I lot of things. Currently the game has only 2 supports, Lightbinder and Alchemist.
The most difference in Skyforge is Support isn’t Healer, in this game don’t have healer, although the alchemist has a cure, ultimate ability, and Divine Healing, one Divine Combat Ability that restore your character’s health. Outside these hypotheses, the two only way to heal your health is, If you get health orb or If you use some restoration item (like potion in another games).
After this you can know that the function of Lightbinder is reduce the damage taken by the enemy, protecting allies with barrier, increase allies and yourself damage with buffs and help reppeling monsters with some control attack, he only maintain the health of allies.
Below you can see some Pros and Cos about this class:

I will divide the Guardian of Light in three categories to explain more about this class:
Protection – This kind of category means that Lightbinder will use abilities to maintain the health of allies, reducing damage but NEVER recovering, because how I said above, have only 3 ways to recover your health, alchemist’s ultimate ability, divine combat ability and recover items.
Buffs – This kind of category means that Lightbinder will use abilities to make allies and himself stronger to kill hard monsters, another players or bosses. (This is soo cool ^-^)
Attack – This kind of category means that Lightbinder is playing alone, making individual dungeons, that need some damage and offensives abilities to kill enemies. Lightbinder has single attacks and massive attacks, that is called AOE. He has control attacks too that serve to repel enemies, gain time for the cooldown of other skill or give more damage with a stunned damage, have a lot of possibilities.
After CB3, in CBT4 and OBT until now, his damage was reduced but he can kill monsters yet, he has a acceptable damage but who played with this class in Technical Beta, CBT1, CBT2 or CBT3 will feel much difference.
You always will use these categories combined, I think that is impossible use each category isolated because do not have many skills to do it.
How you can see, Lightbinder can do many things, I love it hehe
2. Skills and Talents
Lightbinder has 20 abilities, including finish strike attack and more 3 abilities in Incarnation of Light Mode, 20 talents and 158 nodes in Ascension Atlas.
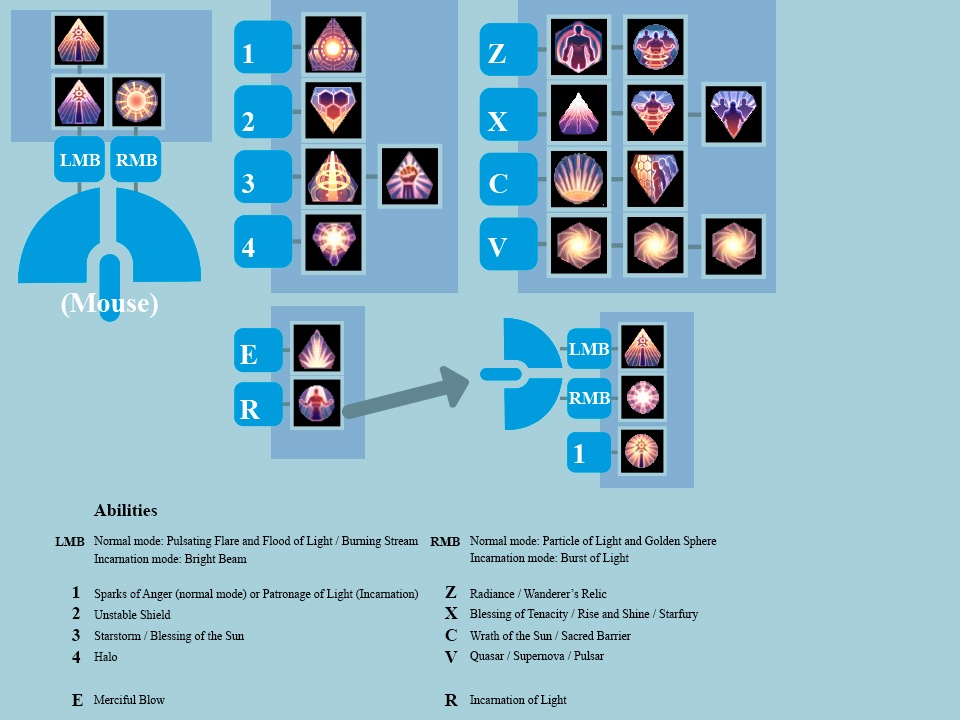

This is an example of the window of your Lightbinder’s Abilities and Talents, you clearly can see Normal abilities and Abilities in the Incarnation Form (Lightbinder’s Ultimate Ability)
Guardian of Light has 20 talents that enhance or supplement certain skill will not only strengthen them and use different tactics of the game. You can use only 8 of talent (10 in total but I don’t know when the 2 lasts slots will be unlocked or how much prestige we need to unlock it).
Now I will explain each talent that Lightbinder have and talents to each abilities and sometimes I will do some observations about some skills. Pay attention, when you see only the name of the skill, this means that is a Ability, if you see the name with a “>” before, this means that is a Talent.
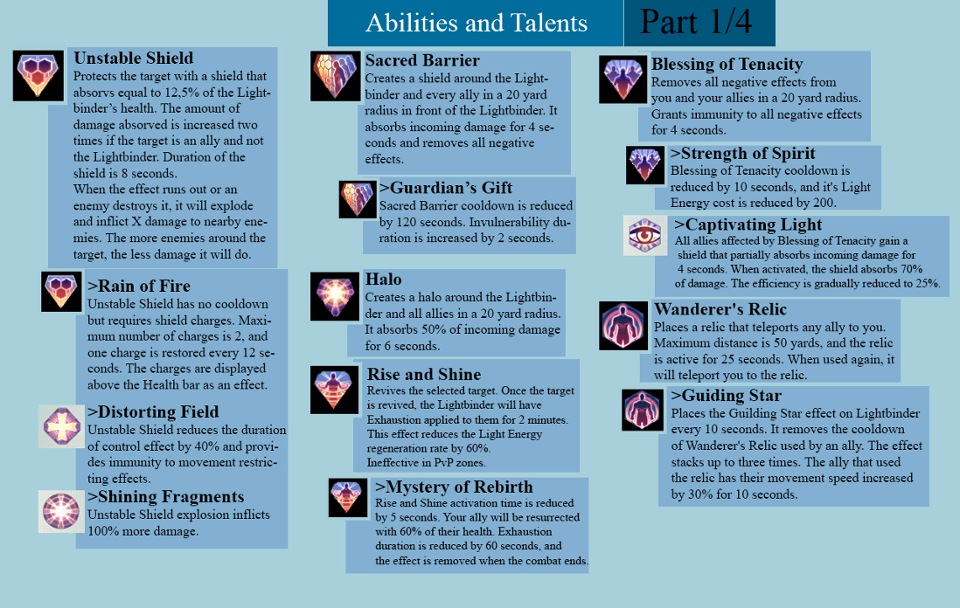

In part 1 and 2 you can see a lot of abilities that are used to cast shield and protect yourself and allies, you can see that some Talents increase effects in some Abilities.
For example Blessing of Tenacity is an ability used to remove negative effects but, when you use the talent Captivating Light, Blessing of Tenacity is able to create a shield for you and your allies for 4 seconds absorbing 70% of damage (initially) and this shield is reduced gradually. This is so good!
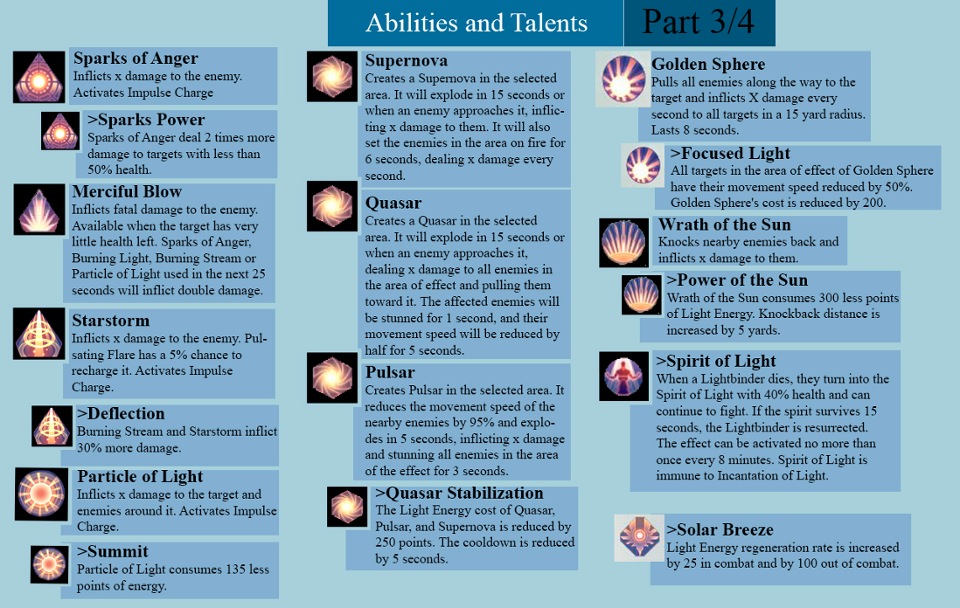
In part 3 you can see more about offensive abilities and talents that increase the power of these abilities or reduce the Light Energy consume. You can see control abilities too and other talents hehe.
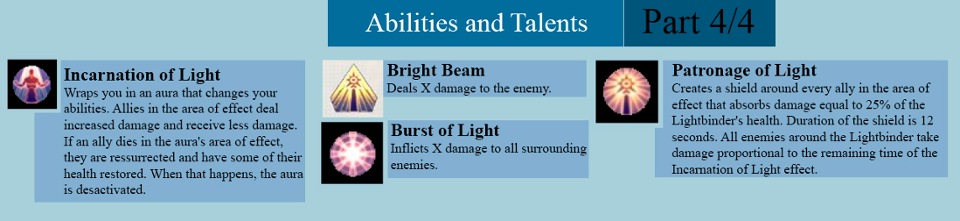
Finally, in the last one you see the ultimate Ability and the three extra abilities that you only can use in Incarnation Mode. (I love the animation of the Ability Patronage of Light and the effect is very good)
3. Symbols
You can see your symbols window in the next image.
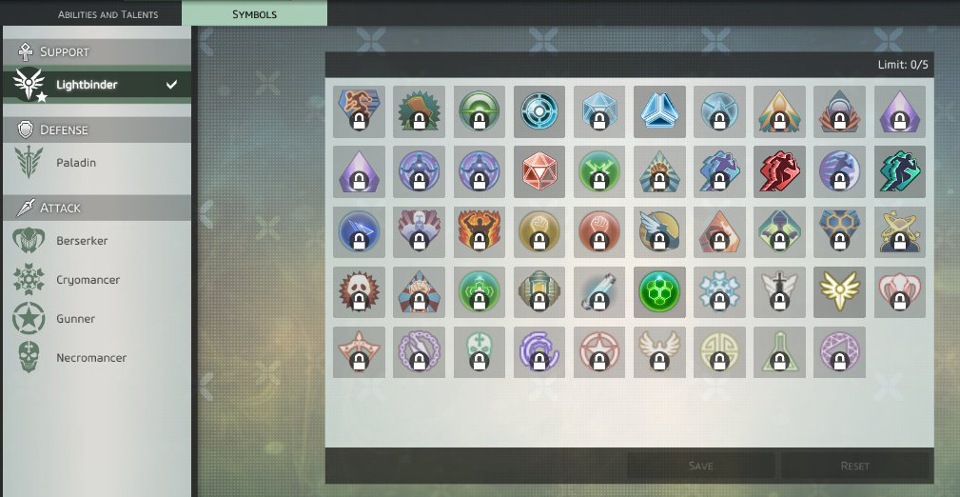
Above you can see many Symbols and you need to unlock each one to use. Symbols are passive “talents” that can help you so much.
When you unlock this tab, you can use only 3 symbols, when you complete the Ascension Atlas with one class, you receive a new costume and the symbol of your completed class. You can see that my lightbinder badge has one star, this means that I have already completed my Lightbinder Ascension Atlas and, in the last line and penultimate column you can check that my Lightbinder Symbol (Shroud of Light) is unlocked.
Another thing is when you complete the Ascension Atlas of one class, you gain more 2 slots of symbol in you limit to use more and more symbols, my limit is 5, because I started with 3 and more 2 because I completed Lightbinder.
I forgot to say, have only 2 ways to unlock that symbols, Class Symbols you only can unlock completing the class, all of the others you need to unlock by Ascension Atlas using Sparks.
Now I will mark the recommended symbols to Lightbinder but remember, you can change, you can do a lot of thing because I will mark only some symbols and with the passage of time you will be able to use more symbols that I will show you hehe (I saw one video that the player use 17 symbols, oh god).
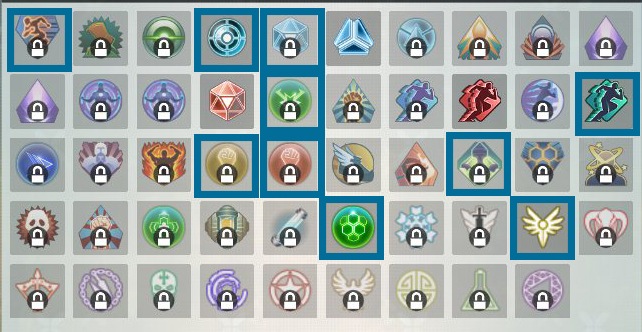
Shroud of Light – Lightbinder
When the character is not in combat, they gain a shield that absorbs damage equal to 5% of the character’s maximum health (three plates maximum). The shield can be restored during combat, if the character takes no damage for 6 seconds.
Double Discharge
When Impulse Charge is restored, there is a chance that it can be activated two times in a row. The chance is increased by 12% for every level of this symbol.
Clever Maneuver
For 3 seconds after Dash is used, the incoming damage is reduced by 10% for each level of this symbol.
Bonus Dash
Number of Dash charges is increased by 1 for each level of this symbol.
Adrenaline Surge
When taking damage, the character’s speed can be increased by 15% for each level of this symbol. The effect lasts 5 seconds, and its activation chance depends on the character’s current health.
Impulse Intensity
Impulse damage is increased by 10% for each level of this symbol.
Maximum Recoil
Critical damage is increased by 10% for each level of this symbol.
Painful Spasms
Impulse damage applies an effect to the enemy that inflicts damage over time. Total damage is equal to the character’s Spirit.
Dissection
Impulse damage applies an effect to the enemy that inflicts damage over time. Total damage is equal to the character’s Luck.
Tactical Defense
Melee defense is increased by 5% for each level of this symbol. Ranged defense is increased by 5% for each level of this symbol.
4. Characteristics of the Character
Attributes
1. Main:
1.1. Prestige – An indicator of the development of your character. The more prestige – the harder and more adventure reward from them.
1.2.Might– Increases the base damage
1.3. Stamina – Increases your maximum health.
1.4.Strenght – Increases the minimum base damage.
1.5.Valor – Increases the bonus damage.
1.6.Luck – Increases critical damage.
1.7.Spirit – Increases impulse damage.
2.Damage character
2.1.Base damage– Is the basic skill damage of the character
2.2.Bonus damage – Bonus skill damage is proportional to the oponent’s health (More health, the higher the damage inflicted)
2.3.Critical Damage – Bonus damage added when the character inflicts a critical hit
2.4.Impulse Damage– Bonus damage inflicted by skills that use Impulse Charge
3.The formula for calculating the damage is
(Base damage + bonus damage + critical hit damage + Impulse) * coefficient + skill damage bonus of amulet
Modifier skills = own ability modifier *modifier skills Wands *modifier on the skills and talents
4.Additional
4.1.Proficiency – The only requirement in the game equipment, you need proficiency to use equipment.
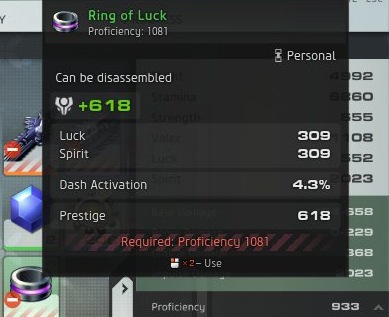
In this case I can’t equip my ring because the requirement is profiency 1081 and I have only 933.
4.2.Greatness – It affects the limit levels of your provinces.
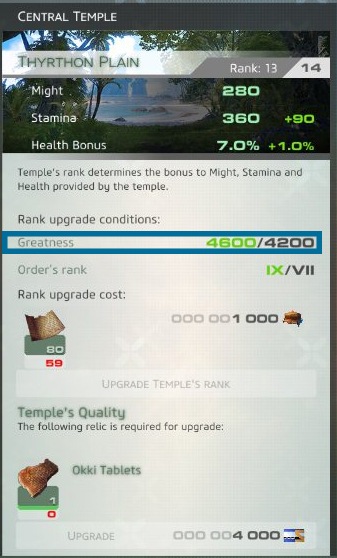

In this case, you could buy a lot of Argent, buy a lot of Holy Text, you could level up your Order Rank a lot but, Greatness is one requirement to upgrade your province rank, If you don’t have Gratness, you won’t upgrade it.
The only way to get Greatness is Ascension Atlas, each node of Greatness give you 200 of Greatness.
4.3.Critical Damage– Increases your critical hit chance
4.4.Discharge Recovery– Increases the frequency of Impulse Charges and the amount of Impulse Damage
4.5.Accuracy – Brings the minimum base damage closer to maximum and increases your Strength’s influence on the base damage.
4.6.Temper – Increases bonus damage and the chance the ability will inflict maximum bonus damage regardless of the target’s health.
4.7.Crushing Blow– Give a certain chance to increase the base damage two times.
4.8.Endurance– Reduces damage to you from attacks that cause damage in excess of 10% of your health
4.9.Health Bonus– Increases your maximum health
5.Secondary (minor)
5.1.Violence – Increases damage output when the health of your character is below 50%
5.2.Solidity – Increases Might by a certain percentage of your Stamina
5.3.Ranged Damage– Increases the damage on the enemy over 20 yards
5.4.Vigor – Increases the damage inflict to enemies at a distance of more than 20 yards
5.5.Shield Power– Increases the effectiveness of boards that are stacked on top of your character
5.6.Regeneration – Restores some lost health in battle, if the character did not receive damage over 4 seconds
5.7.Block – Periodically reduces damage to you, to the percentage of your Stamina
5.8.Adaptation – Reduces damage from skills with periodic damage
5.9.Dash Activation – Reduces dash activation time.
5.10.Melee Defense– Reduces damage from the melee attack of other IMMORTALS (close attacks)
5.11.Ranged Defense– Reduces damage from other IMMORTAL at long range
5.12.Defense Penetration– It makes that you can ignore part of the target’s defense
5.13.Control Efficiency– Increases the duration of your control effects
5.14.Control Suppression– Reduces the control that impose on you
6. Invasion
6.1 Tactical Sense – (Invasion) Increase the percentage of defense ignored by your attacks when fighting certain high-level invasion monster.
6.2 Cold/Eletricity/Poison/Radiation/Hypnosis Resistance – (Invasion) Decrease the damage taken bu bosses in Invasion according to the resistance that has.
Equipment
1.Rings (There are six types of rings in the game. Of the additional features found in all – preparing spurt and an increase in health)
1.1. Luck / Spirit
1.2. Strength / Luck
1.3. Valor / Luck
1.4.Strength / Valor
1.5.Strength / Spirit
1.6.Valor / Spirit
SPIRIT | LUCK: This is a good choice because Lightbinder has enough skill that use Impulse Charge and using Spirit the damage using Impulse Charge will be very increased, Luck will increase your critical damage. This choice will help you to take more damage. (Don’t forget what I said in the begin, Lightbinder don’t have the same damage as before)
SPIRIT | STRENGHT: In this case Spirit is like before but the difference is change Luck to Strength, now you will increase your minimum base damage, now you don’t want to wait at your damage take critical damage. You prefer increase all your attacks.
STRENGHT | LUCK: In this you will maximize your minimum base damage to take more damage in each hit and give more damage when you take critical hit too. In this case you will need to increase your Critical Hit Chance.
2. Rods
2.1 – Spark Anger – Best option DD
2.2 – Blessing of the Sun – Group, FS
2.3 – Starstorm – Need “luck”
2.4 – Merciful Blow – Useless
3. Pommel
3.1 – Particle of Light Best option PvE Solo and DD.
3.2 – Halo – Best option PvP and PvE Group
3.3 –Sacred Barrier – Good anywhere
3.4 – Radiance – Useless
4. Amulets
4.1 – Sparks Anger – good option DD
4.2 – Pulsating Flare – good alternative to DD or FS
4.3 – Particle of Light – useless
4.4 – Burning Stream – DD option too
Cult
As you progress through the adventure in the game, with 2050 of Prestige (I think), open access to the cult – the system of worship character mortals, giving various bonuses to the characteristics and prestige (by default, “L”). The development of the cult of an important part of the game for each class.
Thanks to the cult Lightbinder receives necessary features:
- Might
- Stamina
- Health Bonus (%)
The system also provides cult chapels, special construction that provide up to 8 additional bonuses to the characteristics of which are the following: (some bonus change in each province)
- Endurance
- Accuracy
- Temper
- Dash Activation
- Critical Chance
- Block
- Discharge Recovery
- Shield Power
- Violence
- Ranged Damage
- Crushing Blow
- Block
- Vigor
- Defense Penetration
- Adaptation
- Regeneration
- Solidify
Provinces (recommended)
- 1-Primary: Accuracy, Critical Chance and Endurance
- 2-Primary: Discharge Recovery and Accuracy.
- Secondary: Shield Power and Ranged Damage
- 3-Primary: Critical Chance and Crushing Blow
- Secondary: Shield Power
- 4-Primary: Discharge Recovery
- Secondary: Shield Power and Ranged Damage
- 5-Primary: Accuracy, Endurance and Adaptation
- Secondary: Regeneration
- 6-Primary: Critical Chance
- Secondary: Shield Power
- 7-Primary: Critical Chance, Crushing Blow and Endurance
- 8-Primary: Adaptation and Regeneration
- Secondary: Ranged Damage
- You can see about upgrading provinces in the Attributes Chapter when I said about Greatness.
5. Builds
PVE
Full Support
PVP
6. Tips and Tricks
1st – When Lightbinder is close of allies (in party), they gain 10% more health max.
2nd – When you need to do quest in a stronger place and you know that you can’t do it alone, you can kill no monsters without die, you only need to see somebody that attack this monster and buff him with pulsating flare (LMB), when you do it you receive loot, complete quests and everything like if you have already attacked the monster.
3rd – You need to use “T” button to change target between allies and enemies.
4th – When you are using ally target, you can use TAB to help change target to buff and help more in the 2nd tip

Outstanding guide. You need to do more.
Soooo helpful. I have the exact same layout as the suggested PvE build. One question though, how do we unlock more talent slots?
This guide is perfect *-*
Thanks for the tips <3