FFXIV Astrologians Guide for Non-AST Players
FFXIV Astrologians Guide for Non-AST Players by ExtraHP
I notice there’s been a lot of concern about Astrologians currently, and I feel like a lot of it just comes from people (who don’t play AST) not knowing much about us, which is understandable. Yes there are already guides on this subreddit for AST, but none of them are for the other people, who DON’T play Astrologians.
The interesting thing about the Astrologian job is that in order to play it well, the Astrologian player needs to have a good understanding of every OTHER job. We need to know what type of skills and what resources other jobs use in order to make the most out of our cards.
ON THE OTHER HAND, other jobs also need to know about Astrologian to make the most out of their cards. It’s a 2 way street with this job, and makes for an interesting relationship between Astrologians and all other jobs. This is because you probably won’t really even notice when and what cards we use on who, which kinda wastes our cards if you don’t take advantage of what we give you.
In addition, I’ve heard people say they can’t tell if we’re playing our jobs effectively or not when they party with us, and that’s completely valid. It is absolute true it’s hard to judge us, especially when a lot of people, again, don’t know much about us. So here’s hoping that this little guide will not only let everyone else take full advantage of when we give you buffs, but also so everyone else knows when an AST is doing good or bad. I absolutely love this class, and I don’t want people immediately thinking we’re all bad because they’re wrongly judging us due to lack of information.
Cards: Image of ALL icons that I will explain that you should look for and pay attention to:
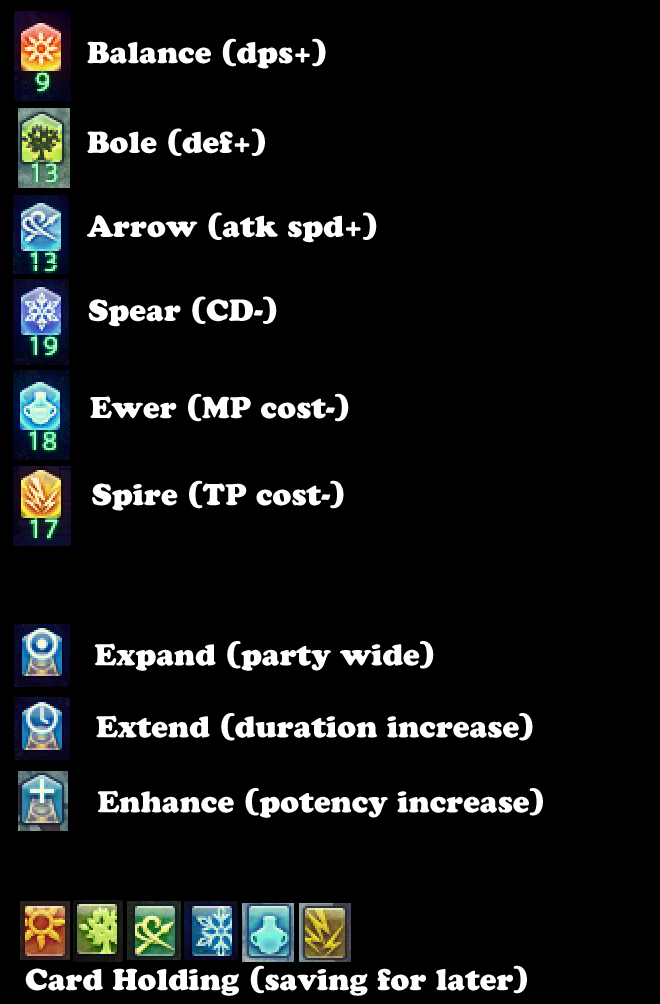
-Balance (The Red Card) – This one straight up increases your overall DPS by a WHOLE 10%, and more when enhanced. When you see this red icon on your buffs, go nuts. Use everything you have. Hit hard.
-Bole (The Green Card) – A card that reduces damage taken by 10%. This will mostly be used on tanks if ever. Tanks: if you’re uncomfortable with how an astrologian is healing you, you may politely ask for a Bole when they get one, or to ask them to save one(Spread) for later during a large pull.
-Arrow (The Blue Card) – A card that lowers your GCD, increases your skill speed, and also spell speed by 10%. Just like Balance (red card), this means this will increase your overall DPS if you go nuts and spam all your attacks. Make use of your lowered GCD!
-Spear (The Purple Card) – This one is tricky, but it reduces the COOLDOWNS of your off-global cooldown skills by 20%. That’s a whole 5th of the time! This goes for all Ninjutsu, all DRG jumps, BRD’s Bloodletter, Rain of Death, and basically every buff ever, yes even PLD’s insane amount of buffs, yes even Hallowed Ground (by an entire minute). This card is a bit hard to use because we have absolutely no idea where your skills’ cooldowns are at. It only reduces the cooldowns of skills thatAREN’T already on cooldown. So spam your cooldowns that you haven’t already used after you get the Spear card buff, but also don’t wait on a Spear buff, nobody will ever know when it’s coming, and waiting will just lower your overall DPS. It’s a tough card to make use of, but it still helps when it comes if you’re aware of it!
-Ewer (The Light Blue Card) – This reduces the MP costs of all your skills by 20%. Again, that’s a whole 1/5 of the cost! To put that into perspective, every 5 holy’s a WHM casts, they will get a 6th FOR FREE. If a BLM casts 5 fires or fire IVs, they can now cast a 6th before they have to switch to ice?! More DPS!
-Spire (The Yellow Card) – Same as the one above, but for TP. Again, any AoE spamming that costs a lot of TP, you can now pay for 5, get 1 FREE! That’s how much TP you can save. Wowwww~
Hopefully that’ll help other healers, tanks, and dps know what they’re getting and be able to make full use of it. BUT WAIT! THERE’S MORE!
There are other icons that may not directly affect you, but it’s good to know what they are so, again, you can judge a good from a bad Astrologian.
We have a thing called Royal Road, which is a way to buff our own cards, even before we use it on you. There are 3 types of buffs, with obvious names.
-Expand – This icon with a circle inside a circle means that our next card we use will be applied to everyone in the party, but at a reduced potency. If you want to make sure you get the buff, BE SURE to stay close. There’s been many cases where a ranged DPS was too far and was not able to get the buff, which is wasted potency per card use. To Astrologians: the radius of the party wide buff comes from the TARGET you use the card on. If you’re selecting a tank, and use expand, then 15y radius of the party buff will come from the tank being the center. Be sure to pay attention where the center of the radius will be.
-Extend – This icon with a clock inside the circle means that the next buff we use on the person will be extended in duration, making a longer buff.
-Enhance – This icon with a plus sign inside the circle means the next buff we use will be at 150% potency.
Why do others need to know about Royal Road you may ask? It’s because we can only draw ONE card per 30 seconds. Royal Roading requires we spend one card. That means to get a royal roaded card, we will, most of the time, need a whole minute to build it up (unless we saved a card from before). If you see one of these 3 icons on your AST, that means they’re building up a buff, not that they’re being lazy. Sometimes it’ll take even longer if we’re not drawing the card we want to enhance. Be sure to watch and figure out what we’re trying to do.
The last set of icons you see at the bottom of my image is for when we use Spread. It’s a skill that let’s us hold onto a card for later use. Most of the time, we will be holding Arrow or Balance, or maybe even Bole. I like the idea of holding a Bole for if a tank pulls too much and I can’t handle the healing. Bole could come and save the day. But mostly, it is best used for holding a Balance or Arrow, getting a Expand, and then use the Balance/Arrow so that everyone in the party gets the buff.
Lastly, I just wanted to give a quick mention to our healing output. Yes, it is lower than WHMs and even SCH. However, a decent AST can still keep the party alive fine. You may notice your HP dropping a tad more than a WHM or SCH would let you, but we by all means have the tools needed to keep you alive. We have a slightly-weaker Benediction every 40 seconds. If your hp’s drop a bit, we will most likely have that to instant bring you back up. At the same time, your AST’s should always focus on topping you up before handling their cards. Healing is and will always be our primary role.
Now that you know all our important icons, you can watch out for if we’re doing our jobs or not. Hope this helps all and have a good day~
And for the colour blind:
Tree – Bole (-dmg taken)
Sun – Balance (+dmg done)
Snowflake – Spear (cdr)
Swirlies – Arrow (haste)
Lightning – Spire (tp)
Bottle – Ewer (mp)

Recent Comments