Valorant Crosshair Placement Advanced Guide
by Hi_Im_TwiX
Hey guys, I’m Twix, and I’m back with another informative post, this time concerning the aspect of crosshair placement. Through this post I will be discussing the importance of crosshair placement within the tac shooter genre, going over the most common mistakes I see people make in my experience as a coach, and offering structured routines to remedy the majority of these mistakes. If you haven’t read my first post which is a comprehensive general guide for players looking to improve in Valorant, I highly recommend you look at it here before continuing on to this post.
Why is crosshair placement important?
If I was asked about the importance of consistent crosshair placement in games such as PUBG, Apex, Overwatch, Fortnite, etc. I would probably answer by saying that while it’s beneficial to maintain solid crosshair placement, it’s by no means the most important aspect in relation to performing well in those games, in tactical shooters however, it’s a whole different story. Tactical shooters are low TTK ( time to kill ) games, and for the most part, a single bullet to the head is enough to eliminate a player, this means that in contrast to AFPS games, or games like Overwatch or Apex, which have a much higher TTK, first shot accuracy is of extreme importance in Valorant, inevitably leading to the fact that crosshair placement is also extremely important. In a game with higher TTK, even if your first shot accuracy isn’t perfect in an aim duel, you can win the fight if you land more shots on the opposing player over x amount of time that you trade with them, while in Valorant, whoever needs to make the least amount of adjustment to their crosshair when engaging in a 1v1 scenario wins the exchange. It doesn’t matter if your raw aim is out of this world, even if you have the most precise flicks known to the FPS community, if your crosshair placement is sub-optimal, you will lose vs. someone with consistent crosshair placement, this is simply due to the fact that all they need to do, is click once your head moves into their crosshair, often without even needing to move their mouse. Crosshair placement may very well be the most important aspect in relation to gunplay and generally the mechanical aspect of tac shooters such as CS:GO or Valorant, as it’s the deciding factor in the majority of aim duels.
Common mistakes
A large amount of players tend to underestimate the importance of crosshair placement in Valorant, and especially the underlying complexity of maintaining consistency in that context. People think that all you need to do to maintain solid crosshair placement is aim high enough to hit headshots, meaning that the only factor that affects crosshair placement is vertical positioning, others still stick to making their main source of information on game improvement being players who make statements as un-informative and vague as “just click heads”, my main goal is to break down and explain the multiple factors that go into proper crosshair placement. Lets start with the basics:
Vertical Positioning:
As mentioned above, one of the elements which ties into crosshair placement is vertical positioning. this is the set distance that you need to position your crosshair at in relation to the ground to be able to align your crosshair’s horizontal axis with player model head-level. The good thing about vertical positioning, is that you can get accustomed to the head level that the player models have in Valorant quite rapidly, as the hitbox sizes in this game are identical, meaning you can always use the ground as a point of reference to determine where the enemy player’s head would be.
In Valorant, the head level always remains a set distance from the ground

In order to train your general ability to place your crosshair at the correct height, try to make a habit out of constantly reminding yourself to place your crosshair at head level, regardless of where you are or what you’re doing on the map. What I mean by this, is that even if there isn’t any imminent threat of enemy players peeking you, try to keep constantly keep your crosshair at head level, the more time you spend doing this, the faster it will become a habit and become something you do subconsciously, without having to actively focus on the action. This habit allows you to build muscle-memory during otherwise useless down-time, another way to do this is to track your teammate’s heads with your crosshair while rotating, leaving spawn etc.
While vertical positioning is something that people get used to relatively easily, I have come across a recurring issue among the VODs of people I coach, and that is that people generally struggle with adapting the vertical component of their crosshair’s position to varying points of elevation. Here’s an image to help you visualize a scenario where this could be an issue:
Peeking C Long, Positions marked: Cubby ( right ), Platform ( left ), back-site ( back )
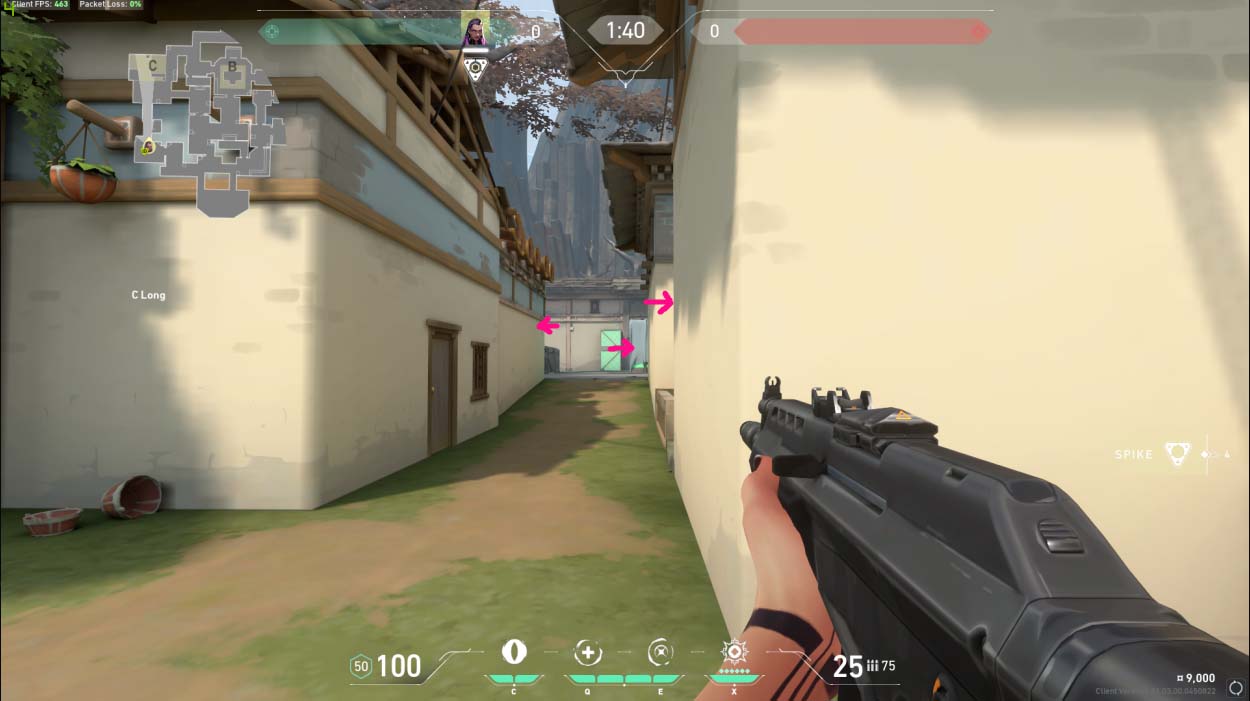
In the image above I am peeking into C back-site from C long on the map ‘Haven’, I have highlighted three different positions / angles where an enemy could potentially peak from in an in-game reenactment of this scenario, Platform, Cubby, and back-site. What you’ll notice is that these positions all have different points of elevation, meaning that while using the ground as reference will allow me to maintain my crosshair at head-level if someone peeks my position from ground level on C site, in order to clear cubby and platform, I would need to adjust my crosshair accordingly, using their lower levels as a reference for where the head-level position would be in those angles.
Unfortunately, if you are struggling with this due to the fact that you aren’t familiar with the map layout yet, the only thing that will remedy your situation is more time spent playing the game, if however, your issue stems from a mechanical inability, meaning that your mouse control isn’t good enough to allow you to make such adjustments comfortably, the routine provided later in the guide may help you get past that issue.
Horizontal Positioning:
Just as with vertical positioning, horizontal positioning is pretty self-explanatory in terms of it’s function. Knowing at what height to position your crosshair at in relation to the environment is far easier to do than knowing where to position it on a horizontal axis, the reasoning behind this is that with vertical placement you will always have the ground or lower level of the object the opponent is standing on as a point of reference which allows you to instantly know at what height head-level is. When focusing on the horizontal aspect of crosshair placement, there isn’t a set point of reference at all times; Sometimes you need to hold wide angles, sometimes you need to move along with the object you’re playing against, and sometimes you need to pre-aim to swing effectively, all this variability makes it much harder for a newer player to grasp crosshair placement and horizontal positioning is just as crucial as vertical positioning if not even more important.
A very common mistake which I see a lot of in the VODs I review as a coach, is newer players holding angles too tightly, meaning that they’re playing in a position where they anticipate an enemy push and are waiting for the engagement, and their crosshair is a position where it’s hugging the edge of the wall the enemy will peek from. Here is a visual representation of what I’m talking about:
Example of incorrect horizontal placement

In the image above, I’m holding an angle where if someone crosses moving parallel to the wall I’m looking at, I’ll have under 50 ms to react, my crosshair is so close to the edge of the wall that I will need to click my LMB the milli-second I see the enemy. By holding this angle, chances are that by the time I click the enemy will have already crossed to the left of my crosshair resulting in a miss and most likely my death; It would take inhuman reaction times for anyone to hit a player while holding like this, especially if the enemy player is swinging. Instead, you should allow some distance from your crosshair to the edge of the angle you’re holding, allowing yourself to spot the enemy’s player model, and then time your click effectively. Here is a visual representation of correct crosshair placement while holding the same angle:
Example of correct horizontal placement
As you can see, in the image above I am allowing for some space between the wall and my crosshair, giving me a significantly longer time window to spot an enemy player and react. Holding an angle that’s too “tight” would mean I need to make a larger adjustment to hit the enemy, and therefore I increase my margin of error due to vertical overshoot ( see below ). There are exceptions to the rule when it comes to the distance you need to hold at, if the angle you are holding only allows forward movement ( into your crosshair ) you can hold a narrow line of sight. If you are clearing an angle ( moving along it to check for enemies ) and you are the agressor, you can hold tight and move along with the wall / LOS to allow for a faster reaction if you spot an enemy during your movement. If you are the agressor and you want to swing into an angle that you believe / know an enemy is holding, it is sometimes optimal to pre-aim, meaning you position your crosshair in a way where without moving your mouse it will be aimed at the enemy’s head once you swing out the angle.
Vertical Offset:
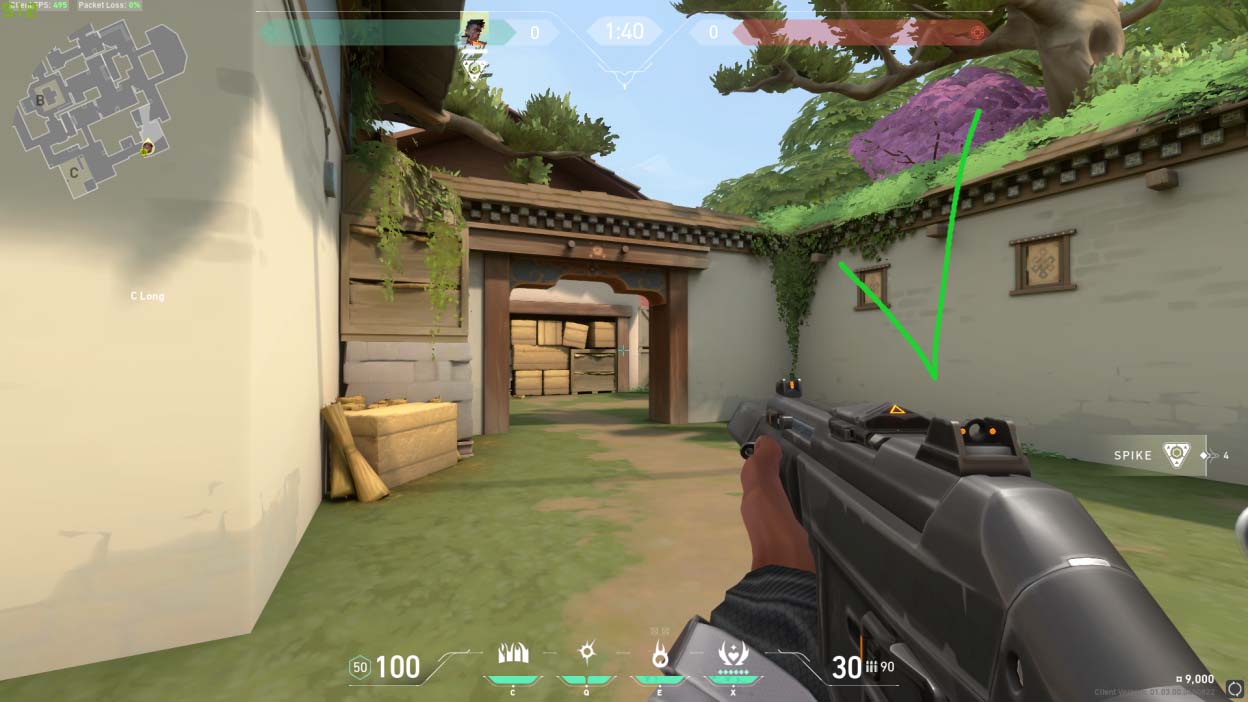
The final common issue I would like to bring up which ties into both crosshair placement and horizontal click-timing, is something I call “vertical offset” or “vertical overshoot”, this is a player’s inability to move his crosshair horizontally while maintaining the same vertical placement. Vertical offset is a big issue when it comes to switching angles or flicking horizontally, I have seen many scenarios where a player is holding an angle properly with their crosshair at a pixel-perfect vertical position in relation to head level, only to make a 30 degree turn to check a different angle and end up shooting at an enemy’s chest and losing the duel. Usually, the larger the movement, the more the player’s crosshair deviates vertically. Here is a depiction of what vertical offset / overshooting looks like in-game:
Example of margin of error caused by vertical offset / overshooting

In the image above the green dot is where the crosshair should end up in an ideal scenario while flicking from it’s current position to the target dummy, while the green lines represent a theoretical margin of error for overshooting. Fortunately for people that face this issue, I have come up with multiple Kovaak’s maps and firing range excercises to help combat it and largely reduce your margin of error when moving your crosshair / flicking horizontally.
Settings: What sensitivity / crosshair should I use?
This part of the post discusses a topic which is highly subjective, both the sensitivity you use and the crosshair you use are something preference-based that you should decide upon on your own, the reason I’m adding this section into the post is for players which are newer to the tac-shooter genre; There are a few guidelines that will help them narrow down the settings that work the best for them.
First off, don’t by any means copy your favorite pro’s config, just because something works for a professional player that has probably spent well above 10,000 hours playing FPS games and decided upon their ideal sensitivity and crosshair within that massive period of time, doesn’t mean that it’s going to work for you, use whatever you’re most comfortable with. Other than individual preference, and having gotten used to their sensitivity, the Pros you watch may be using gear which feels different at their sensitivity setting. A lighter mouse, faster mouse-pad, and faster feet can feel very different in terms of mouse movement, even if you’re playing on the same sensitivity value on paper. In relation to grip-styles and what mice are ideal for each hand size, make sure to check out my first post in this sub before moving forward with this guide, as playing on hardware that caters to your individual preferences plays an important role in increasing your mechanical potential.
Sensitivity:
As I stated in the paragraph above, sensitivity is something quite subjective and while there’s no general rule as to which single sens value is superior, Valorant and CS:GO professionals tend to stick to e-dpi or cm/360 much lower than professional players in other titles and FPS subgenres. Your e-dpi is your in-game sensitivity value multiplied by your mouse’s DPI setting. The average e-dpi used by Valorant professionals is around 250 e-dpi, which would be a value of 0.625 in-game @ 400 DPI, or around 50 cm/360.
Pro player & Streamer sensitivity settings (e-dpi)
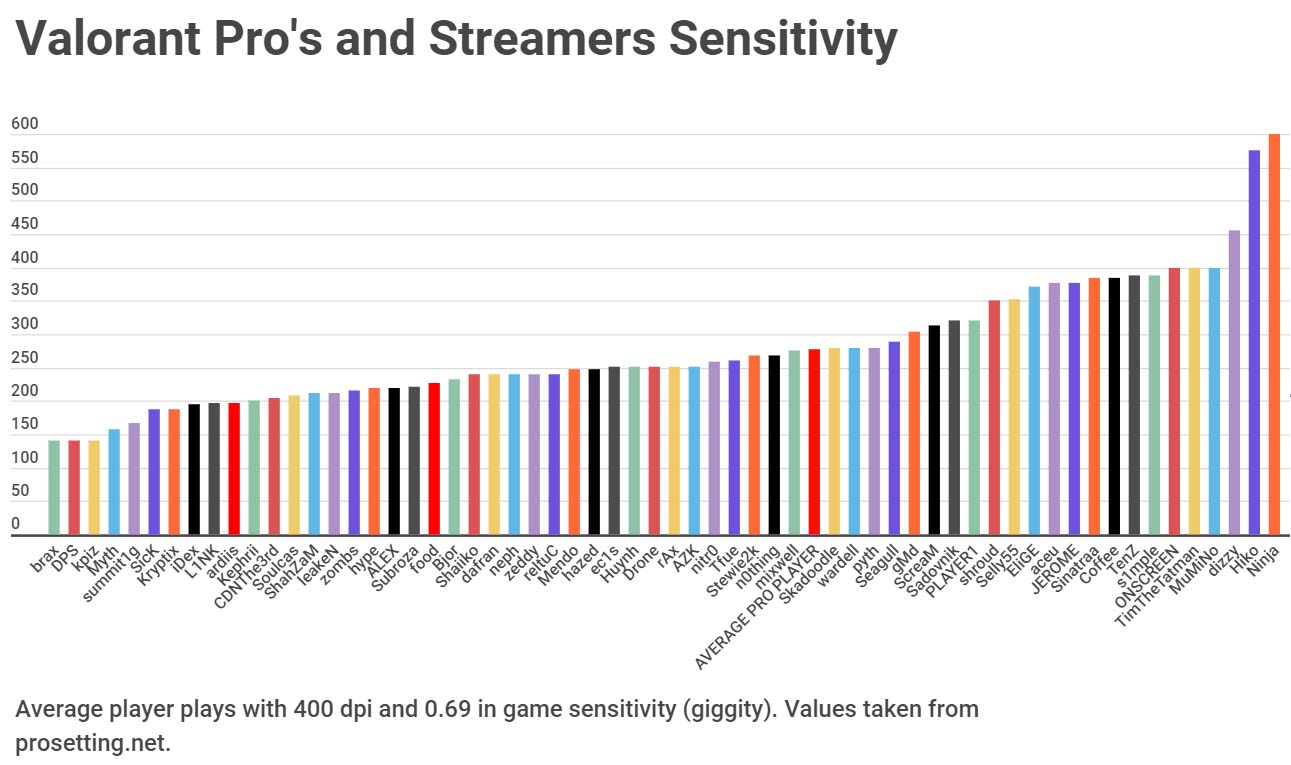
cm/360 is a universal format for sensitivity measurement, it’s the amount of centimeters you need to move your mouse in order to perform a full rotation. This is the format adopted within aimer communities due to the simple fact that you asking someone “what sensitivity do you play on?” And them responding with “1.5 in CSGO” is pretty useless information as they could be playing at any DPI range, and you don’t necessarily know what each CSGO sens corresponds to in relation to physical movement, or even movement in other games. “e-dpi” solves the issue of different DPI x Sens measurements within the same game, but the cm/360 format is easily transferable from title to title.
The reason professional players in the tac shooter genre use lower sens on average, is due to the fact that in contrast with other FPS games, tac shooters don’t require larger or extended movements, instead they require you to hold or clear angles while maintaining stable crosshair placement, the least adjustments you need to make to your crosshair’s position on your screen, the better your “aim” will be. The majority of players I have coached report that it has been significantly easier for them to maintain consistent crosshair placement at lower sensitivities. For newer players that still haven’t found a “main” sensitivity that they feel comfortable on, I would recommend for them to stick to the range of 200-300 e-dpi, while for more experienced players coming from CS or other similar games, I would recommend a similar range with a higher cap, at 200-400 e-dpi ( very few professional players play above 300 e-dpi ).
Crosshair settings:
This is something even more subjective and preference-based than sensitivity even, so what I will do in this section is simply post my own settings which I use for my in-game crosshair, and explain why I picked each value within the menu.
Crosshair Settings
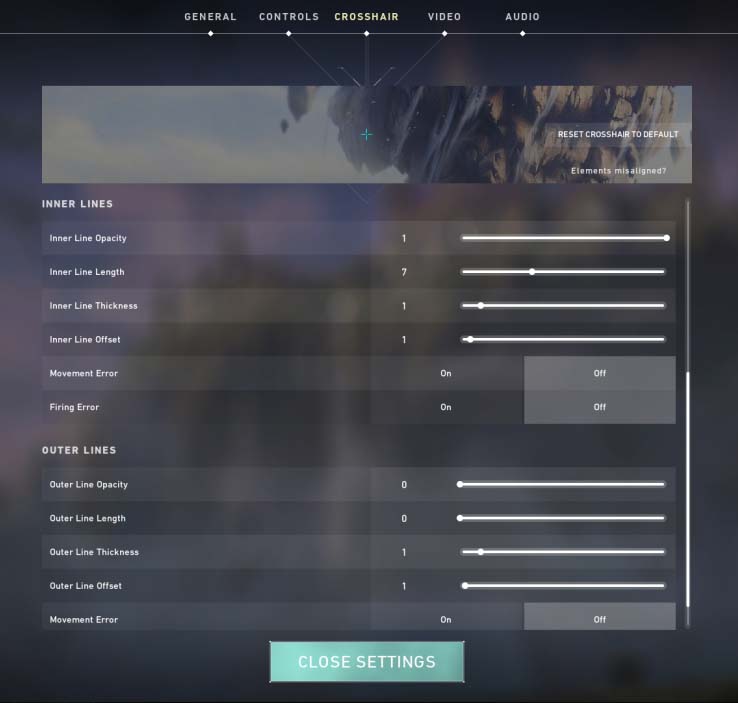
So, lets break my crosshair down setting by settings:
- Color: I use “Cyan” as it stands out quite well for me with my current color settings, any color that doesn’t match your enemy outline color works perfectly fine here.
- Inner Line Opacity: This setting basically determines how see through your crosshair will be, I like setting mine at “1” as It makes the crosshair stand out more.
- Inner Line Thickness: I set this to “1” which is the lowest value, a lot of professional players like to use “2”, I think setting the value to “1” makes it easier to align your crosshair with heads or with other objects in the environment, it is also less obstructive, so I highly recommend either this or “2” to newer players
- Inner Line Offset: This setting determines how large the gap is in your crosshair, I like setting this to “1” as the gap is as small as possible without disappearing, larger gaps make it more difficult to determine where the exact center of your screen is, which can act as a hnderance in your first shot accuracy at longer range engagements.
- Movement & Firing Error: These settings just turn your crosshair into a dynamic crosshair and make the gap widen significantly while moving or shooting respectively in order to give you a visual representation of how the innacuracy factor works. Useless and distracting, would highly suggest that you keep these both off unless you’re very new and still don’t understand how movement / spray accuracy works.
- Outer Lines: Everything is off here, I don’t think playing with outer lines provides any benefit whatsoever and it’s an extra distraction.
Crosshair Placement Improvement Routine:
A large portion of improving your crosshair placement is based on simply playing the game more, crosshair placement is largely based on muscle memory, part of having good crosshair placement is simply based on having experience in-game allowing it to become a subconscious habit, and the rest is based on your ability to anticipate player model movement and learn to make horizontal movements without simultaneously your crosshair vertically. The routine I will provide is not only a great way to work on your crosshair placement, but also highly beneficial to the click-timing aspect of your aim, which is basically the only element of aiming required in Valorant, as good tracking is unecessary in such a low TTK game. If you are already training using a daily routine on Kovaak’s ( as you should be ) you can just implement this into your daily scenarios.
Kovaaks:
( These are all maps which require you to make horizontal movements without overshooting vertically, thus good aim training for those struggling with crosshair placement, see my other posts for a larger variety of Kovaaks maps )
- 1 wall 2 targets horizontal – 10 minutes ( focus on your flicks, work on hitting both targets in the same movement, not pausing in between )
- Valorant Small flicks – 10 minutes ( Great routine as head level is that of Valorant, and vertical deviation will cause you to miss, forcing you to maintain head level as you play through it )
- PatTarget Switch small – 10 minutes ( Works on your ability to swap from one target to another while maintaining head level crosshair placement, keep LMB held while playing, only go for heads )
HSDM:
- Valorant doesn’t currently offer it’s own deathmatch servers, therefore the next best thing is practicing in CS:GO. HSDM is a headshot only modifier for community FFA servers in CS:GO. To access these maps go to “Community Server Browser” and simply type in “HSDM”, any server with decent population will do ( preferably 128 tick ). Playing FFA on headshot only forces you to maintain head-level crosshair placement as body shots don’t count. I advise going for taps rather than spraying, as it limits the RNG, also spraying in CS:GO isn’t transferable to Valorant as a mechanic. Make it a challenge for yourself to maintain positive K/D while playing. Use the AK in rifle servers, and the USP-S in pistol servers.
Firing Range:
- Set the target dummy position to static, and practice your click timing by only going for the targets furthest to the left and furthest to the right interchangeably, do this for around 10 minutes.
- Play Spike Rush and set it to hard. When set on “Hard” the AI will one shot you as soon as you peek if it has seen you, and one shot you after around half a second if you shift-peek it. Pretty decent warmup in relation to crosshair placement as you will die every single time if you aren’t instantly headshotting the targets the moment you peek. Play this for another 10 minutes.

Recent Comments