Rocket League Last Man Role Guide
Rocket League Last Man Role Guide by ytzi13
Hey guys, I wanted to attack a subject here that I think is important and that a lot of people seem to miss, or over-complicate. The last man position is, in my opinion, the most important position on the field as well as the most difficult to master. One of the easiest ways to differentiate between ranks is by seeing the types of goals they let in. The last man isn’t responsible for all of them, but he is certainly responsible for most of them. The following is an attempt to simplify the process for people.
Keep in mind that my goal with guides like this is to simplify the decision-making process as much as possible by providing a set of rules that you can use a foundation to build upon for yourselves. Everyone has different abilities and unique play styles and no advice is suited perfectly to everyone.
Objectives for the Last ManFirst and foremost, the last man should have 1 unwavering objective that should take precedence above all else:
Protecting the goal.
Any action they choose to take should maintain that priority and never risk it.
Furthermore, when the opponent has control of the ball, the last man has 2 additional objectives:
- To relieve pressure.
- To buy time for their teammate(s) to get into a defensive position to support them from.
That being said, let’s dive deeper into the defense role of the last man.
The Defensive RoleThe defensive role assumes that the opponent has possession of the ball and that the last man is the lone defender. How do you know when to challenge? How should you position yourself?
I like to split the field into 3 zones.
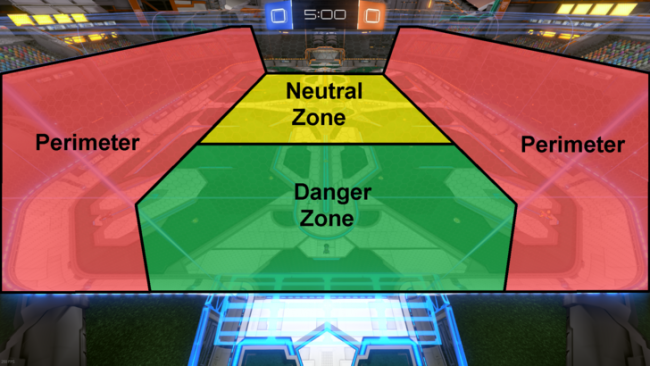
This zone contains the space at, on, or near the wall in all areas of the field. If the ball is on the side wall, it’s in this zone. If the ball is being dribbled down the sideline near the ramp, it’s in this zone. If the player is a little bit in-field and directing their possession to the side-line, it’s in this zone.
The last man should never challenge the ball when it is in this region.
When the ball is in this region, it is not a direction threat to the goal. Since it’s not a direct threat to the goal, you can use the opportunity to buy time while you get into a better defensive position to protect the goal from.
Why not challenge the ball in this zone?
Simple. When you challenge the ball at or near a wall, whether the challenge is won or lost, the ball has a very good chance of deflecting back into the mid-field, whether it be a direct result of the challenge, or a result of a deflection off of the wall near by. When this happens, the last man will have lost any momentum they had and the goal will be unprotected as the ball likely drops somewhere in the mid-field where a supporting opponent may be waiting.
If they’re dribbling down the line and into the corner, get into net, being sure to rotate into goal from the far side, and wait to defend the cross, or challenge them when they turn in and start to approach from your back wall. The only acceptable time to challenge sooner is when you know that you have bought your teammate enough time to be in position behind you by the time your challenge takes place, meaning you are no longer the last man.
Zone 2: The Neutral ZoneThe neutral zone includes the middle of the field stretching from the opponent’s back wall all of the way up about two-thirds the length of the field.
In this zone, the ball is far enough from the goal to not be considered an immediate threat, but central enough to be dangerous and require (most of the time) shadow defense. In this region, you only want to challenge the ball if your odds are at least 50-50. If you can guarantee a good challenge in this zone, you should take it. Since you’re at mid-field, it’s likely the result of the challenge well be to either side, which is far enough away to ensure that the ball will either not end up in the middle, or take long enough to deflect back to the middle that it is no longer dangerous.
When the ball is in this zone, it’s a good time to try and slow down the opponent in order to allow your teammates time to recover back and help out with the defensive effort, perhaps disrupting the defender on their way back and clearing the ball for you to counter with.
A note on shadow defense will follow Zone 3.
Zone 3: The Danger ZoneThe danger zone is what I refer to the middle portion of the field directly in front of your own goal. This region starts at your back wall and extends about one-third of the length of the field.
If the ball is in this zone, challenge immediately. The ball is a direct scoring threat and in close enough proximity to be dangerous. You should challenge the ball as soon as possible in order to cover as much of the net as you possibly can.
Remember: These descriptions assume that a teammate is not yet in position to cover for you as 3rd man. In many cases, you may choose to challenge in zones 1 or 2 because you’ve bought enough time for a teammate to get back into position behind you and take over the duties as last man.
You’ve heard it. You probably know what it means. I’m going to simplify it best I can for those who don’t quite understand it.
Shadow defending is the act of creating momentum in a similar direction to the ball’s, or “shadowing” the ball, in order to give you an easier approach when saving the ball by relatively slowing down the speed of the shot.
If you’re sitting in goal and the ball is shot above you going 70 mph, you have to have to save the ball at a relative speed of 70mph, perhaps higher if you happen to have any forward momentum. If you’re shadowing the ball at 50 mph and the ball is shot at 70mph, you have to save a ball with a relative speed of 20mph. Because that speed is slower, you can allow yourself positioning closer to the ball, which allows you more time to react and the ability to cushion the ball for more controlled contact.
The way I like to visualize shadow defense is this:
Draw a line from the ball to both of your goal posts. This creates a triangle. You do not want to get caught inside of this triangle when shadow defending. You want to stay slightly outside of the line, allowing for a greater buffer the further your distance from the ball, and you want to ride the line back until your decisive action. The only time you should find yourself inside of the triangle is when you intend to challenge the ball.
Here is a very basic visual representation of what I’m talking about. The red zone is the area you don’t want to get caught in. The green zones are the areas you want to shadow from.
Why should we stay outside of the triangle? After all, that means the goal is unprotected from the ball’s perspective.
To understand why it’s important to stay outside of this area, we should first understand why it’s a bad idea to get caught inside of it.
- When you’re caught inside of the triangle, the ball is on your back side. This is a huge disadvantage because it means that if the ball is not shot early enough and you have to challenge the dribbler directly, you have to slow down your car, perhaps even apply the brakes. When you do this, you lose control of your car, making you vulnerable to getting beaten to either side. Even if you do manage to pull off the backwards challenge, your challenge will very likely be weak and uncontrolled. It’s risky. And the direction of the challenge favors the direction of your goal, meaning the ball will likely end up in a dangerous position in the middle of the field. You lose the ability to control the challenge. That’s important.
- When you’re caught inside of the triangle, you have to defend multiple angles. If the ball is shot towards the left side of the net, you have to react left. If the ball is shot right, you have to react right. If it’s shot above you, you have to react vertically. This is a problem. Because the angle from your own car to either post is less than if you were positioned outside of the area, it means your approach when making the save is going to be weaker because the direction of your force on the ball when you make contact will be very similar to the ball’s trajectory. And if the ball is hit closer to you, there’s a very good chance that your save will be angled towards your back wall and deflect back to the middle.
So, why is it a good thing to be caught outside of the triangle?
When you’re caught outside of the triangle, you give yourself a couple advantages:
- You only have to worry about defending the ball in one direction. Let’s say you’re on the left side of the field and the goal is on your right. You only have to worry about defending the right side of your car. If the ball is hit above you, it’s not on target. If the ball is hit to your left, it’s not on target. If the ball is hit to your right, you can react easily because you’re prepared.
- You don’t have to worry about altering your car’s momentum. Momentum is the biggest advantage you have; you get to remain in control of your car by matching the speed of the ball without worrying about slowing down in order to turn in on the ball at any point. If you need to alter your distance from the ball to get closer or further away, you can do so by veering a little bit wider for a second and keeping a constant speed. If you were inside of the triangle, veering one way doesn’t quite achieve the same thing because you have vulnerable points on both sides of you. So, from this position outside, you can ensure that any save you make is done so with momentum, with an approach, and with a direction aimed away from your own goal. On top of that, the recovery from the save is much easier and you’re more likely to be able to stay in the play by conserving momentum and following the ball.
As a general rule of thumb, don’t get caught with the ball on your back.
If you’re in mid-field and the ball is on your back, veer outside as soon as possible to create that space outside of the triangle. And if you’re defending down the line and the ball is on your back, do yourself a favor and drive towards mid-field and back towards your opposite corner on your way back to goal. If the opponent is dribbling down the line, you shouldn’t be challenging anyway unless they turn in-field and so you’re better off crossing through the triangle area to the far side of it.
The Offensive RoleWe’ve discussed the defensive role of last man, but the offensive role is equally as important. It’s a difficult role to fill because you want to be able to abide by the primary objective of protecting the goal while also allowing yourself to effectively contribute to the offensive pressure and get involved in the rotation. The strategy here is more complex than the defensive role because it relies on a lot more variables, so I’ll try to make it as simple as possible.
Let’s make a list of some rules:
- Rule 1: If the last man goes for a shot, it should be a sure thing. They shouldn’t be contested and they should be confident they are going to score it.
- Rule 2: If the last man goes for a challenge, they should have the advantage on the ball. If an opponent leaves the ground before them, they should stay grounded and turn back.
- Rule 3: If the last man goes for a challenge, it should be for the purpose of relieving pressure. An uncontested touch should be one that slows the ball down and/or keeps possession. A contested touch in the offensive quarter of the field should be a soft block aimed to keep the ball in that quarter of the field.
TL;DR: Rule 1-3: Don’t go for anything that isn’t a sure thing!
- Rule 4: The last man should never assume that their teammates will win a challenge. If an opponent challenges the ball at any point, the last man should prioritize defensive positioning and be angled in a way that ensures an outlet back to make the save or receive a deflection down-field.
- Rule 5: In 3v3, if the 2nd man is supporting the line, the last man should be supporting central. If the 2nd man is supporting central, the last man should be supporting the line.
- Rule 6: As last man, you are responsible for any double-commits that you make. You can see your teammates; they can’t see you. You may have a better approach on a ball, but once you see a teammate committing to it, you need to back off. You may start to aerial up for a ball and then see your teammate also going up for it. Get down as quickly as you can and create space back towards your side. Bite the bullet when you need to; it makes you a better teammate.
Now, I want to address an issue that a lot of people bring up, which concerns being the 3rd guy on a team that won’t rotate back. A lot of people think that they can’t be part of the play because they have 2 teammates that cut rotation and don’t like to come back to 3rd man. While these scenarios do sometimes exist to extremes, I find the issue people often have is not knowing how to support in a way that allows them to become a part of the game, regardless of what their teammates are doing. Ball-chasing teammates should not prevent you from being a part of the offense.
Some things to consider:
Are you sitting too far back? Often times people think their teammates aren’t rotating back, but at least part of the problem is that they are playing too deep to really make a play on the ball if the opportunity presents itself.
The solution? Get closer to the play and be sure that you’re in proper position. Easier said than done, sure, but there are ways to do this without sacrificing defense.
First of all, consider whether you may be covering the same side of the field as the second man? You can’t reasonably expect to make yourself useful if you’re covering a part of the field that is already covered. Looking up at the rules, if your 2nd guy is covering line, you should be positioned centrally and you are responsible for anything that pops high to mid-field, across the goal to the other side of the field, or over your teammate down the line, which you can easily circle around to. If your 2nd guy is covering across field, you are responsible for anything line, high through the mid-field that doesn’t cross past mid-field, and any ball that deflects towards your side of the field through the center or opposing side.
Now, more importantly, you want to think about your role as last man similar to how you would think about shadow defense. You want to, first and foremost, be able to protect the goal, but you need to be able to contribute offensively as well or else you’re not doing your job. Looking back at rule 4, you should never assume that your teammate will win a challenge. So, your positioning should reflect your ability to have the defensive covered any time the opponent is going to make a challenge on the ball.
Consider these 3 positions:
- You’re between the ball and the net, facing backwards, away from the ball. You can afford to be closer to the play because you have an immediate outlet back to defense, but you can’t contribute offensively.
- You’re between the ball and the net, facing the forward. You have to space yourself far away from the play in order to have the defense covered, which is priority number 1, but you still can’t contribute offensively because you’re just too far away to warrant going for anything in the air.
- You create that triangle between the point of contact and each of your own posts, creating that triangle we talked about earlier, and ensure that you are outside of that triangle. Instead of being forced to face away from the ball, or directly at it, you are able to angle your car somewhere in-between and have an easy outlet to both offense and defense with a subtle turn. You can afford to be closer to the play and contribute to both sides of the field.
Number 3 is obviously the correct choice. You may find yourself often turning away from the ball when trying to read a challenge just to ensure that you have the defense covered. This means you’re probably not positioned properly with the proper angle on the ball when a challenge is being made. You may find that you’re stuck back staring at the ball a lot. This means that you’re too far back and not understanding proper positioning. Read the game and find those positions to be in when challenges occur so that you can live somewhere in-between.
I want to take a second here to briefly discuss the importance of boost conservation and small pad pickup as the last man.
I won’t go super into detail on these subjects because I think they could easily be an entire post on their own, but I will give these tips:
- Try to always stay moving. Momentum is your friend and makes everything easier. Try to avoid hitting the breaks and/or reversing, pretty much anywhere on the field, and instead opt to slow down and adjust your angles or your path. If you find you’ve ventured too close to the play, instead of backing up, opt to circle around. You lose a lot of control and momentum when you hit reverse and it’s very rarely worth it.
- Consciously get in the habit of altering your path over small boost pads. You’ll benefit immensely from this alone in that you can keep better positioning and not have to worry about about grabbing boost. It’s especially important as last man and you don’t need a lot of boost to do your job.
- Relative to the last point, grabbing small boost pads allows you to better achieve your primary objectives. If you’re grabbing small pads, you can leave the side boost generated for your teammates as they rotate back. Often times the last man will ignore the needs of their teammates when simple acts like this can make a huge difference.
Furthermore, it’s often the player feeling stuck in the defensive role who also feel like their teammates aren’t there for them when they do have a chance to attack. That’s because 2 teammates just finished pressuring together and likely both needed time to recover. We’ve already attacked the concept of being positioned closer to the play and in a spot that isn’t already covered, so once the ball comes to you, you should understand that your teammates will support you if you can buy them enough time to recover. Common objectives for the last man are relieving pressure and buying time for teammates. This is no different and the rules still apply. If you don’t have a direct, high-percentage chance on net, try to create an opportunity in a way that allows your teammates time to get back there to help you. Trap the ball and take it up the side wall for a high cross, or do something like pop the ball high up in the air and follow it for an additional touch. If you play too quickly in these scenarios, you can’t reasonably expect any help. Keep the ball high and controlled and help will come.
EndI know this was long, but this is me trying to be as general as possible without really missing any key points. If you guys have any questions, want to challenge some points, or think that I missed anything, I welcome all of those comments and will gladly discuss anything, so long as it’s constructive.
As far as a TL;DR is concerned I may throw one together and append it to the post at some point, but I also think that those who are actually interested and want to learn should be willing enough to read through the entire thing.
For those of you who did make it through, thanks for reading!

Recent Comments