Pokemon Sun and Moon Breeding Shiny Pokemon Guide
Pokemon Sun and Moon Breeding Shiny Pokemon Guide by Cryphon
Hello Reader, have you ever bred a shiny Pokemon and it took way too long since it was part of a high step egg group? Have you ever bred a shiny Pokemon with an undesirable IV spread but didn’t have the time to train it to level 100 just to fix one measly stat? Have you ever bred a shiny Pokemon but it didn’t have the desired ability or gender? Well now there’s a solution for that, and the best part is that it doesn’t require cheating. This wall of text below will show you both how to get a shiny Pokemon quickly and to further modify it for ideal traits.
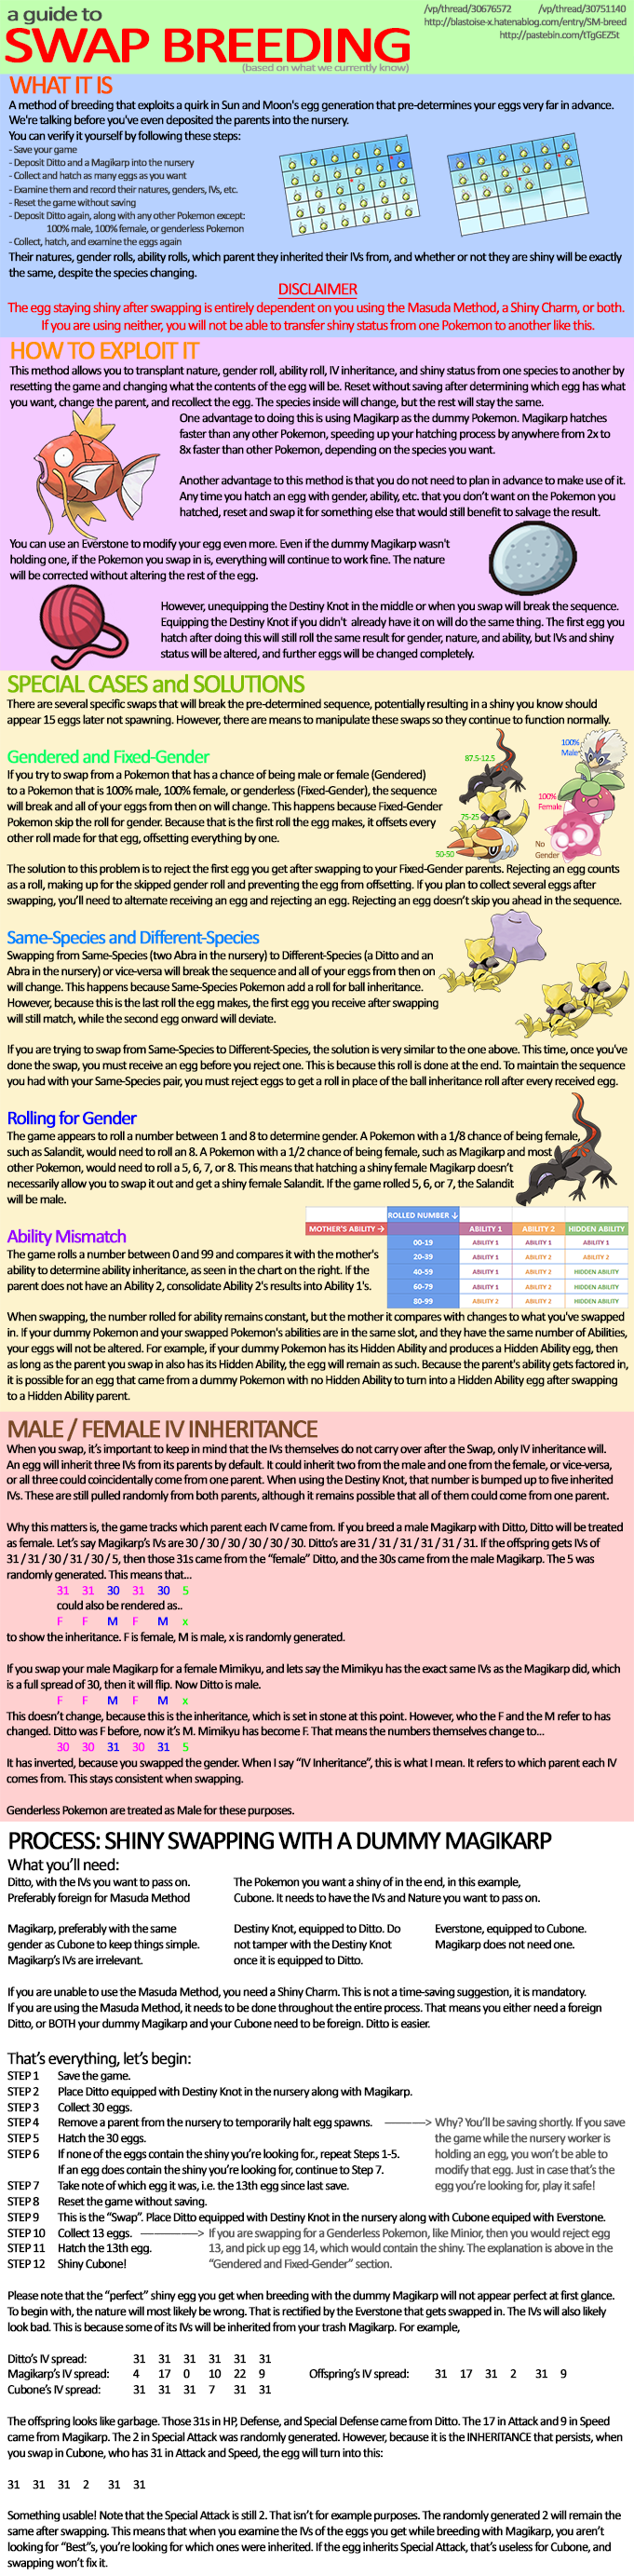
I’m sure at this point many of you have tried using Magikarp for the swap method posted on /vp/ to more time efficiently breed shiny Pokemon. There are many benefits to this since it significantly cuts down on the time hatching eggs, as well as a preview into the IVs of the hatched Pokemon. So for example if you get a really crappy Attack IV, you can put Special Attacking parents in the nursery to get an offspring that doesn’t mind the Attack IV roll being low. But what if the IV rolls are something you don’t have much options to work with like in the speeds or defenses? What if you didn’t get the Hidden Ability you were looking for? Or the gender you wanted? (I’m looking at you Salandit) Well as it turns out, you can “change” these to get something more desirable. However, before I get into that I am going to briefly explain some details of the swap method as they are crucial to understanding how to change around IVs/Ability/Gender. I highly recommend you check out the infographic here as I will be repeating a lot of the information listed in it, as well as the mechanics behind things so that they may better make sense. If you are already familiar with the swap method, feel free to skip ahead. It is not required but certain aspects involved with it are.
First off, swap breeding refers to a method exploiting Sun and Moon’s egg generation. The characteristics/properties of eggs are predetermined before parents are even placed in the nursery. Unlike other generations as well, your egg seed does not change upon what frame you enter the game. You can verify this by saving your game, put two parents in the nursery and collecting however many eggs you want. Record natures, IVs, abilities, etc. of these eggs and reset without saving. Put the same parents in the nursery and collect the same amount of eggs. Upon hatching them you’ll notice that each egg after reset is exactly the same as the egg recorded before the reset. It is VERY IMPORTANT to note however, that the values for a Pokemon being shiny will only stay the same if you are using the Masuda Method (one foreign parent), have the Shiny Charm, or are using both. Otherwise any shiny you hatch will limited to the original egg as you will not be able to transfer it to another Pokemon.
The idea here is that you can transplant nature, gender, ability, IV inheritance, and shiny status from one species to the next by resetting the game by changing the contents of the egg. Reset without saving after finding an egg with the desired traits, change the parents, and recollect the egg. The species will have changed, but everything else will stay the same. The advantage of this is to use Magikarp to check eggs since it hatches in a little over 1000 steps. It is the fastest Pokemon to hatch, with most Pokemon being around 5000 steps to hatch. As you can imagine, this is pretty useful when dealing with Pokemon in the 8000 step egg groups to save a considerable amount of time. NOTE: There are limits to this. You must keep conditions constant (two parents of the same species, use of destiny knot, etc.) in order for egg traits to stay the same. There are ways to adapt to changes that I will get into later, but for the most part you should do your “dummy” breeding with similar conditions to what conditions you will be using when transferring shiny status. Considering this guide is for people who care about IVs, it assumes you are using Destiny Knot and either or both Masuda Method and Shiny Charm. Unequipping or equipping Destiny Knot mid-process will change the sequence of eggs and mess everything up. As mentioned previously, having the Shiny Charm or using the Masuda Method is the only way to keep the shiny status of a Pokemon across resetting. Everstone does not affect any part of the process.
This guide requires the following:
- Use of the Masuda Method or Shiny Charm
- A desired Pokemon with the end result being shiny. Preferably this Pokemon has the correct IVs and nature as you will not have the chance to breed one after the process has begun.
- A Ditto, preferably foreign for Masuda Method, equipped with a Destiny Knot.
- Patience for a potentially long process ahead. You are still breeding for a shiny Pokemon which can take a while, but you are potentially speeding up the process 8 times using Magikarp.
Because it is important and I cannot stress this enough, if you are not using the Masuda Method (both before and after resetting) a Shiny Charm is mandatory as otherwise this will not work. Usage of Destiny Knot must be consistent otherwise this will not work. Once you have all of the above you are ready to begin.
- With an empty nursery, save the game.
- Place the Ditto equipped with Destiny Knot, as well as a Magikarp (with or without Everstone) in the nursery
- Collect a set number of eggs that you can easily keep track of. The easiest is to collect/hatch 30 eggs since that is how many Pokemon fit in one box. Make sure these eggs stay in order of egg collected!
- Remove parents from the nursery to stop egg spawns after the set number is collected.
- Hatch all the eggs.
- If none of the eggs contain a shiny, repeat steps 1 through 5. If the egg does contain a shiny, continue to the next step.
- Take note of the egg number. (Ex: 10th egg collected)
- Reset the game without saving.
- Time to complete the swap. Place the Ditto equipped with Destiny Knot in the nursery, as well as the target Pokemon to breed shiny (with or without Everstone).
- Collect the same number of eggs to get the shiny (Ex: Collect 10 eggs)*
- Hatch the 10th egg.
- Okay with the IV rolls, ability, and or gender? Great! No further steps needed. Want to potentially change around the other characteristics of your Pokemon? Prepare yourself for a potentially tedious endeavor.
*If you are switching to a genderless parent or a parent with a 100% gender roll, for example you would need to reject egg number 10 and collect egg number 11 (as well as all eggs before it) to accommodate for offsetted values. We will get into that later, but for now use the infographic to learn what to do in these scenarios. Also if you want to try and modify a genderless shiny it becomes more tedious than it already is.
At this point we’re going to get into the nitty gritty details of things. You will probably soon realize the title is somewhat click bait in the way we can’t physically change Pokemon, but we can look for more desirable Pokemon on nearby frames. So the way this game works with egg generation is that accepting an egg from the nursery advances the egg frames forward a certain random amount usually between 15-25. When factoring in Masuda Method and Shiny Charm, the frames advanced by the collected eggs are usually 25-40. Rejecting an egg will always advance the frame by 1. As mentioned previously, these seeds associated with these frames do not change upon resetting the game. Another feature that these game’s mechanics produce is very frequently you will generate shiny seeds closely packed together. Rather than landing on one lucky seed with a shiny, you’ll likely land in the middle of a patch where +/- 5 frames are all shiny. Now it goes without saying that these patches are larger and smaller depending on the combined or single use of MM and Shiny Charm. Here’s an example of what this looks like. So what does this mean? Well on each egg frame, there is a different seed giving the egg different traits. So you are able to search ahead or behind a few frames to potentially get a more ideal roll of IVs/Ability/Gender on your new shiny Pokemon (and nature if not using Everstone). The way rejecting eggs works always advancing the frame by 1 every time makes this very easy to check whether or not you can potentially get a better traits.
To explain further we’re going to work with a hypothetical situation. From there I will show you a logical process of events to find different shiny Pokemon traits. I will note that it is significantly easier to look in the frames occurring after you received the shiny egg than it is to look prior. Once again this will be covered later.
Let’s say I found a shiny Abra in on egg number 3 but I’m not happy with the inherited IV spread. First I am going to take note of where I found the Abra. It is very important to NOT save after receiving the shiny egg. We’re trying to change its traits after all. This specific frame of receiving this egg will be our base frame 0 (zero) that we will use for all future endeavors. I highly advise setting up an excel document which I will be using as an example to easily keep track of a lot of information.

Now that we’ve recorded our base frame, let’s check the frame after it. I repeat the process like before and accept 2 eggs, now instead of accepting the third egg, I’m going to decline it. This will advance the frame forward by one. After this I will pick up the next egg, hatch it, and record its traits.
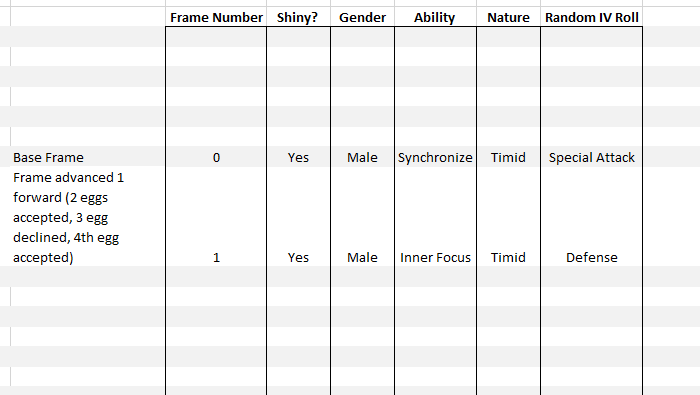
It still isn’t an Abra I want, so let me check the frames after that.
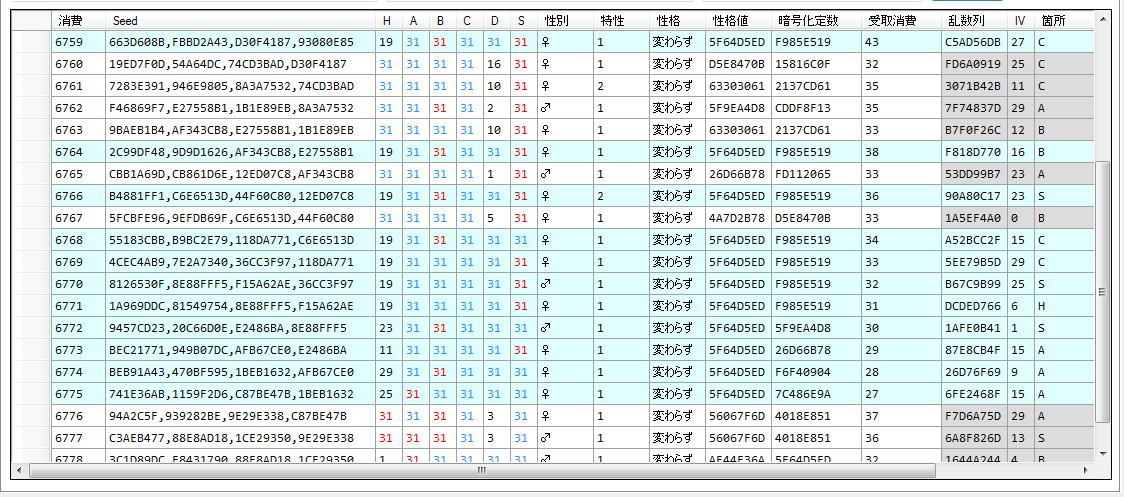
After repeating the process and rejecting one more egg each time than the last before accepting the egg, an example result can be seen by this image:
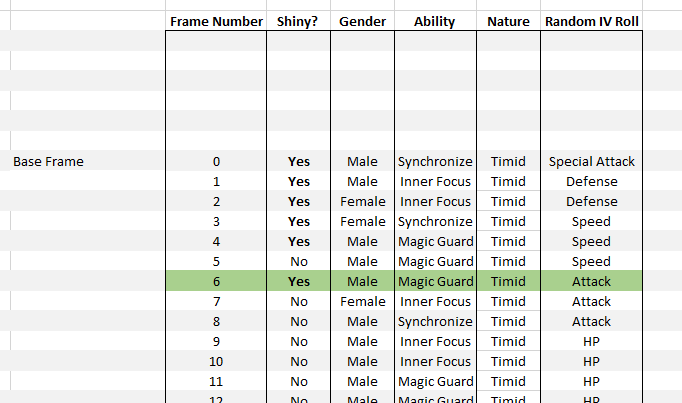
Highlighted in green is the Abra I want with its Hidden Ability and random IV roll being attack. (assuming both parents are flawless IVs in all stats, this will result in an Abra with perfect IVs in every stat except for attack). Notice how there was a sequence break in shiny status. It is not uncommon for patches of shiny status to be broken up at the start or at the end by a normal egg or two. If you end up finding 5 or so normal Pokemon, it’s safe to say you’ve exited that batch of shiny seeds. It is also important to note that gender may change if switching from different gender ratios with Magikarp at 1:1 to something like Vulpix with 1:4. Reminder that switching to completely genderless or 100% gender Pokemon will change your seeds and is covered later. I’ll recommend again looking at the offsetting section in the infographic and trying to understand how it works as things get complicated quickly when using these types of parents.
“Wow! I got a shiny Abra, AND I got the traits I wanted! Thanks, Stranger!” Is what I hope you’re saying right now, because checking the seeds prior to the base frame is a lot more complicated and time consuming. In most cases I wouldn’t recommend doing it, but for those who are persistent, there’s still hope for a better Pokemon.
So what makes checking these “negative” frames so difficult?
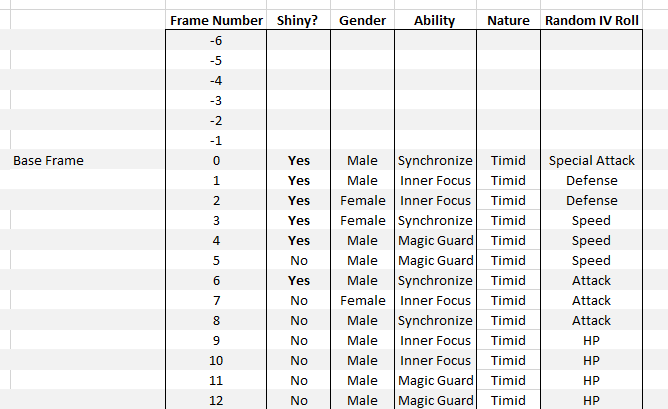
If you recall, the shiny seeds are normally grouped together. They can be as little as 2 and the most I’ve seen is 12 for one of the Pokemon I’ve done. As you also know, accepting an egg advances frames a RANDOM amount. This is where the it gets tedious. It can advance your frame count anywhere from 10 up to 40. For example, let’s say I still get a shiny Abra on the third egg and am using the same base frame as before. If accepting the second egg in my line advances the frame count by 30, I could get the same Abra by accepting only one egg, declining 30 eggs, and then accepting the 31st egg. So in order to check the “negative” frames, for this example you would need to accept 1 egg, decline 29 eggs, and accept the 30th. This is your frame “-1”. As you can imagine this is a very long process and the frustrating part is that will not know how many frames are advanced by accepting this 2nd egg. This leads to a long guess and check process. If you are only using one of either Masuda Method or Shiny Charm, you may only have to decline up to 10 eggs to find your base frame again. If you are using both, you may have to decline up to 40 eggs to find your base frame again. And those eggs rejected are on a Per Save basis with you recording everything as you go. It is very very time consuming. As soon as you end up finding repeats in data from your Base Frame 0 and forward, only then can you tell where exactly in the negative frames you are. You may also just hit the very first shiny in a patch and waste time searching in the negative frames when none of them are shiny. It is why I don’t recommend it necessarily if you want to keep your sanity, but it can help you nonetheless.
Now a big question in all of this, is how do you deal with switching from Magikarp to a Genderless or 100% gender Pokemon? And what if you switch from a Ditto and a Magikarp to two of the same species of parents? If you remember the infographic from /vp/, this will be a little familiar. This will not cover using parents of the same species as it adds rolling for ball inheritance at the end of each egg generated. This makes things extremely complicated and more time consuming that you’re better off just breeding for another shiny. Gender on the other hand can be easily covered. Gender is the first roll that the egg makes, so with a genderless or 100% gender Pokemon, this roll is skipped offsetting every value by 1. The way this guide is set up, this should not really be an issue for finding the ideal Pokemon in the patch. You will still need to follow the initial set up to get to the base frame by rejecting/receiving eggs in the order listed in the infographic. For example, say you have a shiny on egg 1. It skips the roll for gender using a genderless parent, everything comes one frame later meaning you’ll reject one more egg than you did previously to get the same results. Here the example using the same Abra stats:

As you can see with everything shifted a frame later, the egg on frame 5 would then become shiny and the egg on frame 6 would no longer be shiny and the traits change the same respectively. The eggs themselves have not changed at all. They just will come one frame later. Note that this is just for one egg as well. These offset values need to be accounted for every egg you would normally be accepting and then the eggs you’d be rejecting. This is why this can get extremely complicated checking negative frames if you are not initially using a genderless/100% gender Pokemon to check for shiny eggs. For most of us using Magikarp, it becomes very tedious. I’m going to make note here that can make checking for positive frames a far easier process. Accept the amount of Magikarp eggs minus 1 (n-1). At this point switch the parents of the desired species and you will only have to deal with offsetting the value of one egg. Meaning you don’t have to alternate accepting and rejecting eggs up until the base frame and THEN rejecting X amount of eggs. You will just have to reject one egg and it will be treated like the shiny is on egg 1. You can also do the same for (n-2) eggs and do the rejection process from there to check the negative frames. If the infographic does not make sense and this does not make sense, try and cut your losses and avoid frustration by just taking a shiny Pokemon that isn’t genderless or 100% gender. I would very much appreciate someone much more knowledgeable to help try explaining this better as the complications justify a whole new guide just for these specific Pokemon.
It is important to note that these shiny patches of seeds can occur 5 times or more within 10000 frames (around 300 eggs accepted one after another), or as little as once in 20000 frames (around 600 eggs accepted one after another). It is entirely possible to skip over shiny patches without knowing it and go on a very long dry spell. That is why this guide is here to try and help you get your ideal Shiny Pokemon with more time back to your life/game. I hope this was helpful, and good luck hunting!

Recent Comments