SWTOR Warzone Mechanics Guide
SWTOR Warzone Mechanics Guide by Nitia
There are a lot of tactics and guides on how to win, this is just meant to explain the mechanics behind the warzones. Let me know if you spot any mistakes or have something to add!
1. Ancient Hypergates
Ancient Hypergates is a Warzone that revolves around winning with points. Due to the design of it there are different ways to gain points or deny your enemy.
Your team wins if it reaches 600 points first. When both teams reach 600 or more points, the team with the most points wins.
There are three ways to score points:
- Capping a pylon: This rewards you with 75 points if you can hold it until the explosion.
- Killing Enemies: Every enemy is worth 1 base point.
- Gathering Orbs: Every orb handed in is worth 2 base points.
The special thing about orbs is that they immediately grant you points.
The other two methods only grant you points after the explosion and only if you kept the pylon.
That means if someone caps your team’s pylon in the last few seconds you will retain your orb-points but lose all kill-points and the enemy will take the 75 pylon points.
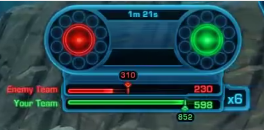
What makes Hypergate more complicated is the round multiplier. It is shown to the right of the scoreboard and starts with x3. After the first explosion it’s x4, after the second it’s x5 etc. until the WZ ends.
A killed enemy in the first round is worth (1×3) 3 points. A gathered orb is worth (2×3) 6 points.
In the fourth round with a multiplier of x6 an enemy kill is worth (1×6) 6 points, an orb is worth (2×6) 12.
Kills are counted for every round. The bonus you receive (for example (5×3), (5×4), (5×5) if you scored 5 kills in the first three rounds each) is added each round when you cap a pylon. (In round 4 when you cap the pylon you’ll get points for your current kills plus (5×3) + (5×4) + (5×5).
That makes kills much more valuable than commonly thought.
During the rounds you’ll build points with kills. It doesn’t matter at which point in the round you capture the pylon as long as you do, the points do not get lost. If you have two pylons the kills don’t get multiplied, you deny the enemy points and get 75 more yourself.
During the delay while the explosions happen any kill counts towards the next round already. Note that a player dying to the explosion doesn’t produce any points so it might be a good idea to commit suicide.
In Ancient Hypergates capping a pylon takes 6 seconds. That means it is quite easy to successfully stealth cap and should be taken into consideration.
2. Voidstar
Voidstar is all about attack and defense.
There are three areas with doors. To get through the doors an attacker has to place a bomb with a 8 second channel and then defend it for 20 seconds.
Between the first and second is a bridge that the attackers have to extend, between the second and third there is a lightfield that the attackers have to shut down.
The objective of the defenders is to interrupt the attackers doing that and to disarm any bomb with a 3 second disarm channel.
Attackers respawn immediately after death.
Defenders are locked behind a force-field when they respawn.
The duration of that force-field is 30 seconds when it goes up and it opens for 5 seconds.
You can keep track of when the force-field opens by looking at the circle in the middle, whether you are defender or attacker.
- If it has four corners it will open in 30s.
- If it has three corners it will open in 22.5s.
- If it has two corners it will open in 15s.
- If it has one corner it will open in 7.5s.
After blowing up a door, during a transition, attackers that die will spawn in front of the obstacle (bridge or lightfield), while defenders will spawn behind it.
If, after blowing up the door, the defenders are delayed and not killed, they will not have anyone defending the doors.
3. Novare Coast
Novare Coast is straightforward. You need two of the turrets to damage the enemies shields – so in theory the match could be endless.
Once you control two, the enemies shield will take 2% damage every 8 seconds. If you control all three, it’ll take double damage – 4% every 8 seconds.
To cap you have to click the console in the middle of the emplacement. Initially you have to channel 5 seconds for the first bar, then every bar takes about a second.
The more people channel, the faster it channels. Two people will only need 2.5 seconds for the first bar to move.
4. Civil War
In Civil War the objective is point based again. Both teams start with 600 points on their ship’s shield each and then try to capture turrets to reduce the other team’s points. As soon as one team hits 0 the game is over.
When they are capped every turret will deal 10 damage in intervals of 10 seconds to the enemy’s shield.
This makes it a mechanically easy warzone. If the score is for example 60:130 the team with more points on their shield will win even when they are holding only one turret.
5. Huttball
In Huttball the goal is to score 6 times first or have the most points as soon as the timer of 15 minutes runs out.
If it’s a tie when the time runs out the team with the current ball possession wins.
If it’s a tie and no team has the ball the team who last scored wins.
Hazards:
Air Lifts: In the normal Huttball there are two Air Lifts in the middle in the map. If you walk into them you get pushed into the air and land in a random location. You won’t take any fall damage but you might land in a fire trap.
Fire Pit/Acid Drip(Quesh): Both Hazards aren’t quite as big as they look at you can stand in the corners. The Acid Drip will also apply a deadly slow. You can run through them with a speed-boost but you will take damage. The damage ticks several times per second. An Operative rolling through them might be able to avoid the damage but that is a question of lucky timing.
Acid Trap(Normal Huttball): Also deals damage but by far not as much as the other Hazards. It applies a slow and should be avoided or jumped over.
Grappling Hooks(Quesh): At the bottom on the sides you’ll find grappling hooks. Those are unusable by ball-carriers. Everyone else can channel for 1.5 seconds (only interruptible with the Interrupt or stuns.) This will boost you up a level and provide you with a 6 second immunity to Force-Pushes and Pulls.
Passing the Ball:
This ability has a 30m range. You can double-click it when targeting an ally to throw it exactly on-target. You can not pass to a stealthed target or a Sorcerer with Force Barrier.
To intercept a ball throw you have to stand closer to the middle of the pass than the enemy.
If you are the same distance, the pass favors the team who threw the ball.
If you are the same distance and stun your enemy, you will get the ball.

Recent Comments