Skyforge Adventures Guide
Skyforge Adventures Guide by teek
Greetings fellow immortals! I’m Teek, and today I bring to you my uber mechanic guide to ensure you swiftly and easily destroy all of your enemies!
Let’s get on with it!
Factory 501 – Map Link
| Singular Scissor Cerberus | this boss has a long duration straight line beam attack beginning with it folding it’s wings in towards itself. his second attack begins with standing upright followed by a small aoe that will knock anything within ~5meters |
| Shadow Reaper | boss is surrounded by 4 panels, panels must be interacted with before his shield will come down and he is immune to all damage while the shield holds. Each panel interaction will spawn a wave of Oculat adds. After the last panel is activated the shield will fall and the boss will be vulnerable to attack. There are also random beam attacks around the area from the immune turrets on the outside, it seems as if these nuke mobs down if you kite them through(unconfirmed). |
additional notes – nothing very special about this area. the medics will drop a healing totem that will heal anything near it and can be disabled by interacting with it. throughout the map there are also a few panels that, if interacted with, will kill some of the minions in the group of mobs near the panel. some of the oculats will explode on death, simply avoid standing near them when they’re counting down.
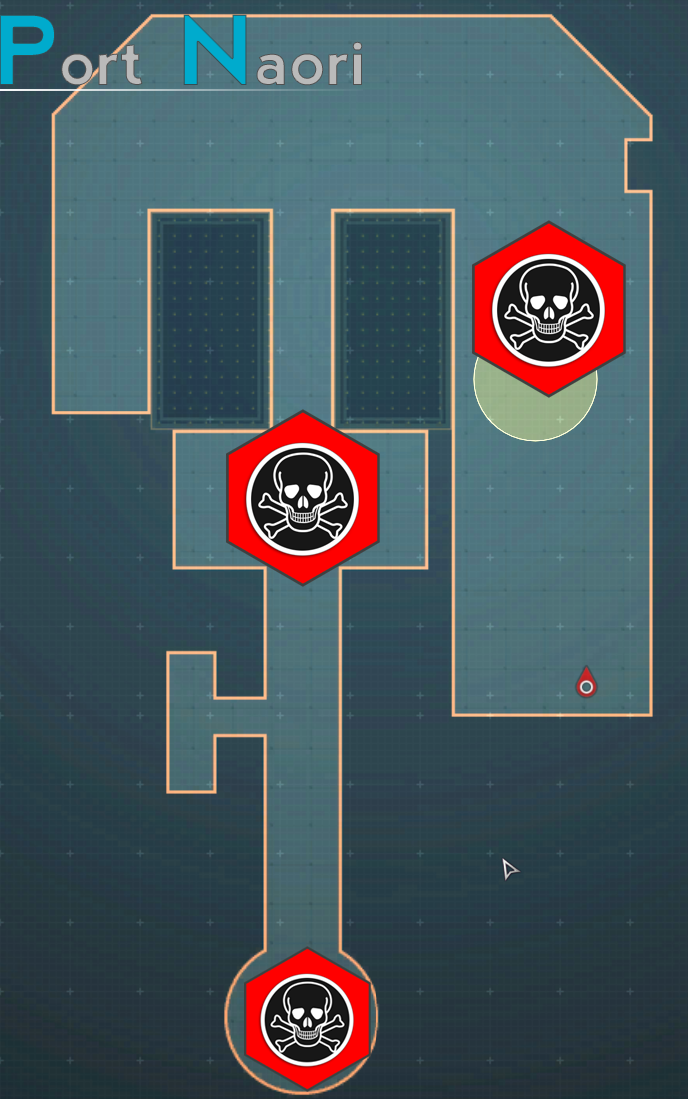
Port Naori – Map Link
| Ferocious Happo | Happo periodically glows red causing increased damage output. He also does a somewhat flex animation followed by a tsunami wave attack (in a cone-ish shape in front of him) for high damage. |
| Llurus the Storm Claw | This fight has two bosses consolidated into one, one boss is a Khelp type mob that charges a blue colored ranged damage attack that shoots in a straight line orientating from his hands, easily avoidable. Second is a Naiad who periodically emerges from a shipping container where she becomes vulnerable to attack. She will spam puddles of water under whoever has aggro, so make sure you move these away. do not stand in them without shielding/reflecting for very long as they deal large amounts of damage over time. When the Naiad emerges from the shipping container, she grants a shield to the Khelp which reduces damage, it is recommended to focus the Naiad during this part. |
| Nemida | Approximately every 30 seconds this boss will shield itself and summon adds, the shield has a capacity so it can be burned down. Alternatively the shield will drop when the adds are killed. |
additional notes – the naiads in this zone will occasionally throw puddles of water under their target’s feet, moving out of this will avoid a lot of damage.
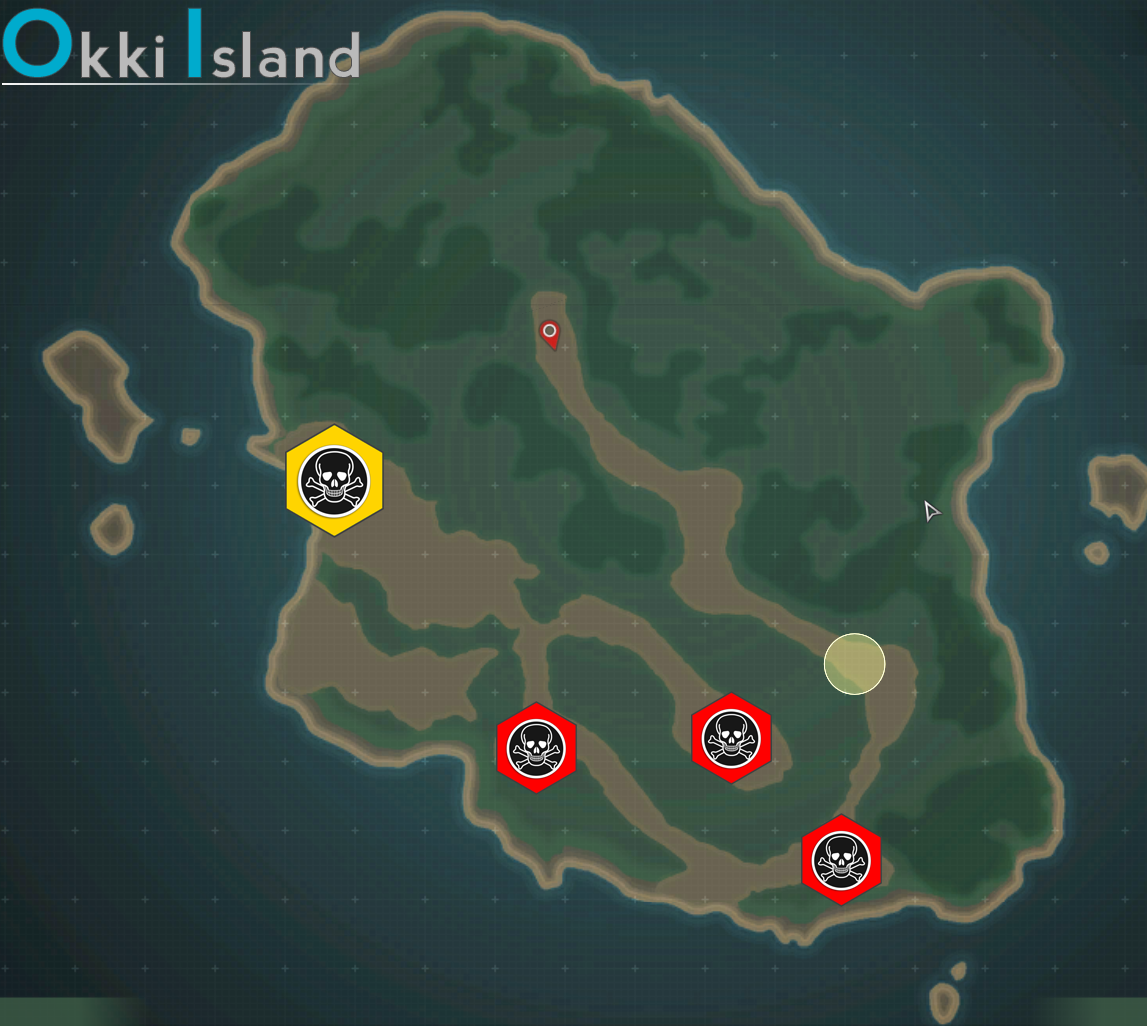
Okki Island – Map Link
| Gruhn the Flaming Axe | Gruhn’s rotation consists of 3 basic attacks followed by a charged axe smash accompanied by a high damaging fire aoe in the area the axe hits. The fire lasts for 3 patches worth of time so there’s always breathing room. If you break the area down into quadrants(like a pizza sliced into 4 pieces) and move him from quadrant to quadrant after each axe smash, this fight is very trivial. |
| Zuurkh | Zuurkh has identical attacks as carrion berserkers. He will periodically turn red followed by going on a rampage with quick attacks for ~ 6 seconds. Between rampages, he seeks out a burrow that emerges from the ground and if successfully burrows, summons weak adds while he’s burrowed. Destroying (interacting with) the burrow before he reaches it completely avoids the add spawning phase and speeds the boss up quite a lot. After ~50% boss will also perform a crouching charge attack that will knock down and highly damage anything in it’s path. |
| Ancient Ashy Varax (Optional) | This boss periodically summons 3 lizard adds with relatively low HP. Throughout the fight he will perform a charged 3 hit attack indicated by the boss leaning backwards like it is prepping for a lunge. This attack can do a lot of damage if all attacks hit, and it is recommended to just move to his side/rear as the attack will hit in the same direction he is facing when he starts charging it. |
| Adeor | In the area around the outside of the encounter zone, hands, identical to the ones you find throughout the area will spawn that will either do damage (purple) or heal (yellow) to anything they hit (including the boss!). Intercept the yellow ones or he will heal for a portion of his HP – lead the purple hands into him (easily accomplished if you position the boss between you and the hand) and they will damage the boss. If you are playing in a group, he will periodically (every approx 15 seconds) charge an attack with a mid-high damage knockup on anyone in melee range. This ability will cc you for ~2 seconds and can be avoided by moving dash range away from him. |
additional notes – carrion berserkers, like zuurkh, will occasionally glow red followed by a flurry of claw attacks. these attacks have a low range and can be kited fairly easily.
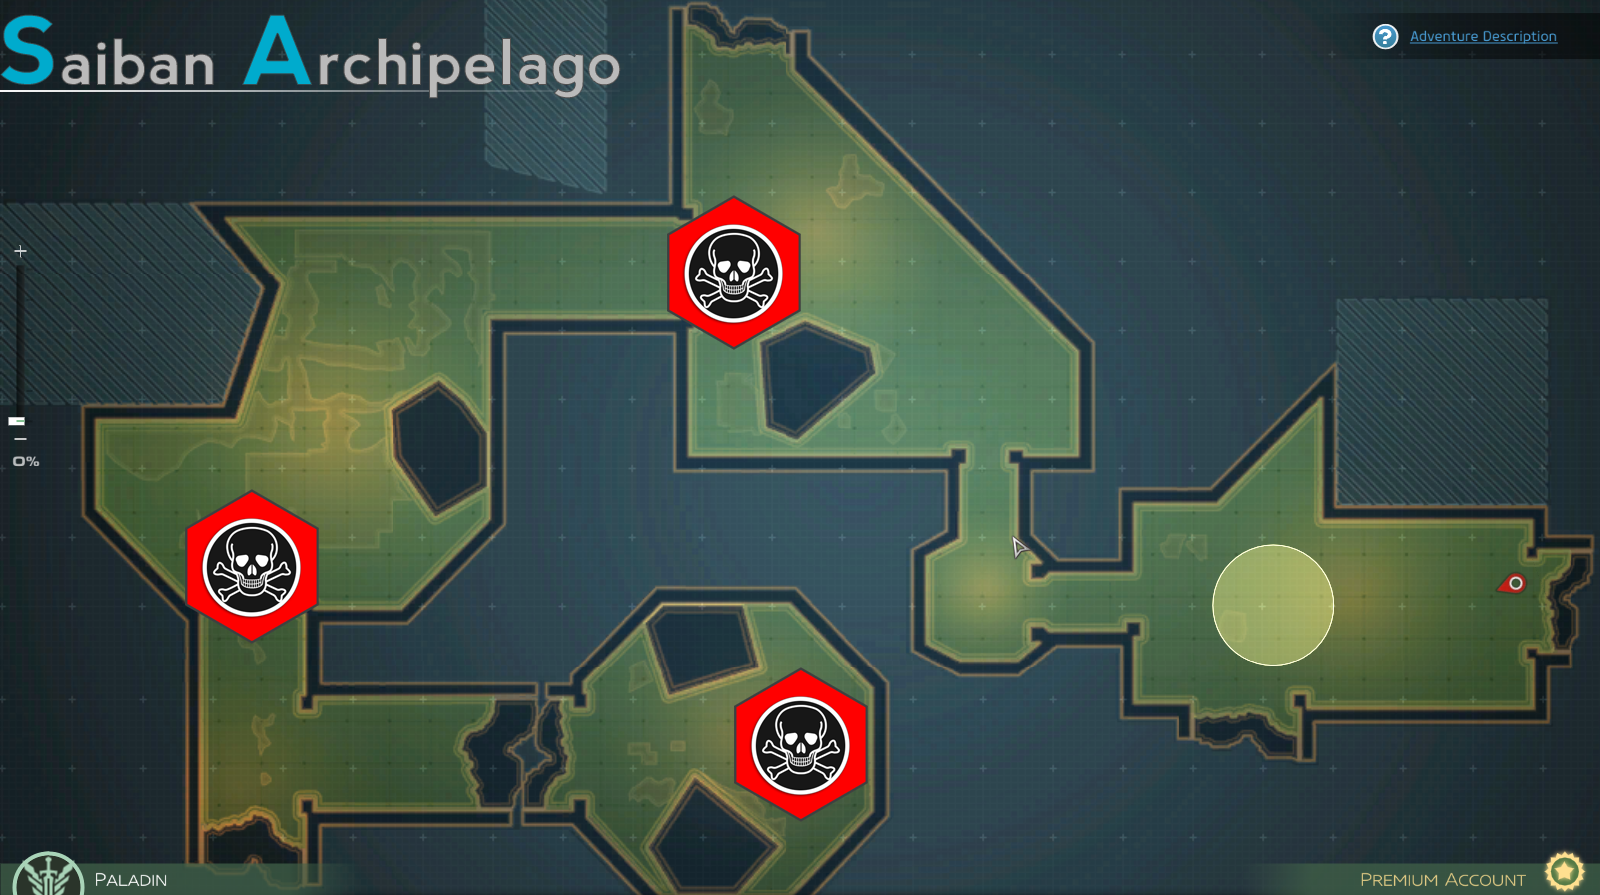
Saiban Archipelago – Map Link
| Heavy Secutor Thunder | The first boss has a standard square mech bomb patch similar to the trash mobs previous to it. It also spawns between 3-5 circular bombs that converge on where his target is standing when first casted, these bombs will either explode when they collide with a player or when they reach one another. Use the gap between two of the bombs to dash/run through and avoid the explosion. He may also charge and shoot a low damage red beam depending on party size/difficulty |
| Heavy Secutor Prism | The second boss spawns weak Oculat adds periodically. It also has a beam attack focused at one target for approx. 6 seconds. Simply kite/reflect the laser, kill the adds. |
| Special Secutor Talisman | The third boss also has a standard square bomb patch like the miner mobs found in this area. The boss periodically splits into 8 shielded versions of itself. The correct version must have shield bursted down before boss appears and becomes vulnerable to damage again. Take note of where the boss moves to after he splits, as it is possible to visually track the boss and pick out the correct shielded version to speed the fight up substantially. |
additional notes – there are medics similar to factory 501 that will drop a totem that heals anything within range of it, interacting with this totem will destroy it. some of the high damage Oculats explode on death so watch for their countdown and avoid being near them when they get to 0.
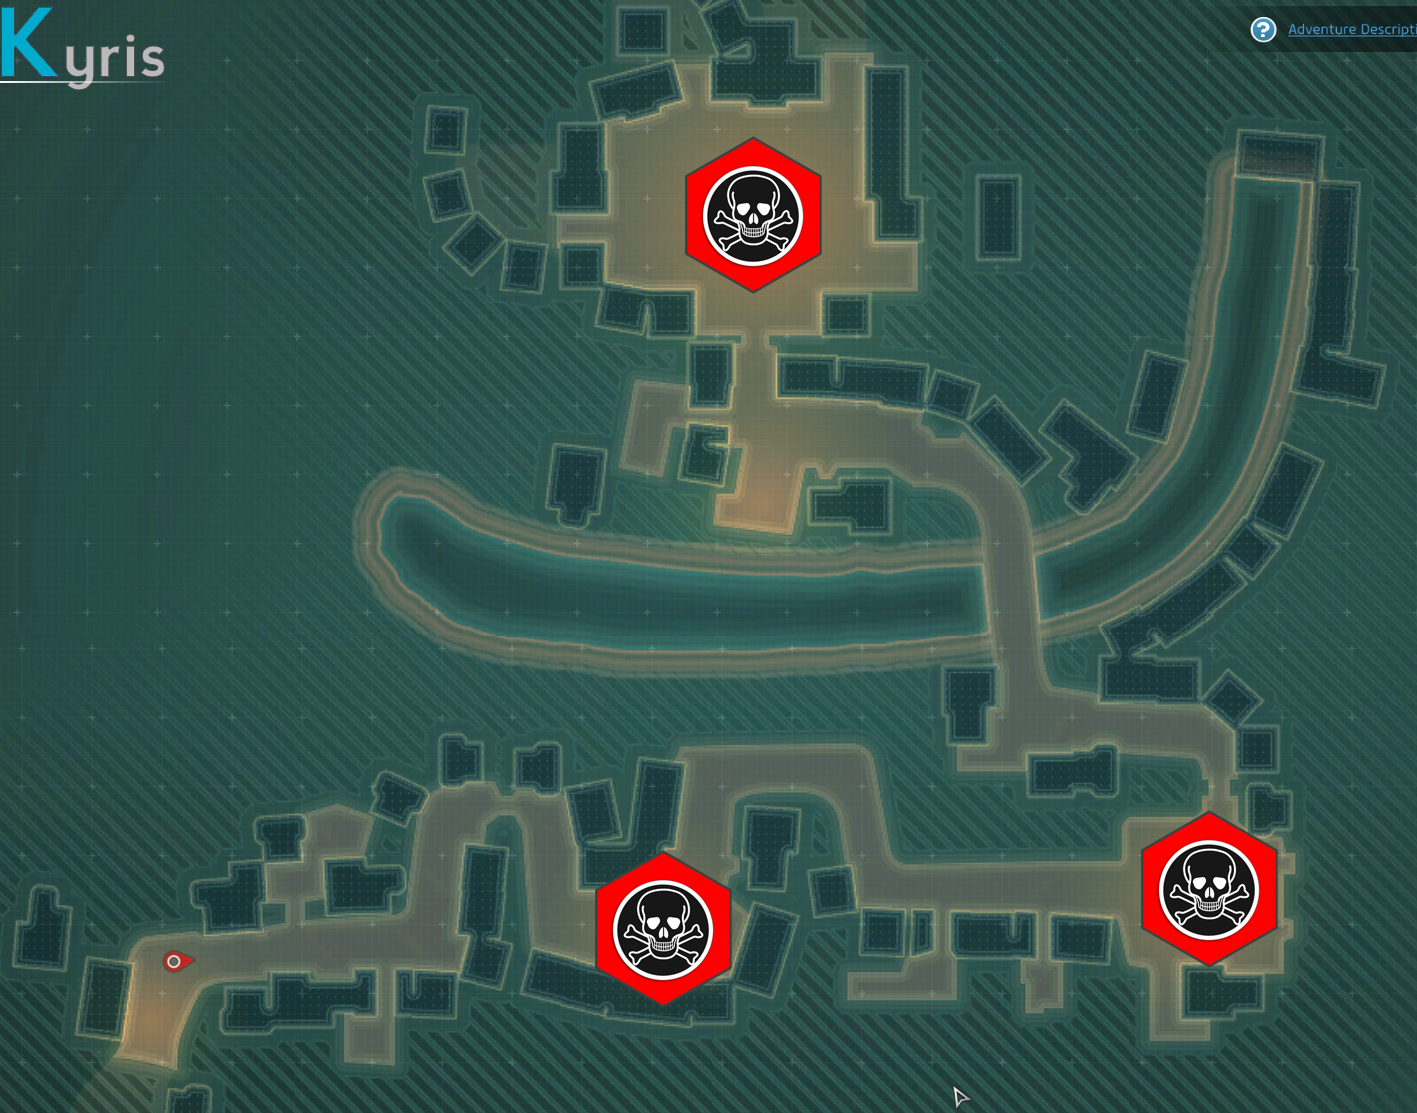
Kyris – Map Link
| Deathpoisoner | Between every 3-4 autoattacks, Deathpoisoner will turn slightly green and shoot a poison projectile that drops an aoe patch of poison on the highest threat player. DP will periodically fly to a barrel and start channeling poison from the barrel, when he does this the barrel can be destroyed which will result in him taking a large amount of damage from the explosion and also make the fight substantially quicker. |
| Romur | Romur has a fairly simple charged up smash attack in which he starts by levitating followed by smashing the ground in front of him similar to the half bug/human(Aswang) trash mobs in the adventure. Romur periodically goes immune and summons weak Aswang adds from the corner of the area in waves. |
| Ferocious Illira | Illira summons weak Winger adds periodically. She also carries a damage soaking reflect AOE (indicated by purple sphere above her head & purple telegraph on the ground). The amount of damage this AOE does depends on how much damage she takes while charging it. You can outrange this by exiting the telegraphed purple circle on the ground until she finishes charging/exploding. It takes about 12-15 seconds for the ability to finish channeling and do damage so it is possible to time invulnerabilities/reflects during this time. |
additional notes – the Aswang mobs have a slow windup overhead smash ability similar to Romur. the four yellow colored wingers in the area have a charged attack that initially glows purple, followed by a piercing projectile that hits anything in a straight line for ~8 meters.
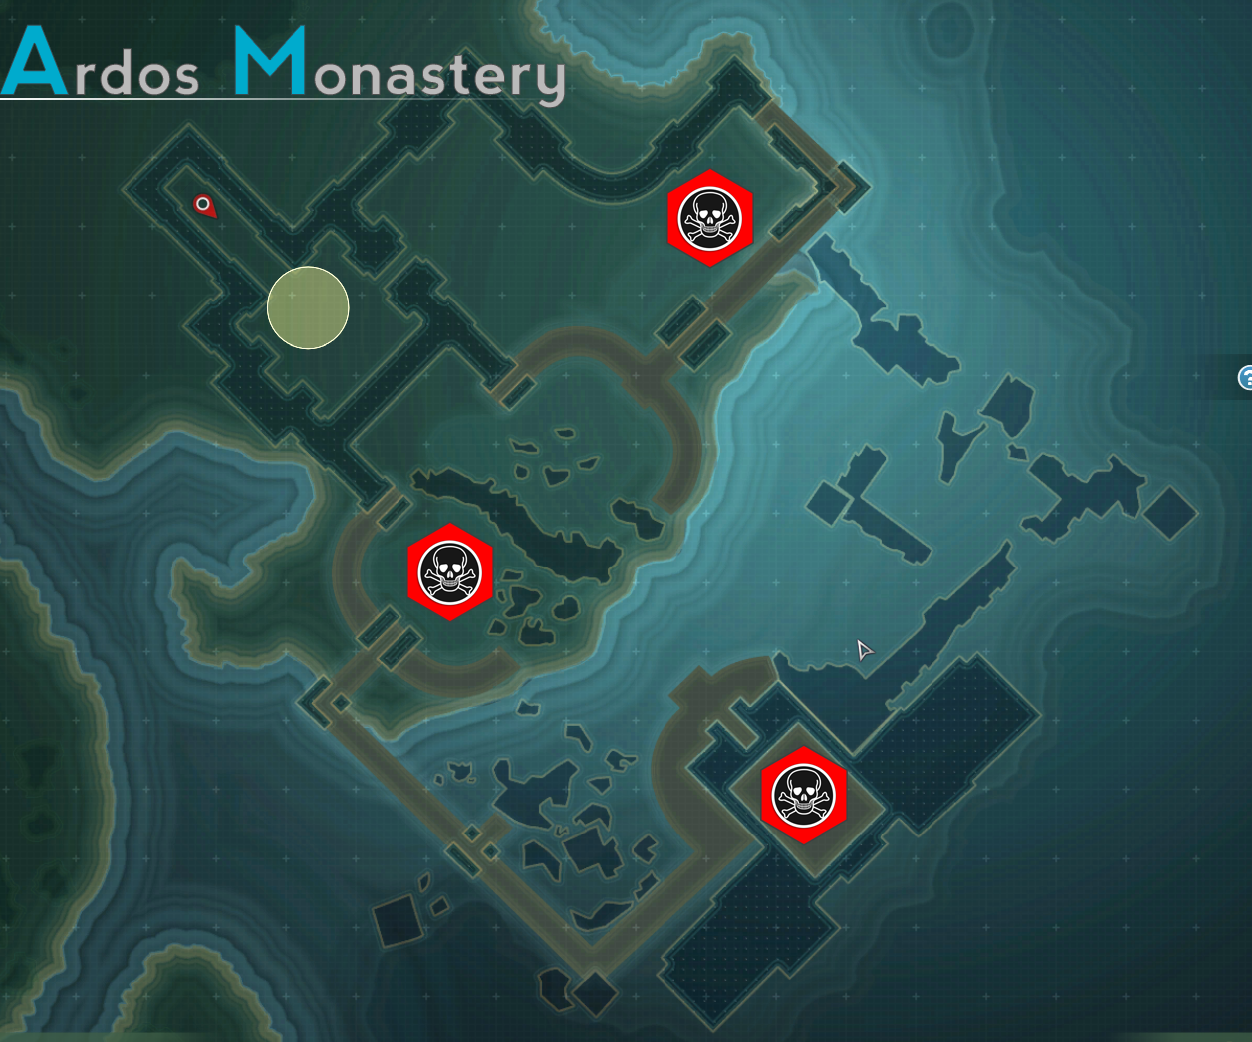
Ardos Monastery – Map Link
| Stormbringer Daire | Throughout the fight, Stormbringer Daire will randomly create a guyser at your feet requiring you to move or you will take a large portion of damage and be knocked into the air. Daire also carries a charged tsunami wave cone attack that is indicated by placing the end of their staff on the ground in front of her. Once this boss is defeated she spawns another guyser that is used for traveling to the boss encounter area to the walkway above. |
| Khelp Elder | This boss has a channeled sonar-looking cone attack that will fear whoever it hits for ~3 seconds, this ability has a very obvious tell – boss leans forward and starts shooting sonar looking waves at his target. The other ability this boss will periodically use generates multiple cyclones on the ground (increasing in number over the fight) which converge on whoever is targetted. simply kite these until they die. these cyclones will disappear once they have made contact with their target so if you have an invulnerability, reflect, mitigation or any other type of damage immunity you can pop that and soak them to continue with dps. |
| Urbus | Urbus periodically drops eggs on the ground that will either hatch adds or cause the ground beneath them to be engulfed in flames. The flames hit very hard so it is recommended to kite the boss away from the eggs when he drops them. The adds are weak adds and can simply be cleaned up with aoe. |
additional info – the Khelps with the shield icons cast a charged aoe indicated by a blue circle on the ground, it hits very hard so move out of it. the serpent (eel-like) mobs will spin in a circle dealing high aoe damage to anything within 5 meters.
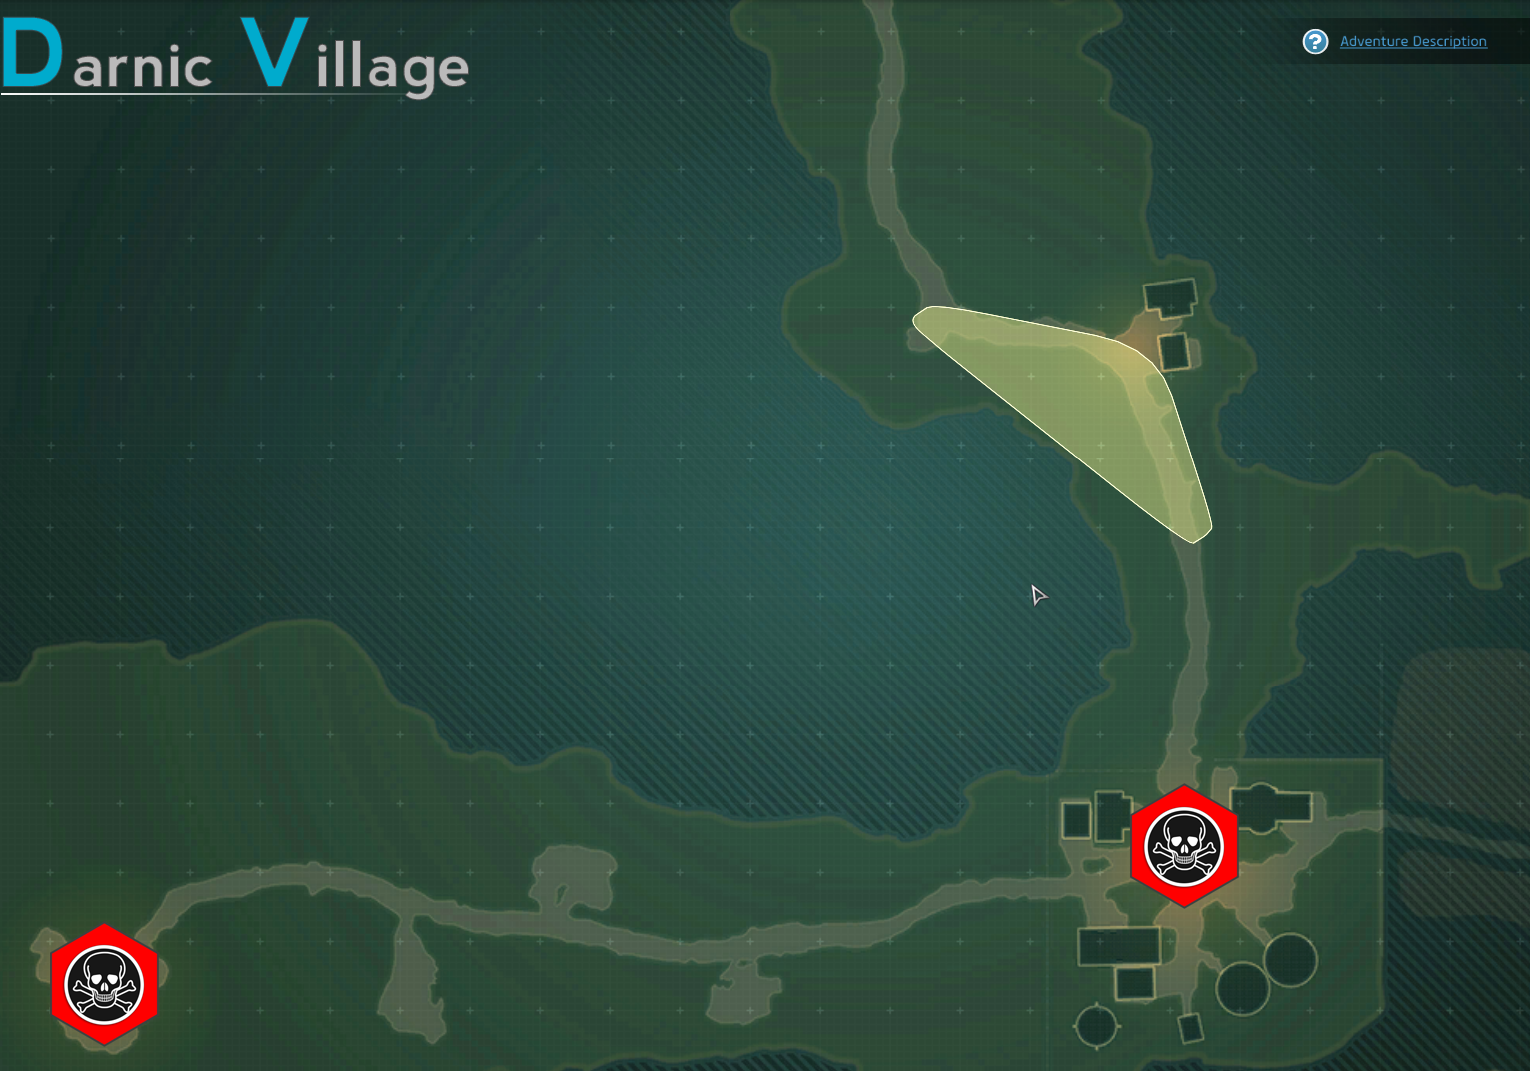
Darnic Village – Map Link
| Vaal | Vaal has no specific abilities, but he will periodically go completely immune and summon a melee mob to do his bidding. This mob needs to be burned down asap as it will explode if it is not killed quickly enough dealing high damage to anyone near it. |
| Chichir Haulstomp | This boss has two distinct abilities, one will cause him to glow red followed by a flurry of attacks towards his target. these attacks have a range so if the boss is on you, simply kite to avoid all of the damage. His second ability is a ground smash ability that will cause anyone hit by the earthquake-like projectiles to take damage and be knocked up. It’s recommended that if you’re in melee range of this boss you dodge diagonally (such as ↘) as the ability hits similar to a cross shape on the ground with him being the center. |
additional info – not much to the trash mobs in this area, try to deal with the reapers as soon as possible. Carrion berserkers, like Okki carrions, will charge a claw attack and focus one target with it, simply kite to avoid all of the damage.
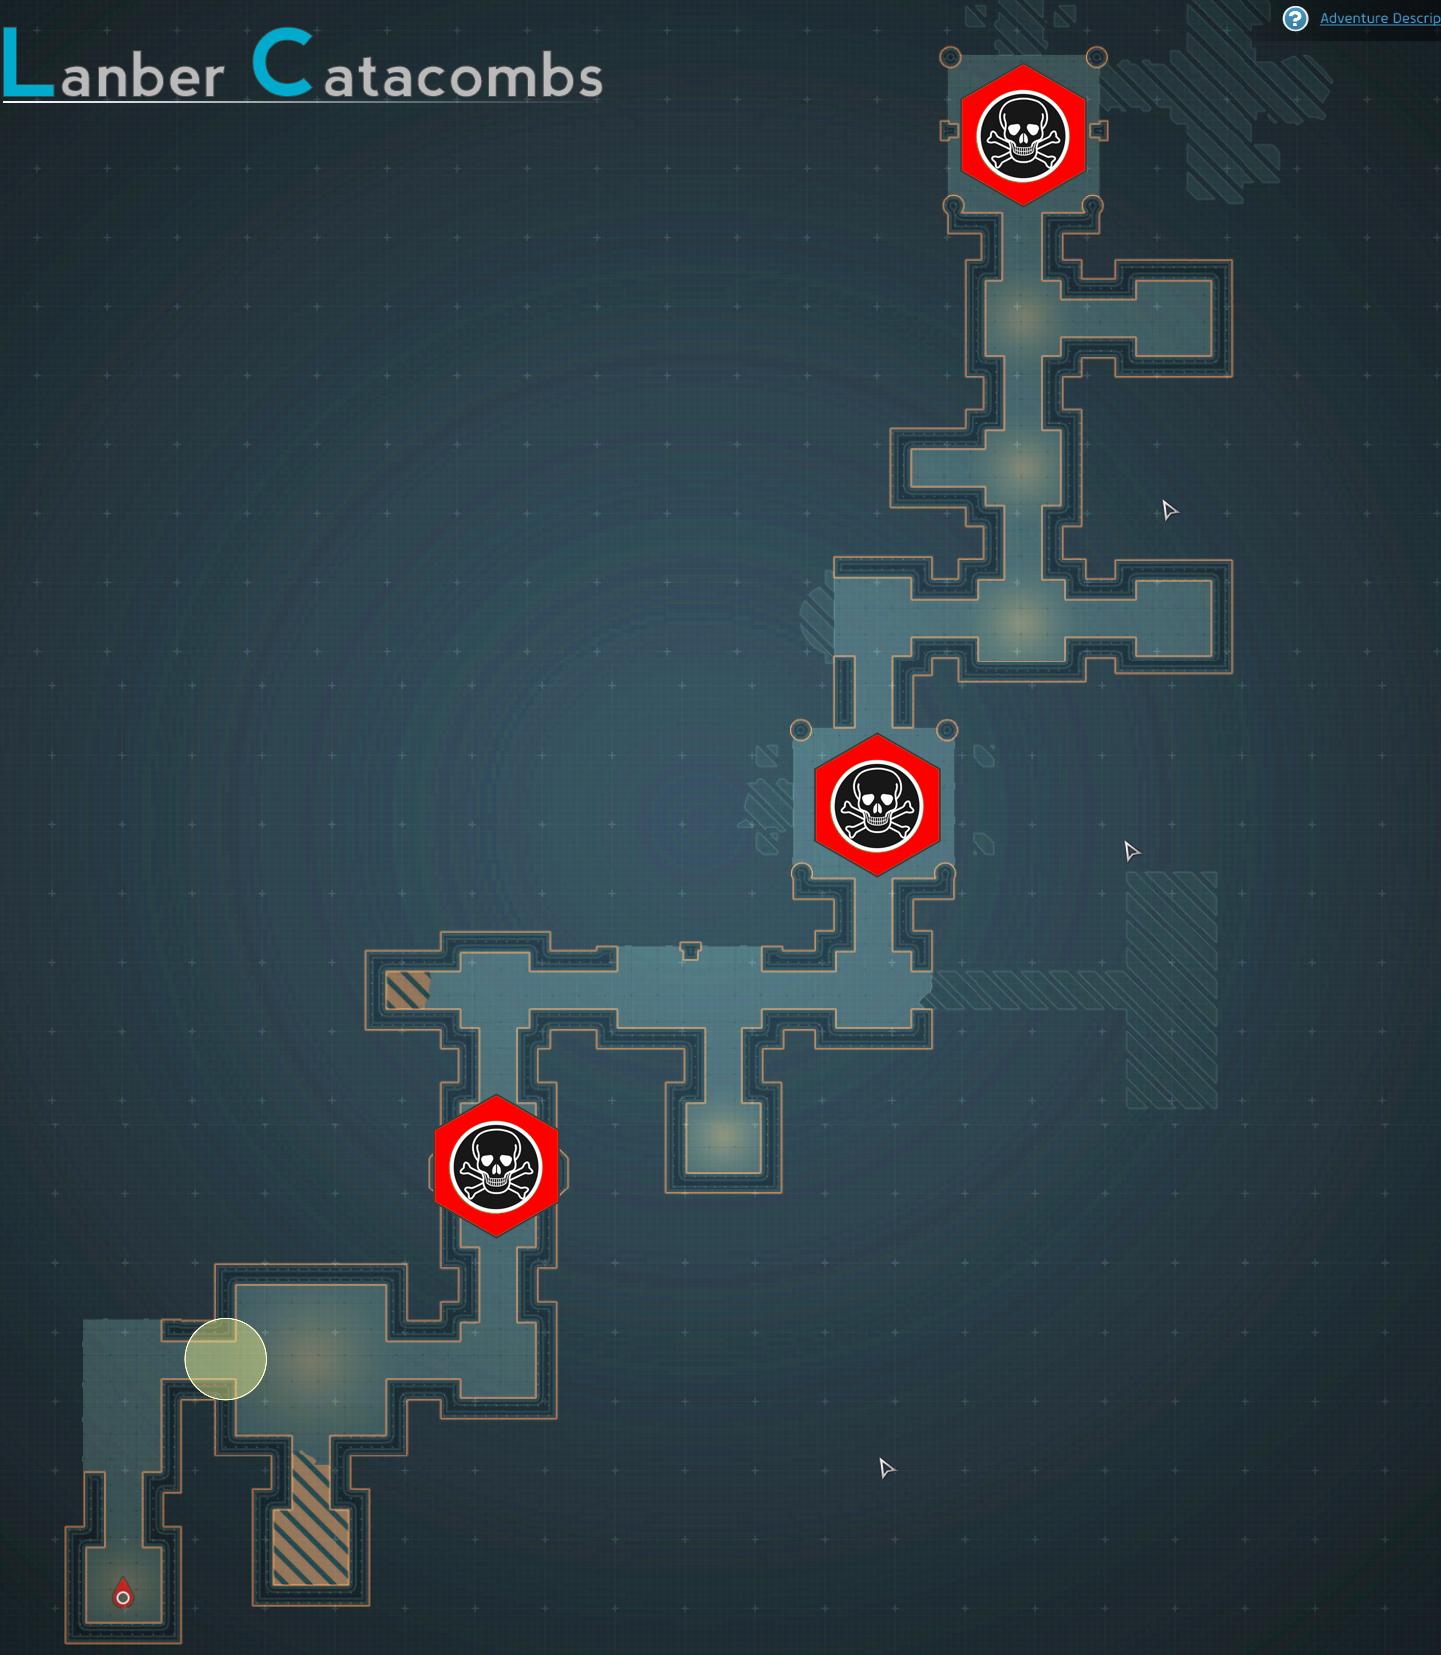
Lanber Catacombs – Map Link
| Clinging Horror | Clinging Horror is completely invulnerable to common attack abilities. His main mechanic involves the 3 boxes of poison you see around the area in front of him. He will summon waves of weak Winger adds throughout the entire encounter. After each wave of adds are killed he will open up his “mouth” to summon another group of mobs. When he opens, simply interact with one of the poison containers around the encounter area which will cause him to take damage, this is the only way to damage him. The adds will randomly drop a low damaging poison on the ground pretty much everywhere, so be aware of where you are standing. |
| Hespar | Hespar will periodically glow red followed by a spinning attack that strips you of ~90% of your total hp and scatters health orbs around the area, simply grab health orbs as soon as you can to avoid being hit while low health. He also carries a smash attack identical to the ones found on Aswang mobs in Kyris, etc. Additionally, there is a shrine located in the middle of the room which will randomly become active throughout the fight, surrounding itself with rotating mines and providing whoever interacts with it (including the boss!) a buff. If you step on one of the mines you will take a small amount of damage and be knocked further away from the shrine, so avoid the mines while racing the boss to the shrine to steal his precious buff to make the fight much easier. |
| Merciless Astara | Astara has three main abilities which cycle throughout the fight. The first of it’s abilities is a hard hitting charged-up cone shaped attack indicated by the boss raising it’s front feet slightly. Position the boss facing away from your friends so they are not hit by this while ensuring you avoid it as well. The second of her abilities is indicated by a purple glow followed by rocks falling from the sky, you must move away from where the rocks are falling and then reposition yourself behind a rock to avoid the large aoe damage she casts after the rocks have fallen. if any of these falling rocks collides with a player, the rock is destroyed meaning less places to hide from the following AOE. For the third, final and MOST IMPORTANT of her abilities, she will move to the center of the area and spawn between 1-3 eggs around the outside of the encounter area that must be killed immediately or they will spawn VERY high damaging adds (these adds will make even the beefiest tanks soft like butter). |
additional info – there are three damage shrines located around the map, first one is in the middle of one of the beginning rooms, second and third are in side-rooms throughout the dungeon, using these will increase your damage and make some of the mobs much easier, you can also save these and pop them before the bosses for an extra damage buff (useless on the first boss). careful for mantide guards charging their purple absorb/aoe (exactly like illira in Kyris) as it often will 1 shot people in melee range.
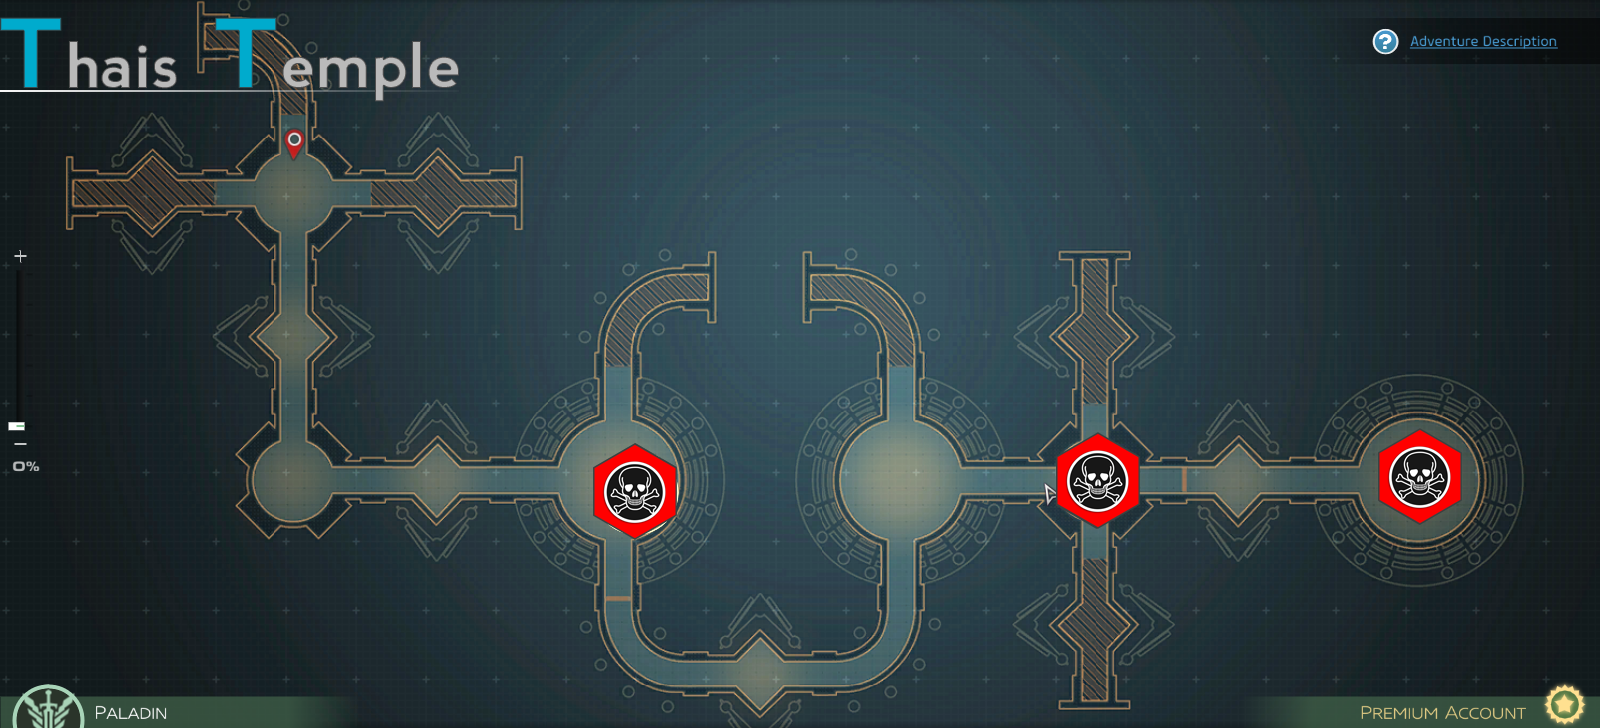
Thais Temple – Map Link
| Horrus | Horrus is mainly a tank and spank fight with a couple of low impact abilities, first of which being another egg-type mechanic. The boss will periodically summon eggs next to it which should be killed to prevent adds from spawning. He will also place a dot on the player with aggro indicated by arrows beneath your feet, simply dash in any direction to remove this. The adds are fairly easy to deal with in the off-chance one spawns a mob, and can basically be kited by a ranged character while continuing to kill the boss, or killed. |
| Hesione | Hesione is one of my least favorite bosses to play against as a paladin. Hesione will VERY OFTEN(pls nerf) summon large pools of water that deal heavy amounts of damage under the feet of whoever is highest on the aggro table. If this is you and you are melee, simply kite the pools away from your dps so they can keep whaling away. |
| Protheus | Protheus is a three phase encounter, the first phase starting off with 4 waves of spawning weak Khelp adds. The first wave comes from directly behind where he levitates at the start, the second from the left(north) side of the boss, the third from the right(south) side followed by another wave where the first wave spawned. After you clear these waves the boss will descend down and start phase 2 aka it’s main ability rotation. The boss has 2 different abilities in the second phase, one being a charged-up smash attack that hits directly in front of him which does massive amounts of damage if it hits anyone. The second ability Protheus does will summon different adds as the fight goes on, starting with small squishy Khelp and working up to large cc focused Naiads. During the add phase Protheus gains a large damage resistance shield. Killing these will alleviate your group of a lot of damage and cc as well as drop Protheus’ shield so prioritize them. The shield DOES NOT DROP until he starts his add summoning animation (kinda like a slow-motion uppercut) so SAVE ALL BURST for when he begins summoning adds. The third phase of his abilities is pretty much exactly the same as the second except he replaces his smash with a ranged lightning bolt attack. this attack hits in a straight line and pierces anything in it’s path for large amounts of damage, simply move to the left or right of the telegraph to avoid it and make sure he is positioned facing away from other members of your party. |
additional info – not many specifics outside of the boss fights here. keep an eye on the serpents, they will charge an aoe attack that hurts. the damage icon khelps also charge an ability similar to the second boss of port naori that shoots in a straight line out of their hands.
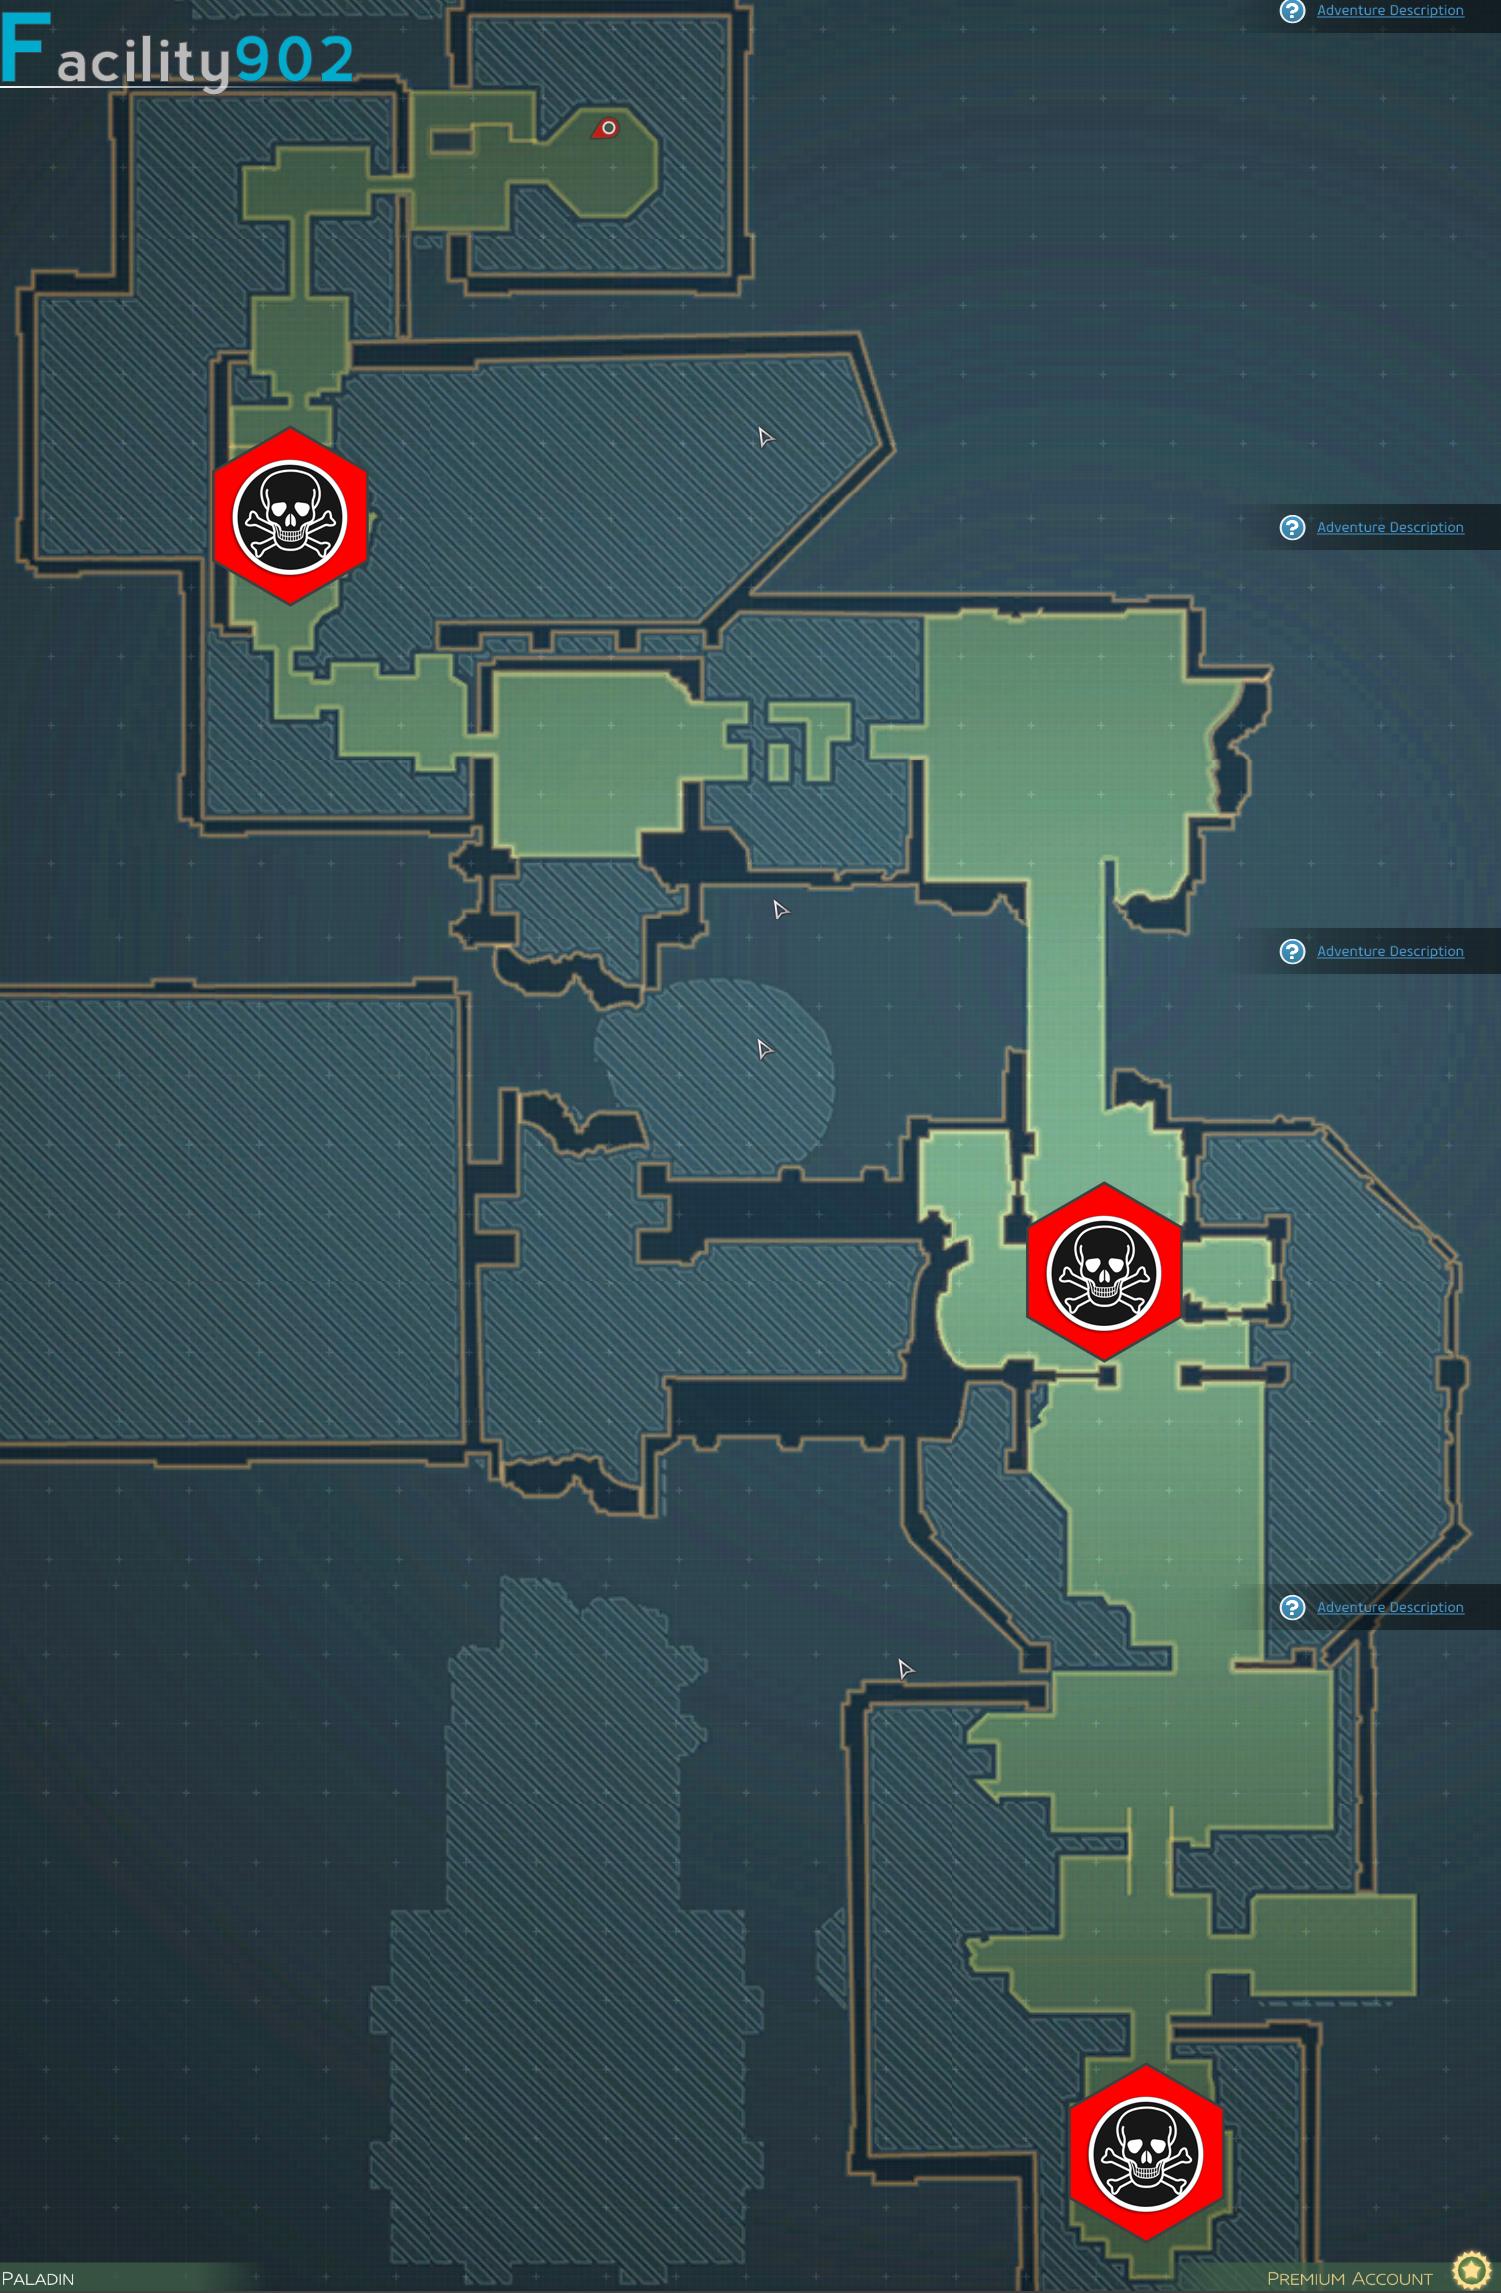
Facility 902 – Map Link
| Armored Scissor Bastion | Bastion begins with the boss accompanied by two adds which should be burned down at the beginning of the fight to avoid unnecessary damage for whoever has aggro. Focuser->Shooter->Bastion. He has one bomb type attack similar to the bosses in Saiban Archipelago which is telegraphed and easily avoided. Bastion will also periodically shield himself requiring you to stand on the purple platforms on either side of him to release the shield. |
| Reinforced Secutor Hornet | Hornet will throw out large blue orbs that rotate outside of melee range following any ranged characters and damaging anything it comes in contact with.. Not so much an issue for melee but ranged must avoid being hit by these orbs. He will also periodically curl his tail and shoot a charged beam that shoots each side of him (front/back first, then left/right) |
| Special Retharious Chaos | Throughout the fight Chaos alternates between two main abilities while a constant stream of adds spawn from where he is located initially at the beginning of the fight. When you enter the encounter area you will notice a turret located on the left hand side that you can sit on and use, the lowest dps in the group should get on the turret (support, etc). Start the fight by having the tank/highest dps get threat on Chaos and have your turret operator sitting on the turret. On the first sign of adds, have your low damage hop on the turret and nuke the adds while someone continues to try to keep threat on the boss. Whoever is highest on the threat meter will be focused by a blue beam similar to the second boss in Saiban Archipelago. The second main ability consists of Chaos turning into a sphere shape followed by an aoe pull and an aoe damage ability that will hit everything within 5-8 meters of it, dash range puts you at a safe distance. If you are tanking this mob, try to keep him away from the turret so the player on the turret has minimal downtime. |
additional info – not much for mob mechanics in this dungeon, fairly straight forward… just make sure you jump the gaps on the broken bridge!
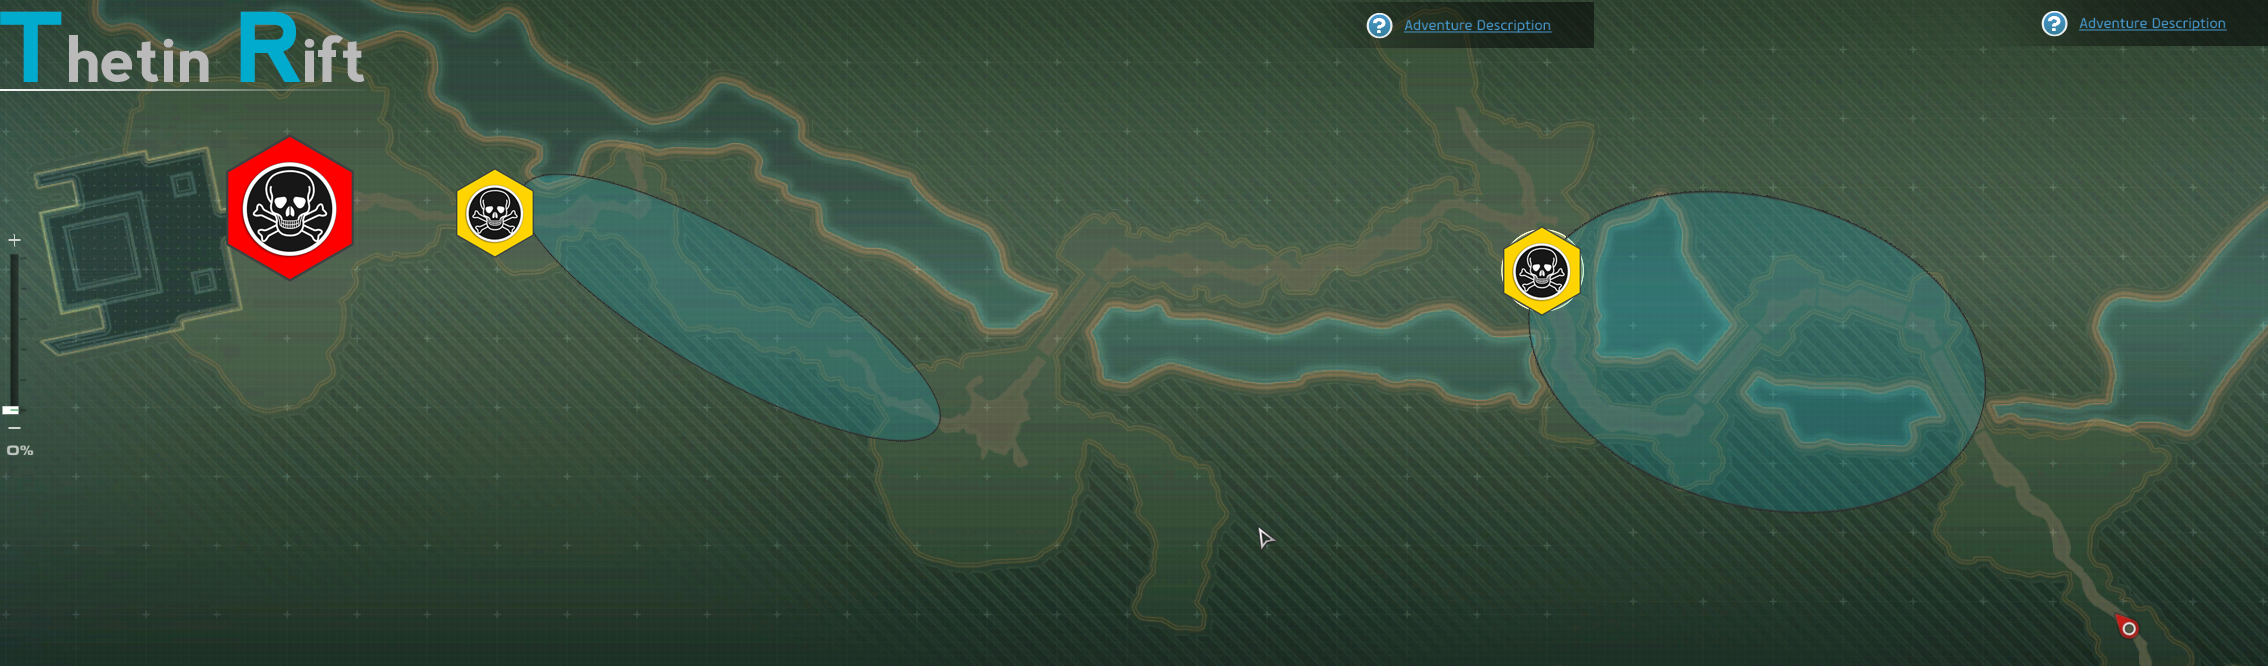
Thetin Rift – Map Link
| This adventure is slightly different than anything you have seen so far. This map is divided into two sub areas, each sub-area consists of random trash mobs as well as a queen at the end of the sub area that summons adds that will patrol the area and attack you while you are clearing the other trash packs. In order to stop the adds, you must fight through the static trash mobs while dealing with her waves of summoned adds and kill the queen. After both slaloms, you will then be faced with Fathomless Gorge. This boss summons adds throughout the fight, he will also attempt to swallow the person he is facing periodically. If not avoided he will cocoon whoever he hits, which must be broken by another player. |
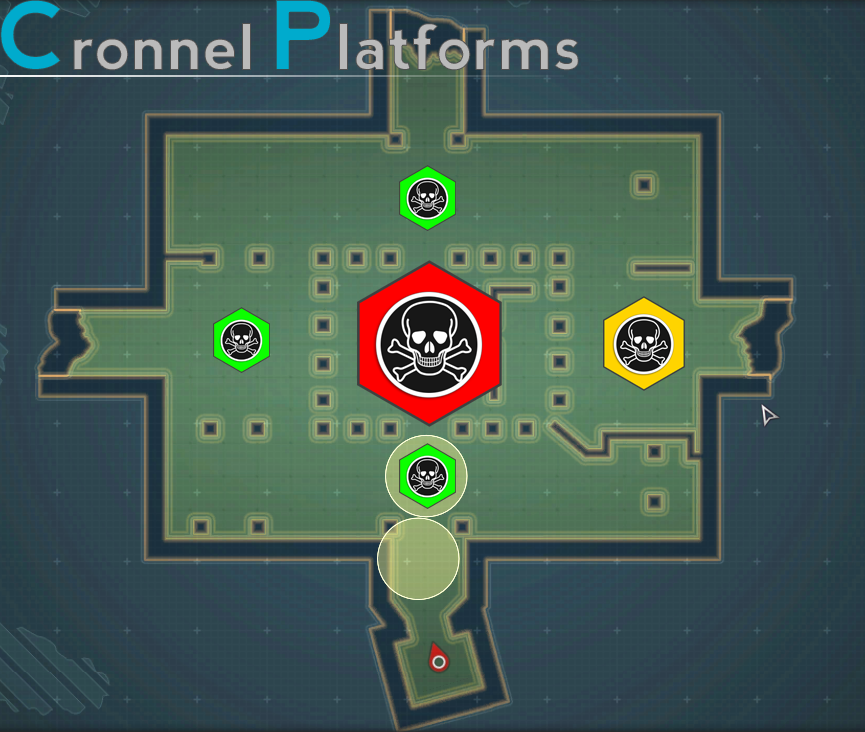
Cronnel Platforms – Map Link
| Ignis | Around the map (south, west, north) you will see Altars with swirling water animations around them. Disabling the alters will provide whoever interacted with it a water buff. DO NOT attempt to engage the boss before disabling these altars as you will be instantly killed. When pulling Ignis at the start of the fight, do not run up to him, instead ranged pull him or you will be one-shot by the fire that is located around his initial spawn point. In this encounter Ignis will periodically burrow similar to the basic mobs of his type. Instead of being accompanied by an aoe, after coming out of the burrow he actually shoots a three projectile cone attack at the person with highest aggro, so stay away from your group. Throughout the fight Ignis also summons adds (bombs) kill them or move away from them to prevent explosion damage. Ignis will also periodically drop fire on the ground that does damage if you stand in it. |
| Nimbus (Optional) | This boss has two main abilities. The first ability, the boss will extend itself upward, surround itself with a few bubbles and then cast a large raincloud-like bubble at someone. This bubble will follow it’s target doing damage anytime the rain hits anyone, simply kite it away from your group if it is targetting you. The second ability is a standard water-type wave ability indicated by swirling waves at the base of the boss, this ability hits in a cone so face it away from your friends. |
additional info – split your altars between your party members for equal distribution of mitigation. cc oriented mobs(triangular icon) should be your focus as they summon quite a few mobs if left unattended. watch out for the burrow aoe.
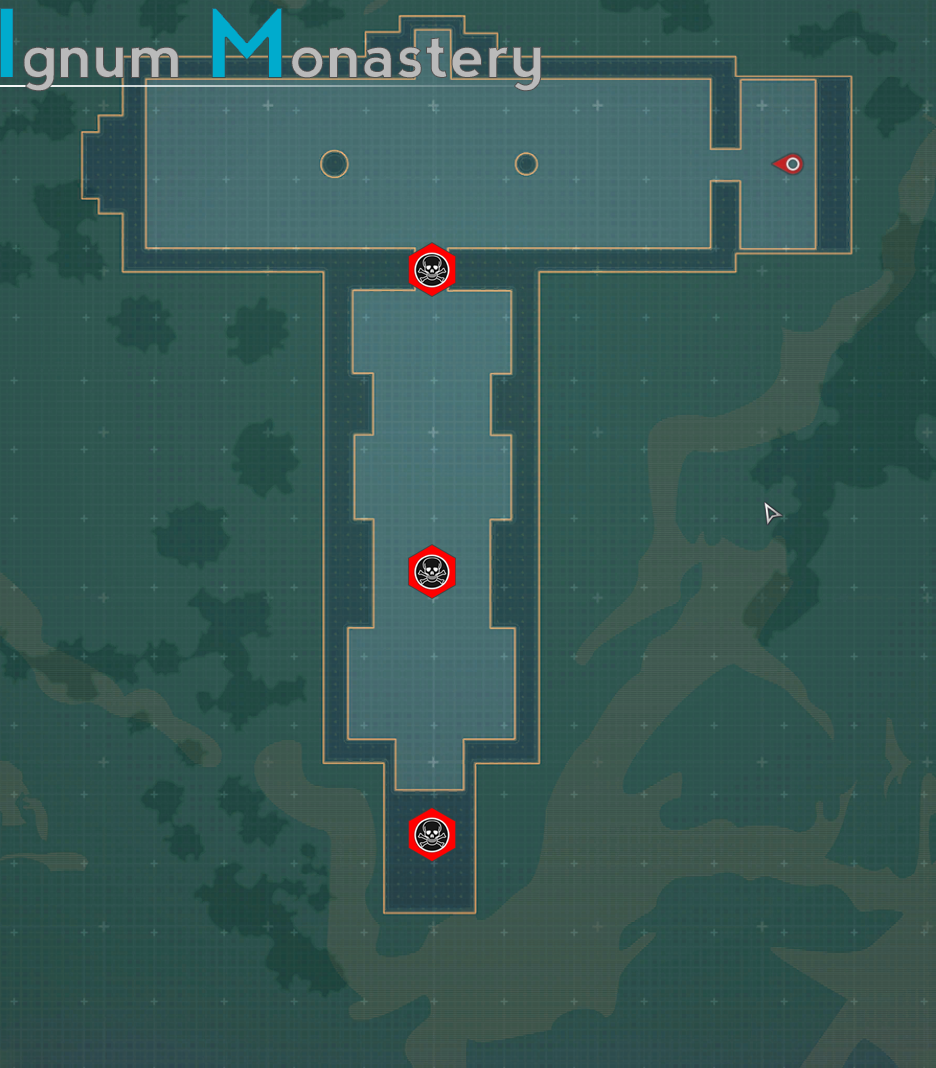
Ignum Monastery – Map Link
| Titan Atlas | Titan Atlas is a very simple boss, only has two main abilities which rotate every 16 seconds. The first ability, a slow uppercut, causes his target to drop their weapon, silencing them until the weapon is located nearby and picked up(interacted with). The second of his abilities is a 3 hit leap attack beginning with him jumping into the air, this attack has a very short duration fear/disable associated if the attack connects with his target. He will always do one and then the other with 16 second intervals between them. As a paladin with Aegis II and the cooldown talent your Aegis will be up at the perfect time throughout the entire fight. |
| Siege Tank Tornado | This fairly basic boss summons a tanky mob that attacks whoever is highest threat. He also drops missiles that have red laser indicator on the ground. The trash mob has a charged smash attack that is indicated by a yellow/goldish beam. The common strategy to this fight is just to ignore the add as he does low damage, instead focus on avoiding the red laser bombs and killing the boss as fast as possible. |
| Tradius | Tradius periodically surrounds himself with a purple shield causing him to be invulnerable, kite him into light beam when he gains the shield and the shield/invulnerability will be destroyed. He also has a charged smash where he will actually turn to hit his target, so instead of moving to the side just move backwards/out of range a bit. Occasionally he receives a damage buff which causes his auto attacks to hit for twice as much damage. |
additional info – the archer mobs hit with an ability that does not follow an aggro table, it is indicated by glowing blue arrows in front of them before they shoot. this does a LOT of damage and should be avoided at all costs. keeping the mobs cc locked (stuns/knockdowns, etc) helps a ton. the guards hit with a charged smash attack similar to Aswangs.
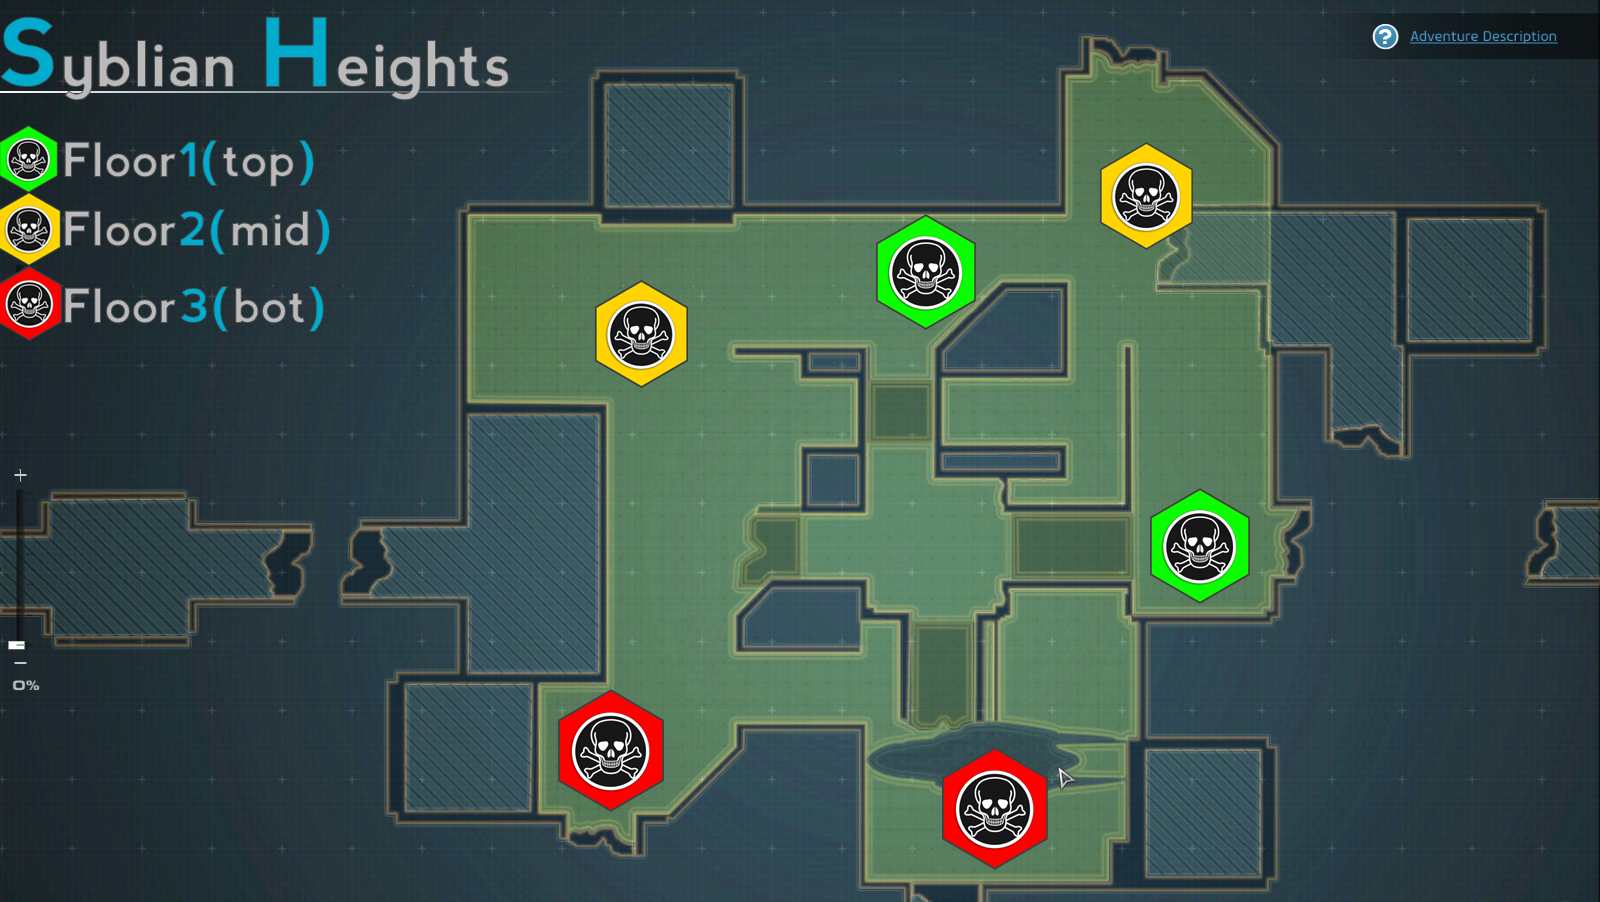
Syblian Heights – Map Link
| Amnis (Water) | Amnis has a bubble nuke indicated by curved arrow under target’s feet. This bubble attack will cc you until broken. In a group, a party member must break the bubble. Solo, pressing 1 of 3 keys is required to break (Q, E and space) the bubble. This boss also has a typhoon indicated by swirling water around the base of the boss. |
| Kinius (Fire) | Kinius spawns a purple-blue orb that surrounds and follows one party member (if solo, instead the orb randomly spawns and rotates around the map) that makes you immune to his pulsing aoe attack, so as soon as a party member gains this, stack on that member. He also uses a firestorm type ability that drops meteors on people. These are indicated by a small fire patch on the ground before dropping, and can be avoided by simply moving away from the fire patch before the meteor hits. |
additional info – the shrines will continuously spawn mobs until disabled. it is also possible to skip trash packs by hugging the walls in some areas.. once you disable the shrine, the corresponding types of mobs on that specific floor all despawn so you will not have to sneak around them on your way back out.
Tau Experimental Station – Map Link
| Messenger of Death | At the start of this fight you are presented with 3 panels, Messenger of Death can be summoned by pressing the middle panel. Releasing and defeating the other 2 jailed mobs via the panels on the left and right of the middle panel before releasing the boss will add bonus rewards to the boss loot drops as well as make the fight more difficult. Throughout the fight the boss burrows and then explodes periodically (every ~15 seconds) he will also summon one add that does the same. When the add explodes near the boss, the add heals the boss for large amounts of hp. The easiest way to deal with this mechanic is by executing the minion (the minion does not explode when he dies through execution, but will from any other source of damage). At ~30% hp the boss splits into multiple smaller versions of itself, once these are defeated the encounter is complete. |
| Face of Death | Face of Death starts immobilized and surrounded by a few adds. Around the outside of his initial spawn are 3 terminals (one on the left, one on the right and one on the catwalk located behind his spawn area. After killing the adds, you must navigate around the poison and hit the consoles to release the boss. When released, he drops yellowish poison on the ground and burrows for an explosion like the others mobs and bosses of that type. You can simply circle kite him around the area where the consoles are. Avoid the poison as it hits fairly hard. |
additional info – careful for the burrowing animations followed by large aoe damage.

Recent Comments