Destiny Edge Faction Reputation Guide
Destiny Edge Faction Reputation Guide by Craysh
I’ve seen a lot of suggestions that people “Edge” their faction reputation, but not a lot of information on how to do it. So I thought I’d put together a guide for it. This guide is specifically for the Vanguard, Dead Orbit, New Monarchy, and Future War Cult Factions.
1. Reputation
You can check your Faction Level/Experience either in game, from the website, or from a third party site such as Destiny Status.
In order to get packages (what we want when HoW drops), you need to achieve Level 3 or higher for a faction. In order to have your reputation applied to the faction of your choice, you can wear any non-faction class item for Vanguard, or a Faction specific Class Item to apply it directly to that Faction. The reputation required for each level is listed below:
| Level | Amount of Reputation Required |
|---|---|
| Level 1 | 1,500 Reputation |
| Level 2 | 2,000 Reputation |
| Level 3+ | 2,500 Reputation |
You want to get as many of these as close to leveling (and at least at Level 2) as you can. Once HoW drops, it’ll be rather simple to push them over the “edge”.
2. Nightfalls and Weeklies
Check your reputation status in Part 1 above and determine what faction you want to apply reputation to.
Your first stop will be a Nightfall, which will give you a ~24.8% bonus (Bungie rounds 25% down) towards experience and reputation called Radiant Light.
Once complete, you will do the Weekly Heroic at Level 30. The rep you earn will be as follows:
| Activity | Reputation Earned |
|---|---|
| Nightfall | 500 Reputation |
| Weekly Heroic | 400 Reputation (499 with Radiant Light) |
Be sure to have your specified Class Item equipped.
3. Bounties
Load up on Vanguard and Bounties from Xander 99-40 and complete them. Be sure that you have the the Faction specific Class Item equipped.
If there are any Kill X Majors or Ultras, use the following places:
| Race | Location |
|---|---|
| Cabal | Exclusion Zone – Mars |
| Fallen | The Archive Checkpoint – Venus |
| Hive | Subway, The Steppes – Earth, Sword of Crota Mission right before the Gatehouse – Moon |
| Vex | Gatekeeper Checkpoint – Venus, Buried City – Mars, The Citadel – Venus, Eye of a Gatelord Mission- Venus |
4. Patrol Farming
This will be the bread-and-butter for farming reputation. Make sure you equip your Faction specific Class Item.
There are five different Patrol mission types that can be started by selecting a beacon. You can see which Patrol mission type a beacon contains by summoning your ghost (Select, Touchpad, Back, or View).
Earth is the best location I’ve found for Patrol Farming. Each of the Fireteam members will split into their own separate Patrol areas. Each Fireteam member will earn the reputation no matter their location as long as they’re in the fireteam.
- Fireteam Member A will cover the Mothyards and The Steppes.
- Fireteam Member B will cover The Divide and Rocketyard
- Fireteam Member C will cover either Skywatch or Forgotten Shore
I’ve created a map to visualize the Patrol Locations
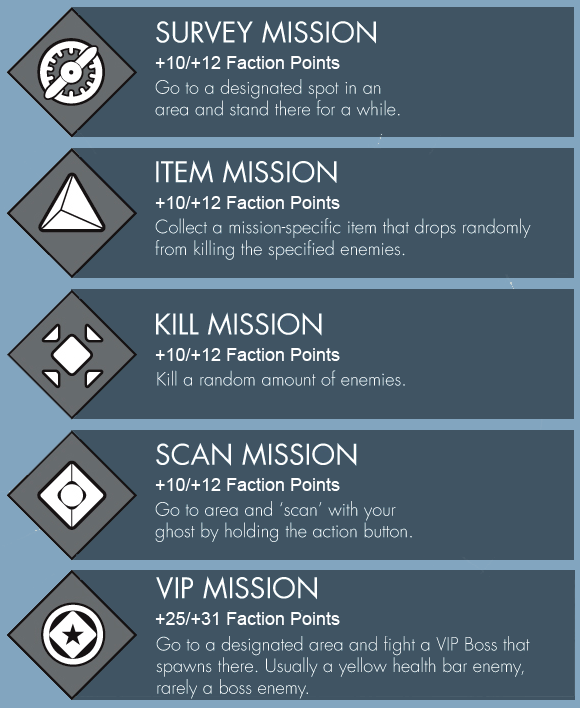
Once each Fireteam member gets to their location, we start a rotation. Use the mission type image above to see what missions are available in the location(s) you’re assigned. The preferred priority of missions are as follows:
- VIP Mission
- Kill Mission
- Item Mission
- Survey Mission/Scan Mission
VIP Missions should never be abandoned. They provide the most reputation and are generally extremely quick to complete. With the distribution of the Fireteam, there is a very good chance that the target will be very close to one of the members. VIP Locations are listed below:
| Beacon Location | VIP Location |
|---|---|
| Steppes and The Divide | The Breach |
| Mothyards | Lunar Complex |
| Forgotten Shore | Skywatch Entrance |
| Rocket Yard | The Refinery |
Kill Missions should also never be abandoned. With 3 Fireteam members killing enemies these will go extremely fast as you can kill anything and you do not need to collect any drops from them.
Item Missions generally shouldn’t be abandoned. They are usually enemy specific and require your Fireteam to collect drops, but the distribution of the Fireteams provide relatively easy access to Hive and Fallen targets (the only enemies on Earth connected to Patrol Missions).
Survey Missions and Scan Missions are opportunity Missions only. While the distribution of the Fireteam should provide a relatively short trip to complete most of them, there can be some very distant Survey/Scan locations. Do not hesitate to abandon these if the trip seems like a long one to retrieve it.
Each Fireteam member should keep the priority list in mind when calling out what beacons they have available. As the Fireteam cycles through the available beacons in the priority list, new ones will eventually spawn.
Eventually these locations will grow stale. Thankfully there is a built in break from patrols: Public Events
Whenever one of the Patrol Locations have a Public Event, you should all converge on that area as fast as possible. Once the Public Event is complete, it’s time to cycle your Patrol location. The Fireteam member who ran Patrol A can move to Patrol B, Patrol B to Patrol C, and Patrol C to Patrol A. This will not only keep your locations from becoming onerous, it will also help rotate new Beacon spawns.
Reputation Numbers
I’m adding this table for easy reference:
| Activity | Faction Reputation (Without Radiant Light/With Radiant Light) |
|---|---|
| Nightfall | 500 Rep |
| Weekly Heroic | 400/499 Rep |
| 2,500 Bounties | 50/62 Rep |
| 5,000 Bounties | 100/125 Rep |
| Patrol – Survey Mission | 10/12 Rep |
| Patrol – Item Mission | 10/12 Rep |
| Patrol – Kill Mission | 10/12 Rep |
| Patrol – Scan Mission | 10/12 Rep |
| Patrol – VIP Mission | 25/31 Rep |
| Crucible – Win | 25/31 Rep |
| Crucible – Loss | 10/12 Rep |
I’ve kept Strike Playlists out of guide because it’s a good bit slower. You may get some nice engrams but you’ll only be getting +25/+31 Rep in at best ~10 minutes. Patrol Missions have a much faster turnaround for Reputation.
Well, I hope this guide helps you to edge your Faction Reputation! If anyone has any suggestions, feel free to post them!

Recent Comments