Destiny Crota HM Detailed Guide
Destiny Crota HM Detailed Guide by n64ssb
I’ve decided to create a very detailed guide to taking down Crota on Hard Mode, including a nice map that I designed. I have found that although most players know the general idea of how to do this, not everyone is solid on the details. I hope this guide can help standardize the way in which we can expect to defeat Crota. This guide details what I have found to be the most widely-used and general strategy for taking down Crota. This strategy can work regardless of the sword guardian’s class (Bladedancer not required). All that is required is at least one Defender Titan (who is not the sword guardian), although it can be slightly modified to avoid the need for one (as described during the guide).
This ended up getting to be quite long because I tried to be extremely detailed. Please let me know if anyone finds any errors in this guide or has any suggestions for improvement. Thanks!
The map I will reference can be found here:
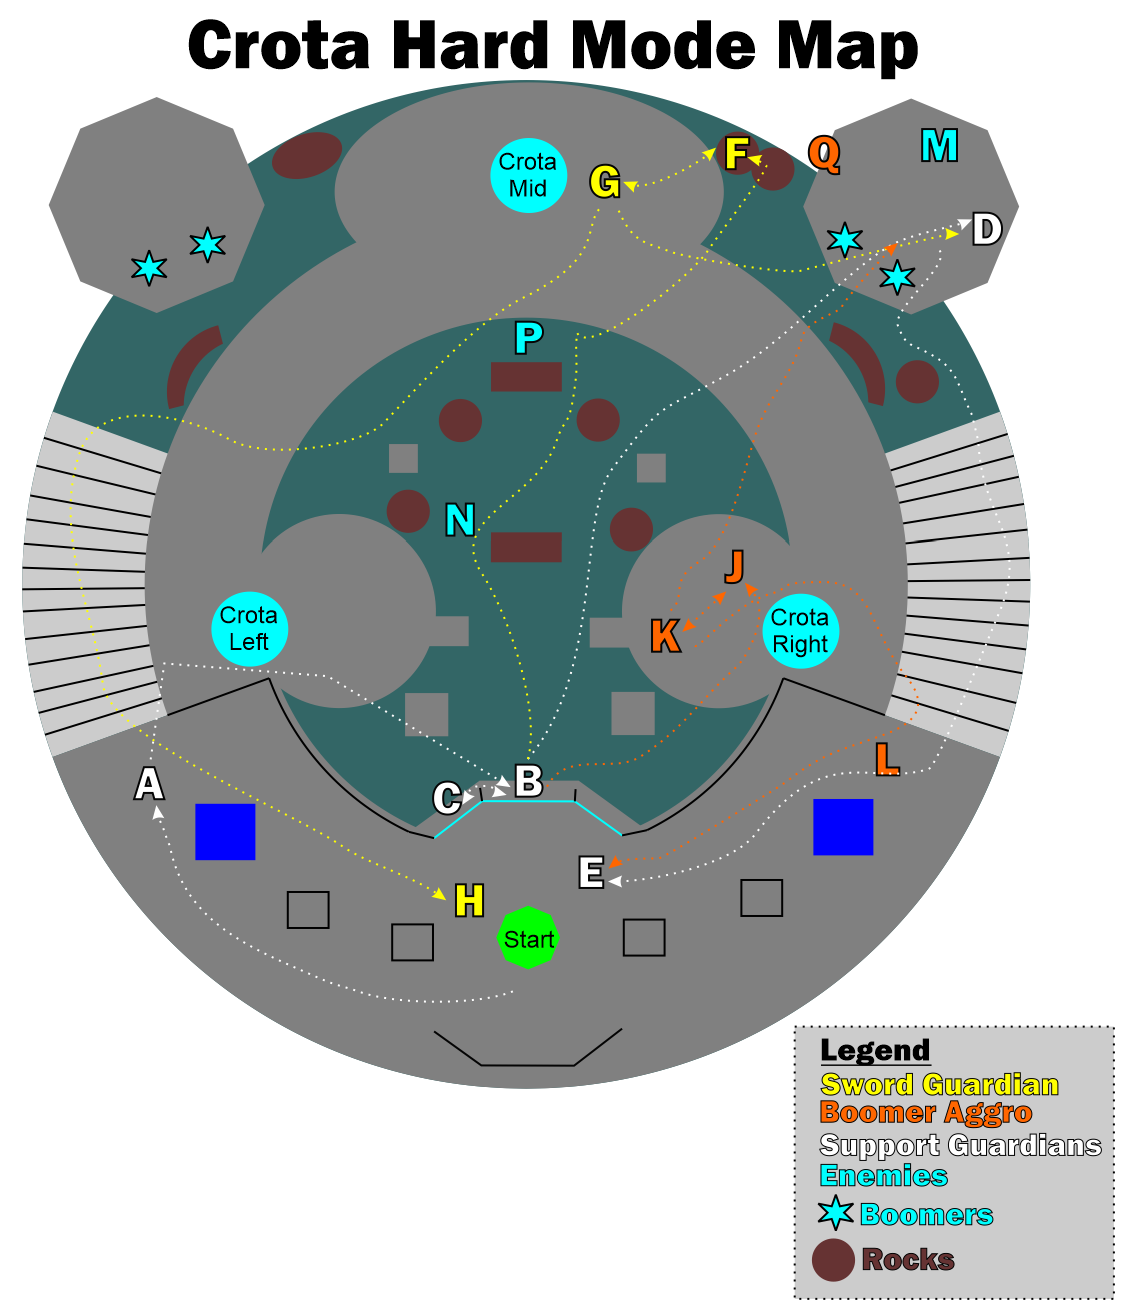
Map without arrows:

Map without letters or arrows:

(Feel free to use these maps to draw out other strategies, etc)
There are three roles that I will refer to in the guide:
- Sword Guardian: the guardian that will use the sword to attack Crota.
- Boomer Aggro Guardian: the guardian that will distract the boomers.
- Support Guardians: the remaining 4 guardians.
The guide is broken into a section for each role.
Role 1: Support Guardians (4 Guardians)
When the encounter begins, everyone will stand next to the crystal marked “Start” on the map. This will spawn Acolytes and Knights to the right and left of the starting room. All the guardians should find positions in this room that provide cover (between the coffins on the wall or stand on top of them). When the glass opens up, quickly take out as many of the Acolytes as possible; however, do not kill the Knights. Just weaken them to about 10% health. Then, two of the Support Guardians should use their super abilities to kill the right and left side knights. This will generate orbs that will allow the Sword Guardian and Boomer Aggro Guardian to get their supers up when needed later in the encounter.
Once all the Knights and Acolytes are gone, all six guardians should meet at point A on the map. No one should go past this point until everyone is ready, as leaving this room will start the next phase of the encounter prematurely. Once everyone is ready, everyone should follow the path from A to B and stand on the ledge at B.
Everyone should now get out their sniper rifles or rockets and prepare to take out the Swordbearer who will spawn at point P. Once the Swordbearer comes out of the door and starts to move, begin to hit him with sniper rifle headshots. The headshots will stagger him and prevent him from running too far out of view. If he hides behind the rocks to the right or left of where he spawns, have someone shoot a rocket at him which should make him come back out.
As soon as the Swordbearer is dead, one of the Support Guardians should start shooting a few shots of primary weapon at Crota just to grab his attention away from the Sword Guardian. (You should decide ahead of time who will do this). The other 3 Support Guardians should pull out their rocket launchers, aim down sight at Crota, and wait. The guardian who distracts Crota should also do this once he has finished firing a few shots at Crota. Now as soon as the Sword Guardian is in position, he will call out “Take down Crota”. At this point, all four Support Guardians need to fire one rocket at Crota, and then switch to their primary or secondary weapon and continue to fire at him just to make sure his shields go completely down. Once Crota kneels down, switch back to your rockets, aim down sight at Crota, and wait again. Crota will stand back up and glow orange briefly (indicating that he is invincible). Once the orange glow disappears and the Sword Guardian calls out “Take down Crota” again, shoot one rocket each and switch to primary/secondary fire afterwards. Sometimes the Sword Guardian may prefer not to call out the second time to take Crota down, and he will expect you to just take Crota down as soon as his orange glow disappears. Communicate this with the Sword Guardian beforehand to make sure everyone is clear.
This time, once Crota kneels, all the Support Guardians should move from point B to point C by walking along the edge of the window sill. Make sure your back is pressed against the glass when at point C. Crota will rotate from the “Crota Mid” position to the “Crota Right” position. If your backs are pressed against the glass at point C, Crota will not be able to fire at you. While at point C do not shoot at anything, especially the new Swordbearer who will spawn at point P. If you shoot at him, he will likely run off and hide. Just wait at point C until the Sword Guardian calls out that Crota is rotating back to the middle.
As soon as Crota starts rotating back towards the middle position, everyone should make their way back to position B. At this point the same process as before should be followed. First take out the Swordbearer, who should be near position P. Then have one Support Guardian fire a few shots at Crota to distract him, and have everyone aim down sight with rocket launchers. When the Sword Guardian calls for damage on Crota, everyone fire a rocket then use primary/secondary weapons. When Crota kneels, get rockets out again. Fire once he stands up and stops glowing orange (or when the Sword Guardian says he is ready). As always, follow up your rockets with primary/secondary weapon fire.
After the second time Crota kneels, all the Support Guardian should make their way from position B to position D (on top of the coffins on the wall in the Ogre room under the right boomer tower). This position will keep you safe from the thralls on the floor and in a good position to take out the Ogre when it spawns. After about 30 seconds, an Ogre will spawn at position M. As soon as it spawns, everyone needs to hit it with a grenade followed by sniper fire or rockets. [Just be careful not to shoot a rocket if the Ogre is too close to you, or you might kill yourself]. Once this first Ogre is dead, hop down to the floor of this room and look out. Another Ogre should be near position N by this point. Take out this second Ogre using snipers and rockets, while remaining in this room.
Once the second Ogre is dead, all the Guardians should follow the path from point D to point E. First check to make sure Crota has not already rotated to the right side. If he has, then take an alternate route up the left-side stairs. In any case, be careful to avoid any fire from the Boomers while running to position E. If a titan can drop a bubble with blessing of light near the exit of the Ogre room, he should do so, and everyone should run through it on their way out to get an extra shield on their way to point E. Once everyone is at point E, Crota should be at his middle position, or possibly the right position if you took a while. Either way, just wait here for Crota to move to the right and then back to the center.
When Crota starts moving back to the center, everyone should run back out to position B to repeat the same process as earlier. Take out the Swordbearer, and then use rockets to aim at Crota. One guardian shoot Crota with your primary to get his attention. Wait for the Sword Guardian to call for damage on Crota. Everyone shoot one rocket followed by primary/secondary weapon. At this point, all the Support Guardians should take a step forward so that their backs are not against the glass (because thrall will spawn in the room behind you when Crota enrages, and they can hit you through the glass). This time, when Crota stands back up, he will enrage (spawning an oversoul behind him). Just ignore the oversoul and aim rockets at Crota again. As soon as his orange glow disappears and/or the Sword Guardian calls for damage, shoot one last rocket and follow it with primary/secondary fire. This time when Crota goes down, the Sword Guardian should be able to finish killing him, and you will win.
Role 2: Boomer Aggro Guardian (1 Guardian) – (Requires Titan Defender Class)
Make sure you have already read the section for Support Guardians because your job is only a slight modification of that job.
You need to follow all the same steps as the Support Guardians up to the point where everyone is in position B, taking out the Swordbearer. Once the Swordbearer is down, jump over to position J. Take a shot or two at the Boomers in the Right-Side Boomer Tower. Once they see you and start shooting, place your titan bubble at point J. Once you do this, you should step slightly outside your bubble to position K. This position should give you a line of sight at Crota while having your bubble block you from the Boomer fire. Once in position K, you should aim down sights at Crota with your rockets and wait for the Sword Guardian to call for damage. When he does, shoot one rocket followed by your primary/secondary weapon until Crota kneels. When Crota gets back up and stops glowing orange, shoot him with another rocket followed by your primary/secondary weapon. Once Crota stands back up after his second kneel, run along the path from position K to position E, making sure to pass through your bubble for blessing of light.
Wait at position E with the Sword Guardian while Crota rotates right. Pick up some orbs that were left in this room at the beginning to bring your super back up. Once Crota starts rotating back towards the middle, you and the Sword Guardian should quickly make your way out and around back to position B.
Once at position B, repeat the same process as before. Help kill the Swordbearer, and then place a bubble at position J. As before, use your rockets from position K to help take down Crota both times when the Sword Guardians calls for damage. After the second time Crota kneels and then stands up, make your way from position K to position D and meet with the rest of the Guardians in the Ogre room. Help the rest of the Guardians take down the two Ogres, and then make your way to position E with them. When back in position E, collect orbs to refill your super.
Wait for Crota to rotate right and then back to the center. As he rotates to the center, make your way back out to position B with the rest of the Guardians. From position B, help take out the Swordbearer, and then head to position J to create another bubble. Simply repeat the same process as before of firing a rocket followed by your primary/secondary weapon when the Sword Guardian calls for it. After the second time Crota kneels, the Sword Guardian should be able to finish him off and you win.
Modification if no one is a Defender Titan:
If you don’t have a Defender Titan in your fireteam, there is an alternate strategy that can be employed. If the Sword Guardian is a Bladedancer, then you actually don’t need anyone to distract the Boomers, and you can just have 5 guardians fill the role of Support Guardian; however, if the Sword Guardian is not able to be a Bladedancer and the Boomer Aggro Guardian is not a Defender Titan, then you will need the Boomer Aggro Guardian to employ this alternate strategy: After all the Acolytes and Knights are killed at the beginning, the Boomer Aggro Guardian should wait at position L while everyone else is meeting at position A. Once everyone is ready, the Boomer Aggro Guardian should be the first out the door and run as quickly as possible to position Q while everyone else runs to position B. Position Q is up top behind the right boomer tower behind some rocks. Once at this position, the Boomer Aggro Guardian has a very simple job. Just distract the Boomers by hip firing at the wall of the tower. You can also periodically punch the wall and jump to add to the distraction. Just continue to do this the entire time to keep them distracted. Especially make sure you are doing it when the Sword Guardian is making a run for the sword and attacking Crota. You should not leave this spot at all during the entire encounter until Crota is defeated.
Role 3: Sword Guardian (1 Guardian)
If you are the Sword Guardian, you have the most important and stressful job. A single mistake will likely result in a wipe for your team. If you don’t have much experience with the sword, I would suggest doing some dry runs as practice. Once at the Crota checkpoint (but before starting the encounter by standing next to the crystal) you can try just running along the paths and practice jumping up the rocks next to Crota. Having the mechanics down is very important to minimize mistakes like missing a jump during the real encounter.
I have divided this portion of the guide into two sections based on your class. The first section is for anyone other than a Bladedancer and the second section is for Bladedancers. Make sure to read the sections for Support Guardians and Boomer Aggro Guardians first so you are aware of what everyone else should be doing. As the Sword Guardian you are effectively “leading” the team. You need to call out orders to the rest of the team as appropriate to keep everything coordinated. Everyone else’s role is to support you.
Sword Guardian – (For Warlock or Titan Class)
The Bladedancer class is the best for the Sword Guardian simply because you can go invisible; however, a Warlock or Titan can certainly still get the job done. I have successfully taken down Crota as a Warlock numerous times. This section of the guide describes the process if you are NOT a Bladedancer. See the next section if you are a Bladedancer. If you are a Warlock, I would suggest using the Sunsinger subclass with the self-revive ability. This way, if you make a mistake and die you can potentially still recover. Regardless of your class, you should max out your agility stat to run faster and jump higher.
Begin the encounter with everyone else by taking out the Acolytes and weakening the knights. Once all the enemies are gone, move to position A and wait for everyone to be ready. When everyone is ready, move to position B. From this position use your rockets or sniper to help take down the Swordbearer. When the Swordbearer is nearly dead, jump down and start making your way along the path from point B to point F, picking up the sword along the way. As soon as you jump down, call out for the Boomer Aggro Guardian to place his titan bubble. As you make your way to point F, it is important to make sure you first run to the wall where the Swordbearer spawns (point P) and then hug the wall below Crota as you make the remainder of the path to point F. Do not run directly to point F in a straight line or the Boomers might start firing at you. Once at point F (on top of the higher rock to Crota’s right), call out “Take Crota down.”
Right after calling for damage on Crota, you should wait until you see the first rocket heading towards Crota (ideally about one second after calling for damage). At this point, you should quickly jump up and run towards position G (right next to wherever Crota is). If timed correctly, Crota should just be starting to kneel down (indicating that his shield is gone) just as the Sword Guardian reaches him. Hit Crota with the Right Trigger (or R2) attack three times while holding your left stick forward towards him. This seems to make the sword attack hit correctly. After the third hit, immediately run back to position F and wait.
Crota will stand back up and be temporarily invincible (he will glow orange during this period). The Sword Guardian should wait a couple seconds at position F and then call for damage on Crota again. Once again, wait until you see the first rocket and then run and hit Crota three more times with the RT/R2 attack. This time after the third hit, jump into the air and start smashing RB/R1 to quickly swipe your way away from Crota. Follow the path from point G to point H, being careful to avoid the Boomer fire from the left Boomer tower.
Once at point H, you should grab the orbs left in this room to max your super and regain health if needed. From this room you can also look at Crota through the glass to check his health bar. If you successfully hit him a total of six times, his health bar should be just at the start of “S” in “Crota, Son of Oryx”. Wait in this room until Crota starts rotating back to the center. When he does, call out “Crota is rotating back,” so the Support Guardians will know. At the same time, run back out to position B and help take down the Swordbearer again.
Once the Swordbearer is down, repeat the same process as before. Jump down and call out for the Boomer Aggro Guardian to place his titan bubble. Run along to point F and pick up the sword on the way. Once at point F, call for damage on Crota, wait until you see a rocket coming, and jump up to hit crota three times. Then run back to F, wait a few seconds, call for damage again, wait till you see a rocket coming, and jump up to hit Crota three more times. This time, after the third hit, run directly from point G to point D to help the other Guardians take out the Ogres.
Once both Ogres are dead, make your way with everyone else back to point E. At this point, collect any orbs you need and look at Crota’s health. If you successfully hit him another 6 times, his health should be right at the “r” in “Crota, Son of Oryx”. Wait for Crota to rotate right and then back to the middle. When he is on his way back to the middle, call out “Crota is rotating back to middle” and everyone should run out to point B again.
Once at point B, the process of getting the sword and taking down Crota proceeds the same way as the first two times. First help your team snipe/rocket the Swordbearer until his health is low. Jump down and call out for the titan bubble. Run to point F and pick up the sword on the way. Proceed exactly as before by calling for damage on Crota when ready and getting in three hits. After the first set of three hits, Crota will enrage (you have done 15 total hits at this point). Ignore the fact that he has enraged and just go to position F to wait as usual. Call for damage again and get in three final hits on Crota. This should kill him and you just beat Crota on hard mode.
Sword Guardian – (For Hunter Class)
If the Sword Guardian is a Hunter, he should be using his Bladedancer subclass, mainly for its invisibility perks. Make sure all of your invisibility perks are turned on including: Vanish (Press RT/R2 to go invisible during Arc Blade), Escape Artist (Go invisible after hitting an enemy with Blink Strike), Shadowjack (Increase duration of invisibility), Stalker (crouch to go invisible). Otherwise just max out your agility stat to run faster and jump higher.
Now the strategy for a Bladedancer Sword Guardian is very similar to the strategy for a Warlock/Titan given in the section above, so I will only describe the differences. Please read the section above first.
As a Bladedancer, the first difference is that when the Swordbearer is about to die, you should jump down from point B and use your super. When the Swordbearer goes down, press RT/R2 to use Vanish (go invisible) and then pick up the sword. Now, instead of running to point F, run to the rectangular rock right in front of point P, and jump on to it. Once here, call for damage on Crota and then immediately jump up right in front of him. Since you are invisible, he won’t attack you. You are using this to your advantage by being right next to him when he goes down. This eliminates the difficulty in timing this part. As soon as you see him start to kneel down, start hitting him, and make sure you get in three hits with RT/R2.
After your third hit, immediately drop the sword by pressing the weapon swap button (Y/triangle). Follow this by doing a blink strike melee attack on Crota so that you will go back to invisible. If you do this fast enough, you should be invisible by the time Crota stands up, so he won’t see you. Go ahead and pick the sword back up while invisible and walk around to the side of Crota to get ready for the next hit. As soon as his orange glow goes away, call for the other guardians to shoot at Crota again. Stand right next to him, and as soon as he begins to kneel, get another three hits with RT/R2. After this second salvo of hits, simply run away to point H (after the first Swordbearer) or point D (after the second Swordbearer), just as described in the previous section.
Essentially the only difference when running the sword with a Bladedancer is that you will use invisibility to go up from the middle rock rather than on the right side rock, and that you can use invisibility to hide between kneels rather than hiding at point F.
A Few Notes for the Sword Guardian
If you are level 32 (which you better be for hard mode), it will take a total of 18 hits of RT/R2 to kill Crota. This guide has you split these up into three hits for each kneel and two kneels for each of the three Swordbearers that you take a sword from. This gives 3x2x3=18 hits total. You may find that at some points you mess up and miss a hit due to timing, especially if you don’t have the luxury of using a Bladedancer to go invisible. If this happens, you can try to make up a hit by getting four on a future kneel. It is also sometimes helpful to try to go for four hits on one of the early kneels to leave margin for error on a future one. Basically the only way to get in four hits is if the first one is delivered right as Crota begins to kneel. If you find yourself in a position where you timed it perfectly and he is just starting to kneel when you reach him, go for the fourth hit. You should not try to get a fourth hit if your first one was not timed perfectly, however, because if you do, he might stand up all the way and kill you after your fourth hit before you can get away.
One other note: if you are a Sunsinger Sword Guardian and you get killed by Crota as you are running away after the second time he kneels on any given Sword run, tell your team to shoot the oversoul that spawns. Then just wait for Crota to move and you can self-revive and proceed as normal. If you happen to die on the first kneel of any Sword run then it is pretty much a wipe because your team will probably not have time to both kill the oversoul and bring Crota down for you to hit him again. The only exception is if you are on the final Sword run since the oversoul was going to spawn anyway from Crota enraging. If you die here, just tell your team to bring Crota down again. Self-revive a second or two after you die and pick the sword back up to go for your final three hits.

Recent Comments