Dota 2 Axe Culling Blade Guide
Dota 2 Axe Culling Blade Guide by Chrimunn
Knowing the Killing threshold of Axe’s Culling Blade is essential to playing an effective axe. Whether you successfully cull an enemy is the difference between staying in a teamfight and giving you and your allies a buff, or dealing minor damage and activating a cooldown.
First of all, we need to know how health is displayed. By default, a hero’s health bar is divided into slices, divided by thin lines for every 250 HP, and thick lines for every 1000 HP. We will use this division of health as the method of estimating our killing threshold for culling blade.
>Culling Blade lvl. 1 250 HP ![]()
![]()
Level one of culling blade has a killing threshold conveniently identical to one slice of enemy health. Simply put, when your enemy is at or below one slice of health, use culling blade.
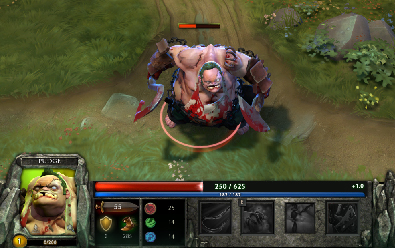
>Culling Blade lvl. 2 350 HP ![]()
![]()
Levels 2 and 3 of culling blade are difficult to judge with the default division of health, as they don’t allign with the default slices like level one does. The best way to go about using culling blade at these levels is to play it safe and ensure that your enemy is under what is best described as 1 & 1/3′ slices of health.
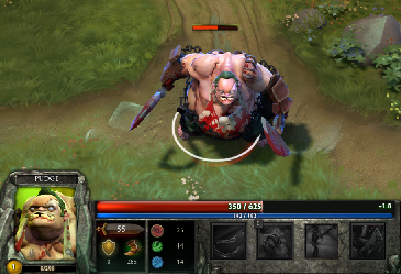
>Culling Blade lvl. 3 450 HP ![]()
![]()
Level 3 of culling blade, like level 2, can best be described as 1 & 2/3′ slices of health.

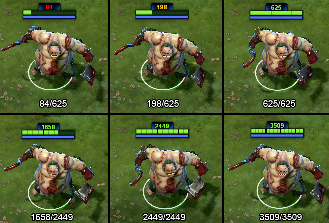
Things become even trickier if you decide to build Aghanim’s Scepter, as it increases the killing threshold for each level of culling blade. Shown below are the divisions for each level.
![]()
![]() > lvl. 1 300 H P. “A little over a slice”
> lvl. 1 300 H P. “A little over a slice”
![]()
![]() > lvl. 2 450 HP. “Almost 2 slices”
> lvl. 2 450 HP. “Almost 2 slices”
![]()
![]() > bit. 3 625 HP. “A little over 2 slices” or “Fucking OP”
> bit. 3 625 HP. “A little over 2 slices” or “Fucking OP”
If you would like to be able to see the thresholds more easily, there are some console commands that can allow you to change the divisions of health to any desired number. This requires you to bind these commands to keys that you can press whenever your culling blade levels up. Special thanks to Typhox and Me4onyX for providing me this information.
Change divisions of health by opening the console and typing:
dota health_per_vertical_marker <number>
We’ll use the numpad keys as an example of how we can bind this command to each level of culling blade:
Culling blade level:
lvl. 1- numpad 1 bind “KP_1” “dota_health_per_vertical_marker 250”
lvl. 2- numpad 2 bind “KP_2” “dota_health_per_vertical_marker 350”
lvl. 3- numpad 3 bind “KP_3” “dota_health_per_vertical_marker 450”
Culling blade level WITH AGHS
lvl. 1- numpad 4 bind “KP_4” “dota_health_per_vertical_marker 300”
lvl. 2- numpad 5 bind “KP_5” “dota_health_per_vertical_marker 450”
lvl. 3- numpad 6 bind “KP_6” “dota_health_per_vertical_marker 625”
Using these commands will change the enemies health to exactly one slice depending on which level of culling blade you currently have. If you’re using this technique, remember to be aware of your culling blade level, and whether you have aghs or not. HAPPY DUNKING!

Recent Comments