WildStar Veteran Malgrave Trail Gold Medal Guide
WildStar Veteran Malgrave Trail Gold Medal Guide by thedukey3
Hi Everyone,
This guide will outline Malgrave trail, the path that you will take, and explain some things to know while running the trail. It will make the adventure last roughly 30 minutes, and if done correctly, will get you a gold medal at the end.
Things to know about this guide:
- I have a horrible memory, which this was all written from. If I can’t remember the name of a mob, I make one up. Deal with it!
Gold Medal Requirements:
- All 30 caravan members must make it to the end.
Class Balance:
- 1 Tank
- 1 Healer
- 3 DPS
Gear requirements:
- Level 50 greens/blues. Blues recommended on 3/5 group members, specifically the Tank, Healer, and at least one DPS.
Other requirements:
- VOIP (Mumble, Skype, Vent, TeamSpeak, etc.)
- ENT Spy Add-on – This add-on simplifies things, and fixes the buggy missing caravan member events by helping you see where they are at. Highly recommended.
- A brain to think, and mouth to communicate.
Important Random Information:
- Vacuum loot after all kills. You will get lots of free resources when doing this.
- DO NOT PICKUP MEAT OR CHICKEN. It will make your caravan sick. Who eats meat from the ground? Nasty.
- If your group needs more time to clear, or gather, all but one person select the next path. This will give you about a minute extra to start clearing ahead.
Assigned Roles:
- Tank – the tank must always be at the front of the caravan. Specifically the tank must always be running ahead, to clear mobs, and move them to the side if they cannot be cleared fast enough. The tank does not worry about gathering resources. Two to three interrupts recommended.
- Healer – the healer stays with the tank at all times. The healer does not worry about gathering resources.
- DPS #1 – DPS #1 must always be with the tank, and healer, to make sure mobs get cleared, before the arrival of the caravan. This DPS should also be the strongest DPS of the three. Build single target DPS. Three interrupts recommended.
- DPS #2 – DPS #2 is a floater. The floater runs between the caravan, and the tank, assisting with gathering resources, helping clear mobs, and helping DPS #3 with caravan events as needed. Build a mix of single target, and AOE skills. Two to three interrupts recommended.
- DPS #3 – DPS #3 is the caravan’s guard/babysitter. DPS #3 gathers as many resources along the way as possible. It’s recommended that DPS #3 has built with an AOE setup to deal with Chompacabra attacks on the caravan. Two to three interrupts recommended. Important notes about the roles:
- If you have a problem with dodging telegraphs, just rotate interrupts. Some mobs will have one interrupt armor, some will have two. Just call it out early, and call it before you do it.
- DPS #3’s job is EXTREMELY BORING, but it’s the most important of them all. The caravan can die for a number of reasons, here’s a short list of them below:
- Sickness – members will get sick, press “T” to heal them. Look for members who turn green.
- Horses (can’t remember their actual name) get flies on them. Press “T” to get rid of flies.
- Lost caravan members. Use ENT Spy to assist with finding. Do NOT trust the direction the caravan leader tells you they are. 4. lost, found this to be wrong a lot?
- Random mob agro – if your forward group does not clear all mobs, you may have to clear some chocobos from the caravan at some point. Gather as many resources on the way as possible, do not go more than 200m away from the caravan, too far to matter.
- DPS #2 needs to be very aware of his position. If needed, break off the front clearing group to help DPS #3 to clear the caravan, or find the missing party members. Have fast movement skills to hurry between the two.
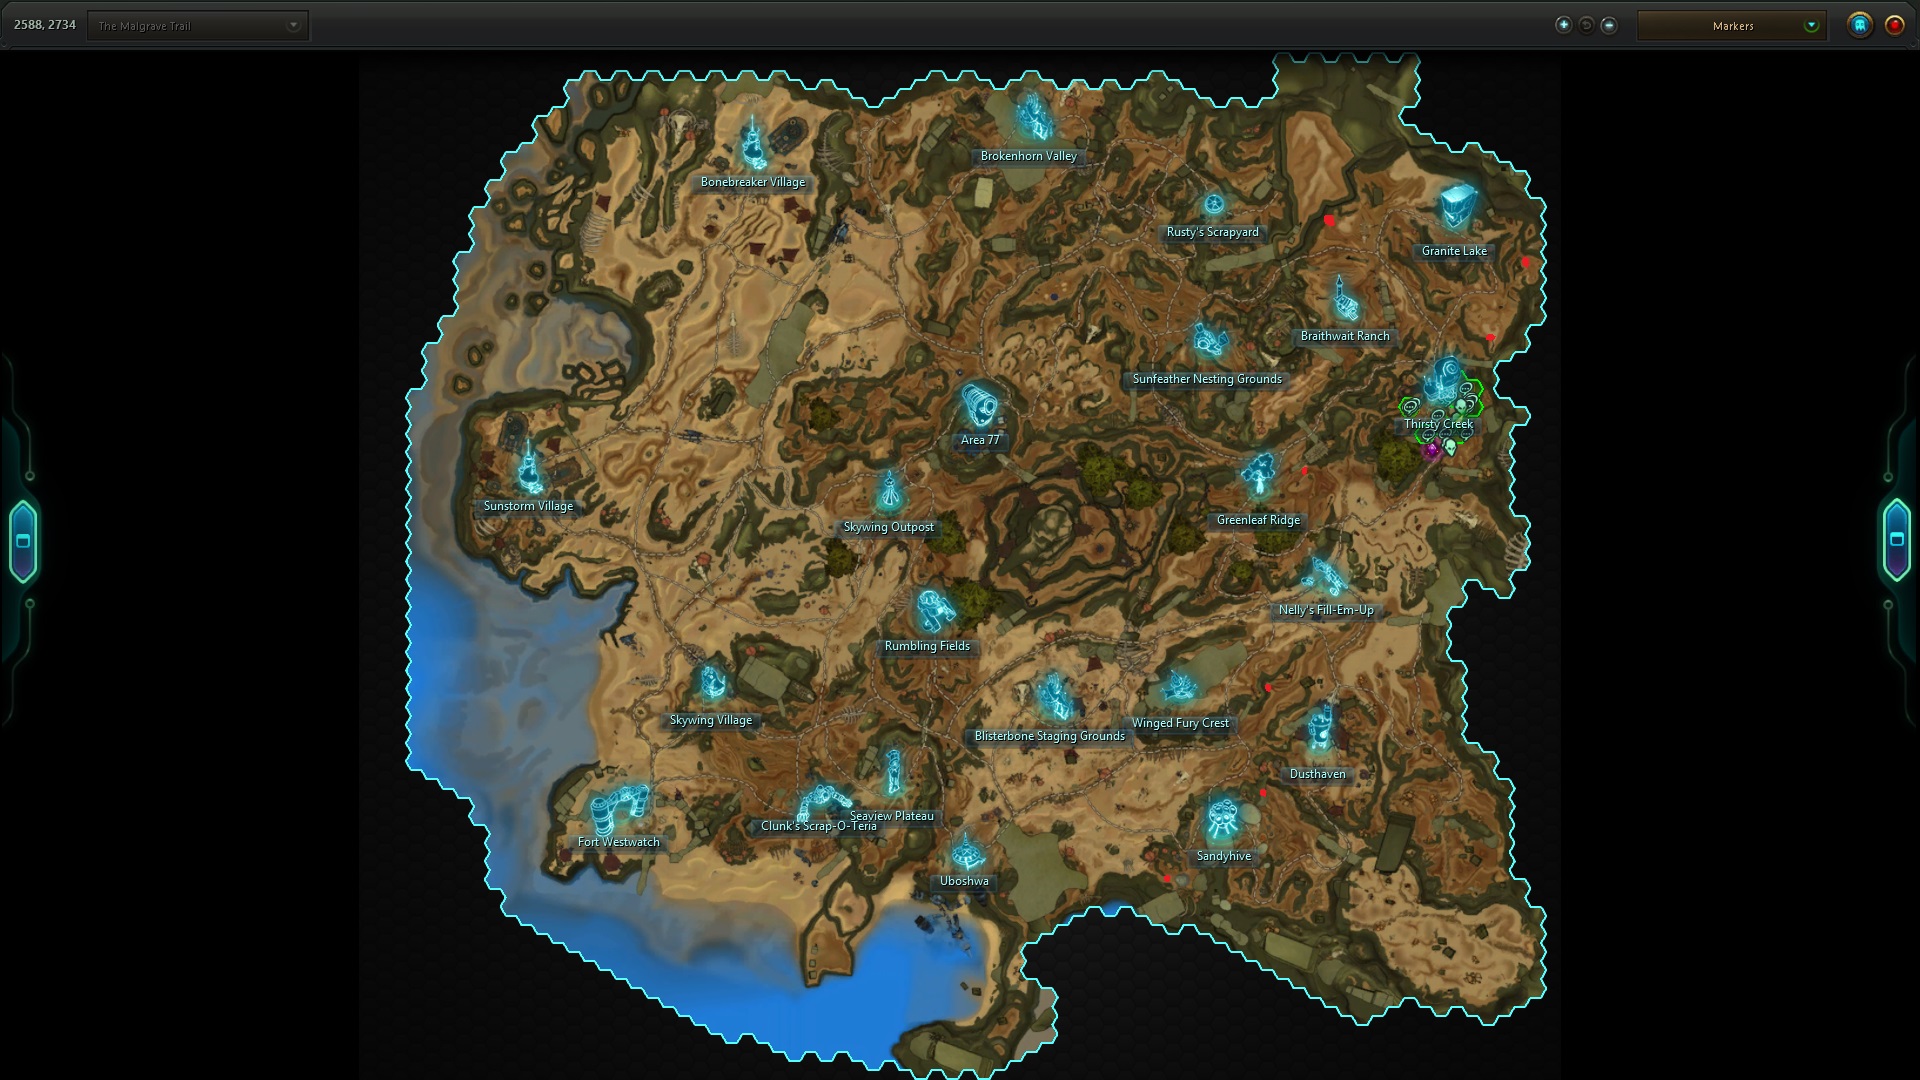
The Route:
- Greenleaf Ridge
- Winged Fury Crest
- Sandyhive
- Blisterbone Staging Grounds
- Uboshwa
Greenleaf Ridge Explained:
- Greenleaf is now going to be based on gathering enough water to skip this area completely.
- Your goal is to get max water, or very close to it, by the time the caravan gets to Greenleaf.
- Roles will stay the same for the most part, except you should have DPS #2 search for the invisible water sources. I recommend having a character who can drop agro if you get it. Move speed is also highly recommended if available.
- See the picture below for the nearest invisible water sources. Have DPS #2 run to them as fast as possible, and get at least 3 of them, before getting to Greenleaf. Once you get to Greenleaf, you will talk to the guy, he will say they need to dig for water, and then tell you there is enough water, so you can move on. This saves a ton of time. Gather any hellrose nectar you see on the way as well.
- Special note, if you have a lot of explorers, who increase the caravan movement speed, this may be a hard thing to accomplish. If you have no explorers, the run will be slower.
Winged Fury Crest Explained:
- You will be given the option to camp, if you have over 10% fatigue, select yes. This will be the only time you camp during the run. Camp until fatigue is down to zero. If you can find hellrose nectar while running for water, this reduces fatigue as well. Skip the next three steps if not camping.
- During this time, you may get a random event that happens. For instance the caravan can catch on fire. Jump on the fires to put it out, or be smart and grab a fire extinguisher. This includes the actual caravan members. Don’t let them burn to death.
- If a thief steals from you, quickly catch him to kill him. He’s fast.
- There’s a tree directly in front that’s always surrounded by resources, go gather those.
- Once fatigue is zero, end the camp by talking to the horse. Resume normal group assignments.
- When you are entering Winged Fury Crest, there will be a few groups of humanoids. Get these cleared. Otherwise leap strike may ruin a run.
- At this point the caravan will stop again, so you can do the portal puzzle. During this puzzle, the tank, healer, and DPS #1 will guard the caravan. It doesn’t happen often, but humanoid leap strike mobs can spawn while the group is sitting. Form a triangle around the caravan, and pull agro immediately. Do not let anything touch the caravan.
- DPS #2/3 will be doing the puzzle. It’s a very simple process. We are not sure if you can fail it, and get a gold medal. We always complete it just in case. We do not use the portal in our path. Just do it you lazy bastards.
- DPS #2/3 will be scavenging from the junk piles around, looking for specific parts. They will start with 2 fuel, 2 focusers, and 1 converger. Once you put in the caravan leader will try to turn it on. If it’s right, you are done! If not, he will tell you to add more or less of something. That usually turns into some sort of 3/1/1 combo. Very easy to figure out, but you only have a few minutes, and three chances.
- Once the puzzle is complete, it will ask you where to go. Even though we fixed the portal, choose Sandyhive. I might get feedback to use the portal, but we’ve actually ran into resource issues one time by doing this, and group members getting killed. Better safe than sorry!
Sandyhive Explained:
- Once the caravan starts moving, resume normal duties.
- Now come the fire flowers. TURN THESE OFF IMMEDIATELY. Tank, healer, and DPS #1 should be enough to run ahead and clear the mobs from the road, and DPS #1 should be turning off the flowers while the tank aggros. The flowers kill the caravan easy, don’t do this late.
- DPS #2/3 just gather resources on the way to the hive, specifically hay. On the north side of the hive is a hidden water source. On the south west side of the hive on your way out is another.
- The hive is awesome. Easy to get through, chance to easily get your godly kill achievement as well. You can pull as many bees as your group can handle.
- Your caravan will stop at the front of the hive, and you will need to kill the torchers, nothing hard.
- When killing bees, remember to vacuum loot. This will put your food to max. The hidden water sources above will fill your water up. You will only need to worry about hay.
- After all torchers are cleared, the caravan will head out the road that goes southwest.
- Clear the bees leading out of the hive quickly.
Blisterbone Explained:
- Now here’s where you better get your DPS on. DPS #2 may need to assist with doing this part if the usual three can’t clear fast enough.
- Immediately when the caravan leaves the hive, they will ask if you want to camp. Say no. You have enough fatigue to finish the adventure. If you need extra clear time, one person don’t say no, let the timer run out, this will give you about a minute extra.
- Pay special attention to the road, you will see a crashed ship, with green irradiated smoke around it. Of course don’t touch the smoke.
- The caravan walks to the RIGHT of this ship, and cuts through the area to the road that leads to the easy entrance of Blisterbone. You will know where to go by the big guys scattered to the right of the crashed ship. You need to clear all of these leading through the open area, to the road, and north up the road to the east Blisterbone entrance.
- TURN OFF THE FIRE FLOWERS! Once again, more of them. Turn them off as you run by. All of them.
- The caravan will stop right at the entrance to Blisterbone for an event.
- When you get to Blisterbone, only four people will go in. We’ve had it where all five go in, and mobs randomly appear and kill the caravan. DPS #3 is the one to wait back with the caravan. Don’t even enter the gates, there may be a trigger for this somewhere. Just sit back, and start having a conversation with the members while moving your camera around furiously looking for attackers.
- The tank, healer, and DPS #1/2 will go in. The usual three will clear the path on the road, to the bosses hut. You will see the large hut with a drum in front of it.
- DPS #2 will stealth around and destroy weapon cache’s around the area. You can stealth in, destroy them, and get out quickly with movement skills. Even if you are getting hit by mobs, it won’t interrupt the cast bar to destroy them. Don’t sit there too long after, the explosion will kill you.
- After all weapon cache are destroy, and the road is cleared, the boss will spawn. Kill him, and all Blisterbone guys will run away. The camp will be open except for a few packs of wolves. The group that cleared the road needs to run back to the caravan and clear it one more time so wolves don’t agro.
Uboshwa Explained:
- After leaving Blisterbone, the group resumes rolls. The clearing group will move forward to clear a few remaining mobs, and fire flowers.
- DPS #2/3 just gather resources if you need any, but chances are you really won’t.
- The caravan arrives at Uboshwa and sits down again. (lazy bastards)
- You will need to clear the camp of all mobs, and kill the two bash brothers. We’ve found that as long as you can tank it, pulling all mobs besides the bash brothers is easily doable, and saves time.
- The Bash Brothers are easy. Just don’t stand in the circular telegraph for their one strong hit.
- After the caravan boards the ship there.
- Once you fly, literally… you fly. Don’t forget to look up and remind yourself this instance is broken.
I hope this helps everyone. If you enjoyed the guide, keep a look out for more! We will keep pumping them out to help people get attuned, and geared up! We’ve chosen this route, and way of doing things simply based on countless ruined runs with bugs. We’ve got this to a point where doing this minimized those bugs.

Recent Comments