WildStar Runecrafting Guide
WildStar Runecrafting Guide by Flannan
Introduction
Welcome to the All Encompassing Guide to Runecrafting, in this guide you can find out pretty much anything you wish to know about Runecrafting in Wildstar. Available to players who have reached level 15, Runecrafting is Wildstar’s way of letting players enhance their items. These enhancements come in the way of Runes, of which there are 7 Rune Types;  Air,
Air,  Earth,
  Life,
Life,  Logic,
  Fire,
Fire,  Fusion, and
  Water. For an item to be able to receive a Rune, it first must have at least one Rune Slot on the item. There is a Rune Slot that corresponds to each Rune Type, plus an Omni Slot which can take any Rune Type. Each Rune will add one kind of Primary or Secondary Stat to the item, whether or not the item already had the Stat on it.
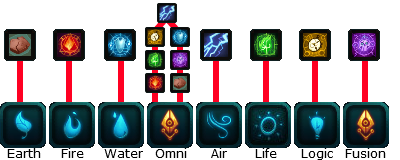
Above is a quick break down of which Rune Types can go into what Rune Slot. Currently The Omni and Fusion Slots share the same graphic, so make sure to pay attention to which one it is if you get it on your item.

HOW TO RUNECRAFT!? Engraving Station Edition
Crafting the Rune
So you either never did the level 15 Runecrafting quest or just have totally forgotten how to Runecraft. Well first you’ll need to get to an Engraving Station. The Dominion one in illum is located in the Luminous Gardens inside a house (Map Cords: -3229-769), once inside the building the Engraving Station is to your left. The Exile Engraving Station is located in the Tradeskill District (Map Cords: 4375,-2332), southest of Academy Corner. After clicking on the Engraving Station a window will pop-up, there will be two tabs labelled: “Create Runes” and “Equip Runes”. To create a Rune you want to be in the first tab. At the bottom of the Rune List there will be a button, it will either be called ‘Show Only Craftable’ Or ‘Show All Runes’. The ‘Show only Craftable’ will show only the Runes that you have all the mats for. ‘Show All Runes’ will display all of the non-Runeset Runes and any Runes that are part of a set, whether or not you have all the mats to create them. The caveat to that though, it will only list the Runeset while you have the Runeset Fragment in your inventory. To view what each Rune does, hover over the Element Type for the Rune, a tool-tip will pop up giving you the information about the Rune. At the bottom of the tool-tip it will tell you if it a Primary/Secondary/Tertiary Rune. Once you have found the Rune you want to craft, clicking on the name of the Rune will bring a small drop-down of the required mats needed for the Rune and a ‘Craft’ button. Click ‘Craft’ to make the Rune.
Equipping the Rune
Now that you have made the rune, it is time to put into a Rune Slot, to do that go to the ‘Equip Runes’ Tab. This tab will populate a list of all items that have Rune Slots on them, whether they are currently equipped or in your Inventory. Each item will have it’s gear icon followed by all the Rune Slots for that item. If an item has more than one Rune Slot all of the Rune Slots after the first one will be locked, you must unlock them in order, the second Rune Slot must be unlocked before you can unlock the third Rune Slot, so on and so forth. To unlock a Rune Slot simply click on the Rune Slot you wish to unlock, a pop-up will ask you if you would like to proceed, click yes. Unlocking will cost some small amount of currency and get steadly more as you unlock more Rune Slots on an item. To add a Rune to a Rune Slot, simply click on the Rune Slot you want, a pop up will appear above it with all available Runes for that Rune Slot. Select the Rune you want, another popup will appear asking for confirmation of adding the Rune to the Rune Slot, at this point it will also tell you exactly how much the Stat/Attribute will be adding to the item. Clicking yes will put it into the Rune Slot. Keep in mind, If an item contains two or more of the same Rune Slot Type, you CAN NOT put more than one particular Rune in that item. You can however have the same Rune in more than one item. To replace a Rune you first must destroy the current one in the Rune Slot you want to change, this will clear the Rune Slot for a new Rune. To Destroy a Rune go through the same steps that you did to Add the Rune.
To View the set bonuses that you have, in the bottom right corner of the Engraving Station window will be a button ‘View Stats’, this will show any Rune Sets that you have on a piece of gear, Equipped or in your Inventory. Even if you only have 1 piece of a Rune Set, it will show the Set Bonuses for the Rune Set. Though it will only count how far you are into a Set by the items you have equipped.
The In’s and Out’s of All Things Rune
Runes
Available at level 15, Runecrafting is a system designed to enhance items. With Runecrafting you are able to increase your Base Stats, as well as your Primary and Secondary Attributes. There are three tiers for Runes; Primary(High Amount), Secondary(Moderate Amount) & Tertiary(Small Amount). These tiers help determine how much of what Stat/Attribute will be applied to an item. The gear slot of item also determines how much each tier will affect the item. Along with the Rune tiers, there are 7 types of Runes; Air, Fire, Fusion, Earth, Life, Logic, & Water. Each Rune Type has specific stats that it can provide and can only be put into its corresponding Rune Slot. As well, some Runes are part of Rune Sets. These Rune Sets will give you bonuses depending on how many Runes of a specific Rune Set you have equipped.

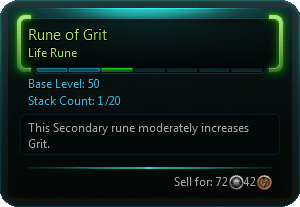

Here is an example of the Tiers of Runes: Primary, Secondary, and Tertiary.
Rune Slots
In order for a rune to be placed into a piece of gear, the item must first contain at least one Rune Slot. Rune Slots are where the Runes you create are placed to modify the item. Depending on the item, it can have anywhere from 0-5 Rune Slots. Not all Rune Slots are created equal, there are 8 different types of rune slots; Air, Fire, Fusion, Earth, Life, Logic, Water, & Omni. Each Rune Slot Type can only be filled by a corresponding Rune of the same Rune Type, a water rune can only fit into a water slot, etc. The exception to this is the Omni Rune Slot, you may place any Rune Type into this Rune Slot. If an item contains two or more of the same Rune Slot Type, you CAN NOT put more than one particular Rune in that item. You can however have the same Rune in more than one item.
For the min-maxers: On your items, the order placement of the Rune Slot is something to consider. For example, if you have a Chest Piece with 4 Rune Slots, and all of them are Earth slots. Taking a Rune Of Grit (Primary rune of + Grit) will give you a different amount of + Grit depending on which Rune Slot you put it in. The first Rune Slot will give you the most +Grit, while the last Rune Slot will give you the least amount of +Grit.
The change in how much you get from the Rune is not dependent on how many of a certain type of Rune Slots is on an item, but rather where the Rune Slot is located in the order. So you want to make sure to be trying to put Runes with your Primary attributes in the first few Rune Slots as much as possible.
Rune Sets
Rune Sets require specific Runes and Rune Types which are associated with that Rune Set. A Rune Set will give set bonuses when a certain number of Runes associated with the Rune Set are placed into the gear a player is wearing. Depending on the Rune Set, bonuses will come at 4/8 Runes, 6/11/15 Runes, or 8/12/20 Runes. In order to create Runes that are part of a Rune Set, you first must acquire the fragment that is associated with the Rune Set. There are currently 31 Rune Sets in game with some of them being class specific. There is no limit to the number of different sets that you can be wearing, but the number of Rune Slots and the Rune Slot Types will determine which sets you are able to use.
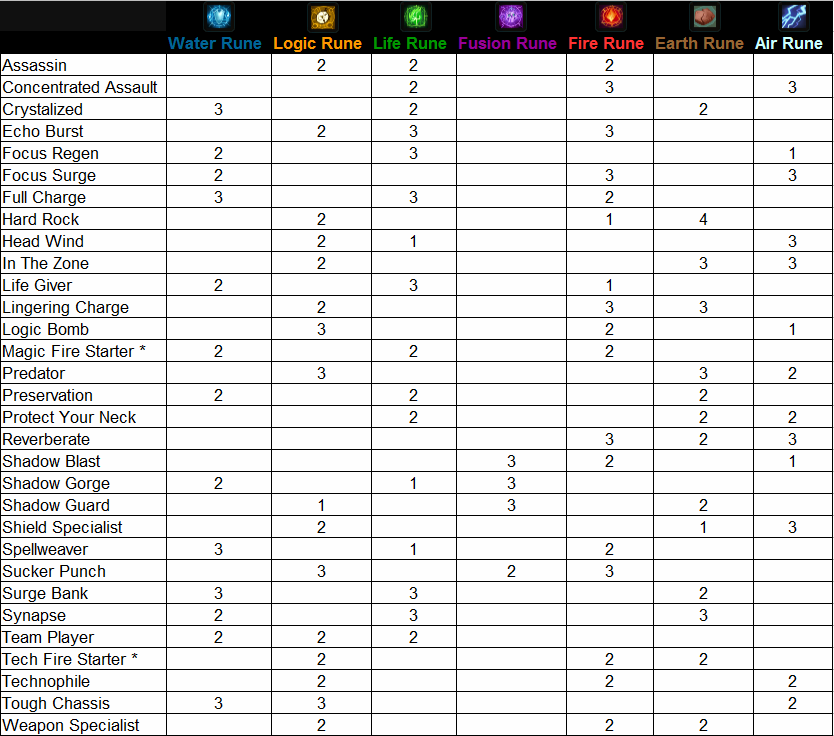
Rune Sets and Rune Types
Every Rune Set will have 3 Rune Types associated with that Rune set. A Rune Set will then have a total of either 6 or 8 Runes associated with the Rune Set. Don’t forget, if an item contains two or more of the same Rune Slot Type, you CAN NOT put more than one particular Rune in that item. Keep that in mind when deciding what Rune Sets you want. Here is a table breakdown of each Rune Set and what Rune Types they have to complete the set.
Rune Fragment Set Bonuses
Some Rune Set Bonuses tiers do stack, so if a tier gives you a % Assault/Support Power it will add the percents together. The Shadow Blast/Guard/Gorge Set Runes will only increase their specified Teirs, not their normal counterparts. Example, The Shadow Blast Rune Set is an Assassin Set, any Shadow Blast Rune you equip will only affect the Shadow Blast Rune Set Bonus, it will not affect the regular Assassin Set Bonus.
Assassin Fragment [Class: All]
(4) Assassin:Increases your Assault power by 5% gives you a 25% chance to deal 167 bonus damage when you strike an enemy below 30% health with a direct attack.
(8) Assassin:Increases your Assault power by 5% gives you a 25% chance to deal 240 bonus damage when you strike an enemy below 30% health with a direct attack.
Concentrated Assault Fragment [Class: Esper]
(6) Concentrated Assault: Whenever you use Spectral form foes within 5 meters are Rooted for 1.5 seconds.
(11) Concentrated Assault: Whenever you use Spectral form foes within 5 meters are Rooted for 2.5 seconds.
(15) Concentrated Assault: Whenever you use Spectral form foes within 5 meters are Rooted for 3.5 seconds.
Crystalized Fragment [Class: All]
(8) Preservation: Increase your maximum Health by 532 and gives you a 10% chance to restore 195 health whenever you deal direct damage.
(12) Preservation: Increase your maximum Health by 1000 and gives you a 10% chance to restore 357 health whenever you deal direct damage
(20) Crystallize: When you drop below 50% Health you will Root the 5 closes enemies within 6m for 2.0s.
Echo Burst Fragment [Class: Medic]
(6) Echo Burst: When you Critically Hit an enemy with direct damage you deal 101 bonus damage. Also when you Critically Heal an ally you do 101 bonus healing.
(11)Echo Burst: When you Critically Hit an enemy with direct damage you deal 144 bonus damage. Also when you Critically Heal an ally you do 144 bonus healing.
(15)Echo Burst: When you Critically Hit an enemy with direct damage you deal 272 bonus damage. Also when you Critically Heal an ally you do 272 bonus healing.
Focus Regen Fragment [Class: All]
(4) Serenity: Increase maximum Focus by 20% and gives you a 50% chance to restore 5 Focus when you Critically Hit with a direct heal.
(8) Serenity: Increase maximum Focus by 20% and gives you a 50% chance to restore 7 Focus when you Critically Hit with a direct heal.
Focus Surge Fragment [Class: Spellslinger]
(6) Focused Surge: ??
(11) Focused Surge: ??
(15) Focused Surge: ??
Full Charge Fragment [Class: Medic]
(6) Full charge: You gain 5% Assault Power and Support Power while under the effects of Energize.
(11) Full Charge: You gain 5.5% Assault Power and Support Power while under the effects of Energize.
(15) Full Charge: You gain 6.5% Assault Power and Support Power while under the effects of Energize.
Hard Rock Fragment [Class: All]
(8) Weapon Specialist: Increases Physical damage dealt by 5% and gives you a 10% chance to apply a debuff whenever you deal direct damage that reduces Physical Resistance by 7% for 5.0s.
(12) Weapon Specialist: Increases Physical damage dealt by 7% and gives you a 10% chance to apply a debuff whenever you deal direct damage that reduces Physical Resistance by 9% for 5.0s.
(20) Hard Rock: Gives you a 5% chance to summon a Granite Golem to fight beside you for 15 seconds. This can only occur every 60 seconds.
Head Wind Fragment [Class: All]
(8) Head Wind: Whenever you Sprint you leave behind a trail that will Snare enemies that stand inside of it by 15%.
(12) Head Wind: Whenever you Sprint you leave behind a trail that will Snare enemies that stand inside of it by 30%.
(20) Head Wind: Whenever you Sprint you leave behind a trail that will Snare enemies that stand inside of it by 45%.
In The Zone Fragment [Class: Engineer]
(6) In the Zone: You take 5% reduced damage when you are between 25% and 75% Volatility.
(11) In the Zone: You take 5.5% reduced damage when you are between 25% and 75% Volatility.
(15) In the Zone: You take 6% reduced damage when you are between 25% and 75% Volatility.
Life Giver Fragment [Class: All]
(8) Serenity: Increases maximum Focus by 20% and gives you a 50% chance to restore 7 Focus when you Critically Hit with a direct heal.
(12) Serenity: Increases maximum Focus by 20% and gives you a 50% chance to restore 9 Focus when you Critically Hit with a direct heal.
(20) Life Giver: When you Critically heal an ally with a direct heal you have a 50% chance to create a 6 meter field that lasts for 6 seconds restoring 1075 Health every 2 seconds to allies standing inside of it. This can only occur every 20 seconds.
Lingering Charge Fragment [Class: Warrior]
(6) Lingering Charge: Detonate causes your next Restricted ability to deal 201 bonus damage.
(11) Lingering Charge: Detonate causes your next Restricted ability to deal 298 bonus damage.
(15) Lingering Charge: Detonate causes your next Restricted ability to deal 544 bonus damage.
Logic Bomb Fragment [Class: All]
(8) Shield Specialist: Increases Shield Capacity by 532 and reduces your Shields Reboot time by 20%.
(12) Shield Specialist: Increases Shield Capacity by 1000 and reduces your Shields Reboot time by 20%.
(20) Logic Bomb: Whenever your Shields are depleted you will unleash a Logic bomb dealing 645 damage to the 3 closest enemies within 6 meters and restore 645 shields to yourself and 3 of your closest allies within 6 meters. This can only occur every 30 seconds.
* Magic Fire Starter [Class: All]
(8) Spellweaver: Increases Magic damage dealt by 5% and gives you a 10% chance to apply a debuff whenever you deal direct damage that reduces Magic Resistance by 7% for 5.0s.
(12) Spellweaver: Increases Magic damage dealt by 7% and gives you a 10% chance to apply a debuff whenever you deal direct damage that reduces Magic Resistance by 9% for 5.0s.
(20) Fire Starter: When you Critically Hit an enemy with a direct attack you have a 50% chance to create a 6 meter field that lasts for 6 seconds dealing 1075 damage very 2 seconds to enemies standing inside of it. This can only occur every 20 seconds.
Predator Fragment [Class: Stalker]
(6) Predator: While using Stealth or Combat Stealth your Movement Speed is increased by 12%.
(11) Predator: While using Stealth or Combat Stealth your Movement Speed is increased by 15%.
(15) Predator: While using Stealth or Combat Stealth your Movement Speed is increased by 18%.
Preservation Fragment [Class: All]
(4) Preservation: Increases your maximum health by 431 and gives you a 10% chance to restore 136 health whenever you deal direct damage.
(8) Preservation: Increases your maximum health by 532 and gives you a 10% chance to restore 195 health whenever you deal direct damage.
Protect Your Neck Fragment [Class: All]
(4) Protect your Neck: Increases your Armor by 3%. Additionally grants a buff that reduces damage taken by 15% for 5.0s when you drop below 30% Health. This can only occur every 30 seconds.
(8) Protect your Neck: Increases your Armor by 5%. Additionally grants a buff that reduces damage taken by 20% for 5.0s when you drop below 30% Health. This can only occur every 30 seconds.
Reverberate Fragment [Class: Warrior]
(6) Reverberate: Deals 122 technology damage to 3 foes within 6m that generates double Threat when Plasma Shield expires or is interrupted.
(11) Reverberate: Deals 175 technology damage to 3 foes within 6m that generates double Threat when Plasma Shield expires or is interrupted.
(15) Reverberate: Deals 323 technology damage to 4 foes within 6, that generates double Threat when Plasma Shield expires or is interrupted.
Shadow Blast Fragment [Class: All]
(8) Assassin:Increases your Assault power by 5% gives you a 25% chance to deal 240 bonus damage when you strike an enemy below 30% health with a direct attack.
(12) Assassin:Increases your Assault power by 5% gives you a 25% chance to deal 453 bonus damage when you strike an enemy below 30% health with a direct attack.
(20) Shadow Blast: When you Critically Hit an Enemy with a direct attack you have a 5% chance to deal 1616 bonus damage to that enemy and the 3 closest enemies within 6 meters.
Shadow Gorge Fragment [Class: All]
(8) Team Player: Increases your Healing done by 5% and gives you a 25% chance to restore 240 bonus Health when healing an ally that is below 30% Health.
(12) Team Player: increases your Healing done by 5% and gives you a 25% chance to restore 452 bonus Health when healing an ally that is below 30% Health.
(20) Shadow Gorge: When you are Critically Hit by an enemy you have a 10% chance to pulse 808 damage to the 3 closest enemies within 6 meters. You will heal yourself and your group members for the damage dealt. This can only occur every 20 seconds.
Shadow Guard Fragment [Class: All]
(8) Protect your Neck: Increases your Armor by 5%. Additionally grants a buff that reduces damage taken by 20% for 5.0s when you drop below 30% Health. This can only occur every 30 seconds.
(12) Protect your Neck: Increases your Armor by 7%. Additionally grants a buff that reduces damage taken by 25% for 5.0s when you drop below 30% Health. This can only occur every 30 seconds.
(20) Shadow Guard: When you are Critically Hit by an enemy you have a 10% chance to apply to the attacking enemy reducing their damage dealt by 1616 for 0.0 seconds.
Shield Specialist Fragment [Class: All]
(4) Shield Specialist: Increases Shield Capacity by 431 and reduces your Shields Reboot time by 20%.
(8) Shield Specialist: Increases Shield Capacity by 532 and reduces your Shields Reboot time by 20%.
Spellweaver Fragment [Class: All]
(4) Spellweaver: Increases Magic damage dealt by 3% and gives you a 0% chance to apply a debuff whenever you deal direct damage that reduces magic Resistance by 5% for 5.0s.
(8) Spellweaver: Increases Magic damage dealt by 5% and gives you a 10% chance to apply a debuff whenever you deal direct damage that reduces Magic Resistance by 7% for 5.0s.
Sucker Punch Fragment [Class: Stalker]
(6) Sucker Punch: You have a 50% chance when striking an enemy from behind with direct damage to deal 29 physical damage. The damage dealt is reduced by half when attacking form an enemy’s sides.
(11) Sucker Punch: You have a 50% chance when striking an enemy from behind with direct damage to deal 41 physical damage. The damage dealt is reduced by half when attacking form an enemy’s sides.
(15) Sucker Punch: You have a 50% chance when striking an enemy from behind with direct damage to deal 68 physical damage. The damage dealt is reduced by half when attacking form an enemy’s sides.
Surge Bank Fragment [Class: SpellSlinger]
(6) Surge Bank: Increases your maximum Spell Power capacity by 5.
(11) Surge Bank: Increases your maximum Spell Power capacity by 1092616192.
(15) Surge Bank: Increases your maximum Spell Power capacity by 1097859072.
Synapse Fragment [Class: Esper]
(6) Synapse: If you generate all 5 Psi Points within 4.0s your next ability will gain an additional 50% chance to Critically Hit.
(11) Synapse: If you generate all 5 Psi Points within 4.0s your next ability will gain an additional 75% chance to Critically Hit.
(15) Synapse: If you generate all 5 Psi Points within 4.0s your next ability will gain an additional 100% chance to Critically Hit.
Team Player Fragment [Class: All]
(4) Team Player: Increases your Healing done by 5% and gives you a 25% chance to restore 167 bonus Health when healing an ally that is below 30% Health.
(8) Team Player: increases your Healing done by 5% and gives you a 25% chance to restore 240 bonus Health when healing an ally that is below 30% Health.
* Tech Fire Starter [Class: All]
(8) Technophile: Increases Technology damage dealt by 5% and gives you a 10% chance to apply a debuff whenever you deal direct damage that reduces Technology Resistance by 7% for 5.0s.
(12) Technophile: Increases Technology damage dealt by 7% and gives you a 10% chance to apply a debuff whenever you deal direct damage that reduces Magic Resistance by -8.9% for 5.0s.
(20) Fire Starter: When you Critically Hit an enemy with a direct attack you have a 50% chance to create a 6 meter field that lasts for 6 seconds dealing 1075 damage very 2 seconds to enemies standing inside of it. This can only occur every 20 seconds.
Technophile Fragment [Class: All]
(8) Technophile: Increases Technology damage dealt by 3% and gives you a 10% chance to apply a debuff whenever you deal direct damage that reduces Technology Resistance by 5% for 5.0s.
(12) Technophile: Increases Technology damage dealt by 5% and gives you a 10% chance to apply a debuff whenever you deal direct damage that reduces Magic Resistance by 7% for 5.0s.
Tough Chassis Fragment [Class: Engineer]
(6) Tough Chassis: Your Bots will have their maximum Health increased by 431 and their damage dealt increased by 15%.
(11) Tough Chassis: Your Bots will have their maximum Health increased by 532 and their damage dealt increased by 20%.
(15) Tough Chassis: Your Bots will have their maximum Health increased by 1000 and their damage dealt increased by 25%.
Weapon Specialist Fragment [Class: All]
(4) Weapon Specialist: Increases Physical damage dealt by 3% and gives you a 10% chance to apply a debuff whenever you deal direct damage that reduces Physical Resistance by 5% for 5.0s.
(8) Weapon Specialist: Increases Physical damage dealt by 5% and gives you a 10% chance to apply a debuff whenever you deal direct damage that reduces Physical Resistance by 7% for 5.0s.
* The rune sets Magic Fire Starter, and Tech Fire Starter both use the rune fragment, Fire Starter Fragment. They do not have their own unique set fragment.
Useful Rune Sets For Classes
Warrior
Tank
- Coming Soon
DPS
- Assassin
- Weapon Specalist
SpellSlinger
Healing
- Focus Regen – If you find yourself running out of focus quickly, and have only a few Rune Slots, this is the Set you want to go for first.
- Life Giver – If you are still running out of Focus, and have the extra Rune Slots, combining this with Focus Regen will give you a much larger Focus Pool.
- Team Player- Once you find yourself not running out of Focus during Fights, you want to start looking at increasing how much youre healing for. This is the Set to get.
- Surge Bank
DPS
- Assassin
Esper
Healing
- Focus Regen – If you find yourself running out of focus quickly, and have only a few Rune Slots, this is the Set you want to go for first.
- Life Giver – If you are still running out of Focus, and have the extra Rune Slots, combining this with Focus Regen will give you a much larger Focus Pool.
- Team Player- Once you find yourself not running out of Focus during Fights, you want to start looking at increasing how much youre healing for. This is the Set to get.
DPS
- Assassin
- Magic Fire Starter
Engineer
Tank
- Coming Soon
DPS
- Assassin
Stalker
Tank
- Coming Soon
DPS
- Assassin
- Weapon Specialist
Medic
Healing
- Focus Regen – If you find yourself running out of focus quickly, and have only a few Rune Slots, this is the Set you want to go for first.
- Life Giver – If you are still running out of Focus, and have the extra Rune Slots, combining this with Focus Regen will give you a much larger Focus Pool.
- Team Player- Once you find yourself not running out of Focus during Fights, you want to start looking at increasing how much youre healing for. This is the Set to get.
- Echo Burst – While the Healing it does may not be much for Burst Healing, for consistent group healing this helps to keep players topped off quicker.
DPS
- Assassin
- Technophile
- Tech Fire Starter

Recent Comments