Rift Level 60 PvE Guide
Rift Level 60 PvE Guide by Seatin
Congratulations, If you’re reading this you’ve most likely reached level 60 or you’re reading ahead to get prepared for level 60, either way, you’re taking the time to go onto the forums and try to learn to be better at the game, so massive props to you on that, you’re an awesome person.
So to start off the guide, I’m just going to run you through the different types of currency you will encounter throughout your ventures of endgame RIFT:Storm Legion and also give you a bit of advice on how to best spend them to get the most “bang for your buck” so to speak.
Planar Attunement
Planar Attunement or ‘PA’ is an alternative advancement system that is activated once a player reaches level 50. You’ll notice when you reach level 50 you’ll already have a small handful of PA levels, you can press ‘U’ to open up your Planar Attunement tree where you can spend them. The PA system is also account wide, so this means any experience you gain on an alt is added to your accounts PA! There are a total of 1279 PA levels, which will sound very daunting at first however it’s not at all a necessity to have this capped out to clear all the content as PA provides a fairly minimal stat increase past the first 400-600 levels which are very easy and quick to get.
Pretty much everything and anything in RIFT’s endgame awards Planar Attunement experience, by the time you’ve hit level 60 you’ll probably have roughly 200 Planar Attunement levels via questing alone. Once you hit 60 you’ll find that you will get the first 400-600 hundred levels quite fast just casually doing endgame activities.
Here’s how I personally suggest spending your Planar Attunement if you’re aspiring to progress quickly through endgame and get into raiding:
- Increased Planar Charges in the first tier of each tree (You can have 6 additional Planar Charges for just spending 12 PA points)
- Filling all the Endurance Nodes across the Earth, Life and War Trees, this means investing a ton of points in some miscellaneous/worthless nodes to advance onto the next tier. (E.G % damage reduction taken from RIFT creatures, increased damage done to RIFT creatures, PVP damage reduction and abilities when you don’t PVP etc) This is because a lot of RIFTs raids and content have rough health checks (E.G If you don’t have X amount of health you’ll get one shotted!) and not a lot of ‘difficult’ DPS checks until you get to tier 3 raiding. Also scientists have done rigorous studies and uncovered that alive ascended do 100% more DPS than dead ones.
- War Planar Attunement Nodes with +1 CP (Most of these will you’ll already have filled by filling the war tree enough to access all the Endurance nodes)
- All nodes that give you +1 AP or SP while wielding a wand or ranged weapon (Because you’re always wielding a wand or ranged weapon!)
- All nodes that give you +1 AP or SP to your classes main stat (I.E Clerics – Wisdom, Mages – Intelligence, Rogues – Dexterity and Warriors – Strength)
- All nodes that give you +1/2 AP or SP for the weapon/weapons your currently wielding in your MH + OH (The reason this isn’t further up the list is because you’ll likely be changing the type of weapon you use a fair bit while gearing up, so once you’re at bullet point number 6 then you’ll probably be fairly ‘decent’ geared and able to make a good decision on what main weapon you want to invest in)
- Temporary Powerstone/Weaponstone Enchants:
- Caster – Burning Sigil 160 SP temporary weapon enchant (Tier 3 Fire)
- Melee 1h – Honed Edge 80 AP temporary weapon enchant (Tier 3 Fire)
- Melee 2h – Planar Edge 160 AP temporary weapon enchant (Tier 3 Life)
(There are better versions of all of these temporary weapon enchants in the form of consumables available from crafting via the Artificer proffesion or for the lazy you can purchase them via the Auction house at a pretty affordable cost. If you’re a casual player who doesn’t want to raid these enchants are probably the first thing you want to aim for with Planar Attunement)
- Any nodes that provide a beneficial increase to stats. Essentially from here on out you’ll be in pretty deep into PA by now. You should be able to use your own judgement to grab and fill all/any nodes that will provide you with a stat increase or anything that you think will be useful in endgame raiding.
That’s just my personal advice for people aspiring to quickly get into the world of RIFT raiding!
End Game Currencies
WARNING: None of the following currency/notoriety rewards I’ve mentioned factor in any bonuses from:
- Patron Status – Purchasable through the Trion site or the RIFT store (+15% to ALL Currency)
- Patron Vials – A 2 hour Patron vial or charge is awarded daily to characters with Patron Status, this provides a 40% increase to all currency apart from Fragments of the Ward
- Cache Finder Guild Perk – This is a perk easily accessible by simply being in a guild providing that guild has 1 point spent in Cache finder which the majority of guilds do! (+5% to ALL Currency)
- Purchasable Vials – Purchasable through the cash shop there are vials that award a 20/40/80/160% bonus to all currency apart from Fragments of the Ward, these vials last 2 hours.
- Treasure Map – End yellow tier loyalty perk (+10% to ALL currency), The end black tier loyalty perk upgrades this an additional 5% (+15% to ALL currency)
- 2 Piece Lockbox/Weekly Gift Armor Set Bonus – 10% Increase to all currency apart from Fragments of the Ward. This gear is roughly expert equivalent, so if you’re raiding Tier 2, there is a bit of a stat burden wearing it.
This means that the maximum bonus you can have to currency gain is 235% (40% Patron’s Token Vial + 160% Trascendant Token Vial + 5% Guild Perk Cache Finder + 15% Black Tier Treasure Map and + 15% Patron Status)
Keep in mind this is outside of the best in slot PVE Currency (Fragments of the Ward) where the maximum bonus you can have is only 35% (5% Guild Perk + 15% Patron Status + 15% Black Tier Treasure Map)
There are currently a total of 4 Unique Endgame Currencies; the majority of vendors are located in Tempest Bay. If you are at the Porticulum and are looking east, to the left is a curved set of stairs, if you follow these stairs up and go through a small corridor this is where all the vendors for currencies and Hunt Rift are located. In context to this guide this will henceforth be referred to as the “vendor room.” You can also access all of the rewards throughout different sections of the RIFT store under ‘equipment’.
[Infinity Stone]
Earned by completing end Game Carnage Quests, Instant Adventure, Hunt Rifts, Dailies in Ashora and Steppes of Infinity, defeating rare and powerful enemies and completing Zone events in Kingsward, Morban, Ashora, Steppes of Infinity and The Dendrome.
You also gain Infinity Stones from participating in lower level zone events providing you are mentored to around the appropriate level of the zone event (E.G If there is a zone event in Scarwood Reach (Level 30-36 Zone), mentor anywhere in that range to gain Infinity Stones)
This is the open world level 60 Currency that you will need a fair bit of throughout your level 60 adventures. There are 5 different Items that I would suggest you save up for and use these stones to buy which can all be bought in the vendor room and via the cash shop window under equipment:
- Synergy Crystals
- Venerated Torvan Hunters Capes
- Torvan Hunters Venerated Essences
- Lyncini Venerated Essences
- +50 Resistance Sigil Runes
There is also a merchant that offers a complete starter level 60 gear set which is roughly equivalent to 59/60 Dungeon drops. Once fully upgraded it is roughly equivalent to the Expert Dungeon drops. This gear is prohibitively expensive to first initially buy and then to upgrade and should only be used as “filler” gear if you just are not getting drops in normal dungeons and wish to get enough hit/focus to advance further to expert dungeons, otherwise the gear gets replaced rapidly and you essentially just end up wasting the stones.
[Empyreal Slayers Mark]
Earned by completing a wide variety of instanced end game activities, there are both daily and weekly ways that you can earn these marks, they can be used to buy both expert and tier 1 raid gear, tier 1 raid gear is considerably more expensive however. First off I’ll cover all the ways you can obtain these marks~
Daily-
– Random Daily Expert Dungeon = 400 marks
– Chronicle – Hive Kaaz’gfuu: Queens Gambit:
- Completion = 100 marks
- Bonus chest (100% spawn chance) = chance to drop 50-400 marks
- Rare spawn ‘Lung Feeder’ = chance to drop 50-400 marks
– Chronicle – Infernal Dawn: Laethys
- Completion = 100 marks
- Guaranteed spawn bonus chest = chance to drop 50-400 marks
- Rare spawn ‘The Watcher’ = chance to drop 50-400 marks
- Maklamos hardmode = 50 marks
- Rusila Dreadblade hardmode = 50 marks
- Laethys hardmode = 50 marks
– Chronicle – Planebreaker Bastion: Aftermath
- Completion = 100 marks
- Bonus chest (100% spawn chance) = chance to drop 50-400 marks
- Rare spawn ‘Proteus’ = chance to drop 50-400 marks
- Usurper Esai hardmode = 50 marks
- Sharad X9 hardmode = 50 marks
- Tesni the Ravenous hardmode = 50 marks
- Mistress Iny’ra hardmode = 50 marks
– Intrepid: Hammerknell – Runes of Corruption:
- Completion = 100 marks
- Random currency has a 50% chance to be awarded when you get saved to the instance by clearing mobs in the initial corridor = chance of 50-400 marks
- Rare spawn ‘Vladi Prime’ = chance to drop 50-400 marks
– Chronicle – Intrepid: Greenscales Blight:
- Completion = 100 marks
- Random currency has a 50% chance to be awarded on your first boss kill = chance of 50- 400 marks
- Rare spawn ‘Blightbeard’ = chance to drop 50-400 marks
– Chronicle – Intrepid: River of Souls:
- Completion = 100 marks
- Bonus chest (Unlike the other chronicles that give their ‘bonus’ via the chest, the chest in Intrepid: River of Souls only has around a 50% chance to spawn, so to reiterate it is NOT guaranteed to spawn) = chance to drop 50-400 marks
- Rare spawn ‘Sinthis’ = chance to drop 50-400 marks
Weekly-
- Endless Eclipse – 400 per boss x 5 = 2,000 Marks
- Frozen Tempest – 400 per boss x 5 = 2,000 Marks
- Triumph of the Dragon Queen – 300 per boss x 4 = 1,200 Marks
- Intrepid: Drowned Halls – 300 per boss x 4 = 1,200 Marks
With your all mighty knowledge and dashingly handsome looks Seatin, how would you suggest I spend my Empyreal Slayers Marks?
What I’d recommend is if you are below 400 hit (The amount of hit needed to get into tier 1 raids), I’d suggest you initially spend them on blue expert gear that grants hit to bring you over that threshold, these are items such as:
- Gloves – +53 Hit
- Ranged Weapon – +53 Hit
- Weapon/Weapons – + 2x 53 Hit/1hand or 1x 10⁶ hit/2handed
Do NOT buy expert equivalent rings or a helmet, the rings and helmets from marks really do suck and you can purchase much better rings and helmets off the auction house, this is covered in more detail below.
I have over 400 hit now, what should I spend my marks on?
Once you have 400 hit, I’d strongly advise no longer buying or upgrading expert equivalent gear, as now you’re statistically eligible for tier 1 raids, providing you’ve read up on your class and are playing a viable spec, you will be putting out more than enough damage or healing to meet any of the tier 1 DPS and healing checks. If you can find a semi-decent guild and get straight into tier 1 raids you will find that your gear will be replaced fairly swiftly with an assortment of drops, so I’d suggest going for the long haul and saving up for the tier 1 raid gear purchasable via Empyreal Slayers Marks, rather than splashing out on gear that will be replaced in no time.
[Frozen Eclipse Stone]
Earned via Chronicles, Expert Dungeons, Tier 1 raids and Tier 2 raids, this currency is used to buy tier 2 raid gear, which is currently the second best tier of gear in the game. Here is a list of the following places you can obtain it from:
Daily-
– Random Daily Expert Dungeon = 50 Stones
– Chronicle – Hive Kaaz’Gfuu: Queens Gambit:
- Bonus chest (100% spawn) = Chance to drop 25-100 Stones
- Rare spawn ‘Lung Feeder = Chance to drop 25-100 Stones
– Chronicle – Infernal Dawn Laethys:
- Bonus chest (100% spawn chance) = Chance to drop 25-100 Stones
- Rare spawn ‘The Watcher’ = Chance to drop 25-100 Stones
– Chronicle – Planebreaker Bastion Aftermath:
- Bonus chest (100% spawn chance) = Chance to drop 25-100 Stones
- Rare spawn ‘Proteous’ = Chance to drop 25-100 Stones
– Chronicle – Intrepid: Hammerknell Runes of Corruption:
- Random currency has a 50% chance to be awarded when you get saved to the instance by clearing mobs in the initial corridor = chance of 25-100 Stones
- Rare spawn ‘Vladi Prime’ = chance to drop 25-100 Stones
– Chronicle – Intrepid: Greenscalesblight:
- Random currency has a 50% chance to be awarded on your first boss kill = chance to drop 25-100 Stones
- Rare spawn ‘Blightbeard’ = chance to drop 25-100 Stones
– Chronicle – Intrepid: River of Souls:
- Bonus chest (Unlike the other chronicles that give their ‘bonus’ via the chest, the chest in Intrepid: River of Souls only has around a 50% chance to spawn, so to reiterate it is NOT guaranteed to spawn) = chance to drop 25-100 Stones
- Rare spawn ‘Sinthis’ = chance to drop 25-100 Stones
Weekly –
- Triumph of the Dragon Queen (10 Man) = 25 Stones x 4 Bosses = 100 Stones
- Intrepid: Drowned Halls (10 Man) =25 Stones x 4 Bosses = 100 Stones
- Frozen Tempest (20 Man) = 50 Stones x 4 Bosses and 1 Mini boss = 250 Stones
- Endless Eclipse (20 Man) = 50 Stones x 5 Bosses and 1 Starter event = 300 Stones
- Grim Awakening (10 Man) = 200 Stones for the first 2 bosses, 250 for the last 2 bosses = 900 Stones
- Infinity Gate (20 Man) = 250 Stones x 3 bosses = 750 Stones
- Planebreaker Bastion (20 Man) = 250 Stones x 5 bosses and 1 mini boss = 1,500 Stones
[Fragments of the Ward]
Earned via Tier 3 raiding and used to purchase the highest tier of raid gear in the game (Tier 3). Unlike other currencies which have multiple channels to obtain them, Fragments of the Ward can only be obtained via defeating Tier 3 raid bosses (The hardest bosses in the game).
The amount of Fragments of the Ward gained can be increased by the following perks:
- 5% From Cache Finder (Guild Perk)
- 15% From Patron Status
- 10% From Treasure Map (End of Yellow Tier Loyalty Perk)
So now I’ve given you a brief talk about the currencies you can obtain, how to gain and spend them, I’m going to talk you through everything you can do at endgame, what activities have certain requirements, how you can advance onto the next tier of ‘difficulty’, tips and tricks for certain aspects of content and suggested raid progression paths
What can I do?: The Progression Path
WARNING: None of the following currency/notoriety rewards I’ve mentioned factor in any bonuses from:
- Patron Status – Purchasable through the Trion site or the RIFT store (+15% to ALL Currency)
- Cache Finder – Guild perk (+5% to ALL Currency)
- Token/Exp/Notoriety Vials – Purchasable through cash shop, 40% ones granted daily via patron status (+20/40/ 80/160% to all currency apart from Frozen Eclipse Stones)
- Treasure Map – End yellow tier loyalty perk (+10% to ALL currency)So be aware you will get more rewards if you have any of the aforementioned perks!
Sidenote: This guide lists everything you can do. You do not necessarily have to do every aspect of the game to progress further
0-300 Hit/Toughness
Crafted Gear
Provided you haven’t developed an addiciton for Dimensions, you should have a nice lump of plat knocking about in your bags, Crafted gear is an insanely good option and a worthwhile investment which can give you a big boost to your hit rating, which makes getting to 300 hit very easy.
A Helmet, Rings, Waist and a Weapon for all classes can be crafted at usually quite a cheap cost, although this depends on the server you’re on.
It is advised that you check the Auction House for:
2x Rings = 53 Hit each
1x Helmet = 53 Hit
1x Weapon = 40/53 Hit for 1 hand, 80/106 hit for 2 handers
The waist should be last on your priority list but still worth getting, as while it does not have any hit, it usually is a massive stat upgrade.
This can quickly be the boost you need to get you into expert dungeons and daily raid rift groups.
An additional crafted item that will be a huge boost to your output is a Seal, Seals can only be gained via crafting, you can buy some really good starter seals with around +70 to +80 stats on the Auction House for a fairly low price. The best in slot seals which have 100+ stats on are usually for sale for several thousand plat. If you have the money to spend on them they are a good investment.
Chronicles
Before you enter Chronicles you will want to get a ‘viable’ spec for Chronicles, these specs will make your life in chronicles a hell of a lot easier.
Cleric
61 Inquisitor/15 Defiler/ 0 Justicar
61 Inquisitor/8 Justicar/ 7 Cabalist
61 Shaman/15 Defiler
61 Druid/10 Shaman/5 Inquisitor
Mage
61 Harbinger/11 Chloromancer/4 Elemantalist
Warrior
61 Riftblade/11 Tempest/4 Warlord
61 Champion/15 Warlord
41 Warlord/35 Champion
Rogue
51 Nightblade/21 Riftstalker/4 Tactician
61 Bladedancer/11 Riftstalker/4 Tactician
A Hero Rises – Solo Chronicle
Basic Rewards: Start Level 60 Gear, both 180x[Infinity Stone] and 100x[Empyreal Slayers Mark]
As soon as you hit level 60 this is your first port of call for grabbing initial gear, a Hero Rises is a solo dungeon that can get you that little bit of extra gear you need to push you into both normals and experts, this dungeon usually takes anywhere from 10-30 minuites and does not present much of a challenge, this chronicle has a one day lockout, so be sure to prioritise it on your list of things to do until you are ready for experts!
Hive Kaaz’Gfuu: Queens Gambit – Duo Chronicle
Basic Rewards: Starter Level 60 Gear, both 180x[Infinity Stone] and 100x[Empyreal Slayers Mark] and occasionally a random chest that can drop 25-100x [Frozen Eclipse Stone]amongst other things.
Although this chronicle is recommended for two players, it is easily soloable for fresh level 60 players, on the provision that you have viable specs for soloing content. If you don’t then you have two choices, you can either check the class forums and get a viable spec or you can use level 60 chat to find a partner in crime to take down this chronicle. This chronicle should be ran every day as it is extremely rewarding. It can be a slight challenge initially as there are various mechanics on each boss that you may need to adjust to, for a full video guide for the chronicle ~ Click here!
As mentioned in the title a chest is guaranteed to spawn at various locations throughout the chronicle, it will have the chance to contain either 50-400x[Infinity Stone] or [Empyreal Slayers Mark] or on rare occasion 50-100x[Frozen Eclipse Stone] the sheer amount of currency that drops from this chest makes it well worth doing every day and also having a thorough scavenge around the Chronicle for the chest.
Infernal Dawn Laethys – Duo Chronicle
Basic Rewards: Starter Level 60 Gear, both 180x[Infinity Stone] and 100x[Empyreal Slayers Mark] and occasionally a random chest that can drop 25-100x [Frozen Eclipse Stone]amongst other things.
A further step up from the difficulty Queens Gambit and a Hero Rises, Infernal Dawn:Laethys is a chronicle that consist of three classic bosses from the vanilla raid ‘Infernal Dawn’ known as Maklamos, Rusila Dreadblade and finally the Dragon of Earth herself Laethys.
When you first run this chronicle you will want to be sure to bring a partner, a lot of new players find this chronicle difficult to solo due to the increased complexity of boss mechanics in comparison to the Queens Gambit and A Hero Rises, however once you run the fights a few times, they are easy to master.
This is the first Chronicle to feature ‘Hardmodes’, these hardmodes are significantly harder than the normal versions of the fight, hardmodes give each of the bosses more health, more damage and more mechanics. Defeating hardmodes will give you 50x [Empyreal Slayers Mark], A 100 reputation token, 2p 50g and 150,000 PA exp. It is not suggested that you attempt hardmodes until you’re geared enough to run expert dungeons. If you can find a good partner that you’re doing Chronicles with on a daily basis, hardmodes can add an extra sense of challenge,enjoyment and reward to your run through of Infernal Dawn: Laethys every day.
As mentioned earlier, a chest is guaranteed to spawn at various locations throughout the chronicle, it will have the chance to contain either 50-400x[Infinity Stone] or [Empyreal Slayers Mark] or on rare occasion 25-100x [Frozen Eclipse Stone] the sheer amount of currency that drops from this chest, makes it well worth doing every day and also having a thorough scavenge around the Chronicle for the chest.
Planebreaker Bastion: Aftermath – Duo Chronicle
Basic Rewards: Starter Level 60 Gear, both 180x[Infinity Stone] or 100x[Empyreal Slayers Mark] and occasionally a random chest that can drop 25-100x [Frozen Eclipse Stone]amongst other things.
On a similiar difficulty level to Infernal Dawn: Laethys, Planebreaker Bastion:Aftermath is set in the Planebreaker Bastion raid area, it presents a fair challenge to new level 60 players, you will likely need a partner to be successful in your first run of this Chronicle.
This is the second chronicle to feature ‘Hardmodes’, these hardmodes are significantly harder than the normal versions of the fight, some of the hardmodes in Planebreaker Bastion:Aftermath are quite a bit harder than any hardmodes in Infernal Dawn:Laethys (Usurper Esai and Mistress Iny’ra), where as some are quite a bit easier (Tesni the Ravenous and Sharad X9). Defeating hardmodes will give you 50x [Empyreal Slayers Mark], A 100 reputation token, 2p 50g and 150,000 PA exp. It is not suggested that you attempt hardmodes until you’re geared enough to run expert dungeons. If you can find a good partner that you’re doing Chronicles with on a daily basis, hardmodes can add an extra sense of challenge,enjoyment and reward to your run through of Planebreaker Bastion: Aftermath.
As mentioned earlier, a chest is guaranteed to spawn at various locations throughout the chronicle, it will have the chance to contain either 50-400x[Infinity Stone] or [Empyreal Slayers Mark] or on rare occasion 25-100x [Frozen Eclipse Stone] the sheer amount of currency that drops from this chest, makes it well worth doing every day and also having a thorough scavenge around the Chronicle for the chest.
Intrepid: Hammerknell Fortress – Duo Chronicle
Basic Rewards: Starter Level 60 Gear, both 180x[Infinity Stone] and 100x[Empyreal Slayers Mark]
This Chronicle consist of three bosses Murdantix, The Broodmother and Rune King Molinar + Prince Dolin. You can skip the Broodmother and it is suggested you do so, as she just rewards usually a very terrible piece of gear, so killing her is really not worth the time. As a fresh 60 if you take the trash pulls slow and steady, you should be able to solo this, however the trash in this Chronicle does hit ridiculously hard in comparison to other Chronicles.
Upon killing the initial packs of trash and getting locked to the instance, you have a 50% chance to get either 50-400x[Infinity Stone] or [Empyreal Slayers Mark] or on rare occasion 25-100x [Frozen Eclipse Stone].
Murdantix and Rune King Molinar+ Prince Dolin are stupendously easy, all you need to do to defeat them is click a purple ‘Rune Vessel’ near where the bosses are located, this will give you super damage and super damage reduction and then you can just plough through the bosses health.
The rare mob ‘Vladi Prime’ has a set spawn location (If he is spawned that is, from experience he has roughly a 15% spawn chance) If you come down the initial stairs if the mob has spawned he will be to the far left of the hall murdantix is located in.
Intrepid: Greenscales Blight – Duo Chronicle
Basic Rewards: Starter Level 60 Gear, both 180x[Infinity Stone] and 100x[Empyreal Slayers Mark]
This Chronicle invovles initially working your way through the hedge maze to kill Duke Lazeres, Oracle Aleria and Infiltrator Johlen, once all three have been defeated you can then go and fight Prince Hylas and Greenscale. The trash in here and the final boss Greenscale all deal an absolute ton of damage, so as a fresh 60 it is suggested you bring a partner.
Upon killing any one of the first three bosses you have a 50% chance to get either 50-400x[Infinity Stone] or[Empyreal Slayers Mark] or on rare occasion 25-100x [Frozen Eclipse Stone].
The rare mob Blightbeard has a set spawn location and spawns in the segment of the maze located infront of Infiltrator Johlen, so usually running this Chronicle, if Blightbeard has spawned, you will likely run into him.
Intrepid: River of Souls – Duo Chronicle
Basic Rewards: Starter Level 60 Gear, both 180x[Infinity Stone] and 100x[Empyreal Slayers Mark]
Due to what I’d regard as poorly tuned trash, when you’re running this chronicle I’d suggest taking a partner. Trash in this instance in some cases has more health than the bosses, while it does not pose that much of a threat damage wise, it just takes ages to kill if you are there solo.
The chronicle itself is fairly simple, you go around and siphon the 3 energy crystals (two of which are guarded by fairly straightforward bosses), then deliver the power to plutnous, then report to alsbeth, rain some carnage on an undead dragon and collect your rewards.
Unlike some of the other chronicles that feature a bonus chest with rewards in, this chest in this doesn’t have a guarenteed spawn rate, I’ve estimated it to be around a 50% chance to spawn, but if it does spawn it will contain either 50-400x[Infinity Stone] or [Empyreal Slayers Mark] or on rare occasion 25-100x [Frozen Eclipse Stone].
The health of the trash, the amount of trash and the unreliable scavanger hunt for the bonus chest makes this the worst chronicle by a large margin, personally it’s the only chronicle I don’t bother to run on a daily basis.
Normal Dungeons – Rewards: Starter Level 60 Gear
When you hit 60 there are 3 normal dungeons that give what can be defined as Starter Level 60 Gear:
- Archive of Flesh
- Tower of the Shattered
- Empyrean Core
These dungeons are the initial stepping stone into level 60 dungeon progression and although are not completely necessary in terms of gear progression to complete, they are an advised activity to do, to get you used to running dungeons in a group at max level.
Instant Adventure – Rewards: [Infinity Stones]
Instant Adventure or IA as it is often known is basically a never-ending adventure that can be accessed by pressing ‘.’, There are currently 3 Different Zones which have IA featured in that reward Infinity Stones, These 3 zones are Steppes of Infinity, Ashora and The Dendrome.
While it is not 100% clear which of these zones is the most rewarding, generally speaking the bigger your instant adventure group the more rewarding the Instant Adventure will be. Also initially it is probably best to do Instant Adventure in the zone you have completed the least carnages in.
Zone Events – Basic Rewards: [Infinity Stones]
At level 60 there are 5 Zones that you should keep your eye on for invasions:
- Ashora
- Dendrome
- Kingsward
- Morban
- Steppes of Infinity
There are a wide variety of different Invasions that can happen, each one has different contribution levels to claim the end reward, and the end reward from an Endgame Invasion when the Invasion is complete in any of these zones is the usually the same and is as follows:
300x[Infinity Stone] and 10x[Crystalized Insight]
However some specific zone events have several stages and objectives that must be completed, for example the Volan event and the Dendrome event the awakening rewards bonus Infinity stones for each phase of the event you complete upto I believe roughly an extra 600x[Infinity Stone] on top on the end bonus.
There are also specific Zone events located in the Dendrome that fire off as a normal zone event would, you will notice as on the objective they have close ‘Hunt Rifts’, instead of normal rifts, if you partake in these, they will give you 3 tokens for 1,000 Torvan Hunters rep each!
You can also mentor down to the appropriate level of any Zone Event and get [Infinity Stone] for completing it, usually the reward for doing a mentored down Zone Event is about half that of a level 60 Zone Event.
Hunt RIFTS – Basic Rewards: [Infinity Stone]
Currently there are 18 Hunt RIFTS required to do in order to move on and unlock the the Great Hunt RIFTS. Hunt RIFTS occasionally open in the world by themselves, though are normally opened with a Lure bought in the “vendor room” in Tempest Bay. Some of the Lures require Torvan Hunters Notoriety to purchase. Hunt Rifts are fairly easy to solo, though they scale with the number of players present and it is generally worthwhile to run in a larger group. The more people, the more invasions, the more rewards. Hunt RIFTS that are opened in Steppes of Infinity and Ashora have a moderate chance to grant 30-60x [Infinity Stone]
All 18 of the Hunt RIFTs, have a fairly similar structure of 5 phases-
- Build the Conduit
- Defend the Conduit for 2 minutes
- Kill the 2 additional enemies and then lower the boss to 50%
- Prevent Invasions from spawning a foothold in the middle of the RIFT for 2 minutes
- Defeat all additional enemies that spawn and then defeat the boss
If you chose to ignore additional enemies when the boss spawns, the boss puts up a shield reducing damage taken by 10% for each enemy active; the mechanics vary from boss to boss so it is adviseable to kill the additional enemies in all scenarios as most bosses heal or shield even further, meaning that it’s much easier to quickly burst down any adds that are up. You must fully complete each hunt RIFT to get the achievement, once you have all 18 Achievements; the first tier of Great Hunt RIFTS is unlocked.
Great Hunt RIFTS – Basic Rewards: [Infinity Stone] and Torvan Hunters Rep
There are 5 Ranks to Great Hunts. You must complete each of the Hunt Rifts to get an achievement allowing you to purchase Great Hunt Rift lures. You can still participate and gain achievements for Great Hunts if someone else opens them.
Rank I – Designed for 2 players minimum, but will scale.
3 Phases-
- Build 1 Conduit
- Defend the Tower from planar invaders
- Defeat the boss
Around the edge of these RIFTs are turrets, during the boss phase you need to power up the cannons and drag the boss to them to remove the stacking shield that the boss puts up
Rank II and III – Designed for 2 Players minimum, but will scale.
3 Phases-
- Build 3 Conduits
- Ensure at least one of the towers survives
- Defeat the boss
Again around the edge of these RIFTs are cannons, during the boss phase you need to power up the cannons and drag the boss to them to remove the stacking shield that the boss puts up reducing damage taken.
Rank IV and V – Designed for 5 or more players, but will scale.
3 Phases-
- 1.Build 3 Conduits
- 2.Ensure all three of the Conduits survive
- 3.Defeat the boss, while addition invasions spawn
As a sidenote during the third phase while additional invasions spawn, the turrets tend to favour those mobs over the boss, meaning that the shield does not get purged as quickly and damage can’t be done to the boss, so it’s best to try and get the invasions down as fast as possible.
Strongholds
These are located in the Dendrome, there are two types of strongholds ‘Group’ and ‘Raid’, Group strongholds are intended for 2+ players and scale upwards, raid Strongholds are intended for 10+ players. Raid strongholds give three times the rewards of group strongholds in regards to the reputation and [Infinity Stone] granted.
You can tell the difference between level 60 and 62 strongholds by using the map, group strongholds will be marked level 60 and raid strongholds will be marked level 62. You can also tell the difference when you are in-front of them as raid strongholds when you first encounter them they will have lots of defense orbs whereas group strongholds will just be a shielded foothold. My personal recommendation would be to only bother will doing raid strongholds when there is a large group of people doing them on your server/shard.
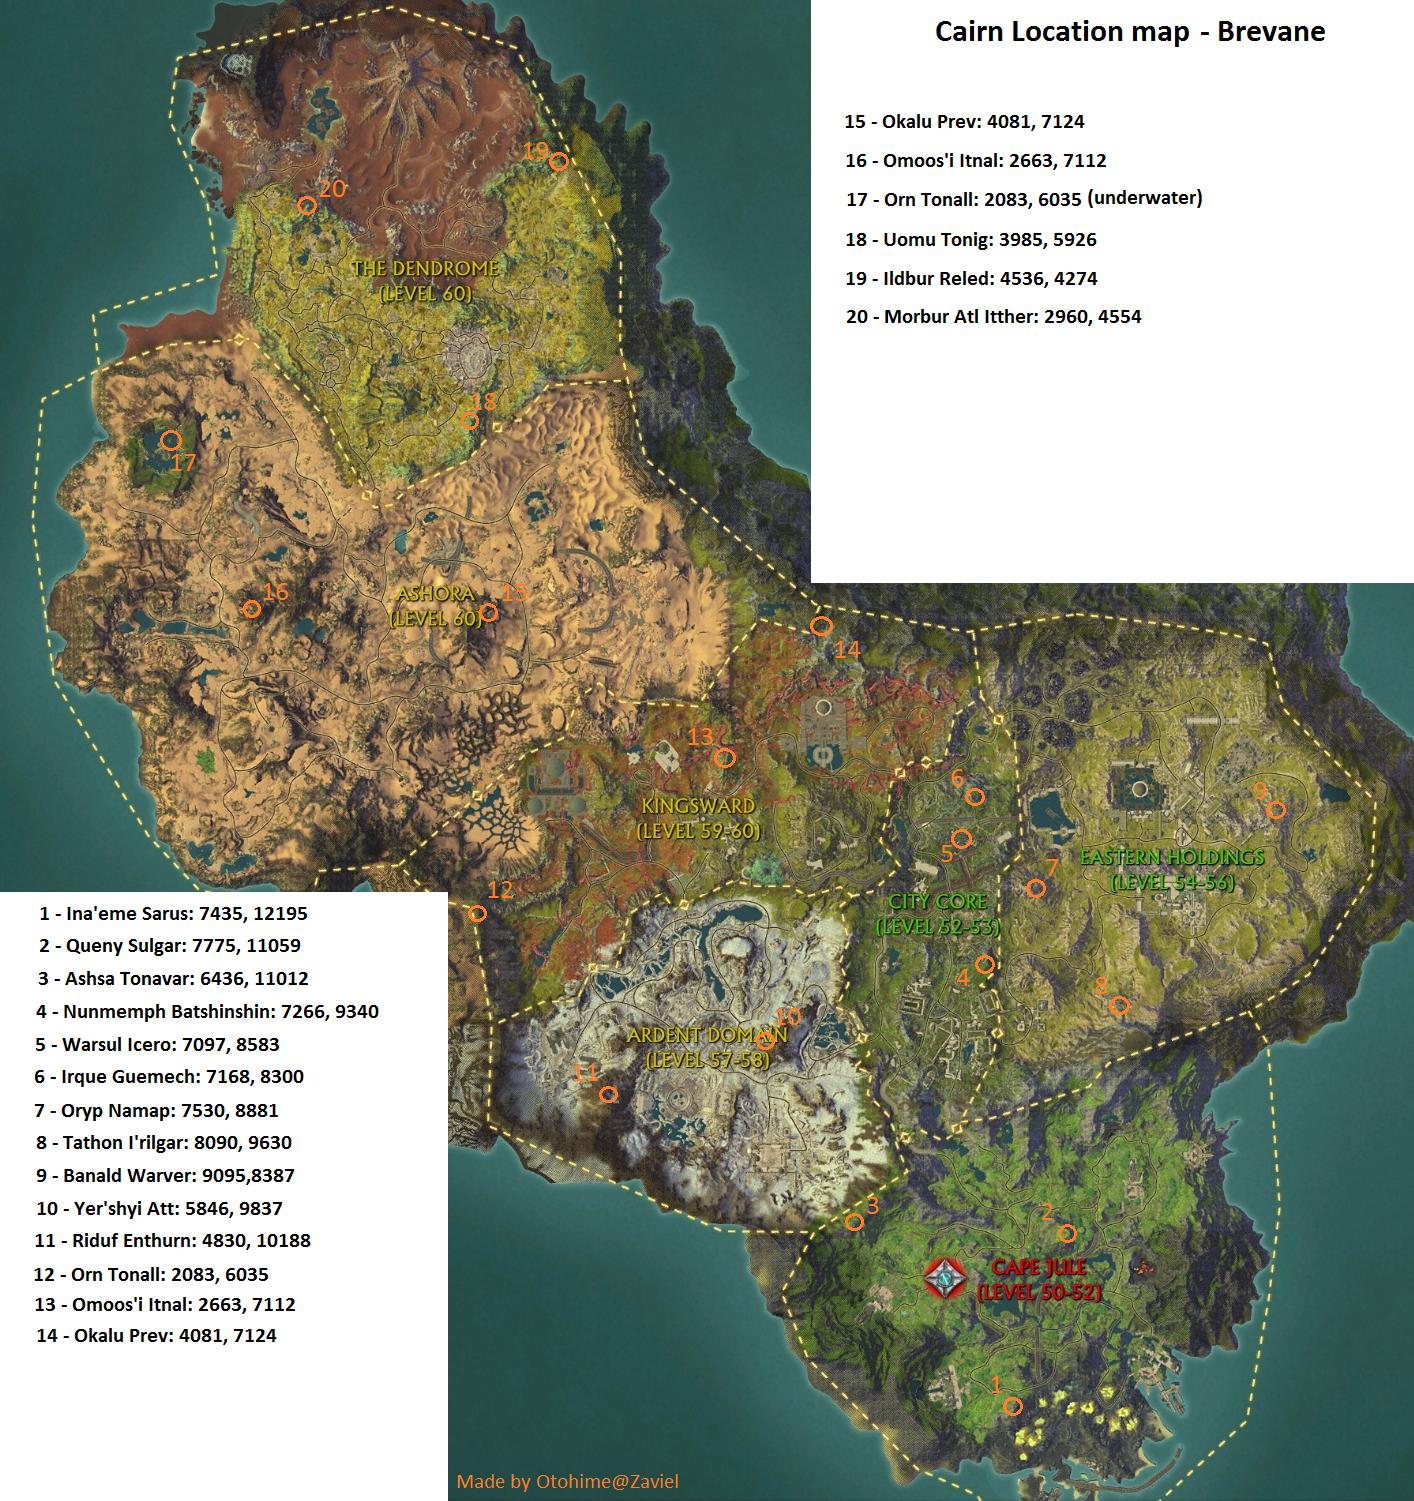
Cairns
There are a total of 28 Cairns located throughout Dusken and Brevane, Cairns are commonly located in high and sometimes hard to reach places, cairns can offer quite a nice chunk of plat and also sometimes a class appropriate epic item.
Here are two maps for Cairn locations for both Dusken and Brevane:
Puzzles
There are a total of 7 puzzles in Storm Legion, while they do not provide any gear of statistical value, they do provide a lot of enjoyment for people who enjoy a mental challenge as well as a large variety of cosmetic items and rewards, more information on puzzles can be found on ~ http://www.riftscene.com/guides/puzzles/
Bloodfire Strongholds
Basic rewards:[Infinity Stone]and starter level 60 epic essences
Completing ‘Bloodfire Behemoth’ zone events appropriate to your level or mentored level will reward you with something known as an Infernal Conduit; these are used to summon bosses inside the Bloodfire Stronghold. One infernal conduit summons one boss.
Outside both Sanctum and Meridian are portals to the ‘Bloodfire Stronghold’, to be eligble to enter the Bloodfire Stronghold at least one member of your party needs to have an Infernal Conduit.
Once you’re inside the Stronghold you’ll notice it has multiple levels where you’ll be automatically mentored to level 15, 30 or 60 depending on which level you’re on. It’s suggested you just stick to the level 15 platform, as it is the easiest by far and there appear to be no extra rewards for doing the level 30 or level 60 levels.
The bosses are extremely easy and straight forward. It’s suggested that you save up Infernal Conduits until your group has at least 25+ Conduits between the entire group, then you can quickly enter, take turns summoning bosses on the level 15 platform that can be nuked in 20-30 seconds and quickly farm large stacks of Infinity Stones and starter level 60 epic essences.
Some other notable rewards from Bloodfire Strongholds are a rather awesome looking Magma Walker mount you can get by killing 50 bosses inside the Stronghold and also a Crucia’s Supply Crate and Infernal Helm you can get by killing 100 bosses inside the Stronghold
Ember Isle Underwater Quest Line
Located off the western coast of Ember Isle is an underwater quest line that acts as a prelude to the RIFT 3.0 expansion, while this quest line doesn’t reward any currency or worthwhile notoriety it does provide you with a lot of Planar Attunement experience along with a 6 slot epic sigil with bonus water resistance, tons of lore and story information and a few different vanity pets, not to mention it’s pretty damn fun.
Reputation/Notoriety Enchantments and Rewards
Eternal City Survivors
There are 2 Quartermasters that have identical stock. One in the Ursin Grove Bunker and the other in Southwall Bunker, both in Eastern Holdings, runes are also accessible via shop interface under Equipment -> Runes.
Notoriety gained by doing:
- Story quests and carnages in Eastern Holdings, Argent Domain and Kingsward
- Occasional crafting dailies in Tempest Bay
- Drinking Daily inside Eastern Holdings
- Fishing turn ins in Cape Jule
- Eastern Holdings IA
- Mark of Notoriety Turn in
- Notoriety Tokens from Chronicles
Rewards:
Neck Runes –
Honored: +18 Primary Stat/+10 Endurance
Revered: +35 Primary Stat/+19 Endurance
Caretakers of Necropolis
Quartermaster is located in Necropolis, South-west of Porticulum. Runes also accessible via shop interface under Equipment -> Runes
Notoriety gained by doing:
- Story quests and carnages in Seratos, Morban and Steppes of Infinity
- Several dailies located in Steppes of Infinity near Zerzala Porticulum.
- Onslaughts in Seratos, Morban and Steppes of Infinity
- Steppes of Infinity, Morban or Seratos IA
- Notoriety Tokens from Chronicles
- Mark of Notoriety turn in
- Occasional crafting dailies in Tempest Bay
Rewards:
Belt Runes –
Honored: +18 Primary Stat/+10 Endurance
Revered: +35 Primary Stat/+19 Endurance
Qaijiri
Quartermaster is in Nurjak Vostra, south of Port, Runes are also accessible via shop interface under Equipment -> Runes
Notoriety Gained by doing:
- Story quest and carnages in Ashora
- Dailies in Nurjak Vostra camp area
- Ashora IA
- Notoriety Tokens from Chronicles
- Mark of Notoriety turn in
- Occasional crafting dailys in Tempest Bay
- Ashora onslaughts
Rewards:
Cape Runes –
Honored: +18 Primary Stat/+10 Endurance
Revered: +35 Primary Stat/+19 Endurance
Torvan Hunters
Quartermaster in “vendor room” in Tempest Bay, essences and cloaks also accessible via shop interface under Equipment -> essences for the essences and Accessories for the cloaks.
Notoriety gained by doing:
- Hunt Rifts/Great Hunt rifts
- Daily Hunt/Great rift quests
- Daily Raid RIFT quest
- Strongholds
- Daily Stronghold quest
- Torvan Hunters quest Line
- Mark of Notoriety turn in
- Dendrome Hunt Zone Events
Rewards:
Venerated – Best in Slot Capes
Venerated – Best in Slot Greater and Lesser Essences
There is pretty much no point buying any of the Glorified Essences from Torvan Hunters rep, they are very expensive, you might as well save up, bite the bullet and continue your quest to Venerated reputation.
The Lycini
Quartermaster in “vendor room” in Tempest Bay. Also runes are also accessible via shop interface under Equipment -> Essences.
Notoriety gained by doing:
- Onslaughts
- Rifts
- Invasions
- Dendrome weekly raid quests
- Mark of Notoriety Turn in
Rewards:
Decorated: Sigil Machine Resistance Runes
Venerated: Best in Slot Lesser Essences
There is pretty much no point buying any of the Glorified Essences from Lycini rep, they are very expensive, you might as well save up, bite the bullet and continue your quest to Venerated
The Achayti
Quartermasters in various camps throughout the dendrome, also accessible via shop interface under Equipment -> Runes
Notoriety gained by doing:
- Killing Architects in Northern Ashora
- Quests at the Achayti camp in North-eastern Dendrome
- Notoriety Tokens from Chronicles
Rewards:
Ring Enchants-
Honored – +9 Primary Stat/+5 Endurance
Revered – +18 Primary Stat/+10 Endurance
Hailol
Quartermaster in Hailol, also accessible via shop interface under Equipment -> Runes
Notoriety gained by doing:
- Hailol Footholds
- Hailol Daily Quests
- Quests in Dendrome
- Notoriety Tokens from Chronicles
Rewards:
Seal Enchants –
Honored – +35 Spellpower,+35 Attackpower or +15 Endurance
Revered – +45 Spellpower +45 Attackpower or +25 Endurance
Empyreal Alliance
Vendor at Solstice Tower, also accessible via shop interface under Equipment -> Runes
Notoriety gained by:
- Powering up Stronghold platforms
- Dendrome Onslaughts
- Quests in Dendrome
- Notoriety Tokens from Chronicles
Rewards:
Trinket Enchant –
Honored – +18 Primary Stat/+10 Endurance
Revered – +35 Primary Stat/+20 Endurance
300-400 Hit/Toughness
*keep in mind hard-cap is 320 Hit
Expert Dungeons
Once you hit 300 Hit/Toughness, you are statistically ready to start venturing into experts, however to make your time in experts considerably more pleasant and enjoyable it is suggested you are playing a ‘viable spec’
- For dps or damage this means being able to pull at least 7k/8k on a dummy, this is very achieveable in fresh level 60 gear providing you have a viable spec, if you’re unsure as to what specs are considered viable, consult the list below.
- For healers you want to be confident in your ability keep both the tank and the group up and deal with unexpected sources of damage (I.E People standing in AOE), a list of suggested healing specs and guides can be found below.
- For tanks you want to aim for at least 45k health and be confident you have the ability to hold agro against strong dps, a list of suggested tanking specs and guides can be found below.
I’ve compiled a very simple list of viable and easy to play specs suitable for expert dungeons with convenient links to either a written or video guide in the brackets depending on your preference!
Suggested DPS specs:
Rogue:
Ranged: 61 Ranger (Video/Written)
Ranged: 61 Marksman (Video/Written)
Melee: 61 Assassin Video/Written
Mage:
Ranged: 40 Pyro/36 Archon (Video/Written)
Melee: 61 Harbinger (Video/Written)
Cleric:
Ranged: 61 Inquisitor (Video/Written)
Melee: 61 Shaman Video/Written
Melee: 61 Druid (Video/Written)
Warrior:
Ranged: 61 Tempest Video/Written
Melee: 61 Paragon Video/Written
Melee: 61 Warlord (Video/Written)
Melee: 61 Riftblade (Video/Written)
Suggested Healing Specs:
Rogue:
61 Physician (Video/Written)
Mage:
61 Chloromancer (Video/Written)
Cleric:
61 Sentinel (Video/Written)
48 Purifier/28 Sentinel (Video/Written)
Warrior:
61 Liberator (Video/Written)
Suggested Tanking Specs:
Rogue:
61 Riftstalker (Video/Written)
Mage:
61 Arbiter (Video/Written)
Cleric:
61 Justicar (Video/Written)
Warrior:
61 Paladin (Video/Written)
61 Voidknight (Video/Written)
Disclaimer: These are by no means ALL the best damage/healing/tanking specs for each and every class, they are however specs that are generally regarded as fairly easy to play and specs that will perform well enough to pull your weight in expert dungeons.
At first expert dungeons will seem like a bit of a slap in the face in comparison to normal dungeons, on Initially entering the dungeons it is probably advisable to run with 1 healer and a support class. When you’re more confident with the fights you can narrow it down to 1 healer. All fights in expert dungeons are do-able with 1 healer, although in some encounters it can be extremley challenging, requiring well timed dispels and cooldowns. For more detailed guides for Expert dungeons check out ~ www.riftscene.com
This is Qube’s website which contains tactics for all expert dungeons, Otherwise you can do it the old fashioned way and go in blind, whatever suits your playstyle!
Daily Raid RIFTS
The difficulty for raid rifts is intended for a group of 10 people, however its much easier if you bring a full 20. On their own Raid RIFT lures are fairly expensive, costing 900 x [Infinity Stone] and 60k Planarite per lure, so in my honest opinion they are only worth doing if its alongside the daily raid rift quests which offer 300 x [Infinity Stone]. The Raid RIFTS themselves mostly drop planar essences that are BIS. Since the lures are so expensive I would suggest one of two things:
- If you’re part of a guild that is willing to rotate who buys the lure on a daily basis, then set up a rotation of who is going to buy the lures and then everybody can roll for the essences.
- This one is commonly used in pugs. Whoever buys the Lure, gets priority over the essences and loot, the person who usually buys the lure is more often than not the leader of the group and in most scenarios and will often quickly auction off any loot they don’t need for plat. This allows people who spend large amounts of currency buying the Lures to get rewarded for it and also if you want to tag along and get your daily stones + a couple of bonus stones, It won’t cost you anything but time.
Dendrome Open World Raid Bosses (Akhane, Senbora and Kaaz’ra)
There are 3 open world raid bosses in the Dendrome, the hit requirement for these bosses is actually 500, but with the weekly quests you get an item which you need to use once every 15 minutes which gives you a bonus 200 hit to each of these bosses. Each one has a weekly quest associated with it that resets on Wednesdays, the weekly quest for each one of these bosses is where the main rewards from doing these bosses come from, these rewards are as follows:
450 x [Infinity Stone]
And a [Dendrome Raiders Cache]
Which contains 300-400 x [Empyreal Slayers Mark] and a very small chance to drop a T1.5 raid level epic item.
Killing a boss on its own gives 120x [Infinity Stone]
Depending on the players you have present they can sometimes be quite the challenge, the hardest of the raid bosses without a doubt in Kaaz’ra, who is located in the Architects hive, Akhane and Senbora are both fairly straightforward and it is not too often you find groups wiping to them. Unless you are in one of the top raiding guilds and have an elite 20 man team, it is likely you will need to assemble or join a group of 40-80 random players.
400-500 Hit/Toughness
*keep in mind hard-cap is 420 Hit
Triumph of the Dragon Queen (TOTDQ) – 10 Man
Located in Kingsward this is the entry level 10 man into Storm Legion raiding and pretty much regardless of where you’re coming from the best raid to start off with, all bosses in Triumph of the Dragon Queen instance have a fairly straightforward mechanics. The instance is a moderate challenge and often ran and successfully cleared with pugs. The best advice is if you are doing it for the first time, to do this with a group of friends and/or your guild
Intrepid: Drowned Halls (IDH) – 10 Man
Recently added in patch 2.5 and located in Scarwood Reach, this raid is also a entry level 10 man raid which is on a similar level of difficulty to TOTDQ. All the bosses have fairly straightforward and simple mechanics, this instance is often ran and successfully cleared with pugs. If it’s your first time venturing into IDH, you may want to consider watching this quick and handy video guide
Frozen Tempest (FT) – 20 Man
Located in Stormhold in Morban this is the entry level 20 man into Storm Legion raiding, almost a full set of expert gear is required for the initial entry into this dungeon, the first boss poses a tough dps and healing check so you must have in your raid at absolute minimum 145k raidwide dps, this pretty much relies on all dps pulling over 10k dps and support classes pulling 3-6k dps.
Thanks to class and gear improvements combined with a variety of nerfs Frozen Tempest can be pugged. The first 2 bosses (Zaviel and Gelidra) are easily defeatable by most pugs, however the last 2 bosses (Twin Frost Giants and Crucia) require a bit more coordination in pug groups to defeat.
Endless Eclipse (EE) – 20 Man
Located in the Shapers Citadel in the north-east of morban, this is also one of the entry level 20 man raids into Storm Legion, this is a death themed raid that contains some of Regulos’ most powerful lieutenants and the final encounter is big-daddy Regulos himself located in the plain of death, more information and guides for Endless Eclipse can be found under the raid guides section of www.riftscene.com
Suggested Tier 1 20 man progression path:
- Gelidra (Frozen Tempest)
- Zaviel (Frozen Tempest)
- Progenitor Searos (Endless Eclipse)
- Kain (Endless Eclipse)
- Kolmasveli and Toinenveli (Frozen Tempest)
- Crucia (Frozen Tempest)
- Matriach of Pestilence (Endless Eclipse)
- Dread Lord Goloch (Endless Eclipse)
- Regulos (Endless Eclipse)
500+ Hit/Toughness
*keep in mind hard-cap is 520 Hit
Grim Awakening (GA) – 10 Man
Located in Kingsward this is currently the hardest raid 10 man raid ingame by quite a large margin, This raid has a total of 4 bosses. The first 2 bosses are fairly straightforward and are quite easily defeatable by a group of characters who just have reached 500 hit. The last 2 bosses however are extremley challenging and require everyone to be at the top of their game. Although the increased challenge does in fact reap some of the best rewards, as this instance drops a variety items that can be considered almost Best in Slot gear, For further tactics and explinations of these fights, check out the raid guides section on www.riftscene.com
Infinity Gate (IG) – 20 Man
Located in the Steppes of Infinity, the Infinity Gate raid takes place outside of the Infinity Gate itself, it consists of a total of 3 bosses, Breaker X-9 ‘Onyx’, Mordan and Viktus and finally Volan. This raid presents a real challenge and in the game’s current state is extremely difficult to pug even the first boss. For this raid you will most likely need an experienced raiding guild with everyone at the top of their game. Before you even attempt this raid it’s advised that all of your raid members have cleared all Tier 1 raid content.
Planebreaker Bastion (PBB) – 20 Man
Located in the Plane of Earth, The entrance to Planebreaker Bastion is the Infinity Gate itself! This raid consists of five bosses. The first boss ‘Eggtenders’ is the easiest Tier 2 raid boss by far, Eggtenders is a boss that is regularly killed by pugs. However once you get past the Eggtenders the difficulty ramps up significantly. Proteus and Warden Thrax pose a significant challenge to even the most experienced raiding guilds and then Iny’kta and Planebreaker Abomonious are at a level of insane difficulty that to this day only a small handful of guilds have managed to defeat them. If you’re attempting Planebreaker Bastion past the Eggtenders you will need to be in a raiding guild that’s fully cleared Tier 1 content and you will need to be sure to bring your A game if your hoping to have any chance of success.
Suggested Tier 2 20 man progression path:
- Eggtenders (Planebreaker Bastion)
- Breaker X-9 ‘Onyx’ (Infinity Gate)
- Proteus (Planebreaker Bastion)
- Mordan and Viktus (Infinity Gate)
- Warden Thrax (Planebreaker Bastion)
- Volan (Infinity Gate)
- Inyr’kta (Planebreaker Bastion)
- Planebreaker Abominous and the Council of Overseers (Planebreaker Bastion)
600+ Hit/Toughness
*keep in mind hard-cap is 620 Hit
The content that requires 600+ Hit/Toughness is known as Tier 3 content. The Tier 3 content in the game consists of 4 dragon ‘lair’ raids set in the past. Each raid features one of the Bloodstorm Dragons and also an additional boss before it, for each raid the additional boss is a lot easier in difficulty in comparison to the Dragon, an effective stratergy for progression in the Tier 3 raids is to take down all the additional bosses and then to start working on the Dragons. There are a total of 8 boss encounters across the four raids.
It is not advised you attempt Tier 3 content until you have cleared the majority of Tier 2 content.
The entrance to all of these raids are located in a hidden version of Library of the Runemaster undernearth Hammerknell Fortress in Moonshade Highlands.
Bindings of Blood: Lord Greenscale
This raid consist of two bosses Toxilua and Lord Greenscale. Toxilua is the additional boss which must be defeated in order to gain passage to Lord Greenscale who is one of Bloodstorm dragons, currently this raid is not pugable as it features tough healing, dps, gear and cordination checks on both bosses. Due to this raid only being released a couple of weeks ago, there is limited information of the stratergy, however these two videos will give you a rough idea of what each encounter looks like:
Bindings of Blood: Akylios
This raid consist of two bosses Irauga and Akylios. Irauga is the additional boss which must be defeated in order to gain access to Akylios who is one of the Bloodstorm dragons. Like the majority of Tier 3 content this raid is currently not pugable due to its tough requirements for healing, dps, gear and cordination. Due to this raid only being released a couple of weeks ago, there is limited information of the stratergy, however these two videos will give you a rough idea of what each encounter looks like:
Bindings of Blood: Laethys
This raid isn’t yet released, it is due to come shortly after the launch of 2.7
Bindings of Blood: Maelforge
This raid isn’t yet released, it is due to come shortly after the launch of 2.7
Suggested Tier 3 20 man progression path:
- Irauga
- Toxilua
- Greenscale
- Akylios

Recent Comments