WildStar Medic DPS Guide
WildStar Medic DPS Guide by unindel
Introduction
Yes, it’s back for pre-order beta and launch: Unindel’s Medic DPS Guide/Spreadsheet! Woo math!
In this thread I want to share my findings/analysis and general thoughts on the class. I’m also going to attach the spreadsheet I made that I’m using heavily to compare various builds so that anyone else who’s interested can take a look. I’ve tried to break stuff down fairly clearly but it’s always possible that I’ve either made straight up mistakes or there’s a better way of calculating something; I’d love to get feedback.
I’d note that at least for now, the numbers we get out of the spreadsheet are more like estimates of what a specific build is capable of. The spreadsheet isn’t as useful for figuring out exactly what DPS you will do so much. It’s also not going to fully encapsulate a real encounter; in reality you’ll have times where you’re out of range or need to run from a telegraph or whatever. Only real play experience will help us fill in those gaps. Finally, while my comments/ideas are based on a combination of the spreadsheet and gameplay, obviously there may be bugs ingame such that something doesn’t work as the tooltips describe.
Where the spreadsheet SHOULD be more useful is in comparing how your DPS might change if you move some tier points around, pick up/drop an AMP, and in some specific cases change your rotation. It’s also handy to see how your rotation can change as you level and unlock higher tiers (sometimes it can be surprising) and so forth. Finally, it helps put some numbers to questions like “how much time do we spend casting discharge with different builds?” and also explore how abilities might become better through things like Global Cooldown adjustments.
How to Use My Spreadsheet
At the very top of the Build Analysis sheet you’ll find spaces to put information about your Medic (Level, AP, SP, Crit %, Crit Severity). This should include AMP bonuses that are always on (just take it from your character sheet after you’re AMPs are set).
Directly underneath that you’ll find a space where you can set some information about your target(s). That includes the current health level of the targets (for use with Collider), the number of targets you’re fighting (mostly used for Recycler calculation). The “Can I fit off GCD abilities in another spell’s GCD” heavily affects the DPS gain from off-global abilities such as Collider, Atomize and Dual Shock. Damage multiplier refers to any regular damage multiplier you may have such as Core Damage, a Warrior’s Power Link or another Medic’s Empowering Probes (note I don’t have anything to easily set that it shouldn’t stack with yours).
Finally, the meat of the spreadsheet is where you can compare two builds. Put Ability Tier points where you want (0 to put something at Base Tier) and it’ll try to calculate something that makes sense. You can also set some AMPs like Recycler, Cooldown Reduction, Power Cadence and Meltdown in the second sheet.
The final sheet “Data” is just the raw AP/SP coefficients taken from the patch notes. Don’t tweak them unless you want to just see how abilities might be buffed or something.
Other Notes/Known Issues/TODO for me (feel free to help!) as of March 20, 2014:
- Atomize Tier4 Armor Penetration isn’t in yet. Last I checked (in February) it seemed to be giving inconsistent results with what I expected from the Armor formula.
- You should manually figure out what your uptime is on Danger Zone/In Flux/Core Damage and enter those into the AP/Damage multipliers respectively. Trying to actually model them directly is more the realm of a simulation than a spreadsheet (stuff like Empowering Probes and Energize are already pushing it)
- T4 Empowering probes seems to be bugged and giving 6% critical chance rather than 3% crit chance/3% strikethrough. The spreadsheet reflects 3% crit.
- Runesets/Item Specials aren’t implemented directly yet (e.g. you can’t just type in 4/8 Technophile and have it do everything). Obviously those account for a pretty big portion of DPS; I found that the item specials seemed to increase DPS by pretty consistent numbers even when I varied my build so it doesn’t really play as much into build theorycrafting as I expected. If you want to try to there are ways to put most of the effects in. There’s fields for Extra Resist Pen that’d work for extra Expose debuffs (assumes additive behavior); you could add to the damage multiplier field yourself.
- Up til recently I had a bug with the Discharge T4 calculation which was making it seem incredibly powerful (I was calculating it proccing every tick instead of just once per cast). Fixed!
There’s a bunch of entries under where you enter in the Tier where you can mess with some specific rotational values. Examples include how many Gamma Rays beams are hitting, what % of field ticks your target is staying in for and how many ticks of Dev Probe you go before detonating and more. There’s Excel comments that you should be able to see when you mouseover the cells that do something. Also new in v08 is the ability to override an ability cooldown without mucking up the actual excel formulas. This is useful for seeing “how much would my DPS change if I delayed ____ to have the same CD as ____”.
- Version 08 – Dropbox link
The Basics of the Rotation:
Overall, the Medic class is relatively easy to math out. Classes like the Warrior, Stalker and even Spellslinger have some very time-dependent components to their damage; KE decays on its own and suit power/spellpower come back continuously. In contrast, the Medic’s Actuators are only consumed when you actively use them and mostly only come back when you use a builder (the Power Cadence AMP being the only exception).
This causes a very distinct split in your abilities. The Medic has a bunch of abilities that have cooldowns and mostly don’t interact with the Actuator resource and then their builder/consumer abilities. Any time you cast some of those abilities in the former category you’ve basically just put a big PAUSE on your basic build->consume rotation.
That has a very important effect on the relative power of Medic abilities. For a non-Discharge/Consumer ability to be worth casting it must:
- Have a worthwhile Utility effect you want to use (e.g. Stunning to break Interrupt Armor/start a MOO, Fissure’s Tech Resist debuff, Empowering Probes’ buffs, etc.)
- Have a higher DPS than the overall DPS of the building/consuming cycle.
- (Have a chance to) generate an actuator to move along the building/consuming cycle.
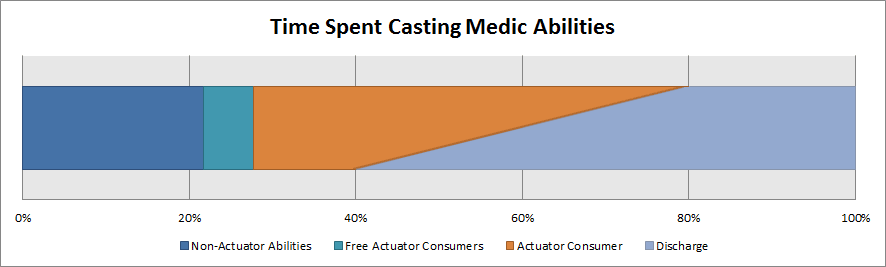
Here’s one way of visualizing how the Medic DPS rotation breaks down:
Sidebar (% time spent casting Discharge):
The relative size of the Actuator Consumer and Discharge portions depends on the speed at which you’re consuming and generating cores. That’s important because consuming cores faster isn’t always a DPS increase.
For example, at low tiers with Discharge and Quantum Cascade, you need to cast Discharge for 3 seconds (75% of the time) for every 1 second of casting Quantum Cascade (25% of the time).
In contrast, it takes 3 seconds of Discharge (66% of the time) for every 1.5 seconds of Gamma Rays (33% of the time).
That increased time casting Discharge (your lowest DPS ability) in a QC build makes it have lower overall DPS than a Gamma Rays build. It’s also part of why Discharge ends up being a higher percentage of your parses in QC builds; you’re spending quite a bit more time casting it and not getting as much mileage out of your free Actuator procs from other abilities.
The DPS Medic LAS
WildStar’s 8 slot LAS poses an interesting question: How many LAS slots do I need to reserve for DPS abilities? Here’s what I’ve found as far as the Medic DPS LAS goes (note that DPS increases for taking an ability depend on how many tier points you have in Discharge/your Consumer):
The Essentials
- Discharge – You’ll always have this on your bars. Obviously you need some sort of reliable source of actuators. The T4 Discharge makes it a pretty decent sustained DPS ability by significantly increasing its damage but the T8 bonus gives you a lot of flexibility to quickly get back to full actuators. I wouldn’t say T8 is mandatory but it is quite nice and usually maths out as close to ideal.
- Your Core Consumer – This’ll be either Quantum Cascade or Gamma Rays. For fights where the majority of the time you’re killing a single target but occasionally you need to hit more you may want to use QC (more analysis in the QC vs GR section below).
- Fissure – This is your number one non-actuator ability. Well, it is if you don’t have another Medic putting up the debuff. Fissure is a flat subtraction on the target’s tech mitigation; as a result it’s a huge DPS increase on even moderately armored targets. You absolutely should have at least one person in your group running this debuff.Tiering up Fissure has been a personal favorite of mine lately in PvE. The debuff is very noticeable and if you have a some combination of other Medics/Stalkers/Warriors/Engineers then you’re helping out their damage a bit too. You probably shouldn’t tier it up much in PvE if the rest of your group is bringing Expose debuffs as well as it’s quite easy to get a mob below 0% mitigation at that point and there’s no benefit once they get to 0.
- Atomize – An incredibly good non-actuator ability. Partly because it does generate some free Actuators (on average one every 20 seconds so not insane but pretty handy). It only starts a half second global cooldown so it’s very easy to include in your rotation; if you’re sneaky you can use it during another spell’s global cooldown to basically cast it for free.In fact, that’s by far the best way to use Atomize. Delaying Atomize til after you have cast some other instant cast ability (e.g. Fissure->Atomize or Collider->Atomize) is worth it as long as you aren’t leaving the ability unused for more than 5+ seconds. That might seem unintuitive (it really cuts down on your overall Atomize damage in your parse afterall) but basically that’s a half-second more every 8-12 seconds that you could be casting Discharge/your consumer.With the recent buff to how long you have after a crit before using Atomize (now 5 seconds) you shouldn’t have a problem using this once you get your rotation going. Proper usage of the ability during another’s global makes it a nice chunky 6-9% increase in damage. Less optimal usage would give still around 3-5% increase.Tiering up Atomize doesn’t seem that important. It’s around a 0.3% increase to your total DPS per point. I’m not sure what the value of the Armor Penetration Tier4 will be, but I’m certain it’s not as good as other T4’s, particularly when you take Fissure into context. Even if you want to play up your burst you’d probably at most ever take it to T3.
- Empowering Probes – Empowering Probes is a pretty obviously important skill. With such a low cooldown, this is like the equivalent of having an extra half player in your group if you’re hitting a bunch of DPS.At base tier this is only around a 5% increase to personal damage (higher when you include teammates, obviously). Minor tiers are around a 0.6% increase in DPS each (per player hit by it) so it’s very good as a place to dump points. The T4 used to be mandatory at 11% crit chance but at 3% crit/3% strikethrough it’s a bit of a toss-up. I’d still probably take it for group buffing in raids but leave it at 0-3 for small group/PvP.
Burst Improvements
- Collider – With this on global cooldown it’s become a bit trickier to use. It’s better in QC builds than GR builds since it’s a bit of a cast-time hog (two seconds of casting every 10 seconds). In fact, just don’t even use this in a GR heavy build unless there’s ever more than one target (though why are you in a GR heavy build at that point?)Basically this is almost a wash for overall DPS including it at base tier. It takes so much time to get the most out of the ability (2 separate 1 second casts every 10 seconds). It’s totally also not worth casting when you aren’t getting the damage bonus.Where it does shine is when you want to sacrifice a bit of sustain for some pretty reasonable burst. It scales decently well with tier points and once you’re at T2 it passes T4 Discharge in DPS while casting (keep in mind as an instant VS Discharge’s sustained ticks). I could see T4+ of this being very viable in PvP and perhaps some very niche PvE boss where you needed that burst. Don’t bother for longer boss fights or anything you think you can hold a T4 Discharge on reliably though.
- Dual Shock – I used to promote this a lot more but at level 50 numbers it’s not nearly as impressive for a DPS build. Still, it has the same ability mechanics as Atomize so if you’re casting it during another spell’s GCD then it’s a decent burst damage increase. Probably pretty easy to leave off the LAS though unless you actually care about the healing (which hey, is pretty good!)
- Annihilation – I wasn’t sure whether to stick this in Burst or Sustain. I ended up deciding on Burst because it’s a pretty marginal overall DPS increase but the damage for your time casting is pretty high. Annihilation would be a great move to start up a big burst combo (Annihilation -> E.Probes -> Atomize -> Dual Shock in less than a second? Yeah, that’s nice).Minor tier bonuses for Annihilation are pretty uh.. minor. You’ll get better returns in sustained DPS from Discharge, your actuator consumer, Dev Probes or E.Probes. The T4 bonus makes two separate fields but all my testing has shown that only one field can tick on a single target at a time (even if it’s big enough to sit in both simultaneously). So that makes it better for fighting multiple mobs or in case there’s movement but it’s not a DPS increase which makes it hard to justify points compared to other abilities. Edit: Thanks IIIII, this is confirmed by Aodz to be intended.It ticks pretty fast so it’s nice for proccing various item specials. That’s something that isn’t quantified in my sheet but it’s certainly true. Is Annihilation worth the LAS slot everytime? Probably not, but it does have its place. Just don’t expect it to increase your DPS by more than 2% compared to not taking it in a long sustained fight.
Sustain Improvements
- Devastator Probes – This got an interesting little buff recently. The detonate is now tied to T4 and requires you to use either Collider or Fissure to set it off. The dot itself is only around a 2-3% increase in damage if you’re in a QC build (for GR it’s almost not worth casting at all).If you get it to T4 it’s a decent damage increase if you can time the detonate to happen after at least 4-5 ticks. Less than that and it’s like you didn’t get much out of it. There’s the Renewed Probe AMP which makes this a bit better but the proc chance is still not that great so eh. Honestly I’d pass on it still since it’s a bit of a pain to manage but with 3 points in CD reduction Fissure comes up pretty close to around Dev Probes’ duration. If you lower your uptime a bit then you could easily get some pretty decent damage out of it. (Basically you’d cast Fissure, wait 2 seconds then cast Dev Probes… next time you cast Fissure on cooldown it’ll detonate Dev Probes).The problem is what are you taking tier points out of to put them in Dev Probes. Empowering Probes is probably a bigger DPS increase for your group to tier up. Taking it out of Discharge T8 (dropping to T4) is viable but complicates the rotation heavily for a tiny overall DPS increase (~3% in a QC build, again it’s not worth it in GR ones).
- Nullifier – This is an interesting sustain ability in a QC build. Again, it eats up just too much time to be worth it in a GR build but it’s actually somewhat viable to drop some tier points out of Discharge to pick this up in a QC build. The T8 bonus in particular is quite a heavy frontloaded hit which makes it very much worth casting if you can manage your actuators to do it properly. The T8 is pretty important though and it’s hard to justify putting points into it if you’re not going to commit all the way. Nullifier T4 would be pretty powerful in the case that mobs are spread out enough that you can’t hit them all consistently though.That’s all assuming you can get the mobs to stay inside the field the whole time though! The effectiveness of Nullifier drops off quite quickly the quicker the enemies get out =p. Probably not usable in small-scale PvP.
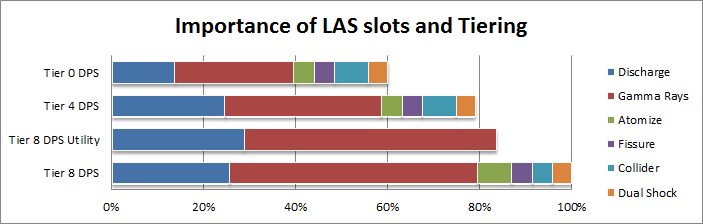
LAS Visualization
That’s a bit hard to understand all in numbers so let’s visualize it a bit. Here’s a comparison of a few builds:
· Tier 8 DPS Utility – T8 Discharge/Quantum Cascade. Base Tier Empowering Probes
· Tier 8 DPS – T8 Discharge/Quantum Cascade. Base Tier everything else.
· Tier 4 DPS – T4 Discharge/Quantum Cascade. Base Tier everything else.
· Tier 0 DPS – Base Tier everything.
You can see that by cutting 4 abilities off its LAS, the DPS Utility build has lost around 20% of its damage. It’s not a full 30% loss (the contribution that those 4 abilities gave) because dropping those abilities freed up time to cast more Discharge/Quantum Cascade. That’s obviously a pretty major loss in say a raiding environment, but this shows that Medics should be able to grab a bunch of those Utility skills without feeling too bad when they do need to.
Alternatively, for around a 10% loss, you could drop 16 tier points by going to the Tier 4 DPS build and spend those points elsewhere. That’s still a pretty major DPS loss but if you really need a T8 of something else, it’s possible. Dropping further points to get to the Tier0 DPS build is pretty catastrophic though since the T4 Discharge/Core Consumer levels are so important.
I sort of like this setup personally. Those first few abilities are incredibly important and while the later ones help (keep in mind an 8% damage increase is still like multiple raid tiers worth of damage increase, particularly with the base damage changes) you could likely justify swapping one or two out for some healing or utility.
Recycler
I’ll try to keep this short. Recycler is a pretty interesting AMP. For a cost of 2 AMP points we can get a 50% chance to regain an Actuator per crit with Quantum Cascade or Gamma Rays. I model this in my spreadsheet by calculating the effective amount of time it’ll take for a core to get consumed by either spell.
Taking Quantum Cascade for example. If I have a 20% chance to crit then to consume one core, QC could take:
0.5 seconds + 10%*0.5seconds + 10%*10%*0.5seconds …
This is a pretty simple infinite series that converges on 0.5 seconds * 10/9. In general, Recycler will make something take 1/(1-0.5*crit_chance) longer to consume a core than normal.
This is complicated a bit when there’s multiple hits per cast (e.g. Gamma Rays and/or multiple targets). For N targets, QC would become:
0.5 seconds + 10%*0.5seconds + …
+ 10%*0.5seconds + …
+ 10%*0.5seconds + …
And each of those branches would spawn N more branches. In general, Recycler would make an ability take 1/(1-0.5*number_of_hits*crit_chance).
Now my infinite series is a bit rusty, but I’m pretty sure this causes a weird breakpoint where at 0.5*crit_chance*number_of_hits = 1, you would be dividing by 0; I think that’s the point where you’d on average be gaining Actuators back from recycler. Even on single target, Gamma Rays would reach that at 67% crit chance if you were hitting with all 3 beams.
I don’t believe there is an internal cooldown on Recycler (I’ve gotten multiple actuators from a single hit before); if that changed recently or if it’s not intended to it’s quite easy to fix.
Quantum Cascade VS Gamma Rays
So QC vs GR has changed quite a bit lately. Gamma Rays is now a single target ability with amazing scaling. Seriously, it’s pretty rocking; Tier 4 doesn’t start a GCD which basically means you’re casting 3 GR in 2.5 seconds and Tier 8 makes GR cost only 1 actuator per cast (before Recycler even gets involved). If you’re ever, EVER fighting only a single mob at a time, use GR.
Add even one other mob into the mix and it’s a bit of a mess. QC leaps way ahead of GR but not because of QC being awesome. No, QC is just alright. I mean it’s great at hitting lots of targets but it’s actually just that casting GR when there’s more than a single target is just a bad decision to make. Compare casting GR when there’s multiple targets to not consuming any actuators at all (yeah, pure discharge vs discharge/GR) and you see GR fall way behind immediately at 2 targets and it just continues to get worse as you add more.
One interesting thing you might consider trying is actually sticking a base tier Quantum Cascade on a T8 GR build. That sounds ludicrous but hear me out; in specific fights where most of your concern is on doing single target damage, you probably want to take Gamma Rays. It just outclasses QC at single target damage. But when you do need to DPS 3+ mobs, even base tier QC is going to give you better results so having it there may be worth it. Alternatively you could just use T8 QC for the whole fight; it depends on how important that single-target part of the fight is (if your group is wiping because you can’t burst down a specific DPS part then it’s worth considering).
Suggested Builds
Note: This first link is an AMP build. The LAS is empty because that depends on the situation (single target vs AoE or some specific situations). The AMP setup is much more static (since it has a cost associated with resetting it) so I wanted to talk specifically about just the AMPs first. Check the following links for some specific ability setups.
PvE – Utility DPS AMP build
http://ws-base.com/b…637.934.682.708
This is probably what I’ll be running in PvE. The damage is not completely optimal quite yet but as I get more AMP points with elder points it’ll fill in nicely. Here’s what I’m missing compared to most builds:
- 8% Crit Severity – Hurts but this is realistically only 2% overall DPS loss for 2 points.
- Meltdown – Meltdown is cool but even using it on cooldown isn’t a huge damage increase. If the overload utility is actually useful in raids I might try to put it in but in terms of normal DPS increases it’s only 1.5-2%
- In Flux – To pick up the utility I wanted I had to choose between this and Danger Zone and I think Danger Zone is a bit better. In Flux is 1.75% AP/point at best but you won’t have 100% uptime so it didn’t make the cut. I expect this to be around a 3% DPS loss
- Annihilation – As I said in the LAS section, I don’t think Annihilation is anything that special. It’s not a bad ability but I’m passing on it on LAS points personally.
All told that’s like overall 6-7% DPS loss but here’s the utility I gained:
- Null Zone – 10% less AP on targets within 8 meters. My brief testing showed this to be working in PvE though I’m not 100% sure. This’d be the first thing I’d cut if it turned out not to be worth it but I expect it will be.
- Quick Dodge – Using a CC Break restores shields and a dash counter. This is really useful if you bring Calm along (which I like to do) as it makes it very easy to counter boss phases where you get CC’d and then reposition immediately.
- Protection Probes + Solid State – P.Probes seem to be in a pretty solid state right now (hah, see what I did there?? I crack myself up). This is a really solid utility ability that could be an incredible boon. I like putting the 4 points to make it give IA as well but if you want a bit more LAS flexibility so you don’t feel like you need to take P.Probes everytime then you can move the Solid State points into Dash Regen/CC Resilience.
General Single-Target LAS
http://ws-base.com/b…637.934.682.708
I left a bunch of stuff blank in this LAS but that’s the general gist of it. If you need an interrupt (you probably do), take Paralytic Surge. You probably want either Calm or Urgency for some utility and then you can either take D.Probes for more sustain damage, Dual Shock for some additional burst/healing utility (make sure you only cast this during another spell’s global, it’s a DPS loss otherwise). If you think you might need to kill a few adds in the middle of this fight (the important part should be single-target though) then bring base tier QC for that.
As for tiering, the easiest to play has 8 points in Discharge and GR. The other points you can spread evenly since the T4’s aren’t as critical. Personally I’m partial to a slight twist like:
http://ws-base.com/b…637.934.682.708
with T8 E.Probes/GR since I don’t think the rotation is that hard to maintain and E.Probes is so strong right now (it’ll get nerfed eventually).
General Multi-Target LAS
http://ws-base.com/b…637.934.682.708
Very similar to Single-target LAS except with GR switched for QC. It actually doesn’t play quite the same though. While the Single-Target build keeps up buffs like Core Damage without thinking, QC is a bit harder to keep up Core Damage if you’re trying to use the T4 QC bonus which would require you to build at least up to 3 actuators before casting it. Recycler should give you more than enough actuators (there’s multiple targets, right?) but if you’re having trouble don’t be afraid to cast two ticks of QC to keep the buff up. Casting QC from one actuator is never a good choice though.
As for tiering, again putting Discharge at T8 makes the rotation easiest since it’s so easy to get back up to at least 3 actuators. I still prefer E.Probes at T8 in a group though. The main argument against T8 E.Probes is that you want the simple rotation in order to keep Core Damage AMP up. Since both Core Damage and E.Probes are likely to get nerfed prior to launch it’s a bit up in the air as of my writing this as to where things will land.
There’s a couple niche multi-target builds that I want to highlight:
D.Probes Detonate Build
http://ws-base.com/b…637.934.682.708
Nothing terribly surprising here; this is better than the general Multi-target LAS build if there’s 3 or more enemies that are clumped up. Again, it’s hard to compare to E.Probes but in general this does quite well.
As a trick for optimizing detonations (late in the dot) with 3/3 Cooldown Reduction, Fissure has a 12.75 second cooldown. Casting D.Probes ~1-2 seconds after Fissure (maybe Discharge or channel QC between) will set up the timers so that if you Fissure right on cooldown it’ll detonate D.Probes pretty optimally.
Spread out DPS Nullifier Build
http://ws-base.com/b…637.934.682.708
This one is pure theorycraft as I haven’t tried it yet. In theory though if you cast Nullifier T4 on more than 5 mobs by spreading out the two fields then it becomes a big DPS increase (since all the other spells have a 5 target cap). I know there’s at least one encounter in Genetic Archives where there’s a bunch of adds streaming in that this might be useful at. Again, very niche build but this is where it’d shine. I only put points into Nullifier up til T4 but getting to T8 wouldn’t be a bad idea as it’s something like a front-loaded 30% more damage on the ability.
Thoughts/Concerns on Winter Beta Patch 4
Great changes overall. I’m really enjoying Medic DPS now. Some thoughts:
- Gamma Rays rotations – Gamma Rays is such a powerful ability when you get it up to T8 that it really just heavily messes with our LAS. Its DPS is so high that it’s very viable to just T8 Discharge and Gamma Rays and completely ignore Nullifier, D.Probes, Collider and Annihilation. That’s also an immensely boring rotation (you basically just spam GR til you can’t then push Discharge once and go back to spamming). It’s probably 90% playable just with a macro that tries to push GR and then pushes Discharge 50 ms later as a fallback in case you didn’t have the actuators (would also use T4 GR well and keep you in In Flux optimally…) and hit Fissure/EProbes on cooldown.One button macro for near optimal Medic single-target DPS: Fissure (wait 50ms), Gamma Rays (wait 50ms), E.Probes (wait 50ms), Discharge.Gamma Rays needs to be strong in order to outclass QC in single target but maybe it could do so by buffing your other abilities? That’d make it remain useful to have/cast all those other abilities on your LAS without making GR weaker compared to QC. If you want the single-target rotation to be a one-button macro though then alright..
- Gamma Rays as singletarget feels a bit weird. I mean, I don’t mind it in theory but one of the most fun parts of the old Gamma Rays was trying to line up multi-beam hits on more than one target at a time. It’s also really weird how when there’s even just two targets and I have points in Gamma Rays all the way up to T8 it’s actually better for me to just minimally cast GR just to keep up Core Damage. T4+ Discharge outdps’s GR against two targets which is pretty sad.
- Gamma Ray’s T4 is strange to use well. It doesn’t start a global cooldown which means we can essentially use three Gamma Rays in the cast time of two.. but it’s not off global itself so it feels odd. I’d prefer a general cast time decrease to make the overall speed the same (2.5 seconds divided by 3 = ~0.83 second cast). The instant cast is also much more annoying to aim since I can’t see the lines ahead of time but eh.
- Discharge T4 – I love the change to instant damage; it feels way better now.
- Annihilation suffers similarly to Nullifier. It’s a bit better off damage-wise but it’s still a weaker choice than even Devastator Probes for sustain. I wish it scaled a bit better with tier points too; it seems like one of the worst places to stick them.
- Devastator Probes – They’re alright now but sort of annoying to micromanage. I guess we’re supposed to cast them a bit after a Fissure so that the next one will pop them? I’m sure we’ll get addons to help maximize this. I sort of wish if they “detonated” then the dot would continue (maybe at a weaker strength if you had to have some drawback?) Renewed Probes AMP is too low proc chance to be reliable/worth the points.
- Collider – I’m very happy with where this ended up. It’s a nice damage increase when you’re getting bonus damage but not as much otherwise. Granted now that it’s on global it’s not nearly as useful in PvP but it’s not bad at all either.
- Empowering Probes – This really needs to be nerfed a bit further. As long as it’s buffing a full 5 allies it’s just a no-brainer even if its selfish damage increase isn’t really much higher than any other ability now.

Recent Comments