Neverwinter TR Stealth Executioner Build Guide
Neverwinter TR Stealth Executioner Build Guide by todesfaelle
Introduction:
My name is Banelorne Fellbanner from the Mindflayer Shard and I’d like to share an alternative way of playing as a Trickster Rogue to my fellow Rogues, and others who may be looking into making one; a build that combines both “defense” and offense at the same time. I believe that as players, we should be playing our class based on how they were designed to be played. A Trickster Rogue playing as a “trickster”, and not as a DPS beat stick, can be also be as viable and opens a new sense of awareness for our TR class. This Stealth Build concentrates on maximizing the effects and duration of our biggest class feature, Stealth. You infiltrate the enemy ranks or base undetected, and before they realize your position, you would have already dealt a serious amount of damage to them already; or better, they’d be dead.
Stealth is such a wonderful mechanic as it gives us the ability to become undetectable to most, if not all monsters in PVE, as well as some players in PVP. This in turn increases our overall survivability and also allows us to maximize our damage without worrying much about getting hit back (unless we’re standing in an AoE zone, which we can easily avoid via dodge). Stealth gives us power and a clear role. And as such, this build will try to lay down the foundations of what all Stealth-based Rogues should have, their advantages and disadvantages, and their overall purpose/roles in PVP and PVE.
First and foremost I’d like to show you all a short summary of the pros and cons of being a Stealth Rogue.
The Pros of Playing as a Stealth Rogue.
- Higher than normal survivability compared to most other TR builds thanks to maximized/permanent Stealth in PVE.
- Deals a competitive amount of damage despite being a defensive build.
- Very cheap to create and doesn’t require high end enchantments.
- Offers fun alternative ways of playing as a rogue, giving players a wider array of methods to play in solo and group play.
- Effective in solo play.
- Very agile which acts as a gap closer for most scenarios.
- Easy to complete in terms of gear.
The Cons of Playing as a Stealth Rogue.
- You don’t always get maximized damage as compared to full cookie-cutter Executioner builds.
- Not too much of a player-killer build in PVP.
- Zero AoE. But Rogues weren’t meant to do AoE anyway.
- Minimal Burst Damage in PVP. Requires a lot of timing in order to make the most out of the damage skills we have PVP.
- Heavily reliant on having Stealth on.
- You’ll be getting a lot of abusive PM’s from people you play against in PVP.
And that is basically the main pros and cons of playing as a Stealth Rogue boiled down small points. This build is by no means built to be intended for PVP play and is mainly used for PVE settings. However, it does not mean that it won’t function well in PVP. As a Stealth-Based Rogue in PVP, you won’t be getting much kills as most DPS-centered Rogues do, and you’ll be doing a lot of fleeing in some matches as well most specially if they are 2 vs. 1 matches. A Stealth Rogue functions very differently in PVP as it concentrates on taking undefended towers quickly rather than defending them, and the skills they use aims for maximum utility instead of maximum damage.
If you like dealing insane damage and doing instant kill moves on players, and dealing maximized damage in dungeon runs, it’s better to go for the cookie-cutter executioner builds. But if you’re looking for a way to be a “trickier” Trickster Rogue, I believe this guide is for you. Please continue reading if you are part of the latter, and we shall aim to emphasize the “Trickster” part in the Trickster Rogue much further. This build acts in a way which a Saboteur Rogue should act, however we’re not spec-ing towards the Saboteur Paragon Path. We’re going to be taking the Executioner’s Paragon Path and that’s where we’ll be getting most of our DPS capabilities. At the same time we’re going to be maximizing the effects of Stealth, Combat Advantage, and AP gain in ways that will also improve our DPS.
Part 1: The Race and Attributes
Now that we’ve laid down the main points we’re going to tackle for this build, let us discuss some of the more minor portions for the entirety of the build, mainly the race and the more important stats. A stealth rogue aims for maximum survivability while balancing DPS in return so we do not lose our roles of being strikers. As such it is important for us to choose races which give us the needed stats to deal damage or take damage. The main three stats which we will prioritize as Stealth Rogues are as follows.
Main 3 Attributes.
- Dexterity: Our primary stat and our main source of Critical Hit chance. You can never go wrong with getting more than 100% damage increase in Critical Strikes. The Executioner Tree excels in making the most out of crits, so we’ll take advantage of that by pumping points in this stat
- Strength: Gives us a flat damage boost whether we are in Stealth or not. It is arguably better than CHA due to this mechanic.
- Charisma: Increases our Combat Advantage damage. And as Stealth Rogues, we are almost always in stealth so having a few points in this stat always help DPS.
For our stats, you’ll want to prioritize Dexterity > Strength > Charisma. Dexterity gives us a higher chance for a shot for increased damage. Strength increases our base damage, and is always particularly reliable stat which also gives us added stamina regeneration. Charisma is a nice stat that gives us added deflection, and added companion stats. There is no solid way to roll your stats using this build. As long as your DEX is higher than your other 2 prioritized stats, you’re good to go. If you want to play a more defensive approach using this build it may also be viable to prioritize CHA over STR. But if you want to deal good amounts of damage in the process, prioritizing STR for the damage bonus we get from it may be imperative.
Here are some of the races in which provide us with those 3 stats, and which I believe may be beneficial for a Stealth Rogue.
Tiefling: The race I chose for this build. I took it primarily because of the Racial Traits; Bloodhunt and Infernal Wrath. Bloodhunt gives us the ability to deal an extra 5% damage to opponents that has 50% or less HP, and for a starter trait that’s a pretty huge boost. Infernal Wrath gives us the ability to reduce our opponent’s Power for 5% for 5 seconds with a 10% chance of proc-ing. While it doesn’t seem to be noticeable at first, at times this may be that one lucky proc that saves your life. Tieflings get a +2 to Charisma which gives us better Combat Advantage Damage, and you also get the choice to go for a +2 on Intelligence or Constitution. I opted to go for Constitution primarily because more HP gives you a harder time to be killed. Paired up with Stealth and it’ll be hard for opponents to get the killing blow on you. Intelligence gives you +1% to your skill’s recharge speed for each point above 10. All you need is 10% recharge speed for it to show its effects for a Trickster Rogue, but every small bit helps. If you don’t mind the horns clipping through head pieces, and your tails clipping through your cloaks, Tieflings are a reliable race for a Trickster Rogue.
Drow: One of the best races for this build primarily because it gets a +2 to both Dex and Cha, which are the main stats of a rogue. Faerie Fire is a useful Racial Trait as it reduces your opponent’s Power and Defense by 6% for 4 seconds, with a 5% chance of proc-ing. That’s huge, and will be really helpful when paired up with Armor Penetration.
Halfling: They get the same bonuses as the Drow, +2 to Dex and Cha, however they get a nice added 3% to deflect attacks AND they get a whopping 10% resistance to Control Effects. 3% deflect is the equivalent of 6 points in Dex or 3 points of Cha, and 10% Control Effect resistance is the equivalent of +10 Wis. Those are pretty huge boosts, making Halflings a very viable choice for Trickster Rogues.
Half-Orc: Hand’s down, the best class in terms of dealing damage thanks to +2 to Strength and Dexterity. I can’t really imagine how a bulky race like an Orc would be dexterous in anyway, but they are in this game, and they are efficient in what they do. They get an added +5% critical severity making their critical strikes hit harder. Paired up with some points in Dex and Crit and they’ll be able to take those critical hit damages even further. They also get a nice movement speed boost of +10% whenever they first get into combat. That +10% added speed may be just what the Half-Orc needs in order to reach the position he wishes to go to much faster.
Human: Humans are just incredible. They get +3 Heroic Feat Points which allows us to give our Stealth Rogues more utility. They only get +2 in a single Attribute, but the 3 heroic feat points they get are so much worth the loss in the other +2 Attribute Points.
Part 2: The Powers and Feats
As a Stealth-based Rogue, we’ll need to concentrate on powers and feats that make full use of the Stealth Mechanics, and to have a way to deal with the environment if by any chance we find ourselves in a situation where our stealth bar is depleted/almost depleted. Here are some of the skills in this build that we shall need in order to create an effective and flexible stealth rogue.
Powers:

At-Wills:
- Sly Flourish (3/3): A reliable at-will that never left my left mouse button, until I realized how powerful and reliable Gloaming Cut can be. You can easily dodge after getting a few stabs in compared to Duelist’s Fury where you have to wait for the animation to finish up before you can escape.
- Cloud of Steel (3/3): Very useful in whittling down your opponent’s HP. Not much use against DC’s and GF’s, but for everyone else, it’s fair game.
- Duelists Fury (3/3): Incredible in PVE settings and will be our main source of damage whenever facing monsters and bosses. In PVP, however, it’s hard to pull out. May be useful against GF’s and DC’s who are preoccupied on someone else but you won’t really join the main fray much in PVP with this build.
- Gloaming Cut (3/3): This will be our main PVE and PVP at-will. The crappiest at-will in the TR’s arsenal of at-wills. It’s slow and hard to control, but once feated it becomes just a beastly skill that hits about as hard as a regular non-crit Lashing Blade. It also replenishes 10% of our Stealth Meter per hit. So even though it is slow, it generally helps us stay in Stealth for a much longer period of time, to the point of it being permanent in PVE.
Encounters:
- Lashing Blade (3/3): Incredible burst damage! Perfect for taking out people whose HP got whittled out by your Cloud of Steel. Against fellow TR’s, and Control Wizards without their shield, it can one hit kill them provided they’re at 1/3rd of their HP bar left. There’s not much to say here, because I’m pretty sure every rogue player out there knows how hard this skill is able to hit, most specially when you use it while in Stealth. Lashing Blade is perfect for situations where you can afford to be out of Stealth, such as 1 vs. 1’s.
- Bait and Switch (3/3): A reliable way to replenish our AP Bar in PVE settings. But it also shows its effects in PVP, specially against those who have not played using rogues yet. People seem to still attack your dummy because it has your name on it, but I’m not one to assume. But in any case, it provides us with AP, something we can’t get enough of because we gain it slowly. And once we take the necessary feats to boost our AP gain, popping 2 of these in PVP or 1 in PVE can almost always take our bar to 75% – 100%. This can become a good method to escaping as well, thanks to the roll animation.
- Impossible to Catch (3/3): Very, very useful skill in PVE and PVP. As stealth rogues it is an absolute must for us to escape damage that may be life-threatening whenever we are about to lose our Stealth. This skill gives us a good 5 seconds of invulnerability provided we had stealth on when we cast it. Good way to escape deadly situations and wait for our Stealth or Shadow Strike to refill. Not to mention it gives a good amount of AP when we use it while in combat.
- Shadow Strike (3/3): This skill is simple and incredible at the same. It’s basically a free Stealth Bar refill as long as we have an enemy in sight, and when used in Stealth, it also Dazes our opponent for a short duration. Good against Devoted Clerics who have yet to put down their AS, or CW’s who just need another Lashing Blade or a couple of daggers for them to die. I put 3 points for this skill, because we’ll be using this skill very often so it’s best to make sure you get the most out of it for each hit. Sometimes the difference in a kill can be 100 hit points, and I can’t count the many times I managed to kill an opposing TR or CW with this skill.
- Smoke Bomb (3/3): Hands down, this is most probably the next best CC skill next to the CW’s Steal Time. Everyone within a small radius will become Dazed. And we all know how often people or monsters huddle up in confined places. The small amount of time given to you by this skill will allow you to dodge for Stealth fills, run away a little bit to let Stealth fill up, or escape completely. It does not do any damage but the utility purposes it has is one of the best in our skill set. In PVP this is also an effective way to stun groups which do not contain much GWF’s, and it also reveals the position of opposing Stealth Rogues when dropped in the correct location.
Class Features:
- Sneak Attack (3/3): One of the main Class Features we’ll be using in this build and it makes us run as fast or faster than the regular 50% speed mounts we see in the game. This feature will provide us with the mobility we need in order to position ourselves well in battle, and hide much faster from enemies when possible. It does not do anything useful for our DPS, but you run really fast and… well, it saves your life.
- Tenacious Concealment (3/3): This is a feature we’ll be switching to and fro from time to time. Tenacious Concealment allows us to ignore 90% of the damage that our Stealth Bar takes whenever we get hit by an attack. This means that an opposing Rogue’s Path of the Blade will not put us out of Stealth that fast, and we our position will not be revealed that quickly even if there are AoE’s flying all over the place.
- Tactics (3/3): Much faster way to regain AP. This gives us a whopping 15% AP gain on top of the other AP feats we’ll be taking. I another feat I switch to and fro from time to time, depending on how much AP a battle needs for me which are most usually boss fights.
- Skillful Infiltrator (3/3): Our second main class feature. +15% movement speed is just incredible when paired up with Sneak Attack. Contrary to popular belief, the movement speed increase is indeed very noticeable and it allows us to position ourselves quicker than usual. It also gives a nice +3% to crit and deflect. Critical stats give us a higher chance of scoring better damage, and deflect gives us a better chance of not being hit too hard. 3% of each makes a good difference.
- Invisible Infiltrator (3/3): Something you’ll be using very often in boss fights. This will guarantee you that you have Stealth on after you use a daily. Meaning you can take your time to reposition yourself somewhere you know you won’t be getting hurt. The extra time will serve as a means to replenish your stealth and your other skills.
Dailies:
- Lurker’s Assault (3/3): I’m not sure where to begin explaining about how good this daily is. It replenishes our Stealth Meter VERY, VERY quickly, almost giving us 10 seconds of permanent stealth. And you’ll almost always get a complete bar of stealth after using Lurker’s Assault. To top it all off, you also get a +60% to damage when you’re under the 10 second effect of Lurker’s Assault. This means Duelist’s Fury for PVE, and Cloud of Steel for PVP, becomes really threatening hard hitters.
- Bloodbath (3/3): After Shocking Execution’s rather “shocking” nerf, the number of players using Bloodbath has increased and they rightfully should as it can be a reliable way of executing a squishy class with less than half of their HP bar. Probably much more reliable than Shocking Execution in 1 vs. 1 situations. For 3 – 5 vs. 1, it may be a good way to harass other players most specially when they’re on horseback. But otherwise, this skill makes us invulnerable for a short while, and deals a good amount of damage in the process.
Total Amount of Skill Points Used: 49.
For the remaining points you are free to allot them in whatever skill you choose, but these are the ones you’ll be switching to and fro from time to time, depending on the situation you are in. Here’s a screenie of the skills I took for my own build.
I will further explain the setup I use most of the time in PVE and PVP settings in another section of this guide.
Feats:
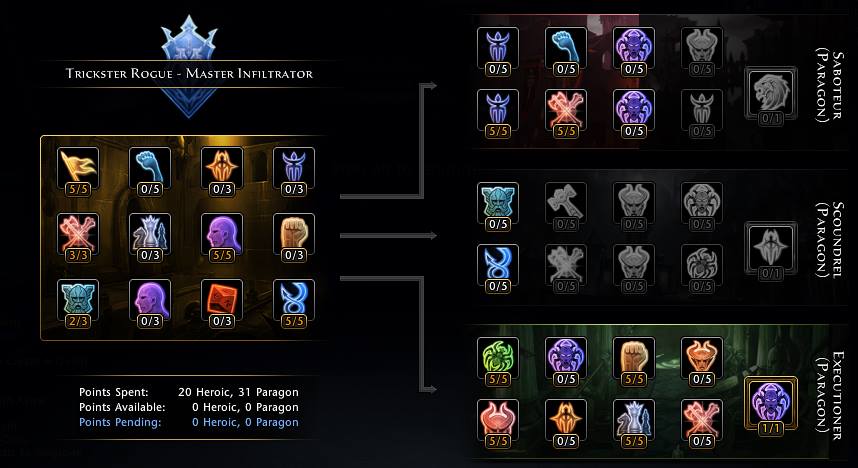
Heroic Feats:
- Action Advantage (5/5): 10% more AP whenever we deal Combat Advantage, something we will regularly benefit from.
- Weapon Mastery (3/3): 3% critical might not seem much at first, but that’s similar to getting +3 to Dex. We should take advantage of getting more crits in while dealing combat advantage for an increased output in damage.
- Toughness (2/3): This feat gives us an added 6% to HP and for Rogues, we can never really get enough HP because we’re quite flimsy. Added survivability goes a long way.
- Twilight Adept (5/5): A really, really underrated feat. It restores 10% of our Stealth Meter per dodge. While that does not seem much, that 10% refill is practically the equivalent of 1.5 seconds of waiting for the a regular steatlh refill, and you can do this refill in a split second using a dodge roll. It can effectively extend your Stealth duration when travelling in hostile territories such as in PVP, allowing you to remain undetected for a longer period of time. And often times, the 10% Stealth you are able to gain from this feat might also be just the right amount you need before you get your stealth meter back up and running. This helps significantly increase our overall survivability.
- Improved Cunning Sneak (5/5): +20% to the Stealth Meter, yes please. You can never go wrong with this as a Stealth Rogue. Combined with the Battlefield Scavenger Set we can easily attain from the PVP store and we can get a whopping huge +40% boost in Stealth. This also means that the Stealth that gets refilled by Twilight Adept is increased in turn. The other damage feats sound nice, but as Stealth Rogues we concentrate on utility than raw damage.
Total Points: 20
Paragon Feats: The feats chosen for our Paragon Feats are chosen based on this one question; how often will I be able to benefit from this? An acceptable answer would be “always” or “most of the time.”
Saboteur:
- Cunning Stalker (5/5): An incredible feat that further increases our AP gain by 20% whenever we are in Stealth. Paired up with Action Advantage’s +10% AP gain from dealing combat Advantage, this helps take care of our awfully slow AP bar refills. Significantly, by the way. It also works with the AP we get from the Bait and Switch dummy.
- Sneaky Stabber (5/5): The feat that turns a crappy at-will like Gloaming Cut into a reliable beast skill. This will allow us to replenish 10% of our Stealth Bar per hit, which essentially prolongs the time we are in stealth whenever we use it while stealthed. This feat allows us to remain in stealth PERMANENTLY in PVE. It’s a cheap way to achieve permastealth and mostly anyone can achieve this permastealth without much need for INT or Recovery stats.
Executioner:
- Dazzling Blades (5/5): A not so effective means of reducing Cool Down, but it works with any of our At-Wills. Every second shaved off from our Cool Downs is a step away from Death’s Doors. We’re not thrill seekers, and we don’t like that door.
- Thrill of the Kill (5/5): +1% to our AP whenever we kill an opponent. When we put all our other AP gain feats and feature into consideration, this 1% AP per kill turns into a very reliable source of AP. Not too useful in PVP, but this is mainly a PVE spec.
- Brutal Backstab (5/5): +25% more Critical Severity when Stealthed, this Paragon Feat was made for Stealth Rogues.
- Critical Teamwork (5/5): This feat is by far one of the best support feats in the game, in my opinion. It gives a flat 5% critical strike to your entire team. Not only do you get to benefit from it, your entire team also shares the same buff. This is always active, which is the reason why I chose this in place of Deadly Momentum. You can benefit from this feat in both PVP and PVE.
- Overrun Critical (1/1): This is by far the only useful final paragon feat as compared to the other Paragon Feat Branches. This gives us a good chance of dealing an additional damage of 30% of our Critical Severity on a non-critical strike, whenever we crit an opponent. This will begin showing its effects once a player reaches at least 33% – 40% critical rating. It’s an incredible means to deal obscene amounts of damage even though we are a defensive build.
Total Points: 41.
Part 3: The Main Skills Used
Now that we’ve laid down the powers and feats that will allow us to maximize Stealth, its effects and advantages, we shall now proceed to the skills that should be slotted in the skill bar. The skills I use in PVE and PVP look really similar and has very little variation. This means that it’ll be easy to adapt the play style in both PVP and PVE, which is to stay in the shadows, do your best to not get noticed, then strike when you see the opportunity.
The PVE Skill Bar.
At-Wills:
- Gloaming Cut (3/3): Slow, hard to control, but this skill allows us to refill our Stealth to the point where we can create a cheap permastealth skill set based on this at-will, Bait and Switch and Shadow Strike. More info about this skill in the rotation discussion.
- Duelists Fury (3/3): Our most powerful and hard-hitting At-Will. Best to use this on huge targets with lots of HP. It’ll be sure to shave off a significant amount of their HP bar in seconds most specially since we’re spec-ed in Combat Advantage and Critical Hits. The Bleed effect also gives us a nice addition in damage, and it procs Dazzling Blades much faster than Sly Flourish or Gloaming Cut.
Encounters:
- Bait and Switch (3/3): A wonderful skill that allows us to refill our Stealth bars provided that we’re at Stealth. When used in solo play, it also acts as a decoy and attracts your opponents away from you, giving you time to breath, reduce a bit of your skill’s CD’s, and refill your Stealth Bar a bit. It also provides a HUGE amount of AP after an opponent is done killing your dummy.
- Shadow Strike (3/3): A free Stealth refill, and it also Dazes your opponent for a short duration. Its damage is rather low but it’s better than nothing. More Stealth is always good and this is our second Stealth refill skill.
- Smoke Bomb (3/3) or Impossible to Catch (3/3): Our main CC skill and basically our emergency escape button when we find ourselves surrounded by too many mobs in solo. Dazes your opponents for 3 seconds, giving us the opportunity to find a way to refill our Stealth. But if you find yourself in a situation where your teammates do not need much CC thanks to CW’s, you’ll find that Impossible to Catch might be a much better choice due to the 5 second invulnerability you get from this skill when used from Stealth. It’s also a good anti-CC skill that bypasses even the stun from Chartilifax and Karrundax.
Class Features:
- Sneak Attack (3/3): Faster means to take favorable positions such as behind your enemies after using Bait and Switch (so you don’t get hit by your enemy).
- Skillful Infiltrator (3/3): Another means to make movement faster, allowing us to take that spot we want before we hit things.
Dailies:
- Lurker’s Assault (3/3): The main daily we’ll be using in PVE settings. It gives us 10 seconds of fast-refilling Stealth, and in PVE, we can pretty much stay in Stealth for an indefinite amount of time when paired up with skills like Bait and Switch which allows us to gain large amounts of AP in one drop. Sadly, though, we don’t gain any AP while under the effect of Lurker’s Assault.
- Bloodbath (3/3): A panic button. If timed correctly this will allow you to kill multiple low HP mobs. But otherwise this skill should only be used if you find yourself in a situation where you are surrounded and need to replenish a little bit of health. Not that you’ll find yourself in such situations much thanks to our cheap permastealth
Rotation: The rotation using this skill set is basically this for PVE settings. Once you see an enemy, you Stealth up, sneak up on them and stab at them via Gloaming Cut. If it’s a big target, use Duelist’s Fury to shave out some of the target’s HP. Once you see that your Stealth Bar is almost depleted, use Shadow Strike for a free refill, and to get some AP on the side too. In order to maintain a permanent Stealth, use Gloaming Cut this time around. And when you see that the bar is almost depleted, use Bait and Switch for a free refill and some more AP. Attack some more using Gloaming Cut to prolong your Stealth, and by the time your Stealth is almost over, you’ll notice that Shadow Strike has already been refilled and ready to use so pop one of those out. Keep using Gloaming Cut again, and by the time your Stealth is almost depleted, you’ll notice that Bait and Switch is already refilled. And you can keep repeating this for an indefinite amount of time. It’s cheap, easy to maintain, and with enough Recovery you might find that you can keep doing this rotation using Gloaming Cut and Shadow Strike only. This is perfect for PVE settings as it doesn’t provoke any aggro at all from enemies.
If by any chance you mess up somewhere in the process, Lurker’s Assault will be able to help you reset your rotation without having the need to go out of Stealth. It also provides you with a good 60% damage increase, which gives us a good reason to use Duelist Fury at this state.
This “rotation” may need some taking used to, and it definitely involves some practice in order to get the timing right but it’s not that hard. I tested this rotation on Epic Karrundax, solo, had my entire party leave, and went all the way to Pyraphenia. It took me an hour and thirty minutes to get to her and beat her but I never died in the process of testing this new skill set.
The best place to practice the rotation would be the training dummies in Trade of Blades. It’s not that hard to nail, I assure you.
The PVP Skill Bar.
At-Wills:
- Gloaming Cut (3/3): Some people may argue that this is a horrible choice for an at-will in something as fast paced as PVP. I, however, beg to differ. One of the reasons for this would be it replenishes a good amount of stealth per hit on targets who are unaware of your position. But more importantly it hits really hard for a rogue at-will. Rogues tend to rely on their encounters in order to deal damage. But Gloaming Cut gives us a reliable method of dealing huge amounts of damage while remaining in Stealth. It hits about as hard as a regular non-crit Lashing Blade. It has a 1.5 second animation time, but the damage you get from it is very worth it. It’s practically an execution in every hit and behaves sort of like a gap closer as it homes in on the closest target available.
- Cloud of Steel (3/3): This is an effective skill in hitting running targets, specially those on horseback. It also deals an increased amount of damage to players who have taken in quite a few of the daggers you threw, meaning you can get kills using this skill. Very good to have in PVP, and before you run out of daggers, they should either be dead or you would have already ran away. The first one is better, but the latter doesn’t sound half bad because you are alive, after all.
Encounters:
- Bait and Switch (3/3): Effective way to increase our Stealth duration via refills, and it also provides additional AP. Lots of them. Most of your AP will come from this skill. For some reason, people like attacking your dummies and killing them. While we may not know the real reason why people like to do that, it gives us free AP. Not going to fuss about something that benefits me a whole lot.
- Shadow Strike (3/3): Free Stealth refill #2, and it adds a nice Daze effect for the people you hit. Good support for players being ganked by Control Wizards.
- Lashing Blade (3/3), Impossible to Catch (3/3), or Smoke Bomb (3/3): We have 3 choices for the third skill. I most usually use Lashing Blade to be able to deal a significant amount of burst damage in PVP whenever I’m taking over a not-so well-defended tower. Impossible to Catch is good when the opposing team is composed primarily of Trickster Rogues, Control Wizards and Great Weapon Fighters. This allows us to escape those scary control effects that endanger us and threaten our survival. In the end, the third encounter all depends on what you currently need. Do you need an execution skill that is available once every after 20 seconds against the soft classes? Lashing Blade is your guy! But if you need an escape button that helps you get away from danger, Impossible to Catch will be invaluable.
Class Features:
- Sneak Attack (3/3): Same with PVE, this allows us to reach points we want to go to much quicker while in Stealth. We do have a horse which we can use to move faster, but we don’t want to be too obvious that we want to attack the opposing team’s undefended tower. Stealth running is the perfect way to achieve that. A stealth rogue is not a beat stick compared to the other Executioner DPS rogues, but rather in PVP, it aims to block your opponent’s point gain by stepping on their undefended towers and attempting to take it for your team. You most usually will succeed in doing this, because PVP-ers are preoccupied in battling in tower 2. It’ll take them quite some time before they notice someone’s taking their tower.
- Skillful Infiltrator (3/3): Same as above.
Dailies:
- Lurker’s Assault (3/3): This is mainly here to increase our damage using Cloud of Steel. Lurker’s Assault and 12 charges of Cloud of Steel basically kills any squishy class like TR’s and CW’s. Some survive, but more often than not this daily and 12 charges is more than enough for a squishy opponent
- Bloodbath (3/3): An amazing skill in PVP. You are invulnerable during the time you are using this skill, and in 1 vs. 1 scenarios against opponents with less than half HP, this almost always guarantees your victory. For 2 – 5 vs 1, however, it is a good method to harass your opponents in to staying in their current position such as their own base, while your allies cap the towers that need to be capped.
Rotation: Our PVP rotation is a whole lot funner than our PVE rotation and probably less action-packed as well. It’s a stress free way to earn points and some kills on the side. Our role in PVP is not to be a beat stick, we don’t regularly kill people like our other ally TR’s, CW’s, or GWF’s. As Trickster Rogues, we aim to trick people, to deceive them and make them guess what we’re going to do or where we’re going to strike next. Our PVP battle is more psychological, and we aim to take advantage of behaviors players usually show in PVP. It’s up to the user as to how he wishes to use this build, and how far he can take it in PVP. This build equips us with maximized Stealth which is a powerful psychological tool against any opponent. People tend to fear what they cannot see.
Our main goal is capturing towers for our team, and blocking our opponent’s point gain increase. Whenever we step on the opposing team’s tower platform, that tower will stop generating points for the opponent. And if you step on it long enough you get to capture it for your team. You net 300 points, equivalent of 6 kills in the process. And if you get to face an enemy while trying to take the tower, you will get another 100 points, 50 for the kill and 50 for the tower rush. Netting you a total amount of 400 points in that tower. But let’s just hope that most of the towers you try to take will be undefended. When you find yourself in a position where you see two enemies running towards you, and you are alone. Do not try to be a hero and attempt to take both of them by yourself specially when using a Stealth build. It’s best to just stealth up, run away, watch them from somewhere hidden and nearby. And once you see they’re gone, go back to their base and take it again. You’ll find very little opponents that is able to notice that their tower is being taken as soon as they leave for tower 2. They’ll be too preoccupied with the idea of defending/taking that tower.
Some people might call this cowardly, but I prefer to call it a strategy. I will happily take the opportunity to screw up the opposing team’s point gain and run away from battle whenever I can. This stealth rogue build also nets me a good amount of top scores thanks to this strategy.
Just remember to stay in stealth for as long as possible and evade the attention of your opponents. Take the long paths if you need to, and make sure no one will know where you’re going. The benefit in this is while your allies are trying to defend/take tower 2, you are taking your opponent’s tower. Your opponents then has 2 things they can do. They can either send someone to stop you, which you will inevitably win since the Trickster Rogue specializes in 1 vs. 1 battles, or 2 people. 2 opponents gone from tower 2 gives your allies a better chance in taking tower 2. While you keep your 2 opponents fixed on you on your opponent’s base, your allies will get an easier time taking the tower they wish to take. This acts as a good support for the team as well as being an offensive maneuver as well. PVP is not just about skills, it also involves strategy. And competitive battling is always funner when you put strategy into consideration.
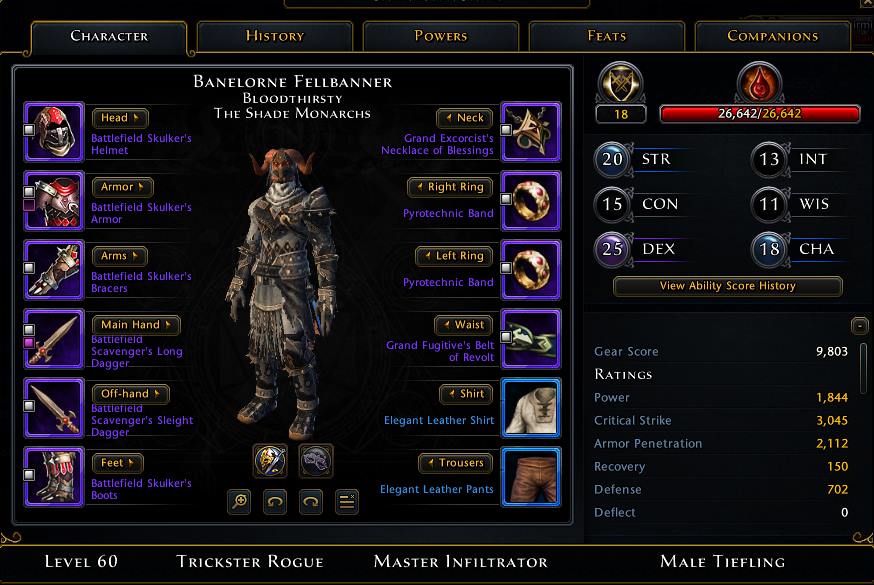
Part 4: Gear Preference and Stat Priorities
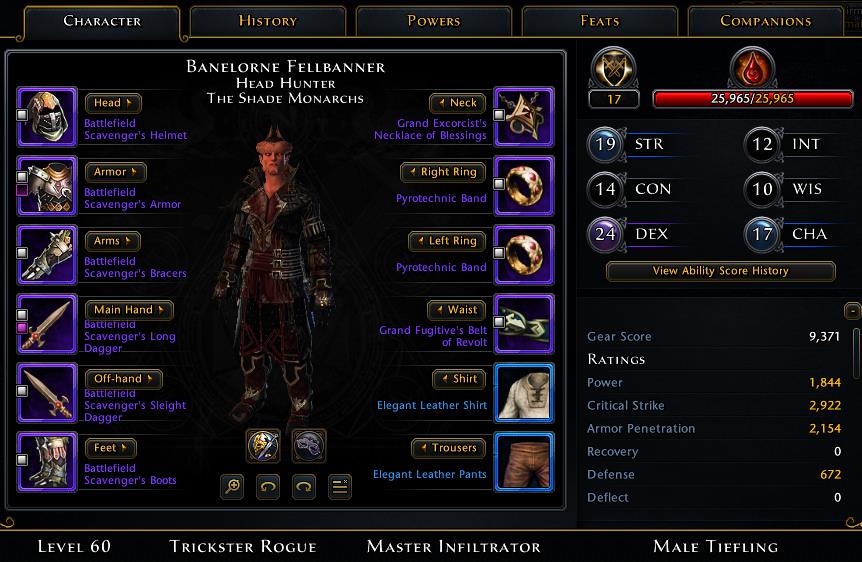

First and foremost, I’d like to forewarn people who are intending to use this build that this is a gear-specific build. In order for it to run properly, a player must need either the Battlefield Scavenger Set, or its more powerful counterpart, the Battlefield Skulker Set. Battlefield Scavenger is fairly easy to collect in PVP. Within a few hours of playing PVP Domination, a player can earn enough glory to be able to purchase the entire set. So if you’re a new level 60 TR, just pop a few matches in PVP when you have the entire day free. There are a lot of PVP pieces in the Auction House as well, at very low prices. Oftentimes you can also read in Zone Chat that players are selling them for Gold. You have a wide variety of ways to be able to attain the Battlefield Scavenger pieces. They are really cheap, but they give us a lot of good boosts that most other sets do not have such as additional HP and Armor Penetration, 2 very important stats in damage-dealing and survival. The 2nd set, however, which is the Battlefield Skulker set, is a little harder to obtain. In order to earn the gear for free, one must grind the Gauntlgrym events particularly the PVP and Dungeon in order to be able to get around 10 Grym Coins per the entire event. Each Grym piece, however, costs 40 Grym Coins. So you can just imagine how long that would be before a player can reach the needed amount of Grym Coins to receive their pieces without using AD’s. But persistence pays off! If all else fails, there’s always the Auction House that sells the pieces for below 200k per piece. These 2 sets boost our Stealth Meter by 20% and 25%, a small boost that is big enough in order to dramatically impact our rotations and increase our room for error. The hard part about playing stealth builds is managing the cooldown of your encounters. But that’s about it. Once a player has that down, the rest will come to them with experience and time.
If a player can purchase the entire Grym Set right off the bat, I suggest doing so. But if not, and the player currently does not have the means to get the Grym Set, I highly recommend purchasing the PVP T1 Battlefield Scavenger Set before going for the Grym Set. 20% Stealth which costs below 40k AD’s is too good to pass on. Get the entire set as soon as you hit level 60.
Now that we have discussed the most important part about the gear, I assure everyone that the latter part is more lax and people will be free to experiment according to how they see fit. I will discuss some of the contributions that other Stealth TR’s added for the build later, but on my part I stack the following stats in order to maximize the damage output of a Stealth TR that specs towards the Executioner Path.
Critical > Armor Penetration > Power > Everything else.
This way, I get to maximize the amount of times I get to proc Overrun Critical which is a very good source of damage increase in both PVE and PVE.
Part 5: PVP Strategies for the Stealth Executioner
As a Stealth Based TR which concentrates on PVE more than PVP, we usually would like to try and avoid any encounters we know we will lose. This includes 2 – 5 vs “you” fights. We do not excel in such situations and it would be within our best interests to run away from such encounters in PVP as we most definitely would not be able to kill anyone in such a gank. Steer clear from anything that may spell your death as there is nothing to gain in dying in PVP, unless you are in that on situation where you are staving off 3 – 4 of your opponents in their own base in order to psychologically prevent them from getting to tower 2. Stealth Rogues are able to do that, and for a good minimum of 30 seconds, 30 seconds enough to allow your allies to cap the towers that are in need of capping. Staying alive as a Stealth Rogue means you have a better and faster means of reacting to what your opponents do in battle. And staying alive means your opponents will always be on the look out for you, the prey whom they failed to catch. A stealth rogue is so hard to kill in PVP and when played right, you can get a high amount of score, decent kill number, and zero deaths.
I shall be dictating the strategies I use in order to effectively defeat players in 1 vs. 1 scenarios. And in the later part of this post, I shall also include other strategies which allows us to escape deadly PVP situations, and various means of harrying opponents.
The Stealth Executioner and its Roles in PVP
We are unlike other TR’s who spec for maximized damage. What we gain in survivability, we tend to lose in DPS. But it doesn’t mean that we do not have the ability to kill other classes. Stealth TR’s should not have any trouble facing up against CW’s, DC’s, and DPS TR’s, but GF’s and GWF’s may prove to be troublesome in PVP. However we mostly do our best to escape conflicts we cannot win and we do our best to force our opponents in 1 vs. 1 scenarios where we are guaranteed to either win or escape, mostly unharmed. Here are some strategies which helps define what a Stealth Executioner can and cannot do.
The Stealth TR and his Purpose:
– As a TR who specializes in remaining unseen, you should aim to abuse this fact by back-capping the bases of your opponents and preventing them from gaining any points. The opponent’s base is most usually a undefended point in the area, because tower 2 gets all the action. Tower 2 PVP-ers will be too preoccupied in what they’re doing that they’ll fail to realize that their tower is being taken, which will cause you and your team to get an increased amount of points in time. In order to fully succeed in doing this, however, you must have good allies with you. Particularly the beefy ones like Clerics and GF’s at point 2, with a CW backing them up for support. Your performance is most usually highly dependent on your allies, and your allies will be highly dependent on how well you can harass your opponents into making them stay in one point as they cap the needed towers. You have, as a stealth TR, the capability of a whole party when it comes to making people stay in one point. You do this by staying stealthed and preventing your opponents from mounting up. This will severely affect your opponent’s mobility, giving your allies more than enough time to cap tower 2, and rush to where you are to provide back up and eventually taking the match to the opponent’s towers. If your opponents aren’t smart enough, they will try to take back their tower instead of taking other undefended points. This behavior can be most usually observed in pug PVP parties, and should be exploited whenever possible.
A stealth TR’s mode of attacking the opponents is mostly psychological. People are afraid of what they cannot see, making them feel stressed. This will, in turn, increase their aggression towards you, making them try to find you, thus preoccupying them and allowing your teammates to operate without facing too much opponents. They will try to find you, but to no avail, because you specialize in staying stealthed. When you are almost out of stealth and have no means of refilling it, you hide. Since you cannot be seen, most people will think you are still stealthed even when you are already hiding somewhere refilling your stealth bar. You will notice that they will run around on their towers or randomly attacking hoping to hit you. But you’re already far away, watching them. The optimum time to strike your opponents back is when they think they are safe, this is most usually the times when you see them mounting up. Since you are a fast runner thanks to Sneak Attack and Skillful Infiltrator, you will be able to get in their range to be able to spam Cloud of Steel at them, making them fall prone from their mounts before they can fully escape their tower.
I shall post screenshots of optimum hiding places in both Hotenow Domination and Rivenscar Ruins; hiding places which will allow you to remain unseen while you see most of what’s happening in the area. Using your terrain to your advantage is a strategy, so please do not think of hiding as cowardice. If it gives your team the victory, playing as underhanded as possible would be preferable.
Sometimes, however, you shall be forced in a 1 vs. 1 combat situation. Any TR should be able to handle this as we excel in 1 vs. 1’s. I will list down my strategies in 1 vs. 1’s and how I win them as a TR with gimped DPS. We lack severely damaging encounters, which is why we shall aim to use the power of our at-wills wisely, our terrain, and our opponent’s behavior. We shall aim to counter most popular class strategies.
But first and foremost, allow me to discuss a little bit more on some gear issues on PVP. Please refer to the screenshot below.
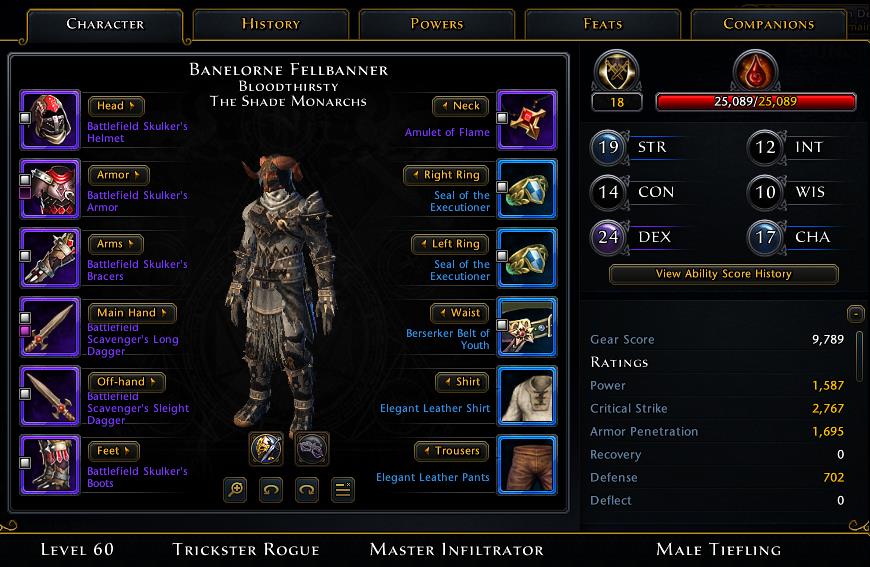
As you can see, I have replaced the following gear with alternatives that contributes to Regeneration.
- 2x Pyrotechnic Band for 2x Seal of the Executioner.
- Grand Fugitive’s Belt of Revolt for Berserker’s Belt of Youth
- Grand Exorcist’s Necklace of Blessings for Amulet of Flame
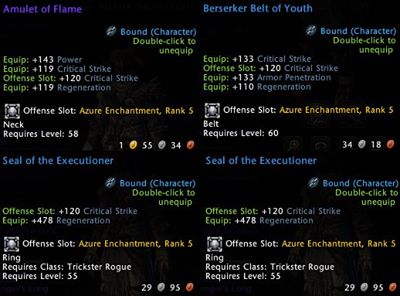
Why the regeneration gear, you ask? The answer is simple. It’s because as stealth rogues who can enter combat without risking ourselves much from getting targeted, the times we stay in stealth provide us with so much time that we can virtually heal ourselves to non-critical HP levels without using potions, only by using regeneration and life steal. When those 2 stats work in conjunction with one another, no matter how low our health is, we can easily gain it back by going to stealth. Run away from dangerous areas if you have to, as long as you are alive and are able to come back into the action at top shape, all is well. This also helps us regenerate our lost HP when we can’t count on the bugged floating pots in PVP.
For reference, these regeneration gear can be attained by the following means.
- 2x Seal of the Executioner: Trade for 15 Pegasus Seals each at Protector’s Enclave.
- Berserker Belt of Youth: Costs less than 5k at the Auction House.
- Amulet of Flame: Costs less than 10k at the Auction House.
These gear are particularly cheap yet the benefits they give us can be immense when played right. And by right, I mean carefully. And now we go to the individual PVP strategies which helps us achieve careful play technique. It’s okay to be aggressive at times so long as we have the opportunity to do so, but for a Stealth TR who must be careful of not messing up his cooldown and rotation, the only way to play is cautiously and strategically.
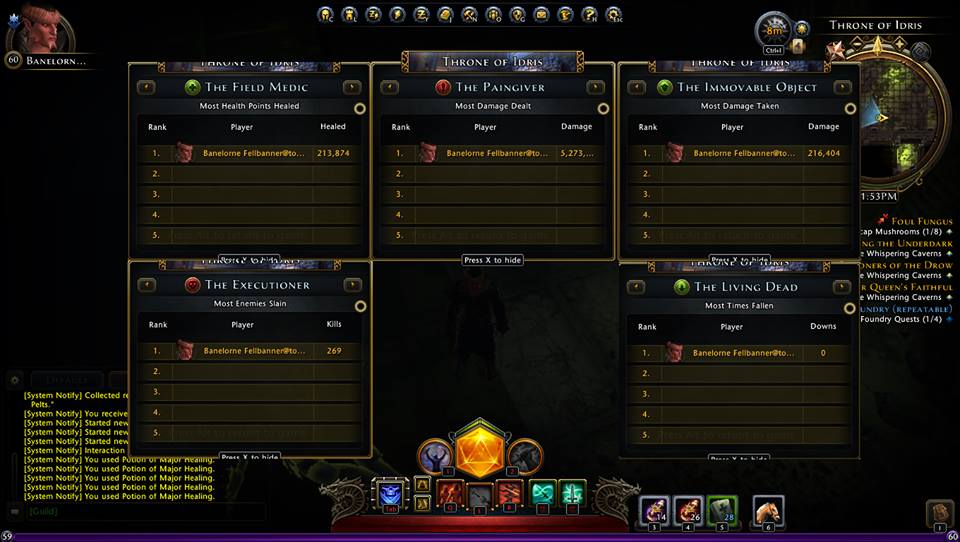
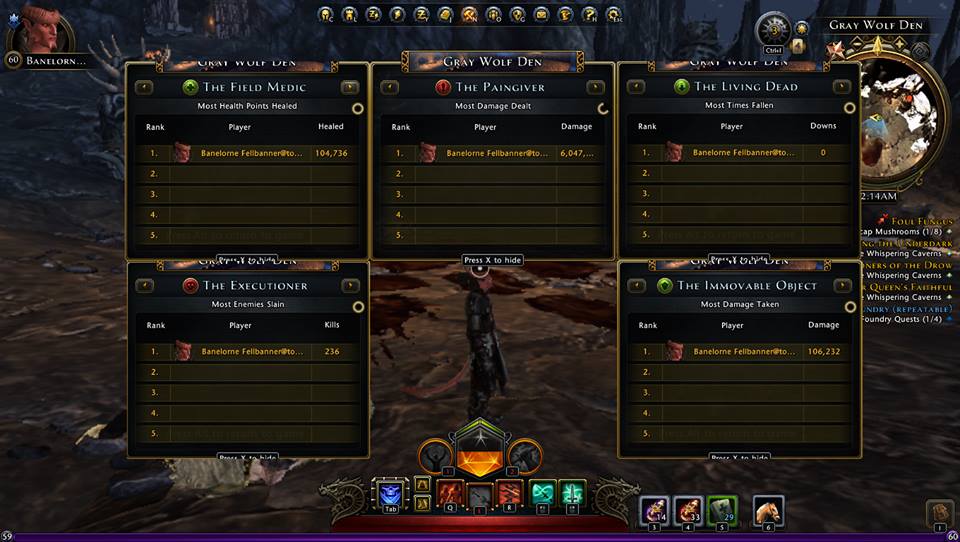
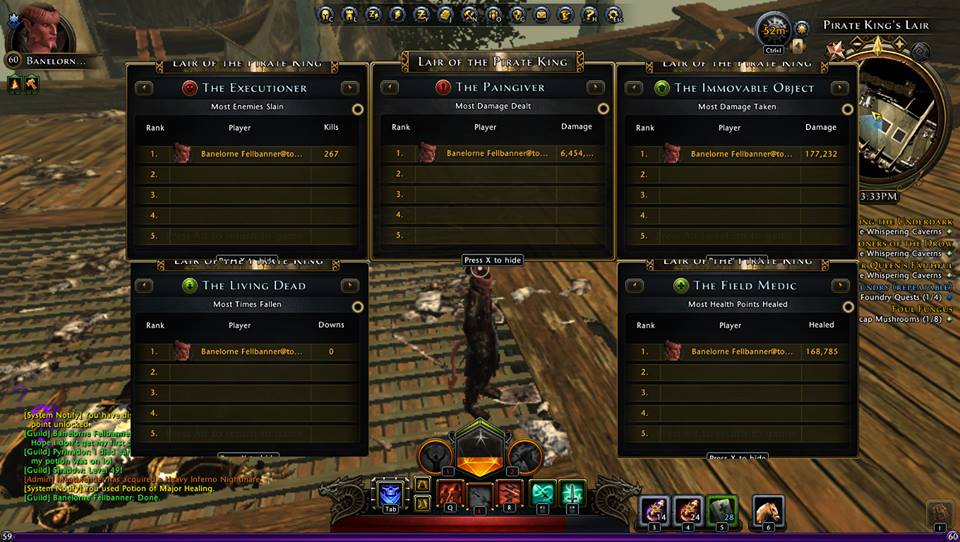
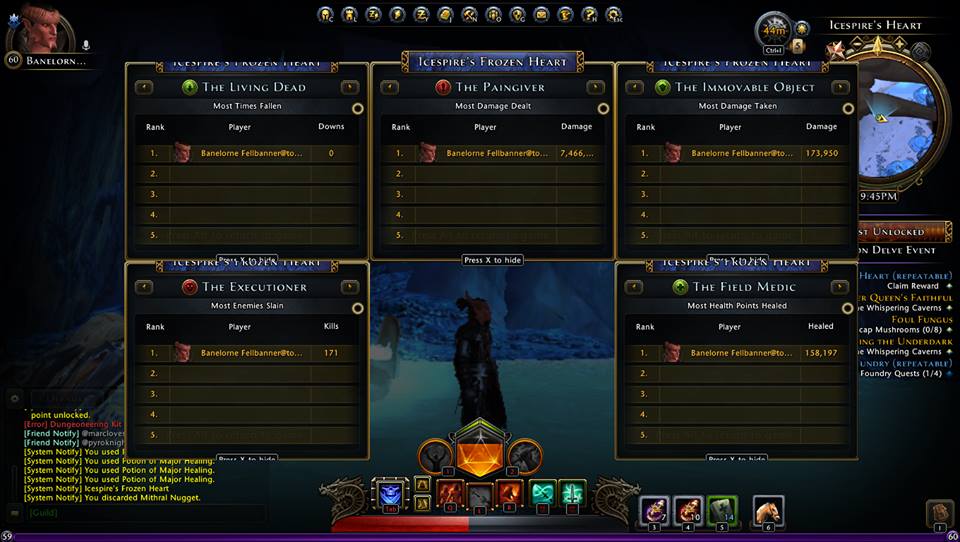
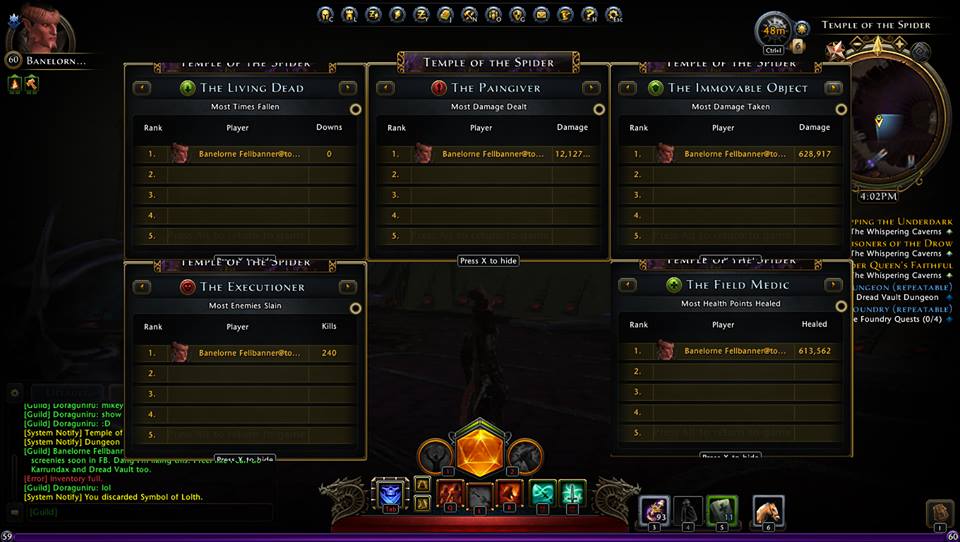
Screenshots: The Solo Dungeon Challenge.
In order for me to be able to test the survivability of this build, I took it upon myself to challenge this build to see how well it can hold in solo scenarios. And what better way to test this than to solo some of the hardest contents of the game; dungeons. Dungeons that are supposed to be taken by 5 players can be soloed by this Stealth Rogue build. So far I’ve done Lair of the Mad Dragon up until Temple of the Spider and I’m planning to continue this up until Normal Dread Vaults. I was also doing Caverns of Karrundax a while back but sadly the game decided to disconnect me in the middle of the dungeon run, just before I got to fight the 2nd boss. It was a disheartening experience but I will be sure to try again when I’m able to just so I can complete my list.
So far here are the dungeons I’ve managed to solo and the screenshots I took in order to commemorate the times I was able to successfully challenge these dungeons without dying, not even once.
Finished Dungeons:
- Lair of the Mad Dragon


- The Throne of Idris

- Grey Wolf Den

- Lair of the Pirate King

- Icespire’s Frozen Heart

- The Spellplague Caverns

- Temple of the Spider


Upcoming Solo Runs:
- Caverns of Karrundax
- The Dread Vaults
I’ve been fortunate enough to have not died, not even once in any of the dungeons I’ve soloed so far. I’ve had several different encounters but the experience I’ve gained through soloing each one dungeon helped me conquer the one I’ve been planning to run through next. I hope these screenshots somehow convince people to try and run this build in the future, and I dream that one day I can find someone in one of my future runs who uses the same build as I am. Just imagining how much a 5 man Stealth TR party can do in a dungeon… that would be a pretty awesome sight.

I just hit 70 with my rogue and am respecing. Thanks for the guide; this information is really helpful for improving my character.
hey the Seal of Executioner at Pegasus vendor shows +478 critical strike, I don’t see any with regeneration. The vendors near the pegasus vendor has a Seal of Executioner for +384 or somethin like that but can’t find the one you posted. ???
I didn’t write this guide, but from reading it, you should follow his feat path.
When you get to the paragon feats put the 10 points in the top path then all of the feats on the bottom path.
Follow the guide for feats. Stealth over damage
While leveling do I follow your list of feats as the best order to put points?
when we get to heroics what tree do we pick?