The Settlers Online Stealing from the Rich Adventure Guide
The Settlers Online Stealing from the Rich Adventure Guide by Tage
Adventure Info:
Player Level: 26+
Difficulty: 4/10
Number of Players: 2
Duration: 4 days
Where to get?: Adventure seek with Explorer or Trader (Shop) for 195 gems


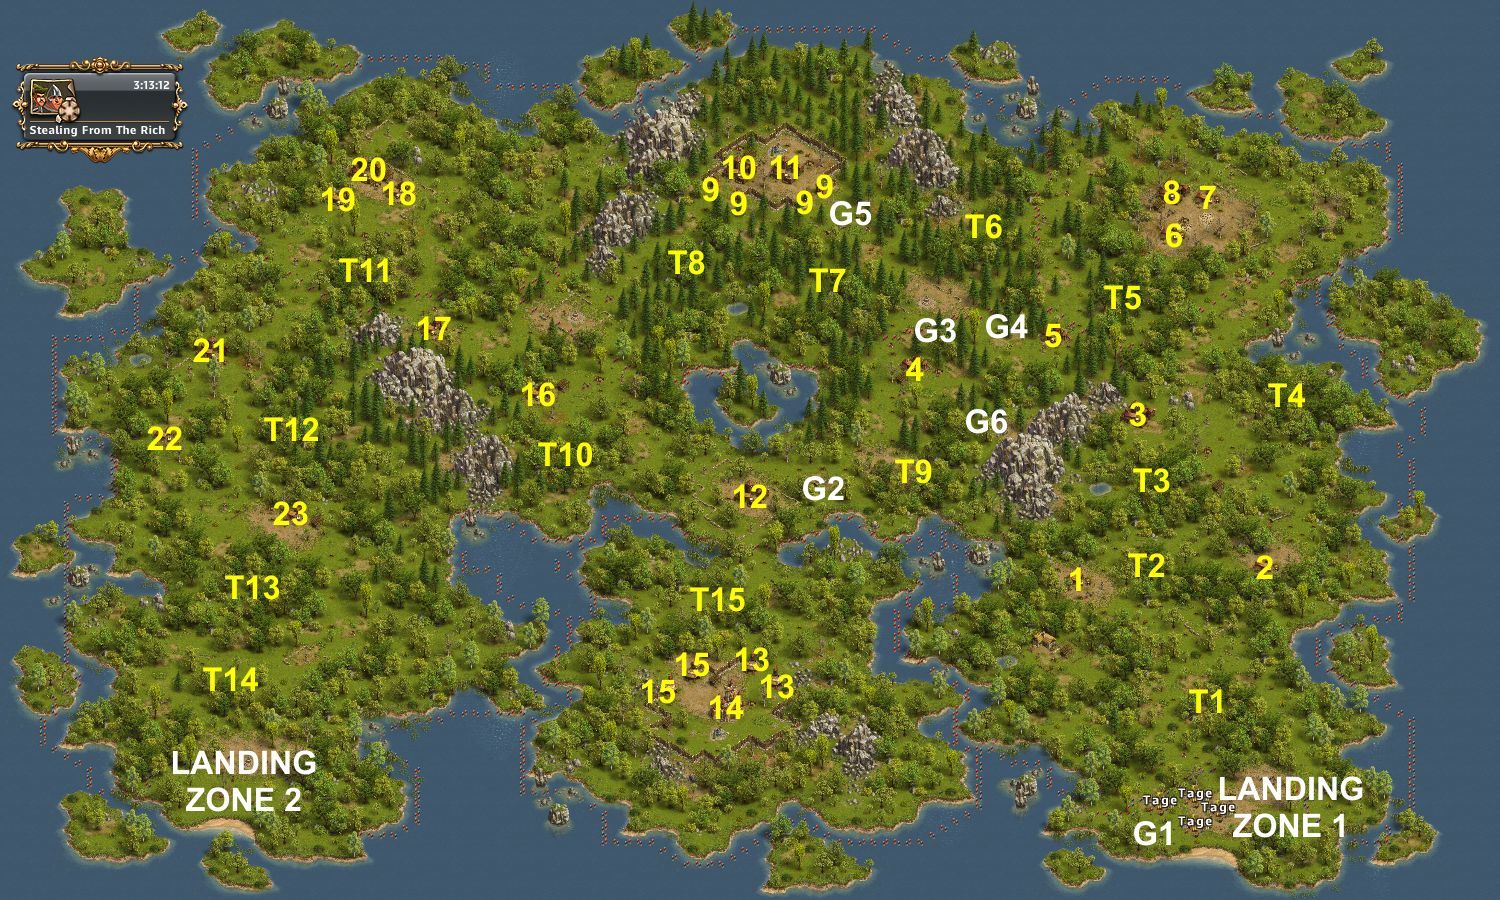
This guide is based on a single player doing everything in this 2-player adventure.
A suggestion for when to sell the lootspot is included below, under garrison position G6.
You need to send troops 5-7 times.
Eleven versions are presented below, for the following minimum number of needed generals and troops and with the following lost troops. If you do not have a veteran general, nor any cannoneers, you may want to send at least four generals to avoid having to wait for those committing suicide to recover.
One ANY general with Longbows, no blocks
- Units needed, average: 1001R 199C 31LB (1231 units)
- Units needed, maximum: 1179R 199C 31LB (1409 units)
- Units lost, minimum: 744R
- Units lost, average: 999R
- Units lost, maximum: 1179R
Two ANY generals with Longbows, using one 1R block
- Units needed, average: 987R 199C 31LB (1217 units)
- Units needed, maximum: 1162R 199C 31LB (1392 units)
- Units lost, minimum: 734R
- Units lost, average: 985R
- Units lost, maximum: 1162R
One ANY general with Longbows, no blocks
- Units needed, average: 931R 187S 199C 31LB (1348 units)
- Units needed, maximum: 1022R 187S 199C 31LB (1439 units)
- Units lost, minimum: 714R
- Units lost, average: 929R
- Units lost, maximum: 1022R 2S
One ANY general with Crossbows, no blocks
- Units needed, average: 929R 187S 199C 23XB (1338 units)
- Units needed, maximum: 1020R 187S 199C 23XB (1429 units)
- Units lost, minimum: 713R
- Units lost, average: 927R
- Units lost, maximum: 1020R 3S
Two ANY generals with Longbows, using one 1R block
- Units needed, average: 917R 187S 199C 31LB (1334 units)
- Units needed, maximum: 1005R 187S 199C 31LB (1422 units)
- Units lost, minimum: 704R
- Units lost, average: 915R
- Units lost, maximum: 1005R 2S
Two ANY generals with Crossbows, using one 1R block
- Units needed, average: 915R 187S 199C 23XB (1324 units)
- Units needed, maximum: 1003R 187S 199C 23XB (1412 units)
- Units lost, minimum: 703R
- Units lost, average: 913R
- Units lost, maximum: 1003R 3S
One BATTLE HARDENED general with Longbows
Two NORMAL generals, using one round block and one 1R block
- Units needed, average: 876R 187S 244C 31LB (1338 units)
- Units needed, maximum: 988R 187S 244C 31LB (1450 units)
- Units lost, minimum: 683R
- Units lost, average: 873R
- Units lost, maximum: 988R 2S
One BATTLE HARDENED general with Crossbows
Two NORMAL generals, using one round block and one 1R block
- Units needed, average: 874R 187S 244C 23XB (1328 units)
- Units needed, maximum: 986R 187S 244C 23XB (1440 units)
- Units lost, minimum: 682R
- Units lost, average: 871R
- Units lost, maximum: 986R 3S
One BATTLE HARDENED general with Cannoneers
Two NORMAL generals, using two round blocks
187 soldiers are needed only if you want to save 2R on the attack on trap T15.
- Units needed, average: 594R 2M 1S 244C 87K (928 units)
- Units needed, maximum: 669R 11M 187S 244C 87K (1198 units)
- Units lost, minimum: 456R
- Units lost, average: 591R
- Units lost, maximum: 669R 11M
One VETERAN general
Two NORMAL generals, using two round blocks
- Units needed, average: 645R 168S 244C (1058 units)
- Units needed, maximum: 726R 168S 244C (1126 units)
- Units lost, minimum: 453R
- Units lost, average: 643R
- Units lost, maximum: 726R
One VETERAN general with Cannoneers
Two NORMAL generals, using two round blocks
- Units needed, average: 516R 6M 1S 244C 179K (946 units)
- Units needed, maximum: 574R 9M 1S 244C 179K (1007 units)
- Units needed, average: 516R 6M 26E 244C 166K (958 units)
- Units needed, maximum: 576R 11M 26E 244C 166K (1023 units)
- Units lost, minimum: 405R
- Units lost, average: 514R
- Units lost, maximum: 576R 11M
This guide includes two optional round blocks of method 2. One of the round blocks can also be a 1R block of method 1.
Game flow, garrison settings and losses (minimum – average – maximum):
 Garrison Position G1
If you have more than 3 generals, a few have probably arrived in landing zone 2.
In that case, you may want to move some of those generals to landing zone 1 (garrison position G1).
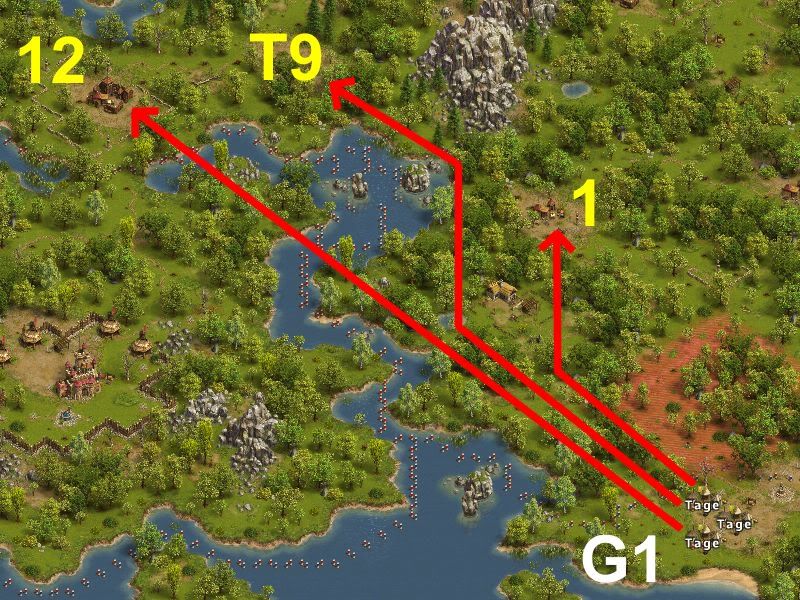
Camp 1) 30 Recruit Deserters, 40 Bowman Deserters
ANY general: [1R 199C (0R – 0R – 1R)]
ANY general: [1S 199C (-)]
Trap T9) 40 Wolves
ANY general: [41R (2R)]
ANY general: [1R 39S (1R)]
ANY general: [1R 1S 55C (1R)]
ANY general: [40E (0E – 0E – 1E)]
ANY general: [1E 60C (0E – 0E – 1E)]
ANY general: [1E 39K (0E – 0E – 1E)]
Camp 12) 20 Elite Soldier Deserters, 20 Crossbowman Deserters, 20 Cannoneer Deserters, 1 Sir Robin
ANY general: [200R (54R – 98R – 115R)]
ANY general: [97R 103S (46R – 87R – 97R)]
ANY general: [89R 1M 80K (62R – 81R – 89R)]
VETERAN general: [82R 168S (46R – 74R – 82R)]
VETERAN general: [75R 163K (56R – 68R – 75R)]
VETERAN general: [75R 20E 155K (56R – 68R – 75R)]
Garrison Position G2
Move at least one veteran general to garrison position G2.
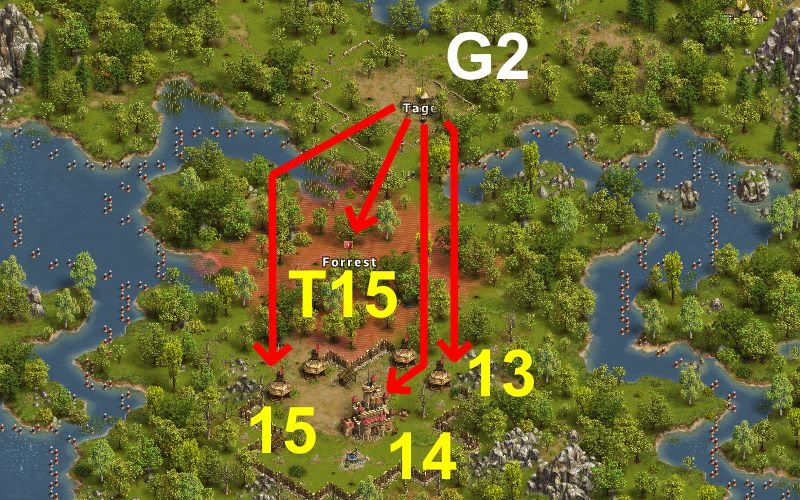
If you have a veteran general, directly attack the tower 13 on the far right.
Your general will be intercepted both by the trap T15 and the first tower 13.
Also without a veteran general, you can attack the right-most tower directly.
Your additional losses will only be 1R or 2R, compared to the separate attacks further down.
Tower 13) 200 Wolves (T15), 15 Longbowman Deserters (Tower 13) and 15 Longbowman Deserters (Tower 13)
ANY general: [100R 100C (14R – 15R – 16R)]
ANY general: [15R 85S 100C (14R – 15R – 15R)]
VETERAN general: [15R 1S 100C 84K (14R – 15R – 15R)]
VETERAN general: [12R 130S 100C (12R)]
VETERAN general: [12R 88S 150C (12R)]
VETERAN general: [12R 1S 142C 95K (12R)]
You may of course also kill trap T15 first:
Trap T15) 200 Wolves
ANY general: [200R (13R – 14R – 15R)]
ANY general: [13R 187S (13R)]
VETERAN general: [12R 199S (12R)]
VETERAN general: [12R 130S 100C (12R)]
VETERAN general: [12R 88S 150C (12R)]
VETERAN general: [12R 1S 142C 95K (12R)]
VETERAN general: [12R 1S 55C 163K (12R)]
When the trap is gone, attack the right-most tower 13,
and the one in front will intercept your general and you’ll kill both towers in one go:
Tower 13) 15 Longbowman Deserters
ANY general: [100C (-)]
Tower 13) 15 Longbowman Deserters
ANY general: [100C (-)]
Whenever the trap is gone, attack the left-most tower 15,
and the one in front will intercept your general and you’ll kill both towers in one go:
Tower 15) 15 Longbowman Deserters
ANY general: [100C (-)]
Tower 15) 15 Longbowman Deserters
ANY general: [100C (-)]
When all towers are gone, kill camp 14.
If you do not have a veteran general, nor any cannoneers, you will need two waves:
Camp 14) 50 Soldier Deserters, 50 Cavalry Deserters, 50 Longbowman Deserters, 1 Big Bertha
ANY general: [1: 176R 2: 200R (187R – 197R – 202R)]
ANY general: [1: 176R 2: 17R 183S (182R – 191R – 193R)]
ANY general: [111R 2M 87K (84R – 98R – 111R 1M)]
VETERAN general: [140R 110S (100R – 124R – 140R)]
VETERAN general: [97R 6M 147K (78R – 91R – 97R 5M)]
Garrison Position G3 (BLOCK)
Move one veteran general and two normal generals to garrison position G3:
- Position A: NORMAL general
- Position B: NORMAL general
- Position C: VETERAN general
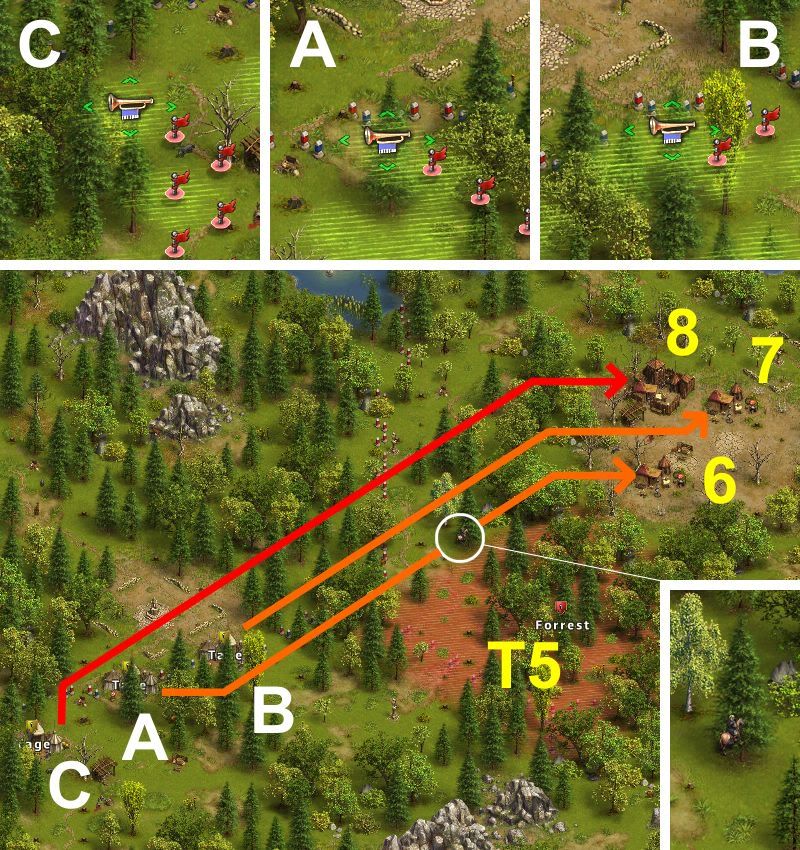
Please note!
When sending general A to camp 6, the game will tell you that trap T5 will intercept. This is however not the case.
General A will enter the red influence area of camp 6 before entering the area of trap T5. Thus he cannot be intercepted anymore.
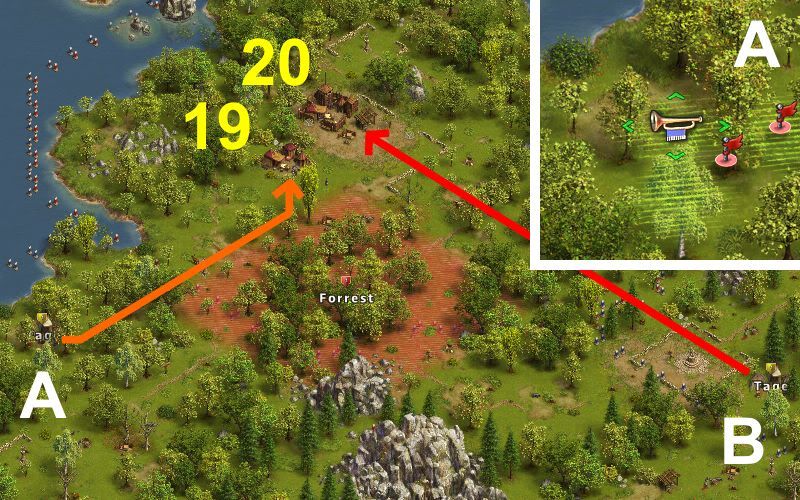
Send general A to camp 6 first:
From A to Camp 6) 60 Militia Deserters, 20 Longbowman Deserters
BLOCKING NORMAL general: [140C (-)] {140 – 220 seconds of fighting}
BLOCKING NORMAL general: [3R 135C (-)] {140 – 240 seconds of fighting}
BLOCKING NORMAL general: [1S 137C (-)] {140 – 220 seconds of fighting}
BLOCKING NORMAL general: [1E 136C (-)] {140 – 240 seconds of fighting}
When general A reaches the spruce tree shown in the inset above, and disappears behind it,
send both remaining generals after each other in this order (as soon as you can):
From B to Camp 7) 40 Militia Deserters, 40 Longbowman Deserters
BLOCKING NORMAL general: [104C (-)] {140 – 220 seconds of fighting}
From C to Camp 8) 40 Militia Deserters, 40 Cavalry Deserters, 1 Sir Robin
BATTLE HARDENED general: [102R 98S (47R – 88R – 102R)] {60 seconds of fighting}
BATTLE HARDENED general: [72R 2M 85K (41R – 62R – 72R)] {40 seconds of fighting}
VETERAN general: [86R 164S (47R – 75R – 86R)] {50 seconds of fighting}
VETERAN general: [58R 1E 179K (34R – 49R – 58R)] {30 seconds of fighting}
VETERAN general: [58R 26E 165K (34R – 49R – 58R)] {30 seconds of fighting}
If you do not want to use any blocks, these are the setups to kill each camp one by one:
From A, B or C to Camp 6) 60 Militia Deserters, 20 Longbowman Deserters
ANY general: [37R 160C 3LB (22R – 29R – 37R)]
ANY general: [35R 1S 164C (22R – 29R – 35R)]
From A, B or C to Camp 7) 40 Militia Deserters, 40 Longbowman Deserters
ANY general: [21R 179C (11R – 15R – 21R)]
ANY general: [18R 1S 181C (11R – 15R – 18R)]
From A, B or C to Camp 8) 40 Militia Deserters, 40 Cavalry Deserters, 1 Sir Robin
ANY general: [200R (53R – 96R – 118R)]
ANY general: [102R 98S (47R – 88R – 102R)]
Garrison Position G4
Move your best general and any other general to the following placements within garrison position G4:
- Position A: ANY general
- Position B: VETERAN general or ANY general
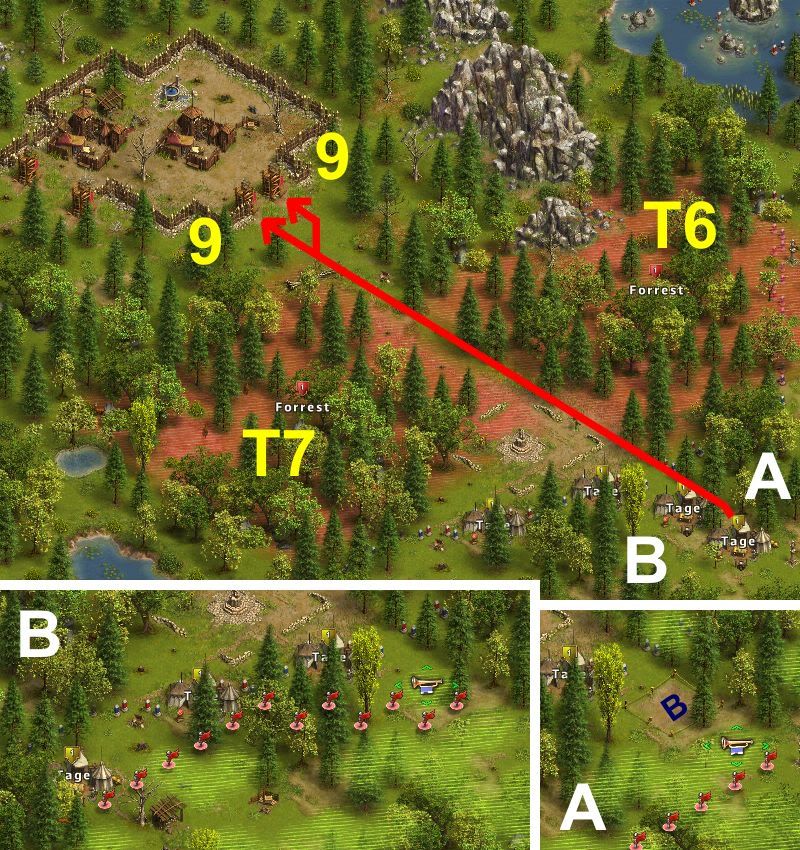
First, attack the two eastern-most towers 9, one at a time (they won’t intercept each other):
Tower 9) 30 Longbowman Deserters
ANY general: [100C (-)]
Tower 9) 30 Longbowman Deserters
ANY general: [100C (-)]
Now, the road is clear to enter the northern walled in area.
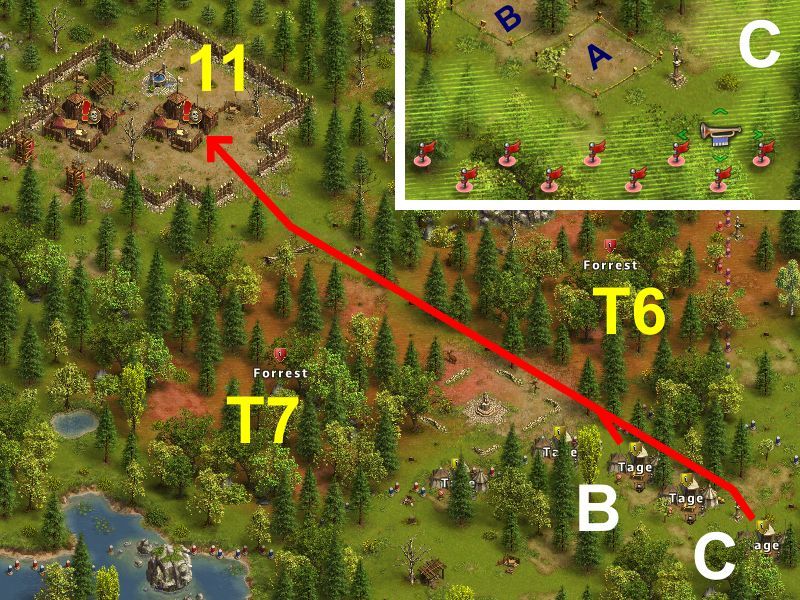
If you do not have a veteran general, nor cannoneers, you will need to send two waves to kill camp 11.
In that case, move an extra general to garrison position C (he will be sleeping for 4 hours in a while):
From C to Camp 11) 50 Soldier Deserters, 50 Longbowman Deserters, 1 Sir Robin
ANY general: [175R (175R)]
From B to Camp 11) 1 Sir Robin
ANY general: [200R (15R – 39R – 45R)]
ANY general: [28R 172S (10R – 25R – 28R)]
If you have a veteran general, or enough cannoneers, kill camp 11 in one attack:
From B to Camp 11) 50 Soldier Deserters, 50 Longbowman Deserters, 1 Sir Robin
ANY general: [126R 2M 72K (83R – 112R – 126R 2M)]
VETERAN general: [140R 110S (80R – 124R – 140R)]
VETERAN general: [112R 2M 100K (75R – 99R – 112R 2M)]
The second camp is still guarded by the two remaining towers.
However, these towers cannot be attacked directly. Trap T7 would intercept such an attack.
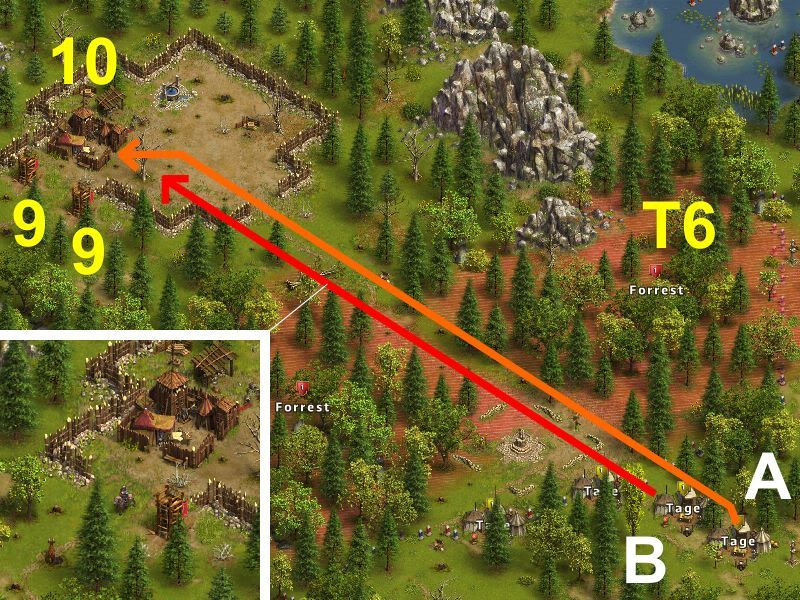
To kill the rest up north, we will send two generals, but not right after each other.
First send general A against camp 10. He will be intercepted by both towers:
From A to Camp 10) 30 Longbowman Deserters (Tower 9)
ANY general: [100C (-)]
When the first tower has been destroyed, and general A is being intercepted by the second tower
(as seen in the inset above), send general B to camp 10:
From B to Camp 10) 30 Soldier Deserters, 30 Cavalry Deserters, 40 Longbowman Deserters, 1 Sir Robin
ANY general: [200R (78R – 133R – 184R)]
ANY general: [137R 63S (73R – 120R – 137R 1S)]
ANY general: [95R 2M 85K (61R – 82R – 95R)]
VETERAN general: [109R 141S (64R – 95R – 109R)]
VETERAN general: [95R 2M 85K (61R – 82R – 95R)]
If general A is a normal general, camp 10 will be destroyed first.
If general A is a fast general, the last tower 9 will be destroyed before camp 10 and that general will attack the same camp 10.
In either case, general A will return unharmed to his garrison when camp 10 has be destroyed by general B.
Garrison Position G5 (Camp 18)
NB!
If you are using round blocks, you may move your generals closer to the targets in order to keep the marching distances shorter.
The alternative Garrison Position G5 is shown in the spoiler below:
Spoiler
Camps 21 and 18
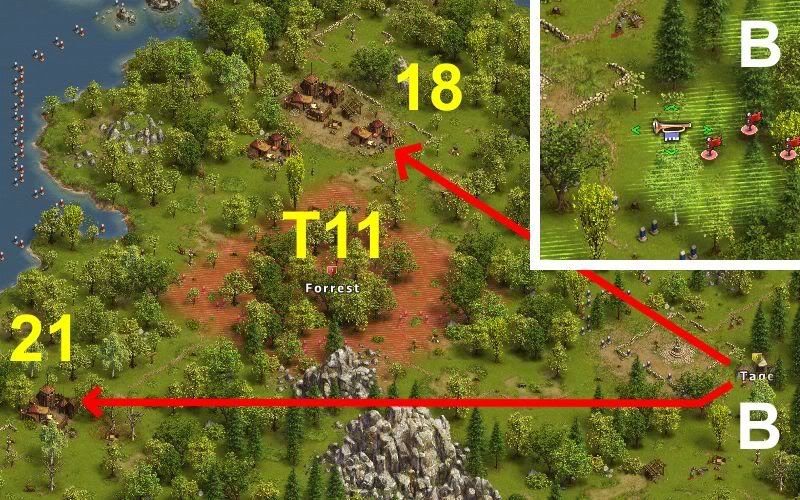
From B to Camp 21) 85 Recruit Deserters, 65 Bowman Deserters
ANY general: [40R 129C 31LB (30R – 35R – 40R)]
ANY general: [39R 1S 129C 31LB (30R – 35R – 39R)]
ANY general: [37R 1S 139C 23XB (29R – 33R – 37R)]
VETERAN general: [27R 1S 222C (21R – 25R – 27R)]
From B to Camp 18) 20 Militia Deserters, 60 Longbowman Deserters
ANY general: [4R 196C (0R – 2R – 4R)]
ANY general: [2R 1S 197C (0R – 1R – 2R)]
VETERAN general: [1S 230C (-)]
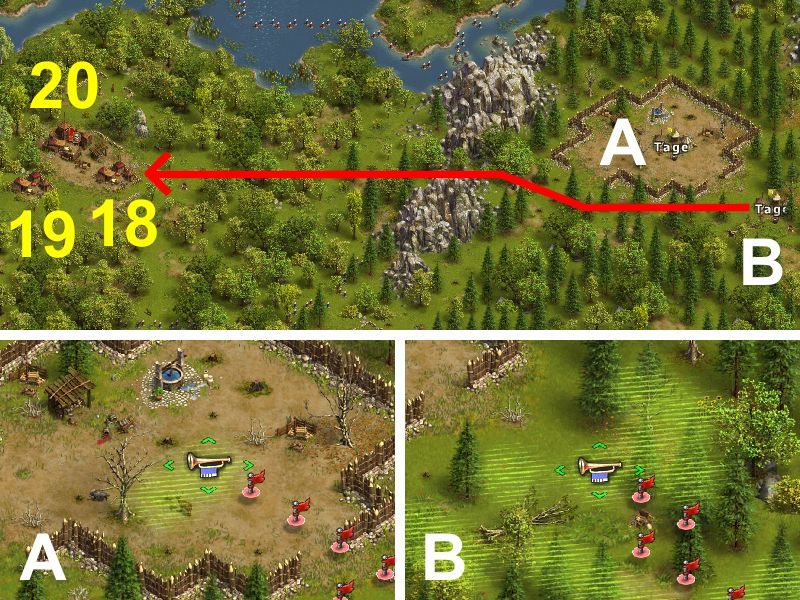
Camps 19 and 20 (BLOCK)
Send both generals after each other:
From A to Camp 19) 40 Militia Deserters, 40 Longbowman Deserters
BLOCKING NORMAL general: [104C (-)] {120 – 220 seconds of fighting}
From B to Camp 20) 40 Militia Deserters, 40 Longbowman Deserters, 1 Sir Robin
ANY general: [95R 2M 80K (61R – 83R – 95R 2M)] {40 seconds of fighting}
VETERAN general: [110R 140S (68R – 96R – 110R)] {50 seconds of fighting}
VETERAN general: [80R 4M 166K (53R – 70R – 80R 4M)] {30 seconds of fighting}
And if you don’t have a veteran, kill the camps one at a time:
From A or B to Camp 19) 40 Militia Deserters, 40 Longbowman Deserters
ANY general: [21R 179C (11R – 15R – 21R)]
ANY general: [18R 1S 181C (11R – 15R – 18R)]
From A or B to Camp 20) 40 Militia Deserters, 40 Longbowman Deserters, 1 Sir Robin
ANY general: [200R (74R – 126R – 172R)]
ANY general: [138R 62S (74R – 111R – 138R 1S)]
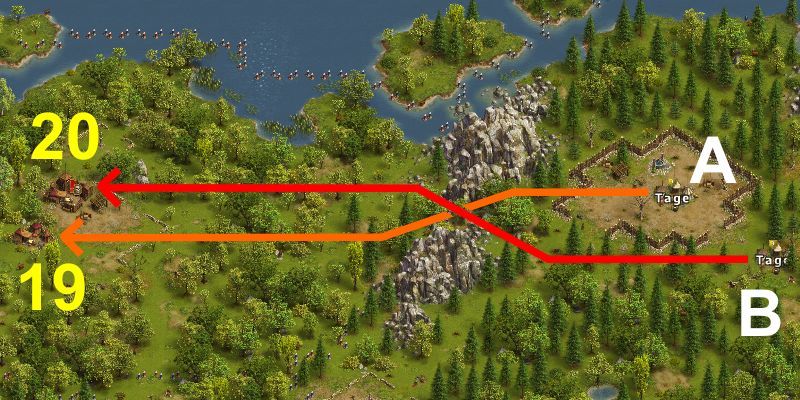
Move your best general and one normal general to garrison position G5:
- Position A: NORMAL general
- Position B: VETERAN general or ANY general
For the first attack, only your best general is needed:
From B to Camp 18) 20 Militia Deserters, 60 Longbowman Deserters
ANY general: [4R 196C (0R – 2R – 4R)]
ANY general: [2R 1S 197C (0R – 1R – 2R)]
VETERAN general: [1S 230C (-)]
Garrison Position G5 (BLOCK)
If you have a veteran general, or cannoneers, use the round block.
Send both generals after each other:
From A to Camp 19) 40 Militia Deserters, 40 Longbowman Deserters
BLOCKING NORMAL general: [104C (-)] {120 – 220 seconds of fighting}
From B to Camp 20) 40 Militia Deserters, 40 Longbowman Deserters, 1 Sir Robin
ANY general: [95R 2M 80K (61R – 83R – 95R 2M)] {40 seconds of fighting}
VETERAN general: [110R 140S (68R – 96R – 110R)] {50 seconds of fighting}
VETERAN general: [80R 4M 166K (53R – 70R – 80R 4M)] {30 seconds of fighting}
If you do not have a veteran general, nor cannoneers, use the 1R block.
Send both generals after each other:
From A to Camp 19) 40 Militia Deserters, 40 Longbowman Deserters
BLOCKING NORMAL general: [1R (1R)] {20 seconds of fighting}
From B to Camp 20) 40 Militia Deserters, 40 Longbowman Deserters, 1 Sir Robin
ANY general: [200R (74R – 126R – 172R)]
ANY general: [138R 62S (74R – 111R – 138R 1S)]
The marching time for general B through the corner of the red influence area of Camp 20 is about 10 seconds.
And if you don’t want to try any of the blocks, kill the camps one at a time:
From A or B to Camp 19) 40 Militia Deserters, 40 Longbowman Deserters
ANY general: [21R 179C (11R – 15R – 21R)]
ANY general: [18R 1S 181C (11R – 15R – 18R)]
From A or B to Camp 20) 40 Militia Deserters, 40 Longbowman Deserters, 1 Sir Robin
ANY general: [200R (74R – 126R – 172R)]
ANY general: [138R 62S (74R – 111R – 138R 1S)]
VETERAN general: [110R 140S (68R – 96R – 110R)]
Garrison Position G5 (Camp 21)
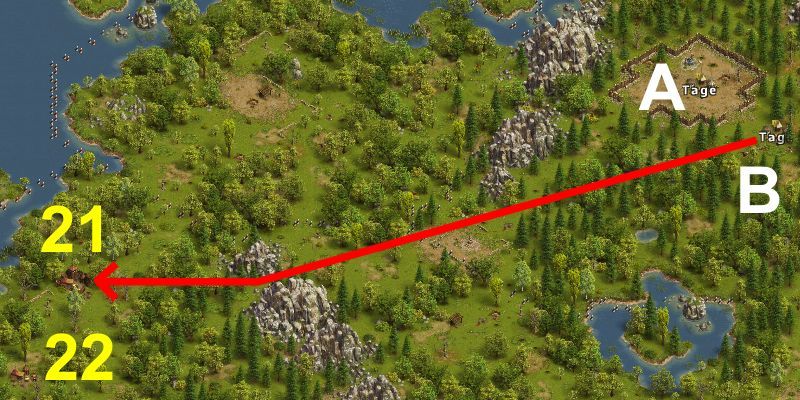
Finally, kill the last remaining leader camp in the west:
From B to Camp 21) 85 Recruit Deserters, 65 Bowman Deserters
ANY general: [40R 129C 31LB (30R – 35R – 40R)]
ANY general: [39R 1S 129C 31LB (30R – 35R – 39R)]
ANY general: [37R 1S 139C 23XB (29R – 33R – 37R)]
ANY general: [37R 1S 139C 23K (29R – 33R – 37R)]
VETERAN general: [27R 1S 222C (21R – 25R – 27R)]
Garrison Position G6 (LOOTSPOT)
Invite your friend (lootspot buyer) now.
He should bring 1R, with which he can attack camp 3 first.

Lootspot buyer’s kill:
Camp 3) 65 Recruit Deserters, 85 Bowman Deserters
ANY general: [1R (1R)]
Before attacking the last leader camp, make sure your friend has made one kill.
Your own last attack has the same setup regardless of whether your friend klled one recruit or not:
Camp 3) 64 Recruit Deserters, 85 Bowman Deserters
ANY general: [27R 170C 3LB (19R – 23R – 27R)]
ANY general: [26R 1S 173C (19R – 23R – 26R)]
VETERAN general: [19R 1S 230C (14R – 17R – 19R)]
All garrison setups have been simulated at least 5000 times, using this simulator.
Even if I do the utmost to ensure that no errors occur anywhere, I am only human, and errors might always appear.
Thus, I do recommend that you double-check all setups in the simulator, especially before trying an attack the first time in a newly published setup.
All garrison setups where recruits and soldiers are included have a very small chance of one or a few soldiers being killed.
I prefer having it so tight, that in most cases that one soldier survives and actually might save one recruit by taking the last hits in the battle.
That being said, be prepared to lose the odd soldier(s) after playing the same adventure hundreds or thousands of times…
All round blocks have been optimised using Andelar’s TSO battle simulator V1.0.1 and double-checked using this simulator.
The durations of the blocks and attacks are based on this post.

Recent Comments