RaiderZ Optimal Efficient Build and Gameplay Guide
RaiderZ Optimal Efficient Build and Gameplay Guide by rosenduck
First and foremost, you’ll need a basic understanding of combat. This section will be dedicated to an analysis of the way combat is handled within this game.
Combat in RaiderZ is done via the server setting an area as “hostile”. The appropriate effects are placed in the affected space for the duration of the time the effect specifies. This is true for ALL combat-related actions, including player placement. For example, Player A uses a normal (left click) attack while standing still on Point X. For the duration of the effective skill (which is usually related to animation time and differs from weapon to weapon) the appropriate space in front of Point X is rendered “hostile” to all elements (NPCs, Players, mobs, world objects) that Player A has listed as “hostile”. That means anything that is within this space during this time will be affected by whatever the skill that is currently occupying the area does. In this case, “hostile” elements will take damage. Multiple effects from multiple players may exist in the same space during the same period of time.
————-
“But Duckie, that’s so obvious! Only a derpy derp wouldn’t know that! We don’t need this stuff, we’re pro!”
————-
Right. If you think that, if you really think that, then you’re in the wrong thread. GTFO.
While this system ensures that everything is done via the server and is therefore a lot harder to hack and exploit, it also opens up a whole new set of possibilities.
It is possible to manipulate damage areas based on your character’s placement. For example, if I were to cast a Gap Maker Attack (S + Left Click) right in front of me, I would have an animation window wherein it looks like my skill is being cast but isn’t, which allows me to change the orientation of my player, and consequently change the area that the skill affects. This is true for some other skills, like most ranged magic spells, which cast towards the target regardless of your orientation if you have successfully locked onto it.
-TECHNICAL-
The server handles combat separately from your client. In the case of a discrepancy between client and server information, the information that the server provides will be used. This is especially important if you have over 200ms. While you will experience choppy, sometimes warping gameplay, the server will always take into account the packets your client sent AT THE TIME IT REACHES IT. This is important for two reasons.
First, placement and combat packets are sent out differently. It is quite possible for you to send a combat packet to the server, move out of the way and send placement packets to the server and have both reach the server in rapid succession. What this means is that the server may very well interpret your combat actions as if it would affect the area you were in WHEN YOU CAST THEM, while it interprets your player as being somewhere else.
Second, the reverse may also happen. A client can send placement packets to the server while the server sends combat packets to the client. This is the primary cause of “lag hits”. The server recognizes your player as being in Point X when a skill affecting Point X was applied to Point X, even though your player could have already been at Point X +/- Y. This means that even though you were nowhere near Point X you will still be affected by the things that are affecting it. This was one of the main reasons legit players could take down Speed Hackers / Exploiters during the Alpha. It doesn’t matter where your client says you are, if the server says you’re here, you’re here. At least until it updates.
The weapons in RaiderZ each have their own intrinsic properties that you will not be notified of and are expected to learn as you continue to use the weapon. This includes a lot of aspects, such as damage fields, skill animations, skill adaptations, action lock out, available follow-through skills, and forced player displacement.
Here’s a basic rundown, as I’ve posted before in another thread:
Normal Attacks (Left Click):
Shortsword & Mace get a short range ~35 degree arc damage cone.
Staff gets a not-so-short range ~45 degree arc damage cone.
Greatsword & Hammer get a medium range ~115 degree arc damage cone.
Gap Making Attack (S + Left Click):
Shortsword & Mace get a short range ~45 degree arc damage cone.
Staff gets a short range ~45 degree arc damage cone.
Greatsword & Hammer get a not-so-short range ~130 arc damage cone.
Gap Closer Attack (W + Left Click):
Shortsword & Mace get a not-so-short range ~35 degree damage line.
Staff gets a short range small AoE radius.
Greatsword gets a small AoE radius as well as medium range ~45 degree damage line.
Hammer gets a medium range medium AoE radius.
Note that you can shift the direction of the damage field (cone, line) if you move your mouse quickly enough. A good example of this is the Gap Maker Attack that the Hammer has. It has a slight window of animation time that allows you to change the direction you’re facing which in turn changes where the damage arc will be.
These weapons also affect most applicable weapon-based skills, with the skills adapting to their damage.
For example, Crush, a tier1 Berserker skill, adapts to the characteristics of your weapon’s Gap Closer Attack. If the person using it has a Greatsword, it gets the corresponding damage line, range, and AoE. If the person using it has a Hammer, it gets the corresponding range and AoE.
Another good example is Focused / Healing Strike in the Cleric tree. The damage field changes radically changed depending on your weapon choice. If I’m not mistaken it adapts the Gap Maker Attack’s damage field, so depending on your weapon, the range and arc that it covers changes.
Another important thing to consider is that both the Gap Closer and Gap Maker attacks forcibly displace your character. That means once you cast them, your character will have no choice but to go from Point X to Point X +/- Y. This means that once the server confirms that you are indeed casting this skill, every point that you go through while moving from X to X +/- Y will register its effects onto your character. So if you’re moving from X to X+30 and at the same time there is a knockdown effect at X+20, you will be knocked down (unless the skill has inbuilt invulnerability frames, like dodge / Nocturne).
-TECHNICAL-
Each weapon has different animations that come with it, and each of these animations have their own set of intrinsic properties that you will have to learn as you go through the game. Generally speaking, the bigger your weapon is, the slower it moves and the longer it takes for animations to finish. This will affect your character in several ways.
- Animation Lock-out – This is the time that your character cannot do anything. This is the time where you sit there trying to mash buttons so that your character does something, but since the animation has it locked-out, anything and everything you do is IGNORED. Mind you, these lock-outs are very quick, ranging from ~0.05 seconds to ~1 second. Here’s a quick list of approximated animation lock-out times stolen- I mean “borrowed” from a Korean fansite.Normal Attacks (Left Click):
Shortsword & Mace: ~0.05 – ~0.25
Staff: ~0.15 – ~0.25
Greatsword & Hammer: ~0.15 – ~0.5
Gap Making Attack (S + Left Click):
Shortsword & Mace: ~0.25 / ~0.30
Staff: ~0.35
Greatsword & Hammer: ~0.50 / ~0.60
Gap Closer attack (W + Left Click):
Shortsword & Mace: ~0.45 / ~0.50
Staff: ~0.55
Greatsword & Hammer: ~0.85 / ~1
During this time, you are completely vulnerable to everything that you will encounter, with the exception of Gap Maker attacks which have a few inherent invulnerability frames.
- Skill Lock-out – Skill Lock-outs are similar to a full Animation Lock-out, however, they are selective as to what may or may not be done. For example, jumping and falling render you unable to use most of your skills and attacks, but give you access to a whole new set of attacks. Similarly, mounts forbid you to use your normal skills until you dismount from them. The most common skill lock-outs currently in the game are mounts and knockdown effects.
- Status Identification Reset – This is the animation property that is tied to two effects in particular: Stun and Knockdown. Your state is determined by the game HALFWAY into your animation, so if you’re getting up from a knockdown and are already halfway to standing up, you’re vulnerable to another knockdown effect. However, if you are just a little bit off half way, the skill will hit you, but the knockdown effect will be negated. Keep this in mind, especially in PvP. Recovery animations for Stun and Knockdown take ~0.1 and ~0.80, respectively.
RaiderZ has a variety of skills for you to choose from, currently divided into 5 tiers. As you progress through the game, you will gather skill points to unlock these tiers. Each tier has a prerequisite of 5 skill points before you move on to the next tier. Once 5 skill points are spent in any one tier in the same class, you will also obtain a special class skill. Each of these skills have their own special properties that in turn are affected by the state your player is in (character statistics, weapon equipped, armor type equipped, etc.)
Korean players have noted four important attributes in a skill. Personally, I find the fourth not as important as the first three, but I’ll list it anyway so you can make the decision for yourself.
1) Skill Animation Lock-Out – Not to be confused with basic combat Skill Lock-out or Animation Lock-out. Just like Animation Lock-outs, Skill Animation Lock-outs are intrinsic properties of skills that force you to lose all control of your character. These can range from anywhere between a fraction of a second to ~1.5 seconds. However, unlike normal combat animation lock-outs, special properties may be applied to your character.
-TECHNICAL-
Here’s an approximated list of all notable Skill Animation Lock-Outs.*
Majority of Melee Instant Cast Spells: ~0.05 – ~0.35
Ranged / Magic Based Spells: ~0.1 – ~0.35
Rush: ~0.25
Massive Strike: ~0.40
Crush: ~0.85 – ~1 (depending on weapon)
Nocturne: ~0.80
Buffalo Charge: ~1.2
*If you are currently slowed / frozen for whatever reason, add ~0.15 – ~0.3 to these times.
2) Skill Follow-Through – There are skills in RaiderZ that can mitigate Skill Animation and basic Animation Lock-Outs. These skills will not only reduce the lock-out time, but may also provide additional bonuses to the next skill/s used. As the skills that are available for follow-through change between classes, armors and weapons, making a comprehensive list was a task too daunting even for the Koreans (or they just wanted to keep it for themselves). Such as it is, I have nothing to stea- I mean borrow. However, I will provide you a simple example.
-TECHNICAL-
The following example is based upon a 10/15 Berserker/Cleric Hybrid in Chain Armor wielding a GIANT HAMMAR. We will call this player “Duckie”. Note that changing weapons and armor types will affect your lock-out times, so this example is only appropriate for the said setup.
Skills and Skill Follow-Through Setups:
Lines in RED are considered system line interpretations.
No Follow-Through:
Duckie casts Crush (Berserker Skill).
=Crush Animation Lock-Out start – ~1 second=
Duckie remains idle.
=Crush Animation Lock-Out end – duration ~1 second completed=
Single Follow-Through:
Duckie casts Crush (Berserker Skill).
=Crush Animation Lock-Out start – ~1 second=
Duckie casts Gap Maker Attack (S + Left Click) (Hammer Intrinsic Weapon Attack Skill).
=Skill Follow-Through Recognized – Crush Animation Lock-out cancelled=
=Gap Maker Attack Animation Lock-out start – ~0.60=
Duckie remains idle.
=Gap Maker Skill Animation Lock-out end – duration ~0.60 seconds completed=
Now here’s a multiple Skill Follow-Through Line, also known as a Skill Chain:
Duckie casts Divine Punishment (Cleric Skill).
=Divine Punishment Lock-Out start – ~0.2 seconds=
Duckie casts Dodge Attack (Berserker Skill).
=Skill Follow-Through recognized – Divine Punishment Animation Lock-out cancelled=
=Dodge Attack Animation Lock-Out start – ~0.4 seconds=
Duckie casts Focused Strike (Cleric Skill).
=Skill Follow-Through recognized – Dodge Attack Animation Lock-out cancelled=
=Focused Strike Animation Lock-Out start – ~0.25 seconds=
Duckie casts Divine Punishment (Cleric Skill).
=Skill Follow-Through recognized – Focused Strike Animation Lock-out cancelled=
=Divine Punishment Lock-Out start – ~0.2 seconds=
Duckie casts Buffalo Charge (Berserker Skill)
=Skill Follow-Through recognized – Divine Punishment Animation Lock-out cancelled=
=Buffalo Charge Animation Lock-out start – ~ 1.2 seconds=
Duckie casts Crush (Berserker Skill).
=IGNORED: Skill Follow-Through unrecognized – Buffalo Charge Animation Lock-out still in effect – ~0.6 seconds remaining=
Duckie casts Divine Punishment (Cleric Skill).
=IGNORED: Skill Follow-Through unrecognized – Buffalo Charge Animation Lock-out still in effect – ~0.2 seconds remaining=
=Buffalo Charge Animation Lock-out end – duration ~1.2 seconds completed=
As you can see, skills are only considered follow-through skills for certain other skills, not all of them. If I had attempted to cast Crush after Focused Strike, it would have been ignored.
IMPORTANT:
Do not confuse Animation Lock-out times with active skill times. Active skill times are the time the server needs to put an effect on the appropriate space, which is also usually shown in real time during the skill’s animation. Animation Lock-out is the time AFTER the server has processed placing your effects on the appropriate area, typically the last 1/4th of the skill animation. For example, Divine Punishment’s animation shows your character opening his or her hand in front of it. then lightning descends and makes a sparkly circle, then vanishes, though your character still has his or her hand open in front of them. The Skill Animation Lock-out time is only the time AFTER the lightning has vanished, but your character still has his or her hand open. Everything else before that is considered part of the active skill time for Divine Punishment.
-TECHNICAL-
3) Effect Priority Order – This is the order that the server uses to compute your skill output.
The original Korean post was too technical even for my liking, so I’ll try to simplify it for you.
Step 1: Server checks the validity of the packets the client sent. It checks a myriad of things, like player status, lock-out status, resource (HP/SP/MP) availability and so on and so forth.
Step 2: Server starts computing for damage. The simplified formula looks a bit like this:

Now, let me show you a simple example of how this works.
Let’s say a player, we’ll cal him Duckie, is casting Divine Punishment, a cleric skill that deals 60% Holy Attribute Magic Damage to a small area in front of him.
Relevant Stat components:
Duckie’s relevant base stats are 100 Magic Damage.
Duckie is also currently using a GIANT HAMMAR which adds another 100 Magic Damage.
Duckie has also eaten a “Special” food that gives him +15% magic damage for 15 minutes.
Duckie has also spent 5 points in 2handed Weapon Mastery, giving him +25% damage while he has a 2handed weapon equipped.
Relevant Skill components:
Duckie spent 5 points in Divine Mastery, which means all his healing and holy damage is increased by 25%.
Duckie is also currently under the effects of Possession, which increases all of his holy damage by 10% and reduces casting time.
With this set up, the formula now looks like this:
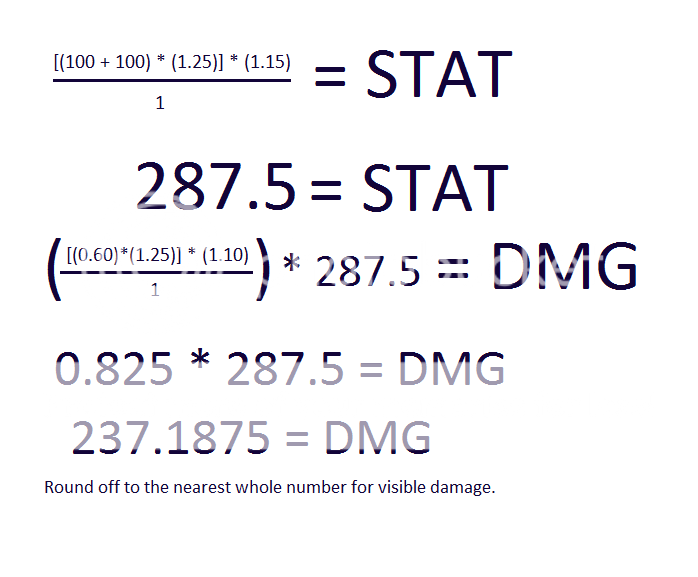
Note that damage reduction works along the lines of a similar formula, with the corresponding damage reduction values substituted for the damage dealing ones.
PART 2.2: BUILD OPTIMIZATION


Recent Comments