Guild Wars 2 Crafting Complete Guide
Guild Wars 2 Crafting Complete Guide by Jerich
Over the past three beta weekends, I leveled each crafting discipline (All except huntsman over 100). I also spent a ton of time mapping zones and researching any source I could find. Here are some pointers to help you hit the ground running when the game releases.
Table of Contents
Part 1: A Crafting Overview
Part 2: Choosing a Crafting Discipline
Part 3: Crafting Explained (with Tips for Leveling) (Basic) (Intermediate) (Advanced)
Part 4: Gathering Explained (More than Just Nodes!) (Basic) (Intermediate) (Advanced)(for Gaiscioch Members)
Part 5: Crafting Maps (Vendors, Farming Locations, and Gathering Routes)
Part 6: Tips for Selling on the Trading Post
Part 7: General Tips / Tricks
Part 8: Discipline Specific Tips / Recipes (Armorsmith) (Leatherworker) (Tailor)(Weaponsmith) (Huntsman) (Artificer)(Jewler)(Chef)
Part 9: Useful Links
Part 10: Thanks and Recognition
Part 11: How to Leave Feedback for this Guide
Part 1: A Guildwars 2 Crafting Overview
Three Things Everyone Should Know About GW2 Crafting
#1: Everyone should Gather
Gathering in Guild Wars 2 is a HUGE source of experience and loot. Even if you are not going to craft in GW 2, the first thing you should do when you start leveling is to buy some gathering tools and at least harvest the nodes on your questing path. I will discuss gathering more in part four.
#2: You Don’t Want to Level Crafting by Grinding on Default Recipes
The fastest and most efficient way to level crafting disciplines is to use the discovery process. If you choose not to use this feature, you will need about two to three times the materials. (Note: Artificer, Chef and Jeweler sometimes break this rule.)
#3: You Should not Try to Learn all the Recipes
The Guild Wars 2 system is designed so that you will only learn about 1/4 to 1/3 of the total crafting recipes while leveling. If you try to learn them all, you need three to four times the ingredients (which could be better spent leveling an entirely different discipline).
Why you should craft in Guild Wars 2
While you could play Guild Wars 2 without crafting, there are several reasons to consider picking up a couple disciplines even if you weren’t planning on it:
- Experience: Every crafting profession will give you ten character levels. When you throw gathering in the mix, it is not impossible to get over 25% of your character experience just through crafting.
- Self Sufficiency: Even with a global trading post, there are often times you will not be able to find the exact item you want. Leveling crafting lets you tailor make your equipment to whatever stat you want without having to hope that someone put the exact item you want on the trading post for a decent price.
- Fun: If you value discovery and making your own gear, the Guildwars 2 crafting process is easy, non-grindy and fun!
- Completion: If completion is your thing, no character is fully maxed out without two level 400 professions. (A few people may even say eight!)
- Helping Others: It is fun to be able to meet other people’s needs.
- Achievements: Crafting actually has its own achievement section! You have to max out every discipline and do quite a bit of gathering and salvaging to complete them all. Also, many of the daily and monthly achievements (which have great rewards) are crafting related. (Note: Luckily these achievements seem to be by account based instead of character based.)
- Epic Items: You will need to have at least two crafting disciplines maxed to make epic weapons. These are the mountaintop goals of GW 2 PvE.
- Profit: While it can take a lot of work to become wealthy while crafting, it is actually one of the better ways to become wealthy (if you know what you are doing). I will write a section on this later.
- Convenient Bank Access: You can access your bank via crafting stations. Since there are crafting stations at each major outpost, this means you will be able to access your bank on the field.
What are the Guild Wars 2 Crafting Disciplines?

*In addition to specialty bags, armor crafting professions can all make normal and invisible bags. Jeweler Accessories consist of rings, earrings and necklaces.
What are the steps of the Guild Wars 2 Crafting Process?
Guild Wars 2 does not employ any crafting mini-games like Everquest 2 or Vanguard Saga of Heroes. This is what the general crafting process looks like:
Step 1: Gathering your Raw Materials (using one or more of these methods)
- Harvest a node
- Break down equipment by using a salvage kit
- Loot items from monsters
- Buy items from vendors for gold or karma (some of which must be unlocked first)
- Transmute the ingredient using the Mystic Forge (either upgrade the tier of component or make an entirely new one)
Step 2: Combine your Raw Materials into Intermediary Ingredients
Step 3: Combine your Intermediary Ingredients to form a finished product
- Using a recipe if you already have it
- Using the discovery process if you do not
Here is a more detailed chart for you visual people that shows how the complete cycle works…

How is Guild Wars 2 Crafting Different than Other MMOs?
While there are similarities to existing MMOs, Guild Wars 2 definitely has some distinctives.
- It is Discovery Based: You are given very few recipes and have to experiment (or read a guide) to uncover new ones. This is by far the most efficient way to level and actually pretty easy if you know what you are doing.
- It is Anti-Grind: You do not need to make 100 widgets to level crafting in Guild Wars 2. If you are doing it right, you will only need to make one each of a specific finished product.
- It is Big: There are a ton of recipes to discover. Armor Smith alone has over one hundred and fifty finished products in tier one. Expect there to be well over 500 valid recipes for each profession.
- It has Bloat (which is a good thing): Each crafter is not meant to discover everything. Most people will make less than a quarter of the total recipes while leveling. This is by design and discovering each recipe will be a time consuming (and somewhat wasteful process). You could most likely level four to five disciplines with the resources necessary to completely explore one of them.
- It is More Streamlined: From being able to send crafting materials directly to your bank, to being able to access your bank while crafting, to being able to discover recipes without every looking at a guide, Guild Wars 2’s crafting process is more user friendly than any game I have played.
- It is Not Random: While some people may debate this with me, I believe this is a good thing.
Won’t a Global Trading Post Ruin the Crafting Market?
While this has worried many people, Arenanet has designed their crafting system to work with a global marketplace. Here is how:
- You don’t need to make more than one of any item while leveling. This prevents crafted items from flooding the marketplace.
- You won’t discover more than a quarter to a third of the items while leveling. This means that everyone will have niche recipes that they make that other people don’t.
- There are a ton of recipes to make (that means that there are enough niches to satisfy a lot of people).
- Due to Guild Wars 2’s item scaling philosophy, crafted items won’t become obsolete with new content like they do in other MMOs.
- Crafted items are Bind on Equip, so people won’t be able to resell them after using them.
- This is not to say that it is easy to make a profit crafting (it isn’t), but many crafters have made money and have made a lot of it.
I believe that these factors will enable a smart and motivated crafter to turn a profit even when faced with the competition from a global marketplace. I will go into detail on how later.
Part 2: Choosing Your Crafting Disciplines
You can choose two active crafting disciplines per character. While you can actually have more, doing so incurs a cost (40 silver at max level) each time you want to swap back to an inactive discipline. There are a variety of reasons to choose a particular set of crafting disciplines on your character. Here are some things you should think about before choosing.
Is it Useful to Your Profession?
Here is a chart of which discipline I think is most usefull to each profession:

For those that want a little more information, here is a more detailed list of why I picked the choices above. I sorted them so the discipine I personally feel most useful to each profession is on top:
All Professions
| Warrior
| Guardian
|
Thief
| Engineer
| Ranger
|
Elementalist
| Necromancer
| Mesmer
|
Which disciplines work well together materials wise?
Which disciplines are synergistic with regards to materials? I researched this by making a spreadsheet of all the materials used in Tier one Crafting by profession and then graphed the outcome. Here is the result:

As you can see, the limiting component for the six equipment making professions is Fine Crafting Materials (like a Vial of Weak Blood or a Tiny Totem). These are materials that primarily drop from monsters, they cannot be harvested. If you attempt to do more than one of these professions, you will need to either grind or buy extra Fine Crafting Materials from the Auction House. In fact, the trend has been for Arenanet to increase the ammount of fine crafting components needed. At the time I am writing this guide, the percentage of fine crafting components needed has actually increased.
Armorsmith and Tailoring use the most cloth, which I find the hardest ingredient to collect in large amount. All the Weapon skills use varying amounts of wood and ore.
What conclusions can we make from this chart?
- Since Jeweler and Chef are the only professions that don’t use Fine Crafting Materials, they are the best complimentary discipline for any other discipline. (Note that artificer does use some cooking ingredients for potions)
- In particular, Jeweler works best with any metal heavy discipline (since you get gems from metal nodes). While this is challenging for Tier 1 since they both use copper ore, they use different metals in T2 and T3 (but the same metals again in T4-T6).
- To a lesser extent, any weapon crafting discipline works well with any armor crafting discipline. Armor Crafter and Weaponsmith are the worst of these combinations since they both use metal.
- The worst combinations are two Weapon or two Armor disciplines.
What type of player are you?
Certain types of playing styles yield themselves to gathering different kinds of materials.
The Event / Heart Farmer
This kind of player goes from heart to heart but doesn’t make a huge effort to explore the nooks and crannies of an area. While not going out of their way for gathering, they will salvage drops and gather nodes that are in their path. Basically they just ride the event wave of the zone. This playstyle will yield equal amounts of ore, cloth, wood and fine crafting materials but low gems. The following disciplines match this playstyle:
- Best Fit: Tailor, Leatherworker, Artificer
- Okay Fit: Huntsman, Armorsmith, Chef
- Avoid: Weaponsmith, Jeweler
The Explorer
This kind of player likes to explore the nook and crannies of a particular zone. They will go into caves, scrape the edges and swim down to the bottom of lakes just for the fun of it. This playstyle gets slightly more of everything than the previous, but gets a LOT more gems and ore. Because of this, they are the perfect candidates for the following disciplines:
- Best Fit: Weaponsmith, Jeweler
- Good Fit: Everything Else
- Avoid: Nothing… these guys can do it all. (Avoid Chef, though, if you only plan on doing one or two starter zones)
The Completionist
This kind of player completes every zone in order, getting every heart, exploring every zone, and basically just likes to have 100% completion on every area in the game. They will get a lot of every material and their ore ratio will depend on how far off the beaten track they go. If they just go from point to point, their material ratio will be more like the Heart Farmer. If they go off the beaten track it will be more like the Explorer. Needless to say, though, these guys will be swimming in materials and may even have enough to feed four or more disciplines on alts (unless they try to discover every recipe… that way leads to madness).
- Best Fit: Chef (This discipline needs access to heart vendors across a wide ranger of areas… Only a Completionist can really do it justice) Right now, however, chef is fairly easy to level and you cannot make much profit on it. Personally, however, I think it is the most fun of all disciplines.
- Good Fit: Everything else and perhaps 3-4 more disciplines. Your only problem will be being too high a level to use your gear… but that is what alts are for!
An Example of Two different playing Styles
I did two heart runs during the beta. One was a leisurely 11 hour 15 minute full clear of Queensdale. The other was a four hour rush through hearts in Wayfarer foothills where I just mapped many nodes instead of mining them. Here are the crafting materials I got for both of them:
- Leisurely run: 370 copper, 76 jute, 134 leather, 270 wood, 165 fine crafting materials, 88 gems
- Quick run: 48 copper, 46 jute, 24 leather, 76 wood, 44 fine crafting materials, 5 gems
Do you want to sell your goods on the Market?
Some people craft for profit as well as fun. This style of player is most likely interested in producing items that the largest amount of people need. I tried to project this by using guildwars2census.com and taking note of the class percentage data. I then processed the various goods disciplines make by class and created a chart that says what percentage of the market each discipline makes gear for (Note: I assumed people would only buy about 4-6 weapons including underwater but would buy a full set of gear). Here is the chart:
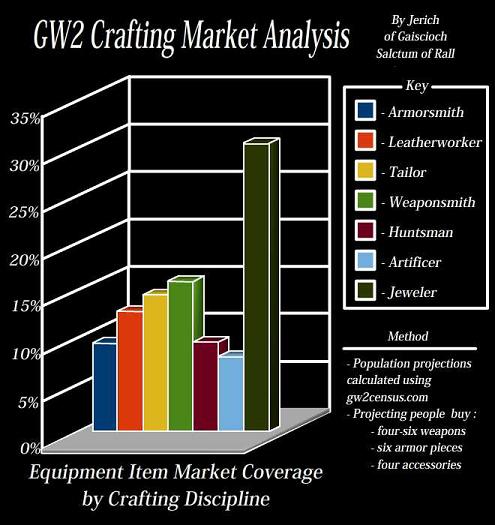
As you probably expected, Jeweler comes out way ahead since it makes goods that every class can use. Weaponsmith makes weapons that almost every class can use so it is second.
- Disciplines with Highest Market Coverage: Jeweler, Weaponsmith, Tailor
- Disciplines with Lowest Market Coverage: Armorsmith, Huntsman, Artificer*
* While Artificer falls dead last, remember that both it and Chef make consumable buffs. If these become the standard for dungeon and WvWvW raids, both of these professions may turn out to be lucrative.
One thing to to keep in mind while looking at this chart, however, is that it only takes into account potential demand for items. The price of items will also be dependent on supply and this will be hard to predict before the game goes live. Recently, John Smith (The Economist of GW 2) posted a blog about the beta economies here. It seems that jeweler was the most popular profession by a lot. If this trend continues, weaponcrafting professions may be the most lucrative in terms of supply and demand.
Also be aware that artificer, jewelcrafting and cooking seem to be the easiest professions to level right now (because they are not as dependent on fine crafting materials). Be aware that this will affect supply. I will talk more about how to sell your goods on the Auction House for profit in part 6 of this guide.
Do you want Legendary Weapons?
If you desire to eventually get legendary weapons for your characters, you may be interested to know that each legendary weapon requires two components that can only be made by max rank 400 crafters. We don’t know whether these can be traded for or not, but you may want to make them yourself anyway. Each weapon requires two different crafting disciplines and while this is a pre-launch list that may be subject to change… Here are some possible combinations (according to the reddit post http://www.reddit.com/r/Guildwars2/comments/xnbom/what_we_currently_know_about_crafting_legendary/ ):
Update: We now know how to make each legendary weapon! Be warned that they take over two million karma and many many resources to make. Read this guide for more information: http://www.guildwars2guru.com/news/780-the-recipe-for-crafting-your-legendary-including-screenshots/:
- Axe: Jeweler, Weaponsmith
- Dagger: Cook, Weaponsmith
- Greatsword: Armorsmith, Weaponsmith
- Hammer: Jeweler, Weaponsmith
- Mace: Armorsmith, Weaponsmith
- Shield: Armorsmith, Weaponsmith
- Sword: Artificer, Weaponsmith
- Spear: Leatherworker, Weaponsmith
- Longbow: Leatherworker, Huntsman
- Shortbow: Jeweler, Huntsman
- Rifle: Tailor, Huntsman
- Pistol: Armorsmith, Huntsman (Some people say it uses Tailor instead of Armorsmith)
- Torch: Unknown, Huntmsan
- Warhorn: Leatherworker, Huntmsan
- Speargun: Cook, Huntsman
- Focus: Jeweler, Artificer
- Scepter: Armorsmith, Artificer
- Staff: Cook, Artificer
- Trident: Leatherworker, Artificer
Maxing Every Discipline – Alts or Not?
While you can only have two active disciplines, you can swap between them without losing recipes. The cost per swap is 10 copper per crafting level (or 40 silver at max level). This allows you to have all disciplines at maximum on one character if you are willing to pay the costs. Here are the pros and cons to each:
Using Alts
- Pro – Cheaper… you don’t have to pay the fee for switching
- Pro – You get 20 free levels on your alt for maxing two professions
- Pro – More bag space between characters for intermediary components
- Con – You have to swap characters often.
- Con – This will make newbie areas slightly easier if you powerlevel crafting since your alts will all start at level 20. Guild Wars 2 level scaling mostly mitigates this effect but not completely. (Some people may see this as a Pro)
Recommendation for using alts
- If you are using alts, combine your weapon and armorsmithing disciplines on the same characters. This allows you to buy the rare and exotic karma recipes one (or two times) instead of once for each recipe.
Using One Character
- Pro – Your main character is more “complete”
- Pro – 60 extra skill points on your main character (makes getting legendary weapons easier)
- Pro – You don’t have to swap characters to make an item
- Pro – You will be able to make the components for any epic weapon you want
- Pro – Some heart vendor recipes are soulbound. This means that you will have to explore with alternate characters to get them if you don’t craft on your main.
- Con – This can get expensive if you switch often (40 silver may not break the bank, but it isn’t cheap either)
- Con – Space will get short and you will find yourself muling often.
Part 3: Crafting Explained (with tips for leveling)
Crafting Basics A: Learning a Discipline
Typically the first thing you should do with a new character after doing one or so hearts quest is buy some gathering tools. I will talk more about this later. The next thing I would do if this is your first time playing Guild Wars 2 is to explore your home city. In particular, look for the bank, the Asuran Portal to Lion’s Arch, and the crafting area… Here is what they look like:
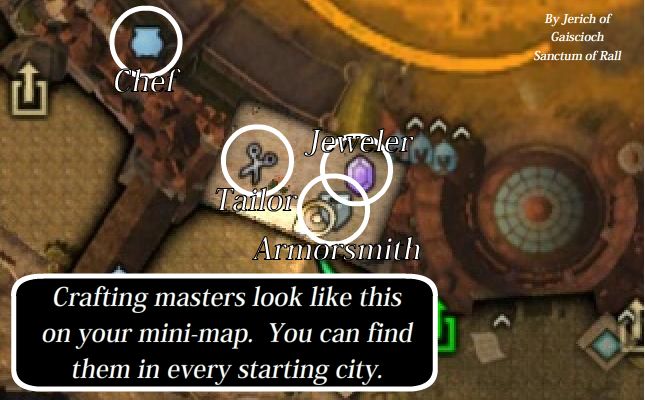
Once you have decided on your two disciplines, it is time to talk to the master crafter and learn them. Don’t worry too much about choosing wrongly. It is free to drop one of your existing disciplines and pick up a new one later. It is also fairly inexpensive to pick up a discipline you dropped. (10 copper per skill point).
Personally, if this is your first time playing, I would go to Lion’s Arch at this time through the glowing Asura gate in your home town. I would do this for two main reasons…
- Lion’s arch is the way to get to other Newbie areas (you will likely want to do at least a couple).
- Lion’s Arch is the best place to craft in the game (crafting stations, auction house, bank and Mystic Forge are all in one convenient location).
I used to do all my crafting in Divinities Reach, but honestly, Lion’s Arch is so much better than any other area that you want to make this your crafting home.
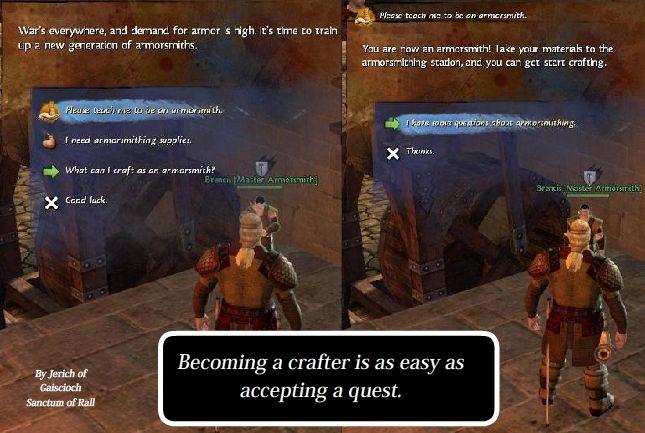
Now that you are a crafter, you should go out and farm some nodes, kill some monsters, and do heart quests / events until you hit level 5 (the first level where you can make items you can wear). You won’t have a ton of bag space yet, but you can right click on crafting components and send them directly to your bank. Once you hit level 5, you probably have enough components stored up to begin crafting…
Crafting Basics B: The Crafting Station
You will want to run up to your crafting station and interact with it. A big user interface will then pop up with a variety of tabs you can pick from. There are four in all…
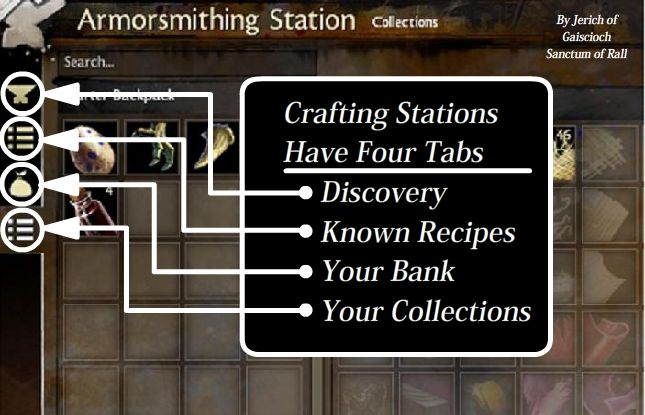
The first place to begin is to go to your collections tab… If you have been gathering components and sending them to your bank, this is where they show up. In order to start crafting, you actually have to transfer all relevant materials to your inventory.
Note that now might also be a good time to either craft yourself eight slot bags if you have the components, buy them off the auction house or at least buy four of the leather bags you can buy from almost any vendor.
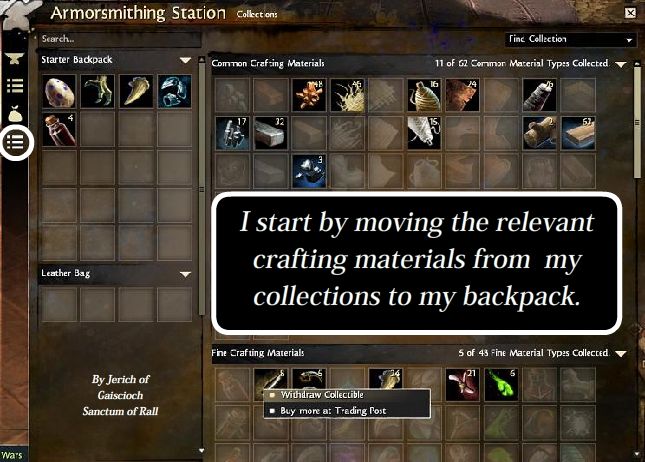
Now that you have moved your materials to your inventory, you can switch to the recipe tab and start crafting. The first thing you will need to do is refine your basic materials. You should always do these in batch as soon as you are able to make a new tier because you want to get as many levels as possible through refinement.
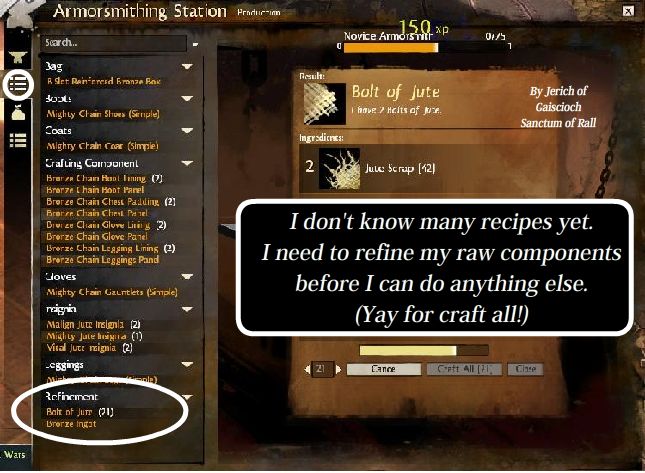
After I have done this, it is time to make some intermediary components.
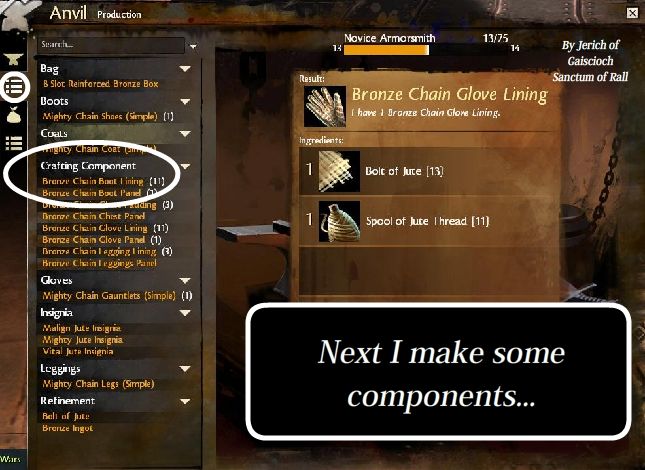
If this is your first time playing, you probably won’t have enough materials to make a ton of items. You probably do have enough to make some. Hopefully you have some weak blood by now. If you do you can make some level five weapons or armor. You might also want to make yourself some bags and runes if your profession allows it.
Crafting Basics C: The Discovery Process
You may be tempted at this point to grind your levels on basic things like bags and simple armor. You should not do this. Guild Wars 2 crafting is discovery based and you level at least twice as fast using the discovery system. My next step is usually to make enough components to begin the discovery process. In the case of leveling Armorsmith, that means I will need to make some insignias.
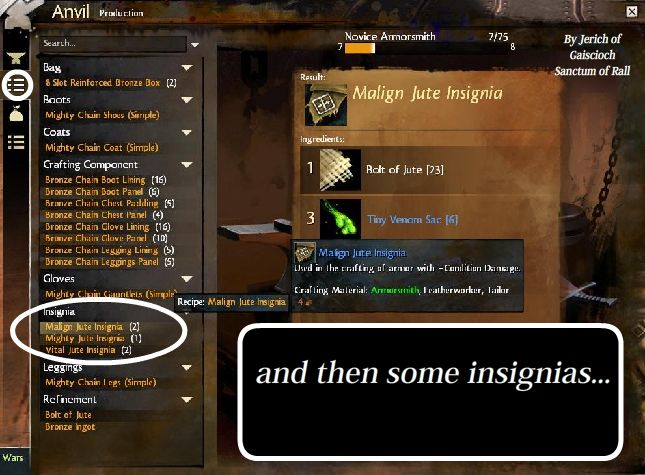
Once you have enough made components, you can switch over to the discovery tab and begin the discovery process.
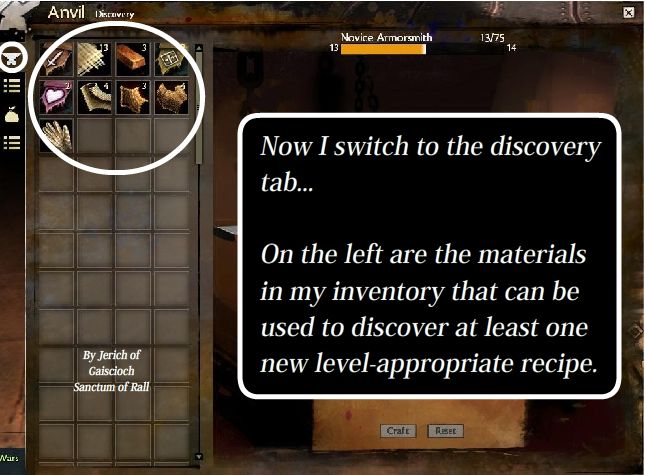
The first thing you will see when you do this is a bunch of materials on the left. These are all the materials that are the ingredients of at least one new recipe you can discover. You can select any of them by either double clicking them or dragging them to the right. (Note: Charlatan pointed out that components can sometimes appear in red for cooking if you have found all the level appropriate recipes for that component.)
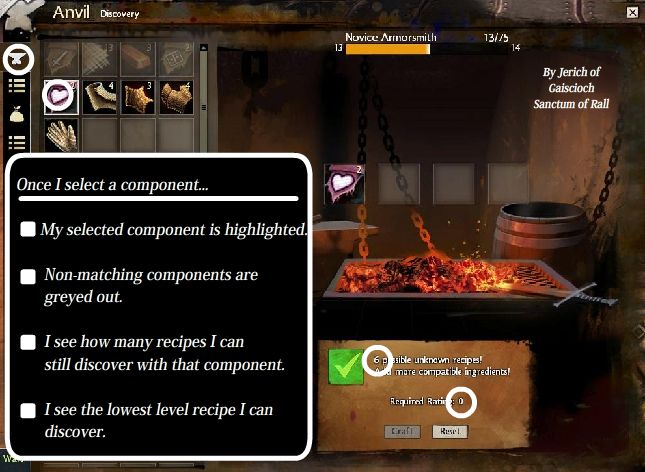
Now that you have selected at least one component, you can clearly see how many undiscovered recipes there are that use it (note that not all of these will currently be creatable at your skill level). You can also see the required skill level for the currently selected item. The nicest thing about the discovery pane, is that the items that don’t combine with the selected material will gray out (which makes finding new recipes fairly easy).
Next I just keep adding components…
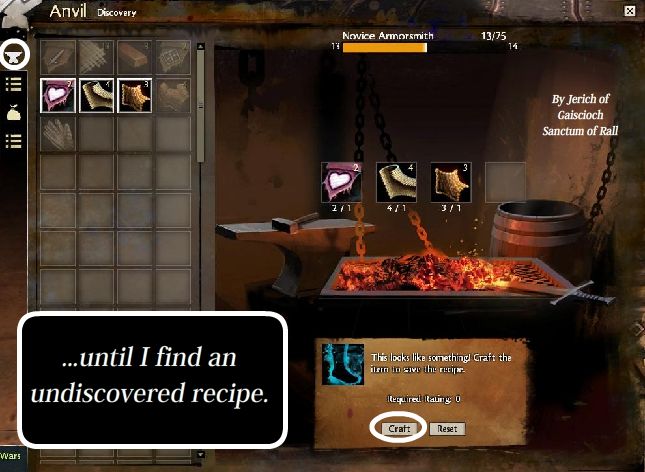
Notice that all the other components are now grayed out and I have the option to craft this new recipe.
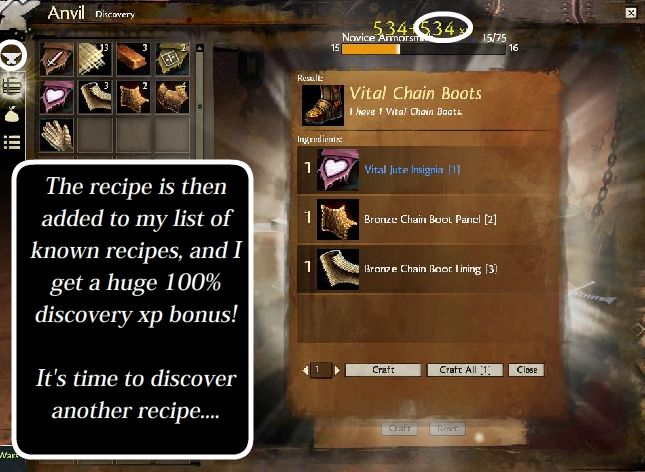
When you click the button, the UI tells you what you have crafted, adds it to your recipe list and gives you the option to make more. If particular, note the large amount of bonus experience we get for discovery. In this case it is 100% but it can go as high as 150% if we get a critical success. This is the main reason you generally want to level crafting through discovery. You can level with half the materials you would use just by grinding. Next I will talk about how to efficiently level crafting.
Intermediate Crafting Part A: The Guild Wars 2 Tiered Crafting System
Crafting in Guild Wars 2 uses six tiered system. During the beta weekend events we have been able to get to tier three. Here is a chart that shows the tiers as of Beta Weekend 3 (I have added the tiers after tier three by searching for recipes).
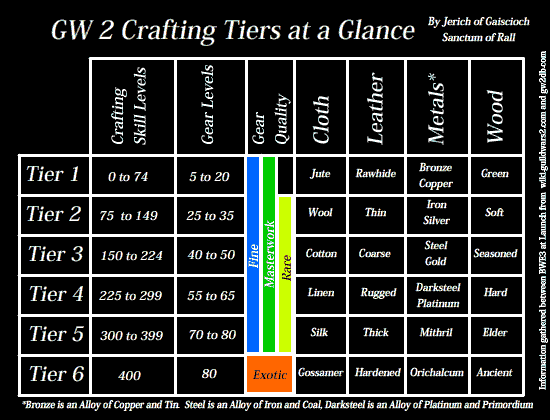
As you can see, there is a repeating pattern of 75 skill point for each level except for tier five (which has 100 skill points) and tier six (which has one skill point). Every discipline except cooking (which follows a real world recipe system) follows this pattern:
- First 25 Skill Points: Refine Base Materials, Make Component Items, Fine Equipment (Three Types)
- Next 25 Skill Points: Fine Equipment (The Other Types)
- Final 25 Skill Points: Masterwork / Rare (T2-T4) Equipment
- Tier 5 Extra Skill Points: Rare Equipment
- Tier 6: Exotic Equipment (Requires Globs of Ectoplasm as a Limiting Ingredient)
Now let’s more closely example a tier in detail.
Intermediate Crafting B: How Each Tier is Structured
If you want to level as effieciently as possible, you need to understand the strucutre behind each crafting Tier. Every discipline except cooking uses a repeating pattern. Let’s look more closely at T1 Armorsmith…
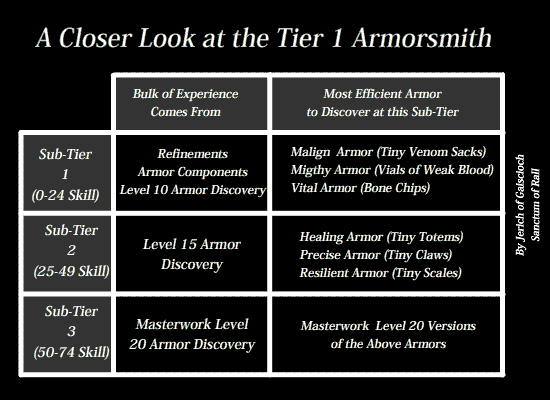
As you can see, the tier can be split into three sub-tiers of skill, each being comprised of 25 skill points:
- In Sub-Tier 1: We will primarily refine our raw materials, make crafting components and discover the first level of armor (Note that in this tier we can make three types of armor)
- In Sub-Tier 2: We will primarily discover the next level of armor (Again three new types)
- In Sub-Tier 3: We will discover masterwork armor. Since masterwork armor takes a lot of fine crafting components to make, this is the most difficult sub-tier to skill through.
- Once you get to skill level 75 you repeat the process, but this time with Tier 2 components.
Intermediate Crafting C: Tips for Efficient Leveling
Here are some general tips that apply the above information to level as efficiently as possible….
Tip #1: Make your refinements and components as soon as they become available.
Refinements and components only give experience for twenty five levels. You will want to front-load them as much as possible because doing so will extract the maximum experience before they go gray. I always start by doing batch refinement of everything I have collected so far and then make enough components for my discovery process. Read section D for an example of how to do this in practice.
Tip #2: Discovery is almost always better than grinding.
The reason why is that discovery yields 100% more bonus experience than grinding on a known recipe. The only reason I would grind is if you are making something that you will use (bags, gear, multiple runes, etc) or if you find an especially easy recipe (cooking and artificer have a lot of these low hanging fruit). Also note that jeweler has less recipes than the other professions. You will most likely have to make duplicates from 25-50. After this, you will have enough recipes to level with discovery. (Thank you wildclaw and Lasmrah for bringing this up)
Tip #3: You should make items appropriate to your sub-tier when possible
You may be tempted to keep leveling a Sub-Tier 1 level item once you hit level 25 because they will still yield experience. Resist the urge. Why? You will level much faster and more efficiently using the Sub-Tier 2 armor that just opened up. This will mean you will have more available fine crafting components for Sub-Tier 3. Since this is the hardest Sub-Tier to get through, you will need to save as many components as possible.
Tip #4: Be adaptable in your level strategy.
Have you been finding a ton of a specific component? Go ahead and discover one of each type of item that component can make. Are you finding an even amount of components? Cherry pick the recipes that use the least amount of materials and make one type of each of those. You should be constantly evaluating what you have available and use the appropriate materials. The main thing to watch out for is the second set of 25 points. Don’t violate Tip #3 if you can help it.
Tip #5: Don’t be afraid to use the trading post.
You can get a lot of discovery points making things like runes and sigils if you buy the rare components on the trading post. Always be searching for cheap fine crafting materials and rare components. Sell you excess materials and buy these cheaply. You will level a lot faster if you do.
Tip #6: Become best friends with web crafting databases
While most of the general recipes are predictable, you will often miss easy experience like runes and bag discoveries. You should bookmark sites like http://wiki.guildwars2.com/ and http://www.gw2db.com/ and get used to using them. I use Guildwars 2 wiki to get a general understanding of what is available to craft and gw2db for its sorting potential. In particular gw2db.com can sort according to crafting discipline and skill level. This lets you see at a glance what you can craft.
Tip #7: Don’t kill yourself with efficiency, expecially if you are making equipment for yourself as you go
You don’t need to worry about being as efficient as possible. As long as you are not completely inefficient you should be able to level quickly and easily. Just making gear you are going to use will almost take you through a tier. The bellow example illustrates this point.
Intermediate Crafting D: An Example of Leveling from 0 to 75 Armorsmith
Let’s say I am making a new warrior and I want to create my own gear and bags while leveling. I don’t have access to the resources of another character so I won’t be able to do things like frontload the first 20 points of each tier with refinements and components. Here is what I can expect assuming I am really unlucky and don’t get any critical successes (You will actually level slightly faster than this example).
Character Level 1-5 (Armorsmith Skill Level 0)…
During these early levels, I will mine ore, farm jute and some blood. Once I get to level 5 it is time to make some armor and runes to wear!
- Refine 25 copper ingots: (Current Skill Level 5) Edit (In the last stress test I tried this and remembered you can only refine copper in chunks of 5. I need to recalculate)
- Refine 8 jute: (Current Skill Level 7)
- Make bronze glove lining, bronze glove panel, bronze chain chest lining, bronze chain chest padding, bronze chain leggings lining, bronze chain leggings panel, bronze chain boot lining, bronze chain boot panel. (Current Skill Level 10) Edit (Don’t make simple chain legs until they are fixed. As of the last stress test they use the box of armor recipe instead of the correct one. You will waste components.)
- Make simple mighty gauntlets, shoes, coat and leggings. (Current Skill Level 14)
- Discover a rune of life: (Current Skill Level 17).
- Make three more runes of life: (Current Skill Level 20)
Character Level 6-10 (Armorsmith Skill Level 20)…
I continue to mine ore, farm jute, etc. I am also going to try to get twelve bone chips so I can make myself some vital armor. Once I have the materials, I will make myself two eight slot boxes and some level 10 armor.
- Refine 20 bronze ingots: (Current Skill Level 21)
- Create 2 eight slot boxes: (Current Skill Level 23)
- Refine Ingots, create a suit of chain components and 4 vital jute insignias: (Current Skill Level 24)
- Discover a full set of vital chain armor: (Current Skill Level 28)
- Make 4 runes of life: (Current Skill Level 31)
Character Level 11-15 (Armorsmith Skill Level 31)…
Continue to farm ingredients and level. I am going for a defensive character with my warrior so I decide I want toughness this time and make sure I either farm fifteen tiny scales or get them from the auction house. I also need four crystal and molten slivers to make runes for my level fifteen armor. I am also going to want three tiny scales and three glittering dust to make my last two 8-slot bags.
- Make my 5 resilient insignias and a set of chain components: (Current Skill Level 34)
- Discover my resilient bronze armor: (Current Skill Level 44)
- Discover an 8-slot equipment box and 8-slot safe box: (Current Skill Level 47)
- Create a rune of life… Create / Discover 2 minor runes of the soldier and fighter. (Current Skill Level 51) (Edit: I couldn’t buy charges slivers since they were too expensive this last stress test… so I just discovered a piece of precise and healing armor instead)
Character Level 16-20 (Armorsmith Level 51)…
I am continuing to level and farm Tier 1 materials. Note that I will start finding tier two materials somewhere in this level range. In keeping with my defensive theme, I’m going to make some masterwork resilient armor and keep the same rune combination as last time (with one rune of Svanir thrown in the mix).
- Make my armor components and six embroidered jute insignias: (Skill Level 55)
- Make my 2x runes of the soldier, warrior, 1x rune of life and discover a minor rune of Svanir: (Skill Level 59)
- Make my masterwork resilient armor: (Skill Level 70).
Note that at this point, I am probably only one four discoveries away from Skill Level 75 and Tier 2 (depending on how lucky I have been with my discoveries). That should be pretty easy at this point.
(I tested this progression on the 8-21 Stress test and aside from the comments I have already made it worked as expected. I ended at 73 skill after bonuses and was able to get to 75 by crafting a couple extra masterwork discoveries)
I don’t typically plan out my leveling path in this much detail, but I wanted to show you how easy it is to get from one tier to the other even if you are not 100% efficient. You can practically do it just making items that you are going to personally use. While it is possible to level a bit more efficiently that my warrior did in this example, you can still level crafting while you level up your character and keep yourself geared at the same time.
Advanced Crafting A: How crafting experience Is Calculated
The Math Behind Crafting Experience
People at Guild Wars 2 Wiki have already figured out how the experience formula for crafting works. I am going to get a little mathy here… so if you don’t like math, feel free to skip to the conclusions summary after the next chart.
The raw equations (taken from wiki.guildwars2.com):
- Equation for Experience Needed per Crafting Level: xp_req(N) = floor(xp_req(N-1) * 1.01) where
- The first crafting level requires 500 experience.
- Each level beyond that requires 1% more than the last.
- Equation for Crafting XP Gain per Item: xp_gain(N) = xp_req(N+1) * multiplier * (1.0 – (N – N_min) / span) where
- Refinements have a multiplier of .3 and a span of 25
- Parts have a multiplier of .6 and a span of 25
- Items / Foods have a multiplier of 1.4 and a span of 40
- Discovery gets a bonus of 100%
- Critical successes get a bonus of up to 50%
- Making items in batch may or may not give bonuses (this is currently being debated on the talk page of the wiki)
The important thing to note here is that the xp gain equation takes the requirement for the next level into consideration. This means the leveling curve is flat and the percentage of experience you get towards your next level is only dependent on the item type you are making and how much you exceed that items minimum level requirement.
By using these principals and the equations, we can build the following experience gain chart which should be viable for the entire crafting process:
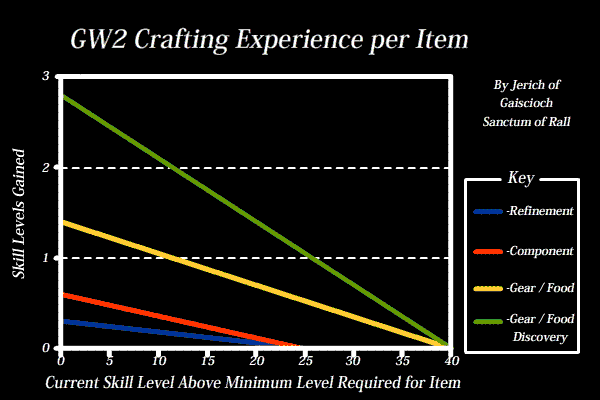
Observations (Non-mathy folks start reading again here)
- Refinements and components only give experience for 25 crafting levels beyond the minimum.
- Gear / Food gives experience for 40 levels beyond the minimum.
- Discovering a recipe at the level it opens can yield almost 3 crafting levels of experience!
- Gear / Food and Discoveries will give you the Bulk of your experience.
Advanced Crafting B: Tips for the Completionist who is Overleveled
One problem serious crafters may face is being overleveled. If you are serious about cooking and leveling multiple professions at once you are probably going to go for completion of each zone. This means that you may hit level 25 before you start getting many tier two ingredients. It would be a sad thing indeed to not be able to create your own gear! Here is how to get around this problem…
Tip #1: Offer to Make Gear for your Guildies/Friends!
Most likely, you are leveling slightly slower than the powerhouses of your guild that are not going for multi-zone completion. Offer to convert their raw materials into gear for them. You get levels and they get gear. Everyone wins!
Tip #2: Use the Mystic Forge!
Even if you don’t have any friends, you should at least make friends with Zommoros. He is always willing to help you out… for a price.:) You can actually covert one tier of ingredients to the next using the Mystic Forge. I will go into this more in the next section. If you are doing multiple full clears of zones, you are most likely swimming in Tier 1 components and skill points. You can use those extra ingredients to start you on your Tier 2 journey so you don’t miss out on the fun of self-crafted gear.
Tip #3: Use the Trading Post!
Sell some of your excess ingredients and buy tier two ones. While this is usually more expensive than the Mystic Forge, you should be able to get some great deals if you look for them. Some components make gear that not a lot of people want and these tend to go for cheap.
Part 4: Gathering Explained (More than Just Nodes)
You need to gather raw materials in order to start crafting. Fortunately Guild Wars 2 gives you a large variety of methods to do this…
Gathering Basics Part A: Sending your Materials to Your Bank
The most important thing you should know about gathering in Guild Wars 2 is how to manage your inventory. Typically crafters always have a ridiculously hard time managing their bulging packs in MMOs. Guild Wars 2 helps in this regard by giving you the option to send your materials directly to your bank while on the field.
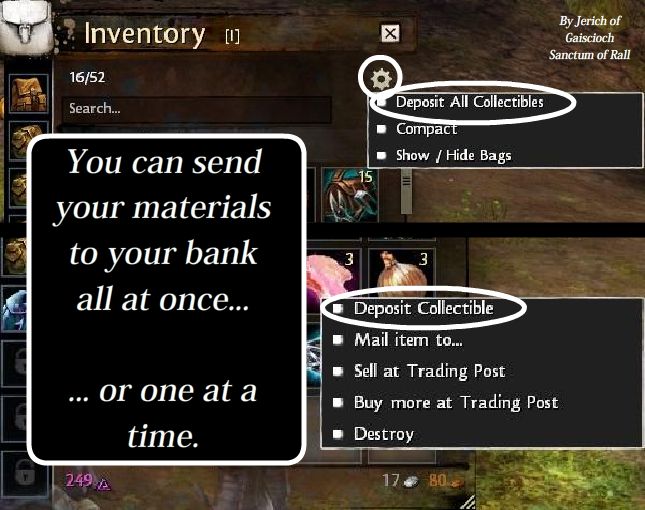
You have two options…
- The first (easy to miss because you have to pick the dropdown on the top of your inventory) is to send all the collectables in your inventory directly to your bank.
- The second is to right click on each collectable one at a time and send it to your bank.
There are two small issue, however, with this feature right now:
- First, your faithful mini-pets are not safe! Unfortunately, mini-pets count as a collectable. This means that the send all feature will boot them directly to your bank. There are three solutions to this problem.
- One is to have a copy of your minature already in the bank collections. This will prevent your inventory one from being sent.
- The second is to get tailor made craftman’s bag. Materials will be placed here first and therefore be easy to right click one at a time and send to your bank.
- Third, placing a mini in an invisible bag / safe box will keep them safe. No materials in these will be sent to your bank. (Thanks Cetacea and Charlatan for this bit of information)
- Second, sometimes items don’t get sent. The reason is that your collections tabs in your bank can only store 250 of each component. As soon as you have this many, items will no longer be sent to your bank. As you probably imagined, there are ways to work around this too (Other than just use or sell it)…
- Move the material from your collections tab to your bank proper. If you are a crafter, you will be able to access your bank at the workstations at every major crafting station.
- You can mail the excess to a secondary account or friend and have them return the mail to you.
- You can jump on another character and mule the item to them. (You have a mule parked directly outside a bank don’t you?)
- Now would be a perfect time to visit the Mystic Forge and transmute the component to the next tier!
- As soon as the collections area is no longer jammed, you can start sending the material to your bank again.
Gathering Basics Part B: Harvesting Nodes
If you have played Guild Wars 2 for any length of time at all, you have seen harvesting nodes both in the field and on your mini-map. They look like this:
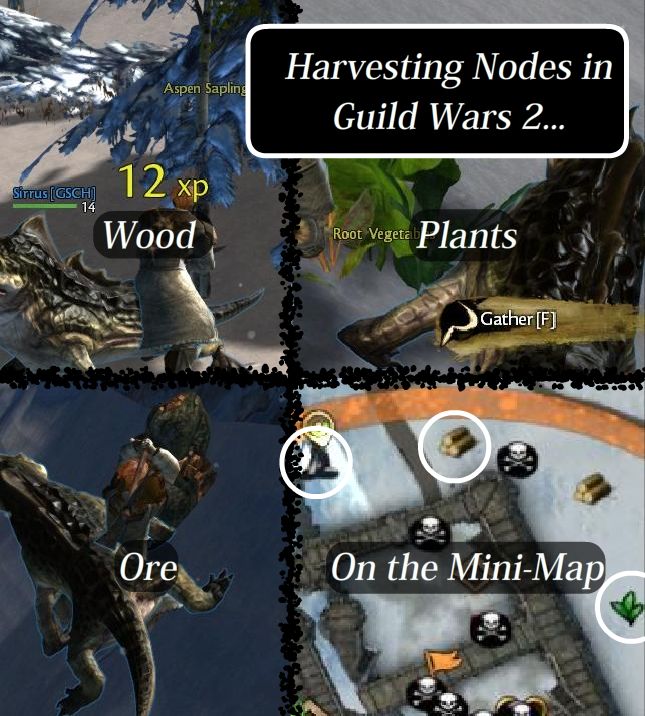
How Node Harvesting is Different than other MMOs
If you have played other MMOs, you are familiar with having to share harvesting nodes or being annoyed when a group member runs off to harvest. GW 2 is not like that. Everyone in your party can see the node and every one can harvest it. The node refresh timer is personal. You also get a TON of experience for harvesting (about three monster kills worth) and nodes can drop rare items like gems and dyes. This means a couple things.
- You should always have the appropriate harvesting tools at hand and harvest most nodes you run across.
- If you are grouped, you should make harvesting part of you scheme and all harvest every node you run across.
Gathering Tools
You would be surprised to know that more than fifty percent of the people I have talked to have never harvested one of them. The primary reason, I believe is that they can’t find the gathering tools…
The first thing I do after making a new character is do one or two hearts. As soon as I do this, I have enough money for a set of basic gathering tools. While there are multiple kinds of gathering tools, you only need a set of the copper ones to harvest newbie zones.
Gathering Tools Explained
- There are three types of gathering tools.
- Harvesting Sickles gather cooking nodes
- Mining Picks harvest ore nodes
- Logging Axes harvest wood nodes
- Each gathering tool has a limited number of uses (30 nodes worth in the case of picks and axes, 50 nodes worth in the case of sickles). I typically carry a spare of each type with me in case my tool breaks on the field.
- There are multiple grades of picks ranging from copper to orichalcum. Basically each new level of pick gathers a new tier of component.
- You can equip them by right clicking on them.
- There is NO benefit to using a higher tier tool gathering tool on a lower tier item. Don’t waste them.
- Black Lion Chests have a chance of spawning rare gathering tools that only have ten charges but are “Extremely efficient at gathering resources and uncovering rare components.” (like gems and dyes)
Here are some locations of vendors who sell them:
- In Queensdale – Horatio in the Shaemoor pub sales them.
- In Ashford – Kaladrian the Greedy in the Village of Smokestead
- In Wayfarer Foothills – Odgrim near the Horncaller Waypoint
- One of the first NPCs in every major starting city sells them. If you can’t find one on the field, zone into your city and you should have no trouble.
- At least one vendor in every major outpost sells them. This is a great place to restock (I typically have a spare set at all times in case my tools break).
- Often karma heart vendors will sell gathering tools. This is a great way to get them if you are low on cash.
Seeing nodes (the control key):
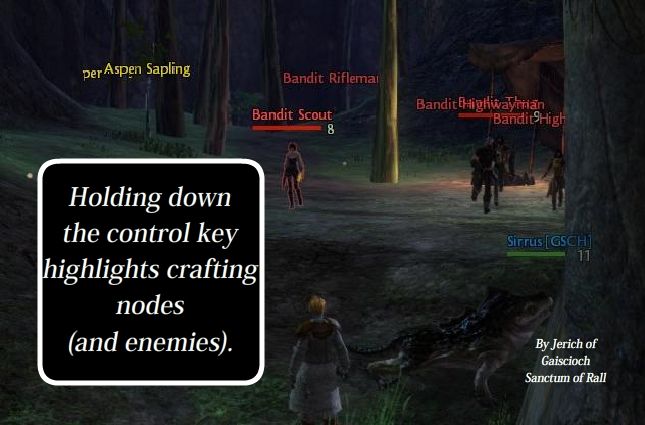
Often you will be running toward a node on the mini-map and it will be hard to see. This is especially the case with cooking nodes that tend to be hidden among a bunch of foliage. Luckily the Guild Wars 2 control scheme will show all of the nodes, interactable items and enemies when you hold down the control button. Warning: If you remap your controls, make sure to remap this key… It is super useful
Cooking farms
Sometimes you will come across a dense cluster of one type for cooking like the picture below:
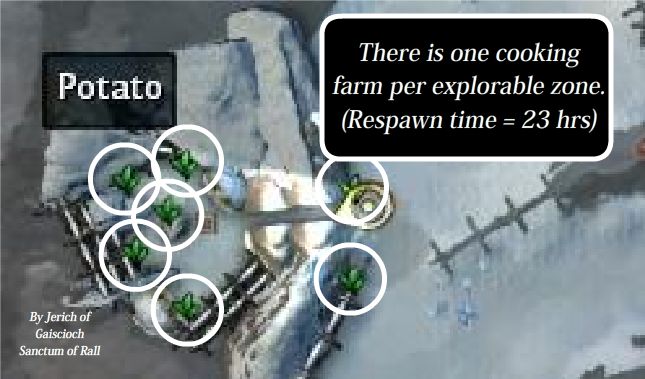
Supposedly each zone has one, these are the only places to get the specific cooking ingredients, and they are on a 23 hour timer. Basically they are timed to give you the incentive to log in and farm them each day without feeling like you have to camp them.
Example locations
- Lettuce Farms: Queensdale, Metrica Province
- Potato Farms: Wayfarer Foothills, Plains of Ashford, Caledon Forest
- Strawberry Farm: Kessex Hills, Snowden Drifts
- Spinach Farm: Gendarran Fields
Gathering Basics Part C: Using a Salvaging Kit
While you can gather ore, wood and plants from harvesting nodes, the primary method of collecting leather and cloth is to use salvaging kits.
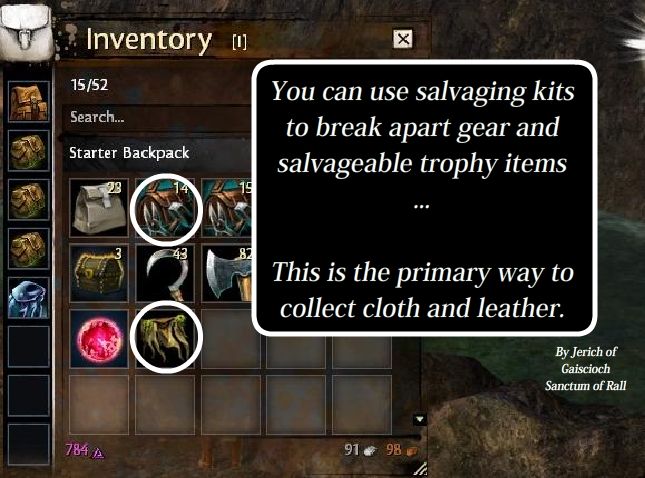
There are two main types of drops that can be salvaged: scraps of cloth etc that are specifically designed to be salvaged and equipment that can be salvaged (but you might also want to use it or sell it). Typically I salvage everything because there is an achievement for it and I love to get as many materials as possible, but a good case could be made for selling equipment to get money. I will leave the balance up to you.
Types of Salvage Kits
- Salvage kits range from Crude (the cheapest) to Master’s (the most expensive).
- Like harvesting tools, salvage kits have a limited number of charges (15, 20, 25, etc). Most likely, there will eventually there will be kits with 100 or more charges, but they haven’t been added yet.
- While all salvage kits will give you basic components, higher quality kits have a chance of salvaging rare materials (used to make runes and sigils) and upgrade components. I suggest using crude if you are poor and at least basic or fine if you have some extra cash.
- You can also buy a Black Lion Salvage Kit (25 uses) from the gem store that will always recover an upgrade component. Use this to recover those rare runes that you had to do 10 dungeon runs to get. If you don’t want to pay real money for this, you can always buy the gems from other players.
- Note that you can also combine the top three salvage kits with mystic forge stones to create a 250 use mystic salvage kit. This is incredibly useful and I reccomend doing this while gems are so cheap.
Where can I buy them?
- Typically you can buy them wherever you can buy your harvesting tools.
- That means the first few vendors in every major city and every major outpost. Make sure you don’t run out!
- Heart vendors often sell salvage kits for a small amount of Karma. This is how I typically get my kits at first.
- Bags that humanoids drop have a chance of dropping them as well. This is a great way to stock up if you are a cheapskate (like me!).
Gathering Basics Part D: Vendors
You will often need to buy crafting components from vendors before you can complete your finished goods. These range from someone standing next to the crafting station to a specific heart vendor you need to unlock.
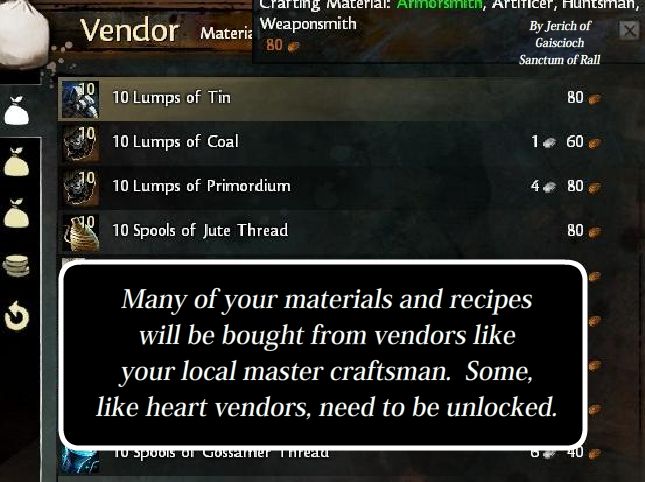
Types of Vendors:
- Master Craftsman: These are the people that trained you in your discipline. They sell items you need to either refine your raw materials or make your components. They also sell rare insignia patterns for karma. If you are interested in making your own gear or selling gear on the market, these are the recipes to focus on!
- Unlockable Heart Vendors: Heart vendors often sell specific crafting recipes. You have to unlock them to access it. Also, in the case of cooking, they sell ingredients you can’t get any other way.
- Miyani in Lion’s Arch: This Mystic Forge vendor sells items for skill points. Read the advanced section for a little information on the Mystic Forge.
- Scattered Vendors: Other vendors are scattered throughout the land. Honestly, we don’t have much information on them yet. Be sure to explore and record your findings!
Intermediate Gathering Part A: Monster Farms
NOTE: If you haven’t turned on autoloot in the options tab… do this now. You will hate life if you try to farm one of these without that.
Scattered throughout each map, there are locations that tend to drop a high percentage of crafting components (either fine crafting materials or cloth or leather). Humanoid creatures are typically the best because they drop gear, cloth and leather fragments and bags filled with crafting components. The best places are usually tucked away in hidden locations which have a fast enough respawn to keep even a group occupied. One such example is Beggar’s Burrow in Queensdale.
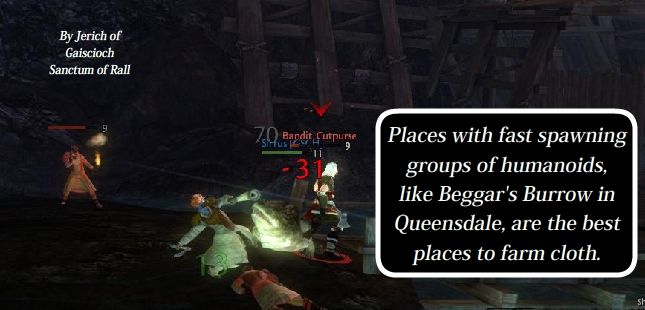
You reach it by means of a hidden door covered by shrubbery. Inside is a bandit farm where the monsters spawn faster than you can kill them and drop a ton of bags. In just 45 minutes this farmed during this last stress test I was able to come away with 55 jute cloth, 15 leather squares and 30 fine crafting components. This is typically much faster than just questing as normal will yield. When grouped, those numbers can rise to over 100 jute an hour. If you need leather, on the other hand, there are a variety of Centaur Farms in Queensdale that drop at a fairly fast rate. I recommend being on the lookout for areas like this in your travels.
Note: The anti-farming code in the game will make it so you stop getting drops from monsters after about an hour. If you find this happening, it is time to move to a new area.
Intermediate Gathering Part B: Gathering Routes
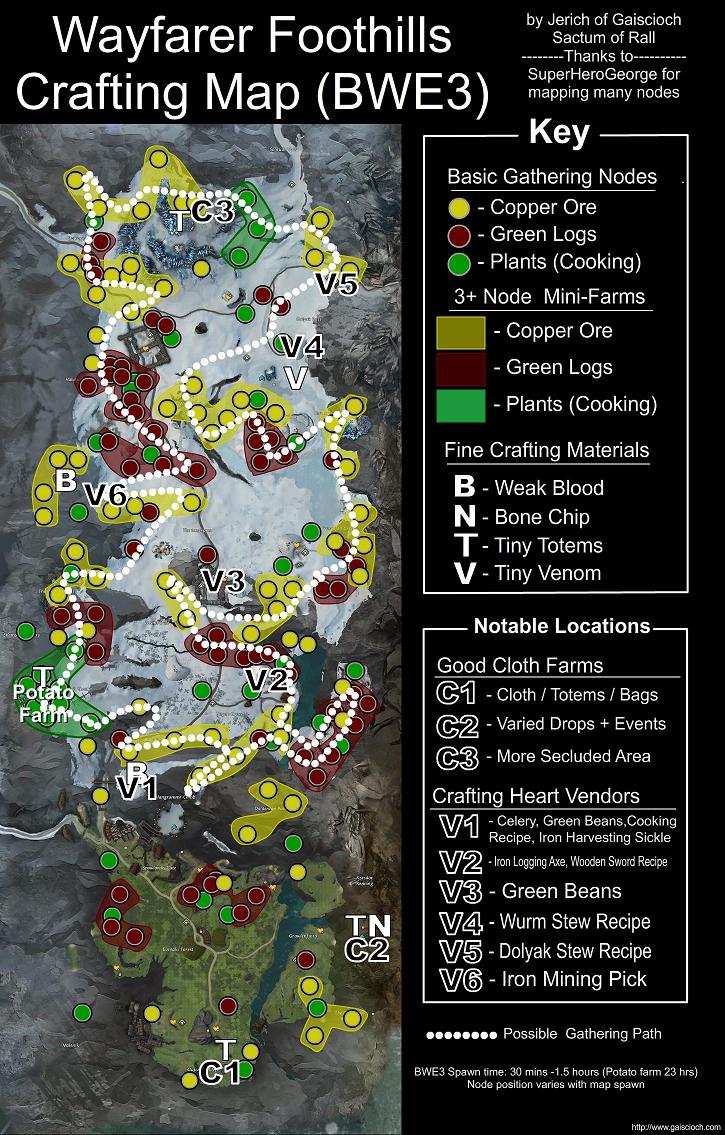
Node positions in Guild Wars 2 tend to change slightly every time the server resets. I get into some theory crafting based on my observations in the advanced section. That being said, every zone has spots where nodes tend to be clustered more often. If you pay attention to zone layout, you can typically find a path that will consistently yield good result. For instance… SuperHeroGeorge and I (a fellow Guild member) have ran the below path over five times:

Sometimes the nodes are not always in the same spots, but each time I have run this route, I end with over 100 copper, 75 wood and 9-11 gems. That is not bad for something that can be run by a speed specced warrior in less than thirty minutes.
Respawn time
Unfortunately, as of the last stress test I was running into node respawn times of over an hour. While some nodes respawned quicker than this, any closed loop you want to run multiple times will have to span an entire zone to be profitable. I recommend finding a couple favorite paths, running them then doing something else for a while before running them again. Another solution would be to farm humanoids for a hour (to get the bags with gathering tools), then use those to run your route. Rinse… repeat.
Intermediate Gathering Part C: Buying on the Trading Post
The global trading post is one of the best places to gather crafting goods. Typically you will have more than enough of one type of item and too little of another (especially fine crafting components). The best way to fix this is by using the Black Lion Trading Post. If you have never used it before, I would make it a goal to sell and buy at least one item within an hour of starting Guild Wars 2. You can access it by clicking on the Lion Icon on the top of the UI:
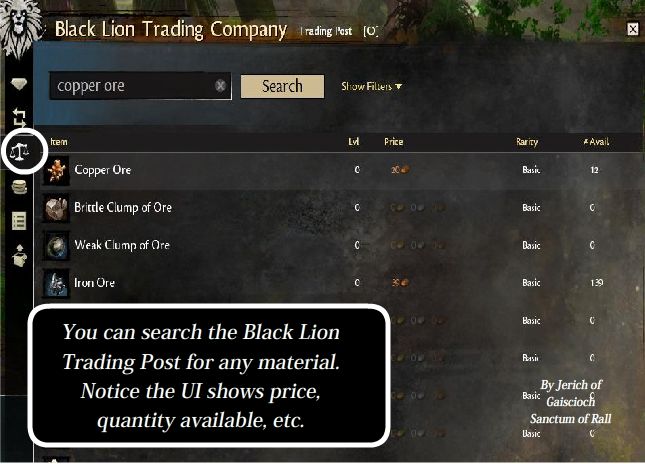
As soon as you do this, you will most likely see them Gem Store highlighted. You actually want the third tab down that looks like a set of scales. This is where you can search for an item or pick a common one.
Once you select an item you will see something like this:
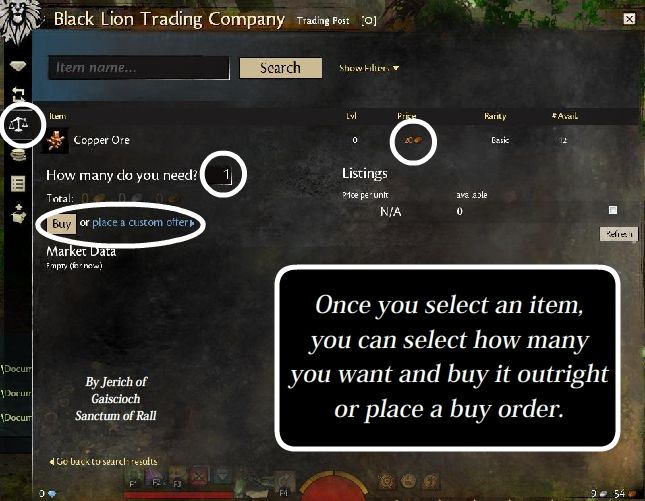
This is where you want to start playing the market… You could either buy the item from the lowest priced seller immediately or you can set a buy order. That allows you to name your price and hope someone will eventually sell it to you.
Typically if you set a reasonable price that is near the top of the buy orders, someone will eventually come along and sell you the item (unless it is rising in price). You should always get in the habit of using buy orders to get materials you need for cheaper. Plan ahead!
As a side note… you can buy or sell from anywhere, but you have to go to a trading merchant to pick up your wares. This is another reason I love to craft in Lion’s Arch.
Part Six of this guide will outline more tips and tricks to using the Trading Post. In the mean-time SuperHeroGeorge is writing a great general purpose guide on the trading post. You can read it here.
Intermediate Gathering Part D: Map Completion
Each time you completely finish an explorable map (unlock all the hearts, vistas, waypoints and point of interests), you will get a variety of rewards which will include crafting components appropriate to the Zone’s level.
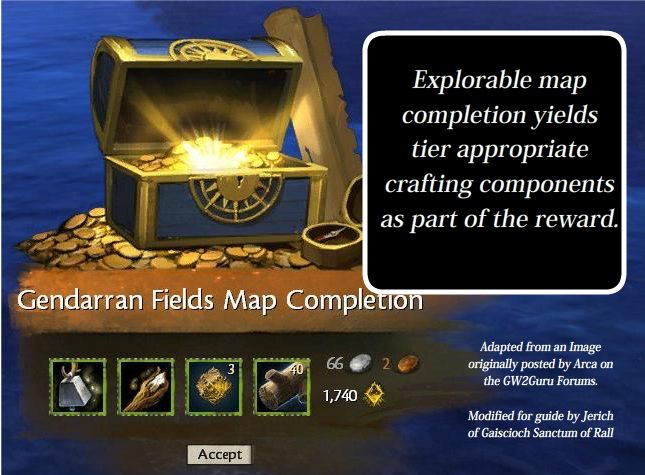
I was able to complete Queensdale and Kessex Hills during Beta Weekend 3. Each time, I got 40 of a specific component (copper ore and thin leather respectively). While completionists will probably get a lot of materials just exploring the map… this reward is a good bonus.
Advance Gathering Part A: The Mystic Forge
One of the reasons I love Lion’s Arch is that there is a Black Lion Headquarters right by the crafting stations where I can pick up my Trading Post sales and purchases. The other reason is that it is the home of the Mystic Forge which has unique opportunities for crafting.
Search for it located near the main traders plaza and it will be fairly obvious… it is a big glowing forge with a column of light above it. If you run around it you will see a vendor named Miyani.
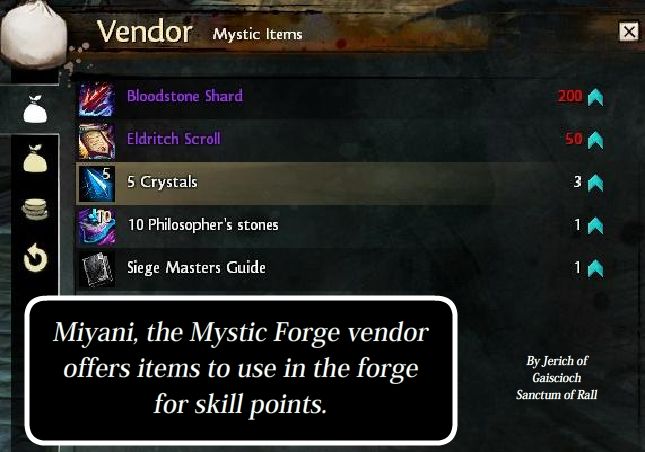
She sells items which are designed to be used in forge recipes for skill points. She also sells recipes that you need in order to make Epic Weapons. While many of these items are useful for crafting, outlining the intricate workings of the Mystic Forge could fit inside an entirely new guide. I am just going to focus on a couple recipes that will be immediately useful to the burgeoning crafter.
The cheapest item is the Philospher’s Stone. You can get 10 of these for one skill point. While skill points may be in limited quantities as you level, you will keep getting them after level 80 each time you get enough experience to level. These will add up and you will use them like currency (you actually need a 200 skill point bloodstone shard to make an Epic Weapon)!
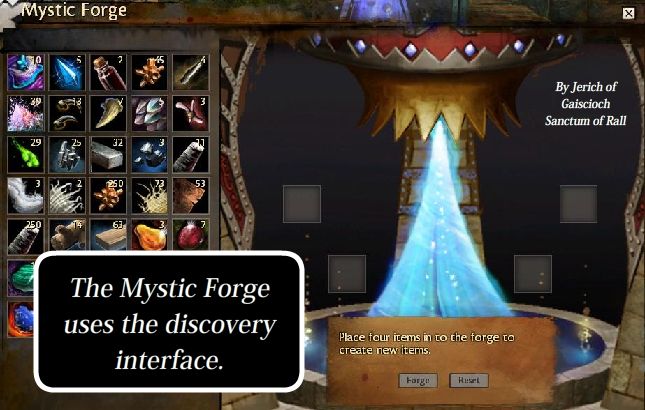
As soon as you open up the Mystic Forge you should be immediately comfortable. It uses almost exactly the same interface as the discovery tab.
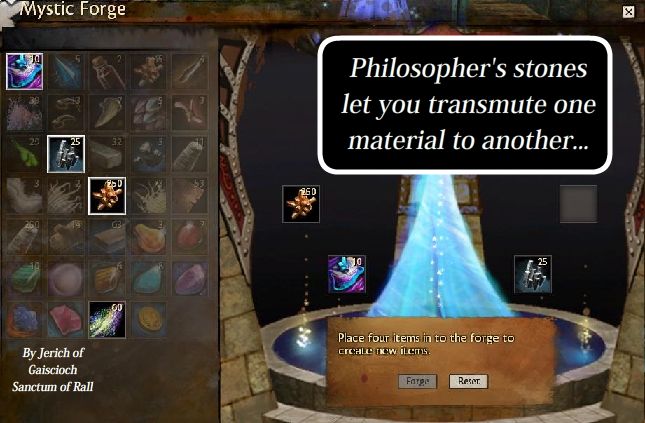
I put some copper ore into the forge and follow that up with a Philospher’s stone. I then throw in some iron ore and some shimmering dust and hit combine….
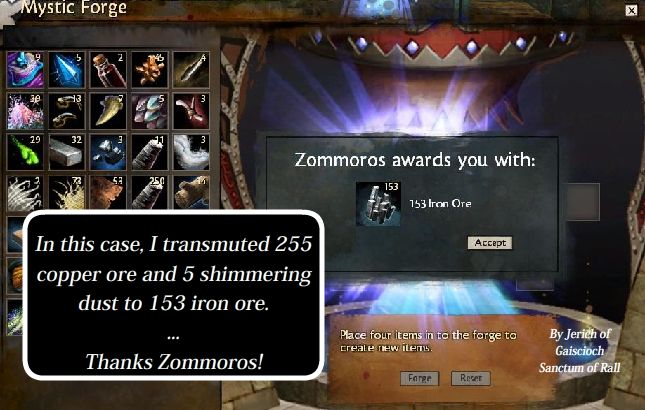
My 250 copper has been transformed into 153 Iron Ore (which my character found much more useful). In fact, the research on Guild Wars 2 Wiki seems to indicate that any T1 material + T2 Dust + T2 material + Philospher’s stones will yield the appropriate T2 item. The recipe also works for T2-T3! While the forge research is still ongoing, this simple recipe is definitely something to keep in mind.
Note: The iron didn’t get used in the process. The reason I needed it in the recipe was to tell the Forge to transmute the coppoer into iron. If I had used silver instead, I am pretty sure the end result would have been silver. You can also do this with wood, cloth, fine crafting components etc (even dust!)
Since I plan on completing every zone, chances are I will have more skill points and low end ingredients than I need. The forge will let me keep myself in level appropriate gear.
Using the forge to get recipes
On the first week of launch I was able to get my monthly achievements which yielded me enough Mystic coins to test out the cooking recipe. I bought 6 x Elonian Wine for about three gold, spent some skill points to get some arcane crystals, and used a strawberry cookie and 17 Mystic coins…
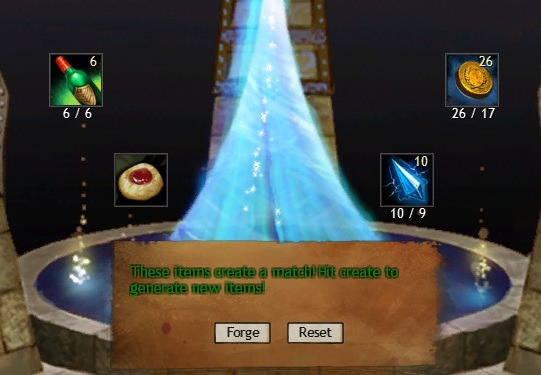
And was able to make this…
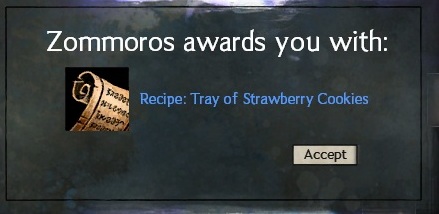
Basically the recipe for each of these is….
- Food item: Elonian Wine, Crystals, Mystic Coins, The Base Item
- Armor Box: Elonian Wine, Crystals, Mystic Coins, Chest Armor Piece of Base Item
The recipe cost scales with skill rank
- Strawbery Cookies (Skill Rank 75): 6 x Elonian Wine (Roughly 1.5 gold), 9 x Crystals (6 skill points), 17 x Mystic Coins, 1 x Strawberry Cookie
- Simple Mighty Chain Armor Box (Skill Rank 0): 1 x Elonian Wine (Roughly 25 silver), 4 x Crystals (3 skill points, 2 x Mystic Coins, 1 Chest Piece of Simple Mighty Chain Armor
Advanced Gathering Part B: Node Respawn Time Conjectures
I haven’t seen anyone who completely explains how crafting nodes respawn as of the time I am writing this. I have made some observations of the last few beta weekend and stress tests, however…
- Everyone seems to always see the same nodes (and be able to harvest them)
- I watched the servers be brought down multiple times in a row one stress test. Each time they reloaded different nodes were activated. There were about 2-3 times the total number of nodes than were activated at one time.
- When I run a route and come back later, the same nodes seem to have respawned.
- Some nodes seem to respawn quickly (15-20 minutes), others seem to take longer than an hour. (or 23 hours in the case of cooking timers).
These observations lead me to the following theory:
- I think nodes are chosen randomly from a possible pool of nodes every time the server resets (which will probably be for maintenance). These nodes are then frozen in place until the server resets.
- Different nodes have different base respawn times… whether this has an element of randomness is unknown at this time.
- When you harvest a node, the it starts a countdown for you. Once it reaches zero you will be able to harvest the nodes again.
Please let me know in this thread if you can disprove part of this theory or have some more light to shed on this.
Part 5: Crafting Maps (Vendors, Farms and Gathering Routes) Work in Progress
Important Note for Using these Maps
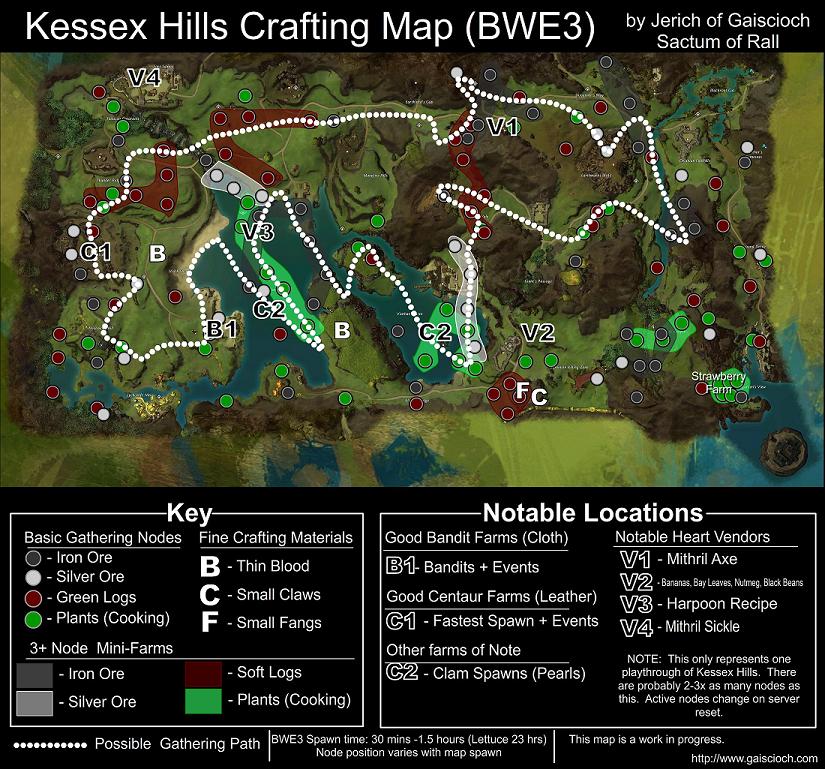
You may have jumped straight here… Be aware that node positions change every time the server resets (I am pretty sure that they are drawn from a pool of 2-3 times the total spawned nodes). That means that your nodes may be different since these maps only represent my (or in the case of wayfarer my and SuperHeroGeorges) playthroughs. That being said, there will still be prime routes due to hotspots remaining consistant (nodes are based on probability after all). If I can get people to help me with the raw data in release, I could make maps that incorporate several server resets and are more accurate. Thanks! Jerich.
Kessex Hills
The Shiverpeaks
Wayfarer Foothills
Part 6: Tips for Selling on the Trading House
This is not a trading post guide. That would require entirely new guide and would be quite speculative at the moment. Note that this section is somewhat rushed because I want to get it out before launch. I will come back to it later once the market patterns start to solidify. Here are some initial observations.
Three Things Everyone Should Know about the Trading Post
#1 It is Not an Auction House
You don’t put up items to bid on. You put up Buy Orders and Sell Orders. The Guild Wars 2 Trading System functions more like a commodity market that most current MMO games people play.
#2 There is a Significant Listing Fee
Guild Wars 2 Wiki states that the Listing Fee is 5% of listing price. This 5% will be charged whether the item sells or not and even if you take the item off the market. If your item sells, you will be charged an additional 10% fee. I don’t think we know the impact of this right now, but it will make mass buying and selling much riskier and discourage posting inflated prices in the hope of getting lucky.
#3 The Trading Post is Packed with Useful Features
You can look at buying and selling stats when trading as well as see what is buying / selling several levels deep. It is definitely worth spending some time with the interface and playing with all the options.
Trading Post Basics: Buying / Selling
Make a goal of at least buying and selling one item your first few hours of playing GW 2. Once you are through this initial hurdle, you will start being more comfortable with the Trading Post.
- When to place an item up for sale: Remember that there is a 5% listing fee. If you think you are setting a reasonable price and the item will sell, then post it up. If you think the price is rising, you can even post above the current high price.
- When to sell to a buyer: If you think the price is falling or you need the money right now, you should sell immediately to the highest buyer.
- When to buy from a seller: If you need the item right now, the price seems reasonable or you think the price may be going up, then buy from a seller.
- When to place a buy order: If you can afford to wait, then place a buy order. If you think the price is going down, then you can place your buy order lower than the current top.
The Material Trade
Materials will be hot commodities in the beginning of the game as people use them to level. Early components will continue to retain value as the game progresses due to being able to upgrade them in the Mystic Forge. Selling materials will almost certainly be the easiest way to make money in the trading post with the least amount of effort and risk. While we don’t know which will be worth the most yet (that will be determined by demand), there are several observations we can make.
- In the last three Beta Weekends, materials actually dropped in price for about six hours as people explored the game and hadn’t switched to crafting mode. After that it shot up almost 100%.
- Wood tends to be the least profitable item with cloth the highest.
- In other games, once prices stabilize, they tend to minimize on Monday / Tuesday and maximize on Friday Saturday. This means that you should buy early week and sell on weekends.
Selling your Crafted Items A – Go Rare or Go Home
Note: Everything here is a Prediction. Real prices will eventually be based on supply and demand that is caused by many factors including, but not limited to frequency of drops, ease of getting rare / exotic gear without using crafting, difficulty of content, etc. These factors will drastically alter the market and cannot be fully predicted at this time.
While you will probably be able to sell most items early in the game as you progress, only certain types of items will generate consistent demand. Here are some of the things I think will sell…
- You can make rare items for the 35, 50, 65 and 80 level (and exotic items for level 80). While these items cost more to make than their masterwork equivalents, They are not worth more than twice as much. I believe people will typically want rare gear. That also means that masterwork, rare and exotic items that fall between these levels may be valuable.
- Explorable Dungeon Modes open up at level 35, 45, 55, 65, 75, and 80. Since people typically want to gear up for successful dungeon runs, I anticipate these levels to be where people often stop and re-gear.
- People tend to upgrade weapons more often than armor if money is tight. This is because weapons make a bigger impact on their killing power.
- Typically, max level gear and low level gear sells the best. This is because people tend to spend most of their time at max level and often get tired of a new character at low level.
- Rare skins that require dungeon components to make or any tradable item that is flashy and requires significant effort (skill points, dungeon tokens, many ectoplasms, etc) should be worth a lot.
- I predict wealthy people to buy boxes of leveling gear if we can get them in rare form. These are easier to store while your character is leveling.
- There will typically be one to a few types of food items that people find most useful. One will be the most common type of ground spawn food item that people use in WvWvW or dungeons, the other will be items for specific builds. Once players learn these, they will be the most common items to sell.
- In addition to this, items that help with leveling (+ experience etc) should sell (Once Anet fixes them).
- Like materials, expect prices to minimize mid week and maximize on weekends.
Buying Materials and Selling Crafted Items – Risk versus Reward
Be aware that a five percent listing fee is a siginificant hurdle to buying components and selling gear. You need to be in a market with a large enough margin to warrant the risk of your item not selling. If you are serious, here is a technique you can employ to sell on the market.
- First you will want to find a corner of the market and use a spreadsheet or some other tool to calculate the rare material price of each item you want to sell based on the cost of the materials on the AH.
- If there are items for less than this cost * 1.25, then the item is not worth selling. If items are selling for more than this on the market (or it is empty), then sell another for 1.5 times the materials cost.
- Keep track of how fast the two items sell. If the first fails to sell, do not enter the market at this time.
- If the first sells, it may be worth selling that item if it sells consistently.
- If the second sells, that market is hot and you should make an effort to keep at least three items (one for 1.25, one for 1.5 and one for 1.75) on the market place each week until the market dries out.
Taking Advantage of Events
- If you can spot an event trend you can make a lot of money quickly. For instance, if there is a new Wintersday event in a particular dungeon, potions appropriate to the dungeon will rise in price. If you start thinking about what people will need, you can usually find the best market.
That is all I am going to write on this subject for now. I will write more once we know more about how the economy is actually working.
Part 7: General Tips / Tricks
This section is designed to highlight a few tips and tricks that will be useful for crafting. Let me know if you have any other ones that you think are worth putting here!
Inventory Tips
- I wrote a separate guide on inventory to help you out. It explains how you can organize inventory and breaks down cost of bag / gem upgrades… http://gaiscioch.com/tavern/guildwars_discussion/post_32754.html
Gathering Tips:
- Get an invisible bag if you want to use minis. Otherwise the send all materials to bank sends the minis back too.
- Always keep an extra set of tools in your inventory. You don’t want to run out while in the middle of the field right next to a large cache of gathering nodes
- If you have a padded equipment box to gather dropped equipment, that will make salvaging faster.
- Playing a class with good run speed buffs and charges will help you gather much faster. I am starting with warrior over guardian for this reason.
- Turn on auto=loot in the beginning of the game. This will save you a ton of time and won’t be a big deal inventory wise if you are careful.
- Always sell junk items whenever you can.
- Try to keep your bank clear so you can send items back to it. This can sometimes be a pain, but it will save you grief in the long haul.
- Hold down control to highlight crafting nodes. This will help you find hidden ones.
- You should convince your entire group to gather while grouped. It is better for experience and will keep them from being annoyed at you when you sometimes run off.
Crafting Tips:
- I recommend using Lion’s Arch as your crafting hub. It is superior to all other zones.
- You should make use of crafting stations while on the field to craft upgrade your inventory / fix your bank. It is incredibly useful.
- You may want to find a crafting buddy that is doing other disciplines than you and send each other excess components. You can then make each other gear (this will give you more purpose to your discoveries).
- You will often be able to sell your finished gear on the trading post for more than the vendor sale price. I typically do this (or salvage them).
- If you are a member of Gaiscioch, make sure to check out Marketplace. It is a great way to get resources for leveling crafting and then use them to help out guild members. You will also gain contribution points and artisan points by using this.
Have any other tips you think would be useful for people? Feel free to contribute them and I will update them. Check the botton of this guide for information on how to contribute.
Part 8: Discipline Specific Tips / Tricks / Recipes
Note: This guide is not meant to take the place of specific discipline guides. I do, however want to give you enough information to get you started so you don’t miss entire categories of recipes. It is meant to be used in tandem with another resource like Guild Wars 2 Wiki, gwdb, or Guildhead. Here are some general tips / general recipes for each discipline.
Armorsmith
Tips
- If you are having trouble getting from 0-25 and you want something to grind on… Runes of Life are the cheapest.
- You can buy Rare Insignias with Karma from your Master Trainer. There are ones for level 35, 50, 65 and 80.
- Gloves, Helms, Pauldrons and Boots are the best things to make while leveling since they are cheaper than Leggings and Chest
Types of Recipes
- Armor: 2 x Components, Insignia
- Box: 10 Ingots + Rune of Holding (No rune needed for 8 slot)
- Safe Box: 10 Ingots + Rune of Holding + 3 Dust
- Equipment Box: 10 Ingots + Rune of Holding + 3 Scales
- Runes of Life: 2 Bronze Ingots + Bolt of Jute
- Runes: Ingot + 1 or 2 Rare Crafting Materials (Slivers, Fragments etc) (Some recipes have one extra components)
- Armor Boxes: (Contains 1 of each): Ingots + Cloth + Thread + Fine Crafting Materials
Insignias
- Fine: Cloth + 3x Fine Crafting Materials
- Masterwork: Cloth + 5x Thread + 8x Fine Crafting Materials
- Rare (T2+ Unlocked with Karma): 2x Cloth + 10 x Thread + 15 x Fine Crafting Materials
Unique Armors
- Iron Legion’s Armor: Purchasable in Char Areas for Karma?
Leatherworker
Tips
- If you are having trouble getting from 0-25 and you want something to grind on… Runes of Life are the cheapest.
- You can buy Rare Insignias with Karma from your Master Trainer. There are ones for level 35, 50, 65 and 80.
- Masks, Shoulders, and Gloves and Boots are the best things to make while leveling since they are cheaper than Leggings and Chest.
Types of Recipes
- Armor: 2 x Components, Insignia
- Pack: 10 Leather + Rune of Holding (No rune needed for 8 slot)
- Invisible Pack: 10 Leather + Rune of Holding + 3 Dust
- Oiled Pack: 10 Leather + Rune of Holding + 3 Bones
- Runes of Life: 2 Leather + Bolt of Jute
- Runes: Leather + 1 to 2 Rare Crafting Materials (Slivers, Fragments etc) (Some recipes have one extra components)
- Armor Satchels: (Contains 1 of each type of item): Leather + Cloth + Thread + Fine Crafting Materials
Insignias
- Fine: Cloth + 3x Fine Crafting Materials
- Masterwork: Cloth + 5x Thread + 8x Fine Crafting Materials
- Rare (T2+ Unlocked with Karma): 2x Cloth + 10 x Thread + 15 x Fine Crafting Materials
Unique Armors
- I haven’t found any yet. Let me know if you find them.
Tailor
Tips
- If you are having trouble getting from 0-25 and you want something to grind on… Runes of Life are the cheapest.
- You can buy Rare Insignias with Karma from your Master Trainer. There are ones for level 35, 50, 65 and 80.
- Masks, Gloves, Shoulders, and Boots are the best things to make while leveling since they are cheaper than Leggings and Chest.
Types of Recipes
- Armor: 2 x Components, Insignia
- Bag: 10 Coth + Rune of Holding (No rune needed for 8 slot)
- Invisible Bag: 10 Cloth + Rune of Holding + 3 Dust
- Craftsman’s Bag: 10 Cloth + Rune of Holding + 3 Bones
- Runes of Life: 2 Jute + 1 Leather
- Runes: Jute+ 1 to 2 Rare Crafting Materials (Slivers, Fragments etc) (Some recipes have one extra components)
- Armor Satchels: (Contains 1 of each type of item): Leather + Cloth + Thread + Fine Crafting Materials
Insignias
- Fine: Cloth + 3x Fine Crafting Materials
- Masterwork: Cloth + 5x Thread + 8x Fine Crafting Materials
- Rare (T2+ Unlocked with Karma): 2x Cloth + 10 x Thread + 15 x Fine Crafting Materials
Unique Armors
- Devout Gear (Level 20 Masterwork): Recipe From a Karma Vendor (Let me know if you find where)
- Shadow Armor: (Let me know if you find where to get the recipe)
Weaponsmith
Tips
- You can buy Rare Insignias with Karma from your Master Trainer. There are ones for level 35, 50, 65 and 80.
- Recipes to make if you have extra wood: Axes, Hammers, Maces, Spears
- Recipes to make if you have extra metal: Daggers, Shields, Swords, Greatswords
Types of Recipes
- Weapons: 2 x Components, Insignia
- Sigils: Ingot+ 1 to 2 Rare Crafting Materials (Slivers, Fragments etc) (Some recipes have one extra components)
- Consumable Sharpening Stones: Not enough data
Inscriptions
- Wooden Dowl: 1 wood plank
- Plated Dowl: 1 wood plank, + 3 ingots
- Fine: Wooden Down + 3x Fine Crafting Materials
- Masterwork: Plated Dowl 8x Fine Crafting Materials
- Rare (T2+ Unlocked with Karma): 2 x Plated Dowl + 15 x Fine Crafting Materials
Unique Weapons
- Wooden Sword: From Wayfarer Foothills (Karma Vendor)
- Quetzal Harpoon: From Kessex hills in lake area
- Lionguard Issue Sword: Unknown vendor at this time
- Char Weapons: Lakor Grizzlemouth in the Village of Butcher’s Block (Diessa Plateau?)
- Copper Mace: ???
- Grawl Axe: ???
- Iradiated Sword: Chaos Krewe Leader Pachoo, Metrica Province Heart Vendor
Huntsman
Tips
- You can buy Rare Insignias with Karma from your Master Trainer. There are ones for level 35, 50, 65 and 80.
- Recipes to make if you have extra wood: Longbow, Shortbow
- Recipes to make if you have extra metal: Horn, Torch, Pistol, Rifle, Speargun
Types of Recipes
- Weapons: 2 x Components, Insignia
- Sigils: Ingot+ 1 to 2 Rare Crafting Materials (Slivers, Fragments etc) (Some recipes have one extra components)
Inscriptions
- Wooden Dowl: 1 wood plank
- Plated Dowl: 1 wood plank, + 3 ingots
- Fine: Wooden Down + 3x Fine Crafting Materials
- Masterwork: Plated Dowl 8x Fine Crafting Materials
- Rare (T2+ Unlocked with Karma): 2 x Plated Dowl + 15 x Fine Crafting Materials
Unique Weapons
- Experimental Skritt Musket: From Twitchok (Karma Vendor in Brisban Wilds)
- Skale Repeater: From Researcher Irkz in Ascalon Basin (Karma Vendor in Plains of Ashford)
- Char Weapons: Lakor Grizzlemouth in the Village of Butcher’s Block (Diessa Plateau?)
- Iradiated Sword: Chaos Krewe Leader Pachoo, Metrica Province Heart Vendor
Artificer
Tips
- You can buy Rare Insignias with Karma from your Master Trainer. There are ones for level 35, 50, 65 and 80.
- Often potions will be the cheapest thing to skill up on. If you can get a lot of potion components, you may want to break the discovery rule while leveling… And example would be a Minor Potion of Nightmare Court Slaying which is a level 100 item that requires lettuce, spinach, venom and water. If you farm spinach farms for a couple days, this will most likely be an easy few levels.
- Recipes to make if you have extra wood: Focus, Scepter, Staff
- Recipes to make if you have extra metal: Trident
Types of Recipes
- Weapons: 2 x Components, Insignia
- Sigils: Ingot+ 1 to 2 Rare Crafting Materials (Slivers, Fragments etc) (Some recipes have one extra components)
- Tuning Crystals: 6 x Dust
- Potions: 1 x Dust, 2 other ingredients, 1 x water or blood base
Inscriptions
- Wooden Dowl: 1 wood plank
- Plated Dowl: 1 wood plank, + 3 ingots
- Fine: Wooden Down + 3x Fine Crafting Materials
- Masterwork: Plated Dowl 8x Fine Crafting Materials
- Rare (T2+ Unlocked with Karma): 2 x Plated Dowl + 15 x Fine Crafting Materials
Unique Weapons
- Asuran Trident: ???
- Harpy Totem: ???
- Irradiated Focus: ???
- Skale-Smacking Stick: ???
- Char Weapons: Lakor Grizzlemouth in the Village of Butcher’s Block? (Diessa Plateau?)
- Moogooloo Trident: ???
- Glaxx’s Focus: ???
- Mossy Scepter: ???
Jeweler
Tips
- You can buy Rare Insignias with Karma from your Master Trainer. There are ones for level 35, 50, 65 and 80.
- Level 25-50 is a dead-zone where you only have six recipes to discover. You may need to grind extra items in this area. Luckily you will have necklaces and four gems (eight recipes) in T2.
Types of Recipes
- Necklaces, Earrings, Rings: 2 x Components + Jewel
- Gem Transmogrification: 2 x Jewel + Dust
Upgrade Components (Double as Masterwork / Rare Activators)
- Fine: Base Jewels
- Masterwork (Adorned Jewels): Filagree + Jewel
- Rare (T2+ Unlocked with Karma): Filagree + 5 x Jewels
Unique Items
- Enchanted Rock Pendant: ???
- Jeweled Broach: ???
- Iron Band: ???
- Owl Amulet: ???
- Deldrimor Ring Replica: ???
Chef
I don’t really want this guide to become a guide for individual disciplines and cooking does not have the same types of repeating patterns that the other disciplines have. I think cooking really warrants its own guide with directions on where to get each item. I will make one later if no one on our forum
Tips
- If you plan on discovering each recipe, plan on getting a lot of bag space. Cooking can be the most bag intensive.
- If you play your cards right, however, you can look for recipes that are easy to make that you can grind on. One example is Chocolate Covered Bananas. These only require chocolate bars (which can be bought from your trainer) and Bananas (which can be bought for karma).
- A large stack of the same item, will often be more useful for leveling (since a single stack of 20 items takes up less space than 20 stacks of one while on the field). Keep that in mind while grinding. One way of leveling cooking is to grinding on recipes that you will use.
- The wiki says that cooking recipes do not stack. I was, however, able to get two to stack while eating in beta weekend 3. I am not sure if that was a bug or not.
Components / Recipes:
I will try to make another guide for cooking later. (unless one I can link to gets made first). Covering karma vendors etc… here would give this guide too much bloat.
Part 9: Useful Links
Here are some useful links I have found as I researched crafting information:
Official Wiki
http://wiki.guildwars2.com/wiki/ – This is a one stop shop for most things Guild Wars 2. The Guild Wars community is great at keeping wikis up to date. The crafting section is great and will often link directly to zone information.
Databases
- http://www.gw2db.com/ – The curse database site. You can sort by level of crafting skill which is incredibly useful.
- http://www.guildhead.com/ – Made by the creators of Wowhead. This will most likely be a great tool with interactive maps as well as item searches.
Forums
- https://forum-en.guildwars2.com/forum – The official forums.
- http://www.guildwars2guru.com/forum – These are some of my favorite forums for guild wars 2 and they have a dedicated crafting sub-forum
- http://www.reddit.com/r/Guildwars2/ – Not Actually a forum, but the Guild Wars 2 sub-redit is a great place to frequently scan to see if you have missed something important.
Video Guides
- Enigmus1’s Guides: A Great Introductory Series on Crafting
- Basic Crafting: http://www.youtube.com/watch?v=bFU_b4e2bxU&feature=g-all-lik
- Crafting Part 2: http://www.youtube.com/watch?v=Ry3Ddw6Gqmo&feature=relmfu
- Crafting Cooking: http://www.youtube.com/watch?v=jpPWp1Yh_30&feature=context-chv
Crafting Maps
- Crafting Map (In Progress): http://gw2craftmap.bteamgaming.com/
Discipline Specific Guides:
- I will link these as they become available. Let me know of any high quality discipline guides are written.
If you find any more links that you think I should post here, let me know either here or my guru link (which is stickied in the guru forums). I will look at them and add them if they look useful.
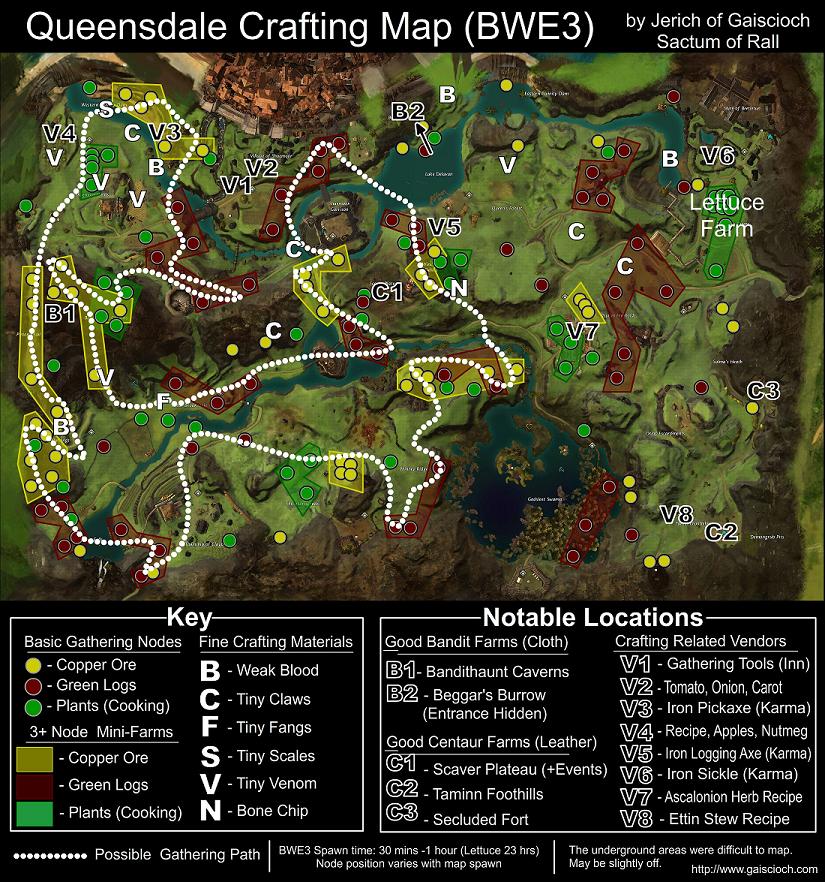

Recent Comments