EverQuest II Guild Raids Walkthrough
EverQuest II Guild Raids Walkthrough by Raidi Sovin’faile
Our guild, Cirque of Six on Mistmoore, have been doing these guild raids a while now, and I thought I’d put up a spoiler on successfully beating them.
First, a quick run down on the names of the quests as you get them from the Registrar (good and evil) as well as compared to the Journal entry.
Guild Raid Name Chart
Journal Evil Good
1st Bold Avatars of Betrayal Avatars of Jealousy
2nd Daring Daughters of Thule Lone Heretic
3rd Gallant The One Who Opened Their Eyes One Who Got Away
4th Noble Scales of Commerce Scales of Justice
5th Heroic Beneath the Blood Beneath the Roar
Use this to clear up the muggy “who gets what quest” when everyone is sitting at the Registrar.
And now for the tactics. Most of this is from memory, so some minor details might be off, but the major tactics are good. I used ACT to get Boss damage info.
A quick note.. once you’ve personally done all 5 raids, you can get the quests again in any order. Until then, you can join the raid as long as someone has the quest to zone you in, but you won’t earn the guild status.
We’ve found that doing them in order each weekend gets everyone caught up pretty quick anyways.
1st, Bold Confrontation (High Shaman Vascha)
Quest: Kill High Shaman Vascha
Location: Shattered Vale (Antonica). Exits near Thundering Steppes/Stormhold. Good: run home, Evil: gate.
Map:

Tactics: After killing all the trash, take down the gnolls in the druid ring. Then kill the large encounter of gnolls inside the ring. After that, the High Priest will summon an elemental to attack you (random, seen fire, water and air).
Immediately after killing the elemental the High Priest becomes killable. He doesn’t have any special tactics, but will spawn about 2-3 solo mobs every 20s or so. A good tactic is to have everyone focus on taking down the main boss as fast as possible, with the tanks sending out AoEs to bring down the adds. Best to clump together so no one is sitting with an add out of range of the tank’s AEs.
Boss Specifics: High Shaman Vascha is a healer, most likely defiler script. Mostly (75%) crushing melee, a couple disease spells (damage and debuff). Doesn’t use wards, only direct heals.
Reward: 1 Chest, only seen 1 armor out of it but possible potential for 2.
2nd, Daring Confrontation (Mother Znedari)
Quest: Kill Mother Znedari
Location: Eternal Gorge (Commonlands). Exits top of tower near Nek forest. Evil: run home, Good: gate.
Map:
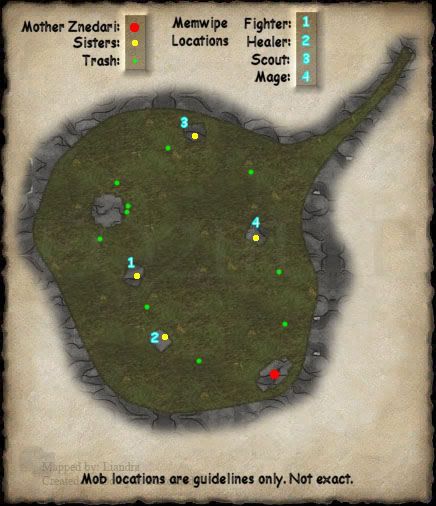
Tactics: Get ready at the top at zone in (buffs, etc). Everyone go downstairs but stay inside tower, have the tank step outside and pull mobs in until the area around the tower is clear. Avoid using out-of-encounter AEs (blue background, etc) because they can hit mobs wandering around the tower and add.
Once the tower area is clear, start pulling each mausoleum. There is a named in each with a couple guards. These named will memwipe and aggro a certain class frequently, calling out the name of the person they are going to attack. See map for the type of class each sister will aggro on memwiping. Healers include power healing, so enchanters should watch out on two mobs.
Once all 4 sisters are killed, the “shield” around the Mother is gone and she can be attacked. It is best to approach from a nice open place where everyone can see each other (the tombstones can sometimes block casting for healers). She will also call adds during the fight, but there is a trick. Start off by focusing entirely on the Mother, and ignore her guards. Don’t AE at all, as she seems to bug sometimes (or maybe it’s scripted) to call adds faster when her guards are dead.
She will memwipe and target ANYBODY in the raid, that includes anyone that revived up in the tower. DO NOT REVIVE, stay down and let a rezzer (pref paladin, necro or dirge) to rez you. Otherwise she can run off towards the tower, with the adds staying put, splitting the raid force. Better to stay dead the whole fight than risk wiping.
Also, she can bug out if you wipe too often, and become non attackable. Thankfully this zone does not lock until you kill her (hopefully it stays that way).
Boss Specifics: Mother Znedari is a caster, warlock script. Casts a disease and a poison spell, melee’s with crushing damage.
Reward: 1 Chest, seen 1-2 armor drops before. Also, this is the only zone that I’ve seen a rare harvest drop nearly once per raid. It drops off trash, in a wooden chest.
3rd, Gallant Confrontation (Prince Mianja and Piali the Profane)
Quest: Kill Prince Mianja and Piali the Profane
Location: Firemyst Gully (Antonica). Exits close to Blackburrow. Good: run home, Evil: gate.
Map:
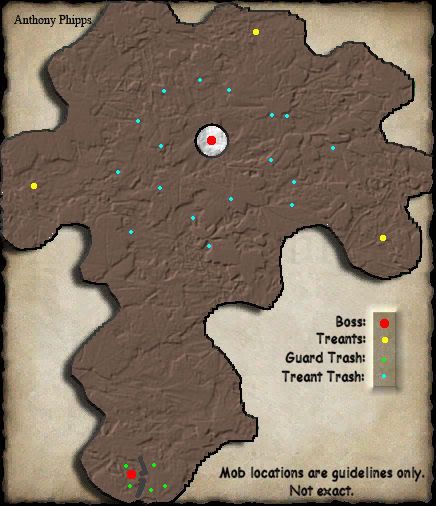
Tactics: Follow the left wall towards the small encampment. Kill the guards around the left opening in the short wall. Pull the Prince and prepare for a nasty fight. Along with calling heroic guards, the Prince will also use a raidwide Stun that lasts a few seconds. It’s scripted, so it can’t be avoided or resisted (it seems).
As usual, burn down the Prince as quickly as possible while MT holds adds. Let the adds burn down from AE, and any other tanks pull adds to the MT if they are on other people. If possible, turn the Stun game back on the mobs and stun them as much as possible (AE preferably) to give the healers a chance to catch up on heals due to the stunning.
Once Prince is dead, head towards the treants. The main area is filled with heroic trees, only kill as needed as they respawn. Kill the three named treants around the perimeter of the zone. They aren’t too tough, and come with two heroic guards. This will spawn Piali the Profane in his little evil house.
Piali also has the Stun the Prince used, but on top of that he has a Knockback on a seperate timer. This is dragon sized flining knockback, and will fling you VERY far. So, the best approach is to have the whole raid rush him and fight inside his house. No one leave their back to the entrance, and fight point blank.
Piali has a strong AoE that hurts quite bad, and a fairly long stun (5 seconds or more if I recall), so everyone be ready for being buffetted quite a bit. He also spawns little saplings, but the tanks and MT should be doing enough AoE’s to keep aggro. Healers should be focusing as much on group heals as healing the MT.
If you die in here, considering the amount of group healing required, it is easiest to give the rezzers a break and just revive and run back. There’s no memwipe to worry about, and you can come back with full power (although with rez effects).
Boss Specifics: Prince Mianja is a fighter, most likely a Bruiser script. Has all crushing attacks and melee. Other than the Stun he’s easy.
Piali the Profane is a treant (no class). Has crushing damage attacks. His AoE is crush damage as well, so having low mitigation will get hurt (mages beware!).
Reward: 2 Chests, one for each boss. Have seen 1-2 armor drops from Piali’s chest.
4th, Gallant Confrontation (Commander Gorzok and Surveyor Remolus)
Quest: Kill Commander Gorzok and Chief Surveyor Remolus
Location: Bloodskull Valley (Commonlands). Exits close to ruins of Valmar and Orc loggers. Evil: run home, Good: gate.
Map:
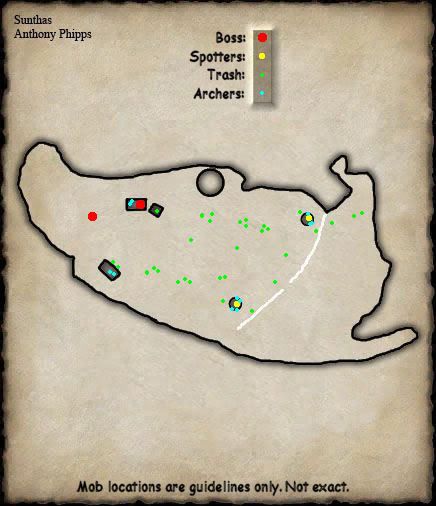
Tactics: This zone throws a curve-ball compared to the others. After killing the first couple trash at the first wall you come up to, there is a zonewide announcement that the Spotter calls for reinforcments. This will send a bunch of orc adds, and will not let up until you get into the tower and kill the Spotter.
This isn’t as easy as it sounds. Basically, you have to take the adds as you go, pull one Epic encounter at a time, all the while killing the adds and rarely being out of combat. Mana regen and conservation here is a MUST, as well as moving on quickly once the Epic encounter is dead (whether the adds are necessarily all gone or not). I stress Mana managment because not only are you going to be constantly in combat, but the Orc Mages also power drain. They make good charmed pets though.
Kill the last Epic group in front of the tower entrance and then rush the top of the tower and engage the Spotter. He will break aggro if he leaves the tower, so he must be fought there.
Do not AoE at the top as there are Archers there as well. They will hit you through walls, extremely far away as well, and can’t be avoided short of killing them off. It can be done, but they have a ton of hitpoints compared to the regular Epic encounters. They also don’t aggro properly (they don’t move around and no swinging action) and will continue to do the arrow attack at random people while targetting the MT, so it can be hard to see if they’ve aggro’d and who they are attacking.
Also, fights in the tower can be a little buggy as the mobs will sometimes be on a different floor and not visible, but can still attack/be attacked.
Once the first Spotter is dead, the rest is easy. Head back towards the entrance, and go south along the zone wall (not the short wall) towards the second tower. If you approach while keeping to the edge of the zone, the Spotter won’t see you and send adds until you are practically on top of him. Kill him quick and take down those archers as well if you want to stop them. The orc leaders that wander up and down the wall can be ignored as they don’t drop anything or set off anything, they just yell orders constantly.
Legionnaire Kruk isn’t a real named, and actually quite an easy fight. Fights only a little harder than the previous regular melee Epics in the zone.
Once done with the second Spotter, clear the way towards Commander Gorzok. He will be on the roof of the middle building, and can be pulled with range if you stand on a rock and jump to get line of sight. He’s a pretty simple fight, however he has quite a nasty AoE. It is mental based, but even with resists it’s quite damaging. Burn him down quick, let the MT and tanks handle adds if they come (watch for Epic runners), and focus on group heals until he’s dead.
With the commander dead, Chief Surveyor Remolus is next. DO NOT try and take him first, as he has some massive AE that vaporizes the raid if the Commander isn’t killed first.
Remolus comes with a couple guards, like everyone else, but is otherwise a pushover. He has no AE, and is in fact an easier fight than the Commander without his massive AE.
Oh also, if evil and running home, don’t forget that most of the trash hasn’t been killed.. don’t run into them on autorun like I did.
Boss Specifics: Commander Gorzok is a fighter, most likely a Guardian script. He has mostly slashing combat abilities and melee. He also comes with a mental based AE “Rallying Cry” that does quite a bit of damage to the raid.
Chief Surveyor Remolus is a bard, most likely a Troubadour script. He has crushing attacks and a mental based all (?) resistances debuff. His “Singing Strike” also heals him a little.
Reward: 2 Chests, have seen 1-2 armor drops from either. Legionnaire Kruk, the named right before the entrance to the second tower, always drops a wooden chest that always contains a feysteel item (weapon or armor).
5th, Heroic Confrontation (Summoning Cthulu)
Quest: Kill Saltwater Saul, interfere with the summoning, kill the-thing-which-cannot-be-pronounced and Hairaza Sollen
Location: Cove of Decay (Thundering Steppes). Exits near splitpaw entrance. Final raid, go wherever you want once done.
Map:

Tactics: The zone will be rampant with undead, however they can mostly be ignored by running along the wall. Work your way towards the shoreline, and kill Navigator Nina to make Saltwater Saul attackable. Nina now has a stun effect that lasts 2-3 seconds everytime she calls for adds. This has made her fight a little bit harder, but she doesn’t do that much dps, so just handle her like the Prince from the firemyst gulley raid.
Once done head over to Saltwater Saul. He has a bunch of rat friends, but they are mostly AE bait and most folks will be competing to get their AE in to be the one that kills them all. Saul is a pretty easy fight, however he has a “kicks sand in your face” that stuns, as well as another ability to stop magic briefly. They are on seperate timers, he seems to alternate between them.
Once dead, Hairaza will get upset and send her spectral sailors over to slow you down. Kill them off (just a single Epic encounter), and then head to a safe spot near Hairaza and watch the event.
A massive Amygdalen called Kor’allaztaraka the Feared will come from the water and rush the raid. He is actually not that hard (fairly cool theatrics though!). He’s pretty much entirely single target damage and heals himself very infrequently.
However, very quick after he dies, Hairaza Sollen will aggro and rush the raid. She has a nasty raidwide AE that comes with an annoucnement (stench rolls off the waves or something), that is a disease attack that she spams constantly, every 1-2 seconds. At lvl 64 con, she was hitting our lvl 60 con swashy (who had only 2k resist) for over 2k damage per hit. She has no adds, very little melee.. her only hard part is the disease. It is only encounter wide too, it only hits the group the MT is in (like in AoA). So move the weaker folks to group 2 and avoid the deaths.
Mostly, the encounter is “hard” because it’s two bosses back to back… individually they aren’t exactly tough. Mana regen makes it fairly easily.
Boss Specifics: Cthulu is a squidface (no class). He has all single target attacks, slashing melee being the largest portion of his damage. He has a poison attack, and a mental based siphon damage/heal.
Hairaza Sollen is a… well she doesn’t really do much. She has that one nasty dot, but otherwise just has regular weak and slow crushing melee. Basically, if you can cure or withstand her dot, and handle the fact that she gives you no downtime after the squidface.. she’s a pushover.
Reward: 2 Chests, only seen 1 armor drop per chest, although that doesn’t preclude the posssiblity for better. Since nearly all trash can be avoided, not sure if rare harvests can drop. Might be worth trying.
Base maps courtesy of eq2maps and their respective creators. Mob locations/tables added by me.
I used ACT (Advanced Combat Tracker) to get the Boss Specific info.
Mentoring
A few tips on how mentoring can work to your advantage, and some of the quirks of mentoring.
– The instance will scale to the highest level character in the zone at the time of creation. So if you intend to have one or more folks high level during the instance, keep them mentored for the zone in so the instance doesn’t spawn at the higher level.
– If you are unmentoring after zoning, recast any buffs that were scaled down. Even after unmentoring, the buff will stay at the lower level cast until you recast it.
– Keeping the whole raid within xp levels (14 at cap) of each other will allow everyone to update the quests and give you guild xp upon quest completion. The more the merrier, so make sure no one is “not getting xp”.
– Chest drops come from non-grey mobs. Keep it in the green, and the higher you can manage it the better it seems. I’ve seen two drops per chest before when we didn’t mentor down as far.
– Don’t worry about group setups for the raid until you’ve zoned in. It’s more important that you have everyone mentored correctly, so keeping all the Freeport folks in one group and Qeynos in the other, that need to mentor, and then rearrange after zoning in. Let people unmentor before moving them to another group too, since that likes to bug them into not being able to unmentor. Just disband and reinvite if that happens.
If you are doing this, make sure that someone in each group can zone you into the planned instance. So at least one person per group will need to have the quest.
– Only the first set of people that zone in will determine the level of the zone. So you’ll only need one side (qeynos or freeport) mentored and zone in first, then the rest can zone in once the instance has been made. This can save a lot of headaches if you have are having trouble getting everyone to a certain level or lower.
Quests and Armor Molds
Getting the quests are simple. Talk to the registrar in Qeynos Harbour or East Freeport. The first time you get these quests, you must get them in order, starting with the first one, working your way up. After you complete all 5, you are given the choice of whichever one you want when you hail the Registrar.
Entering the zone is done by clicking on the door right next to the Registrar. Make sure everyone in the zone with you has what they need done, as it will zone everyone. It appears that there is no group requirements (you can solo or single group it), however the fact that it scales and actually requires a decent raid force unless greyed out makes it so you should probably have enough people anyways. Like most raid zones… nearly everything is Epic, even trash.
If you get an armor mold, you can get the armor by simply examining it and accepting the quest. It will give you the choice of rewards, there’s a different set for good and evil classes. The “quest” is basically to talk to the Armorer that is right next to the Registrar.. and accept your reward!
Most are pretty good, and on a level slightly better than mastercrafted. A few I’ve seen are better than most legendary out there, and a few are worse off than mastercrafted.
There are two flavours of armor molds. For the level 60+, they are Fine and Ornate. Fine molds give you the option for a Head, Hands, or Feet armor piece. Ornate molds give you the option for Chest or Legs. Ornate is far more rare.
There is currently a bug that if you had both a Fine and an Ornate piece on you, finishing the quest for one will eat both items. Watch out!
NEW SIXTH RAID INFO!!
Lordly Confrontation
This takes us back to the Shattering Vale (exactly like the first one). Your goal is to take down the 4 conspirators in the zone… 3 ambassadors to aspects of nature (druids, nymphs and pixies) followed by killing the main guy, another giant tree.
There are wanderers all around, just like in the first guild raid. The three ambassadors are surrounding the druid ring. One to the left in tents, one to the right in a little bend, and one in the back behind the druid ring.
There are Heroic mobs interspersed with epics throughout the entire area. You’ll also notice a rign of treants surrounding the Druid Ring as well, they are non-aggro though.
The first guy (druid) to the left in the tents will drop a chest. He has a minor stun, but that’s about it.
The second ambassador (nymph) is to the left and doesn’t drop anything. She has a brief charm.. well it can be cured now so it was always brief for us. Might be harder if you aren’t quite on the cures.
The last ambassador is in the back (pixies), don’t remember anything uniquely tough about it.
We always kill all the treants surrounding the last boss just in case they become active when fighting him. This is probably good practice… we ended up with an Acrylia cluster from a chest anyways.
The last boss is what makes this one hard. This raid will kind of teach you what it’s like to raid Vilucidae.
Basically, this guy will spawn a ton of adds all while AE’ing and debuffing the entire raid. There are some devices however sitting on the druid ring ruins that you can click to “release poison into the ground” (ah, now it’s like the flower fight). Basically, have one person run back and forth, or two people one at each, constantly clicking these devices (there’s a message that flashes across the screen when they are ready) and you won’t get the adds.
Another problem is that the mob has a nasty AE. This can be avoided at range, so only the MT needs to take damage if you pull right.
The final problem, and what still makes this hard, is that the guy will periodically Dispel the entire raid. When we mentored lower, it didn’t debuff as hard, and some were able to resist outright, but at a higher level (no mentoring) this gets very tough.
Basically.. your MT will lose HP buffs, defensive buffs, healing buffs, and hate buffs. Your raid will lose power regen, and any other buffs they give themselvse and the group to dps more. So you have to hold back a bit so the tank can keep aggro, but at the same time your power regen is constantly gone.
We failed the first time due to the fact that we had only 2 healers, and one was low level, and a couple people had to take off so they were only there for buffs (which got Dispelled anyways).
The second time around we had a full raid, with something like 5 or 6 healers and two regen constantly rebuffing, and the mob was mentored down to around 65. So we managed to beat it very quickly and easily.
I’m positive a well prepared full raid of 70s would be able to handle it unmentored.
We ended up getting 3 pieces of gear out of that one chest.. and I think two out of the other guy. Pretty nice haul, about as much as I’ve seen in relic gear drops out of one lab raid and this only took an hour. Gear was very nice too, Someone got the Mage Vest that procs a detaunt.
A few corrections
Quests 1 -6 are now just called:
Quest 1 – A Bold Confrontation.
Quest 2 – A Daring Confrontation.
Quest 3 – A Gallant Confrontation.
Quest 4 – A Noble Confrontation.
Quest 5 – A Heroic Confrontation.
Quest 6 – A Lordly Confrontation.
Whether you are good or evil, the quests have the same name. If you have people from each city trying to zone in, at least ONE on each side MUST have the quest active in their book to be able to zone in. So if your raid is mostly qeynos and you have a couple of Freeporters wanting in, at least one freeporter must have the correct quest.
Also, anyone wanting to join the raid late MUST have the quest in their journal or they will not be able to join in.
Armour Molds:
This information was confirmed by Morticus (SOE Dev) on the old forums.
Each armour mold can be examined and handed for a reward. Any class can get a tiny amount of XP, but only the classes below will get a piece of armour.
Plate – Warrior, Crusader & Cleric only
Chain – Scouts & Shaman
Leather – Brawler & Druid
Silk – Mages only.
When you hand in the mold you get to choose from lvl 50 (T6) items or lvl 60 (T7) items. As mentioned there are 2 types:
Fine – Head, Hands or Feet
Ornate – Chest or Legs.
Ornate molds are very rare. You will be lucky to see one from doing all 6 raids. You will get between 1 and 3 molds per chest. 2 seems most common.
A Bold Confrontation updates
As said the elemental can be one of a number of types. In addition to the ones above I have seen earth.
The Air elemental has an Cold AE (Suffocating Winds) that goes off roughly every 60 seconds and hits for about 1k (at lvl 60) a time.
The Earth Elemental has an Magic AE (Shockwave) that goes off roughly every 60 seconds and hits for about 2k (at lvl 60) a time
While the Shaman isn’t that tough, the fact he agros as soon as the elemental is dead and the constant stream of adds thru the fight do make things tough.
Both the elemental and the Shaman can drop Mold chests.
Bug – When we did this raid last week, we wiped with the Shaman at 15% or so. However the encounter did not reset properly. The adds kept coming and attacking the raid at the revive point. We had to rebuff, rest up and take the constant adds down at the same time before we could pull the shaman again.
A Daring Confrontation updates
Pretty much as Raidi said.
Make sure your MT is ready for the sisters Memwipes. Other than that the only issue is the Mothers adds.
Only the Mother drops Molds.
A Gallant Confrontation updates
Again, pretty much as Raidi said.
Make sure you fight Piali in his hut so the knockback doesnt send you flying. By now you should be used to dealing with all the adds throughout the fight.
Bug – Make sure no one evacs during the fight. (i know this shouldn’t be an issue but just in case) One raid we did someone accidentally evaced dumping himself and one other outside in Antonica and of course they could not get back in due to lockouts.
A Noble Confrontation updates
Again, pretty much as Raidi said.
Bug – Last time we did this, neither spotter sent adds after us making the 1st part fo the raid fairly easy.
A Heroic Confrontation updates
The 1st named (Navigator Nina) came with 1 add. Brineblender. She didn’t start calling for adds until after brineblender was dead.
Once you kill the 2nd named make sure the raid stays together as you move back towards the West side of the beach. That way you make sure the spectral sailors don’t start picking on the stranglers.
It takes about 5 minutes for the script to run and Kor’alla to appear. So relax and don’t worry. You cant miss him as he is HUGE. He walks out of the water and up to the camp fire and then agroes your raid. He isn’t difficult however he does charm. He has an attack (Siphoning Suckers) that will either drain HP or power from his target and heal himself by the same amount.
Straight after he dies Hairaza agros and she is NASTY. Her AE is now raidwide and has a longer range than max-cast range. It is disease based and goes off every 6 – 10 seconds. It hits for an average of about 2-2.5k damage at lvl 60.
Only Kor’alla and Hairaza drop Molds. As usual 1-3 each.

Recent Comments