Allods Online Necromancer Guide
Allods Online Necromancer Guide by lawful
Alrighty, seems some people are eager to see a Necromancer Guide and just so happens that i was planning on making one after i’ve learned abit more about the class .
I’ll try to fit in as much useful information as i can before Open Beta starts, thus that leaves me with a couple of hours.
Well, here we go.
Patch comments: After the recent patch, Necromancers were severely nerfed thus being arguable as a main healing force. Its unclear if a Necromancer can keep the whole party alive alone now.
Main nerfs:
1. Healing power of all Necromancer spells decreased by 30%.
2. Mending Plague is not spammable now, has a 60 second cooldown between effects.
3. Relaxation ability removed.
4. Mending Plague is severely influenced by stats, thus heals alot less now.
5. Antibody debuff, dissables any available Mending Plague effect for 60 seconds after one has ended.
1. Introduction
Necromancer, what is a necromancer? When creating your character, you will read about him being able to control power of darkness and all, well useless info, lets get down to what he really is.
A Necromancer is a rather unique combination of styles in Allods, one of the most versatile Classes in my opinion that can take up quite a few different roles, from DPS’ing, to Nuking and even Healing and supportingю Yes, yes you heard me right, paradox isn’t it? Supposedly a class that practices Dark Arts that were meant to play with death itself, to curse, weaken , torture and murder people, yet they can actually save lives and bring back the dead, the dark side of healing if you may, Night Priest The Necromancer has a list of different abilities wich are, his DoT’s, curses and weaken type spells that eat trough your opponents Health continuously till he dies, like poison. Vampirism, spells that leech life from your opponent and recover you and your pets instead, and ofcourse curing, at the cost of the blood that the Necromancer gathers in his containers, he transfers it to himself or his fellow party members and helps them recover from their injuries, and also last but not least, the traditional Necromancy gift, Summoning! He can raise the dead under his command and keep them under control as his underlings.
What makes this class interesting in my opinion is the freedom to create builds to your own taste, either it be a full supportive healer, either a DoT (damage over time) type build, either a heavy magic damaging type class, or even a hybrid and combination of both or a bit of all three.
2. Character Creation and Racial Abilities
When creating a Necromancer, you will have three races to choose from, two are on the Empire side and only one available on the League side (Not much choice for league huh >.<)
As a League Necromancer you will be able to become a Elf Demonologist
As a Empire Necromancer you will be able to become a Xadaganian Defiler or a Arisen Savant
The differences in choosing a Race are the special Racial abilities you will get and of course for each race, the summonable fiends look differently.
Demonologist Ability and Pet Images: His ability is one more additional DoT spell, wich you can lay on your enemy and it will last 16 seconds, dealing damage each two seconds and healing you and your pet for double the amount of damage dealt.
Savant Ability and Pet Images: His ability is that he can fully heal his pet in one cast.
Defiler Ability and Pet Images: His ability is that he can increase his pets Strength and Dextery by 30% for 30 seconds.
Pictures will be updated soon.
As for each’s special ability, well they aren’t really all that worth going into detail about, nothing super natural or overly useful. In my opinion the developers could of tried a bit harder at that part >.<
3. Stats
Where to invest your per level stat points:
I’ve seen alot of threads lately with people asking wich is the best attribute do drop your points into each level.
There are different opinions on this matter but every experience player would agree that the most balanced and surefire way to invest your points into a good attribute would be – ☯Luck!!
Some people might ask why Luck?! Well the answer is simple, every class without exception needs a balanced luck stat so they don’t get a high Glancing Blow rate wich will halve the effect of your abilities! To evade that happening you need to keep your luck at a certain balance and the reason why you should pick Luck is because equipment that comes with good stats wich includes Luck is usually quite Rare and in MOST cases you would have to sacrifice alot of your Intelligence/Perception stats to aquire Only Luck!
Thus adding it will relieve you from the stress of sacrificing too much of your other important attributes to get a luck balance.
For a example most gear with luck usually comes with Agility, Stamina or Endurance, and no Intelligence or Perception and you have to replace your Intelligence or Perception gear that usually comes with both stats on the same item and even also comes with Stamina or Agility to get only luck, ending up in you losing a larger amount of important stats.
Other good alternatives are Wisdom since Wisdom is usually not in very large amounts on Intelligence and Perception gear, thus even less on Luck gear, but its still there.
The worst scenario is investing your Points into Intelligence or Perception since these stats come easiest and in the largest amounts.
Thats it for the where to put points pointers. Lets continue with the stats section.
—————————————————————————————————-
The stat section is looong and boring to type so i’ll just copy it from my other guides..well not like anything changes >.<

Every character in Allods has a certain amount of stats, lets review them all and each’s usefulness for a Necromancer.
Strength – represents the modification of damage in close range, applies to damage from normal attacks aswell as physical spell attacks, useless for a Necromancer, you can totally ingnore this stat without suffering severe consequences as with some other stats.
Finesse – represents the resist modificator that a enemy will have against your physical attacks. Useless for a Necromancer, you can also keep this stat at a minimum.
Expertise – this stat affects the accuracy of your physical attacks, useless for a Necromancer also, you won’t even use physical attacks.
Agility – a stat that affects the chance of you dodging a enemy physical attack, not as important to the Necromancer. But most INT/Perception gear will come with either Agility or Stamina, so this stat will be actually quite high.
?Luck – a stat that affects how often will you deal critical or glancing blows, wich also applies to heals. Very important for Necromancer, probably i’d say this is the third most important stat for a Necromancer but its harder keeping it in balance without sacrificing Intelligence and Perception.
Endurance – a status that determines the chance with wich you will receive a critical or glancing blow, it has a mediocre significance both in PvE and PvE.
Stamina – a status that determines your maximum health points, very important for a Necromancer.
?Intelligence – a stat that affects a characters Magical attack and Healing power, a extremly important stat for a Necromancer , wich multiplies the total damage and heals of your spells from your wand power. Also similar to the Warden class, this spell affects your summons aswell, it increases their overall damage like Strength would.
?Perception – stat determines the amount of resistance your enemy will have against your magical spells, a VERY important stat for a Necromancer. Unlike other classes, this class will prefer this stat as high as possible without sacrificing means since it affects a couple of vital spells like his Blood Aegis and the amount of defense Corrosive Acid decreases. Also another stat that affects your Summons aswell, it increases their Expertise.
Conviction – a stat that affects the success of your control abilities such as dissorients, stuns, slows, ect. Mediocre usefulness in PvP and generally not a very important stat to look out for.
It will be rised a bit anyways out of the random gear you’ll be wearing since some of it is bound to have a bit of it on it. Necromancer don’t really have any controlling spells except Fear , weakness and Death Breath but still.
Willpower – the counterpart of Conviction, a stat that affects the success of you being affected by control abilities. Mediocre in PvP and useless in PvE, not a stat thats worth worrying about, same as the one above.
Rage – a stat that determines the seriousness of wounds that you will deal to a target , mediocre usefulness in both PvP and PvE, not a stat worth worrying about, will come itself ingame with gear.
?Faith – a stat that determines the effectivness of your heal spells on wounded targets, this stat is very important for support Necromancers that are planning on healing alot, it makes their healing spells ignore wounds and heal more. Very useful in actual combat.
?Wisdom – the counterpart stat of Stamina, it affects your maximum Mana points and their recovery rate, for a Necromancer this stat is of a very high importance aswell since not only does it affect your Mana pool but it also affects your Minions and their finesse.
Different builds would require different attributes for a Necromancer but the most basic ones that any type would need are Intelligence, Perception, Luck and Wisdom.
To this list Healers need to heavily add Faith.
There are also critical Acid Necromancers, these would give up on most of their stats for Luck/Intelligence and Perception primarily, since the necromancer has quite a few interesting passives, a build like this would do quite the bit of damage, this build also works well for DoT types also, but combining both would do best.
There are also those who would concentrate on Intelligence for maximum damage output or heal output.
Also some types like to take Perception as their main attribute to increase effects of such spells as Blood Aegis and Corrosive Acid.
But all of these are only preferances, as generally you would have to keep all of your stats balanced to a certain level then only choose one or two in wich you would like to excel.
For example for a crit Acid build the necromancer would like to keep his Perception at lets say 350, Intelligence at 350, Wisdom at around 300 and Luck at 450.
Vice-versa for other builds. I hope that gives a rough understanding on how stats should be kept.
Lower we’ll see some graphics that give a aproximative understanding of how stats work in a rising order after being affected by the increase in the appropriate stat.

The general damage modificator is dirrectly infulenced by Intelligence at a square rate so you can increase Intelligence as much as you want and the stat won’t lose in its effectiveness.
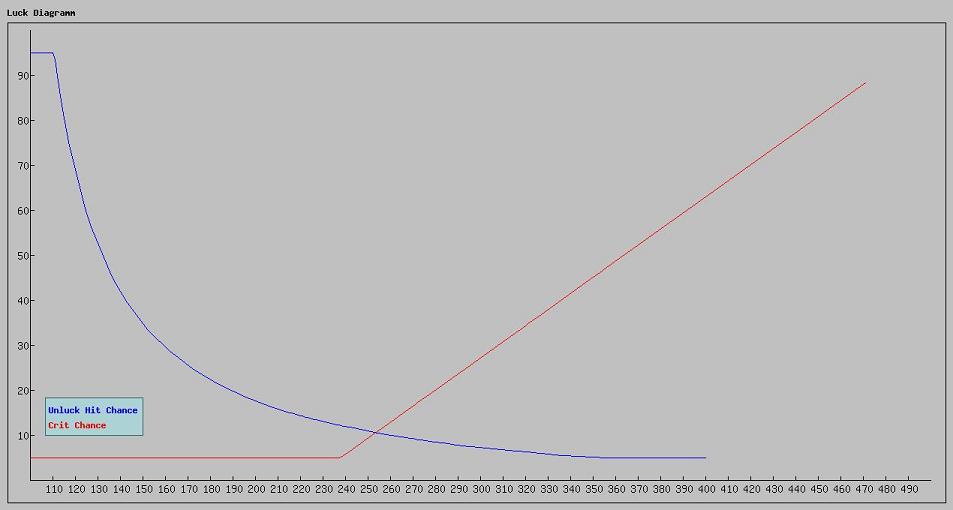
Luck affects two abilities, your critical hits and your glancing blows. As we see in the graph after luck reaches 237, it turns from a linear to a square rate characteristic such as intelligence but the chance of dealing a glancing blow works a bit differently and isn’t linear until luck reaches 355. So we can make a conclusion that the round number that we should be aiming for would be from 280 to 350, while balancing the other stats respectively.
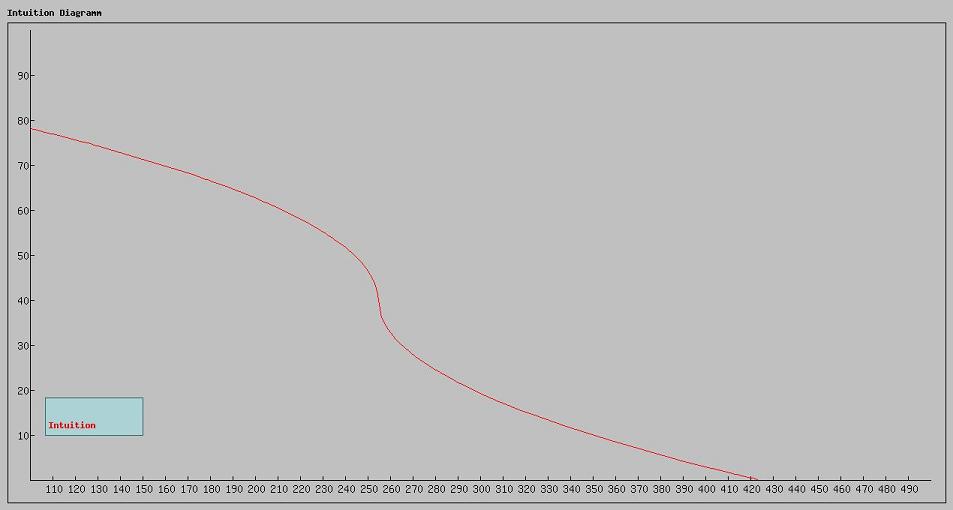
Perception, the effectiveness of perception as we see also isn’t linear so and in the 230-270 range we see a high effectiveness growth of the stat and after 270 the effectivness slowly starts deteriorating. So the optimal number for this stat would be aroun in the range of 300~350.

The linearity of Faith seems to be quite similar to the one from Perception so the optimal numbers as we see that you would want to go for would be 300~350. Drop of effeciency after 270, same as the chart with Perception.
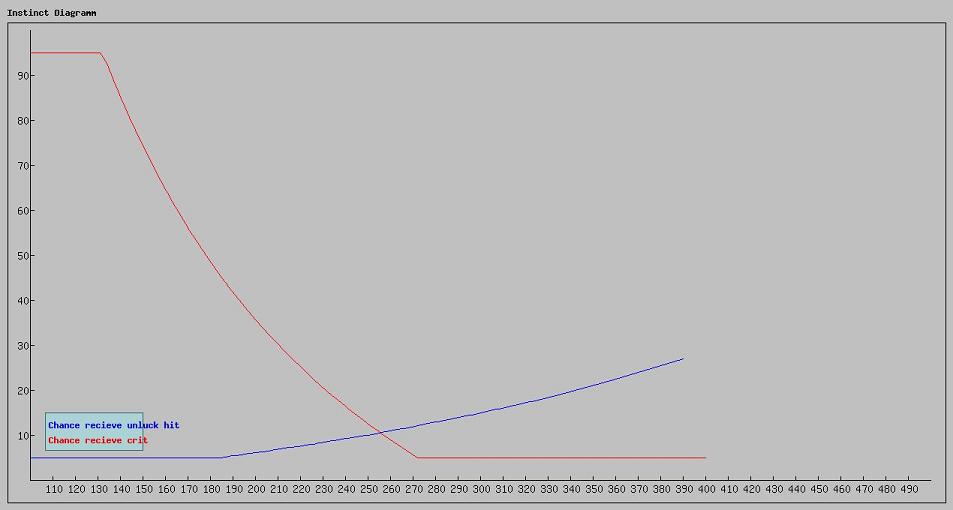
Endurance affects both the chance of you receiving a glancing or a critical blow, as we see the chance of you receiving a critical hit after the stat reaches 135 isn’t linear and decreases drastically down till the stat reaches 273 after wich it just focuses on being at minimal chance. And as we see the chance of you receiving a glancing blow is linear up to the point of 186, then it slowly starts being more effective.
With that said, you shouldn’t really concentrate on increasing the stat much after it went over 230~280 since thats the optimal value you would prefer for it not to influence your other characteristics.
So what conclusion do we reach here after seing all these graphs?
Intelligence is possible and should be increased infinitely because of the linear and stable increase in overall damage and healing for a Necromancer.
Wisdom should be increased until a certain point. By means of testing it came above that the optimal stat value for it would be around 300~350 since it also influences Minion accuracy, wich works like Perception for you.
Perception should be at around the number of 350~400 and should be kept at that number since any higher and its effectiveness will drop noticeable and the points are better off in another attribute, but thats if were talking about Effectiveness with spell resists, but if your planning on getting very high Aegis and def penetration with acid, then you can rank this as much as you like.
Luck should be kept at around the number of 280~350 but if you have the option of having more luck without sacrificing other stats then by all means you should get more, but don’t get too fanatic about it.
As for all the other stats, they should be kept at minimal level.
Naturally the higher the stats – the better but lets keep in mind that certain stats start to lose their effectiveness after they reach a certain point and further points should not be wasted into them but rather allocated somewhere else.
4. Spells
In this section we’ll talk about spells, how do they work, what effects them, wich are best to be had for wichever reasons, ect.

Acid Bolt – your basic necromancer spell, you get it at level 1 when creating your character, damage is increased with spell rank but so is casting time, at rank 2 deals more than twice the damage it dealt at rank 1 but casting time is increased from 1.5 seconds to 2.5 seconds, rank 3 increases only damage by a certain amount of around 20%.
Has a 40 yard range, deals Acid type damage, no cooldown.
This is your basic spell, quite useful in any form, be it rank 1 or 2 or 3, its cheap, and deals atleast some kind of damage in addition to your DoTs and summons.
But can be your most fierce spell if ranked up and ruby’s for it aquired.
Putrefy – your first DoT, you get it at level 2 automatically, the most used of all your dots, deals periodic acid type damage, lasts 20 seconds and damages each 2 seconds. Instant casting time, no cooldown, low mana cost.
You can basically spam this spell, i love using it outside instances when killing stuff on multiple enemies then just let them gather up and finishe them off with my pet.
Anyways, recommended to get rank 3 for DoT and Acid type builds.
Vampirism – quite a unique spell, the Necromancer sends a bat flying towards his opponent that will bite them , leech life then bring it back to the Necromancer, refilling his Health (And his pets if ruby’s are aquired) and also brings back 1/2 drops of Blood.
Starts at a casting time of 2.5 seconds and increases to 3.5 with next rank, thats quite a long casting time for a actual combat spell, most people get passive ruby’s to decrease casting time or rely on a special ruby called Poisoners Ecstasy to totally reduce casting time.
Rank 3 isn’t worth getting since it only increases damage dealt slightly, also it consumes a noticeable amount of Mana so if you’ll use it too often, your risking on burning out.
Range 40 yards, no cooldown time, type of damage – Shadow.
Recommended rank – 2.
I wouldn’t recommend this spell myself, i only took it for the blood filling ability when i’m in need of some, otherwise its quite useless, Acid builds will find Acid Cloth alot more useful.
Blood Injection – Your first healing spell, has a long casting time of 3 seconds, no cooldown, high mana cost, 30 yards range, consumes 1 blood drop.
Well this is your first heal, the healed amount is quite decent, compared to Cleric spells its even stronger by 25%.
Healed difference from rank 1 to rank 3 is 50%.
In my opinion you should get rank 1 of this spell as a starter heal, since your other heals won’t come earlier to you than level 18+ while you can get this quite early ingame at around level 6. The healed amount is quite considerable but casting time is quite long so the target might die if you don’t precast it on time.
Strongly recommended at later levels to use a water of death and get back the points spent into this heal if you get it.
Blood Aegis – Your one and only protection spell. It consumes 3 Blood drops and creates a shield around the caster that increases his defense rate by a certain amount thats affected by rank and your Perception stat, also it doesn’t let your spells get prolongued when receiving damage, has 6/7/8 charges, one charge is consumed per hit received.
This spell is a must for any type of Necromancer, rank 3 is required. It adds quite a considerable amount of defense that can easily replace Plate type armours, so if some people would dare underestimate you as a cloth type class while your under this shield, oh how wrong they are. But the blood consumption is quite decent, so recasting it multiple times will put a strain on your reservoir and restrict you from healing, handle with care.
Summon Hellion – your first Summon you can aquire at level 6 earliest. Its a tank type summon that deals decent damage, regenerates Health and can take quite a few punches on his own and has several useful spells also.
The stats of your summoned fiend are user influenced, so it will get stronger along with you, it changes appearance with each higher rank in the spell, unlike the Wardens pet that changes appearance with the characters level.
At rank 1 it learns a combo hit spell wich deals damage several times in a row.
At rank 2 it learns a charge type move, that makes him able to dash towards your enemy, stunning it for a bit and makes your summon imune to control spells for a short period of time and disspells any debuffs from him.
At rank 3 it learns Disarm, for a few seconds it disarms your opponents weapon thus lowering their damage considerably (Only works on Melee Weapons, doesn’t work on bows, wands and shields).
With each rank up , the summons effeciency also increase, deals more damage, has more health, ect.
In my opinion this pet is a must have for any type of Necromancer, hes a great help at lower levels while your Necromancer doesn’t have decent gear and your damage is…well gently put low. But even tho hes supposed to be a tank, he loses aggro quite easily if the Master of Summoning ruby isn’t learned.
The damage he deals is around the highest among all of your possible summons, so hes useful both in PvP and PvE. Plus that he regenerates Health on his own greatly makes your life easier since you never really have to heal him.
Fear – Your one of the very few controlling abilities, makes a target run around in Fear , being unable to do anything while at it, damage does not cancel the effect, duration is 6 seconds, instant cast, cooldown of 60/45/30 seconds, 15 yards range.
This spell is your life savior when you get ganked in neutral territory maps by enemy players, the cool-down is very high so its not usable very often but it does save your life on occasions and also is useful when getting a monster off you.
Some players prefer getting this to rank 3 for reduced cooldown, but i’d recommend it left at rank 1 since 30 seconds is still quite a huge cooldown while it only lasts 6 seconds on all ranks. Plus it has short range, try to force it and get a close up to use it too often and then your asking on getting hit on the head.
Relaxation – Spell is removed, a Necromancer will no longer be able to recover Mana.
Blood Pact – this spell is introduced instead of Relaxation, will give you additional blood drops at the cost of sacrificing your own health.
Summon Soul – your ressurection spell, when casted out of combat – raises a target from the dead with 15/40/75% health and mana/energy restored. 15/10/5 second casting time , no cooldown.
Nothing much to say about this spell either, rank 1 is pretty much a must for any Necromancer, any further than that i a waste of points, at level 40 it eats a tremendous amount of mana so you won’t be spamming it left and at rank 3, pretty much after ressing a person, you’ll have to regenerate mana each time.
Plague of Mending – Your AoE healing spell, consumes 4 Blood drops and puts a 20 second regeneration infection on the target wich heals every two seconds and spreads to everyone around in 10 yards, from wich respectively spreads to others. Also after the effect of the Healing is over, the target will receive a “Antibody” debuff effect wich lasts 60 seconds and will not allow any more Plague of Mending be used on the target while the duration is on.
This spell is your group heal, its one of the strongest healing spells ingame. Spreads around the whole group in a few seconds and has a quite long duration, its also used in combination with Blood Transfusion on the main tank to have two types of regeneration spells on him to increase survability. But now with the new Antibody system, it will be used once every 60/42 seconds.
It works the following way, when you infect someone with Panacea, the spell icon on him will have a 5 number of stacks on it, thus infecting everyone around and decreasing stacks while doing that, but each infected person will also have several stacks, thus being able to further infect others around. Number of stacks is decreased by 1 from person to person.
This spell is now doubtful, its surely useful but now Necromancers have probably lost the ability to totally replace Healers in a party.
Any other Pleague of Mending will cause antibodies and will block any imcoming Plague from any player.
Dark Empathy – Another powerful single target healing spell, heals the target for a certain amount of health at once and also leaves a regeneration effect wich heals him bit by bit every two seconds for 20 seconds. Consumes one Blood Drop.
This is the main healing ability of a support Necromancer, used in combination with Panacea proves to be very effective, the healing amount that is instantly healed is less than blood injections but the total amount healed is times greater and it only consumes one blood wich is relatively very cheap and spammable.
Rank 3 for Support Necromancers and optional for other build types.
Blood Plague (Virus) – Infects a person with a Virus that will incubate for 12/10/8 seconds then explode and deal damage. Bearer infects everyone around in 10 yards with Virus.
After Virus successfully explodes, the Necromancer gets 1 Blood.
This spell eat alot of Mana and dealst low damage, the only reason why its worth getting is the blood it generates, after it infects several targets and explodes, all the blood goes into your container. Also under the effect of Poisoner Ruby’s it infects everyone with Ptomain automatically.
Getting rank 1 is recommended for pretty much any kind of Necromancers.
Reanimation – Strongest healing spell, heals the target for a certain amount of Health , the health amount recovered is also increased if the target has less health. Consumes 4 Blood Drops, 1.5 casting time, no cooldown.
It isn’t called Reanimation for nothing, this spell is your strongest healing spell, the lower the HP of the healed target, the stronger it gets, only problem is that it can be random, it can heal either for 50% of the targets health or for all 100%. The blood consumption is rather high so using it often wouldn’t be recommended, its more like a emergency heal.
I usually leave it at rank 1 since it does the job well, but some people prefer getting it a bit higher since its the strongest spell and all, well you decide, but even rank 1 does the job excellently.
Its strongly recommended always having it precasted so you can isntantly shock your other player in need of health back to life.
Summon Banshee (Lurker) – Summons a banshee to your command that can Drain Blood from your opponent, go invisible and cause Mass Silence.
With each rank damage dealt is increased and cool-down time for Drain Blood is decreased.
At rank 1 gets the ability to Drain Blood Drops from the opponent and deliver them to the Necromancer.
At rank 2 gets the ability to become invisible.
At rank 3 gets the ability to AoE silence everyone around thus making them unable them to cast spells for a while.
This summon is only useful for a Full Support type Necromancer!! Other type builds should not get her at all, while a for a support its strongly recommended in getting her to rank 3. She drains Blood Drops from the enemy and puts them right into the Necromancers Blood tank thus enabling him to heal continuously without having a lack of Blood, thats why shes priceless, also has a good ability to silence everyone around but may prove to be quite a nuisance at times and generate unwanted aggro.
Generally damage dealt is low and she can’t tank , so shes a no-no as a combat type summon. So once again, ONLY supports get this one, everyone else – spares points.
Raise from the Dead – Raise the Necromancer back from the dead and recovers 20/40/60% of his life and Mana, while stunning him for 7/5/3 seconds and making him invulnerable to damage for 5 seconds, ability is usable once every 30/15/5 minutes.
This ability is a must at rank 1 for any Necromancer, incase your party gets wiped, you’ll be able to be the last standing and ressurect everyone thus giving your party a second chance.
The only change with rank is that you can ressurect yourself more often and the stun time is lessened, at rank 3 you will even be invulnerable for 2 seconds, stun time and invulnerability time are unaffected by your attributes.
Wandering Fever – This spell infects a target with Fever, the target will receive continuous damage every 2 seconds for 60 seconds, anyone who gets closer than 10 yards with the contaminated target will also get infected. Instant cast, no cooldown, affordable mana cost for such a spell.
This spell is the Necromancers Royal Flush and why the class is really hated in Mass PvP! It works just like Panacea with stacks and infections, and in Mass PvP will infect the whole opposing fraction in mere seconds. Damage dealt is the highest among all of your DoT’s and it lasts longest also.
Alright now lets get down to Ruby talents, there were alot of questions regarding ruby mechanics and stuff wich i’ll try to clear up in this section.
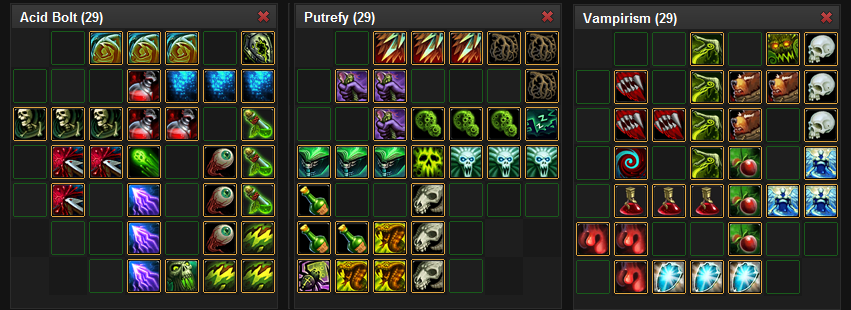
As we see, ruby’s are devided into three categories, wich are Acid Bolt, Putrefy and Vampirism.
After level 10, when you press your N button to access your talent tree, you will have three additional labels wich will be these ruby grids.
Rubys work by connection, to access a further away ruby, you will have to first connect ruby’s along the way to get there, you can even buy empty ruby slots to access some Ruby’s without going in a detour.
You can buy one ruby each time you level from your Class Master, starting from a price of 1 Gold for your first ruby and ending with a price of 50 gold for your last ruby. In total you can buy 31 Rubys from your master, aquire 7 more from different World mystery quests.
It seems the Tooltip translation was improved a bit so i’ll use the new translations introduced for people to not get confused.
Acid Bolt Ruby Grid:
Corrosive Acid: Active Ruby spell, makes your character learn another DoT that eats trough your enemies Health each 3 seconds for 30 seconds, also decreases their defense greatly.
Cooldown of 15 seconds, instant casting time, defense decreased is influenced by your Perception attribute.
This spell is a must have for any Necromancer that plans on doing instance raids at higher levels, one of the reasons the class is sought after in instances is this spell, since it drastically increases your Melee Fellow party members damage on bosses or hard to take down enemies.
Also is very useful against heavy armored players in PvP, throw this DoT on them and its like their wearing cloth instead of plate now and if your hanging around with a good Hellion…well then, i guess the hellion won’t be as harmless anymore.
Burning Acid: Increases the critical chance rate of Acid Bolt, Virus(Blood Plague) and Corrosive Acid by 30/60/100%.
This spell doesn’t give you 100% crit rate with the above spells, it only doubles your current amount of critical rate for the above spells, thus if you’d have 20% crit rate, with rank 3 in Burning Acid those spells would have a 40% critical rate.
A must have talent for the Acid builds since their main attack is Acid Bolt and this baby makes it crit alot more often, with luck builds that have over 40% critical rate, it’ll be critting almost every cast.
Concentrated Acid: This ruby increases the damage dealt on critical hits by Acid Bolt, Corrosive Acid and Fiend Summon spells by 20/40/60%.
Also a must have ruby for the Acid build, combined with your Burning Acid ability, those crits will not only be very often but also horribly strong.
Blood Tap: This ability enables you to regenerate 1 additional blood drop and 5/10/15% addiotional mana per each enemy killed. Works wonders inside instances and parties since this effect activates even if a party member killed a enemy and not you.
Recommended rank one since it gives one addiotional blood and 5% mana per enemy killed, upgrading ranks doesn’t increase blood amount gained yet only the mana amount, thus get a higher rank only if you feel like your running out on Mana too fast.
Cold Eye: passive that increases your Perception attribute by 5/10/15%.
A must get passive for any type of Necromancer, it decreases the overall ability of your enemy to resist your spells plus it also affects Blood Aegis and Corrosive Acid.
Summon Fiend: your second summon, summons a Fiend to your command wich will attack enemies from a range with Acid Bolt, Acid Wave and Poison Explosion.
Hmm, a pit of mysteries like a certain Necromancer said, its not yet much known about this pet, supposedly its a DD type pet that dies easily and its ranged but in reality..well it doesn’t stand up to the role, its attack speed is too slow, Hellion will deal more DPS with lower damage attacks than this thing at rank 3. Plus it doesn’t regenerate Health, can’t really hold aggro, can’t tank…so well its quite useless.
Dark Reach: Increases the range of your Acid Bolt, Vampirism, Putrefy and Corrosive Acid by 5/10/15 yards.
Nothing much to say, i think its useless for 3 ruby points spent, quite the amateur ruby for fun, get it if you like it, don’t if you don’t.
Master Defiler: Decreases the MP cost of your Acid Bolt and Blood Injection by 10/20/30%
Passive that decreases MP consumption, well to blood injection its useless since you won’t even use that spell at high-end, while to Acid Bolt its arguable since it doesn’t consume much mana to start with.
DarkWeaver: grants your Acid Bolt and Dark Empathy a 10/20/30% chance to decrease the casting time and mana cost of your next Vampirism or Blood Injection spell by 50%.
Yet again a relatively useful spell, get it if you like spamming Acid Bolt, since with a 10/20/30% chance it will buff you with a spell that for the next 15 seconds will decrease casting time and mana cost to your Vampirism or Blood Injection, quite useful if you have a high ranked vampirism with 3.5 seconds and no passives to it, other than that its useless.
Master Summoner: Increases threat generated by your Hellion by 10/20/30%, increases damage of your Fiend by 10/20/30% and decreases cooldown of your Banshee’s Drain Blood ability by 5/10/15%.
Ruby talks for itself, if you want your hellion to be able to hold aggro better then get it, if you don’t mind the monsters running off to you from your hellion, then don’t.
As for the Fiend users its a must have Ruby since it increases damage and for Banshee users its quite useless, since the bonus reduced cooldown is too low.
Catalytic Blood: I haven’t been using this ability myself thus found out how it properly works just recently.
Passive ability that lays a buff on you for 15 seconds after you receive a critical attack from someone upclose in a range shorter than 8 yards with a chance of 33/66/100%
While the buff is on, your next Acid Bolt spell will knock the target down for two seconds and deal additional damage.
Uses of this ability is doubtful, it works mainly against Melee Characters that crit alot, thus making your next Acid Bolt have aditional damage and a knockdown effect, quite the optional and situational ruby, more useful in PvP, less useful in PvE.
Putrefy Ruby Grid:
Evil Genius: Increases the necromancers Intelligence by 5/10/15%.
Nothing much said, its a passive increasing your intelligence by 15% at rank 3, a must have for any Necromancer.
Panic Monger: Passive ability that decreases the cooldown of your Fear spell by 10/20/30%.
Optional, i wouldn’t spend points on it but some people like the short cooldown on fear that is 22 seconds if its maxed and with this ability. Even altho i think that 22 seconds is still long considering that it works for 6 seconds.
Also fear is a short distance spell, get in close too often to cast it and your begging to get hit on the head.
Frightful Presence: Gives your character a 5/10/15% chance to cause fear on a enemy for 2 seconds that is striking on you in a range shorter than 10 yards.
Nothing much to say, it has a 15% chance to fear your opponent for 2 seconds when he does damage to you, mainly works only against Melee Classes that need to get close to hit, the actual success rate isn’t as great so expect this ability to work once or twice when fighting one. Thus a 2-4 second fear effect isn’t worth the 3 points in my opinion.
Plaguebringer: decreases MP consumption by 10/20/30% of your Putrefy, Plague of Mending, Virus (Blood Plague), Wandering Fever and Neurotoxine.
Arguable talent, i wouldn’t spend 3 points into it for a bit of less mana consumption, the Necromancer is quite gimped Ruby wise so there are alot better alternatives where your points could be of much greater use.
Withering Touch: previously known as Poisoner, it has a 33/66/100% chance to automatically infect the target with Putrefy when Virus (Blood Plague) is used, and a 10/20/30% chance to infect it with Putrefy when Neurotoxine causes damage.
A must have ability from my opinion for pretty much any build out there that likes DoT’s, one Virus (Blood Plague) spell will spread your Putrefy to all of your enemies around without you having to drain mana , time and stress casting it on everyone manually.
Neurotoxine: Active DoT spell that when used on the target will deal damage every 3 seconds to it and when the stacks of this spell reach 6, it will explode dealing additional damage and stunning the target for 3 seconds.
This spell is another must have for your necromancer, it works with poisoner and can inflict Putrefy automatically, and when throw on the enemy it will have a 1 on the spell icon, with time the number on the spell will increase either itself either when you use additional spells on the target like Putrefy, vampiric, Neurotoxine, ect and when it reaches 6, it will explode dealing decent damage to the target and stunning it for 3 seconds.
Necropotency: Earlier known as Poisoners Ecstasy, has a 16/32/50% chance that when Putrefy deals damage to the target it will generate a 15 second buff on you that will decrease your casting time for your next Vampiric, Blood Injection or Dark Empathy spell. The effect stacks up to 5 times.
A quite useful ruby if i may say so myself, since mostly every Necromancer uses Putrefy as their main DoT , this spell is always in effect and with a 50% chance at rank 3 will generate a 20% casting time decrease for casting speed for Vampiric mainly since thats the longest spell out there, thus if you have multiple enemies under Putrefy, the stacks will gather up rather quickly and allow you to use a instant vampiric very often for additional damage.
Virulence: Increase the duration of your Putrefy , Plague of Mending, Wandering Fever and Dark Empathy spells by 10/20/30%.
Nothing much to say, if you have spare points then use them here, its always a good idea to increase duration of these spells thus it ends up in being additional damage/heals.
Empowered Infections: increases the effectiveness of your Putrefy, Wandering Fever, Plague of Mending and Neurotoxine spells by 10/20/30%
A must have Passive Ruby for practically any Necromancer, increases damage dealt by your DoT’s and healed amount by Plague of Mending by 30%!
Advanced Genetics: Decreases the duration of your “Antibodies” debuff by 10/20/30% and increases the duration of your Weakness spell by 15/30/45%.
Weakness: Another Active Spell with instant casting time wich will decrease your targets and all the targets around that come in contact with it within less than 10 yards, moving speed and damage by 50% for 10 seconds after a 10 second incubation period of the infection. If the target successfully survived the infection then for the next 45 seconds the target will be immune to weakness.
Works as a great AoE debuff, in my opinion a must have for any Necromancer, especially useful in instances to infect the monsters the tank is keeping on himself to decrease their damage drastically.
Vampirism Ruby Grid:
Reservoir of Blood: this ability increases your blood reservoirs maximum capacity by 2/4/6 Blood Drops.
Nothing much to say, a must have for any Necromancer.
Acid to Blood: Passive ability that generates one blood drop every 30/20/10 seconds and increases critical chance rate by 30/60/100% for your Vampirism, Blood Injection, Howling Death and Dark Empathy spells.
A must have for any Necromancer also, atleast rank 1 is required for a somewhat decent regeneration of Blood even when your out of combat or don’t have the chance to cast a Vampire.
Dark Pact: Active ability that when activated, you will sacrifice 20% of your maximum health that will provide you with 5 Drops of Blood.
A risky ability, keep in mind that it might kill you if you don’t have enough health. Very useful in conditions where you don’t have any blood left, need some emergency blood for a heal to your party members and have just the right amount of Health.
In PvP combat isn’t recommended using since well..lol 20% Health loss >.< but can be situational.
A strongly recommended ability for Full Support Builds.
Blood Flow:your vampirism spell will have a 33/66/100% chance to generate one extra Blood Drop.
Thus your vampirism will get you 3 drops of blood each cast if its rank 2+. Useful ability for vampirism builds, but i don’t usually waste points on it, rather get the regenerating drops.
Healing Shield: passive ability that triggers a regeneration spell for 9 seconds that heals each 3 seconds when your Blood Aegis looses one layer.
Mmm doubtful ability.
I’ll be honest that i never used this ruby myself thus can’t say much about it, but read somewhere on the Russian forums that its not worth the points, wich i would probably agree with, rather use Dark Empathy once and have a longer duration plus stronger heal.
Dark Leech: Ability that decreases your vampirism spells casting time by 10/20/30%
Must have ability for Vampire builds, other than those, skip it or try to avoid it.
Bonesetter: additional ability to your Vampirism that gives it a 33/66/100% chance to also heal your Summoned pet, also generates twice less threat.
Doubtful ability, i never really liked it thus only used it sometimes as a step-up, gives a chance to heal your pet too with vampirism, in my opinion isn’t worth it since you can normally heal your pet if you need and the Hellion doesn’t even need heals since he regenerates Health on his own.
Reanimator: when Reanimation, Vampirism or Dark Empathy produces a critical strike, then you will have a 15/30/45% chance of fully recovering the lost blood drops and mana spent on the abilities.
Also decreases your Summoning times by 15/30/45%.
Dark Gift: passively increases your stamina by 5/10/15% and your pets stamina by 15/30/45%.
Nothing much said about this ability, adds additional Health to both you and a considerable amount to your pets, optional, take it if you feel like it, don’t if you don’t.
Call of the Grave: passive ability that increases the effectiveness of your Vampirism ability by 10/20/30% when your Health drops below 50%, also increases damage of your Howling Death and Acid Bolt abilities by 10/20/30% when your targets Health is below 50%.
What can i say? A must have ability for both Vampirism and Acid Bolt user builds, not as important for any other build.
Howling Death: Active spell that deals quite heavy damage to your target in a instant, also slowing them by 50% for 5 seconds. Consumes 6 bloods.
Doubtful ability, might work as a Finishing off move but its most certainly not a heavy CC ability or DPS ability since it eats a whole 6 bloods to activate, deals almost twice the damage of a rank 3 vampirism tho.
I usually don’t get it since i don’t see much usefulness in it in actual experience , but you might like it.
Thats pretty much it for the spells and ruby grids, lets move on to the last part of this section wich are the Necromancers World Mystery abilities, there hasn’t been much word about them so i assume alot of people would be wondering what are they.
These abilities you will get free after completing long World Mystery quest chains.
World Mystery spells:
Tenesse’s Gift: ressurects one fallen player , cooldown is 20 hours, so not much use in this spell, plus the Necromancer has a ressurection spell on his own..no logics.
Fake Death: you fake your own death thus losing monster aggro but doesn’t work on bosses. Very useful ability when you grabbed a few monsters off your party members by accident and want to throw them off.
Antidote: removes a certain variety of DoT’s, success rate isn’t 100%.
Don’t know how useful this one might be since i haven’t seen it yet in action, but it does remove some DoT effects so its useful somewhat.

Recent Comments