CrimeCraft Newbie Guide
CrimeCraft Newbie Guide by Slyder
Allright. This is a post for all the newbies to the CC world, and hopefully you’ll read it, and hopefully it will explain the UI and some of the basics in the game. This isn’t a how to fight in PvP or anything, simply a guide of what everything is in the city, how to get into instances and just some other basics, so here we go.
The User Interface.
I am not sure if this is a work in progress, or a final version, but this is going to use the one that is in game at the moment. It is accessable by pressing the TAB (by default) key while in the City lobby. You cannot access this in an instant, TAB pulls up the score board.
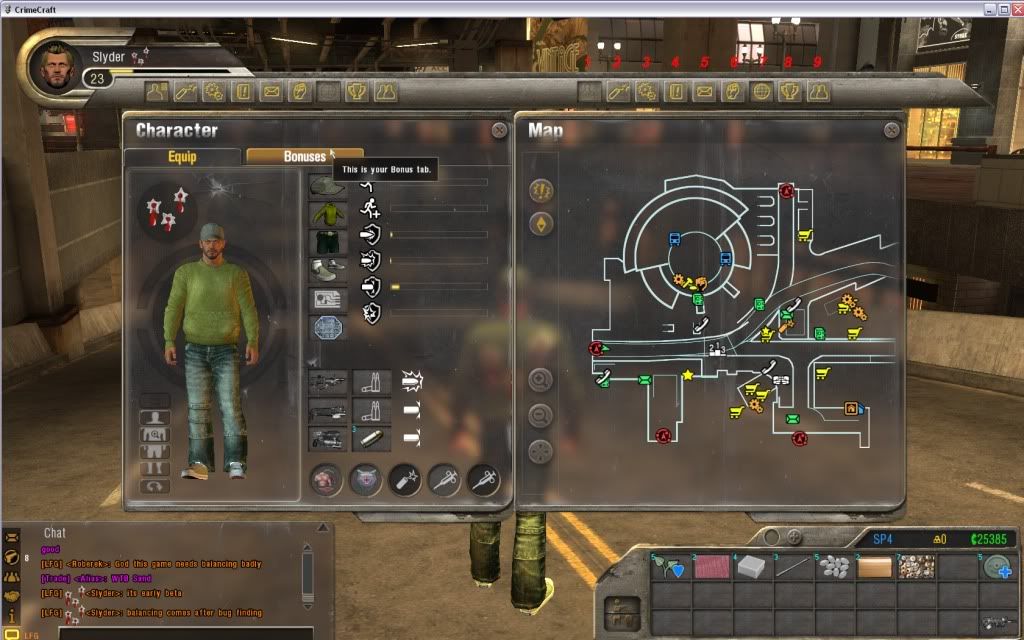
Notice that there are two rows of buttons at the top. You can have two seperate things open at the same time, simply by clicking on different buttons on either side. The buttons on both sides are identical.
1. Character Profile
2. Skill Window
3. Crafting Window
4. Missions/Jobs
5. Mail
6. Gang Window
7. Map (current city only)
8. Achievements Window
9. Social Window
Pretty self explanitory once you start to look around at them. They function pretty much as any normal MMO type game would. In the bottom right you see your inventory. The bottom left houses your Chat window, as well as several icons. The top is a Mail Notifier. Next is a Gun looking symbol which handles your instances, which I will cover in a bit. Next is what I believe to be the group window, although I am not sure. The Handshake Icon i believe deals with notifications of people requesting group, or perhaps trading. The i I have no idea about, havn’t seen it activate yet. The bottom icon that looks like a Chat Bubble, is for manually choosing different types of chat. Right click it to pull up the options. I believe at this moment, this is the only way to get to group chat, as /group does not seem to work.
The Map.
This is the map of the First City, known as Sunrise City. There are three different cities to go to, but it seems most people congregate here, and this is where new players start so i will use it for the purposes of this article.
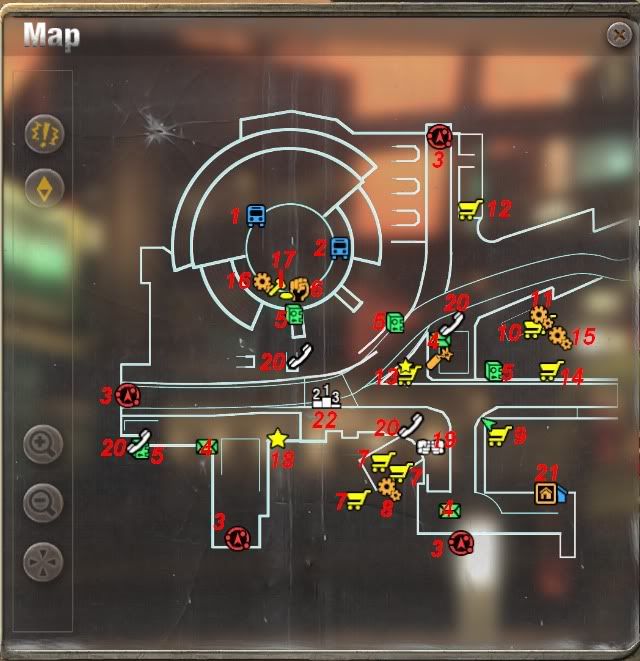
This is the map you get when accessing it through the UI by using TAB and selecting the proper icon. While in the city running around, you can also press and hold M for a smaller version in the middle of your screen.
1. Bus to Midtown Square (another city lobby) 12. Drug Vendor
2. Bus to Oceanside (another city lobby) 13. Specialty Drug Vendor (lvl 15+)
3. Available Instances for PvE and PvP. 14. Greneral Crafting Vendor (one at each spot)
4. Mail Boxes 15. Chemistry Trainer
5. ATM (bank storage) 16. Engineer Trainer
6. Guild Registar (the fist) 17. Auction House
7. Clothing Shop 18. Premium Shop
8. Tailoring Trainer (the gears) 19. Gang War Registrar
9. Weapon Enhancement Store 20. Phones (for Jobs)
10. Weapon Dealer 21. Housing Vendor?
11. Weapon Smith Trainer 22. PvP Ladder’
Again, this is only for Sunrise City, but all of the icons remain the same in the other two.
Starting Out.
After charachter creation you’ll be dumped into Sunrise City. The first thing you should do, is open your map. You’ll notice a flashing marker on it near the middle of the city. This will take you to an NPC to talk to. Talk to him, and he gives you a mission to go see someone in the Weapon shop. Follow the new mark to this location, and speak to him. He will give you a mission to kill 1 player in PvP. You’ll need to join an instance, and accomplish this. When done, return to him, and he sends you back to the first NPC you talked to. This gets you level 2, and this NPC sends you to the skill trainer. Again, follow your mark on the map, and train into a new skill. After this, you will be instructed to goto a specific phone to attain jobs. This is the intro tutorial. Very breif, but it gets you some basics. The phone (ill go into later) is where you pick up AND turn in jobs. This should be the very first step you take.
Getting into Instances.
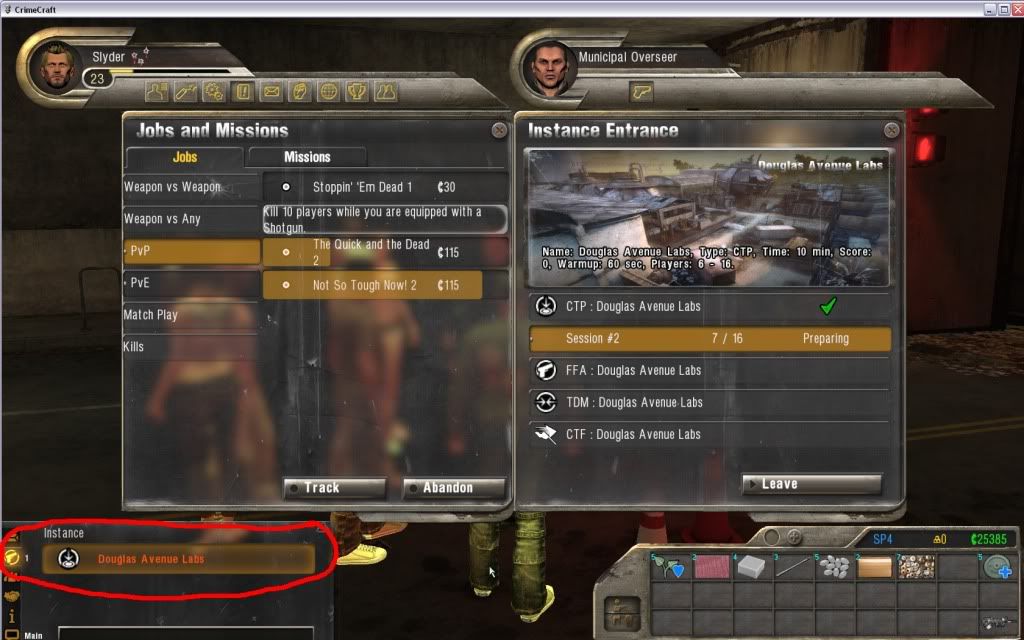
This is the question most asked in the game. “How do i get into an instance…” Here is a rundown. First thing first. Using your map, locate one of the 4 red circles. In Sunrise, they are Isopatch Oil, Mitsuki Tower, X-Allign Shipping (the only one with a PvE map) and Douglas Ave. Labs. Go to any one, it doesnt matter. Once there, talk to the npc, and youll see this.
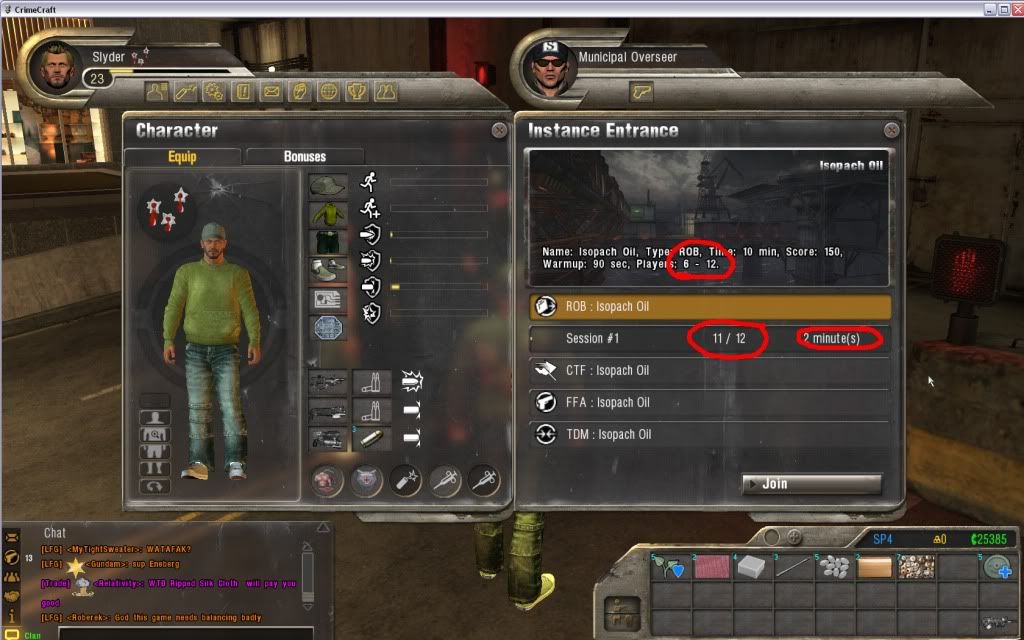
This is the instance selection screen. There are a few key things to notice. First, the top circle. This is the number of players the map holds. In this case, it is 6-12. Note that the 6 is the MINIMUM you need queued before the instance will start. If it says 1/12 in the middle circle, FIVE more people will need to sign up before this is launched. The instance will not start when you simply click join. The Middle circle is the number of players IN (if it is higher then the 6 required) or the number of people queued (if the number is lower then 6). It is best to choose an instance that has more players in it, since this will start sooner, or is already running. The right circle is the instance status. In this case 2 minute(s) means that there is only 2 minutes remaining in the map. If the time limit is too low, it won’t let you enter. Other words that will appear here are “Started” which means you are still waiting for enough players to start the map. “Preparing” means it is launhing and you will be notified when it is ready. That brings us too how to join the map, even though you have already hit the Join button.
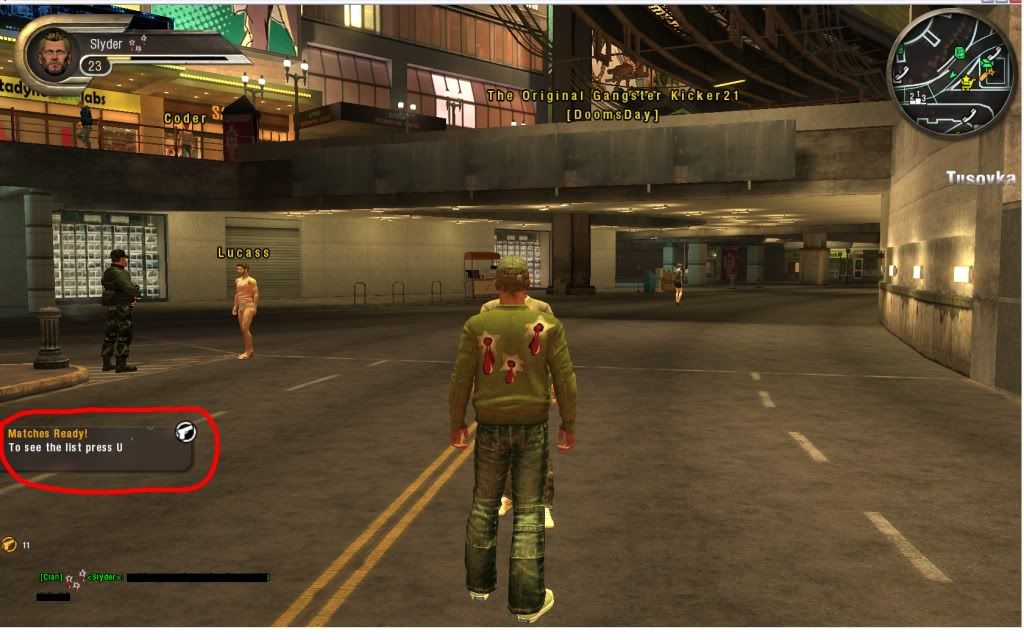
When a (you can queue for multiple maps at once) map you have selected is ready to start you will see this icon. Note, different maps have different minimum number of players needed to start. Once the map you selected meets this minimum, the game will “Prepare” the map. Once the map is prepared, you will see this tab. Also note, that you will only see this if you are NOT in the UI. So once you are done talking to an instance npc, exit out, as this is the easiest way to see it. Observe that it says press U to join. Once you do this, you will be moved to the instance. You will NOT simply auto join a map by pressing the JOIN button while talking to an NPC, you must manually activate it. Another way to join, if you are speaking to an NPC and havn’t exited the UI yet is like so…
The gun tab keeps track of all your queued instances. If you notice that it says PREPARING, like it does next to this mission, you can click on the gun tab to see your mission. Once it has turned red like I have highlighted, you can simply click on the red text to also enter your instance.
One thing to note about the gun tab. If you have not queued for any instances on your own, it will broadcast several instances that are in the process of queueing up. Your gun symbol will flash with a large number by it.
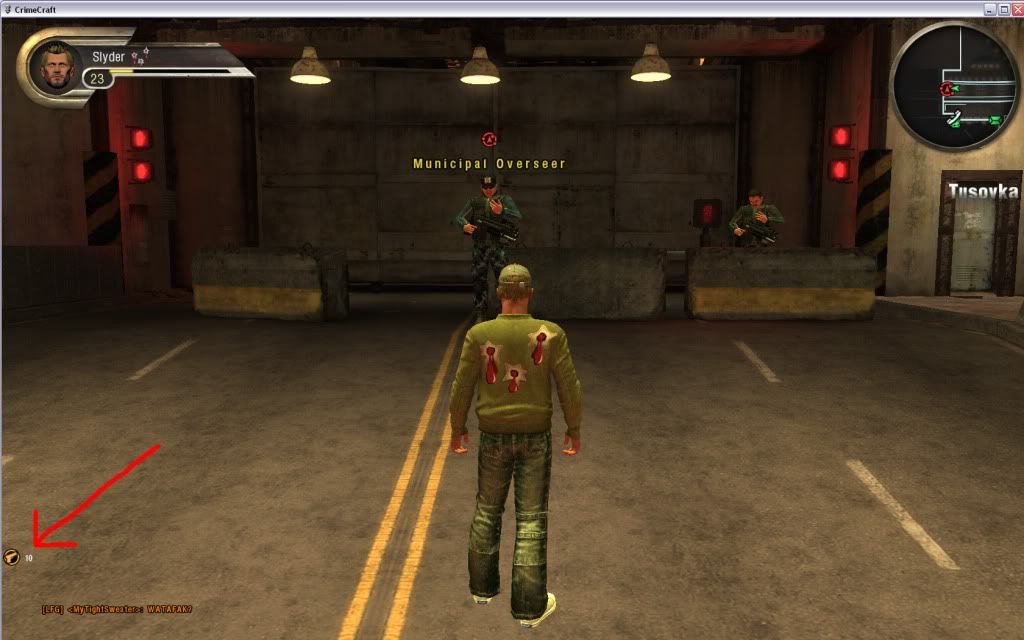
Here you can see that I have been auto queued for 10 maps. If you hit tab, then click on the gun, it will pull a large list of instances for you to select from. Map names in Orange text are waiting on enough players to start, while map names in Red text are ready to be joined right away.
Jobs/Missions.
At the moment, there are only a couple of missions in the game. The first one, I told you to do right away. I believe at level 5 a couple new ones open, and they are marked by a white ! on your map. They are simply there to introduce you to crafting essentially. Jobs however, are a great way to get money, xp and items. Don’t think of them as quests, but more along the lines of gang related Hits. They all deal with killing players in PvP or npcs in PvE. There are too many to cover, so your going to have to read, but here are some basics. First, you can access jobs from ANY phone on any map. This is what you’ll see.
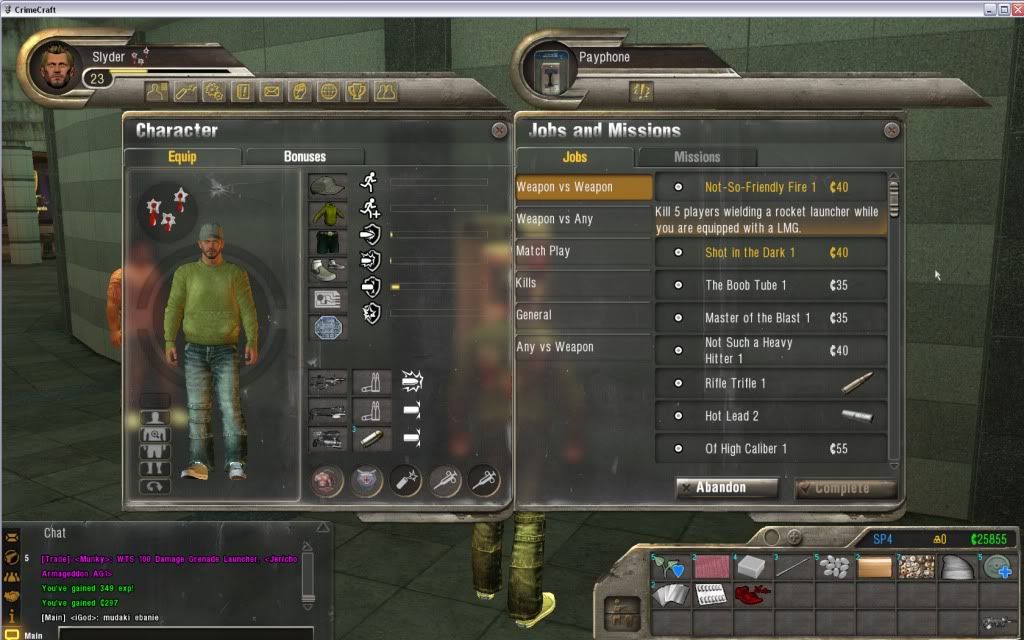
There are several different job types, with a ton of categories. Weapon vs Weapon deals with killing players armed with a certain type of weapon, while you are equiped with a specific weapon. Example: Kill 5 players wielding a shotgun while you are using a pistol. There are a ton. Select these jobs based on the weapons you like to use. Weapon vs Any have to do with you simply killing a certain number of players while using a specific weapon. Example: Kill 15 players while using a LMG. Match play deal with the different PvP maps. Pick jobs that pertain to the types of maps you like to play, ROB, CTP, CTF, FFA, TDM and so on. Kills deals with…kills. Kill streak jobs can be found here, as well as more general kills vs players and npcs. General has to do with dealing damage with weapons, rankings in matches and what not. Any vs Weapon is the last one. This is basically the same as weapon vs any, but reversed. You’ll find jobs like “Kill 20 people using a LMG.” Does’t matter what weapon you use.
There are so many, I just can’t go over them all. You’ll need to experiment with this yourself. Choose quests that pertain to the weapons you like to use, and the maps you like to play. This will be the easiest way to complete a lot. Don’t take kill streak missions till you can achieve them, and don’t take PvE missions while PvPing, and vice versa.
Once you have completed a job (you will be notified on screen in big text) you need to go turn it in. Go back to any phone, and you’ll see this.
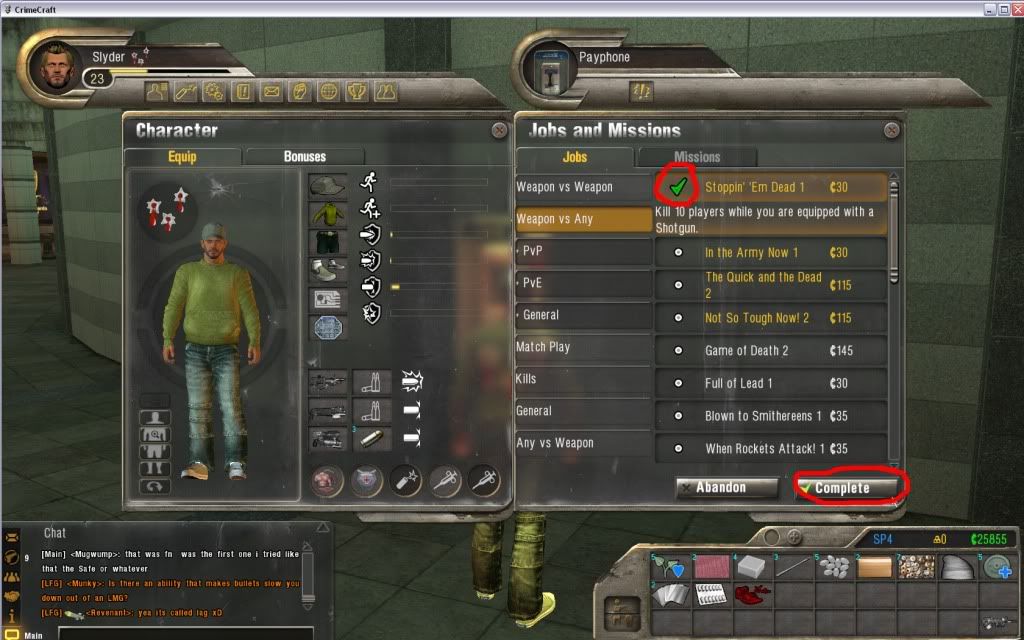
Simply search through the main job tabs, and there will be a green checkmark next to the ones you have completed. Select it, and hit complete at the bottom right, and presto, free money, xp and items.
Skills.
Every time you level up, you get an SP. You can see how many you have attached to your inventroy window. You use these to purchase abilities. The skill trainer is marked by a stick of dynamite on your map.
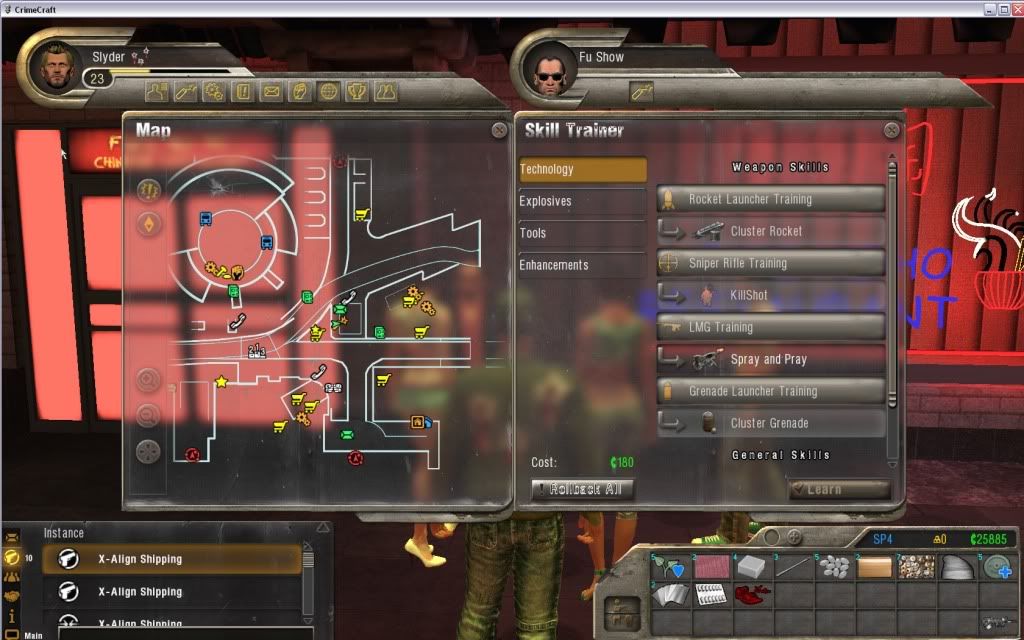
This is the skill trainer window you get when you talk to him. There are all sorts of skills, and I am not going to go into them all, as they all have descriptions attached. You’ll have to read them and choose the ones that fit your style of game play. One thing to keep in mind, is that on this screen, the Tech screen is where you learn the higher end weaponry. These consist of: Light Machine Gun, Sniper Rifle, Rocket Launcher, and Missile Launcher. Also on this screen, not displayed is Active Camo (cloak) and Insindeary Rounds (fire ammo). One key thing to note. To train in one of these weapon skills, it costs 5 SPs. So you get access to these weapons at level 6 (since at level 1 you have 0 SPs). Also note, in the bottom left of the skill window is a button named Roll Back. You can reset all your SPs for the amount listed above. So feel free to use your SPs, you can always get them back. Once you hit level 6, and you want to try one of the new weapons, roll back and go for it. Select a skill, and click Learn in the bottom right.
Equip your Skills.
Any skill that is NOT a weapon needs to be equiped to use it in game. Some are marked as passive, like Regenerative Combat Armor, but they still need to be equipped to be used in game.

Here, you can see where to equip them. You have two open slots for skills, makred with dynamite (the black one isn’t useable, at least at level 23) and one slot for drugs (the needle). Drugs must also be equipped to use. Simply drag the skill/drug into these slots. You can see here I have Active Camo and Regenerative Armor equipped. They wont show up in the city, but once in an instance, youll see F-keyes assigned to them in the bottom right of your screen. If it is a passive skill (like my armor) itll work automatically based on its description. If not, you have to press the correct F-key. Same goes for the drugs.
Upgrading your Weapons.
All weapons in the game are upgradeable, and you will find various forms of enhanvements for them. Note, that the starter weapons only have 1 slot available, which is the first slot. The first slot on ANY weapon is only for color modification (Gun Modifier Kit). You cannot equip Sights, Shells, Barrels, Triggers or any other mod that isn’t a kit into this slot. Only guns with a second slot (noted as Empty Slot 1 on a gun) can equipe one of these. Here is my LMG with both slots filled.
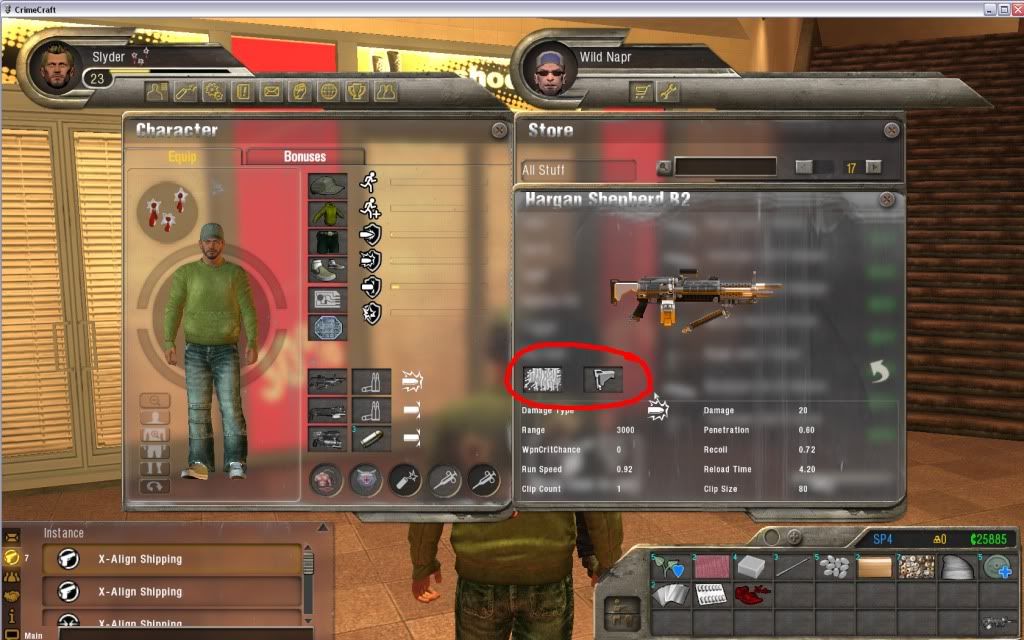
Notice the first slot on the left is the pattern. When looking at a weapon you own, this slot is denoted by the words Base Color on your gun. The second slot on the right is the weapon moddification. I have a SHELL (or stock as it is known) in the second slot. While looking at a weapon you own, this slot is denoted by the words Empty Slot 1. To add either a kit, or an enhancement to your weapon, simply right click the gun, and select Customize. This window will pop up, and all you have to do (anywhere in the city, doesn’t matter) is drag the specific mod/kit into its appropriate slot. IMPORTANT! There is no notification when you do this. The game has no prompt that says “are you sure you want to do this.” Once you drag the item to the slot, it instantly sets it in place, so be CERTAIN you have what you want. Also, you cannot take mods/kits out. So you’ll need to buy a new gun if you want to change it out (not a problem if your good at killing people.)
Well, thats it. Just a basic starter guide for new players. I think this covers about all of the essentials. How to access instances, what it is you are seeing in the UI, how to train skills, how to get jobs, and how to upgrade your weapons. Welcome to Crime Craft, and be prepared to die…a lot.

Recent Comments