Lost Saga Desert Blader Guide
Lost Saga Desert Blader Guide by genericasian
Twin Blades of the East
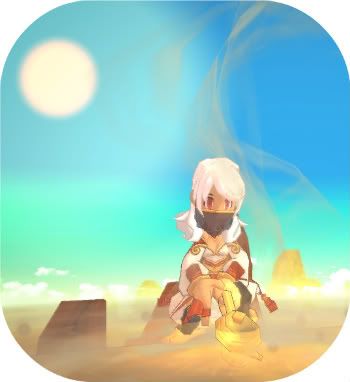
The Desert Blader, a swift user of twin blades who overwhelms all opposition with it’s speed and precision strikes. It’s ability to deal damage is mediocre, but its strength lies within its ability to strike fast and never be struck.
Default Combo – DDDD
The Desert Blader’s strikes are fast to strike and fast to recover from.
The first two swings have decent reach and can come out almost instantly. They can be used to pressure an opponent for they’ll have to fear your hold D attack and…
The third strike, which is a stab from the shorter blade. This hit’s hitbox is very linear, but causes a half faint, which on hit, causes your opponent to bend over in pain, they’ll be unable to do anything for a short half-second period. This strike, if connected, means that your your final strike will hit 100% of the time, assuming you do not wait too long. It also allows you to use your hold D attack, start the DDDD combo again or jump/run away safely.
The final swing is an uppercut of your blade that knocks the target slightly in the air with a short knockback. Because of the nature of the third strike’s stun, this final hit should be used only after the third hit hits and you need to knock your opponent down, or to pressure should the third hit be blocked.
Important:
Although the combo itself is DDDD, the Desert Blader’s attacks does not end their. After connecting a final strike, one can hit their airborne opponent with a jump attack for a controlled knockback and extra damage, or a hold D for even more knockback at the risk of moving yourself forward. At the highest level of skill, one can even add a full DDDD combo after a successful final hit, but it is rarely worth the trouble to land due to its unreliability.
In short:
DDDD hold D – Use it for maximum knockback, but beware that you’ll move yourself forward a good deal as well.
DDDD jump attack – Use it for a tiny bit for damage and knockback, but is safer then hold D as it will not send you flying forward.
DDDD DDDD – An extremely hard to pull off combo that has more damage and knockback then both previous combos, but is rarely feasible to use in a real fight.
Special Attack – Hold D
The Desert Blader’s unique attack, the hold D, allows it to quickly dash forward a distance, going through opponents dealing a small amount of damage, causing a slight stun, and most importantly puts you behind your opponent. There are many ways to use this to your advantage:
1) Bypass block:
Against any hero that cannot block against attacks from their back like Mages or Vikings can, the hold D puts you in their most defenseless area, their back. They cannot attack you with their normal attacks without turning around, and should they use a skill, you have ample to time to escape. Use the hold D if your opponent is blocking your normal combo too much. After which, continue to attack them, or dodge if you predict they’ll use a skill in an attempt to stop you.
2) Get away from enemy’s skills and attacks:
If you ever played a ranged or special hero, you’ll know how incredibly useful their dashes are, quickly moving them from one spot to another at a much faster speed then a melee hero’s run, at the cost of having a short recovery after the dash is over. The Desert Blader’s hold D can be used like one such dash, instead of dashing through an opponent to get to their back, dash away from them at a 90 degree angle. If done fast enough, this can dodge just about any skill in the game.
Also, there aren’t that many skills that can hit an opponent behind them, therefore one can play extremely offensively by using the hold D to dash through an opponent using a forward going skill (Such as Cowboy’s Triple Shot, Robin Hood’s Multi-Shot, Tao Warrior’s Wind Shock, and many more). Not only does your opponent waste a skill, they’ll be stuck recovering from using their skill while you’re behind them ready to dish out some damage (No pun intended).
3) Close distance:
The Desert Blader suffers from a rather mediocre melee range, and none of its skills can hit faraway opponents quickly. This allows ranged heroes and melee heroes with long reach to attack the Desert Blader outside the Blader’s attack range. This weakness is nullified by the Desert Blader’s hold D and jump attack, which both allows the Blader to quickly get up close where their opponent’s range advantage won’t matter. Simply move in the general direction of your opponent, and use your hold D in-between or after blocking one of their attacks/bullets.
Important:
One thing that many new Desert Blader users tend to do is overuse the hold D. While it is an extremely useful skill, it doesn’t deal much damage, nor does it have a good stun. It also tends to put you right into a mob of enemies in large team games. While some players might not be able to deal with “Dash Spam”, it does not make you a better player, nor will it benefit your team in higher level games. Use it as you need, not more, not less.
Also know that three hold Ds in rapid successions can cause dizzy faint on your target if all three hits connect, but don’t rely on it. It is easy to see through and block.
Jump Attack:
The Desert Blader’s jump attack is a godly fast stabbing attack with a slight stun and decent knockback. It does not have much in terms of air reach (Meaning it can’t really hit targets higher then it), but its down reach (Ability to hit ground targets) is only matched by the Kage Ninja and ranged heroes.
It can be used the moment you jump for a surprise push, it can be used halfway through your jump for your standard attack, or right before you land to surprise your opponent who could be tricked into thinking that you’re not going to jump attack. Most melee heroes can only do the second option as their attack does not come out quick enough to be used before landing, or does not reach far enough down to hit as they’re jumping. The Desert Blader has multiple options in the jump attack itself.
In short:
Jump, Attack – Quick attack, aimed to surprise your opponent.
Jump, Wait, Attack – Your average jump attack, used as part of mixing up your attacks.
Jump, Wait, Wait, Attack – Surprise attack that comes out right before you land, when your opponent is thinking “He’s too far down to use a jump attack now”.
And of course, you can always choose to not use a jump attack and recover from your jump quicker.
Being able to mix up your jumps with jump attacks is a vital part of Desert Blader’s mind games and ability to approach long ranged enemies.
Dash Attack:
The Desert Blader’s dash attack is a two-parter, first a short dash and a far reaching stab, then a swing upwards to knock your opponent into the air. If used on a standing opponent, they can block the second hit, which makes this attack rather worthless in an upfront fight. However, it can be used on a fainting opponent for a quick launch.
Dash Attack, Hold D – High knockback, be aware that the hold D will move you a good distance forward. Don’t dash yourself off the stage. Only time you should use this is when a jump attack wouldn’t give you enough distance to edge.
Dash Attack, Jump Attack – This is what you’ll probably be doing most the time. Decent knockback and you can control it better then the hold D.
Dash Attack, DDDD – Best damage and knockback, takes awhile to learn to time it, but should be learnt.
Dash Attack, [Sandstorm] – If you use [Sandstorm] as soon as you recover from a successful dash attack, it’ll give the [Sandstorm] just enough time to connect before your opponent can stand back up.
Counter Attack:
Like some other melee heroes like Shadow Assassin or Iron Knight, the Desert Blader possess a counter attack.
A counter is used by letting go of block and quickly tapping attack the moment you successfully block an attack, melee or ranged does not matter.
Desert Blader’s counter can be argued as the absolute safest counter-attack in-game, as it is like the Blader’s hold D attack, meaning it dashes through your opponent and puts you behind them, making you perfectly safe from nearly all opponent counter attacks. Not only that, the counter’s dash-through attack causes a half-faint like its default DDDD combo’s third hit. These benefits comes at the price of having a slightly longer start-up time then its hold D attack.
Use this counter if your opponent fancies delaying their attacks, or is just a slow hero in general (Tao Warrior, Savage Berserker, etc).
Don’t be too reliant on it, but it’s definitely a valuable skill to learn.
A series of three back and forth hold D attacks that causes dizzy faint upon completion.
Note that with this skill, only the final dash has to hit to cause dizzy faint, unlike the normal hold D attacks where all three hits must connect.
It’s cooldown is decent, damage is rather low, but the speed is extremely fast, and should be able to catch just about anyone who did not predict or see it the instant it’s activated. This should be used when you’re attacking with a mix of your default combos, jump attacks and hold Ds to start combos and keep your opponent in constant fear of being hit by it (Making them block less, which is good for you as you do not have a natural guard breaker).
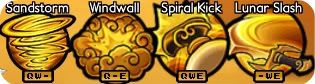
Armor Skill – [Spiral Kick]
An extremely fast kick that hits a small area behind you. Decent cooldown, low damage, with a pretty good knockback and recovery.
This is yet another surprise skill with some interesting uses, and like all knockback skills, its main purpose is to edge your opponent, not to just donkey kick someone in the face for giggles.
1) Mid-Combo GB:
Simply turn around and use Spiral Kick in the middle of pressuring your opponent with your normal attacks and hold Ds. It’s simple, yet effective. Obviously, if their back is to an edge, this skill becomes much more dangerous. The hit range isn’t too far, but it covers the area behind you quite well. If used quick enough, nothing but a skill counter will be able to save your target from getting a foot in his face.
2) Runaway Kick:
Have you ever fought an opponent parallel to an edge?
There is no skill that can whack someone away from you at a 90 degree angle (Shut it, luck skills like Drill Sergent doesn’t count), so to edge someone, most players will use a skill or attack to faint, then knock their opponents off, making most players wary for faints. However, the speed and backwards hitbox of Spiral Kick makes it ideal for this kind of situation. Simply turn from the edge in the middle of your combo, walk a step or two and use your Spiral Kick. Most players that see you walking away will either keep blocking because their reaction time sucks, come after you, or get away from you. Unless they do the last option extremely quickly, Spiral Kick will knock them off the side unless they skill counter.
3) For Giggles:
Whenever you’re fighting someone, go ahead and just turn around. You don’t even have to use Spiral Kick itself.
If they know about Desert Blader’s Spiral Kick, chances are, they’ll either jump away or use a skill.
If they try to run away, use your hold D to catch up and get a free hit or two off.
If they skill, simply walk away and smile because they just wasted a skill.
Helmet Skill – [Windwall]
The Desert Blader suddenly envelopes itself in a wall of wind (Talk about accurate names) and pushes all nearby opponents back a step, does not deal damage.
This skill itself doesn’t have too much offensive potential besides pushing someone off the edge, but its main usage is to protect oneself. [Windwall] can be used in the air, when you’re in a half-faint or hit-stun, before a fall to avoid fall damage and can get you out of just about any combo. It cannot be used if you’re fainting or suffering from a status aliment such as burnt (Torch, Meteor, etc), electrocuted (Lightning Mage Skills, E-Shock, etc) or stunned (Haunt, Headbutt, etc).
An extremely good defensive skill that’ll save you from countless combos and deaths. Though know that it’s recharge is mediocre and range is tiny.
Note that [Windwall] can also hit an airborne opponent and put them into a stand. Although when you’ll actually need to make use of this is beyond me.
Trinket Skill – [Sandstorm]
The Desert Blader will kneel down and rub a magic lamp for a few seconds before sending out a massive sandstorm (More like a twister, but whatever) forward. It’ll continue going forward for a great distance before finally disappearing. Anyone hit by it will not take direct damage, but it’ll pick them up and fling them so high into the air that they’ll suffer fall damage when they land on the ground again.
When someone takes fall damage, their body also bounces a tiny bit after landing, allowing someone to hit them again, therefore:
[Sandstorm], DDDD – Is for maximum damage and knockback, but takes the most time to execute.
[Sandstorm], hold D – Is for a quick edge, decent knockback.
Some players seem to do [Sandstorm], [Spiral Kick]. This is generally a waste of two skills as the knockback isn’t too amazing, nor is the damage. The only time you’ll want to do it is when you don’t have the time to do a full DDDD and there isn’t enough space to safely land a hold D.
[Sandstorm] can also be used to attack opponents that like to camp as it is not stopped by any obstacle (Barricades, Minigun, Walls, etc). However, DO NOT run away from a team fight to use it. It comes out way too slowly and requires you to be away from your team for too long that it’s rarely worth the trouble.
Default Desert Blader Combos:
Lost Saga’s main feature is the number of heroes one can use and switch between during a game, so do not limit yourself to default Desert Blader combos unless you want to. The Desert Blader itself doesn’t have too many combos as it is more of a combo-starting hero and a fighter. However, if you must, some possible Blader only combos are:
[Lunar Slash], Dash Attack, DDDD – Simple, and does decent damage with edging possibilities.
[Lunar Slash], Dash Attack, [Sandstorm], DDDD – The dash attack isn’t required if you don’t believe you have the timing down for it. This is a default Desert Blader’s most damaging combo that’s reasonably simple to do.
[Lunar Slash], [Spiral Kick] – Quick edging combo without much chance of a teammate saving your target.
Swap Combos:
There are nearly infinite possibilities for swap combos in this game, so I shall only name a few that I use or I believe will be an effective one. It’s up to you to learn how to use Desert Blader and make your own combos.
Simple Swap Combos:
[Lunar Slash], Treasure Hunter, [Camera], Cyber Medic, Stab, Stab, [Drain], Stab, Stab, Desert Blader, Dash Attack, DDDD, Cyber Medic, [Zero Gravity], Desert Blader, DDDD
A very simple fainting based combo with a TH-Medic-Blader combo, you can use Treasure Hunter’s double shot faint in place of Medic stabs for a harder, but more damaging combo.
[Lunar Slash], Viking Raider, Dash Attack, Dash Attack, DDD
A conservative combo that only uses one skill and does a good amount of damage. You can also use Grim Reaper’s Hold D to Air Combo, Crazy Sapper’s Suicide Mine, or just about any other hero with more damage output then Desert Blader to take advantage of [Lunar Slash]’s dizzy faint.
[Lunar Slash], Dash Attack, [Sandstorm], Grand Templar, Hold D
Use the wait time from [Sandstorm]’s drop to charge your hammer and send them flying. This can be done with Berserker’s [Savage Slam], Shaman’s [The Hand] and just about any high knockback skill. Good for edging, obviously.
[Lunar Slash], Dash Attack, Fire Mage, [Flame Wave] ontop opponent, Taekwondo Master, [Concentrate], Fire Mage, [Flame Wave] ontop opponent, DD
High damage combo.
[Lunar Slash], [Sandstorm], [Ascend], etc
Team based combo, keeps one or more opponents in the air for a long time, plenty to have teammates set up damaging combos.
My Personal Swap Combos:
These will require you to have my heroes and epics/legends, so copying them is not recommended. This is to give a sense of how to modify combos to fit your needs.
[Lunar Slash], Treasure Hunter, Quick Shot, Quick Shot, Captain Hook, [Cursed Skulls], Treasure Hunter, Quick Shot, Quick Shot, Reload, Torch, Savage Berserker, D, D, hold D, Wild Tiger, hold D
Knock someone down with Desert Blader, Fire Mage, [Meteor], [Bloodsucking], Treasure Hunter, Quickshot, Quickshot, [Camera], Quickshot, Quickshot, Grim Reaper, hold D, DDD (Normal Combo), Mafia Boss, [Detonate], hold D
Once again, once you get the hang of Desert Blader, you should create your own combos to suit your playstyle and hero line-up. Don’t follow other’s footsteps, let them guide you to make your own path.
Helmet Gears:
Default Desert Blader [Windwall] – 5/5
Amazing gear in its own right, a defensive skill to break out of almost any combo.
Taekwondo Headband [Break Fall] – 5/5
Never get knocked down. Does the same job as the default gear only in a different way.
Bunny Ears [Triple Jump] – 4/5
Instantly makes Desert Blader’s jump attacks much more deadly as you can stay in the air longer, move further and avoid skills easily.
Sapper Mask [Bunker] – 4/5
Amazing defensive gear as well, although using it requires precise timing. Its fast recharge can save you many times if used properly though.
Medic Cap [Drain] – 4/5
Not a fan of Drain Spam, but there’s no denying how effective it is. Blader suffers from a skill counters, so why not destroy that weakness in one skill?
Defender Mask [Eye Beam] – 3/5
Good offensive skill that can set up for your [Sandstorm], nothing I would give up my [Windwall] for though.
Armor Gears:
Monk’s Robe [Blast] – 5/5
Always an amazing gear, it’s basically a [Windwall] that attacks while combo breaking.
Default Desert Blader [Spiral Kick] – 4/5
Good gear for Desert Blader’s playstyle.
Ice Robe [Ice Burst] – 4/5
Overused, always complained about, but no matter how you hate it, it’s still an effective skill that gets its job done. Even more so with Desert Blader’s hold D abilities.
Cyber Scrubs [Zero Gravity] – 3.5/5
Picks up grounded opponents for a quick hold D or a full DDDD combo.
Knight’s Armor [Shield Sigil] – 3.5/5
Although with Desert Blader’s small reach, you’ll want to be up close, the push back from [Shield Sigil] can save you from many melee combos and you can always close the distance with your hold D.
Cowboy Uniform [Quickdraw] – 3/5
Sets up your [Sandstorm], not too amazing, but it is still a good offensive skill.
Robin Tunic [Tumble] – 3/5
Desert Blader is a very fast hero, if you don’t plan on using it to fight always, [Tumble] makes Blader an extremely mobile hero.
Trinket Gears:
Viking Shield [Backguard] – 5/5
Completely nullifies the weakness of hold D (Where your opponent might be able to hit your back if they block your hold D and attack quickly) and is just an amazing defensive gear in general.
Fire Orb [Fire Spirits?] – 5/5
Blader’s speed and hold D easily allows your [Fire Spirits?] to hit and cause a faint, can also be used in combination with your DDDD’s third hit for a faint. Amazing for combo set ups, and an amazing cooldown.
Dark/Normal Angel Wings [Low Flight] – 4.5/5
The Legendary Gear favored by our cousins over the ocean, most melee heroes cannot make full use out of this gear due to their jump attack’s execution time, but Desert Blader’s godspeed jump attack is perfect for it.
Grim Scroll [Haunt] – 4/5
Same reason as Fire Orb, but since Blader doesn’t have a way to faint outside of [Lunar Slash] or swap combos, [Haunt]’s effectiveness is greatly diminished.
Magic Lamp [Sandstorm] – 2/5
Unfortunately, [Sandstorm] is just not fast enough for Blader’s playstyle, and its only purpose in combos after [Lunar Slash] is overshadowed by skills like [Ascend] or just other combos in general.
Note: The all-powerful Camera is rather useless on Blader as its [Lunar Slash] does its job well enough without set up.
There is absolutely no best way to build your Blader, I can only tell you what builds works well or is favored by top players, but the final choice rests with you and how you wish to play your Blader. These stats are how they should look at level 50 (150 Stat Points, ignoring the +10 Female points).
Build One:
Weapon Skill: 30
Armor Skill: 0
Helmet Skill: 40
Trinket Skill: 0
Attack: 40
Defense: 0
Speed: 0
Dexterity: 0
The “brawler” build, where you’ll fight mainly with your Blader instead of using swap combos. I do not recommend this build due to the recent discovery of how ineffective the attack stat is.
Build Two:
Weapon Skill: 50
Armor Skill: 50
Helmet Skill: 25
Trinket Skill: 25
Attack: 0
Defense: 0
Speed: 0
Dexterity: 0
This is the build Mortal (Hero/Brake/Mike/B.A.M.F, that guy in the WCGs) is apparently going to do. I can only assume it’s a combo/edging based set up.
Build Three:
Weapon Skill: 50
Armor Skill: 0
Helmet Skill: 50
Trinket Skill: 0
Attack: 0
Defense: 25
Speed: 0
Dexterity: 0
This is the build I’m personally going for, it’s an alternative version of Build Two, whose purpose is to set-up swap combos. I have maxed out [Windwall] to keep myself as safe as possible. Note that I use Monk’s Robe and Viking Shield with this build. PS: I know I have points in Attack, I’m going to reset them eventually.
Build Four:
Weapon Skill: 50
Armor Skill: 0
Helmet Skill: 0
Trinket Skill: 0
Attack: 0
Defense: 0
Speed: 50
Dexterity: 0
This seems like a very powerful build in theory if executed properly. Using your speed to avoid damage and [Windwall] on the rare occasion you get caught and set up combos with [Lunar Slash]. Of course, it’s more of a “for fun” build rather then a serious one.
Closing note: Whatever you do, don’t try to distribute all your stat points equally among all 8 stats. All you’ll end up with is a slightly buffed hero with no defining feature. Of course, in the end, stats can only go so far. Skills are what’s important.
Your’s Truly
[MH]Nate

Recent Comments