Grand Fantasia Sprite Protection Guide
Grand Fantasia Sprite Protection Guide by Litintha
Hello everyone!
I was actually quite shocked to see that no one had posted a guide on how to use the Sprite Protection system. Well, since no one else has done it, I figured that I would make my own and see if it will be of any help to the Gaia community.
So, let’s start!
FIRST AND FOREMOST: GETTING THE QUEST.
In order to unlock the Sprite Protection system, you need to:
- Be level 18
- Be on the Gaia Server
- Complete the quest
The sprites that offer these quests are located in all of the major cities (Ilya, Jale, Kaslow). They are typically found by the Skill Trainers in each town, except for Kaslow. Their locations are as follows:
- Kaslow: 166, 243
- Jale: 109, 239
- Ilya: 221, 153
When you get the quest, proceed to Kaslow and find the sprite named Hamu (He is the sprite located on the map). Talk to him, complete the quest, and you will have the Sprite Protection system.
Now, you have the Sprite Protection System, but how do you work it? Well, that is where this guide comes in! So, let’s not waste time and get right into it!
NOTE: Before you ask, the Sprite Protection System ONLY BOTS combat. It WILL NOT BOT any other part of the game.

When you acquire the ability, it will be in the “Say” tab of your Skills window. You will see the ability moused over in the screenshot above. To open up the Sprite Protection options, right-click it. Let’s move on.
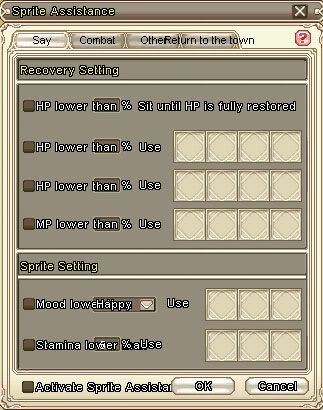
In the above screenshot, we have the first window in the SP (Sprite Protection) window. There are 4 boxes you can check that are your recovery options:
- 1 “Sit to Recover” option
- 2 Healing Item/Skill usage options
- 1 MP Item/Skill usage option
This tab also has options for your sprite. Since your sprite will be out, grabbing loot and giving you it’s buffs, it will start to run low on stamina and it’s happiness will decrease. If you have sprite items, such as soda pop or honey-glazed biscuits, you can put these in the designated spots. When the sprite falls below the user specified condition, the item will be used.

Next, we have the Combat tab. This one lists the sequence of attacks that you can designate once the SP has been activated. The options that are given to you are somewhat limiting, but you can use different skills to make it more flexible. There are 4 options for attacks:
- First Attack
- Normal Attack
- Resuming Status
- Multi-mob
The bottom of this tab lets you select which kind of mob you want to auto-avoid. This means that the bot will not target the designated mob-type, attempting to avoid them. Please note that this does not mean it will avoid mobs BY the designated mob-type. If the bot sees a mob that it can attack right next to one that you designated it not to attack, it will still attack the former. This could lead to bad pulls, and inevitable death.

Now, the “Other” tab deals primarily with loot and items. In this tab, you have the option to automatically discard loot based on it’s rarity:
- Gray
- White
- Green
You also have the option of repairing equipment that becomes damaged or broken.
The last set of options deals with your character dying. You can select:
- Revive
- Use Item
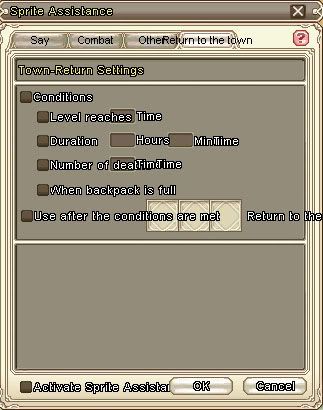
And, the final tab deals with SP shutdown options. If you don’t want your bot to run 24/7 in the same area, getting the same loot, and eventually getting less and less XP from each mob killed, then it is best to set this tab up. When you check the “Conditions” box, you get 4 conditions to choose from:
- Level
- Time
- Deaths
- Inventory
When the specified condition is met, if you have the “Use after conditions are met” box checked, you can then designate a skill/item to use if you choose to go back to town. By “go back to town,” the game means warp back to your soul-bound location (Res point).
Alright! With all of that out of the way, let’s set it up! I am using the setup that I currently have for my Sage. Your desired setup will most likely be different. So, this is just for example purposes.
First: Recovery

In the recovery Tab, I have all of the boxes check. The integer for the ‘Sit to Recover” option is 10%. This means that if my health falls below 10%, after combat, my character will sit down and heal until fully recovered, or attacked.
UPDATE NOTE: This is an inaccurate percentage and used strictly for explanation purposes. The “Sit to recover” option is best used at high percentages, such as 90% or 95%. If this option’s percentage is lower than the rest, your character will use this option, THEN move on and use the other options afterward. This can mean too much downtime and your grinding will become less efficient.
The next option is set to 70%. This means that I will use Spirit Mend if my health falls below 70%. The last HP option is set to 45%. However, notice that I have both a Healing potion AND a healing spell? This means that if the potion is on cooldown, the bot will automatically use the healing spell instead.
Finally, for my MP recovery, I have the integer set to 20%. Just like the HP options, the bot will use the Ether pot if my MP falls below 20%.
As for my sprite, I have the “Happiness” integer set to “Happy”. When out, a “Happy” sprite is equal to an “Elated” sprite when it is in it’s cottage. A “Happiness” sprite is equal to “Happy” when inside the cottage. I have my sprite’s stamina integer set to 50%. If it falls below that, the Honey-glazed Biscuit will be used. In layman’s terms, the “Happy” mood is the highest one, while “Happiness” is the lower one.
Next: Combat

The “First Attack” option is your opener. You can put 2 abilities here. This is so that in case one is on cooldown, the other one will kick in. I have Shining Judgment and Strike set as my First Attack skills.
“Normal Attack” is the attack sequence that follows after the First Strike. Keep in mind you don’t need to completely fill all 8 slots. In most cases, the target will be dead before then. As you can see, I have Strike and Melee Attack.
“Resuming Status” is just another way of saying “Cooldown Abilities”. This means that, when a cooldown ability (i.e. Speed Demon, True Word of Guarding, etc.) is not on cooldown (aka, ready to use), the bot will automatically use it, provided MP is there. Looking at the screenshot, I have True Word of Guarding set as my Resuming Status.
Finally, We have the Multi-mob attacks. In the small box, you can designate how many mobs need to be in combat with you before the desired ability is used. I currently have mine set to “2”, and the ability is “Nature’s Wrath”. This means that if there are 2 or more mobs in combat with me, provided that the bot doesn’t need to use a Recovery option and is not in the middle of using another ability, it will use the Multi-mob ability.
Continuing: Other

Here, since I am grinding mobs and getting Fresh Sunbird Meat, I don’t want their broken egg shells. So, I have checked “Auto-discard” and then selected “gray-color”. This means my sprite will pick up and automatically destroy any gray-quality items. I don’t have any mallets, so I don’t have to set any repair options.
As far as death goes, I have a Gaia Blessing lv2 I can use. So, the meaning of that is if my character dies, the bot will use the GB2 and revive me. I just pray I don’t die while surrounded by mobs.
Finally: Return to Town

Since I don’t want to be out grinding my butt off for hours and hours on end, I have selected the “Conditions” box and then put a check-mark next to “When Backpack is full”. This means that the bot will shut down when that condition is met.
However, if you have the “Use after Conditions are Met” box checked and a skill designated, like me with Song of the Sprites, the bot will use that ability FIRST, and THEN shutdown, as all of the conditions are met.
Before I close the box down, and I have everything set the way I want, I click the box at the very bottom of the window that reads “Activate Sprite Protection”. This will start the bot up when you are not in a town.
That about covers everything that you need to know in order to operate and effectively execute the Sprite Protection System! While all of what I provided were just examples, it will be up to you to experiment and tinker with the different combination of your skills and items to make sure you can maximize the usefulness of this system.
Happy botting, and good luck!
–Ryuusei

DID THEY GET RID OF THIS/.???