Clash of Clans TH9 War Base Design Guide
Clash of Clans TH9 War Base Design Guide by TonyRealm
I’ve been TH9 for a few months now, and I see lots of questions at this level of the game about building war bases. I was inspired by jimbo831’s excellent post about TH8 war base design to create a guide for all of you TH9s out there. I’ll be attempting to synthesize information from OneHive’s and G2ClashOfClans’ videos, as well as including things I’ve learned in my own gameplay.
A quick note: I’m not going to be posting a base and telling you to use it. This goal of this guide is to get you thinking about certain things as you create your own base. When you understand the concepts I’m going to talk about, a custom base becomes the best option, not only because an attacker will have never seen it before, but also because you understand the nuances of your own layout, and can continually tweak it.
I also wanted to briefly mention upgrade order. The rough order I would upgrade the defences in is as follows: the CC, ADs, teslas, wiz towers, x-bows, arch towers, cannons, mortars. (My reasoning.) Walls and traps (especially giant bombs and the black air mines) are also really important, so don’t neglect those.
Alright, here we go! (Get ready, this is gonna be long.)
Designing a TH9 War Base
Part 1: Centralize the CC
Many of the TH9 attack strategies rely on luring the CC beforehand, so you want to make the attacker waste lots of troops to get the lure. If the trigger range exceeds your defences, attackers can plop down a giant/balloon/hog and get everything, which is too easy.
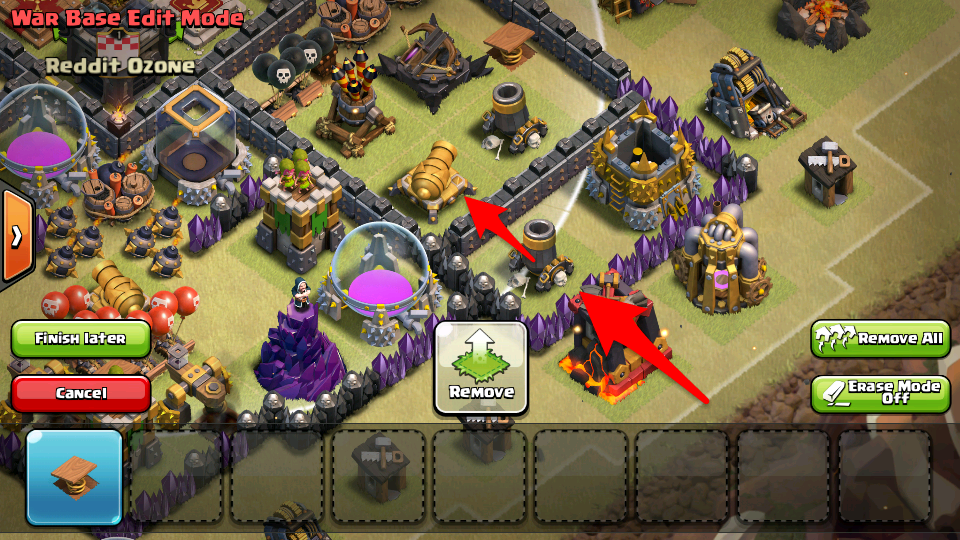
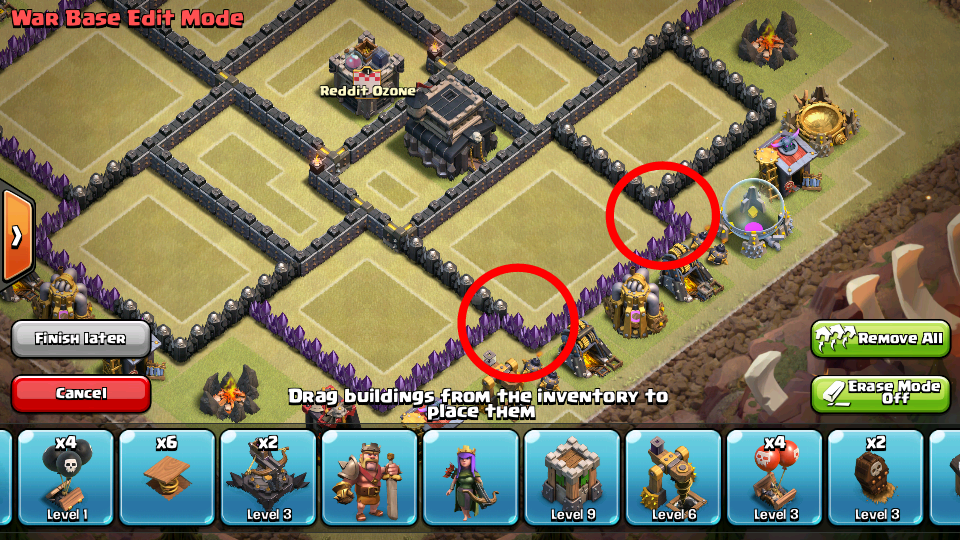
I’ve seen a lot of people block the CC trigger range like this. This is okay, but if I send in a couple of hogs on that mortar, the hogs will kill that defence, and then jump in for the cannon next, getting the lure. It’s not as easy as dropping a giant, but it’s still easy. What I would recommend is to block the trigger range with multiple defences, like this. It’s harder to figure out a easy way to get the lure if a bunch of defenses are all on the edge, because the hogs will path to the sides instead of inward. (There will be places in your base where it might not be possible to keep all the defences on the outside of the trigger range. For example, that left cannon in my picture…just try to make them hard to spot :P)
Some people like to do a tesla trap, where they make it look like the CC is easy to lure but use a tesla to block the CC trigger range. I’m not a fan of this tactic because it doesn’t always work (the attacker just has to send a few hogs/loons on the tesla), and it’ll only work once anyway; usually there are better uses for that tesla.
You may be asking “if I centralize my CC, then where do I put my TH?” Offset it. Sure, that may make your base easier to 2-star, but we’re talking about defending against the 3-star. Some top war clans even put the TH way outside because in a 3-star situation, the TH is just another building. I prefer to treat it like the most important storage building you have: keep it kind of close to the center, but offset it. Offsetting your TH also increases the chances that you’ll be attacked from that side, and you can take that into account when you design your layout.
Part 2: Defending against GoWiPe/GoWiWi
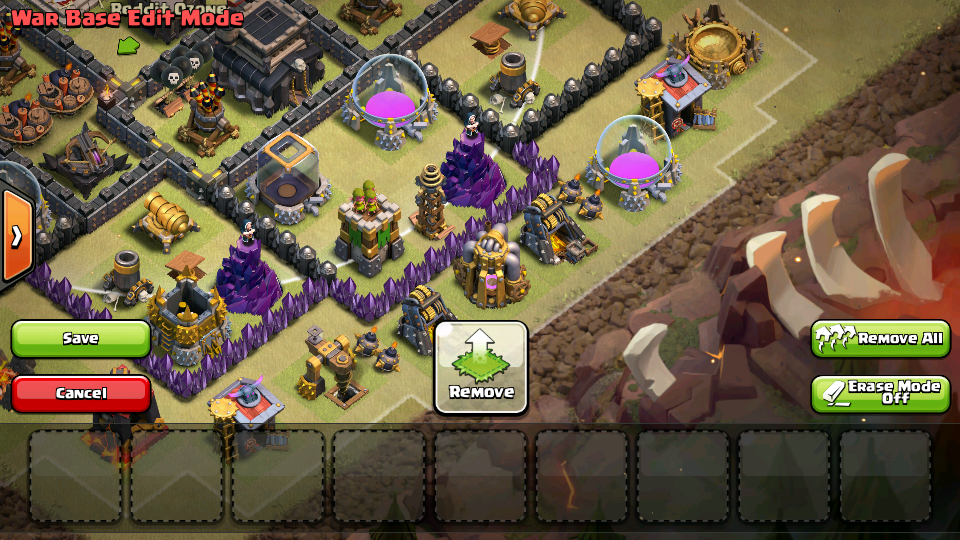
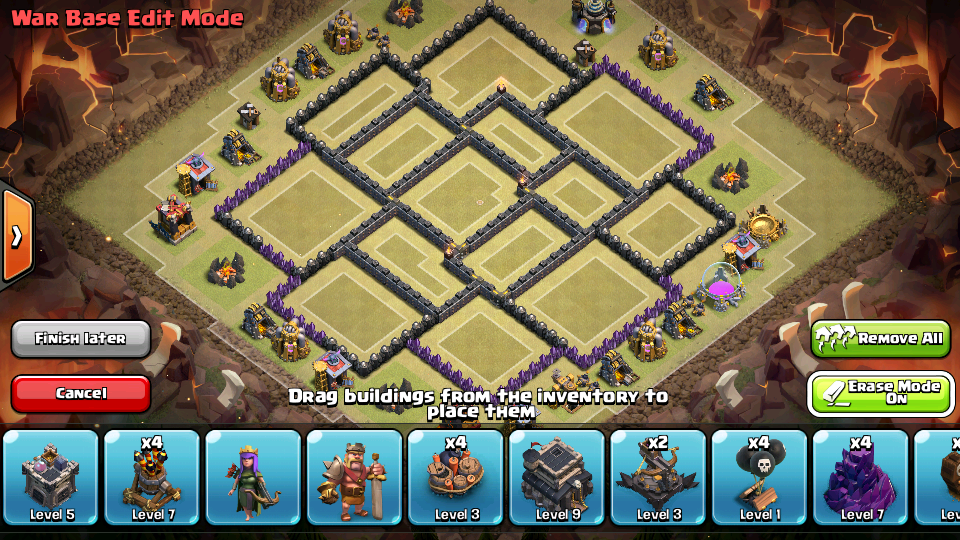
This is by far the most common attack strategy at TH9, but it’s pretty easy to defend against. Two things: you want lots of closed compartments (like at least 10, probably more), and high level walls, to stall the attack. If an attacker breaches a compartment, you want the troops to have to break through another wall pretty soon. If there’s a compartment that spans more than halfway across your base, that’s too big. Small compartments (i.e. they can only fit one building) are usually okay, but I would advise against having a core that’s very small, because a jump spell can be placed right on top of the compartment and troops will get access to every area around it. Something like this is good: 14 compartments, none of them are overly big/small, armies will have to break through lots of walls to get from one side to the other.
Another tip: stagger your outer walls, so that wallbreakers don’t open two compartments at once. I try to do this on every side of my base, but it’s more important to have it on the side you’ve offset your TH on, because you’ll probably be attacked from that side.
Part 3: Defending against Dragon-Based Compositions
Max out your ADs. Um…yeah that’s about all I got. (I’ll talk a bit about AD placement in part 5.)
Part 4: Defending against Hog-Based Compositions
Hogs are freaking powerful at TH9, so you definitely want to be prepared for them. It is practically impossible to make a TH9 war base fully hog-proof, but you can make it very difficult, and I’m here to show you how. There are four keys, but as I already talked about the CC in part 1, I’ll dive into the other three.
Part 4a: The Giant Bomb
As you all should know, when hogs set off two giant bombs at the same time (i.e. a DGB), they die. Thus, you want these. However, I’ve seen so many people place these incorrectly, so here’s a detailed guide on DGBs.
- They should be in between defences. (Note: teslas are defences too! A sneaky trick is to set up a DGB next to a tesla, this makes it look like a bad spot for a DGB when it’s actually an okay spot. If you decide to do this, be very careful; you’ll have to have something right next to the tesla, otherwise you’ll have a spawn hole.)
- Length-wise DGBs are bad, it’s hard for hogs to trigger them at the same time. Width-wise is the way to go.
- Don’t make them easily reachable. If I can send a hog and set off a bomb we’ve got a problem.
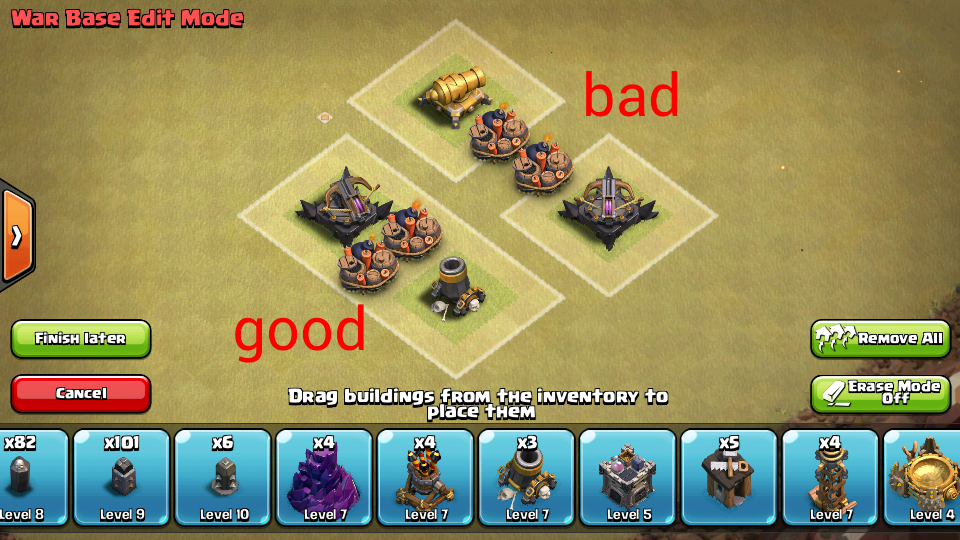
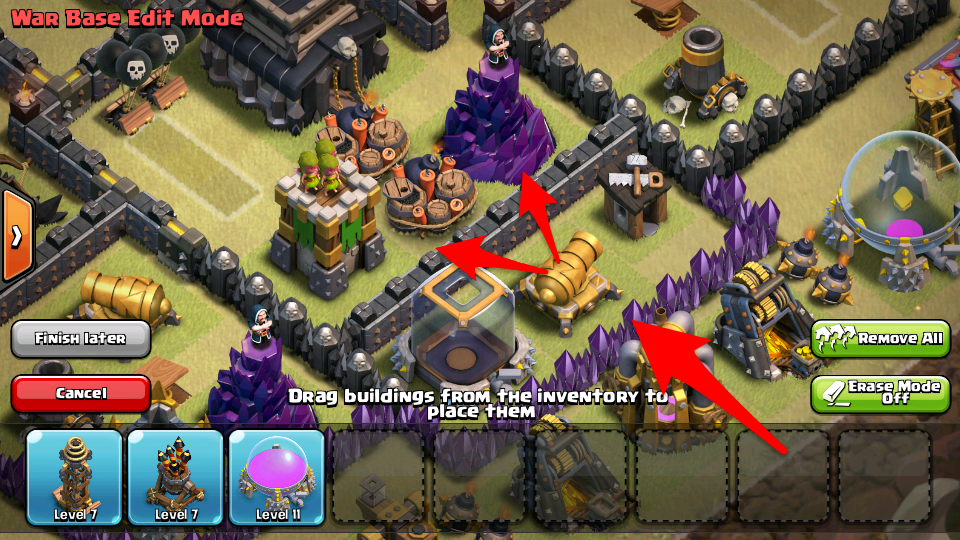
- To prevent what I just talked about, I’ve seen a lot of people stick a defense right in front of the DGB to “protect” it. In general, this a BAD idea. If I send my hogs right on that outer cannon, they’ll kill it, split to the next two defences, and set off ONE bomb, but not the other. If the attacker drops down a heal there, your DGB has just been rendered useless, because the hogs will get healed up before they trigger the next one, which means you’re screwed. Here’s another example. In this base, the DGB only works if you can get the hogs to travel from the cannon to the AD (or vice versa). Thus, if you send hogs in on the wiz/arch tower, only one bomb gets set off at a time.
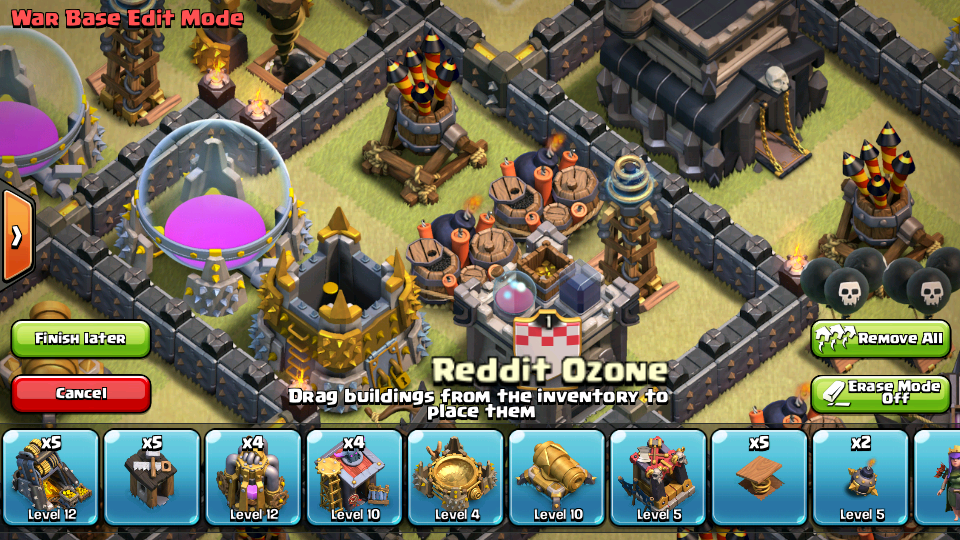
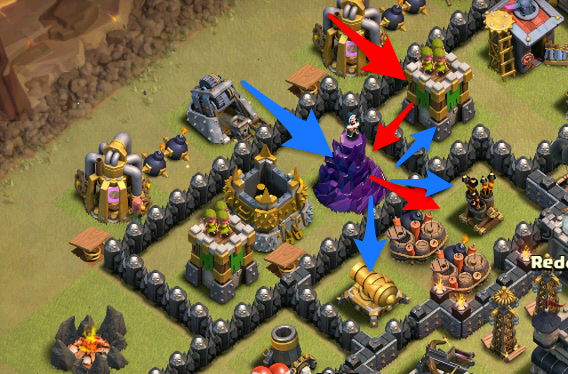
Alright, so what’s the proper way to have DGBs? Basically, you don’t want to protect it, you want to divert the hogs so they go around it, then come back and run across it (like a circle). Here’s an example. The red line represents how the hogs will path, and as you can see, no matter where you send them in, they go in a circle, and at some point they have to run through the DGB. Notice how there is no defence directly blocking the DGB; if I put a tesla there, that would draw the hogs in, and then they’ll jump into the DGB and set off one at a time.
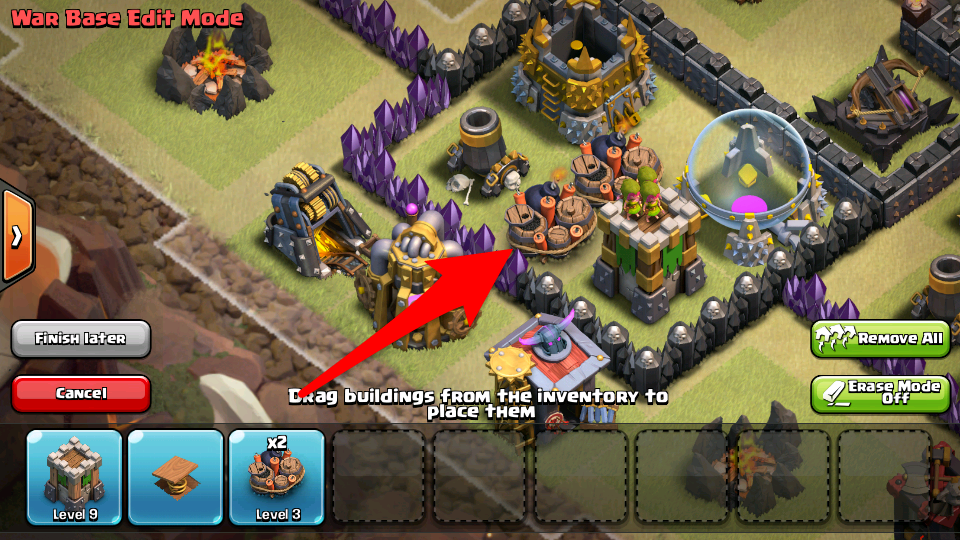
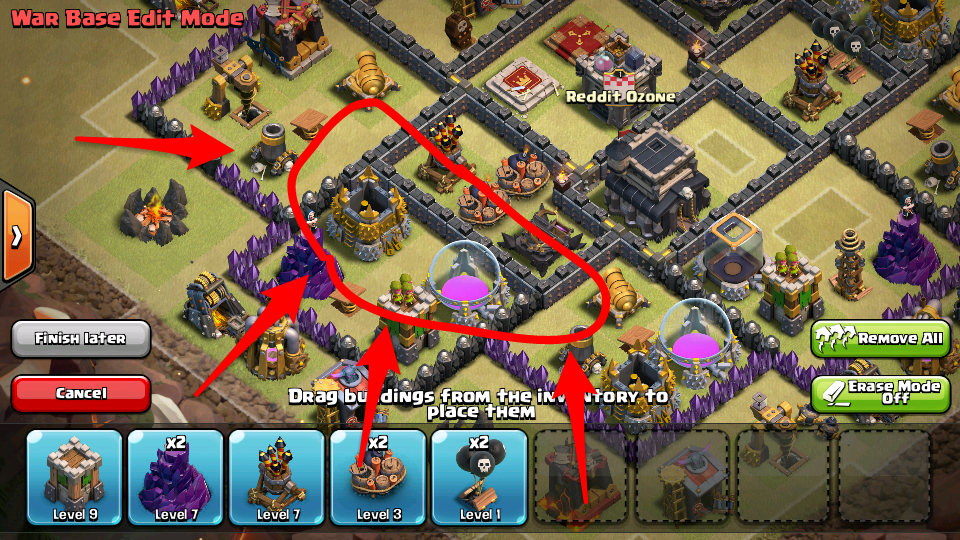
Here’s another example. This one’s a bit more complicated and not just a clean circular path. However, one way or another, the pathing all leads to the mortar or the AD without triggering a bomb early, which is what you want.
Try not to put your DGBs too close to each other. If I can set off both DGBs with a single kill squad (usually some sort of golem/wiz/heros mixture), that’s not good. Separate your DGBs with another compartment/lots of stuff in between.
I like to have around 4 good potential DGB spaces. The AQ also plays a part in where you want to place your DGBs, so I’ll talk about that next.
Part 4b: The Archer Queen
On defense, the AQ is a nightmare to hogs, because of her high damage, fast fire rate, and how the hogs ignore her to go after defences. Therefore, a good hog attack will try to eliminate her with a kill squad before sending in the hogs. As a defender, your job is to make that as hard as possible. Ideally, you want a hard-to-reach AQ, but you don’t want the attacker to set off your DGB traps as troops are going for her. This is actually surprisingly difficult to do effectively, but here are some tips:
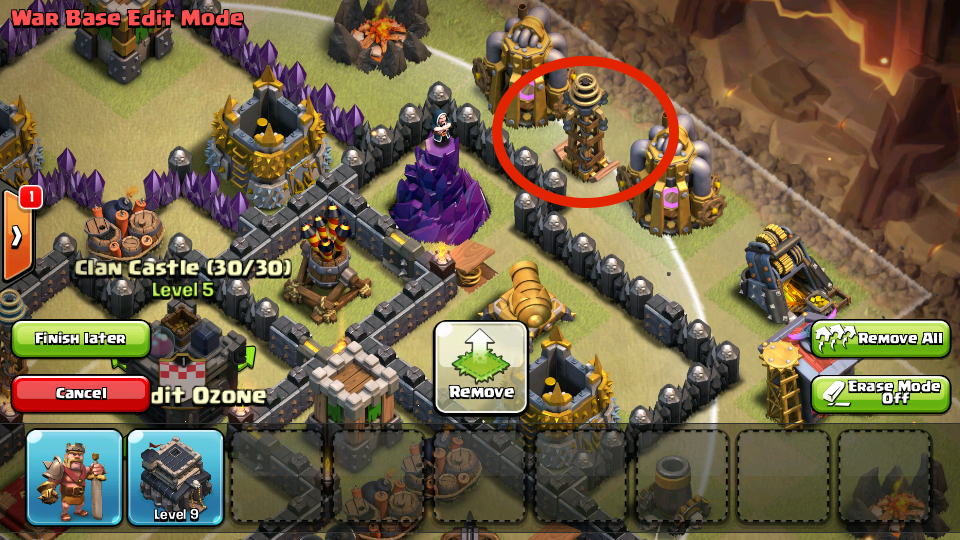
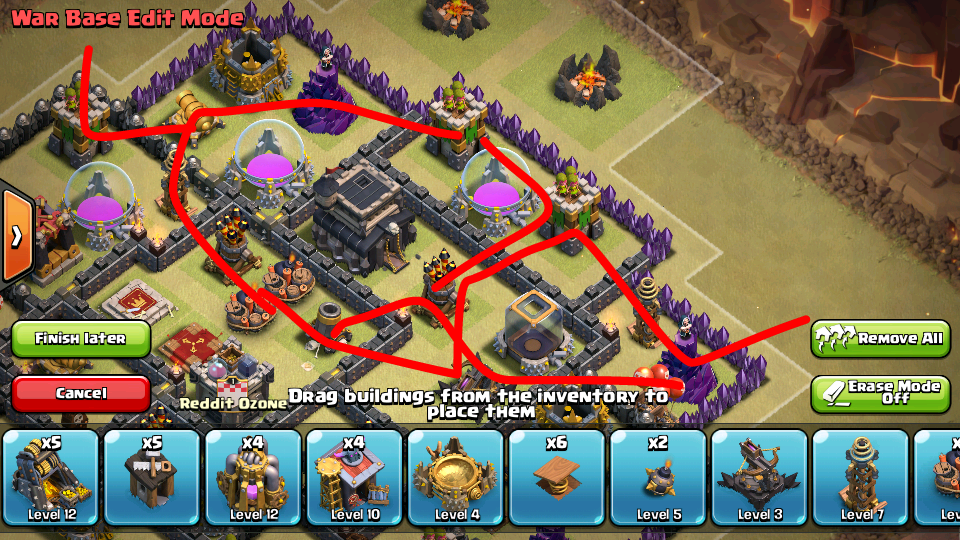
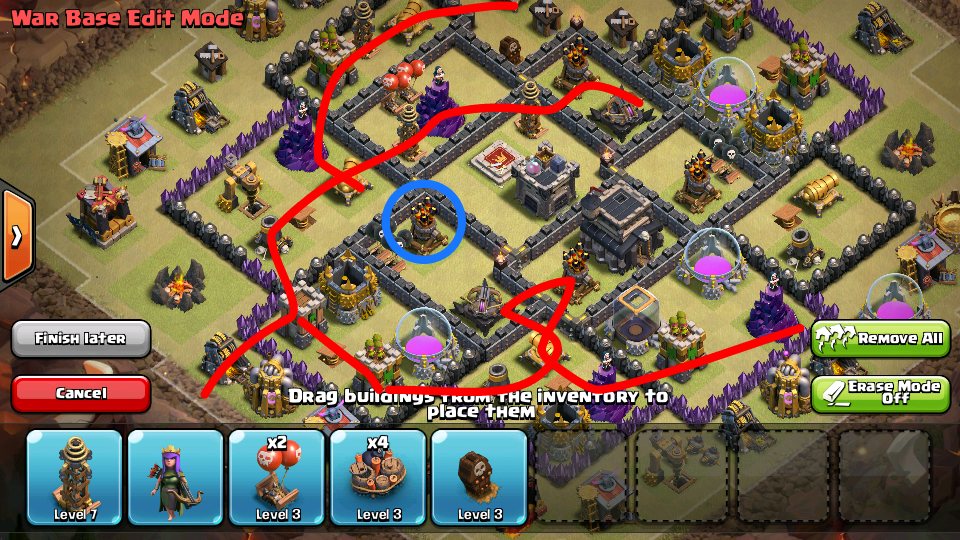
- Offset your AQ towards the side/corner you don’t have a DGB trap. You’re trying to bait your attacker to taking the “easiest” route to kill your AQ, so if your DGBs aren’t there, they remain intact when they try to hog you. Here’s an illustration (red rectangles = possible DGB spots, dotted blue circle = where the AQ will stray, she WILL jump the wall, green arrows = easiest ways to reach the AQ). Arrow #1 is the easiest path (too easy actually; accessing the AQ by only breaking through one wall is too simple), so DGB #1 is really bad. DGB #2 is not very good either because path #2/#3 will run into it on the way to the AQ. DGB #3 is okay; there is a slight risk of the AD in the core getting killed which would ruin the pathing for that though, so watch out. DGB #4 is the best one because it’s far away from the AQ.
- If you want, you can stick your BK in front of the AQ. It’s not essential, but he can act as a shield for your AQ and help her live a few seconds longer.
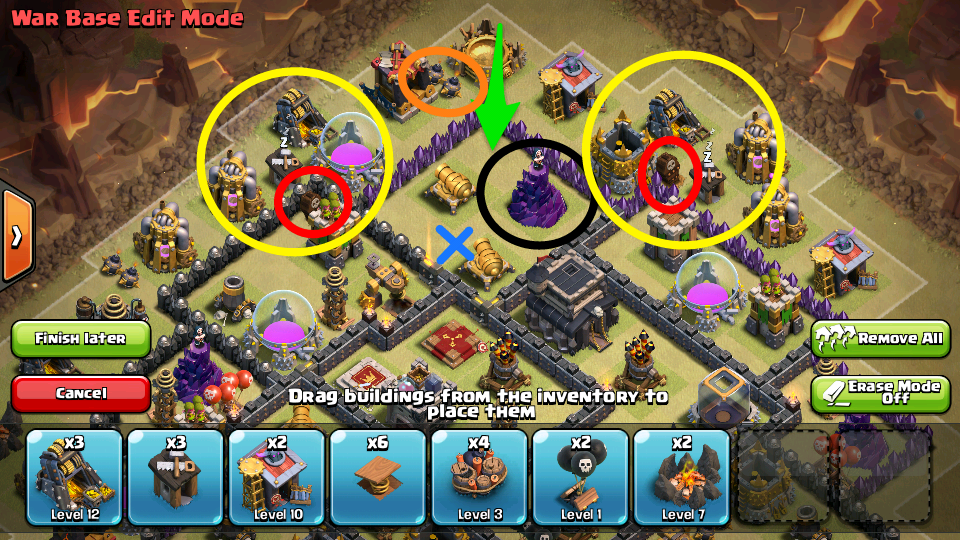
- There are a few other sneaky tricks you can try if you know where the attacker will come from, illustrated here. (Green path = easiest path to AQ, Blue X = where the AQ will stand.) A nearby wizard tower (black circle) and some small bombs (orange circle) can make it hard for wallbreakers to reach the wall, ground skeleton traps (red circles) off to the sides can divert troops to the sides and prevent them from going inward. The yellow circles are anti-funneling tactics; to make troops go inward toward your AQ, attackers have to cut the trash ring (i.e. funnel). However, what if you stack two buildings on top of each other? Look at the yellow circle on the right. If you put a wizard on that gold mine, the mine, then the elixir pump will die, but the storage/builder hut (it’s better to use a higher HP building than a hut though) are still alive so the trash ring is actually still in intact, making it possible that troops will stray that way and not go in to the AQ.
Part 4c: Spring Traps
Even if you’ve done the above, eventually a clever attacker will find some way to lure your CC, kill your AQ, and set off/negate your DGB placement. In this case, spring traps are your last line of defense against hogs. Each spring trap can set off up to 3 hogs, so that’s potentially 18 hogs sprung, which can devastate the hog attack. I would recommend putting all of your spring traps in between defences, and in the area that you expect the hogs to come from (i.e. where you don’t expect the kill squad/lure to come from). Also, don’t telegraph your spring traps by leaving gaps in the walls for your spring traps, that gives your attacker too much info.
Part 5: Defending against Loon-Based Compositions
At TH9, LaLoon is pretty much unstoppable (SC plz nerf). Nevertheless, there are things you can do to make it harder on attackers, which I share below.
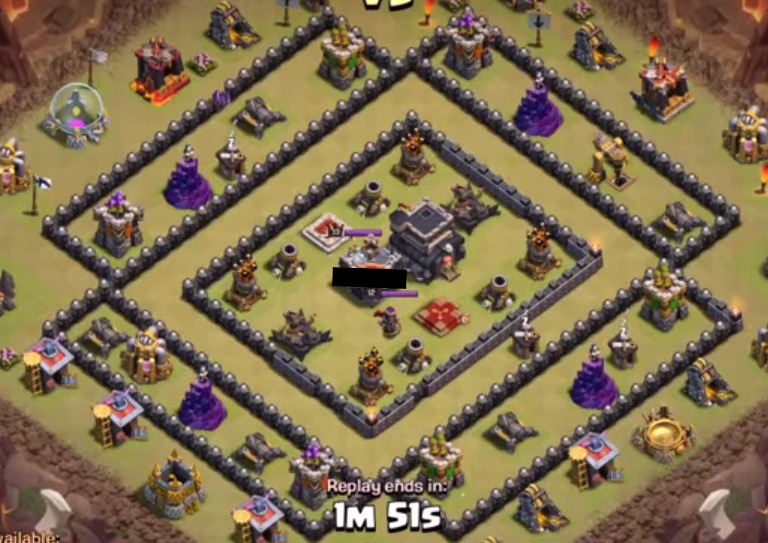
If I can drop some hogs and the first OR second thing they target is an AD, they’re too exposed. However, you don’t want your ADs to be super central either, because if your ADs barely cover the outside defences, attackers can use loons and efficiently wipe out a lot of your defenses. You also want to make sure your ADS are not all in one compartment. Although the ADs in this base do cover a lot of the outside defenses, there are no walls separating them, so this makes you weak to GoLo (where an attacker sends in a group of troops to take out that compartment and then loons the outer defenses after your ADs are gone). (And also the compartments in that base are way too big.)
Therefore, you want your ADs in-between: not exposed, not super central, all in different compartments.
Other Tips:
- Many LaLoon attacks will try to take out your AQ before sending in the hounds/loons, so remember everything I mentioned in part 4b! Attackers will also try to take out an AD at the same time, so if you can keep some distance between her and your ADs that would be ideal (this is so hard to do though omg).
- X-bows pointed up. Always.
- Some people have tried to set the skeleton traps to air to combat LaLoon; I personally don’t think this is effective because the traps do so little damage, and hounds/loons ignore them anyway. I believe it’s better to put them on ground, for the reasons I talk about in part 4b.
- Place two of your black air mines on the two ADs that are furthest away from your AQ. You want these mines to hit the hounds and kill them ASAP.
- Make sure your wizard towers cannot cover your ADs. You want the wizard towers to attack the balloons, not the hounds.
- Put your red air mines on the edges of your base, close to defences. You want these to hit loons and not hounds/pups, so keep them far from your ADs.
- Make at least one AD (preferably one that your AQ is not close to, and one that you stack black air mines on) very hard for loons to reach. Because loons go to the closest defence, if you can create a path that goes around the AD, that AD has a chance of staying up long enough to kill the hounds and the loons the AD eventually gets targeted.
A final note: Yes, this is a lot of stuff to think about. No, your base does not have follow every single point I mentioned. This guide is to get you thinking about lots of different design tactics and the reasoning behind them, and you get to decide what is important enough for you to incorporate. Treat your layout as a continual work-in-progress.
I realize this is a long post, but with the amount of strategy that TH9 warring entails, a detailed, comprehensive post was the only way I could give this topic justice. There are some other topics I could have gone into (e.g. moat bases, having 2 DGBs vs. only 1, teaser bases, etc.), perhaps I’ll address those in the future. Thanks for reading; comments, corrections, questions, and feedback is very much appreciated!

Recent Comments