Smash 4 New Player’s Guide
Smash 4 New Player’s Guide by XXXCheckmate
Seeing as how it is the holiday season and that Super Smash Bros for 3DS/Wii U are hot items, I feel that it is necessary to help out new players by writing a quick guide that will not only inform them of the basics of Smash, but will also help to lower the number of “Who Should I main” and “I have XX% winrate in For Glory”
There is so much to do in this game. Where should I start?
It is important to get to know the basics of the game. Make sure you know all of the controls and basic maneuvers, as well as the objective of the game. Make sure you understand the difference between a tilt and smash attack, how to short hop, and how to roll/spot dodge. Smash isn’t like a typical fighting game where button mashing can lead to a win; it’s important to look it as a platformer with fighting game elements.
There are so many characters! Who should I main (favorite character)?
This is a question that I see posted a lot. Do you like Kirby because Amazing Mirror is your favorite game? Do you play Pikachu because you loved the Pokemon cartoon as a kid? Is Palutena your waifu? It doesn’t matter who you main, just as long as you pick a character and stick with them. Although getting experience with a character is important, it is also important that you familiarize yourself with the character. You should have a general understanding of when to use each of your character’s move, as well as your character’s strengths and weaknesses. Once you do that, then it would be a good idea to pick a secondary and co-mains.
But the tier list says (character) isn’t that good…
Roy has been my main for almost a decade. I’ve gotten good enough to beat all of my friends in Melee with him. Will I ever win a tournament with him? No. But beating everybody in my dorm is good enough for me, and odds are that being able to keep up with friends is good enough for the average player. So unless you plan to win big in major tournaments, don’t worry about tier lists. Besides, it is early in the game’s life and the community isn’t near coming up with a definitive tier list anytime soon. You also shouldn’t let what other players prevent you from playing someone. Rolling around and throwing boomerangs as Link is a legitimate tactic, and Little Mac isn’t a “noob” character. You’re friends are probably just being salty.
I see a lot of questions about GameCube controller adapters. Do I need one to play well?
No. Use whatever controller feels comfortable to you. A GC controller is not necessary to enjoy Smash 4 on Wii U. I would suggest using the Gamepad/GC controller/Pro Controller/Classic Controller if they are available because their dual sticks allow for greater control over your character. A 3DS/Wii Remote + Nunchuck is also a decent choice if the other 4 aren’t available. I wouldn’t recommend using a lone Wii Remote because the D-Pad can make doing tilts/smash attacks difficult, as well as having a lack of button options.
I keep getting rekt online. My winrate is only XX%…
This has been said many times before: Winrates in For Glory don’t accurately reflect skill! While a winrate can give you a rough idea of your skill level, don’t let a 20 percent winrate after 30 matches deter you from enjoying Smash. For Glory is only one stage that benefits certain characters and tactics more than others, not to mention the massive amount of lag that can take place during matches. If anything For Glory should be used as a training ground to improve you basic skill of the game. It also couldn’t to play some teams in For Glory, and learn from both your teammates and opponents. Don’t forget that For Glory isn’t as competitive as some make it out to be. You can try /r/smashconnect to meet new players and battle on other stages.
Some good tips
-Be careful when you use your second jump. Don’t use too early or too late when knocked off stage
–You have defensive options! Often, I’ll see new players forget to use these. Use your rolls, spot dodges, and air dodges; just don’t use them too often.
-Sometimes, you can’t punish every missed attack. Occasionally, you might have to let Captain Falcon get away with a missed Falcon Punch…
-Don’t get too predictable. Using dash attacks, rolls, or grabs too often can make you an easier read than a Dr. Seuss book.
Closing Words
There is no wrong way to play Smash. If you prefer to have Pokeballs and Assist Trophies on high on Hyrule Temple, go right ahead. Just because you like winning with the help of Entei doesn’t make you a bad player. As long as you’re having fun, a winner is you!
Basic Controls
Jab: Press the “normal attack” button (default is “a”/”1”) without pressing a direction. Some characters, like Fox, can perform a jab combo is the button is pressed repeatedly/held down. Some, like Mario, will perform a 2 or 3 hit combo if the button is pressed repeatedly. Characters like Captain Falcon can do both. By pressing the button 3 times, he will do a “Gentlemen” (3 hit combo), or press the button quickly to do a rapid jab combo.
Tilt(aka “Strong attack): Tilt the stick/press the D-Pad in one direction and press “normal attack”.
Smash attack: Smash the control stick/D-Pad in one direction and press the “normal attack” button at the same time. Can be charged if held down. Can also be done with the second analog stick.
Roll: Hold the shield button and press left or right.
Spot Dodge: Hold the shield button and press down.
Air Dodge: Press shield in the air.
Grab out of shield: When shielding, press the “normal attack” button to perform a grab. By grabbing out shield, you can punish unsafe attacks that end in front of you with a grab (works well on most dash attacks/aerials)
Pummel: When grabbing someone, press the “normal attack” button to hit the opponent for extra damage. The higher your opponent’s percent, the more damage you can get in without them breaking free.
Down/Up/Back/Forward throw When grabbing an opponent, you can toss them in a certain direction using the control stick/D-Pad. A forward throw is done by pressing the direction your character is facing, while a back throw is done by pressing the direction the opposite of what your character is facing.
DI (Directional Influence): Once your character is launched, you can alter their trajectory by pressing a direction. In order to maximize the damage your character takes, press the direction that is perpendicular to their trajectory. For example, if you are being launched straight up, press left or right to prevent yourself from going into the top blast zone.
Forward/Back/Down/Up/Neutral aerials: Similar to the throws, once you character is the air, they will perform a different set of attacks depending on the direction they’re facing. To perform them, you can either tilt the second control stick in one of the directions or you can use the control stick/D-Pad and the “normal attack” button. To perform a neutral air, don’t input a direction and press the “normal attack” button. (these are often called “fair,bair,dair,uair,and nair”)
“Zair”: Can only done by characters with tether grabs (Link, Samus, Toon Link, and Zero Suit Samus). By inputting a grab while in the air, your character will shoot out their tether. Use this to perform a quick attack or to have the tether latch onto the ledge. Doing this with any other character will have them perform an air dodge.
Short hop: By pressing and releasing the jump button quickly, your character will perform a shorter jump, which allows you to land aerial attacks on a grounded opponent.
Fast fall: By pressing down while in the air, you character will faster towards the ground. This often used with short hop aerial attacks to end the attacking animation.
Strategies
I decided to write a follow up guide detailing some of the important strategies in the game. So now that you’ve familiarized yourself with your main, you found you’re preferred control method and you know the basic controls, it is time to put what you have learned to actual use.
How to approach
Once the game starts, both players are “neutral,” meaning that neither player is at an advantage or disadvantage. The objective of this game is to knock your opponent offstage. In order to do this, you need to take advantage of the stage. You want to limit the number of options that you opponent has, while increasing your options.
Here is an example of a bad approach. Something I see a lot of new players do is start a match with a dash attack. In the example, King Dedede is now in a disadvantageous position; he only managed to weaken Lucina’s shield, while making himself vulnerable because of the ending animation from his dash attack. Lucina can now punish King Dedede’s mistake in a number of ways, a tilt, a grab, or even a smash attack.
This is a much smarter approach. By using her down-tilt, Lucina was able to apply pressure to King Dedede’s shield, as well as push him further away from her. The ending animation from her down-tilt is minimal, allowing her to follow up with another attack.
This is another bad approach that I see a lot of new players do. Using aerials on a grounded opponent can result in punishes. Because Kirby is too close to Bowser Jr.’s shield, he can easily punish Kirby with a grab-out-of-shield.
A better approach. Similar to Lucina’s down-tilt, Kirby’s back-air allows for better spacing. If he misses his opponent with this move, he can still drift away from Bowser Jr. to avoid getting punished.
Shields, however, are not unbeatable. Not only do they become weaker over time and after taking damage, they also don’t protect from grabs. If you see that your opponent shields a lot, punish them with grabs or by withering their shield away. In this example, Palutena’s shield is almost completely diminished. Mega Man can now apply more pressure because he has limited her options. Palutena can no longer shield unless she wants her shield to break (which will result in her being dazed). Mega Man now has opportunity to rack up more damage by exploiting his opponent’s vulnerability. He has to be quick though, because her shield will come back in around 5 to 7 seconds.
Other defensive options include rolling and spot dodging. These techniques offer brief frames of invulnerability, but will also leave you briefly vulnerable afterwards. Don’t use these too often, however. Rolls will always send you the same distance every time, and a good player can punish rollers/spot dodgers with attacks that have a lot of active frames (a good example would be Shulk’s down smash.) If you do feel that you are in a tight spot, don’t be afraid to roll away from you opponent.
When running, you also have multiple options available. Other than a standard dash attack, you can also grab, jump, roll, up smash, and shield out of your running animation. Just be careful of letting go of the direction you are running or pressing the opposite direction because your character will skid, leaving you vulnerable for a few frames.
However, all of Smash doesn’t take place on the ground. You often find yourself in the air, and it is important to know your options available when airborne.
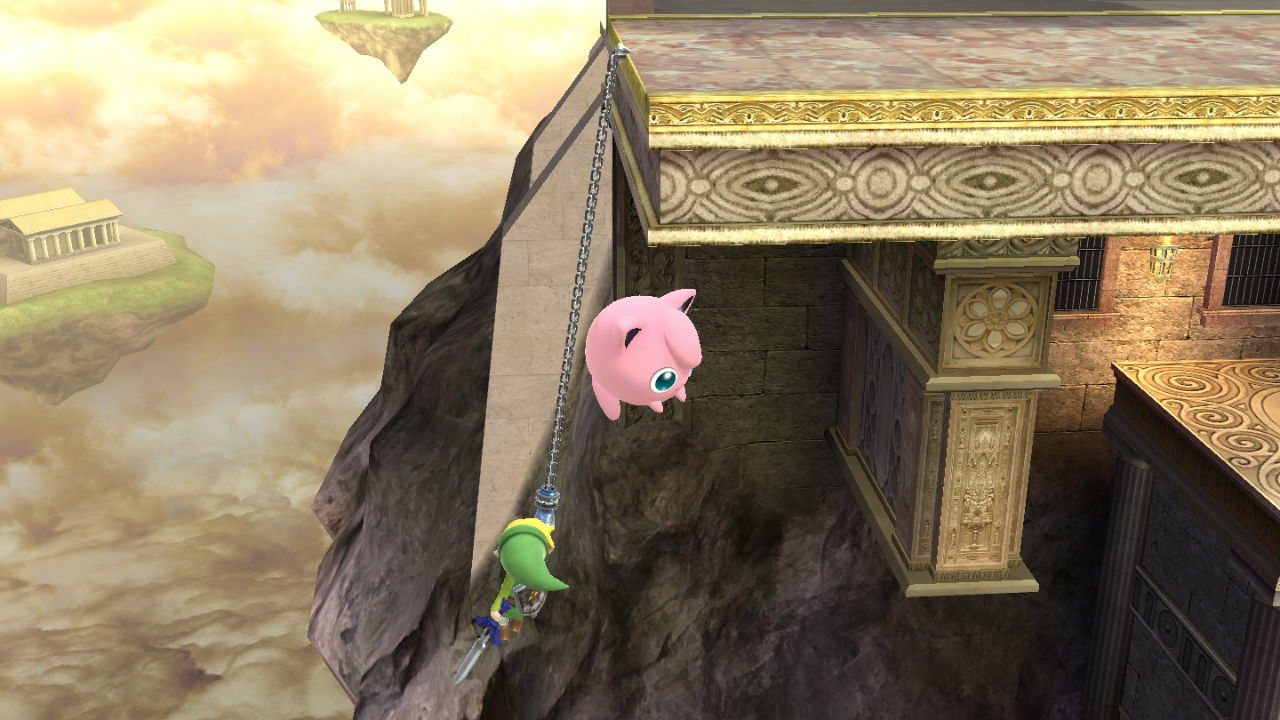
You almost never want to be above your opponent. Being above you opponent puts you at a disadvantage by limiting both your offensive defensive options. You should try to get back to the ground safely. Something that I see a lot of new players is use moves that send them downward quickly, such as Bowser and Yoshi’s down specials, to get back on the ground. Although there are instances where these moves could work, they are highly punishable upon landing. Try to limit your usage of these moves. For example, Link’s down-air may be powerful, but it also has a long ending animation (often referred to as lag). He is now vulnerable to Bowser’s attack. Link’s neutral-air paired with a fast fall allows for him to return the stage in a safer manner. Although it does less damage, it has almost no lag and has a much wider hit box than his down air.
Air dodging is another important tool for making it back on to the ground. Here, Bowser safely avoided Link’s neutral-air with invulnerability given to him with an air dodge. Don’t use an air dodge to close the ground, though. The lag from an air dodge close to the ground leaves you open for an attack.
If you get hit by a strong enough attack that sends you into a tumble animation, you may notice that your character will lie down after touching the ground. When your character is on the ground, they are vulnerable to other attacks. You can prevent your character from lying on the ground by a technique called teching. By pressing “shield” before you hit the ground, your character will get of their tumble animation, as well as get a brief period of invincibility. By pressing a direction and teching, you can also do a roll.
Now that we got the basics of the of the stage game down, it is time to go off stage.
Often, you will find yourself off the stage, and you need to recover. It is important to try to grab the ledge as opposed to actually landing on stage because it grants a brief period of invulnerability. Landing on stage can also mean that you may have landing lag, depending on how you recovered. However if you opponent is preventing you from grabbing the ledge, you might be required to land on stage. It is important to know when to use your second jump. You shouldn’t use it as soon you are able to. If you use it too early and your opponent hits you, you won’t get it back. Make sure that use it when you are beneath the ledge, and use your recovery move if you have to.
These are some important properties to know about ledges in Smash 4:
-If you grab the ledge a second time without getting back on stage, you will not become invulnerable.
-Grabbing the ledge resets your jumps.
-Grabbing the ledge, letting go, and getting hit will allow you to get invincibility on the ledge again.
-If a second person grabs the ledge while you are on it, you will be booted off.
-Once you grab the ledge, you have four options for returning to the stage.
It is important to know when to use each of these options and when to use them. By pressing “jump” while on the ledge, you character will jump up in the air and still have their second jump available afterwards. By pressing “normal attack,” your character will perform a get up attack. Don’t use this too often, as it can be shielded and punished by your opponent. By pressing “shield,” your character will roll back onto the stage. Just like regular rolls, these can be punished by good players if you are too predictable. Finally, by pressing the direction that your character is facing on the ledge, they will do will climb onto the stage with a few frames of invulnerability. Be sure to mix up how you get off a ledge so you don’t become too predictable, and take your opponent’s position into consideration.
Now what to do if your opponent is off-stage
When you knock your opponent off-stage, you want to make sure they don’t come back. When a player prevents their opponent from coming back onto the stage by interfering with their recovery, it is called a gimp. Some characters like Little Mac, are gimped very easily, while characters like Villager are almost impossible to gimp (but is still possible). Going off-stage and hitting you opponent even further away from the ledge is one possible way to gimp. One of the most common ways to gimp an opponent is through a meteor smash, an attack that sends opponents straight down. At earlier percentages, opponents can recover out of a meteor smash, so it won’t work 100 percent of the time.
Another way to gimp your opponent is through a footstool. If your character is right above your opponent and you press “jump”, your character will use opponent as a platform and jump in the air and send your opponent tumbling down. This technique can be hard to pull off, and requires a lot practice to perform consistently.
You can also stage spike your opponent in order to gimp them. By knocking your opponent into the stage, they will bounce off of it. However, a player with a quick enough reaction time can tech once they hit the stage, preventing them from falling down. Here is a gif of a stage spike. Notice how Link could still use his recovery move even though he bounced against the wall.
Some more tips
-Don’t be predictable.
-Take your opponent’s play style into consideration when trying to recover. If they like to go off-stage and meteor smash a lot, it might be best to recover higher, while it might be best to recover low against characters without meteor smashes.
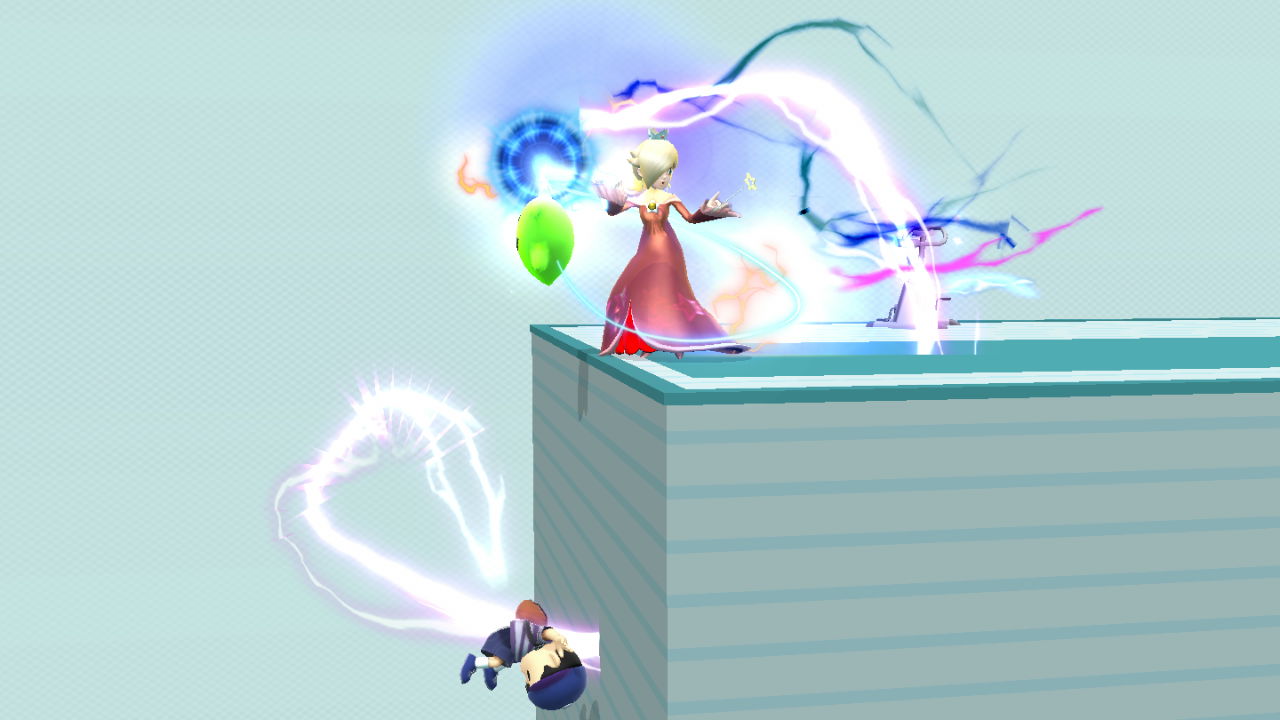
-Be careful of when you use your second jump. Don’t use your second jump over the stage if you don’t have to. By using your second jump over the stage, a good player can capitalize on this and knock you off the stage, crippling your recovery. This isn’t as big of a problem for characters with multiple jumps like Jigglypuff, but you should still keep track of your jumps. Here is an example of a Little Mac using his second jump too early to get back on stage.
-Sometimes you can’t punish every missed dash attack or smash attack.
Advanced Strategies
This part of the guide will cover some more specific edge-guarding and recovery strategies, as well as some character specific tips.
Using your character’s strengths and your opponent’s weaknesses to you advantage
Use your character’s abilities and your opponent’s weaknesses to your advantage when making an edge-guard. In this example Lucina knows that Little Mac’s recovery is also an attack. By throwing out a counter in the air, she put Little Mac in a tough situation. The knockback from the counter will send him off-stage even further, and if he used his second jump already, he most likely won’t be making it back. Inversely, Little Mac can use his counter as a way to recover. Knowing that Diddy Kong wanted to add on some extra damage use his popgun, Little Mac’s countered Diddy Kong’s projectile. Since his counter sends him forward, he is able to make it back on to the stage safely.
If your character has a projectile, don’t be afraid to use it when edge-guarding or recovering. Wii Fit Trainer’s soccer ball is a great way to apply pressure to someone who is edge guarding. It comes out quick, has little ending animation, and can be angled. Even if the projectile misses, it can still be used to deter your opponent from attacking you off-stage or to zone them out and limit their offensive options.
If a projectile, such as Villager’s back and forward-air, goes too high when you try to hit a grounded opponent with it through a short hop, try inputting the attack once your character starts to fall rather than when they are rising. If done too late, your character will cancel the animation and no projectile will come out. With practice and proper timing, you should be able to land short-hop projectiles consistently.
Tethers can also be used for stuff other than grabs. Most commonly they are used to snap back onto ledges. Simply input a grab and your character will fire their tether and will hang on the ledge if they are close enough. You also don’t have to be directly below the ledge to grab onto it, either, being somewhat above the ledge will still allow for the tether to latch on. If your opponent is going for an edge-guard, a well-timed tether recovery could quickly reel you onto the safety of the ledge. Just remember than when you are dangling from the tether, you are still vulnerable and your jumps have not been reset. That will only happen once you actually touch the ledge. Zairs, combined with short-hops and fast falls, can be used to apply pressure bigger, grounded opponents as well.
Here is an example of using a character’s weakness against them. With Ness being off-stage and below the ledge without his second jump, Fox is able to take Ness’ stock by applying pressure. Throwing out his reflector above Ness prevented Ness from using PK Thunder properly. Seeing that Fox had his reflector out, Ness hesitated to use PK Thunder, fearing that it would be deflected. However, he had taken too long to use the move, causing him to lose the stock.
Smash Bros. is also somewhat of a mind game. Dexterity and reflexes aren’t the only parts of getting good at Smash. Being predictable is never a good thing. You should try to mix up your choices in both defensive and offensive options in order to get inside your opponent’s head. In this example Zero Suit Samus is able to punish Ludwig for 1.) being predictable, and 2.) recovering too high. Throughout the match, Ludwig had used recovered in the same every time he had been knocked off-stage. Predicting what Ludwig was going to do next, ZSS had positioned herself properly to punish him with a well-placed back-air. Seeing that ZSS was approaching caused Ludwig to act too hastily. Wanting to avoid getting hit, Ludwig opted to do what he had been doing since the beginning of the stage. If Ludwig recovered lowered, or opted to air-dodge, he could have made it back onto the stage.
Punishing in Smash 4 is a lot of skill and a little bit of luck. New players often try to punish on reaction, such as going for an attack after seeing that their opponent has missed an attack, a tech, etc. Although it is important to capitalize on your opponents’ mistakes, it is even more important that you don’t put yourself in bad position. Taking too long to punish is a frequent mistake that I see. However, sometimes taking risks can pay off. Sometimes you have to preemptive with you punishes. If you are ZSS and you shoot a Paralyzer, mentally prepare yourself to perform a follow-up, instead of waiting to see if the shot connects before acting. In order to become a good Smash player, you need to adapt to your opponent’s playstyle, and make some predictions in order to properly punish them, and sometimes you have you change up how you play. In this example, I took a risky approach, and it paid off. This strategy worked because 1.) my opponent was somewhat predictable, 2.) I tried a new approach (I usually just stood back whenever he grabbed the ledge), and 3.) I took a risk (I didn’t know that Captain Falcon’s down-air would have meteor smashed him. With the amount of lag from that move, I could have been punished with a ledge attack if I had missed). Needless to say, he didn’t fall for that again throughout the rest of our matches. The important thing to get here is that doing well in Smash requires skill, reasoning, and little bit of luck. So if something seems crazy enough to work go ahead and try it. Just don’t do it too often.
Other ways to punish/offensive strategies
With the introduction of the new ledge mechanics came a new technique called ledge trumping. In Smash 4, if a player grabs a ledge while someone else is on it, they will boot them off and take their spot on the ledge. Here is an example of an effective ledge trump. Samus had landed on the ledge slightly sooner than ZSS. Both characters held onto the ledge for a brief moment, but because Samus grabbed first, she was booted off. Samus was caught off guard by this, and wasn’t able to react fast enough to grab the ledge.
As mentioned in part 2 of my guide, teching is important to avoid punishes. Most players, however, do miss a tech here or there, or roll the wrong way teching. If you find your opponent lying on the ground after going through their tumbling animation, there are different ways to punish. One of these methods is called a jab lock. Some characters, such as Meta Knight, Ness, and Zelda, can punish a missed tech with either their jab or one of their tilt attacks. Falco’s laser is especially effective in punishing missed techs. In this specific case, it is called a laser lock. Predicting that Charizard wasn’t going to tech his landing, he was able to land a few blaster shots onto his opponent. Keep in mind that you only get a maximum of three hits before your opponent gets back up.
Another difficulty that I see many new players going through is finding a way to punish rolls. Although rolls are very strong in Smash 4, they can be punished! They will always send your character the same distance, and do have frames of vulnerability in between each roll. Link, for example, is the most common character that I see cause a lot of problems for new players by rolling. If you find a player rolling towards you often, you can punish them with a down-smash. If you find them rolling away from you, projectiles and well timed dash attacks can help your punish game. If you are playing a character with a long ranged grab, you can also punish poorly placed rolls by using your tether.
Pivots can also help to mix up your approaches. In order to pivot, simply input the opposite direction while dashing. If done correctly your character will enter a sliding animation. The sliding animation itself isn’t very useful, and it actually leaves you very vulnerable. It is more important to understand what you can do out of a pivot. You can do tilts, side specials, reverse the direction of your up-smash, and grab out of a pivot. If you input a move during the beginning of your character’s pivot animation, your character will turn around perform a move instead of the sliding animation. The pivot grab is especially useful because it doesn’t have as much lag as a missed dashing grab. In order to perform a pivot grab, press the opposite direction and the button(s) for a grab at the same time, almost like you’re doing a smash attack. If you’re character does a forward tilt, then you’re timing is a little bit off. Pivot smash attacks also require strict timing, and are much easier to perform with a second stick. They are very difficult to pull off on 3DS, and although they are useful, are not required to do well.
More defensive options/strategies
With proper timing, you can negate the effects of an attack with a power shield/perfect shield. It has strict timing, but rewards players for their risk. In the example, Lucario is able to perfect shield Lucina’s shield breaker. He still has a full shield, as well as not remaining in the same spot he was before, as opposed to being pushed back. A perfect shield also drops faster than a regular shield, allowing him to retaliate almost instantly. Another interesting feature of shields is that they can be moved around by gently tilting the control stick. Although it doesn’t look very functional with a full shield, properly moving your shield can prevent a shield stab if it gets too small. Yoshi is the only character that can’t move his shield or get shield stabbed.
Certain characters are also given the ability to wall jump. This allows for more recovery options, along with some new edge-guarding strategies. In order to perform a wall jump, have you character touch the wall, then press the opposite direction to wall jump, which resets your jumps. Keep in mind that you cannot jump off of the same wall without grabbing the ledge, touching the ground, or getting hit first. Some characters, like Greninja will stick to the wall for a few seconds before sliding off. Sticking to the wall allows you to set up some pretty impressive edge-guards if used properly. It is also very important to remember that not all stages with walls allow for wall jumps, such as the Kalos Pokemon League.
Your character can also jump out of shield. In order to jump out of shield, simply press the jump button while holding your shield down. Pair this with some aerials, such as Sheik’s neutral-air, and you can use to escape disadvantageous situations. It is safer than just letting your shield down and then jumping because you character doesn’t go through the animation of dropping their shield.
Combos
First things first, it is important to understand the differences between a combo and a string. Simply put, a true combo is generally defined as a successful series of attacks that cannot* be escaped, no matter what your opponent does. A string is used to define a series of successful attacks that can be escaped, but the opponent didn’t capitalize on the possibility of breaking free. Here is a true combo. The hit-stun created by Sheik’s attacks prevented Shulk from escaping. In this example Ganondorf could’ve escaped in a multitude of ways, but didn’t seize the opportunity to do so. Although a true combo does require some more technical skill and knowledge of your character to pull off, it isn’t necessarily better than a successful string. Do whatever it takes to rack up your opponent’s percentage.
With that out of the way, let’s look into the fundamentals of performing combos/strings. Generally speaking, quick moves with low knock back are best to perform combos at low percentages. Mario’s up-tilt is a good example of an attack that can be used for effective combos/strings. It comes out fast, has a decent amount of hit-stun, and sends opponents a short distance upwards. Plenty of other characters can use their up-tilt to perform combos/strings, such as Pikachu, Fox, Kirby, and Donkey Kong, just to name a few. Character’s like Ness can use their down-tilts for combos, while Sheik can use her forward tilt to do the same.
Another important part of performing combos/strings is the use of grabs/throws. Most characters will want to use their down-throw because they generally have the least amount of knock-back, allowing for easy follow-ups. Another nice tip is to remember to use your projectiles if your character has them! They can extend the duration of a combo/string from a safe distance, and can also be used to throw opponent off guard.
Mixing up how you jab can also strengthen both your combo game as well as offensive approaches. If you time the button between jabs properly, you can follow up with a different move. In this example, instead of doing his rapid kicks, Fox followed up his first two jabs with a down smash. It is even possible to grab in between jabs. One reason for mixing up jab styles is that doing the same move can make you predictable. Fox’s rapid kicks, for example, may be useful for reading rolls, but the opponent can sometimes shield themselves once inside his flurry of kicks. If you land your jabs and your opponent instinctively shields because they are expecting the kicks, by throwing a grab in you can trump their shield. However, if you are known to grab after a jab, your opponent can dash away or attack you, so mix up your playstyle to keep your opponent on their toes.
Don’t forget to use your stage to your advantage as well! Here, Captain Falcon is able to use the platform to reset his jumps, allowing him to continue attacking Donkey Kong. Other elements, such as walls can be used to increase the length of your combos.
If your opponent gets you into a combo, there are ways to break out. You can jump, air dodge, shield, or DI away from you opponent in order to break free from their attacks. There are also offensive options to breaking combos.Counters can be used to punish greedy opponents that try to go for too many hits. Some attacks, including neutral aerial attacks that come out quickly, like Link and Ness, can also be used to break combos/strings.
Strategies Outside of the Battle
Battles in Super Smash Bros. can be won or lost simply at the character select screen. Although counters don’t seem to be as big of a factor in Smash 4 as they were in other games, there are certain match-ups that are in favor of one character. Ness vs Rosalina for instance, is a very difficult match for Ness. Rosalina’s Gravitational Pull completely shuts down his recovery, severely limiting his off-stage options. This is when playing more than one character pays off. Some match-ups are heavily lopsided, and although you really enjoy playing a specific character, you might want to try a fighter whose weaknesses can’t be as easily exploited as the character being used by your opponent.
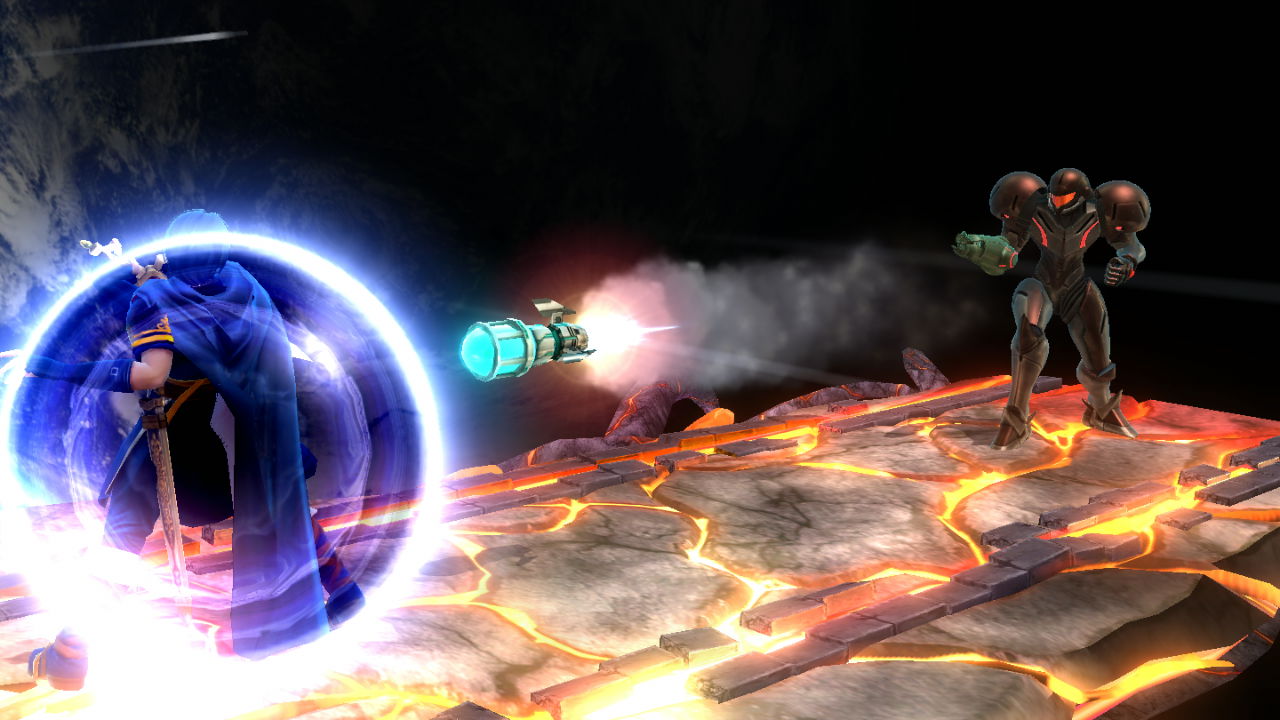
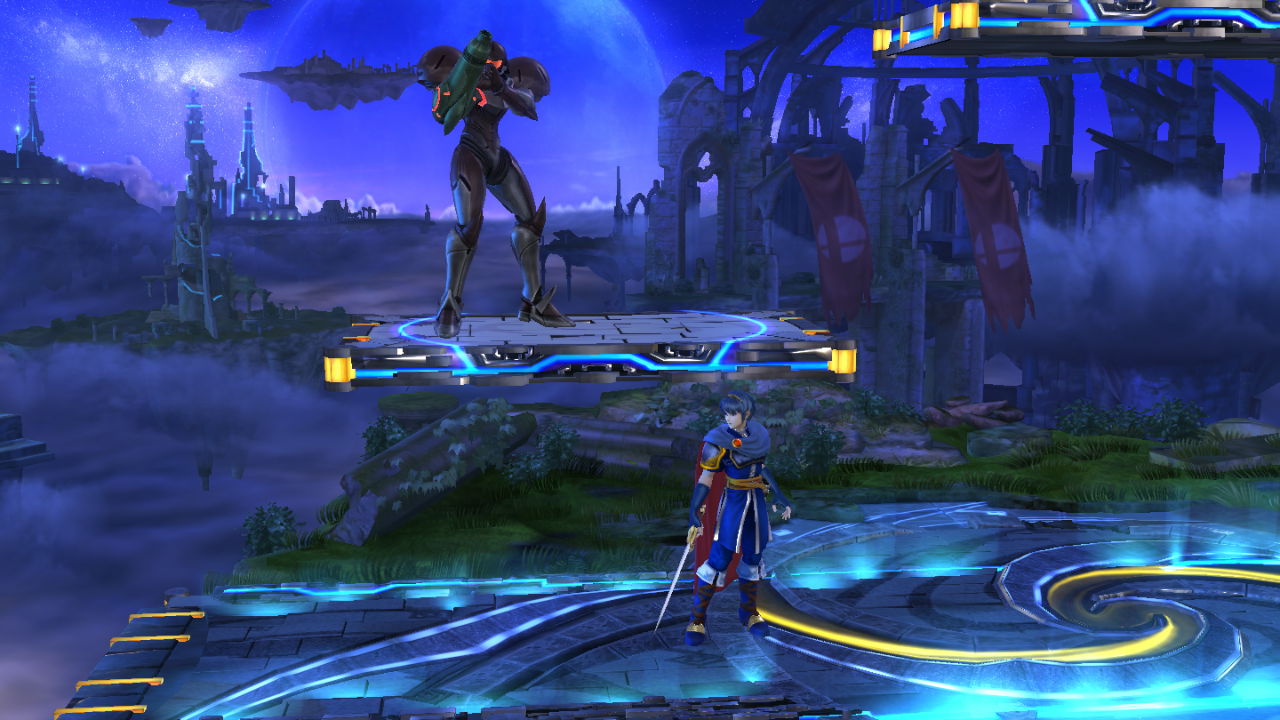
Stage selection can be just important as the characters you and your opponent pick. Various elements of a stage including platforms, location of the blastzones, and “gimmicks” can either help or hinder certain characters. Let’s take a look at this example. Samus has a huge advantage over Marth on Final Destination. Her missles allow her to apply free pressure onto Marth and the long length of Final Destination allows her to retreat to safety if Marth comes too close. Conversely, on Battlefield, Marth has an advantage over Samus. The smaller base size gives Samus significantly less room for her projectiles. The platforms also allow for Marth to safely avoid her missiles and Charge Beams. Marth can even make use of the platforms more effectively than Samus can. His sword gives him plenty of options to safely attack from below platforms, and his counter can make it difficult for Samus to approach from underneath.
Let’s analyze the aspects of Kongo Jungle 64 in regards to the fighters. For one, it has a high ceiling. Since two of Fox’s best finishing moves are his up-smash and up-aerial, and the fact that Ganondorf is a heavy character, gives Ganondorf some help in this match-up. The barrel at the bottom of the stage also helps Ganondorf with his weak recovery. However, the stage’s vertical platforms also help Fox to outmaneuver Ganondorf.
Let’s look at the same match-up, but on a different stage.
Here is Fox vs Ganondorf on the stage Lylat Cruise. This stage has a lower ceiling, allowing Fox to take stocks earlier. The fact that it has lower platforms prevents Fox from evading Ganondorf recovering as effectively. The tilt from the ship also hinders Fox’s blaster. Ganondorf’s recovery is also further weakened on this stage due to its awkward ledges. Factors like these are important to take into consideration when picking a stage competitively. It is up to you to decide how you want to play. Do you want to pick a stage to your character’s strengths or to your opponent’s weaknesses? Do you want to stick to stages that you are familiar with, or on a stage that your opponent doesn’t know too well? Although stage selection is important, don’t forget that a player’s skill is still the biggest factor in winning at Smash!
A few more tips
–Take every match as a learning experience. Repeat what you did right in matches that you won, and avoid what you did wrong in matches that you lost.
–No tactic is a “cheap tactic” in competitive play. Even though Little Mac’s KO Punch can be frustrating to deal with, it is still a perfectly viable tactic. Complaining that a strategy like “grabbing out of shield” being broken will only get you so far. Learning to play around obstacles like these will make you a better player.
–When analyzing your replays, don’t forget to look at what you did right! It is important to find out what you did wrong, but I often see people over looking what they did right. Learning isn’t just about avoiding mistakes, it is also important to repeat with what you did that was successful.
–Try new things. Once you familiarize yourself with your favorite characters, don’t forget to play the rest of the cast every once in a while. You can find weaknesses in the characters that you have a hard defeating if you play as them.
NO JOHNS (obligatory)
Have fun! You are playing Super Smash Bros., after all! You can have Samus fighing Link inside a Pokemon Stadium! If you ever feel frustrated from a losing streak in For Glory, try something silly. Put Assist Trophies, Beam Swords, and Smash Balls on high in Hyrule Temple with 7 other players. You probably won’t feel so salty afterwards.

Recent Comments