Wakfu Settings and Shortcuts Guide
Wakfu Settings and Shortcuts Guide by Genepe
Warning: long post is long.
For a quick search, Ctrl+F these keywords:
for Commonly used Keyboard Shortcuts, search cokeyshor
for Chatbox Commands, search chacom
for Options Menu command explanations, search opmecome
Commonly used Keyboard Shortcuts [cokeyshor]
Keep in mind these are default short keys. You can go to the Options tab to change this. Also I won’t be listing every possible short keys but rather the ones I found useful.
- Q – Opens up the Quest Book window. Quest list includes certain tasks which can be accomplished. The tasks here can be placed on the main interface by clicking the Eye icon [mouse hover: Monitor] or clicking the task for a detailed view then clicking the ‘Monitor’ check box. Completed tasks will have a yellow-green star next to the quest name.
- W – Opens up the Ecosystem window. Can only be used in maps where Ecosystem tab exists and is not greyed out on the main interface below the mugshot of the Clan Member. Hovering mouse of the possible bonus provides the list of possible stat bonus. The horizontal yellow lines indicate the amount of that organism should exist in order to fulfill the Clan Member’s wish and raise the Level of Satisfaction.
- E – Opens up the Emotes window. You can access your one-person/two-person Emotes as well as Smileys here. Note that while you start off with all the Smileys unlocked as well as the Sit Emote, all the other Emotes are locked until certain conditions are met [that is, once you obtain the Emote Scroll and Use it for example].
- R – Used to point out a tile during battle. There is no default use for this button outside battles. Press this button once then hover mouse pointer on the tile you wish to point and click it. *It is suggested to change this to something like ‘Shift + R’ to prevent any mishaps during battle.
- T – Used to toggle transparency of objects during battle. There is no default use for this button outside battles. Press this button to toggle on and off the transparency on objects. Often used to target tiles behind an object. When transparency is on, it is suggested to target the tile you wish to click rather than the outline of the object on that tile.
- I – Opens up the Inventory window. All your character’s possessions as well as equipped gear will appear here. There is a tab on the top of the window for general items and quest items. *Hovering the mouse pointer over your character’s image will allow you to see all the stat bonus obtained from the gears currently equipped.
- P – Opens up the Characteristics window. Your characters current stats will appear here. Clicking the arrow on the lower left of the window can expand and collapse the window. clicking the blue tab on the lower right opens up the Abilities or point-distribution window. You can distribute your points earned from levelling here.
- A – Used to toggle show characters behind walls. This toggle works for both in and out of battles. Used totoggle on and off a ‘circle’ around your character so that walls and static objects which would normally hide your character from view turn invisible inside the ‘circle’.
- S – Opens up the Elemental Spells window. You can view your three branch of Element Spells as well as your Support Spells in this window. Clicking a spell will allow a more detailed view on the viewer below the spell list, and you can adjust the slider bar on the lower end or type in a number to view the stats on a certain level of that spell.
- D – Opens up the Dungeons window. You can view the available dungeons in-game from this window. There is an All dungeons button and an Available dungeons button. I’m not sure how it decides which dungeon to show up on the Available list, but I assume it’s regarding one’s level.
- G – Opens up the Guild window. You can view your guild members as well as guild details here. Note that if you’re not in a guild, this button will not show you an empty Guild window. I would know, I’ve tried it a few times. The tabs on the side allows you to toggle between member list and guild Ranks and the guild related functions each rank has.
- J – Opens up the Professions window. You can view your crafting and gathering professions here. Initially only the Kama Minting profession is unlocked; other professions require one to go to a Clan Member specializing in a certain profession and learn from them. *Available Crafting: Baker, Kama Minter, Chef, Tailor, Close-Combat Weapons Master, Armorer, Leather Dealer, Long-Distance Weapons Master, Jeweler, Handyman and Area-of-Effect Weapons Master. *Available Gathering: Lumberjack, Trapper, Herbalist, Fisherman, Farmer and Miner.
- L – Opens up the Achievements window. You can view all the available achievements here. The tasks here cannot be tagged to show on the main interface. Completed tasks will have a yellow-green star next to the achievement name. Note that achievement taks in Events are subject to change every year; Fleaster did not occur during the year 2013 due to the infamous glitch from the year 2012.
- Z – Opens up the Almanax window. You can view the past Almanax tasks here. Dates with a green bar underneath the number indicates the Almanax you have successfully completed while the red bar underneath the number indicates the Almanax you have failed to complete. Almanax can be said to be a daily quest for a random positive state, also known as a buff, as well as a set experience of 1000 [need clarification with the amount of exp.] and an almoken. You can view which rewards are obtainable with Almokens on the button on the lower right of the screen. *Random positive states obtainable from completing an Almanax quest are +40 PP, +30% All Dmg / Heal, +30 HP, +30% All Res[need clarification for any other possible positive state]. *Random positive states last two hours in-game time to disappear. If a new Almanax quest is completed while previous positive state still remains, it is replaced with the new random positive state.
- X – Opens up the Weather window. Can only be used in maps where Weather tab exists and is not greyed out on the main interface below the mugshot of the Clan Member. Hovering mouse of the possible bonus provides the list of possible stat bonus. The current weather is listed to the right of the mugshot of the Clan Member on the window and a list of expected weather is listed on the left. Resources and Climate column lists the temerature optimal for all possible crops, plants and trees that can be planted.
- C – Opens up the Contacts window. The contacts saved in WAKFU is one way, meaning that if you add a player to your list, the player will not be notified and you won’t be added to that player’s contact list unless they also add you too. [I personally have never used the Ignore list, it would be nice if someone can contribute on any tips for this section].
- B – Used to toggle In-battle/Out-of-battle short keys bars. WAKFU provides two sets of short key bars, one for placing Emotes, Consumables, Planting Resources and Interactive objects such as a warp item while the other set of short key bar solely for spells. *You can click and drag to swap any icons in the short key bar outside of the battle, but not in a battle. *You cannot have more than one icon of the same object/spell. *If you were using, say, In-battle short key bar 3 that does not necessarily mean pressing B will revert to Out-of-battle short key bar 3. Rather, the short key bar number depends on the last short key bar you can manually placed in view.
- N – Opens up the Politics window. You can view status of your nation’s politics and things your current government members want to say amongst other things. You can check if any of the nations are at war using the International Policy tab; that is, the tab on the lowest out of the four tabs on the left of the window.
- M – Opens up the World Map window. By default it will open up the most detailed map of your current position, but keep in mind not all areas of the World of Twelve has a map and thus will fail to produce one in certain places. Right-clicking inside the map area will zoom out while left-clicking an area will zoom in to that place. Shift + M Toggles the mini-map visible/invisible. *Profession worktables will display on your map once you have obtained the said profession(s). *Transportation points such as Zaaps requires one to register to use. Unregistered transportation devices will be greyed out on the map. *the Phoenix currently saved for resurrection will be displayed with colour on the map.
- LeftCtrl + H – Used to toggle Health Bars in battle. There is no default use for this button combination outside battles. Press this button combination to toggle on and off the health bar on objects. *hold LeftCtrl or the RightAlt during battle for the health bar to display only during the instance you are holding the said buttons. Keep in mind certain multi-lingual keyboards with a language toggle on the RightAlt cannot use their RightAlt for this function.
- Shift + H – Used to enter your own Haven Bag. This can only be used outside of battles and on certain places. You will get a red error message, ‘The bag cannot be opened here.’ if you try to open in a restricted tile.
- LeftCtrl + Shift + Space – Toggles the Interface hide/show. Press this button combination to toggle on and off all interface on the main screen, including windows and chatbox. *This will also hide interactive options which occur when you right-click [or left-click if you changed it from Options] an interactive object as well as spell icons when selected a spell to use. *This will still show speech bubbles [need clarification].
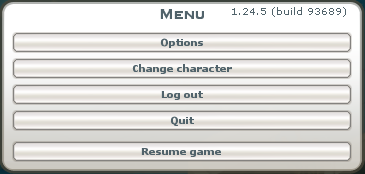
- Insert – Opens up the Systems Menu window. Esc can also work, however Esc doubles as a window close function and will require one to close all active windows before it can be used to open up the Systems Menu. Systems Menu has Options, Change Character, Log out, Quit and Resume game buttons.
- Del – Used to End battles early. This will, after a confirmation window, reduce your character’s health to zero and ultimately lose the fight. Keep in mind if there is an animation playing, it will not activate until the said animation is done. If there are other players on the same side as you, the battle will still continue. You will be kicked out of the battle so you cannot be ressurected in-battle.
Chatbox Commands [chacom]
Type these in the chatbox for certain effects. Same rule applies here; I’ve only listed the commands which I use the most.
- /suicide – Instant-kill your character. Personally use mainly for warping back to the save point if no Recall Potion handy.
- /time – Shows the current time in game time [It doesn’t seem to be GMT+0 from what I can see] gamelog chat [green chat]. Personally use it for determining which dial of Xelor’s Dial will have a boost.
- /clear – Clears all chat on the chatbox this has typed in. Keep in mind if you toggle with the chat filter colour things on the side, the chats will return. Personally use it mainly for clearing guild spam when screenshotting, etc.
- /ping – Shows your current ping on the gamelog [green] chat. Personally 400 ms on average, still runs smoothly. When it hits 1.5k ms it starts lagging heavily.
- /whois charactername – Shows the character’s name and display name on gamelog [green] chat if the character is online, else returns a ‘does not exist’ error. Personally works without quotation marks, such as [/whois Hellfire Mantle] however putting [/whois “Hellfire Mantle”] seems to work fine as well so personal preference I suppose. *Change ‘charactername’ to the name of the character you wish to search for. *Putting Display name does not seem to work.
- /? or /h or /help – Shows all the chat commands available [minus the emote ones] in gamelog [green] chat. Useful list which I got all of my chat commands from but something people never find until pointed out.
- **Text – Changes the chat bubble above your character’s head into a thinking bubble. Must put it in the front to work. Replace Text with any other text. spacing between ** and Text is allowed.
- !!text or text!! – Changes the chat bubble above your character’s head into an exclamation bubble. If placed in front, the !! mark does not show at times. Overrides the thinking bubble if both are put in a single post. Replace text with any other text. spacing between !! and Text is allowed.
- www – this is a blocked word; this will prevent you from posting anything.
Options Menu Command Explanations [opmecome]
You can access the Option Menu by pressing Esc or default key Insert.
Select Options.Game tab
- Allow Interactions with Left Click – Allow certain object interactions with left-click, also can be said ‘open right-click menus with left-click’. From what I’ve tested so far, profession tables and challenge items which are not a monster cannot be left-clicked to be interacted [unsure if this is true for everyone]. Monsters can be left-clicked for interactions normally however.
- Automatically Lock Fights – Makes other players unable to join the fights you start. Team mates are excluded from this and can still join in. Any team mates who does not lock the fight they’re in can also become a loophole for others to join your fights [haven’t tested if this is still true after recent patch].
- Tactical View – Strips the battle field of its graphics and leaves you with the barren tiles. Allies and enemies stay the same and battle animations also, however this view shows which tiles can be walked on [by a danky colour] and which are not [by a red colour] as well as the tile height. The field outside the battlefield is completely blacked out, and still shows border tiles. Certain gimmick tiles such as the teleportation fans in Whirl Dungeon does not show up.
- Hide Walls During Fight – Basically the T button default short key; makes objects transparent.
- Display health bars in combat – Basically the Ctrl + H button default short key; shows health bars on everything with a visible health bar.
- Display the XP bar – display an animated experience gain bar after battle.
- Automatically Lock the Window – Pressing send message in chatbox will make the chat inactive. If this is unchecked, chatbox will still be active so you can type to send again. hitting send message when text field is empty or mouse clicking outside the chatbox will render it inactive.
- Activate Transparency on Inactive Windows – Will gradually fade out the border of the chatbox if left inactive.
- Display the time in chat – Displays the game time in front of each posts made in the chatbox.
- Display the Smileys – Displays smileys above your character’s head when typing in smiley commands.
- Activate the Language Filter – When turned on, certain words will come out as gibberish.
- Display Tips – Displays a Black tip near the bottom of the screen when turned on. This usually notifies when there is a change in governor, elections start, are full when trying to plant and more. The tips will only show upto three boxes and disappears over time; if there were more than three tips to show, they will appear one by one after the disappearance of the previous one.

Video Tab

- Level of Detail – Changes the detail quality of the map. Default key Shift + D.
- Fight Quality Level – Changes the details involving fights which you are not included. Highest quality fight shows a transparent view of the fight, which lowest quality makes the fights a simple totem to mark the places.
- Activate Vertical Synchronization – Need more information about this.
- Activate Sorting of Moving Elements – Prevents graphic errors where characters display as if they go under the tiles when moving from one to another.
- Display Character Behind Walls – Same as default key A. Hides the walls within a circle of your character.
- Activate the Post-Process – Activates Special Effects linked to weather.
- Activate Weather Effects – Displays the weather effects, if not sunny. Examples include snowing and raining and windy.
Sound tab
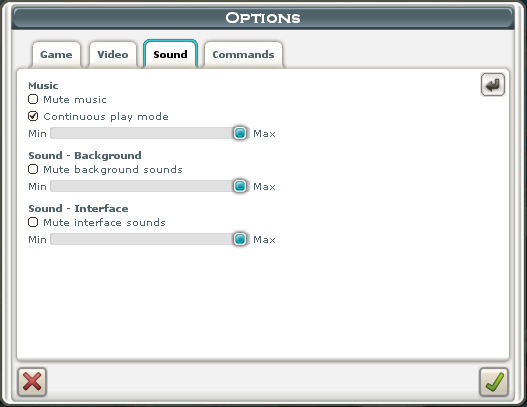
- Music – Controls the volume of the background music for the client window you toggled the slider.
- Mute Music – Mutes background music for the client window you toggled the slider.
- Continuous Play Mode – Loops the background music if on.
- Sound – Background – Controls the volume of the background sound effects such as monster cry for the client window you toggled the slider.
- Mute Background Sounds – Mutes background sound effects for the client window you toggled the slider.
- Sound – Interface – Controls the volume of button sound effect, clicking sound effects, etc for the client window you toggled this button.
- mute interface sounds – Mutes interface sound effects for the client window you toggled the slider.
Commands tab
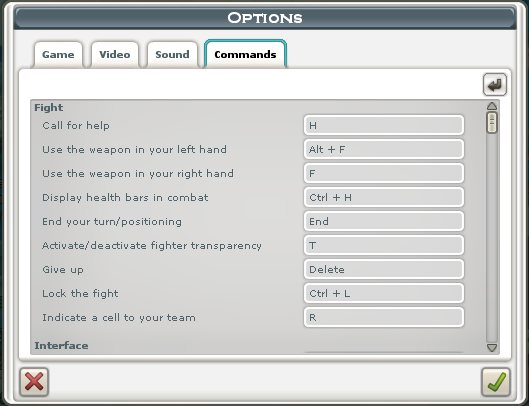
Change default keys here; to do so, left click the currently set shortkey. Pressing the crooked arrow button on the top right will restore to default.

Recent Comments