Age of Wulin Scholar Combat Guide
Age of Wulin Scholar Combat Guide by Kassariane
Table of Content
Counter Mechanics
I. Introduction
Empty Moves
Lockdown Moves
Exceptions
II. How to counter
Kick set PvP strategy
I Learn your skills
II. Strategy
Defensive Strategy
Offensive strategy
Parried knockback combo
Unparried knockback combo
Sword set PvP strategy
I. Learn your skills
II. Strategy
Combo one: 150% spin damage combo
Combo two: “7 hit” combo
III. Possible Problems
PvE Strategy
I. The use of Twin Swords
II. Strategy
Kick set
Sword set
Twins set
Counter mechanics
I. Introduction
The first step to stop being newbie and start becoming an advanced player is to realize that there exists something like a counter. The game uses rock – scissors – paper mechanics, where parry blocks charge, charge counters feint, and feint breaks parry.
While that is true, it is not really precise. I tend to divide moves into two basic cathegories (oficially there are four – real, fake, parry, qi) and that is empty move and lockdown move.
- Empty move – It is a move which has its casting time and while certain parts of animations are done, damage, debuff or crowd control effect is inflicted. While this casting animation is ongoing, they can be cancelled by enemy using lockdown skill or crowd control skill (knockback, stun, etc…). This will result into getting hit by opponents lockdown skill without the ability to parry.
- Lockdown move – Perfect example are charging moves. They do not have casting time, they instantly render enemy powerless without the ability to move, parry or use other skills (with few exceptions) without any regard to animation speed. Perfect example is kick rage. It stops the enemy while you take the pose and the kicking starts after a certain delay, but it still makes enemy powerless, they cannot counter it. These skills are used to counterempty moves.
- Exceptions – Some empty moves got immunity effect to crowd control skills. For exampleemei stun or our spin. If you try to “counter” emei stun, you will indeed hit her, but you will end up being stunned. Same for the spin, you can attack a spinning scholar, but you cannot stop him from spinning. You can tell skills with immunity by a glow around character. Emei stun or tai chi dance got white glow, which gives immunity to lockdown skills, but still can be stunned. Another example is scholar spin, which gives red glow, resulting in immunity to all crowd control effects, including stuns and lockdown skills.
II. How to counter
Countering is simple, yet hard. When you see an enemy use empty move, you use a lockdown skill. This will result in them getting hit by unparriable attack. To be able to counter a move safely, knowing its animation is required, that is why it is hard.
Countering a scholar’s feint with scholar charge skills
Countering a scholar’s knockback with scholar charge skills
Another counter possibility is to counter an empty non-crowd control skill (such as most feints) withcrowd-control empty move. An example: Using kick knockback when enemy uses kick feint.
Countering a scholar’s feint with scholar’s knockback
Kick set PvP strategy
I. Learn your skills
It is vital to know all your skills perfectly, to know which one does what and when it is best to use them. For that purpose I made quite lame picture with some descriptions, but I hope it helps. In guide I also won’t refer to skills by their names, but by the effect they do (e.g. knockback, feint, charge, rage).

II. Strategy
I like to claim that kicks are defensive counter set, but there is also an aggressive strategy with which I do not agree with, but I will include it in this guide as well.
- Defensive strategy – The aim is to wait for an oponnent to use an empty move (such as feint – you lure it by holding parry) and counter it with charge skill. Repeat this a few times, get rage and finally using rage as counter that will finish the match.
Possible problems – Weakness of this strategy is that you do not have any means of initiating a fight because kicks feints / open moves are one of the slowest in game and can be easily countered. There are only two instances where it is safe to use open move as kick scholar.
- Using open move when enemy has no lockdown / CC skills left and thus cannot counter it. (e.g. they spam all their charges at once)
- Using open move from exactly 5 meters distance. Open moves got range of 5 meters, while charges got only 3 meters. When you use charge from 5 meters, you will need to first “dash” to your opponent before the lockdown effect kicks in, providing enough time to be knocked back (This method does not provide you with a sure hit, especially not for slow skill like knockback, it does however, considerably decrease the reaction time needed for opponent, so if opponent starts his counter a bit later, you will get him)
- Offensive Strategy – Aim to break your opponents parry endurance. You wait for your opponent to hit you once to get the parry buff (increased damage) and then hit their parry with both charges, leaving no opening and draining a lot of their parry endurance. Goose out and repeat it a few times, they will try to rage you, which is vital to parry. After that, completely break their parry with one or two last charges and then finish them off with rage.
Possible problems – If your opponent has lower stamina, lower HP, lower parry endurance and lower attack than you, you will most likely win the fight. But if any of the above stated stats is lower on your end, you will most likely lose the fight. In my opinion this tactic is not something you can rely on, but something to kill newbies with. It might prove to be usefull when fighting low HP / parry classes like BV or Tang, but it only makes people rage and call you a “noob”.
Kicks are a situational set, not dependant on any comboes, but still, there are some variation that could be called a “combo”.
- Unparried Knockback – After successfully landing your knockback, you can continue with two charges into opponent on ground. (or rage to finish fight, of course)
Unparried Knockback “combo” - Parried Knockback – After hitting parrying opponent with knockback, there is a follow-up combo that is probably one of the hardest combos to pull off (I cannot do it properly, but it is definitely possible). It goes like this:
- Knockback – First hit your initiating knockback
- Feint – If you time your feint right, opponent’s parry will be broken and they will be knocked down, if not, you will be countered.
- Knockback – After feinting opponent successfully, you can use another knockback on them. But the problem is that even if the timing is perfect, if you stay too close to them, they will be able to counter. If you stand at exactly 5 meters, you will pull it off, if you stand at like 4 meters, they will fly back to you and hit your parry with charge (but will be hit by the knockback), if you stand any closer than that, you will be countered. (Please note that on the video I tried to simulate 5 meter distance, but it is more like 4-4.5)
- Charge – After succeffuly hitting second knockback you can proceed with 2 charges.
Parried Knockback Combo
While it is possible to open as defensive style kick scholar, it is still dangerous and hard to pull off. So when you meet an opponent that does not recklessly uses his open moves, kicks are not a viable set, it is time to switch to sword.
Prefered ending with kick set
Sword set PvP strategy
I. Learn your skills
Same as with kicks, knowing your skills is vital, just randomly bashing buttons will not get you far. Knowing what skills apply which debuff and which effect is very important, especially for sword set, which is combo-reliant set.

II. Strategy
As mentioned above, unlike kick set which is defensive counter and rage reliant, sword is combo initiating set. That is quite the complete opposite of kicks, which gives scholars edge in PvP as they are well-rounded. The main concern of your fight is to land a combo. There are basically two combos, which have several variations.
- Combo one: 150% spin damage combo – This combo relies on getting the 50% extra damage of spin and it goes as follows:
- Wordless Flowers (Feint) – If this skill breaks your opponent parry, it will apply a debuff and make the followup possible. Alternative is to use Hero’s Tears to apply the debuff and then continue with the combo, but a lot of people use autoblock, so your followup will be blocked. Blocking the combo when being feinted beforehand is impossible though for obvious reason.
- Flying Swallow Returns (Knockup) – This skill knocks up enemy into air if they do not parry and have the debuff from Feint / Hero’s Tears. It also deals considerably damage.
- Swirling Flowers, Falling Leaves (Pulldown) – After your opponent is in air and cannot parry due to being unable to move, it is time to use this skill, which when used on airborne enemy re-applies to disable flying skills debuff and pulls enemy to ground, making them take extra 50% damage from spin.
- Romantic Attack (Spin) – Self-explanatory. 150% damage spin that you can’t avoid hurts. A lot.
Spin combo
(Note: Headmaster resisted the pulldown debuffs, so he could parry and eventually goose out after 3rd hit. If he had not resisted, he would not be able to do so and would have to take all 5 hits of spin no matter what he did)
Alternative spin combo:
- Feint
- Knockup
- Pulldown
- Apricot Blossoms (heal, dmg+)
- Spin
Some people prefer this combo over the first one, I do not. By doing this you will get some heal ability and your spin will get “increased damage”. But by putting in another skill before spin, the +50% spin damage buff will apply only to three hits (So the damage is lower in the end) and after these hits the opponent will be fully able to attack you back or counter your spin with their heal + spin (more on that later) or goose out and heal.
Spin Alternative combo - Combo two: “7 hit” combo – This combo results into full 16 / 20 hits into your enemy and is especially deadly at third inner with good sword. Also a good rage-gainer and it renders enemy powerless for quite a long time. I mostly use two variations of the combo, the only difference is the last skill (also note this combo heavily relies on Hero’s Tears, so maxing it is recommended otherwise you might fail):
- Feint
- Knockup
- Pulldown
- Hero’s Tears – used to re-apply the disable flying skills debuff (make sure you have the green buff before attempting this combo)
- Knockup
- Apricot Blossoms – for the heal and extra damage of following skills
- Hero’s Tears – again, re-applying debuff
- Spin / Rage (sword) – Using spin results into sure 5 apricot-buffed hits, which is around 1000-1500 damage depending on equip. It sounds nice and works nice against almost all classes. But using this is not recommended (if you do not have to do it) against scholars. As there is easy counter for that (Video on that below). Using rage skill is more viable option if you have the rage to do it and if your opponent has low health and especially better option against scholars and classes with heal. Deciding which one to use is sometimes hard.
7hit combo
7hit combo scholar counter
(By using Apricot Blossoms and then spinning you can minimize the damage received while dealing some damage to the opponent)
III. Possible Problems
A lot of newbie scholars that just read a guide somewhere and then just spam the skills in the order and hope the combo will pull itself off. That is not how it works. If you fail to use feint, do not bother wasting your knockup. Or if your opponent resist pulldown skill’s disable, you will need to reapply Hero’s Tears and then go for 7hit combo instead of spin combo. There are a lot of variations and the key is to be able to stop in middle of combo and change it into something else. The understanding of your skill effects is a must then.
Another common problem with newbies is that after successfully knocking opponent up, they will use pulldown skill, fly into air and get a “dodge”. This dodge is not due to dodge rate of the enemy, but because the skill knocks up enemies too high that your charge dashes towards your enemy, but as the enemy is on ground by that time, it results into a dodge. There are several ways how to prevent this, Ill share two:
- Wait for an enemy to fall down a little – This method is ping and timing relevant, it is hard to pull off but it works.
- Double jump forward – Tapping space twice while holding down the arrow key forward is probably the easiest way how to pull it off. It is my favorite method and the only method I have been using while doing all these videos. So look at once for reference.
PvE Strategy
This part of guide is aimed for instances and factions, your main role in these is support. (Yes, you deal damage as well, but you prioritize your buffs over anything else)
I. The use of Twin Swords
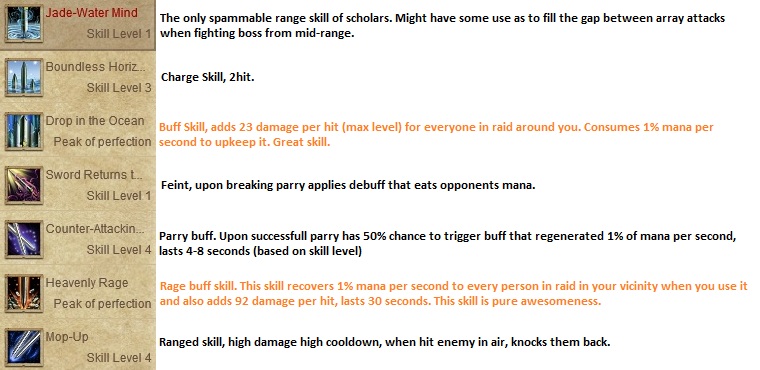
So far I have introduced you sword and kick set, it is time to introduce the last skillset – twin swords set. This set shines in PvE more than anything else, it erases mana problems and makes killing twice as fast.
II. Strategy
It is very simple and seemingly dull. In PvE situations you use all three set:
- Sword set – Sword set is great to clear trash mobs with spinning and it also gives you high survivability thanks to the heal. So when you are clearing mobs, definitely switch to sword set, and use spin, Hero’s Tears, feint and heal as none of these skills throw mobs around and are AoE. Using knockdowns and stuff during clearing mobs is a bad idea, nobody wants mobs anywhere else than in the middle of your AoEs.
- Kick set – This set is used against bosses as you cannot lockdown or CC bosses (factions are exceptions, use kicks there with caution so you do not interrupt your friend’s skills). The reason why to use kicks and not sword against boss is because kicks got mostly multiple-hit skills which is what you want in order to gain rage. In instances its all about your rage.
- Twins set – Once you get 50 rage and are fighting boss, you switch to this set and useDrop in the Ocean and Heavenly Rage. This will result in mana regen and huge damage boost to all of your party members. After you have laid all your buffs, switch back to kicks and save up another 50 rage, to keep the Heavenly Rage running. (Heavenly Rage’s mana regen and Drop in the Ocean’s mana consumption cancel each other, that is why you use Drop in the Ocean only after Heavenly Rage is on. It is also recommended to use Counter-Attack stance for extra mana regen.)
Boss Fight in Faction
(Please note how I am using set-less attacks like basic attack when switching sets. While the base damage is very low, with the buffs it adds 115 damage per hit. As that skill is 2hit, It is 230 damage per skill, which is better than to just stand around and wait for the 7 sec global cooldown)
Those of you who read up until this point, thank you. This is the end of my guide for now. For any questions, contact me in-game or ask below, I will do my best to answer.
Also, thanks to Dramastana, the current Headmaster of Scholars for acting as my punchbag while making the videos

Recent Comments