Anno Online Beginner’s Guide
Anno Online Beginner’s Guide by Katealyst
Anno Online is a free-to-play strategy simulation game that lets you build and develop big medieval cities. No download is required – you can experience a complex city simulation directly in your browser!
Anno Online upholds the traditional in-depth economics that are the hallmark of the award-winning Anno franchise, and invites players to manage cities to an extent never before seen in any browser game. The key element of the game is the player’s main island, where the foundations of your commercial empire will be set. By satisfying the needs of your population, constructing buildings, and managing production, you will unlock new buildings and face new challenges as your population’s demands and consumption habits evolve. Soon, one island won’t be enough to satisfy all their needs, and you’ll have to discover and claim additional islands, connecting them to your main island via ship trading routes. For the first time in the Anno series, players will have the opportunity to be part of a giant empire and congregate in powerful guilds to work towards joint goals and server-wide quests.
Please note that the game is still under heavy development, and a lot of features are still to be implemented (and balanced). Therefore, this service is provided as-is and may contain unstable or unpolished elements. This is expected while the game is in its beta cycle.
INTERFACE
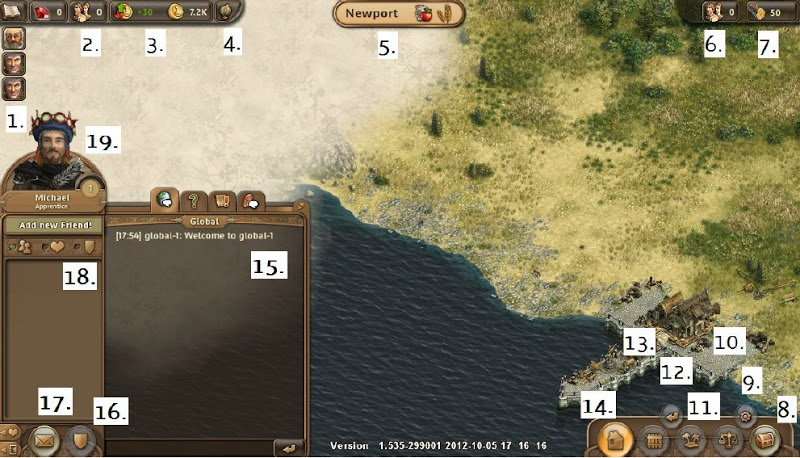
- Quest List
- Population Tab
- Finance Overview
- Notifications Tab
- Name of your Island
- Ascension Tab
- Resources Tab
- Shop
- Options
- Trade Menu
- Island Overview
- Move building
- Inventory
- Construction Menu
- Chat
- Guild Menu
- Mailbox
- Friends List
- Avatar
AUTOMATIC SAVE
No need to remember to press save in Anno Online – you can close out of the game anytime, and your progress will be saved automatically.
LIFE ON YOUR ISLAND CONTINUES WHEN YOU’RE OFFLINE
When you leave Anno Online, the economy continues in real time. Be careful to keep an eye on your economy before leaving the game; a deficit economy may result in lost resources in a few hours of absence.
CLEARING BROWSER CACHE
It is advised that you clear your browser’s cache whenever a new version has been deployed to the server. If you experience game play issues or graphic glitches, you should first try re-logging or reloading the browser tab by hitting “F5” key. If that doesn’t solve the problem, you are also advised to clear the browser cache.
SOUND MENU
You can find this option in the bottom right hand corner by clicking the gear wheel icon.


RIGHT MOUSE BUTTON
Hold the right mouse button to move around the map. Building placement can also be cancelled by pressing the right mouse button.
ROTATE BUILDINGS
Non-square buildings can be viewed at different angles by keystroke “R”, or with the buttons in the “Rotate” window on the top right before they are built.
HELP CHAT CHANNEL
You can access the Help chat by clicking the green question mark. This chat channel is specifically for gameplay-related questions. You can use the Global chat for more general topics and conversations. For announcements, feedback, questions or bugs, please refer to the Anno Online forums.

CHAT COLORS
Chat text is color-coded based on who is typing:
Your text: Yellow
Chat moderators: Light blue
Other Blue Byte employees: Deep blue
Everyone else: White
WHISPER
To chat privately with other players, type the following: /w *PlayerName*
Substitute *PlayerName* with the player you want to reach. It is case-sensitive, so make sure to use the correct capitalization. When you hit SPACE after typing the name, a new window will open up so you can continue to chat one on one with that player. Hover your mouse over the enter icon in chat to reveal other chat commands.
MAILBOX & BUDDY LIST
To use the mail system, click on the envelope icon in the lower left hand part of your screen. In the “Incoming Mail” tab you will see messages and friend requests you have received. In the “Sent” tab you will see sent messages, as well as friend requests you have sent or accepted in the past. The last tab is where you can send new messages.
Whenever you receive mail and friend requests, there will be a notification in the globe icon at the top of your screen showing the number of new messages/requests.
ISLAND OVERVIEW
- Discovered Islands
- Settled Islands
- Population Tab
- Island Resources Tab
- Trade Routes Tab
- Shipyard List
ITEM PRODUCTION | Taylor-made buffs
Buffs can be created in the Provision House, which creates items over time given sufficient resources and coins. Once the production has finished, the item will be in your inventory. Please note that the Abort button is not working yet, so make sure you definitely want to create the item, as you will not be able to cancel production.
SHIP PRODUCTION
This ship mechanic is still a work in progress, and may be a little tricky at first. Please follow these steps to ensure that you fully understand how to settle ships.
- Build a Ship Engineer and a Shipyard
- Open the Shipyard menu and choose a ship type (Small, Medium, Large)
- Different ships require different items, which can be created in the Ship Engineer menu (items have a certain production time).
- Once the required items have been created by the Ship Engineer, select the desired ship from the Shipyard (ships also have a production time).
- Upon completion, the ship can be found in your inventory, where it can then be added to your island.
EXPLORATION AND COLONIZATION
Exploration, colonization, and player trade are made possible by crew members. These crew members can be trained in the “Ship Engineer” building.
- To find new islands, you will need a sailor.
- To colonize new island islands, you will need a loadsman.
- To transport goods, you can use any crew member.
These crew members are, just like the ship, added to your inventory. From here you can add them to any ship. The crew members cannot be removed from a ship once they’ve been assigned. These ships can, however, always perform transportation missions. After adding the crew members to your ships, you can select the ship and choose the desired destination.
EXPLORE, COLONIZE, OR TRANSPORT
Explored islands are shown in the “Discovered” panel in the island overview menu. To colonize these islands:
- Select an island.
- Select a colonization ship from the Ships tab.
- Press the “Colonize” button.
After a short while you will have claimed your new island!
TRANSPORTATION OF GOODS WITHIN YOUR ISLANDS
Any ship with any crew members can be used in a transport route. To set up a transport route:
- Open the transportation window and select the “Routes” tab.
- Press the “Add Route” button to open the transport route wizard.
- Select the start and destination islands for your new route.
- Select the desired ship for the route and press the “Next” button.
- Select the cargo to be taken from the main island.
- Select the cargo to be taken back to your main island from the destination island (optional).
- In this final menu you can enter a name for your route and decide if you want this route to be permanently active by checking the “continuous” checkbox.
When you are happy with your transport route, press the “Finish” button to be taken back to the island overview. Note that you can always cancel a transport route from the “Routes” tab.
SHIP CAPACITY
You will need to take ship capacity into account when creating transport routes. The ship’s total capacity is the combined maximum your ship can transport to and from the islands. This means that a ship with a capacity of 40 can take 40 stacks of wood to an island, but will then need to return without goods. Alternately, if the same ship takes 20 stacks of wood to the island, it has the capacity to return with 20 goods.
BANK
Please note that you can only place one bank on your island. Additionally, this building cannot be deleted, so be sure to place it carefully!
MINES
Every mine has a maximum capacity of 5000 of a given resource. Once these have been depleted, an item from the item producer can refill the mine. There is currently no indication of the amount of resources left in the mine. This is still work in progress.
SHOP
Click on the chest in the bottom right to open up the Shop. The Shop contains items that can be purchased with rubies. Items are sorted into different categories. Clicking on the “Buy” button will open further information about the item. A second click on the “Buy” button will complete your purchase. Please note that prices are not yet final and may change.


CITY LEVELS
The city levels correspond with the following numbers:
- 1 Peasant – Hamlet
- 5 Peasants – Large Hamlet
- 25 Peasants – Thorp
- 60 Peasants – Small Village
- 120 Peasants – Village
- 250 Peasants – Parish
- 1 Citizen – Large Parish
- 100 Citizens – Township
- 300 Citizens – Town
- 500 Citizens – Large Town
- 900 Citizens – Small Borough
- 1500 Citizens – Borough
- 1 Patrician – Small City
- 250 Patricians – City
- 500 Patricians – Large City
- 1000 Patricians – Region Capital
- 1500 Patricians – Federal City
- 2000 Patricians – Large Federal City
- 2500 Patricians – Grand Federal City
- 3000 Patricians – Burgh
- 1 Nobleman – Local Trading Hub
UI LOAD TIME
The building UI sometimes updates slowly. For example, if a need you have unlocked doesn’t appear right away, wait a few seconds for it to load.
PRODUCTION TIMER
If building efficiency is lower than 100%, it will take longer to produce goods.
ACCEPTING QUESTS
Main quests in Anno Online need to be accepted in order to progress. Remember to press “Accept” at the bottom of the quest window. This will also start the highlighting process.

Recent Comments