Dynasty Warriors Online Showdown Guide
Dynasty Warriors Online Showdown Guide by jfigueorochi
Hi guys, im Javier.BH1 from Cao Cao – Wei and Liu Bei – Shu, here to talk about showdowns.
Intro:
The reason for this guide is that i have noticed that a lot of you in all factions (i have alts in all factions) dont know what to do in a showdown.
Some of you think that defending our supply base is priority, others think that bases are not important, and others think that if they take the supply base they have won.
Most of the statements above are not true!
So this is a Medium guide to help you understand and be Efficient in showdowns. Weather you are new or old, all of us make mistakes. And now we have had a rise in generals, because of showdowns and +4 honor and stuff like that, meaning more people for Elite showdowns, meaning you cannot be making Mosuo, Veteran, or Novice mistakes.
So this is the guide, Please enjoy, and give feedback, ANY feedback will be appreciated
Index
Intro
Index
I. Battle Plans
II. Definitions
III. Da Rules
IV. Weapons in Details
V. Word to the Reader and The Community
VI. Videos
VII. Maps in Details
VIII. Personal Experiences
I. Battle Plans:
This is a plan you chose
Att = more attack, able to kill more people, take bases that have generals (red)
Dam = This is damage, able to take towers, juggernauts, and powders (yellow)
Mov = This is speed, you will move faster, all abilities are slightly decreased (blue)
Def = This is defense, able to withstand more hits, higher defense and life (green)
All = this is overall, meaning normal, all abilities slightly enhanced (white/clear)
II. Definitions:
Crystal = A strike to it will change your battle plan the order goes: All->Att ->Dam ->Def ->Mov
A. Rushers = People who will attack the Supply base, most will use Mov (speed) plan to advance fast and then change with a crystal to Damage, in order to inflict as much damage to the Powder Boxes located at the enemy supply.
High damage weapons such as – Whips, Cudgel, I.Blades, T.sword (if any), and others damage weapons, such as those with Obliterate as Advance N.Sword and I.Spear.
Showing the Whip on action and taking on the Supply Base!!!
Attacking Supply Base
Attacking Supply Base 2
Attacking Supply Base 3
Here is More Whips
Firstly, all of your rushers MUST BE USING A WHIP. This tactic does not work (or has not been tested) with any other rushing weapon in the game.
When you start playing on the Fortress map, you and your team are standing on the castle wall. Notice this gap in between the battlements.

Jump off the wall, and run on the side:

Pay attention to my minimap. Instead of going into the Fortress “chokepoint,” I’m heading to their side; 99% of the time, nobody is going to be here:
Stand directly under the gap in the wall:

While holding the Forward button (default “W”), use your Jump Charge:

If done correctly, this will happen:

Now look where I’m standing on the map:

There are two giant reasons why this is the most effective way of rushing on Fortress map: First, this shortcut shaves off precious seconds of your time to get to their Supply Base. Secondly, Supply Base defenders are using weapons with slow movement speed. Nearly 100% of the time, you can actually outrun the enemy defender to the Supply Base and gain a free gunpowder kill.[/quote]
B. Defenders = People who are in charge of defending the supply, should remain within the Supply Base’s premises for maximum efficiency. Kill anything that tries to invade.
*A good strategy to defend is to have 2 T.rods, 1 with a 50320 build for 1 shotting anyone that tries to pass (he must stay in the supply base), and the other with a 40331 build that is outside the supply at the base closest, if he is needed have him rush to the aid of the defense. (LancelotLoire)*
High Attack weapons such as – I.rods, S.Fans, and other weapons with element such as wind or lightning.
(EDITED)
These weapons are to be use by people who know how to use it, DO NOT EXPERIMENT
B-Axe with defense strat: use with toughness and hold the gate.
C-Blade with defense: same as the B-axe
E-Sword with defense or attack: the musou will cover the entire entrace and catch anyone coming in, its all about timing.
V.Staff: same as e-sword.
Trident: Musou works great, but its a must for defense. Sacrifice is also good for when your team is rushing the enemy SB.
Items and abilities for defending the SB:
Mirror and Vision Advance: Help tell your teammates where the enemy is until one person uses v-staff advance.
**********Videos Coming Up***********
C. Capers/Capturers = These are the people in the battle field, they will attack and capture bases, and maintain them, Meaning LOTS and LOTS of killing and capturing.
High Attack and Damage weapons – You can use any weapon in this but its best to have hybrids such as both attack and damage, you can also just have a group of attack and a group of damage.
Capture and Defend Bases
Capture and Defend Bases 2
******THE MOST IMPORTANT JOB, without capturing bases, I GUARANTEE YOU, YOU WILL LOSE EVERY SHOWDOWN.*******
IMPORTANCE OF BASES
III. Da Rules (not really rules, but more like things you might want to follow)
Rule one:
Carefully plan out a strategy and if you have time plan a back up!
By this i mean, take in consideration what the enemy might be planning.
Most famous strategy and most efficient so far is:
2 Supply Base Defenders (no more no less), 2 Rushers, and 8 Capturers.
Others:
3 Defenders, 2 rushers, 7 Capturers
2 defenders, 3 rushers, 7 capturers
0 defenders, 4 rushers, 8 capturers
And much other variations.
Other Strategy
A new strategy commonly used when outnumbered, Take bases at the beginning, do not attack the enemy Supply Base untill you have gotten their life down to about 60% to 40%. then rush the supply base and take it out, thus winning with one final attack to the base.
Team work, team work, team work (EDITED Romanwahoo)
~ Spread out at the start, at the most 2 to each base. On the fortress map, center bases will be where all of the fighting will take place, so it’s nice to have someone who is strong at confront to help defend the base. On mountain path, gates are incredibly important, as they control the flow of the game.
Capture rules apply. Don’t fight an enemy in an enemy’s base. Capture the base first, then turn and fight the enemy. If you are vastly outnumbered, keep moving. If you get killed, you have to take a minute to reflask your highest tempered stat. Help out a teammate in base defense if you are already there or are close by. It’s easier to kill 2v1 than 1v1.
You don’t get max honor for getting the most kills or capturing the most bases. You get max honor and guild points by winning the match. Don’t fight over who gets the kill or who captures the base, just make sure it gets done.
One addition to capture weapons is the whip. Highest speed, plus good damage means you only need a couple of stars in damage and the rest can go to attack.~
Rule two:
Make your plan a reality, meaning EXECUTE it.
Follow your plan and be able to alter it at any time
Rule three:
Capture bases, this is the most important rule of all, if not applied you WILL LOOSE all showdowns.
Rule four:
Defenders only. work together to capture and eliminate the attacker ASAP to prevent the most damage possible.
Rule five:
Rushers, attack smart, if you see too many defenders were you are going, do not just go to that area, if you have a partner wait for him/her and then attack the supply. do not go one on one, it will make it easier for people to stop your attack, also attack different Gunpowders so that you can cause more damage and survive more by splitting their generals
Rule six:
Capturers only, capture as many bases as possible, and shout out what they are, this will help your fellow teammates know what the base is and how to deal with it efficiently.
Rule Seven:
If you loose your Supply Base, DO NOT GIVE UP, just don’t, you can still win, i have been in matches were we have had our supply taken and the enemies intact and because of bases we have won.
Rule Eight:
Just because the enemy is down and almost out, DOES NOT MEANS you have won the match, Do NOT by any circumstance let down your guard, i cannot tell you of how many showdowns i have lost because of this.
Rule Nine:
Farming Showdowns – Have fun in them, but please do not kill the NPC until your teammates take the Enemy Supply Base
Farming
Farming 2
IV. Weapons in Detail (Thanks to Darkenega)
First of all the weapons you should use for defending the SB. Yunsung already posted his list, this is mine:
– T Rods are perfect for defence: their incredible high attack will one shot whip rushers without the attx2 boost and severely damage other rusher types. Simply stand in the entrance to your SB and unleash your C5 with wind element. The only downside T Rods have is their slow running speed compared to the speed of the rushers, so it’s better to stay at the entrance or inside the SB.
Tip: a good way to catch rushers by surprise is to stand just around the corner of the SB entrance, out of sight from the rushers. Simply waste your first attacks as they approach, then nail them with your C5 when they try to enter. Timing is important with this tho.
– The best partners for T Rods are B Axes and S Fans with ice. S Fans are preferred tho because of their faster attacks and their long range. Freeze them, then let the T Rods crush them
– V Staff is also one of the best defending weapons: their musou can cover the entire entrance, catching rushers as they try to enter. The preferred E1 for them would be Thrust: the explosion also covers the entrance and it is elemental. Equip an ice orb and team up with a T Rod wielder to get the best results
– The Deck is also suited for SB defence. If you have C1 Thrust, do the same thing as a V Staff: equip ice and keep spamming it when the rushers approach. Just like the T Rods, it has a ranged C5, tho it is harder to aim. C4 is also a very good attack to use
– I Rods and T Picks should not be used for SB defence, unless you can magically make flasks appear out of nowhere. Besides, the rushers usually have such low defense that Aggression or Godly Hammer are overkill.
Next up, the ideal weapons to capture and hold bases:
– T Sabers are the best weapons for Capture, but not for SD. Everyones starts out flasked so the T Sabers lose their edge. They are still versatile weapons tho, but it is best to team up with other players when facing multiple enemies. Their running speed allows you to reach some of those hard to reach bases, so try to reach them before the enemy does.
– Nunchakus are also versatile weapons for SD.
– T Swords are excellent SD weapons. Offensive: their high damage and AoE attacks can take down any bases. Defensive: activate Phoenix and use the base’s innate element to murder those who try to take it. Equip an orb if you feel like it, or if the base you’re defending has no element.
Tip: with the T Sword, try to defend a base that is close to a patch of yellow troops. If you’ve used Phoenix, then go there to flask up again.
– Similar, I Blades are also very good SD weapons. Offensive: use your N attacks on Damage type bases and C3 on troop bases and activate Fortitude to protect yourself from the base’s innate element. Defensive: use C3 to defend your bases.
– The H Axe and the Trident are very balanced weapons stat wise. With H Axe, do not keep activating Aggression. Only gather the flasks when you happen to find them and activate it when you need to. For the Trident, keep Sacrifice at the ready to give the rushers a bit of a boost. But make sure you are not in combat with enemies when you do so.
– Another good weapon would be the P Sword: its speed, its damage, its attack, its musou, its advanced… Perfect for capturing bases and patrolling them. Take out enemies as you go.
– And last but not least: the Scimitar. It is a heavy duty weapon combined with Godly Speed, great for quickly patrolling the bases.
And then the pretty obvious list of weapons for the rushers:
– Whip, duh! The mistake most players make is to start with the damage plan. START WITH THE MOVEMENT PLAN, SWITCH TO DAMAGE INGAME! You’ll want to take the SB as fast as possible and give your team a jumpstart, right?
Tip: if you see the enemy has elemental users defending their SB (see above) then a good thing to do would be flasking up for Strong Guard. It tripples your defense and increases elemental protection. But don’t think you’re invincible: get in, musou, get out and activate the skill when you need to.
– N Sword…meh. All you need to destroy a gunpowder case is C3 with Obliterate, but it takes some time to flask up. Try to gather flasks as fast as possible if you do wish to rush with this.
– I Spear: same as N Sword. Try to JC your way inside and Obliterate with C3/Musou
– Like I said before: Nunchakus are versatile weapons because they can also be used to capture the SB. They are slightly inferior to Whips tho. The principle is the same: get in, musou a gunpowder case, get out.
Just remember that for base capturing and rushing that speed is the key, do not take weapons that have slow movement speed or attack speed.
There’s also the case of the G Club. It has incredible Damage and AoE attacks, making them great to capture bases. But their slow movement speed cripples them. Their C5 is similar to the T Rods C5 and they have strong knockback on C4, but faster weapons (like those of the rushers) can overcome their slow attack speed. I haven’t been able to test this one during the weekend SD. But I’d say: EXPERTS ONLY!
V. Word to the Reader and the Community!!!
Hope this guide helps you in any way, weather you are new or old, Have fun!
And see ya out there!
And do as you wish now, flame me like always, don’t care!!
Despite what you chose to do, any feedback is accepted, and keep editing, please add more content, you never know if you are going to end up in here
VI. Videos:
Showdown1
Showdown2
Showdown3
Showdown4
Showdown5
Showdown6
Showdown7
Showdown8
More Videos Coming UP (uploading as we speak)
VII. Maps – in details (Real Map pictures will be uploaded next week)
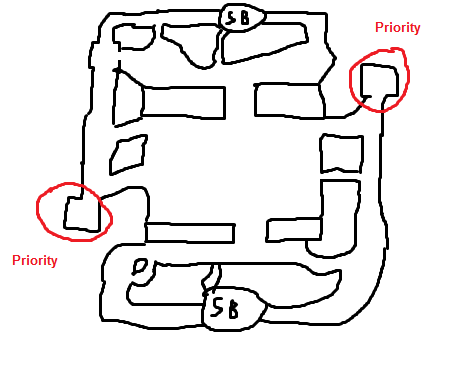
Fortress map
Priority base type 1: the hard to reach bases
http://i33.photobucket.com/albums/d96/negativus/mapfortressp.png
As you can see on the map here (it’s MSPaint, plz don’t laugh), the Fortress map can have 2 bases on the side roads. It takes some time to get to these bases (especially if you take the wrong weapon, confront based weapon on damage base for instance). If you take these bases as quickly as possible and manage to ward off the attackers, then this base will guaranteed deplete the supplies at least once. One decent defender here should do the trick because you want most of your base captures joining the conflict in the central area right.
Priority base type 2: chokepoint
http://i33.photobucket.com/albums/d96/negativus/mapfortressc.png
This setup (I know, it’s MSPaint geez) has a base in the middle of the giant wall. When defended properly, these chokepoint can make life easier for the SB defenders and they can help secure the bases behind it (between SB and the chokepoint). If a rusher breaks through, don’t bother. If someone breaks through and starts attacking the bases behind you, have one of the defenders move back to defend that base.
Put a few defenders there and try to attack the bases in front of you as well.
Capturing the enemy chokepoint is a good thing for the rushers and it will put a lot of pressure on the enemy base capturers.
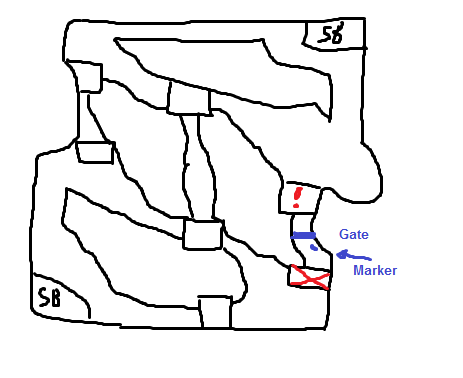
Mountain path
Like I said, this maps has gates and those gates determine the priority bases. There are three paths to the enemy SB:
– If the gates are on the 2 side roads, the bases on the middle road become priority bases
– If the gate are on the paths leading to the middle road, the bases on the sideroads become priority bases
For the Mountain Path, I’ve used the first setup as an example on how to effectively use the gates since they are fairly important.
http://i33.photobucket.com/albums/d96/negativus/mapmountaingate1.png
In this situation (yeah I know, stop laughing!), the marker stone is on your side (the side of your SB). Because of this, there’s not really a need to defend the lower base: simply put all of your effort on the base on the other side (don’t forget tho, the middle bases are priority here). But if you happen to be on that path, do not focus on the defending the lower base, attack the base on the other side
One thing you should not forget tho, is that when the enemy takes the long way around, the marker stone becomes exposed and if they take it, the attackers are gonna be isolated. So keep an eye out for anyone who tries to take the lower base
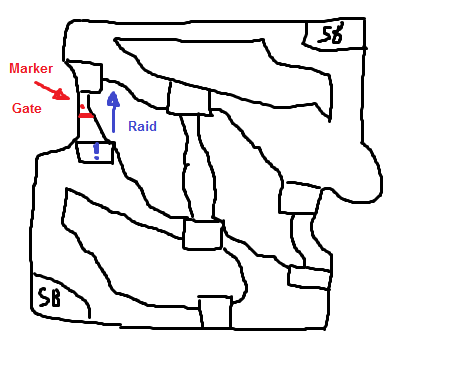
http://i33.photobucket.com/albums/d96/negativus/mapmountaingate2.png
OK, laugh if you want to… Here, the marker stone is on the enemy side. This means that your base is compromised, so if you’re on that path: defend that base.
However, you should not forget about the base on the other side. It can still hurt your supplies if you forget about it. Simply have a few spare defenders perform raids on the other base meaning:
– Attack and try to take the base
– If you take the base, holding it is of no importance so retreat when you know you’re gonna lose
– If you fail to take the base, retreat, regroup and heal at your allied base. Help defend it if it’s under attack.
So that’s pretty much it for priority bases and gates.
VIII. Personal Experiences
contributed by strobava
okay some more tips from persoal experiance.
note that these may not work for everyone but they work for me.
i am usually a rusher or damage base targeter so i will talk about that.
damage being my main stat of importance i dont wait until i die to flask.as i run toward the enemies supply i try to flask my damage uprade in advance(6 for me)
and i try to never go into enemy supply without having full musuo(or close to it)
and the weapons that are hard for me to get around are v staff at a choke point,and the i blades cl1 (moon emblem i think-its the ground shock wave)
i also tend to enter at an opposite direction of fellow rushers to force the enemy to seperate.
i also will harrass the entrance area if i cant get in to try and pull the defenders out so some one else can get in.and if there is a damage target base close by in enemies hands i will temporarily withdraw to retake.i dont know if this helps or if this is the right way to go about it but until someone shows me a better way i guess its how i do things.i also seen in a video a person using a range attack to change the gate from the red side ….mabey my aim stinks but i cant do it,but someone else could i suppose.
and on a defenders point of view…bust up all those pots thats food for the enemy!
edit:i would also like to point out that on the inevitable npc games i dont tell temates to kill the coms,sure it makes taking the supply base 60%harder but just consider it a challange,right?they want to have fun anfd for some thats getting there com kills into double digits-more power to them i say!and on the games were i end up 1 vs 12 i just say go with it!i dont protect anything or try to take over anything your not going to win unless all the enemy players have phoned it inas an instant win.so i go into’blaze of glory ‘mode in witch i look for the red dots and try and pick a fight with whoever is closest(hehhehehe)i almost always have my head handed to me but its fun none the less.and for me the game isnt about winning or losing but having fun.

Recent Comments