World of Tanks Scouting for the Analytical Mind Guide
World of Tanks Scouting for the Analytical Mind Guide by Whiskey_dod
Before I begin here, I would like to go ahead and say that this is not your ordinary scouting guide. If you are expecting me to say things like “lighting things for your team’s arty for prolonged periods of time is a good thing”, then you would be wrong. Anybody can spit out these kinds of facts and bits of information, but rarely do you see the most important aspect of all of this: application. Now don’t get me wrong, knowing these facts is still a good thing. But until you learn how to apply it in the field of battle, they are useless to you. If you are expecting to read this guide and come out an instant bada**, then you are wrong there too. If you can’t become a leading expert in Organic Chemistry by reading a lot of reference books, then what is there to make you think that you will become a leading expert in scouting? It will still take lots of practice to get all of this to work, but this should help you get pointed in the right direction.
Now that that’s out of the way, let us begin.
Part 1: Developing a Mindset.
As is true with many strenuous jobs (like being a professional athlete for example), scouting requires that you have “Your head in the game”. Do you think that Eli Manning was thinking about what he was going to have for breakfast the next morning? Probably not. Do you think that Madonna was thinking about some appointment that she had scheduled later this month? Probably not.
I could go on… but I think that you are starting to see the point I am trying to drive home here. If your head is not in the game, you will see a decrease in your overall performance.
A perfect example of such is when trying to find out how to get to the juicy prize (arty). Please look at the image below as an example
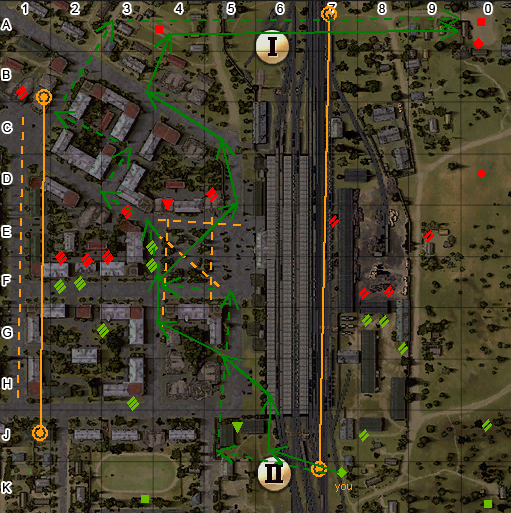
This is you in K7. There are 15 tanks per side on this match, and the following icons is about what you could expect to see in a random pub game. There are some mediums from both teams rushing into the field to quarrel with each other, and the heavies are doing what heavies do best: brawl it out in the city. Now let’s suppose as well that what is happening in the game at this decisive moment is that heavies on the 2-3 column have slammed into each other and are really slugging it out, the mediums in field are sitting back behind cover and not doing much of anything, and the red heavies camping the 4-5 column are currently interested in shooting the heavies along the edge of the 3-4 column.
Now… what do you do?
Since I can’t read your mind, I will show as an example what I would do and my though process behind it all. The solid yellow lines are my “boundaries” that I do not really want to go past. Why I don’t want to go past them is because tanks outside of those bounds are not otherwise preoccupied. The mediums in field are not staring into the face of other mediums, and would be more than happy to shoot or chase after anything that tried to get by. Since through prior knowledge I know that getting into an engagement with mediums is dangerous, I wisely choose not to get too close. The heavy on the far west currently has no targets to shoot at, and would probably try and shoot me if I go zooming down that line (of course I would not know he was there, but I would be able to assume that there is a bad guy there). I don’t want to zoom straight down the 5 line because I would be too exposed to any potential threat that may be hiding in C6 (even though there is no threat there, I don’t know that). I must find a way to not expose myself to too much fire, but still get to the objective, and the 2 paths shown are capable of doing just that (solid and dotted).
The solid path is a more direct path that would get me there relatively fast, but I would still be vulnerable to the potential C6 threat. I would instead opt for the dotted path, which involves much more turns and is bound to throw off any potential attackers who may have a shot on me. Not only that, but my run would have more implications than just getting to arty. The campers in D4 and D5 would most likely briefly take their attention off of the friendly heavies in front of them and try to shoot me. My exposure time to their attacks, however, is minimal and would spare my friendlies some hit point damage. Taking the diagonal curve would expose me to the heavy in the upper portion of E3. Unless that guy was anticipating me, or was already reloaded and had lightning-fast reflexes, I would be able to slip by him without much hassle. And what do you think the reaction of that heavy would be? Chances are, he would start to turn his turret around to try and shoot me, all the while completely forgetting about the heavies he was looking at before. Assuming that the friendly heavies have half a brain, they would most likely take the opportunity to push into that heavy and shoot him in the back of the turret. There goes 1 poor heavy. Then I take the opportunity to throw off my attackers even more, and make another diagonal cut through a group of buildings. At this point I would have less than a minute to take care of the arty in A4. depending on what arty I find there and how much health it has, I may decide to leave it be and come back later to mop him up. At this point I have another arty to take care of in A0. I discover a ‘friend’ who decided to sit next to arty. If on my way there on the final stretch I saw an arty tracer come from that location, I would go after the light. Otherwise I would go after the arty, who could very easily one-shot me.
This route I showed is only an example, but it should have illustrated the potential power of a well-thought plan. I had taken into account a multitude of variables and made an informed decision of how to deal with the current battlefield while at the same time drawing from previous experience and knowledge to fill-in any potential gaps and problems in my plan. See what I mean when I say that you need to have your head in the game? It’ll take every ounce of your ‘computing’ power to make a good plan. If I had my head elsewhere, I may have tried to make a run through field. That would have potentially ended my run in that match rather quickly, if you know what I mean…
And if the situation on the map had been different at that time, I may have not even decided to go for arty at that point in time. I may have instead decided to help pick-off some of the weaker tanks, or maybe even intercept a brave light that was trying to get to our arty, or whatever else you can possibly think of. Heck… even if the situation on the map was the exact same, I may have just opted to play bait to draw out some tanks or 2. Just remember to make whatever plan you come up with as efficient as you possibly can get it, with conditionals for any known (or unknown) weaknesses.
Part 2: Improving Your Combat Efficiency
It’s no secret that lighting up tanks, being a distraction, being an anti-scout, being an arty hunter, and being an extra gun for your team can help win battles. But with so many different things you can do to be successful, how do you ever choose which to do? The answer is easy: you don’t. Why limit yourself to doing a couple of things at a time, when you can instead do a lot of things! Although you probably won’t be able to do ALL of those things all at once, it is feasible to do all of those things over a span of a couple of minutes. And since sometimes it can be hard to tell exactly how long you have to live, being able to “kill 2 birds with one stone” is just another way to ensure that your time alive made a strong enough impact to make up for the possible time dead.
“Yes, we all know that being able to do all these things is good… but how?”
There is sadly no single answer that can even come close to answering this kind of question. Every battlefield is different, and every situation will often times have multiple right answers. Deciding which right answer to go with is a matter of personal preference and which of those answers you feel like you are most capable of doing well.
What I am going to list below is how I personally make battlefield decisions. You can choose to follow these general guidelines, or you can choose to use one of your own creation.
1: Analyze the Battlefield– Before any battle starts, I always look out for some key features that I will use later on in the battle. Depending on what I observe before the game even starts will impact what I will do. If there are a lot of fast tanks on mines, you can be sure that you won’t see me charging for hill (personal experience has taught me that the spots that I can get from hill are not worth the risk of dying in the first few minutes if my team does not support the hill well enough).
2: Locate the Enemy– If I’m going to want to get my job done right, I need to make sure that I get no nasty surprises. I will always keep a good look at the mini-map to try and determine which tanks are where. If I can find out were the majority of their tanks are located, I can then use that knowledge to decide if the risks of what I am about to do are worth the reward. Charging into an open area to pick off a straggler is a high-risk kind of job, since there is a good chance that there are other tanks around that person that will try and shoot at me. If I don’t know exactly how much support that guy has, then going after him is a no go.
3: Determine Overall Battlefield Movement– Since the map is not a static entity, it is going to constantly change. Looking at how red and green on the map are moving can give me a general idea as to what kind of action is happening at that location. If I know that a push is happening on one area of the map, I can then make a decision on whether to avoid that area or go towards it. If enemy movement is strong all over the map, then there is a good chance that there is an opening. It also means that my team could be in real trouble if I don’t think of something soon.
4: Where are People Dying, and Who is to Blame?– This is more of a subset of 3, but it still is important enough to deserve it’s own spot. If my team’s attacking force is being slaughtered by arty, I will want the enemy arty out of the fight as fast as possible. Either through killing them, or spotting them and running amongst them to make them targets for others. If the tanks they are slamming against are to blame, I may attempt to get behind them and get them to turn around. The more tanks I can distract, the better off my team will be.
5: What Condition am I In?– This step in particular has a lot of weight in the decision-making process. If my driver is dead, I will be unable to turn fast enough to evade fire. If my engine is shot, I will have neither the speed nor the agility to do anything too over-the-top. If I have 10% health left, that rules out most brawling situations and makes it so that I have to take as little risk as possible to get done what I need done.
6: Make the Plan– This is where I take all the intel I gathered and do an analysis of the pros and cons of each option I have. This is also where I start adding in conditionals to what could potentially happen. It’s best to try and prep myself as much as possible to what I am about to do, because I don’t want my plan to be shafted by my own reaction to the situation.
7: Execute Plan and Begin Analysis– I never for a second stop thinking about my plan. This is where I start looking at how my team is reacting, and how the enemy team is reacting. Are the bad guys sufficiently surprised by my actions? Are the guys on my team taking the upper hand? Was there a fact that I overlooked that has now surfaced? Just because I made a plan, does not mean that I am not allowed to change that plan to more closely fit the current battlefield.
8: Modify and Execute New Plan– This is simply using the new information and using it to make any changes that need to be done. If all is going according to plan, then I know that I can simply resume the original plan.
Steps 7 and 8 can be repeated as necessary. The only thing that is not obvious on first glance is where I start adding in the ‘combos’. Adding these in is what you do while making the plan. You can think of a scouting run like a stereotypical family vacation, in the sense that your not JUST going to “Wally World”, but that you are also going to visit the Hoover Dam, Aunt Edna, and your creepy brother. It may take a while to get to your final goal, but you will get to do a lot of stuff on the way there. Which, oddly enough, can describe this part of the guide fairly well. I could have just told you that you sprinkle in the combos along the way right off the bat, but then you would have been clueless as to how it can be stitched into what you do.
Part 3: The ‘Scientific Method’
It’s time to thank your 9th grade science teacher, because we’re going to use the scientific method to develop some new ‘techniques’. Well, It’s more like you are going to develop these new techniques, but I will kinda-sorta give you all an example. I won’t give it all away, because a man’s gotta have his secrets to stay competitive.
Before I jump into the examples, I better give you all a more ‘generic’ overview of the scientific method. Nothing long and fancy here, just practical information you can use to improve your game.
1: Determine the Problem– This can be anything between an observation you made during a game to merely a curiosity you want to test. You don’t need any formal hypothesis, just an idea.
2: Test it– I don’t think I could make this any simpler. Grab a friend or 2, go in a training room, and test as many different conditions of your idea as you can. The more you know about it, the better you will be able to determine your answer.
3: Make a Conclusion– This is just a brief personal summary about what you learned. No need to submit your study to any advising committees or anything like that. This is for you, and anyone you want to share your new-found secret with.
Now then… Time for the fabled ‘example’ that I have decided to share in this particular guide. Let us first think back to several well known facts about top tier lights. First of all, they all have the same camo bonus moving and sitting still. Secondly, Russian tanks traditionally have good camo. And lastly, a tank’s ability to see another tank is dependent both on the spotting tank’s view range, and the target tank’s current camo rating. In addition, tanks that do not have a clear LOS to the target will have a significantly harder time finding the target. The question I wanted to know is this: How far can I push it? I knew that if I could find a solid quantitative result to this, that I would be able to adjust my game-play to get the most out of my tank’s “Invisibility Cloak”. And before you even ask: Yes, I am that d****ebag that appears out of nowhere and then vanishes once again.
So over the course of several months, I took various friends and clan-mates into training rooms to help me find the results that I was looking for. One of the first things that was discovered was that if you have a crew that has 100% camo rating, it was very possible to sit in a bush and be totally invisible to somebody 50m away. This was (and still is) used to great effect in clan wars battles. The most notable of the maps that we have used this type of technique on are Malinovka, Komarin, and Murovanka. Another technique found early on was the use of obstacles to approach a target area. Through a large process of trial and error, it was discovered that as long as I could keep some sort of visual blockage between the target and myself, I could approach him unnoticed until I removed the existence of said obstacle between us.
Now here’s the fun part to all of this: It’s your turn. From what I have so far supplied, you all should be able to develop your own ‘first technique’. You may not be the first to discover it, but it would be information that you yourself have discovered through trial and error. This makes the info more personal to you, and shows that you are well on your way to discovering even more new things. Once you can start making these jumps, who knows what else you will piece together?! If you do have that “Ah-ha!” moment and make, test, and prove the theory you have set out to find… send me a PM about what you have discovered, and how you tested your theory. If your theory holds true, I will tell you in a reply that you got it. If it is something that even I didn’t know, then I will most likely request some time in a training room with you. Please don’t put any results as replies to this thread, we don’t want to spoil it for anyone else.
Part 4: Micromanaging
For the most part, I have only addressed large-scale management of tasks. Planning a scouting run is a perfect example of such, and is a very important thing to know how to do. However… This is only half the story. Let’s say you had an objective of “Get to this location alive” when you run across a medium that wants to kill you. According to what I have discussed earlier, you would probably come to the conclusion of “steer away from him and look over the map again for a new way”. Which is a perfectly fine answer… but is a rather broad conclusion. Where do you turn to? How much power power do you put into your turn? What direction should my turret be facing? It is these types of questions that are classified as “Micromanagement”.
Since I am unsure how much some guides cover ‘the small stuff’, I will be going over not only how to apply these minute details, but also what small details are good to pay attention to.
First part of micromanagement I will go over is handling a single opponent. The obvious objective is not to get killed. In more detail, however, it translates to: Don’t get shot, don’t get rammed, and don’t get cornered. Easier said than done. If you are trying to circle an enemy that had fast track traverse and/or fast turret traverse, it will end with you being one sad, dead tank. No matter how good you are, getting in an engagement with a tank that has a combined turret traverse speed and track traverse speed that is higher than your circling speed is a bad idea. However… this is assuming that they have no module or crew damage and that you have no cover to retreat to, which can be a bad situation all of its own to be in. So… if for some odd reason you find yourself in this kind of ‘Lose-Lose’ situation, there is a way to improve your odds to a ‘Lose-Losenotquiteasbad’ situation. The answer to this is a relatively intuitive answer when when you step back from the situation: slow the enemy down. You may not make it out alive, but your opponent won’t be looking too hot either if you play it right.
When I say ‘play it right’, I mean knowing what to do, when to do it, and how to get it done. You should not only seek to cause HP damage to a tank, but module and crew damage as well.
http://gamemodels3d.com/model/ch01
Look at the link above. Save this link. If your thinking about not saving this link… Do yourself a favor and slap yourself across the face, then save the link. This is the single-most important tool that I have in my arsenal, and I strongly suggest that others start studying all these models! Taking off HP is a good way to kill an opponent, this is a better way. Most every module has the potential to screw over an enemy if it is compromised.
-Knocking out the tracks will stop the enemy from moving, and reduce mobility to a small degree when the module is in a damaged state.
-Hitting the fuel tanks will coat the enemy’s engine in fuel, and will make them much more flammable.
-Hitting the engine will slow down movement speed significantly, and possibly light them on fire.
-Hitting the turret ring will reduce turret rotation speed, or even stop it entirely for a short time.
-Hitting the observation ports will reduce their view range.
-Hitting the radio will make it so that he cannot see what an ally far away is seeing, and the ally will not be able to see what he is seeing.
-Taking out the gun will make them unable to shoot for a short time, or just make their shots much more inaccurate.
-Hitting the ammo rack will either make the reload slower for the enemy, or detonate it. This is called getting “Ammo racked” and will cause instant death.
-Hitting the driver will make the tank unable to maneuver effectively.
-Hitting the gunner will make the turret rotate slower, and make the gun more inaccurate.
-Hitting the loader will slow down reload speed.
-Hitting the radioman will reduce radio range.
-Hitting the commander will cause a slight degrade in all stats, and will reduce your view range.
Now that you know these things, it is easy to see what is important to take out when you are circling an enemy. Taking out the tracks early on will buy you enough time to potentially knock out another module. Pounding the turret ring is another good early step to take, since you will want them to be unable to follow your movements. Then depending on what tank you are fighting, you may decide to either aim for the driver, fuel tanks, engine block, or ammo rack. The more you can knock out, the more likely that enemy tank will be too wounded to contribute any significant damage to your team.
Anyways, please feel free to post any questions or comments on this guide. In the mean time… keep practicing!

Recent Comments