PoxNora New Player’s Guide
PoxNora New Player’s Guide by KTCAOP
Welcome to PoxNora! So you are a new player? Returning player? Regardless of how you have come to enjoy this game of PoxNora, I want to welcome you! This is a place where you can get your questions answered about the basics of the game that they don’t teach you in the tutorial.
First, I do want to address that if it can be answered into the tutorial or the faction walkthroughs, I will not address it here.
PoxNora is a trading card game, that puts in a real time turn-based strategy component to the game. Like all trading card games, you can get the starter deck and play, but you will not be able to get very far with just a free starter deck. However, it should be enough that you would be able to enjoy and play the game!
In order to get a starter deck, just go ahead and play through the faction walkthroughs.
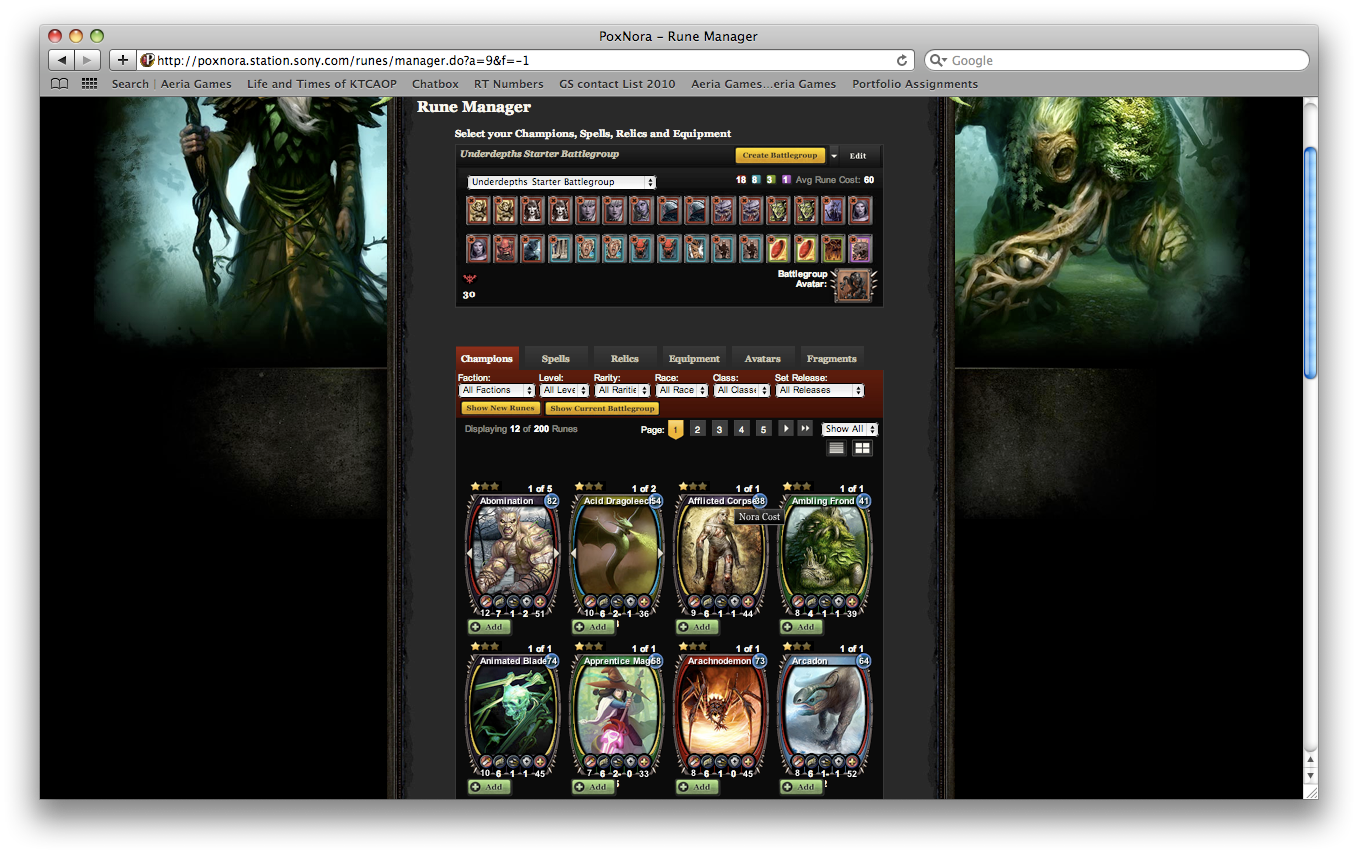
After playing through a Faction Walkthrough (or all of them!), you will be able to access them in rune manager. Now, if you look at the pictures of the rune forgers above, it has changed quite a bit. First, is the number of cards that you were able to obtain in a single deck. When this game first was released, battledecks had a limit of twenty runes. With the last two expansions however, the limit has now been increased to thirty runes! Now, at the end of the battle, the runes that you have used will gain experience (exp), which will then be converted to champion points (CP), to a limit of 200 CP. Before, you would be able to use CP to upgrade just about anything you wanted on your champions, from adding a mixture of stat points (attack, defense, speed, damage, health) or abilities. Each upgrade would cost differently depending on how big of an effect it would have on the champion. Not only would it cost you CP, it would also have an effect on the nora cost of the champion. However, to simplify the system, all of what I have just said has basically been wiped out.
In the current system, you can still gain CP on your champions (even the starter decks! However, please note that the starter deck champions are only limited to 50 CP unless you purchase them!) up to a max of 200, however, the rune forge has changed considerably. Instead of being able to spend the CP on any upgrade you want, your champions will level up depending on how much CP you have. 100 CP will cause your champion to upgrade once, 200 CP will have your champion at the highest level, level 3. What is so important about leveling up? Well, now each time you level you will be able to choose an upgrade. The following picture demonstration will demonstrate.
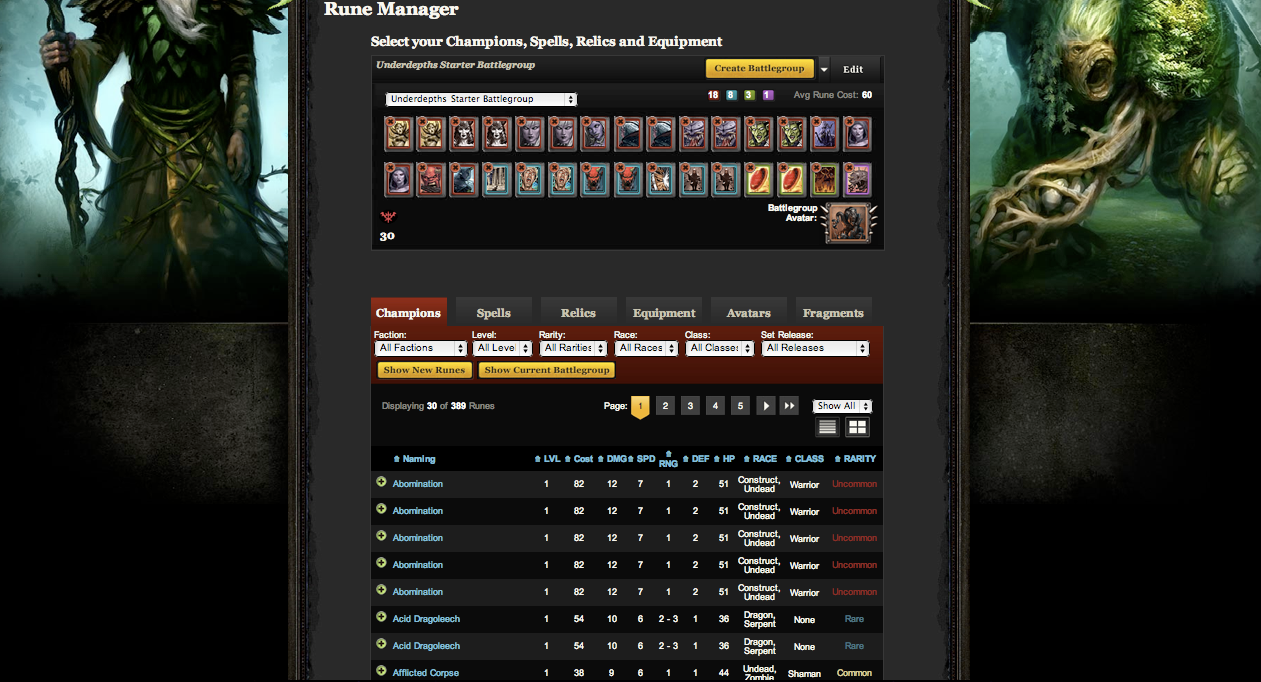
Now when you go into the rune manager you will see one of the following two (both are essentially the same, just one is in list mode, the other is in picture mode)
http://i156.photobucket.com/albums/…./Picture21.png
http://i156.photobucket.com/albums/….icture13-2.png
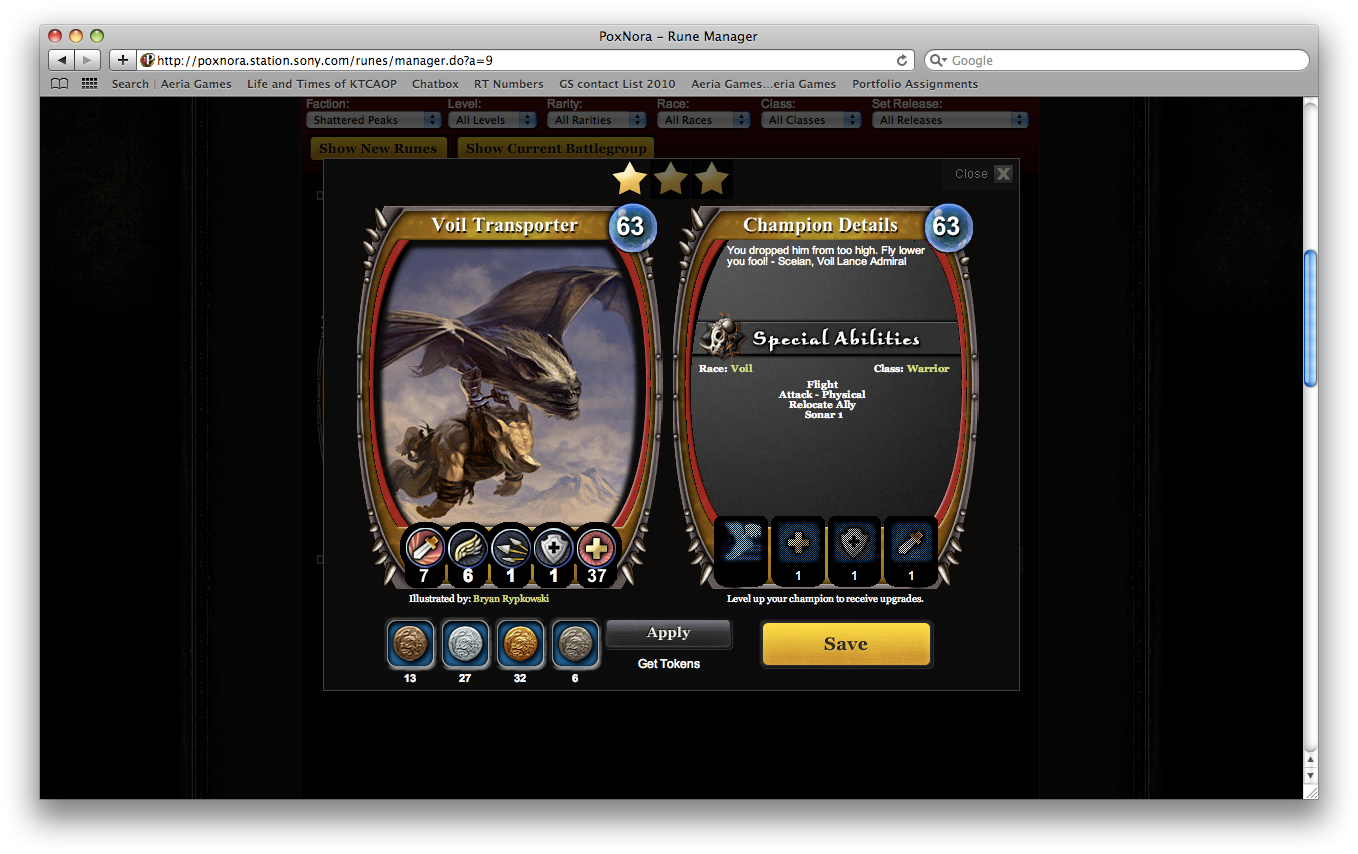
When you click onto a champion, it will pop up in a window, allowing you to take a better look at it.
http://i156.photobucket.com/albums/….icture14-1.png
http://i156.photobucket.com/albums/….icture15-1.png
Now, on this screen you will notice the different statistics, abilities, and you will also notice four shaded out buttons at the bottom of the right hand side of the screen. Those are the four upgrades that your champion can potentially choose from. At the top you will notice three stars, these three stars show you what level your champion is and if you hover over them you will see how much CP it has. Level 1 is one star, Level 2 (100+ CP) is two stars, and level 3 (200 CP) is three stars.
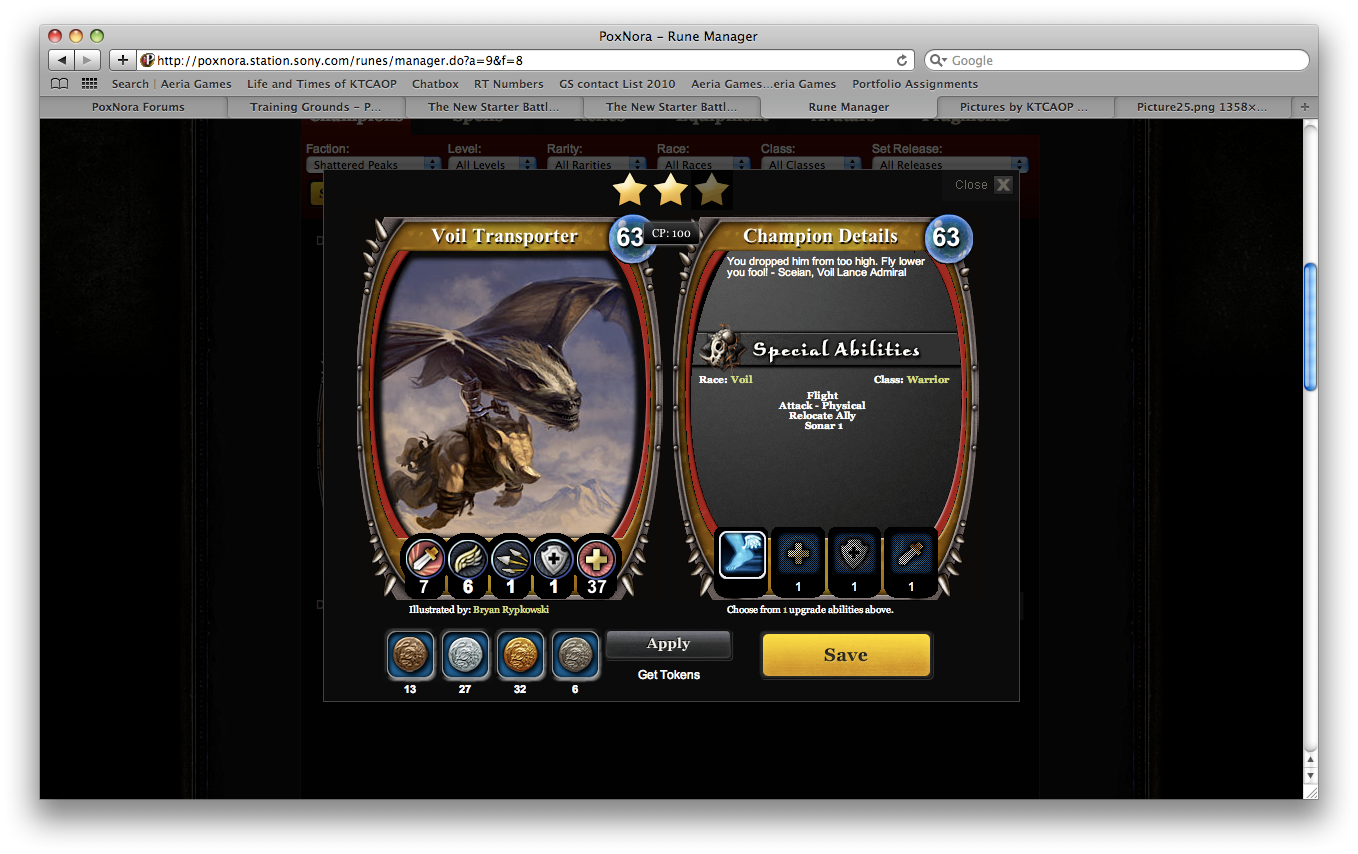
When you level up your champion the shaded boxes will become unshaded
http://i156.photobucket.com/albums/…./Picture25.png
Now you can click onto one of the upgrades, and then you will be able to select it. When it is selected, a white box will appear around it, and the other upgrades will become darkened out again.
http://i156.photobucket.com/albums/…./Picture28.png
Before, you would use the tokens (seen at the bottom left hand of the screen) to reset your champion to upgrade them differently, now that is no longer needed! To choose another upgrade, simply click onto the highlighted upgrade to deselect it, and choose another one. You can change your mind as often as you want. Speaking of tokens, if they no longer reset your champion… what do they do now? Tokens are now an experience booster to your champion. If you buy a token set, and apply the tokens to your champions, you will gain the following amounts of experience.
Bronze Token – 25 CP
Silver Token – 50 CP
Gold Token – 100 CP
Platinum Token – 200 CP
Now, eventually you will get your champion to level 3, how does that work now? Well, similarly, when you open up the rune, you will notice that there are now three stars, and you will also notice that your champion’s previously chosen upgrade is still active, though once again, all of the other upgrades are now undarkened, allowing you to choose another upgrade.
http://i156.photobucket.com/albums/…./Picture26.png
http://i156.photobucket.com/albums/….icture20-1.png
Once again, you can choose to select and deselect the upgrades as many times as you want as you upgrade your champion.
http://i156.photobucket.com/albums/….icture18-1.png
A final note here is to remember that the starter/sample battledecks can not gain more than 50 CP, which means that they can not be upgraded until you purchase them. Once you purchase them, they will count like any and all other purchased cards!
Faction Walkthrough Campaigns
All of these walkthroughs are fairly straight forward. They each have the same set of objectives that I will list out, however, you can use various tricks to shortcut them. I’ll list what they are in the individual walkthroughs =).
All Campaigns have the following commands
– Deploy
– Capture a Nora Font (1/2)
– Capture a Nora Font (2/2)
– Destroy the enemy shrine
You do not need to follow this order. You can attack the shrine directly.
The only exception is the Forglar Swamp starter campaign, in which it prompts you to take the last font.
The general trick for all of these is if you rush the font, prevent them from deploying, and then block the initial point of deployment, you can easily win this campaign. If you fail to do this, you will have a tougher fight on your hands.
K’thir Forest Walkthrough
– Note – You will be facing a Shattered Peaks Deck on the K’thir Forest Map.
– Note – The Mauler will always capture the font on it’s 3rd turn after being deployed.
– Tricks – if you rush the top font and contest it, nothing else will spawn except the Cyclops Mauler. If you kill the Mauler, another mauler will spawn. If you kill the mauler and block the space where it normally would deploy, no monster will deploy.
Savage Tundra Walkthrough
– Note – You will be facing a Shattered Peaks Deck on the K’thir Forest Map.
– Note – The Mauler will always capture the font on it’s 3rd turn after being deployed.
– Tricks – if you rush the top font and contest it, nothing else will spawn except the Cyclops Mauler. If you kill the Mauler, another mauler will spawn. If you kill the mauler and block the space where it normally would deploy, no monster will deploy.
Sundered Lands Walkthrough
– Note – You will be facing a K’thir Forest Deck on the Underdepths map.
– Tricks – If you rush the top font such that it can not deploy once from the top font and are able to kill the Great Eagle, only a Great Eagle will be able to spawn on this map, which will *always* try to reclaim the top font unless it is grounded. From there you can just mass deploy at the top spawn point and rush the shrine. Also note that if you block the place where the Great Eagle would deploy, nothing will be deployed.
Shattered Peaks Walkthrough
– Note – You will be facing a K’thir Forest Deck on the Underdepths map.
– Tricks – If you rush the top font such that it can not deploy once from the top font and are able to kill the Great Eagle, only a Great Eagle will be able to spawn on this map, which will *always* try to reclaim the top font unless it is grounded. From there you can just mass deploy at the top spawn point and rush the shrine. Also note that if you block the place where the Great Eagle would deploy, nothing will be deployed.
– Trick – I use the Ball and Chain to prevent it from even being able to capture the font in the first place. A ball and chain where if it moves it will just go through fire will stop it in its tracks.
Ironfist Stronghold Walkthrough
– Note – You will be facing a Shattered Peaks Deck on the K’thir Forest Map.
– Note – The Mauler will always capture the font on it’s 3rd turn after being deployed.
– Tricks – if you rush the top font and contest it, nothing else will spawn except the Cyclops Mauler. If you kill the Mauler, another mauler will spawn. If you kill the mauler and block the space where it normally would deploy, no monster will deploy.
Forglar Swamp Walkthrough
– Note – You will be facing a Shattered Peaks Deck on the Forglar Swamp map.
– Tricks – if you rush the bottom font closest to the shrine and contest it, nothing else will spawn except the Cyclops Mauler. If you kill the Mauler, another mauler will spawn. If you kill the mauler and block the space where it normally would deploy, no monster will deploy.
Underdepths Walkthrough
– Note – You will be facing a K’thir Forest Deck on the Underdepths map.
– Tricks – If you rush the top font such that it can not deploy once from the top font and are able to kill the Great Eagle, only a Great Eagle will be able to spawn on this map, which will *always* try to reclaim the top font unless it is grounded. From there you can just mass deploy at the top spawn point and rush the shrine. Also note that if you block the place where the Great Eagle would deploy, nothing will be deployed.
Forsaken Wastes Walkthrough
– Note – You will be facing a K’thir Forest Deck on the Underdepths map.
– Tricks – If you rush the top font such that it can not deploy once from the top font and are able to kill the Great Eagle, only a Great Eagle will be able to spawn on this map, which will *always* try to reclaim the top font unless it is grounded. From there you can just mass deploy at the top spawn point and rush the shrine. Also note that if you block the place where the Great Eagle would deploy, nothing will be deployed.
All of these walkthroughs are fairly straight forward.
Forglar Swamp
Intro to Forglar Swamp
Turn 1 – Deploys Salaman Soldier at bottom font nearest to opponent’s Shrine
Turn 3 – Deploys Boghopper Tad
Turn 5 – Deploys Dreadwing
Turn 7 – Casts Bog Trap and Deploys Shock Pomfret
Turn 9 – Deploys Salaman Sentry
Turn 11 – Deploys Swamp Octopus and spawns 4 Tasty Morsels
Turn 13 – Casts Confusion and Soak the Earth and Deploys Swamp Wurm
Turn 15 – Deploys Fentak Servant
Turn 17 – Casts Confusion and Bog Trap and Deploys Bloated Toad
Turn 19 – Casts Soak the Earth and Deploys 4 Tasty Morsels
Turn 21 – Deploys Sludge Worm
Turn 23 –
Turn 25 – Casts confusion and Soak the Earth and Deploys Muck Dragon (Last Deploy)
Turn 27 – Casts Bog Trap and Spawns 4 Tasty Morsels
Turn 29 – Casts Soak the Earth
Frequently Asked Questions
When I try to bid on a trade, it says “Your trading privileges have been revoked.” or “You cannot trade with an unconfirmed account.” What is going on?
All new accounts are unable to trade trade in the Rune Trader for three days. You are able to buy new runes from the marketplace. However, to prevent new players from being scammed, you will not be able to create a trade nor are you are not able to bid on other trade offers for three days. If your account is older than three days, please submit a ticket, or please send one of our Customer/Technical Service Representatives a private message in order to get this block lifted!
I think I’m ready to buy some cards in this game. What would you suggest I buy?
If you know the faction (or factions) that you want to get into, I would highly recommend buying the Starter Battlegroup and the Starter Commons deck. Avatars are optional, but they are always good to have. From there it depends on your goal, however, always take a look at the latest expansion that comes out and consider buying a box. Buying a box will give you a guaranteed exotic and with most trading card games, the latest expansion usually has some of those more rare cards that have a high demand. However, always check with other people, particularly people from Your Faction as rune values can change drastically at any time!

Great walkthrough, esp the part about what to buy… I just picked up this game and I was baffled at what to start with!!! Thanks!